| Author | Message | |||
Brian Vogel Grand Master Username: guyslp Post Number: 642 Registered: 6-2009 |
The starter in SRH33576 has finally decided to give up the ghost permanently. I have already acquired a replacement unit from BritishStarters.com since these have come highly recommended from several sources. If anyone has particular tips or tricks with regard to getting the original starter out (or any part of this process, really) please do share. The replacement starter is tiny by comparison to the original and should be fairly easy to put in. I think the challenge will be getting the original starter out rather than the new one in. Of course, if someone knows otherwise, please share that, too. Brian | |||
Hubert Kelly Frequent User Username: h_kelly Post Number: 95 Registered: 3-2012 |
Hi Brian I have removed several starters from cars, including Dm4 limo. It should be easy enough, ..disconnect battery, try access starter from under car if SAFE to do so. Take care in removing wires from same. The starter will probably be held by 3-4 bolts/nuts. Consider the starter may be quite heavy..so caution!! it might fall on you,if under car. You might consider supporting same from engine bay if needs be? Another thing to consider the starter might be seized onto gearbox casing and might need gentle persuading?. hk | |||
Paul Yorke Grand Master Username: paul_yorke Post Number: 1127 Registered: 6-2006 |
down pipe off I'm afraid. very Long extensions and a UJ from behind the dip stick tube upwards. | |||
Richard Treacy Grand Master Username: richard_treacy Post Number: 2919 Registered: 4-2003 |
3/8" drive socket set. Not difficult. Try a Turbo R with catalytic converter if you want frustration.
Maybe several, Not exactly all. In fact, not nearly the majority. They are only 1.9HP and have a large gear reduction to compensate. They barely crank the first time on many motors (even with a new 750CCA battery), and are generally 30% undersized for the job. This applies especially to 9:1 compression SYs, but even 8:1 SYs and SZs struggle badly. A 7.3:1 motor will no doubt crank more easily, but the starter output speed will still endanger the ring gear. When they do crank, the starter whizzes nicely but the motor itself is cranking at only about 2/3 of the safe speed. Once the engine starts the motor speed overtakes the starter speed far too soon and thrashes the ring gear. You can hear it on any Crewe V8 with these slow starters, and it is in no way acceptable. Hence, as soon as the motor fires you must release the key, far earlier than with any other car, in fear of stripping the ring gear. I took this up, when I fitted one to my Turbo R (8:1 compression ratio) about 5 years ago, with the sellers who actually have them made up by a job shop. After several months of promises and no action I gave up. In Australia, we have a source of locally-configured starters, copies of the genuine Crewe gear reduction units introduced in 1987 and a standard retrofit recommendation by Crewe for cars back to all 3-speed SYs. These units using interchangeable sub-components, and are about the same price as the inadequate 1.9HP HP ones. They have a 2.6HP motor and the same reduction ratio as the genuine Crewe UE46348 Nippondenso starter which also has 2.6HP. Later SZ starters increased to 3.2HP as Crewe considered the 2.6HP ones to be marginal. I still have one of those 1.9HP starters in my Turbo R, and like so many others am quite dissatisfied with it. RT. | |||
Brian Vogel Grand Master Username: guyslp Post Number: 644 Registered: 6-2009 |
Has anyone come up with a decent method of supporting the weight of the original starter while one is taking the bolts out? My understanding is that this thing weighs about 50 lbs, and I'm going to be under the car on a creeper removing the mounting bolts. Given that one of them is quite hard to reach, and oriented with its head toward the firewall I don't think I'm going to have even one free hand to support the original starter while trying to get the thing out. Brian | |||
Jan Forrest Grand Master Username: got_one Post Number: 510 Registered: 1-2008 |
In the past I've got over similar problems by making up a sling which can support the weight of the item being removed and attaching it to a convenient fixture some distance above it. Often it has taken longer to design and manufacture than the job I've been attempting to do. At least I'm still here and (relatively) fit to continue the fight! | |||
Brian Vogel Grand Master Username: guyslp Post Number: 647 Registered: 6-2009 |
Based upon Jan's recommendation I intend to create a sling system for the starter motor. Geoff Wooton had much earlier posted a suggestion for an "across the engine bay" workbench for when you need to get at stuff at the center that's very hard to reach from the edge. So I created one of those: 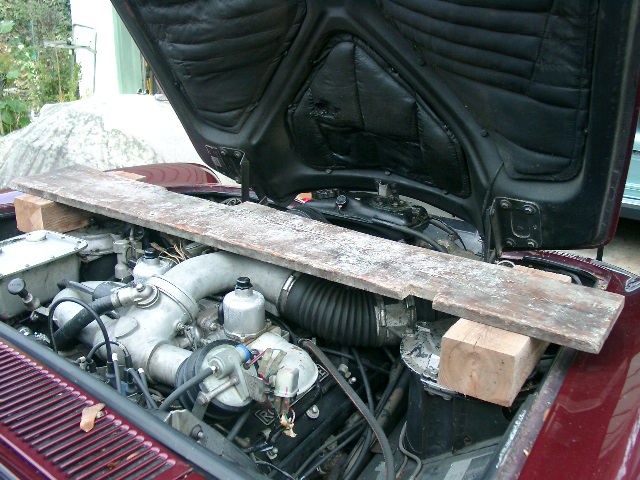 I plan to either run two rope loops or maybe use two ratchet ties down the right side of the engine bay and around the starter motor using the bench as the support system. I definitely don't want there to be any risk of an "uncontrolled descent" of the starter motor once the last bolt comes out since I have to be pretty much directly below it while working. The original connections on my Lucas starter are shown here: 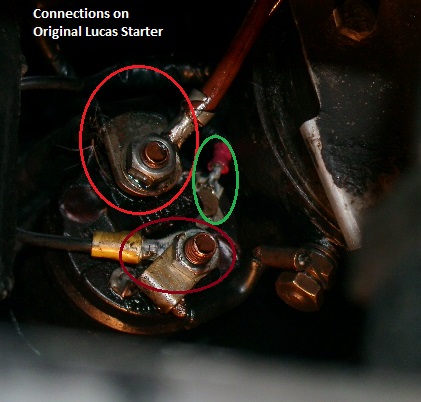 There are a total of five connections in two groups of two and one single: a) The +12V cable from the battery and a fat wire with brown insulation (which I have to imagine is the +12V feed to the rest of the car) [circled in red]. b) The small, thick wire between what I think is the starter solenoid and the body of the starter motor plus another wire on this terminal. [circled in burgundy] c) A thin, single wire that goes on its own small screw connection on the solenoid cap. I have to believe this is the "signal" feed from the key when it's turned to the start position. [circled in green] The gear reduction starter and its terminal layout, with my notes about what I think will go where on it, is here: 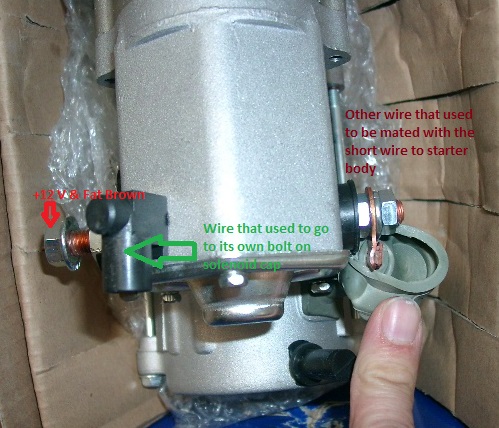 If anyone has done this replacement in the past and sees any errors in my intended course of action, please chime in here. Brian | |||
Richard Treacy Grand Master Username: richard_treacy Post Number: 2922 Registered: 4-2003 |
I do think that a meal is being made of this. The Lucas starter can be lifted or lowered by one (gloved to keep you clean) hand underneath, and the Nippondenso by a finger and thumb above or below. Neither the Lucas nor the Nippondenso are heavy items. Just undo the top retaining bolt last while supporting the starter with the other (left if you are right-handed), and there is real no issue. Using slings and cable ties may sound good, but the risk of the starter slipping out and dropping must be greater than doing it the easy way. RT. | |||
Geoff Wootton Grand Master Username: dounraey Post Number: 332 Registered: 5-2012 |
Brian is acting on information he has that the starter motor weighs 50lbs. I think it is a sensible precaution, particularly as access is very limited and the starter will likely require to be otherwise supported by a single outstretched hand. I pulled a stomach muscle when removing the air-con compressor on my car. I was lifting it with outstretched hands using the front wing as a pivot point against my stomach. Needless to say I replaced it with a sling, helper and a length of steel tubing to manoeuvre it back in place. Brian - I would be interested to know the weight of these units when you have got it off the car, as it is likely I will be doing this job also next spring/summer. | |||
Richard Treacy Grand Master Username: richard_treacy Post Number: 2925 Registered: 4-2003 |
50 lbs or more than 25kg in real units ? This is not a B&W diesel in a North Sea ferry. ? Try 5kg. Also, it is lowered and raised from below which is far safer than reaching over to lift a heavier A6 compressor from above. RT. | |||
Adrian Jump Unregistered guest Posted From: 78.144.23.39 |
As Richard says, there is no real weight problem in withdrawing the old unit, just be ready for it.However do turn the engine one revolution and inspect the ring gear for missing teeth - not an unheard of issue.With these later gear reduction units there is no bearing support at the front of the pinnion shaft unlike the old Lucas 'clankety clank' units. The problem in having a missing tooth or two is that with no front shaft support on the new unit it can in theory bend the shaft. As an aside stater pinnions usually have a one way clutch that allows it to free wheel if the engine overspeeds the starter so preventing damage. Sometimes you may have to straighten the main power feed cable that is right angled at the Lucas starter connection but needs to be straight for the gear reduction type. (Message approved by david_gore) | |||
Brian Vogel Grand Master Username: guyslp Post Number: 664 Registered: 6-2009 |
I'm finally back to this job after getting the exhaust dropped and most of my replacement windows for the house painted prior to installation. The only information I've found on the starter motor is in section M2 of the workshop manual, and what's shown doesn't answer my questions. The starter motor appears to be held in place by: 1. One bolt at the bottom (6 o'clock position, removed) 2. One really, really long bolt at the top that passes through what I have to believe is part of the transmission housing. (12 o'clock position, not yet touched) 3. A stud that sticks out about halfway between those two. (9 o'clock position if looking directly in from the front of the car). I seem to recall the starter being described as secured by two front-facing bolts (the 6 and 9 o'clock positions) and one rear facing bolt (12 o'clock). Am I recalling incorrectly, or am I about to remove something (specifically, the nut on the stud) that I shouldn't be removing? Brian, who has decided to do the "hold and lower" maneuver described here and in the workshop manual for the original Lucas starter | |||
Brian Vogel Grand Master Username: guyslp Post Number: 665 Registered: 6-2009 |
Well, since there was only today and tomorrow where I'll have enough light to work outside in the late afternoon I decided to forge on. Of course, several of my questions answered themselves as I progressed. The first surprise was the bolt/stud combo that was in the 9 o'clock position: 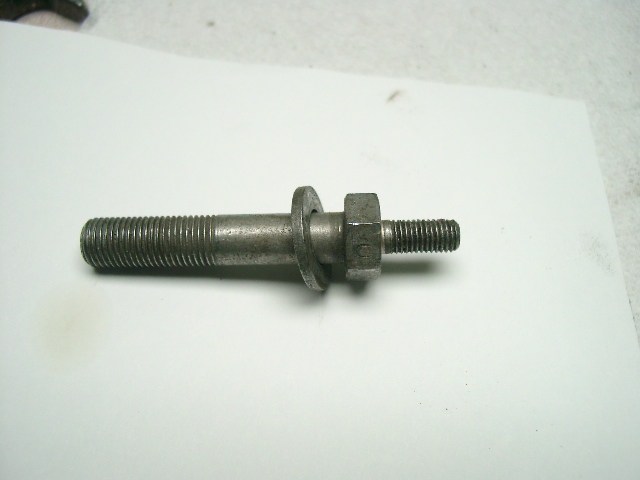 I don't think I've ever encountered one of these before in all my years of tearing various things apart. It is a creative way to create a point to attach the ground/earth strap. The starter is definitely of a weight that it can be managed by one hand if you're anticipating something relatively heavy. The starter and a close up of its drive gear: 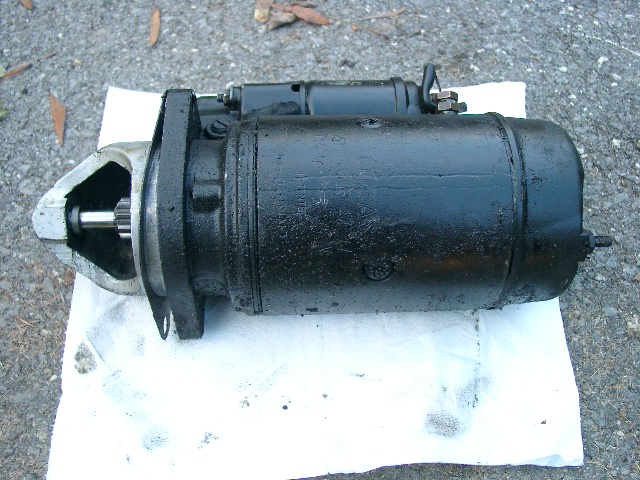 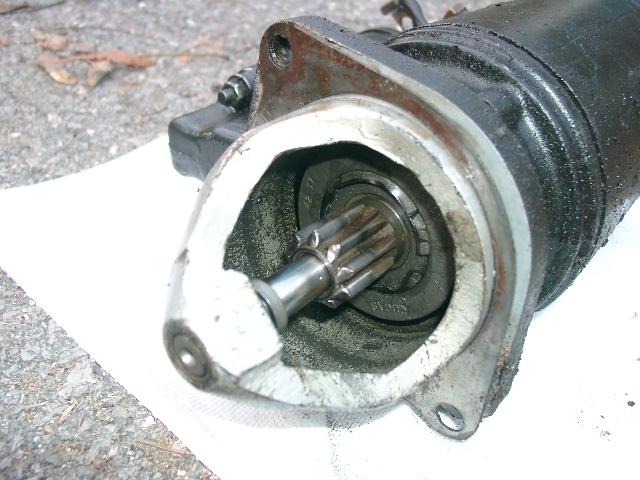 And, finally, a view of the ring gear (or the visible part of it) that can only be seen this way because I could fit my camera into the space available: 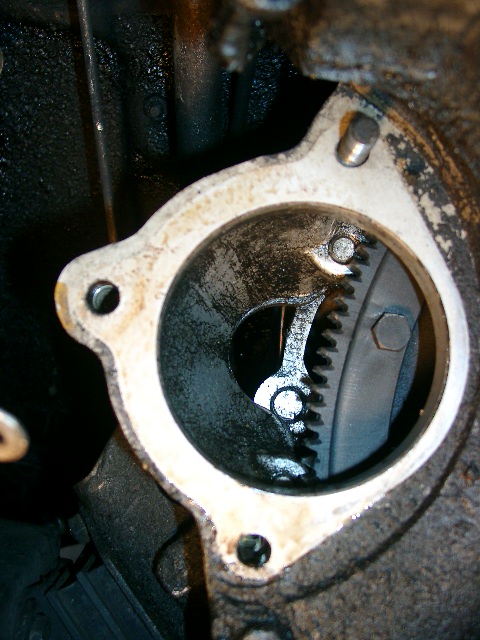 I'll install the new starter tomorrow and then figure out how I'm going to get the battery cable connected. An adapter of some sort will certainly be necessary given at the battery cable isn't particularly flexible and the connection location is quite different than it is on the Lucas starter. If anyone's made one and has recommendations, please post them. Also, you can see the original spacer that was in place between the starter and the housing. Should this go back in with the new starter? It doesn't seem to have a sealing function and I'm not sure whether it's an Lucas-starter-specific thing or not. Brian | |||
richard george yeaman Prolific User Username: richyrich Post Number: 140 Registered: 4-2012 |
Hi Brian it looks like a shim to me probably to adjust the amount of contact with the starting ring if it were me I wouldn't use it. The part of the starting ring that is shown does show considerable wear you should inspect it closely before fitting your new starter motor Good Luck. Richard. | |||
Richard Treacy Grand Master Username: richard_treacy Post Number: 2936 Registered: 4-2003 |
Brian, What you have seen is all quite normal for a Lucas starter or its Bosch and Delco clones fitted to US, European and even Australian motors since the 1940s. The spacer (shim) is important for the gear meshing of course, and if the meshing is poor then the ring gear can be damages quite quickly. The manufacturer (read seller) of your particular starter warns to check the mesh individually, but that requires removing the transmission so it's probably best to take a punt with the existing shim. Judging by the poor state of the ring gear in the photo this whole exercise is a bit risky. That is compounded by the low cranking speed caused by the high gear reduction ratio required for the small 1.9 HP starter you have purchased. Could the original starter be repaired easily as an alternative ? RT. | |||
Richard Treacy Grand Master Username: richard_treacy Post Number: 2937 Registered: 4-2003 |
ps: the starter does not attach to the transmission casing. It bolts to the adaptor plate. The transmission comes out without touching the starter motor. With the transmission removed and the starter still fitted the starter gear mesh may be checked. Removing and refitting the transmission takes three hours, so it is an exercise to be avoided if possible. RT. | |||
Mark Aldridge Prolific User Username: mark_aldridge Post Number: 114 Registered: 10-2008 |
Richard, I note the time to remove the transmission; have you removed an engine, if so how long ? I have a very tired engine in my 1982 Spirit and am contemplating a swap. Mark | |||
Richard Treacy Grand Master Username: richard_treacy Post Number: 2938 Registered: 4-2003 |
Now, Mark, removing a Crewe V8 engine is another matter. I have not removed a Crewe V8 myself but have done quite a few 6-cylinder Crewe motors and several Chev V8s etc. Chev 350s and Ford 351s are tiny and simple compared to what we are contemplating with a Crewe 412 V8. For a Crewe V8 I would allow at least 12 hours to remove it and 25 to refit it, then add lots of hours to put it all right. You can of course overhaul or replace everything in-situ except grinding the crankshaft, so these motors are seldom removed unless badly damaged. You may consider an in-situ rejuvenation using the best used parts of the two motors with a seal and gasket kit. A well-known Sydney specialist has overhauled 200+ Silver Shadow engines over the past 25 years but has only ever removed two for that purpose. Owners of MkVI and R-Type cars must laugh as a motor comes out of those in a few hours. RT. | |||
richard george yeaman Prolific User Username: richyrich Post Number: 142 Registered: 4-2012 |
Could it be possible that the amount of extra contact that the starter gear would have had on the starting ring without this shim might have lengthened its useful life the wear seems to be caused by having a small contact area considering that the starter gear usually has a chamfered leading edge, I do agree with R T. about having the original starter motor repaired this would let you look around for a suitable replacement starting ring you then could fit the new starter with that. Richard Richard. | |||
Mark Aldridge Prolific User Username: mark_aldridge Post Number: 115 Registered: 10-2008 |
Thanks Richard ,engine swap is food for thought !The problem with the existing engine is high oil consumption (120 miles pint),and knocking on load when cold, although this quietens as the engine warms. Mind you it has not got appreciabley worse in the last 20,000 miles. The problem is that the car is only worth �4000 max with a good engine and we use it as the "office hack". An engine swap could be an option as low milage engines can be obtained for �500 in the UK.If it was my other cars, then a proper rebuild would be my option. Mark | |||
Randy Roberson Prolific User Username: wascator Post Number: 165 Registered: 5-2009 |
Interesting turn on this Topic: engine removal. Note the official Crewe method is to raise the Car and drop the entire subframe, engine and all. this was pretty revolutionary when the Shadow debuted, but it is very typical nowadays because so many cars use the front subframe. Bill Coburn removed a Shadow engine thusly and documented it in TeeOneTopics. I witnessed a late-model Nissan Sentra have this very operation performed some weeks ago, and if one is equipped with the lifting equipment, this may be the best way to go. This makes so many of the ancillary parts, as well as the engine compartment itself, so much more accessible for cleaning and repair operations, and it moves these operations away from the Car body (painted surfaces, etc.). Note this is not something I have personally done, but I did stay in a Holiday Inn Express... | |||
Richard Treacy Grand Master Username: richard_treacy Post Number: 2939 Registered: 4-2003 |
Randy, that method was specified for SY cars. For SZs (Silver Spirits etc) the manuals give instructions to remove the engine by lifting it upwards and forwards from the engine compartment. Lots of other hardware including the transmission needs to be removed or disconnected first. RT. | |||
pedro davidson Unregistered guest Posted From: 118.107.49.77 |
I have removed an engine from a shadow per official crewe method and after a rebuild I put it back in.i found the whole exercise very easy.it took about a day to remove and two to put back in.I would do again if I had to (Message approved by david_gore) | |||
Geoff Wootton Grand Master Username: dounraey Post Number: 336 Registered: 5-2012 |
Pedro Did you have a garage lift? If not, how did you lift the body off? Geoff | |||
Peter Davidson New User Username: pedrotheswift Post Number: 6 Registered: 7-2004 |
Geoff I had the loan of a front end loader on a tractor.i put a removalests dolly under the subframe and raised the body then pulled the whole lot out on the dolly and lowed the body onto axle stands then when I was ready to put it all together I did the reverse.Pedro | |||
Geoff Wootton Grand Master Username: dounraey Post Number: 337 Registered: 5-2012 |
Pedro Thanks for that info. I was curious if the body could be lifted from the front using the rear wheels as a pivot point. Sounds like that is the way you did it, rather than using a garage lift to raise the body vertically. Geoff | |||
David Gore Moderator Username: david_gore Post Number: 1346 Registered: 4-2003 |
Hi Geoff, More specific information from TSD2476 especially in regard to the clearance required to extract the sub-frame and engine from beneath the body by using a support frame under the rear wheels to avoid ground contact by the rear of the car during lifting:
| |||
Richard Treacy Grand Master Username: richard_treacy Post Number: 2943 Registered: 4-2003 |
The same applies to the SZ. See the extract at: http://rrtechnical.info/removal.pdf or the full chapter at: http://rrtechnical.info/sz/sz80/h.pdf RT. | |||
Brian Vogel Grand Master Username: guyslp Post Number: 668 Registered: 6-2009 |
Hello All, A small word of warning to anyone who might be installing one of these Nippondenso starters in the future. I don't know whether this would apply to the variant made in Australia, but it could. It definitely applies to the ones made by British Starters in New York state. The starter has a custom machined mounting plate, which fits perfectly. However, that mounting plate allows you to rotate the starter motor on it to allow for best fit. As mine was supplied I am running into difficulty getting the 9 o'clock position bolt back in place due to space constraints on getting a socket to fit on to the bolt due to a protrusion on the starter motor. This picture shows the situation: 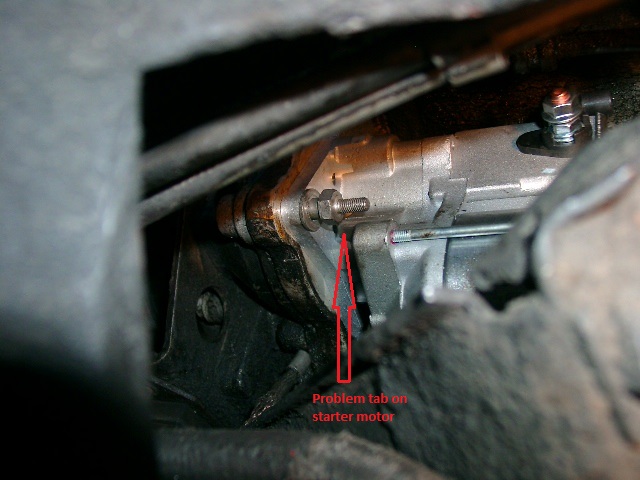 Also, a question for those who've done an install with the British Starters 1.9 HP starter: Did you need to adjust the motor on the mounting plate in any way or did it just bolt in place and work? There's no good way to see how the gear from the motor meshes with the ring gear and I have no idea if one should be trying to adjust the rotated position of the motor on its mounting plate until some sort of meshing/mating is felt between the motor gear and the ring gear. Brian | |||
Bob Reynolds Frequent User Username: bobreynolds Post Number: 58 Registered: 8-2012 |
I have done this job, sort of. In fact my garage mechanic friend did it for me on his lift. I don't know if it was exactly the same motor as yours. I bought it from Flying Spares. The meshing was a potential problem. The workshop manual explains how to use various shims to get the meshing correct, but this is for the old motor and may or may not be relevant to the new one. When the old motor was removed there was one shim fitted. The mechanic didn't know whether to fit the shim onto the new motor or not. He discovered that if he fitted the shim, the nose of the motor would not penetrate far enough to register properly inside the aperture. In other words, it would depend only on the bolts for correct positioning. So we decided to try it without the shim. Fortunately, it works, but there is no way of checking the gear meshing. It is a bit noisier than the original, but the car starts much better. To ensure correct meshing you would probably need to take vernier measurements of all the distances and clearances to calculate the position of the motor, then make up a shim to match. Even then, it would be hit and miss. It's much easier to fit it first and see if it works! I am not sure how far the pinion slides on these new motors, and how critical the positioning is. | |||
Neville Davies Frequent User Username: nev_davies Post Number: 58 Registered: 9-2006 |
Bob I would guess the best way to get the fit right is to smear the gear with engineers blue fit the motor, try it a few times then remove it and see the contact area.This should give a measurement for the shim thickness if needed. Nev | |||
Bob Reynolds Frequent User Username: bobreynolds Post Number: 59 Registered: 8-2012 |
Yes that is a good idea. But it's quite a struggle to fit it and tighten all the bolts up and connect the wires etc. with limited access. Once you've done all that and it works OK, you're tempted to leave it! The official method is to measure the distance between the edge of the flywheel and the mounting flange (and I guess 2 or 3 measurements ought to be taken) and fit shims according to the chart in the manual. Whether this chart would be the same for the new motor as the old one I don't know, as it would depend if the movement and the rest position of the pinion are identical. The shims are specially shaped to fit over the mounting flange of the motor, and wouldn't be easy to make. | |||
Brian Vogel Grand Master Username: guyslp Post Number: 670 Registered: 6-2009 |
And now, for some more of the story . . . There is the tiniest bit of play in permitted if you loosen the hex cap screws that hold the starter motor to the custom machined mounting plate, and that's all it took. The slightest additional rotation made the deep socket needed to tighten down the previously pictured fastener fit. I put the new starter in place without the spacer from the original. You can tell that the gear from the motor is meshing with the ring gear once it's tucked in place, but not bolted down. Today will be checking that everything's tight and getting some liquid electrical tape to deal with cracks in the insulation on the large wire that bolts to the same terminal as the battery wire. This seems to me to be an easier, and more through, option than trying to get in there with any sort of actual insulating tape based on where the two cracks appeared. Now, on to another question: Would I burn up the world were I to crank the car, and have it start, without the exhaust bolted back on? I have no intention of even trying this unless I'm told that a starting of the engine would not result in "fire belching" from the exhaust manifold. The idea here being to test whether the starter at least cranks before putting the exhaust back in place. If it has to go back on first then that's what I'll do. Brian | |||
Mark Herbstreit Prolific User Username: mark_herbstreit Post Number: 114 Registered: 5-2005 |
Brian. Why not just pull the coil lead off so you can crank it with no possibility of it starting. | |||
Geoff Wootton Grand Master Username: dounraey Post Number: 338 Registered: 5-2012 |
I suspect Brian is concerned about dumping neat petrol on the cat that is still connected to the other bank. I would guess there are lots of different views on Brian's question. I can certainly understand him wanting to check the starter motor before reassembling the exhaust system. When I was a (stupid) teenager, a long time ago, I was fitting a new exhaust system to my Daimler Dart. After fitting the silencers but not the rear tailpipe sections I started her up and the V8 sounded so good I took it for a drive, listening to that fabulous V8 sound. When I stopped copious amounts of smoke were rising up from the bottom of the car. The fiberglass floor (these cars were made from fiberglass) had become too hot due to the "modified" exhaust system. Thankfully it did not ignite, but was a good lesson learned. I understand Brian's caution. Geoff | |||
Brian Vogel Grand Master Username: guyslp Post Number: 671 Registered: 6-2009 |
Mark & Geoff, Mark, sometimes one overlooks the obvious, and this is definitely one of those times. I have had so many irons in the proverbial fire lately that confusion is ruling. Geoff, I'm not too concerned about the petrol as this test should be quite short and the usual mechanisms that prevent this should still be functioning. If I don't even wait for the SU pump to stop ticking the float bowls will still be relatively empty as she's been "up on stands" for some weeks. I just wanted to make sure that if she fired up she'd not literally fire up!! If I pull the coil lead that becomes a non-issue and the test can be safely completed. Brian | |||
Richard Treacy Grand Master Username: richard_treacy Post Number: 2946 Registered: 4-2003 |
You may compare this thread to that of 2005 when I fitted a britishstarters.com unit to my Turbo R. This unit is the same small 1.9HP unit which fits 3-speed SYs. http://au.rrforums.net/forum/messages/17001/2980.html I am not particularly thrilled with it as I have stated, and shall probably fit a new OEM Nippondenso soon. It was a rotten evening's work to fit the starter. Being a RHD car the lower steering linkage had to be released, but at least the exhaust didn't need to be youched. The exhaust was in the way but didn't stop the job. As I was driving the car to work daily it was imperative that the job be completed in the evening. It still works fine but its marginal cranking effort means it is headed for the scrap bin. Others who have bought these starters have the same doubts, so it is a shame that the seller did not address this as we could then broadcast accolades. The unit was designed for the US-Spec 7.3:1 compression motors and is not up to 8:1 cars let alone the more-usual 9:1 and 9.2:1 compression UK, European and Australian motors. RT. | |||
Brian Vogel Grand Master Username: guyslp Post Number: 672 Registered: 6-2009 |
Richard, This has been another of those experiences I'd prefer not to repeat. It's actually "easy in theory" but one of my favorite quotations (from an unknown source) is: In theory there is no difference between theory and practice, in practice there is. So far, based upon my survey of a number of owners who've put in the 1.9HP unit, you are in the minority with your dissatisfaction. Virtually every report I've received is of the, "It cranks the motor over *far* more easily than the original ever did." I hope this turns out to be the case for me, as this is a European spec car that the new starter's been installed on. I also hope that my earlier presumption about where the one wire that was on the original starter terminal that the battery cable was not connected to is correct. Wherever it goes at its other end is very hard to determine since the wire itself disappears into the loom along with the ignition switch wire and the large +12V wire. I have to presume that this is the AC clutch "kill during crank" switch lead. I'll report back once I have a chance to try cranking the thing either later today or tomorrow. Brian | |||
Brian Vogel Grand Master Username: guyslp Post Number: 675 Registered: 6-2009 |
She cranks!! It seemed almost somewhat of a small miracle to turn the key and instantly have the starter motor working. Since the main coil wire was disconnected there was no risk of the car actually starting. Now it's time to start what I'm sure will be the delightful task of getting the part of the exhaust system that was dropped back in place. It will be made even more fun since I have to engage my partner's assistance, and he doesn't like small spaces nor does he take direction well once frustrated. Brian | |||
Geoff Wootton Grand Master Username: dounraey Post Number: 339 Registered: 5-2012 |
Brian Thanks for the update. What was the cranking speed like - comparable to before? Geoff | |||
Brian Vogel Grand Master Username: guyslp Post Number: 677 Registered: 6-2009 |
Geoff, I would have to say a tad slower than when the original starter was working correctly, but at least as fast, and probably faster, than it had been cranking on any number of occasions over the last several years. Provided that I don't either forget to listen for the SU pump to stop its initial ticking or get impatient, this car has always turned over *very* quickly, even when the starter was clearly cranking very slowly. I don't anticipate an issue with insufficient cranking speed. Brian | |||
Paul Yorke Grand Master Username: paul_yorke Post Number: 1133 Registered: 6-2006 |
The real beauty of these starter motors is the electrical load they take, not necessarily just the speed they crank at. Because they use so much less power, you are left with an extra couple of volts at the coil so your spark is so much better and starting point much faster and easier. We have fitted lots to clouds and it's the best mod for them. Ever.(There is a demo on my website if you want to listen) Brian, I think Richard was saying he fitted one 5 years ago on his daily runabout and it's still going fine, so on your occasional use vehicle you should be able to double that. Good for the price but we do fit the OE ones to the latest cars when available. Another nice thing about them is he the battery is low, it will usually still crank and start. | |||
Richard Treacy Grand Master Username: richard_treacy Post Number: 2947 Registered: 4-2003 |
As Paul possibly implies, at $295 these starters seem good value for money even though the OEM ones are far better. Unfortunately, the low price brings enough pleasure so one can be happy to overlook the marginal performance, and I know of several Customers in the UK and elsewhere who are more outspoken than I. We have local replicas of the OEM ones here in Australia but they sell for a few hundred more than the ones mentioned in this thread. The OEM Nippondensos are priced at a higher plateau again when bought outright. Incidentally, the first type to stall with a poor battery is the 1.9HP gear reduction unit, followed by the Lucas on pre-1987 cars, and the least likely to stall are the OEM and replicas. Another interesting point which is the flip-side, Paul, is that the OEM starters will crank even when the battery is too flat to generate a spark !! Incidentally, I have one of each three types as brand-new spares in my shed. The Lucas in my T-Series has never missed a beat,and I couldn�t quite come at the whine of a Nippondenso in that car. At least the original gear reduction starter in an R-Type or MkVI makes a distant rumble when active, whereas the Nippondensos certainly let you know when they are awake. | |||
Brian Vogel Grand Master Username: guyslp Post Number: 699 Registered: 6-2009 |
Well, the saga is finally over. Many little things conspired to prevent me from getting that exhaust back on, but we're having a warm snap so today was spent under SRH33576 getting the thing back on. Once I had the segment elevated at three separate points with a stack of wood blocks it was almost hovering precisely where it needed to be hooked up. The job was much easier than I had anticipated. It's also one of those rare jobs that I think was much easier to do with the car on the ground and on jack stands than it ever would have been on a lift. Here's the inaugural start with the new starter. I was shocked at just how quickly she fired up after several months of inactivity. I am positively thrilled with this starter. It takes virtually no time, and far less effort, to get her to roar to life than with the original starter.
She was taken out for a long overdue exercise run which we both thoroughly enjoyed. Brian | |||
Patrick Lockyer. Grand Master Username: pat_lockyer Post Number: 876 Registered: 9-2004 |
I'm sticking with the lovely made LUCAS used correctly with start up hot or cold will last for years of good service. Have heard some cars being cranked for what seems an eternity with faults that have not been delt with. The geared started may get over some start up electrical faults however in the long term use they have a shorter life than the LUCAS. | |||
Richard Treacy Grand Master Username: richard_treacy Post Number: 2979 Registered: 4-2003 |
Patrick is correct. The Lucas job lasts an eternity, but is not available new anymore. The genuine Crewe 1987 Nippondenso is a fair (but noisy) substitute and approved by Crewe as a retrofit in the service bulletins for THM400 cars before 1987. Specialists out here will not touch the low 1.9 HP American substitutes after repeated ring gear failures, but are happy with our local 2.6HP (20k SZ) and 3.2HP (30k SZ) quality copies. I have been warned that the American 1.9HP ones mesh so badly that they can only be aligned with the transmission removed and worse that they stall. RT. | |||
Brian Vogel Grand Master Username: guyslp Post Number: 766 Registered: 6-2009 |
Just a follow-up post after several months of use. I am having no difficulties, nada, with the new starter. It continues to crank the car such that it turns over almost instantly. I don't know what, exactly, Richard Treacy meant by "they stall," but whether I let off the key the moment the engine seems to have started (which is my general practice) or have the starter engaged slightly longer nothing is out of sorts. There's definitely no "grinding and gnashing of teeth." It has never failed to keep cranking on those rare occasions where I'm rushing to start before having waited for the ticking from the fuel pump to have ceased entirely. I could not be happier with this starter, regardless of how the mileage of others may vary. It's functioning far better than the original Lucas starter ever did (but I realize that's because it was "past its peak" when I acquired the car in 2006). For those looking for a replacement starter in the US I would definitely recommend the britishstarters.com unit. Brian | |||
Geoff Wootton Grand Master Username: dounraey Post Number: 376 Registered: 5-2012 |
Hi Brian Thanks for the update. I seem to recall you had the very common "clicking on turning the ignition key" problem on your other car and that you had cleaned the solenoid area and connections. Did this cure the fault? Geoff | |||
Brian Vogel Grand Master Username: guyslp Post Number: 782 Registered: 6-2009 |
Geoff, Somehow I missed this post when you made it. At this juncture I do not recall that I did have "clicking on key turn" issue on LRK37110, but that could simply be because there's been so much "water sloshing under two bridges." If something rises to the surface that allows a definitive response I'll follow-up again. Brian | |||
Geoff Wootton Grand Master Username: dounraey Post Number: 387 Registered: 5-2012 |
Brian Many thanks. Geoff | |||
Bob uk Unregistered guest Posted From: 94.197.122.88 |
The main killer of starters is over use Don't crank for more than 20 seconds allow 2 @minultes between cranks of more than 5 seconds Car batteries are starter batteries as opposed to deep cycle leisure batteries Starter batteries allow high current for short periods This uses the free electrons on the surface of the plates waiting a couple of minutes allows the bbattery elves to go deep into the plates to get more electrons to throw at the starter Also allows starter to cool If battery voltage drops to far the amps will increase to try and maintain horse power Horse power is watts Volts x amps equals watts Batteries recover after high drain for short periods of time Deep charging of starter batteries is important An hour at 10 isn't enough 5 amps at 20 hours best Battery elves are lazy and to many electrons make the elves hot and they complain by farting hydrogen 14.4 volts max Never fully charge battery 95# Never fully discharge keep at 20# min Check Wikipedia then all will be clear I see so many misconceptions about batteries My last shadow battery lasted 7 years (Message approved by david_gore) | |||
Bob Reynolds Frequent User Username: bobreynolds Post Number: 86 Registered: 8-2012 |
Actually 20 seconds is an extremely long time to operate a starter motor. If the engine hasn't fired before 10 seconds you might as well give up because the speed just gets slower and slower and you are just draining the battery unnecessarily. Best to wait a few minutes for the battery to recover and try again. | |||
Bob uk Unregistered guest Posted From: 94.197.122.74 |
Absolutely right I stand to be corrected 10 seconds Today l timed my car from cold it started in 2 seconds Do bother to read Wikipedia (Message approved by david_gore) | |||
Geoff Wootton Grand Master Username: dounraey Post Number: 497 Registered: 5-2012 |
Hi Folks It's starter motor time for me. My car has, on many occasions, suffered the "click but the engine won't turn" problem. It's always eventually started, but I do need to resolve this issue. What is the easiest way to remove it from the car? I would like to confirm that the lower two bolts are removed by positioning yourself under the front wheel arch and then, working towards the rear of the car, using a socket extension to remove them. The top bolt is removed by positioning yourself under the passenger door, working towards the front of the car and accessing it with long socket extensions, possibly with a "wobble" fitting to get the correct angle. Is this the correct approach to removing the starter motor. Geoff. | |||
Bob uk Unregistered guest Posted From: 94.197.122.88 |
Yes. I loosen with 1/2 drive then wind the bolts out with 3/8 drive. Leave the easiest bolt till last. Tie cord around starter body then over exhaust manifold and tie off on front hub or whatever. Once bolts out lower on to velvet cushion with gold braid then get the butler to transport the valuable RR quality part to the bench for surgery. The oem Lucus starter can be overhauled by diy. The brushes are available. Rewinding is an easy job for specialist. This starter is as tough as old boots and response well to new brushes and brgs if required. The pinion with one way clutch is available. Brush springs are available. Time to take the starter apart is 30mins no special tools. Burnt out coils will be obvious. The correct colour is satin black with natural coloured aluminum bits. Check engine earth check battery earth. To check starter off car, place in vice connect battery and the pinion should grind wood away. the manual has all the settings and excellent instructions. The coil that throws the pinion out is connected in series with the motor, when the coil is fired up via the starter relay the earth side of the coil draws current via the starter windings, this causes the starter to turn slowly thus finding engagement of the pinion and ring gear. Then the pinion is full throw in, this closes the main switch at the back of the coil which starts the motor turning at full power. The current in the coil drops so that the pinion is easily thrown out, the lower current is called the holding current. This happens fast. Small fisher man's spring balance is handy to check brush spring tension. Observe torque settings and make sure the shims are put back the same Plus check the big terminals for correct nuts and locking washers. Hold the back nut on the terminals when tightening. Don't soak starter in cleaning liquid wipe only. Aluminum housing on pinion end is ok to soak once removed. Use lots of oil in the bearing by the pinion after cleaning. Keep oil away from brushes and commutator. Use little amount of lubrication on brush end of starter in the bearing. (Message approved by david_gore) | |||
Geoff Wootton Grand Master Username: dounraey Post Number: 498 Registered: 5-2012 |
Many thanks Bob. | |||
Geoff Wootton Grand Master Username: dounraey Post Number: 500 Registered: 5-2012 |
The manual says to use glass paper to clean up the commutator but on no account use emery or sand paper. Obviously this was the terminology of the time. What is the modern equivalent Glass paper? Would it be 600 wet and dry paper, or 1000. Geoff | |||
Brian Vogel Grand Master Username: guyslp Post Number: 1077 Registered: 6-2009 |
Geoff, From what I can find (and this page gives the best short synopsis) glass paper is/was a type of sand paper that uses crushed quartz as the abrasive. This is a relatively soft abrasive and will not cut aggressively causing metal loss. I would imagine that a very light hand with a very fine abrasive paper (or paste) would be fine. The idea appears to be to clean up any corrosion or dirt that may have settled on the commutator without doing anything to change its actual shape. You could even try something completely non-abrasive (e.g., denatured alcohol on a soft cloth) if you think that all you're actually trying to wipe off is surface dirt. A plastic "scrubbie" pad (e.g. Scotch-Brite in Light to Medium Duty Form), applied judiciously, is not particularly aggressive in the abrasive department and they're very easy to source. Brian | |||
Bob uk Unregistered guest Posted From: 94.197.122.85 |
Whoa stop. Commutators must only be cleaned with glass paper which is available from wood work places. The commutator must be cleaned in the same direction as it turns using 120 grit lightly never undercut the gaps. The insulation in the commutator gaps can get loaded with dirt which causes arcing or splashing across the commutator the sand paper cleans it off. To clean hold sandpaper on commutator and turn armature for a couple of turns 3 second job. Small commutators can be cleaned using sandpaper finger nail boards. The boards work on ignition and SU pump points as well. Keep a couple in the glove box. If a lathe is available and the commutator needs skimming remove bare minimum using sharp pointed HSS tool with 10 degree top rake and cut a 100 ft per min dry. Soft materials like copper must be machined only with sharp tools because copper will bobble like a jumper after washing. Copper will take the edge off the tool fast if the tool is not stoned sharp. Before skimming test tool on copper pipe. Armatures aren't cheap. This is a quick easy operation. (Message approved by david_gore) | |||
Geoff Wootton Grand Master Username: dounraey Post Number: 501 Registered: 5-2012 |
Brian and Bob - thanks for your replies. Another question. I am trying to remove the armature from the drive end housing. Does anyone know if and how this can be done, without special tools. 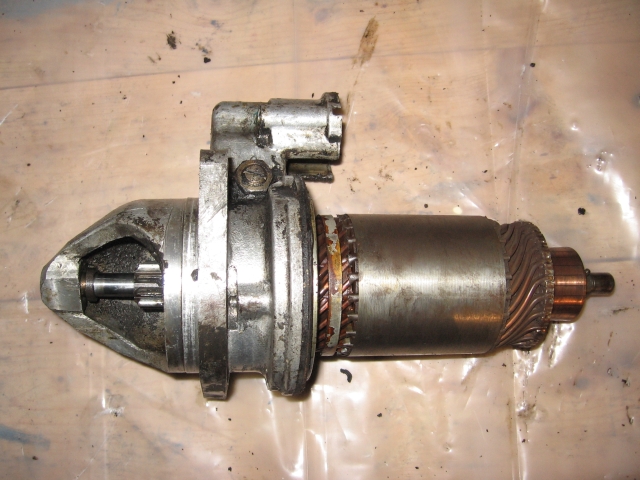 Geoff. | |||
Bob Reynolds Prolific User Username: bobreynolds Post Number: 179 Registered: 8-2012 |
"Whoa stop. Commutators must only be cleaned with glass paper" then: "To clean hold sandpaper on commutator..." then: "Small commutators can be cleaned using sandpaper finger nail boards." Confusion abounds. Also, would you lubricate the pinion and ring gear at all, or just leave them dry? | |||
Jan Forrest Grand Master Username: got_one Post Number: 681 Registered: 1-2008 |
I recall instructions re. cleaning/refurbishing commutators going back several decades. Back then the advice was to clean up the metal fingers with fine 'emery cloth' which I believe is an older form of wet & dry. Although less fine than some of the stuff available these days the backing material was more flexible being fabric rather than paper. If the metal had to be 'polished' back enough to come down to the level of the insulators it would be necessary to cut them back by careful cutting with a fine-toothed bare hacksaw/padsaw blade until they were a few thou' below the level of the conductors. Around the same era I was told that the only lubricant that a starter motor needed was a wash in petrol followed by being left in warm conditions until it had all evaporated. Pre-engaged pinions are far less prone to dirt ingress, but a mixture of grease and fine dust will either jam it or cause it to burn out the motor over time. | |||
Bob uk Unregistered guest Posted From: 94.197.122.81 |
Sorry sand paper and glass paper are interchangeable. Remove the pivot pin the the engagement fork pivots on. and the amature and pinion will slide out. Lubrication. the brg at the pinion end is usually an oilite sintered bronze bush. If this is washed then the oil will be washed out. So give the brg a good soaking in oil and wipe off the excess. Because there is no clutch dust then the dirt takes years to jam the pinion. The brg must be lubricated. (Message approved by david_gore) | |||
richard george yeaman Grand Master Username: richyrich Post Number: 344 Registered: 4-2012 |
Hi all today I was working on SRH19529 and using the starting motor quite a bit the end result is a starting motor that dosent start, I have been reading the above posts and think I will probably take mine and try to have it repaired or if I cant repair it I probably will use flying spares for a replacement. As usual all advice is greatly appreciated. Richard. | |||
Brian Vogel Grand Master Username: guyslp Post Number: 1626 Registered: 6-2009 |
Richard, Are you positive you haven't drained the battery? I only ask because "sudden death" doesn't seem to be the way most of these things go when they go. Brian | |||
Geoff Wootton Grand Master Username: dounraey Post Number: 932 Registered: 5-2012 |
Hi Richard, Brian has beaten me to it. I also thought maybe you had just drained the battery. When you are focused on other things, it is quite easy to miss the obvious. If the problem is with the starter, it's quite easy to dismantle it on the bench and check out the obvious things - brushes, commutator and solenoid switch, before opting for replacement. The accompanying thread also contains a lot of good information: http://au.rrforums.net/forum/messages/17001/14169.html?1440468805 Geoff | |||
richard george yeaman Grand Master Username: richyrich Post Number: 345 Registered: 4-2012 |
I was running the engine while stationary at a fair amount of revs and it cut out when I tried to start it ignition lights came on nice and bright and when the key was turned they stayed bright they didn't dim and there was no solenoid click cant have a look at it today maybe to morrow thanks. Richard. | |||
Robert Noel Reddington Grand Master Username: bob_uk Post Number: 458 Registered: 5-2015 |
Check the starter relay PULL CENTRE KING LEAD FROM IGNITION COIL FROM DIZZY CAP. Using a pair of long nose pliers connect the solenoid to the big fat wire that comes from battery. The starter should work. It's easy for ones imagination to go all expensive. The failure of the starter circuit is probably nothing to do with what you were doing. | |||
richard george yeaman Grand Master Username: richyrich Post Number: 347 Registered: 4-2012 |
Hi Bob I have gone through chapter M in the manual and cant see a starter relay mentioned perhaps you could point me in the right direction to where it might be thank you. Richard. | |||
Geoff Wootton Grand Master Username: dounraey Post Number: 937 Registered: 5-2012 |
Hi Richard Sometimes when I cannot find something in the SY1 manual I check out the SY2 manual. Component location is given at the start of chapter M. I know there are many differences, but the location given in the following diagram may give you a start point. 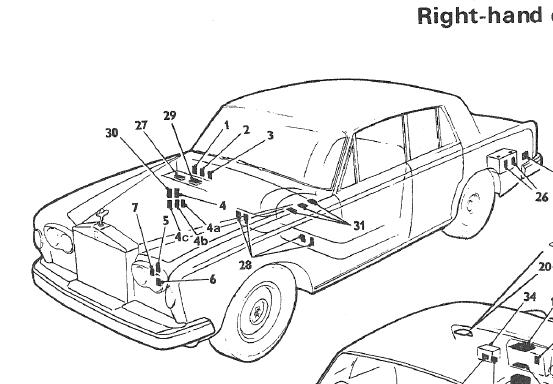 For SY2 cars (RHD), the starter relay is listed as component 30 in the above diagram. It is quite possible this is the same on the SY1 cars. Geoff | |||
richard george yeaman Grand Master Username: richyrich Post Number: 348 Registered: 4-2012 |
Thank you Geoff Electrics are not my strong point This looks to be a very useful diagram I will check it out. Richard. | |||
Brian Vogel Grand Master Username: guyslp Post Number: 1631 Registered: 6-2009 |
Richard & Geoff, Unless something's really different on the SY1 cars the starter relay is "hiding in plain sight." I don't particularly love the component location diagram in this case. The thing looks identical to virtually every other relay and several of the extra double terminals that exist on it are not used and are capped off. You can clearly see the 22RA marking if you look at the side facing the front of the car. If you do find that you have a dead starter relay and don't wish to pay a king's ransom for an actual 22RA there are other options, one of which I've documented in my resources file down to which wires need to go to which terminals, since the substitute Chrysler relay has different designations for its terminals. Here's a photo of the starter relay on SRH33576. It is in precisely the same location on LRK37110. 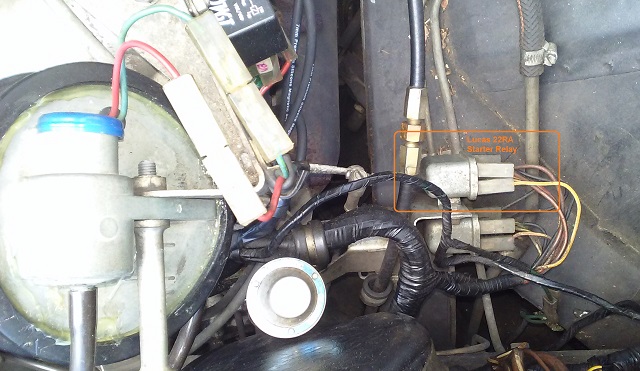 Brian | |||
Bob Reynolds Grand Master Username: bobreynolds Post Number: 330 Registered: 8-2012 |
The Starter Relay is under the bonnet on the right hand side, next to the cruise control bellows and washer bottle (1974/75 Shadow). Relay location topic: http://au.rrforums.net/cgi-bin/forum/discus.pl?pg=prev&topic=17001&page=15292 The relay itself is very unlikely to be faulty. Problems are usually down to a corroded connector or broken wire. | |||
richard george yeaman Grand Master Username: richyrich Post Number: 349 Registered: 4-2012 |
Thank you to all a lot of very useful information I am now going to throw a spanner in the works. On my second post on Tuesday I stated that the engine was running at a fair rate of revs when it stopped suddenly I immediately tried to start the car and no start ignition light is on and oil pressure light is on they don't dim when I turn key to start there is a faint click not that loud seems a bit odd. Richard. | |||
Christian S. Hansen Frequent User Username: enquiring_mind Post Number: 52 Registered: 4-2015 |
Richard... I will be the first to observe that there are many much more knowledgable persons here than I and so perhaps I should not advance a theory regarding what I know so little about, but from your August 25 description, and as confirmed by your last message, I would be more inclined to diagnose why the engine suddenly stopped, rather than why it is now not starting. I observe this simply because the bulk of the thread has been about starter, solenoid, relay issues, none of which would have caused the engine to suddenly stop, and therefore are likely not the problem that is causing the grief. You can confirm that the starting system is NOT the issue by one of the methods proposed for jumping the starter. My bet is that you will find that the starting system is entirely function, and the problem is instead whatever it was that caused the engine to suddenly stop, and that it is there that your diagnostic procedures should be directed. | |||
Robert Noel Reddington Grand Master Username: bob_uk Post Number: 464 Registered: 5-2015 |
The starter system has a relay between the ignition start position and the solenoid. The faint click is probably the relay working. The ballast for the ignition is interconnected with the starter system Check the ballast circuit and the wiring at the starter solenoid relay. |