| Author | Message | ||
Chris Browne Experienced User Username: chrisb Post Number: 41 Registered: 2-2010 |
Hi everyone. I have recently been helping a friend prepare his 1973 Shadow for a European tour and one of the jobs we have done is to replace all the diodes on the fuse panel. This has dramatically improved the performance of the aircon actuators. I would like to do the same thing on my 1979 Shadow 2 but can't seem to find the diode panel. Are they grouped together somewhere hidden from view? Any advice or locations would be gratefully received. Thanks in anticipation, Chris Browne | ||
Tim North Unregistered guest Posted From: 81.132.71.154 |
Chris i don't have the workshop manual to hand but I have seen a mention of the diode board just behind the fuseboard under the glove box. (Message approved by david_gore) | ||
Chris Browne Experienced User Username: chrisb Post Number: 43 Registered: 2-2010 |
Hi Tim, Thanks for your reply. Yes, I was expecting to find a diode panel in the fuse box as in the Shadow 1, but unless I am not looking far enough inside, there does not appear to be a panel of them. I have seen the ones which are fitted on a panel beneath the top roll but these are not the ones which affect the aircon actuators and it is these that I am keen to replace having seen the dramatic inmprovement made when the we changed the ones on my friends Shadow 1. I have the full workshop manual but have been unable to locate any mention of the diodes I am looking for. The search continues! Kind regards, Chris | ||
Llu�s Gimeno-Fabra Prolific User Username: llu�s Post Number: 135 Registered: 8-2007 |
Hi Chris, Being a custodian of a Corniche Coup� (1977 but with a SS2 test airco) I would be very interested to know where these diodes are... in case they are finally found. Thanks in advance | ||
Richard Treacy Grand Master Username: richard_treacy Post Number: 2341 Registered: 4-2003 |
SSII Diode Board. See www.rrtechnical.info workshop manual (TSD4200) for details. 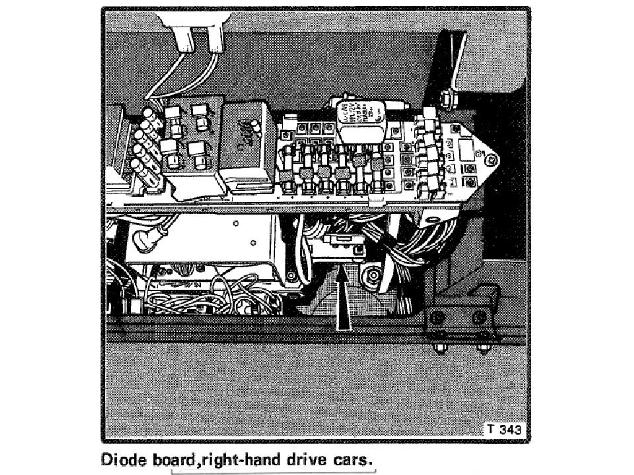 (Message edited by Richard Treacy on 06 June 2011) | ||
Richard Treacy Grand Master Username: richard_treacy Post Number: 2342 Registered: 4-2003 |
LHD 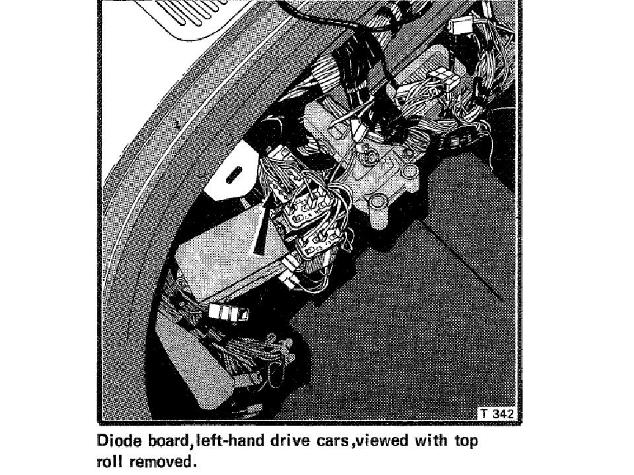 | ||
Richard Treacy Grand Master Username: richard_treacy Post Number: 2343 Registered: 4-2003 |
As opposed to SSI cars, where the diodes are on the fuse panel itself. The gearchange and central locks circuit breaker are incorporated into a three-in-one Otter switch below the flasher unit on 1972 MY cars onwards for somer markets. RT.  | ||
Chris Browne Experienced User Username: chrisb Post Number: 44 Registered: 2-2010 |
Hello Richard, Thanks for the diagrams from which I have now located the diode board. One further question. It seems very difficult to get at. Is there a simple way of releasing the board other than by removing the four Phillips screws which are screwed in from the back of the bulkhead? Kind regards, Chris (Message edited by Chrisb on 07 June 2011) | ||
Paul Yorke Grand Master Username: paul_yorke Post Number: 744 Registered: 6-2006 |
Chris - A simple way - you must be thinking of some other manufacturer! :D | ||
Richard Treacy Grand Master Username: richard_treacy Post Number: 2344 Registered: 4-2003 |
Sorry Chris, I can't be specific as it is some time since I changed the diodes on an SY2. However, I do recall that all that was needed was to undo the setscrews retaining the main fuse board, put it to one side, then undo the diode board from above. I certainly did not need to access the bulkhead. For those interested, here is a link to the Technical Library concerning the diodes. For about $5 you can buy a hundred EM513 diodes from an electrical wholesaler, so best replace them all if you are fooling around in the fusebox at any time. Be careful as some cars have one Zener diode on the diode board too, so leave it alone unless you buy the right one (6,3V I recall) - it looks different from the other standard silicon diodes. http://rrtechnical.info/miscellaneous/diodes.html RT. | ||
Llu�s Gimeno-Fabra Prolific User Username: llu�s Post Number: 136 Registered: 8-2007 |
Thanks, Bloody hell, dashboard out (again)... I guess it's almost weekend anyway. | ||
Richard Treacy Grand Master Username: richard_treacy Post Number: 2346 Registered: 4-2003 |
ps: for Lluis, LHD cars don't look so friendly as the picture implies that the top roll is best removed. It's a bit hard to believe, so I would have a good look first. The only work I have done on SY2 LHD cars is major mechanical stuff on a LHD SSII in Munich so I really don't know about LHD diode boards. | ||
Llu�s Gimeno-Fabra Prolific User Username: llu�s Post Number: 137 Registered: 8-2007 |
Richard, Thanks... I will report, as there are little things aplenty to do in this car (major stuff, including body, transmission and engine otherwise close to perfection). Just to list a few: - Ballast resistor making cold start nasty (caburettor professionally overhauled) - Airco effective, but rather hysterical in behaviour. - Leather has already swallowed 1 liter of softening oil and keeps drinking - Cruise control does not hold speed (accelerates though) - all new speakers needed (dead easy in comparison with the Continental R, which turned out to be an interior-out job). Already done: New carburetor wiring plus high-power wiring from battery to engine. Nippodenso starter (nice) Airco compressor New SS exhaust (nice sound, really) See u, Llu�s | ||
Chris Browne Experienced User Username: chrisb Post Number: 45 Registered: 2-2010 |
Hi Richard, Thanks for the advice. I'll have a good look and follow your method. Thanks again. Paul - "a simple way" - what a stupid thing to say! What was I thinking of!! Kind regards, Chris | ||
Chris Browne Frequent User Username: chrisb Post Number: 52 Registered: 2-2010 |
Hello everyone, Just an update on the diode block saga for those who are interested.I finally located it nestling well behind the fuseboard beneath the glove box. To get at it, having disconnected the battery, I removed the knee roll which doubles as the fuseboard cover. I also removed the end panel from the dashboard. I then removed the nuts and bolts which hold the fuse board to the dash board frame. Once the fuseboard was loose, I marked all the connector plugs which plug into the back of the board with dots of white paint to make sure they all went back in the same positions and pulled them off. The fuseboard can then be removed. The diode block itself is screwed to a black plate which itself is fixed to an adjacent panel by two small set screws  .Once these set screws are released, the diode board can be pulled forward so that the three plug in connectors on the front of the board can be pulled out. These are all different so there is no chance of plugging them back in the wrong way round on reassembly. Once the diode board is out of the car, unscrew the four Phillips screws which attach the cover plate and finally you get to see the diodes .Once these set screws are released, the diode board can be pulled forward so that the three plug in connectors on the front of the board can be pulled out. These are all different so there is no chance of plugging them back in the wrong way round on reassembly. Once the diode board is out of the car, unscrew the four Phillips screws which attach the cover plate and finally you get to see the diodes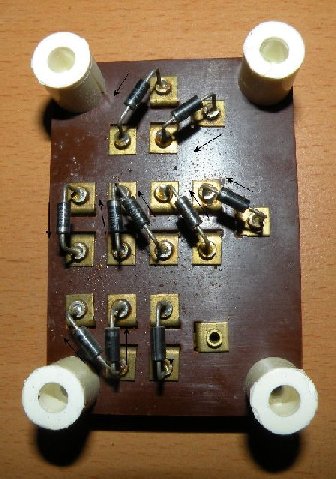 . There are ten of them and they are soldered onto the board. It is a simple task to remove and replace them with new ones. Reassembly is a reversal of the removal procedure. Whilst the fuseboard was out of the car, I took the opportunity to remove each fuse in turn and clean up the terminals on each end. They were filthy after 30 odd years so it does no harm to make sure they are sound and making good contact with their holders. When everything was back together, there was a huge improvement in the speed and quietness of the aircon actuators so the job was well worth doing. . There are ten of them and they are soldered onto the board. It is a simple task to remove and replace them with new ones. Reassembly is a reversal of the removal procedure. Whilst the fuseboard was out of the car, I took the opportunity to remove each fuse in turn and clean up the terminals on each end. They were filthy after 30 odd years so it does no harm to make sure they are sound and making good contact with their holders. When everything was back together, there was a huge improvement in the speed and quietness of the aircon actuators so the job was well worth doing. Kind regards, Chris |