| Author | Message | |||
Jason Watson New User Username: crikeydawn Post Number: 49 Registered: 07-2023 |
Hi there, Some of you may recall I was on a Silver Dawn path, unfortunately that trusted path decided not to sell. After exploring a few other directions I came back to the very start, and well, had myself a rush of blood. I�m not exactly sure what I have done, but I�m excited, have no buyers remorse, and feel very lucky if not a bit honoured. I�ve just bought myself a drowned 1957 Bentley in a 1000+ pieces; and think I have picked up a good buy if not a steal. I can understand many reading will be thinking this guy is a goner or at best delusional. However a project like this does offer achievement, pleasure, education, and well.....something to do. I�ll leave out all the hard work, skinned knuckles, frustration, swearing, and money for now as that will no doubt have its hearing in due course. I have never owned a Bentley or Rolls Royce, and have not mucked around with cars for 25 years or more. However from scrolling through countless publications at my father in-laws breakfast table, many conversations around RR and B, over time developed a secret crush for an S. Then years observing, listening, and admiring a man who bought a Rolls Royce in 50 boxes when it should have been 75, then gave it a magnificent second life a hint of belief was developed. He too did not have bottomless pockets but he had time, and done it all before so a seed of possibility was planted. He listened to my position, called a spade a spade, knows a thing or two about the marcs, and is supportive of my adventure. I�m planning on my only regret will be I wished I developed this interest 10 years ago, as my inspiration and sounding board is now 86. So after much thought, attending a few rallies of various old things, I realised enthusiast are just men, generally. Furthermore what they fuss over is just metal, nuts, bolts. It�s what they do with their time is the amazing part and where the magic lay. Their knowledge may be unique to them but not exclusive, and many are willing to share. It became apparent it�s almost a default human attribute to share the rewards and joy of such an interest. The companionship, knowledge sharing, problem solving, and joy is the personalised medium based around a common interest. As obvious as that seems to the ones who know, if you are not looking you don't see. Strangely enough my first question with such an undertaking is S, what does Bentley S stand for? I�ve been told it just followed R. I�m all ears if you know. My wife said its for BS, it's all ostentatious BS and what are you going to do with that.....plus I�m not going anywhere in it. Tuff start! But after some calm explanation, photos, and creating some imagery I have sold the project and created a vision I�m going to hang in the shed. �Lets take the Bentley�. So that�s the goal, a respectful beautifully restored daily driver where the wife says let's take the Bentley. Back to S.....just S, or Super, Sports, Series, Standard, Steel, Saloon, possibly Special? Rolls Royce have imaginative names like Ghost, something you see or do you emerging from the shadows of a developing motor industry. Phantom much the same but menacing the competition in a deliberate way. Wraith another ghost like image, or Silver Dawn emerging from the ashes of war for a brighter future. Silver Cloud not quite a magic carpet but a liking to softness, gentle, and wonder perhaps. All very subjective to my imagination. Where as poor ol adopted child Bentley just gets 3, 3-1/2, 4-1/4lt, Marks V to VI, R or just S and numbers 1 2 3. Perhaps its origins in names were never inspirational, so in the trueness of RR why change if not required. For my money however and B269EK, S is for Special. It started its days as something Special, then became more Special with Harold Radford �Countryman� additions. To bring it back from the dead will be Special enough. But to then go for outings on a beautiful weather�s day with the top open, the good wife by my side making use of those bench like seats, some lunch and goodies perhaps from the picnic table in the back, or an afternoon kip in the reclining body will certainly be Special. Let�s take the Bentley�..works for me. Guess it�s time to start the huge adventure to get it there. image of car just after 2011 floods.  | |||
Geoff Wootton Grand Master Username: dounraey Post Number: 2341 Registered: 05-2012 |
Congratulations on your new purchase. I hope you will share with us details of your restoration as it progresses. Here's a link to a thread on the Silver Cloud Forum covering the restoration of a 1958 Cloud 1. It may have some entries of interest to you. http://au.rrforums.net/cgi-bin/forum/show.pl?tpc=17000&post=18833#POST18833 . | |||
Martin Webster Experienced User Username: martin_webster Post Number: 51 Registered: 09-2018 |
Hello Jason and congratulations on your purchase. I would be very interested to know which Harold Radford additions were made to your S series? I have a brochure which illustrates the various alterations and accessories and also how much they were at the time none of them inexpensive by the way. ATB Martin | |||
David Gore Moderator Username: david_gore Post Number: 4228 Registered: 04-2003 |
Hi Jason, Welcome to your journey of restoration and may you have a successful and rewarding experience recreating your vehicle's past as a fully functional motor vehicle and its subsequent participation in your and your family's lives. As always, I am certain our valued members will share their experiences and knowledge with you as you restore your vehicle to regular use and enjoy the subsequent experience of classic motoring.  | |||
Jeff Martin Frequent User Username: jeff_r_1 Post Number: 543 Registered: 07-2018 |
The restoration of this will make an excellent thread Jason ! Define, "drowned" Bentley please, and in a thousand pieces, it looks complete in that photo, or is that when it was still all together in 2011 ? I'm going to assume that there is water damage to the interior. How's the wood ? David, I have a question about the cloth braded wiring, why did they use that ? There is none of it on my 51 MK VI Bentley and it's all very sound. I removed the fire-wall for restoration and all of the wires that came through it still had soft and pliable casings. | |||
Jason Watson New User Username: crikeydawn Post Number: 50 Registered: 07-2023 |
Thank you all for the welcoming to journey. I�ve been cleaning out the shed. Having a bit of a chuck out and making room, cleaning up the years of spider webs and dust. Bombing it for future spider control and putting out the ratsac. @ Geoff, yes the plan is to share the rebuild here. I feel imput from owners will be good for all. @ Martin, I would be very interested in a copy of that brochure if possible. As far as I can tell it has reclining seats, brandy and shot glass pockets in the doors, scotch stash the back of the seats, and table in the boot. It may have something in the rear seat centre consul but I�m not sure at present. It does not have the holes for the stool pins in the bumper overriders. To be honest I�m only aware of about 7 of the possible 40? options. I am blessed the seller has supplied copies of an owners manual, spare parts manual, a book of modifications by serial number, wiring diagram and much more. Then my father in-law produced a couple copies of the original Cloud and S sales brochure. I feel very lucky indeed. @ David, thanks. I trust the general section is where this thread belongs. I kind of hope it also brings a bit of traffic to the forum as well. I�ll probably join a local club but nothing like the internet for a club. @ Martin, 2011 Brisbane flooded. I don�t know the owner but met someone yesterday who does, so more dots to join yet. I am told in 2011 it was registered and driven semi regularly. The floods came and on the day the car did not start due to a flat battery. It must have been quite distressing for the owner let alone his house going under. It was under for 24 hours I believe. I was told to mid windscreen....yeeks. The car started being dried out almost immediately and the person I purchased it off, who acquired it within 10 days of being flooded completed the drying process doing an excellent job cleaning it along the way. He also had a vision for it and that involved a complete chassis up rebuild. So parts were bagged, labeled, and lubricated. Incredibly you would be forgiven if you overlooked the interior and woodwork ever going under water. The gear box went off for a full refurbishment. The chassis went off to have corrosion around the battery addressed, checked for trueness, any further corrosion addressed and painted in 2 pack. The motor went to a well known and trusted shop where it was stripped, flushed, rebored and had new pistons, rings, bearing, valves, and to be honest I can�t recall it all. But its all new and just needs assembling. The head has been done, a new radiator also comes with it so again I feel blessed as I will not have to address overheating issues in the future. The shock absorbers have been rebuilt. I�m picking the car up this week but I just could not keep it to myself any longer. Here a few pics of the chassis. A real credit the owner, when you see it in the flesh it has a paint job that rivals many cars body shine and finish.  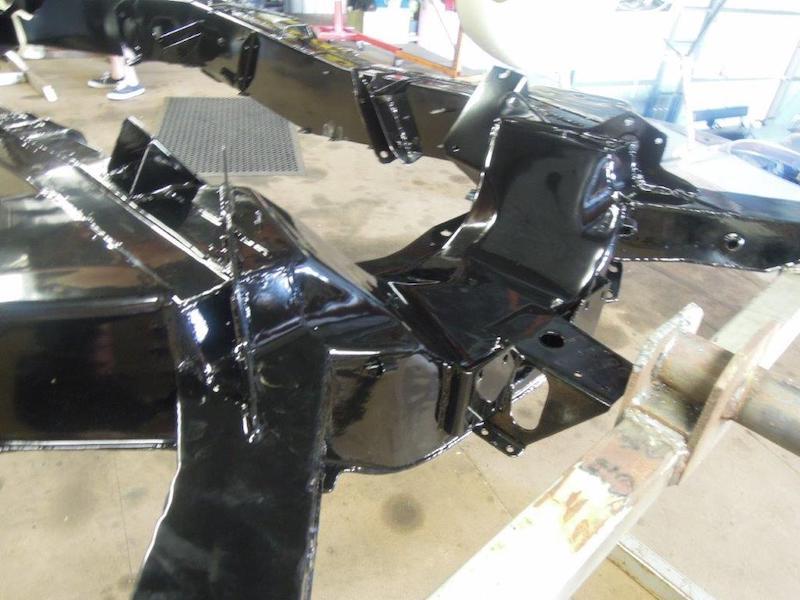 . | |||
David Gore Moderator Username: david_gore Post Number: 4229 Registered: 04-2003 |
For the times when you stop and ask yourself "why am I doing this?" Remember the old tried and true proverb - "A journey of 1000 miles starts with a single step". You have taken that step and I am certain our forum members will follow your journey with interest and our dedicated Silver Dawn/Bentley fraternity will help with comments, advice and suggestions as you detail your restoration progress. I am certain you will be adding more knowledge here as you go forward with your restoration. . | |||
Jason Watson Experienced User Username: crikeydawn Post Number: 51 Registered: 07-2023 |
Thanks Dave, second step tomorrow. It all comes home. Here's a Q, what type of spanners do I need to work on an S. I'm a metric guy but figure it wont be that. Oh and I have to thank Geoff W for the link. Apart from bringing home the enormity of such an undertaking, it sure produced some gems of knowledge and links. I have been asked by a few will it be getting a new harness. Currently I'm thinking yes. | |||
Jason Watson Experienced User Username: crikeydawn Post Number: 52 Registered: 07-2023 |
Courtesy of the FIL who gave me these docs, I though I better scan them for my own records but also allows to share. Road tests from Auto magazines of the time, which still are today. Plus the sales brochure of the time.
| |||
Jason Watson Experienced User Username: crikeydawn Post Number: 53 Registered: 07-2023 |
| |||
Jason Watson Experienced User Username: crikeydawn Post Number: 54 Registered: 07-2023 |
| |||
Jason Watson Experienced User Username: crikeydawn Post Number: 55 Registered: 07-2023 |
| |||
Mark Aldridge Frequent User Username: mark_aldridge Post Number: 851 Registered: 10-2008 |
Hi Jason, The effort in rebuilding this car will be well repaid when you drive it. I rate them as the best car ever produced by Crewe. I have owned my 1956 S1 for 18 years. My Wife rates the car above our Shadow 1 and my Mulsanne S and her Bentley8. My car is non power steering and on radial tyres so heavy to manoeuvre but on the move superbly weighted. Mark | |||
David Gore Moderator Username: david_gore Post Number: 4230 Registered: 04-2003 |
Jason, Sets of Metrinch, BA and Whitworth sockets, open and ring spanners are useful given the usual British specification [BA and Whitworth] fasteners used on Rolls Royce and Bentley vehicles: https://en.wikipedia.org/wiki/British_Standard_Whitworth https://en.wikipedia.org/wiki/British_Association_screw_threads I have found the Metrinch tools very useful in undoing "butchered" fasteners where the corners have been "rounded off" from past removal problems - the fact the Metrinch tools work on the flats on the fastener head rather than the corners facilitates removal of otherwise difficult-to-remove fasteners. https://www.tridon.com.au/products/Metrinch | |||
Jason Watson Experienced User Username: crikeydawn Post Number: 56 Registered: 07-2023 |
Well B269EK arrived at the Watson estate yesterday. Opening the account with 14.5 hours attention and 1 strike in the skinned knuckle log. 2 x 160km return trips were made with a third planned today to pick up bumper bars, exhaust, brake lines and tyres. All went reasonably well considering hard surfaces, space, and forklifts are available at load end, however requires some imagination at the unload end of grass, limited space, and no forklifts. Thankfully my teenage son and a few mates were hanging around as its school holidays. Amazing how heavy a gear box or block is.   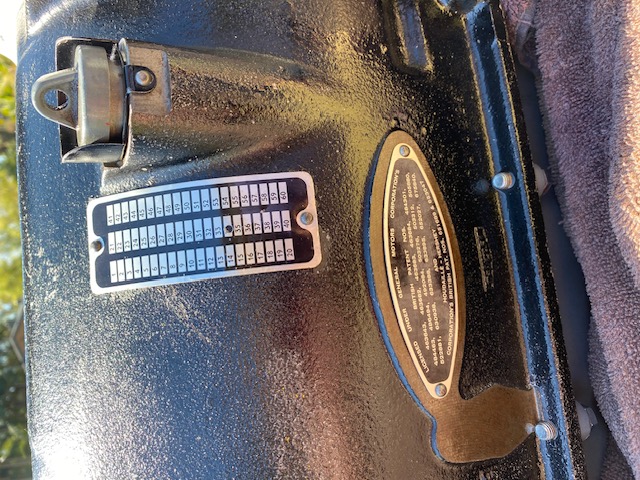 A credit to the seller and lovely generous bloke as well. The work alone in replacing the chassis cross member skid plate is amazing.  | |||
Jason Watson Experienced User Username: crikeydawn Post Number: 57 Registered: 07-2023 |
I now have the amazing honour of completing this build. As you can see, or hope you can, my task is made a little easier as most parts have been cleaned, bead blasted and primed.    First task after my finger heals will be put the diff back together and hang the suspension. Get the chassis rolling before starting to put the motor together. In the mean time I have a mountain of images and reading to work through. I have no idea how a diff goes back but with the service and parts manuals plus google I'm feeling ok about it. 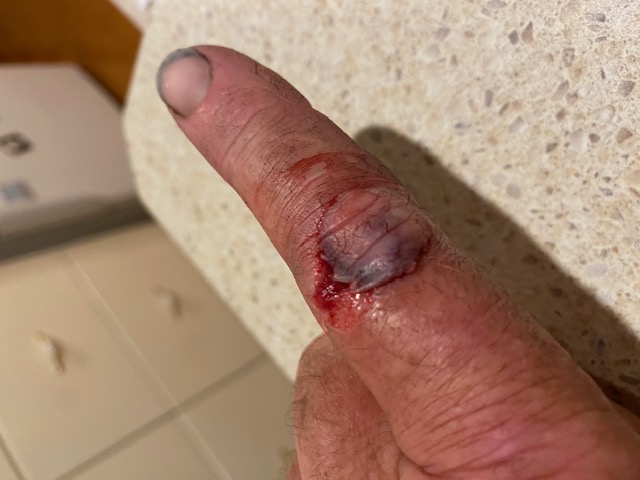  . | |||
Jason Watson Experienced User Username: crikeydawn Post Number: 58 Registered: 07-2023 |
As you can see not all goes to plan. The body which is rather weighty was mounted on a fairly light trolly to roll it around the workshop. Not really made to travel 80km bouncing on a car trailer. We had some adjustments along the way, and thankfully the skinned knuckle event was only 8km from home and almost done. But low a behold the trolly wheel blew out as B269EK was putting its bum into the new abode. Just testing the surrounds I guess. So with a sledge hammer we straightened the frame, then poked a crow bar into the frame making an axle so to speak, and in it rolled. Small I agree, but Henry Royce started his first work in a small garage upon a lane way. Good enough for Henry, good enough for me.   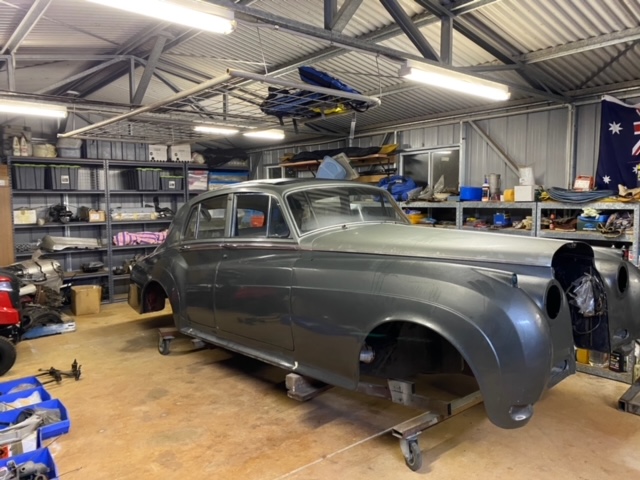 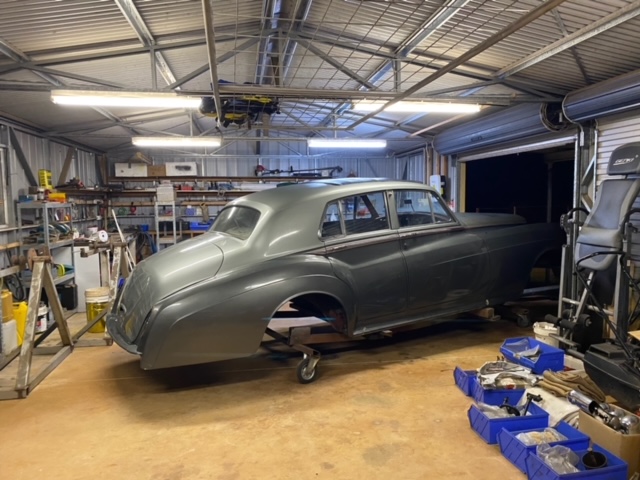 . | |||
Jason Watson Experienced User Username: crikeydawn Post Number: 59 Registered: 07-2023 |
@ Martin W I�ve been able to have a bit of a better look at the Radford Countryman additions for the fishin, huntin, romancin, alcoholic enthusiast. I have a publication that came with the car RR SC1 and BS1 50 years by DB Bassoli and BL King. It�s a great effort to track whats known about the 1955-1958 era of these cars, however sadly and perhaps expectedly, not as comprehensive as wanted. The book suggests 35 C1 and 37 S1 went to Radford from Crewe, However B269EK is not one of them, so perhaps Sir Carol Reed changed his mind soon after delivery. Going on this book I have 13 options with 5 sub specifications of those options to be confirmed. Interestingly though I have a mirror on the trunk liner that pulls down to complement the morning shave, or perhaps for madam or mistress to fix her hair. The book has no mention in the list but can't see anyone els fitting this other than Radford. Its possible there may be other modifications in the boot other than the table, just hard to tell when there is nothing in the boot currently. on this car Front seats - camping body style with armrest in each seat. Cabinets - in rear of front seats under existing tables. (sub specification tbc) Rear seats - 60-40 camping body style Centre arm rest rear - fitted to the 60 side. Folds out again with swivel mirror. Provisions for cigarette case, note book, pen, comb or tooth brush. Picnic Table - boot mounted. Not sure yet if it�s the grand stand variant. Lockers - R and L front doors (sub specification tbc) I have seen something that holds many round bottles so think its the mineral water rack. Lockers - R and L rear doors (sub specification tbc) Sunglass case and mirror - sun visor passenger side Pouch - sun visor drivers side Ventilator windows - rear door quarter glasses Webasto Sun Roof Electric aerial - I presume as centre windscreen roof aerial is removed for sun roof. Winking/parking lights - a small amber/red light on the upper B pillar. Unfortunately all the glasses, flasks, bottles, thermos, first aid kit, sewing kit, or what other small detail that filled all these lockers is no longer. Perhaps countless hours and years of sniffing around may find something. What would really work for me is the espresso coffee percolator but who knows what was in the left front door. | |||
ChristopherCarnley Unregistered guest Posted From: 35.176.108.102 |
Jason, The previous model was the R Type, so the new model was named "S" type, but the only one with a number is S3, as was the R-R version, Silver Cloud 111. All of the sockets and spanners are the AF, across flats (of the hex heads) and have the (US) unified fine threads. Except for bolts and screws below 1/4" and they are 2BA. British Association. Download a copy of both the Workshop Manual and the Parts List, from the Library. You will need them. After your first aid class, use the contents of the swear box, to buy a copy of James Taylor,s excellent book. Apart from your sore looking split finger, you have some pain on,mate. (Message approved by david_gore) | |||
Jason Watson Experienced User Username: crikeydawn Post Number: 60 Registered: 07-2023 |
Thanks Christopher, is this the book?  Reckon that will make an awesome Christmas present, thank you. Yes your right, its not all beer and skittles. A 70 year old car that has been under water will have its problems. Let alone on top of age, origin, and what owners have done. Just because it was an expansive car in its day, and no mater how much money one has, people do what they do. There will be wins and losses with this venture. I am fortunate the car came with an office set and a workshop set of original manuals and parts list can you believe. Still, I reckon a print out of the days job will suffice. Are we sure the tools are AF? Previous post has suggested BSW which I bought a set of yesterday. Not the end of the world as they are old school. Kind of figured metal was better back when and a correctly fitted tool to an un-burred head should do nicely. Here is some pain, a quick rummage through the diff yesterday has proven the diff has not been preserved as well as one would have hoped. In my world with RRs diff reputation an observation of the diff oil and perhaps a change or two would have sufficed for a flooded car with 60k mile on it. However a decision was made by the previous owner who was on a concourse path, to pull it apart and replace everything. Perhaps it was simply overlooked, just in my world it could have done with a bit more oil splashed over the bearings and pinion in the process if it was going to sit around. I see a few draw backs to the concourse path, apart from ending up with a car that in almost every cases will never be capable of returning the money spent on it, it can lead to replacing everything for no reason. Each to their own and no axe to grind either way. I�m seeking advice on possibilities. | |||
NormanGeeson Unregistered guest Posted From: 81.99.74.184 |
Jason "However B269EK is not one of them, so perhaps Sir Carol Reed changed his mind soon after delivery" I am afraid you are in error. This chassis is and was one of the last block of 37 chassis to have designed modifications by Radford. All the specification build sheets note Radford requirements on production. (Message approved by david_gore) | |||
Jason Watson Experienced User Username: crikeydawn Post Number: 61 Registered: 07-2023 |
Ahh thank you Norman. Happy to be wrong, I do a lot of it. The FIL is getting a build sheet for me as he is a member of where you can get them. Already I have seen evidence of a green original interior but its currently light grey. Its also not velvet green/shell grey anymore. Think it will see a green interior again though, I just love them. It seems to me record are not complete all over the place, possibly no matter who recorded them. Attempts are made to have correct records, but people are people and things get misplace, forgotten, or lost. Parts are used up or withdrawn early, and people also do what they do. This book is no doubt a best effort but also states the huge amount of data drawn and collated is difficult and daunting. Then people go and sell and time never stops. Its funny where it takes you though. Looking at my diff I can't say I'm chuffed with how it looks. I need to buy a welder at some point, just pondering if I do so now to fix up this mess and file it back it to better times. 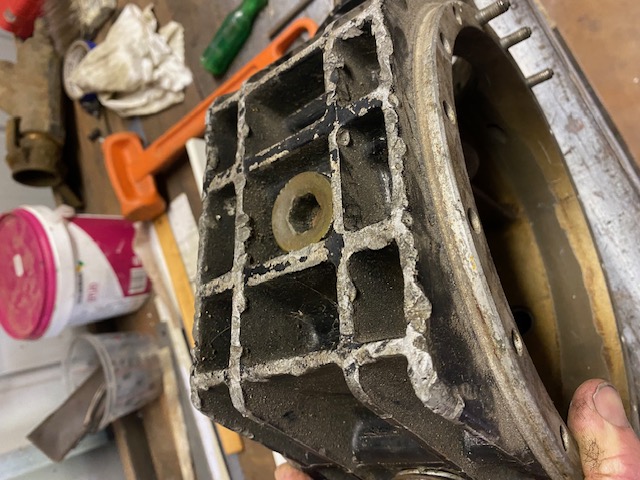 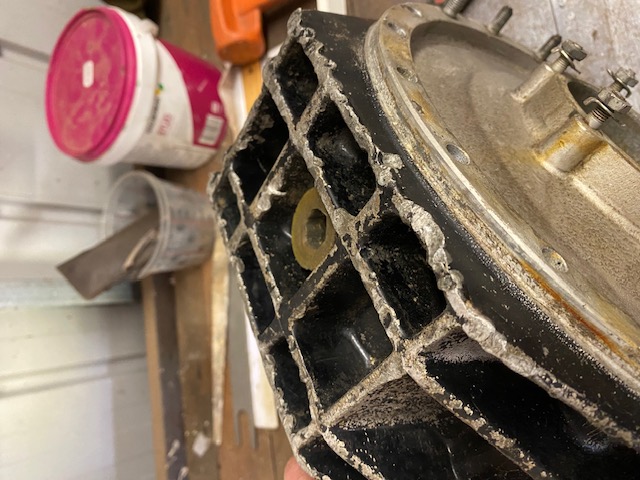 . | |||
Martin Webster Experienced User Username: martin_webster Post Number: 52 Registered: 09-2018 |
Jason, When I get a moment I will dig out the Radford brochure and attempt to send you a copy. Thank you for sending the original specifications the invoice for the extras would have been eye watering as you will see in due course. ATB Martin | |||
John Rowney Experienced User Username: johnrowney Post Number: 159 Registered: 02-2015 |
Jason I am intrigued by your cover of the book " Original Rolls-Royce & Bentley 1946-65" I have a copy of the book, but it has a completely different cover. Does anyone know what the difference is between these versions/editions? 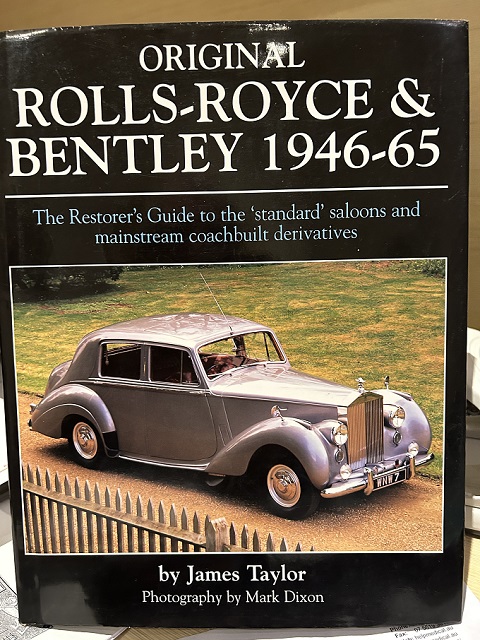 | |||
Jason Watson Experienced User Username: crikeydawn Post Number: 62 Registered: 07-2023 |
John, I believe it's the latest version printed in 2008 superseding the previous. The red open top edition was 1999. I imagine the cover is is perhaps the biggest change. As usual prices vary from sensible to stupid, I have one one the way. $60 AU brand new delivered. | |||
ChristopherCarnley Unregistered guest Posted From: 13.42.104.45 |
Jason, It is the book, and a very well researched one, even if it resembles a "coffee table" type, a snip at around �30. If you consult page A 13 of the Workshop Manual, you will see what the threads are. All the R-R & B cars, up to May 1955 used BSF threads, with only BSW in rare exceptions. After 1955, they are all apart from the 2BA, UNF, the SAE unified fine, identified as A.F. across flats, not "American Fine", even if they are. The BSF ones are identified by the bolt diameter. A bit confusing, e.g. the S1 3/8" diameter con rod bolts, have a 9/16" A.F. nut. The diff, pinion drive flange nut is 1 1/2 inch AF. The diff has large castellated "nuts", left hand threads. Don,t waste time on the cosmetic welding, the base is used for jacking up. Apart from bearings and oil seals and a very expensive gear set, there are no spare parts. Other than the crown wheel side bearing, the bearings are rare specials,the double roller pinion nose bearing retails at nearly �500, at the big shops, the correct hide oil seals are nearly �100. The exploded diagrams in the latest parts list are very good for identifying the parts and where they fit. but the job is not a "monkey see, monkey do", job. I rebuilt a slightly damaged S1 Continental differential for Padgett Motors last week so I will send pictures via David. C. (Message approved by david_gore) | |||
ChristopherCarnley Unregistered guest Posted From: 13.42.104.45 |
Just the dust cover photo John. (Message approved by david_gore) | |||
Jason Watson Experienced User Username: crikeydawn Post Number: 63 Registered: 07-2023 |
Thanks Christopher, I have a steep learning curb and have done a lot of reading but managed to miss the bolt and nut spec. I have discovered however the show is AF as your suggested, and managed to pick up a few already. Facebook "marketplace" is at least good for something even if the social media side isn't. As much as I'd like to go out and drop $1000 on tools I figured a good set of middle upper reputable branded second hand should work fine on nuts and bolts if they are in good nick. The whits are back on the market. The good news is the crown and pinion can be lapped, so that is going to save a few bob. The average news is the pinion nose has some brinelling. So waiting to see if a more suitably priced and readily available bearing can be fitted to a sleeve. I�m hopeful the two Timkin carrier bearings can be sourced. I have found them but need to check a letter ranking as there is $500 each in difference. I�m also waiting to see if the upper and lower pinion bearings can be alternatively sourced. It�s weird the numbers on these bearing turn up nothing, similar the the replacements from the big retailers, it�s like a conspiracy for RR and B parts with prices that should see them doing something far more important than what they are. We are talking 150HP here through an open diff, not 700+. I have a price for a second hand diff centre as a yard stick for pricing. Of course that would need disassembling for investigation but good to know its there. I guess for what its worth there is some comfort 2/3 of these cars are no longer on the road. But it�s also not surprising owners don��t keep the car pristine with the price of parts. Is there an alternative to the hide oil seal? $100+ is a bit out there, would think $25 more appropriate. I know Land Rover specked this felt thing that leaked not long after new. Someone worked out a Corteco twin lipped convention seal did the job and the diff never leaked again. Not 100% original but seems somethings are worth improving, especially if it stops oil from contaminating the brake. | |||
Jason Watson Experienced User Username: crikeydawn Post Number: 64 Registered: 07-2023 |
Hi all, has the board got a view should a diff be gloss or semi gloss. It OE looks semi but i have seen images of gloss also. I imagine all black was the order in 1957. Bit of an update on bearings and oil seals, it's looking good to save a few dollars on alternatives. When I get my ducks in line I'll report. On the felt seal in the pinion nose cover. Just behind where the prop shaft bolts on to the diff. Does anyone have reports on that leaking? | |||
NormanGeeson Unregistered guest Posted From: 81.99.74.184 |
Jason I have literally rebuilt some hundreds of these rear axles, all with 5 year guarantees and I know them quite well. You might call the following just an opinion, but it is one that could save you thousands of dollars. I suspect from your images (with failing eye sight) that the rear axle differential you have is one produced between about January and September 1955. In short one very quickly scraped and not even rebuilt in service by R-R or offered in spares. If this axle history follows past pattern, it has been dumped in exchange for the original axle that now resides in another car. Even if you could locate the correct parts in your parts bin, they are unlikely to be of any use. Now is not the time to be thinking of shades of paint or ordering bearings which will be of little use. Could you show some closer images of both sides of the axle main side plates, the main axle case, and the small end of the hypoid pinion please? (Message approved by david_gore) | |||
ChristopherCarnley Unregistered guest Posted From: 18.130.239.92 |
Jason, That question is answered quite easily. The reinforced half shafts were introduced a little earlier in the chassis series. If there are 17 splines on your half shafts. they are current with your car. The felt seal is oversize for the groove, IT MUST NOT BE CUT, but all of it has to be stuffed in with a narrow blunt tool and bit of oil. Then the drive flange can be eased through. There is a scheme for machining and fitting a lip seal, for the impatient. The felt seals will leak when they break up. If you log onto ebay (.co.uk) and type in, NTN 43138x x 43312, it takes you to a site run by "chaga" in Hayling Island. These are the pinion bearings at a fraction of the cost. I have been buying from this guy for more than 12 years, I could not turn out an economical rebuild without them. "�2500.00 for a set of new bearings, you must be joking"! (Message approved by david_gore) | |||
Jason Watson Experienced User Username: crikeydawn Post Number: 67 Registered: 07-2023 |
Thanks Christopher, The pinion bearings are proving difficult. I have to say there appears to be a fair bit of RR and B tax on these cars. Given it's potential concourse vale and its age and rarity, it's still only worth pare of less than many cars on the road as daily drivers. I look at parts supplied by the larger warehouses and I get there is an ease to them, and their holding costs, manufacturing costs and so on. But I may as well part this thing out and double my money rather than restore it as it would head well over 200k if I maintained the previous standard or any decent standard of restoration. Around $200 AU for a rubber bump stop landed is just absurd. $45 from a local and a bit of reshaping and I'd bet few would ever know. $1000 for a pinion nose bearing, I found one for $100. I pay $1000 for a truck bearing but I'm confident no Bentley is ever going to do 1 million km loaded at GVM. Maybe I'm not suited or wealthy enough for a Bentley, the resto houses sure make it difficult for anyone who's not a cheque book owner/restorer. It's easy to see why the attrition rate of these cars is what it is. I feel they have there part in just as many going under as surviving. Anyway enough whinging nothing is going to change. Thanks for the UK link, much appreciated. As for the felt seal, I'm considering machining a seat on the pinion cover to fit a long lasting double lipped plastic seal or sorts. Sounds like I need the right diff though, I have 14 spline. | |||
Jason Watson Experienced User Username: crikeydawn Post Number: 68 Registered: 07-2023 |
Norman, onto it. I'll get some pics today. Bit sad if a 60,000 mile car has had a diff replacement. I have heard of a few shenanigans around this car and the time of being drowned and sold. It is what it is though. | |||
Jason Watson Experienced User Username: crikeydawn Post Number: 69 Registered: 07-2023 |
I forgot about a memory stick that came with the car. I'll get some more but this is how it stood on the day.   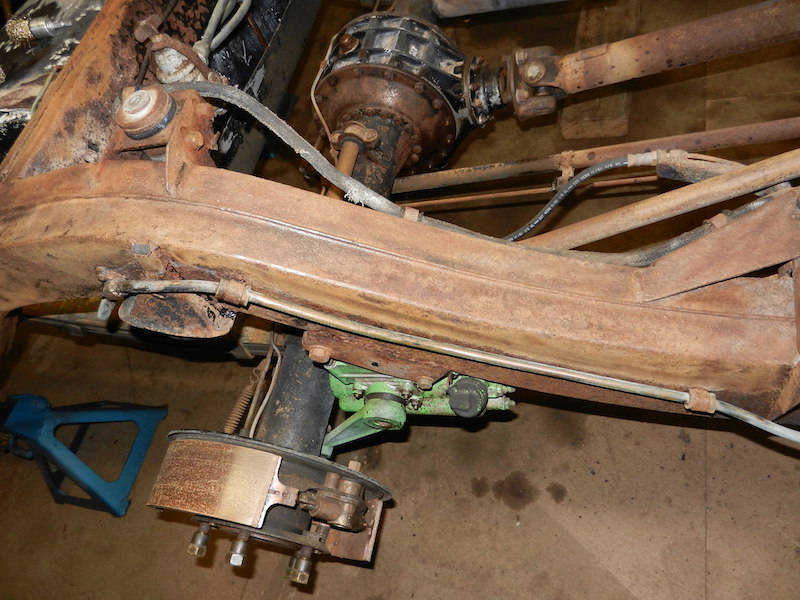 . | |||
Jason Watson Experienced User Username: crikeydawn Post Number: 70 Registered: 07-2023 |
Well the good wife is less than amused reminding me of a few told you sos, plus a few colourful adjectives for B269EK. Got a build sheet on the way. Turns out however the diff was replaced 1991, what for has been lost in time. So what is it that makes a 14 spline good for scape? These what you chasing Norman 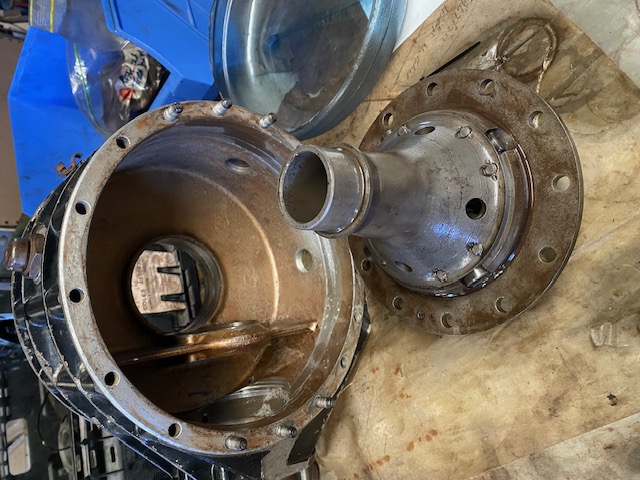 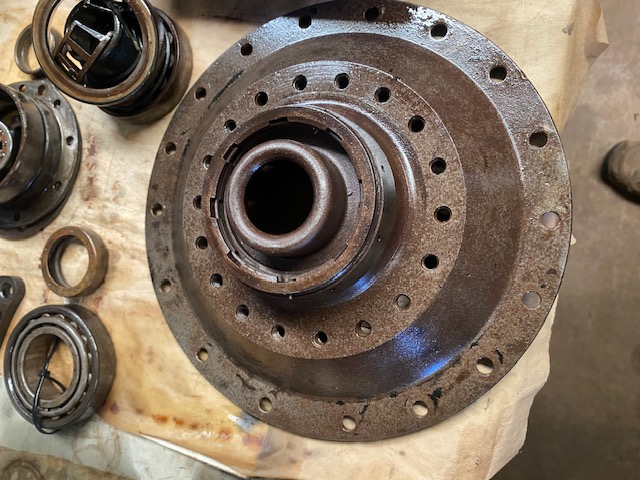 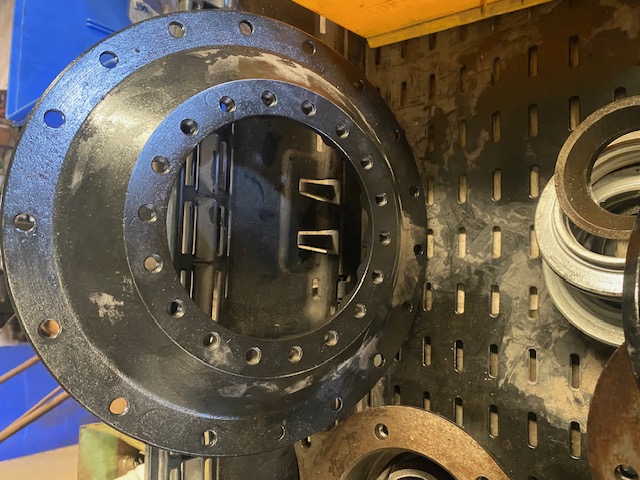    . | |||
Jason Watson Experienced User Username: crikeydawn Post Number: 71 Registered: 07-2023 |
Thought pls It was asked today if the chassis had had water in it. Its been mentioned RR filled the chassis with compressed air before further progress so the answer should be no. Pics however of the chassis before wire wheel and and then restoration have it looking like something your'd expect from England. Think there is any merit in drilling a small hole and pumping oil into the chassis? It's currently on a rotary so can bake it slowly while elevating ends for required purpose. | |||
Jason Watson Experienced User Username: crikeydawn Post Number: 72 Registered: 07-2023 |
The ol second hand collection of AF tools is slowly growing. $175 delivered, pretty happy with that. Wish getting my head around imperial sizing was as easy.  | |||
Jason Watson Experienced User Username: crikeydawn Post Number: 73 Registered: 07-2023 |
Interesting day. I have been told the diff housing is correct for the car so that is pleasing. Why a 14 spline was put in 1991 is a bit of mystery. One possibility is the oil channels in the gearing get clogged and starve various surfaces from lubrication. I presume from lack of servicing. I did whiteness a gear set where this had happened and there is no recovery from it. I wondered if the felt seal let the show down if the car was parked on a good nose down angle but appears not. As too if the side gear/axil seals leaked would that cause issue but not really. Sooo it appears S1 14 spline axels break, 17 spline strip pinion gears (but not sure if that's more a manual thing), and S2-3 17 spline are the go as they are built for V8s. The down side to S2-3 gearing is a little higher so it makes a S1 a bit dozy on taking off, and puts the speedo out. But alas one can purchase a little gearbox that goes on the back of speedo to address this. The crown and pinion I have is recoverable but anyones guess if it will be as quiet as one would hope. That issue can be rectified with products that resemble something like a diff syrup to shut it up. I'm not so sure on that however and it sounds like 14 spine is not great anyway. If anyone has comment would love to hear. | |||
NormanGeeson Unregistered guest Posted From: 81.99.74.184 |
Jason Now you have your images posted compare them with the side plates shown in www.creweclassicsix.co.uk under the heading �Axle Identification�. This identification shows three different side plates (five types are in general circulation), you only need to consider type �C� and of course the opposite side plate and most important the main case that must match these plates. This type �C� was used in two versions, the ones you need have identical bearings at both left and right-side plates and match the type �C� bolt pattern. These match the 14 spline half shafts that were originally fitted ex-works to your car. You also need to check that the main axle tubes have 24 set screw holes on the inner flanges. The 17 spline half shafts were introduced at chassis B 590 FA ,your car is B269 EK, the former a 1958 car, yours a 1957. I would like to know how ORIGINALLY parts introduced on 1958 cars are suggested to have appeared on a 1957 car! Your car has/ had 14 spline shafts as it should. For the record, the left hand late �C� type plate with a LARGER bearing than the opposite right side plate, is used with a 17 spline axle, whilst right and left hand �C� type plates with identical bearings are for 14 spline axles. We are told that the diff housing is correct for the car. Well�.. just make sure the outer bolt ring is 25 bolts and work out how you are going to cope with the spinning of the small pinion bearing in the case and slack in the main pinion housing. You will not be able to work out the bearings you need until you have fully stripped and measured the axle. On this job you do not need any coffee table books, but access to a Workshop Manual, certainly the latest one and if you can, an early 1955/6 version, together with the respective parts manuals. A telephone is mandatory. Beware of being mislead with descriptions and part numbers. Between the manuals a part may appear to be changed once but in fact in the flesh may have changed through five or six numbers quite confusing. A good example is the 14 spline shaft that showed one change but had at least six versions, modified mostly at the inner end. Fitting a S2/S3 complete axle,( because you need the half shafts and axle tubes) is a good swap but it will still need rebuilding. In respect of the prop pinion seal��� machine out the housing from the INSIDE to accept a modern seal. Only machine until the cutter enters the original seal void leaving the front of the housing as original. This modification requires the drive flange to be cleaned up where the seal runs and it is important to machine the face of the flange itself so it runs and couples squarely. The coupling flange recess to propellor shaft was 0.088 inch deep but can be cleaned up at 0.100 inch. This modification can accept a fully oiled axle standing on the flange for 24 hours without leaking, providing the drive key slots are sealed�.try that test on a felt seal! The points I have made are only the minor highlights, these axles need some thought. When I was in the axle business I solved all the bearing problems and at least a third of my business was rebuilding axles with low mileages, previously rebuilt by specialists, who comb forums offering low grade advice. A few of them have lapped gears from spiral bevel axles but few, if any, have mastered hypoid gears running in open alloy main cases�.moral be careful who you deal with, and from who you take advice, unfortunately I detect you could do much better. (Message approved by david_gore) | |||
Jason Watson Experienced User Username: crikeydawn Post Number: 74 Registered: 07-2023 |
Thank you Norman, you are a living legend you know. I enjoy your articles. Yes I once had a girlfriend and we mucked around with a Mercedes. Accurate advice can be hard to find amongst the ones who know, think they do, or just want your money. I guess that experience has some part to why I have had nothing to do with old cars for 25 years. To be honest it was your suggestion the 14 spline was poor, I wrongfully surmised 17 was better. And with the car being mid run of the model and possessing twin server brakes it probably had 17 spline. The parts warehouses also suggest 14 as early and 17 as late with their listings, I am somewhere in the middle. And the workshop that put the replacement centre confirmed it was the wrong centre but could not recall why, again I also surmised it was possibly 17 and perhaps an old 14 was cheaper, easier, and possibly laying around. Maybe I just wanted it to be 17, more fool me and lesson learnt. So I do apologies to you Norman as 14 is correct. A visit to the workshop the other other day suggested the casing was correct for that year car from a publication out the back somewhere, and using UG827 found on the casing. I have no idea if that�s right, but looks to me possibly correct but still technically wrong. As I have A plate for 14 spline instead of a B or preferred C plate if the axels are 14 spline and I read your post correct. The diff came in 100 pieces and have found replacement bearings for it for around 1/3 the price of the warehouses. Though my wheel bearings are not as big as yours. The bearing shop had a different view on technology, purpose, and size given there is no oil seal required anymore. It does however require a spacer. As does the pinion nose bearing due to the diff lapping shop and my engineering FIL having no issues with a spacer for a slightly smaller bearing. Furthermore a sleeve on the pinion nose is a common thing to correct the brinelling. Around $1600 all up in parts and prep. The diff lapping shop comes as virtually everyones recommendation from those contacted and has been a few. He has the proper machine to lap the crown and pinion just I can�t recall its name. The bad news is it looks like he is closing due to health reasons. I guess if there is an upside anywhere here the crown and pinion appears to have worked fine from 1991 to 2011 in this car before being dismantled. I know it�s all ugly but I also don�t have 13K to drop on a new diff, then 6K on axels. Happy for others but I don�t. I am also not after concourse or care about gossip in car circles. I just want to be part of reliable nicely restored ride I can enjoy and hope the family keep it well after I�m gone doing the same. Harold Radford it may be, but you get different opinions on that also. I can buy a whole S1 complete axel (waiting on spline count) which if 14 sounds correct though 17 were fitted later you say and possibly better. Or an S2 axel (sounds best) both here in Australia, and sadly another 2 down. 4 and 5K respectively plus freight. As for C plate that maybe beyond the wish list. I agree yes as suggested it will need rebuilding, however there is a part of me that says if it doesn�t have concerning backlash, and a torch is shone down the casing to check the pinion and crown, then perhaps all it needs is oil seals. Or even then why not fill it with oil and give it a run. If it noisy then rebuild it, if not then you got your moneys worth. Hopefully it won�t leak but it is English. I have been looking into replacing the leather axel seals with modern plastic. Someone put it to me they cut the axel steel. I find that hard to believe but I have not dismissed it either. Would you care to share an opinion. I do have a workshop manual, 2 OE actually, and a OE parts catalogue for S-type E series and onward. Magic bit of kit which will become invaluable the more I get my head around this. I�m sorry if I frustrate the daylights out of observers, but I want to be a skinned knuckle owner who knows his car pretty much from bumper to bumper. As mentioned before I don't have the money to blindly chuck at this car though I accept if some think so. I am aware if it stops when done and I fail to proceed, the wife will want to burn it there and then with all the time and money it will have taken. I pay her that. I can't deny it will cost a holiday to Europe for the family or perhaps 2. I do thank you Norman, and appreciate any and all input. As do others. | |||
ChristopherCarnley Unregistered guest Posted From: 18.169.163.253 |
Jason, From the pictures that you sent, you can be certain that the gears are scrap, the corrosion has gone through the case hardening. If you consult the Parts List, you will se that there is an intermediate type between the 14 and 17 splines. I have sent you a message with a possible solution. (Message approved by david_gore) | |||
Jason Watson Experienced User Username: crikeydawn Post Number: 75 Registered: 07-2023 |
Chris, I appreciate your help and I had a laugh with the email, but I�m going to differ. I am fortunate enough to have around 230 years of combined RR and B skinned knuckled experience from fellow enthusiasts to bounce off. Plus a bit of tooling and machinery. Their is a consensus even though the crown and pinion ain�t pretty, there is no harm in cleaning it up, re-bearing the diff and let it fly. I also cleaned up the pinion and crown after the pics I sent you before showing it to the diff lapping guy. He said the case hardening was still there, and echoed what the other said about giving it a go. I accept ones own work is different to a workshop�s reputation and warranty. I have free labour and time so have little to loose. I can always revisit the diff once its on the road if not satisfactory. Reading my parts manual I have consecutive pages in the J section from 1 to 11, I hope its all there. I have an early, mid and late axel and can see 3 different pat numbers, but can�t�t make any difference to spline count with the mid and late no longer available as parts. It does appear as Norman suggests from FA590 is late so would think where 17 spline fits in. However for diff housings I only have one that covers early to mid, and a second late one from FA590 onward. With only the referencing to any difference in bearings on the latter, and to one side only. The crown and pinion appears the same for all diffs and there is no mention of side cover plates or number of holes. So I guess you blokes have privy to better info. I�m am grateful for the help you blokes have offered up as it has sure help me understand a bit. Just don't think I�m your guy, as previously mentioned I just don�t have 9K+ to tip into a diff. Be nice but not today. | |||
Jason Watson Experienced User Username: crikeydawn Post Number: 77 Registered: 07-2023 |
Bit chuffed with find. $150  | |||
Jason Watson Experienced User Username: crikeydawn Post Number: 85 Registered: 07-2023 |
So possessing a desire for this S not to drip oil, and following on from Normans pinion nose seal modification�. http://https://kda132.com/wp-content/uploads/2018/04/Pinion-Oil-Seal.pdf I decided to give the diff seals a crack. Made all the easier as the race for the old leather seals was looking every bit of 66 years old. Some alternative rubber seals were sourced that matched the the OD of the originals and close enough for the width. The ID was 1 1/4 inch so that gave plenty of fat to come off the axles. And the best part is they were only $8 each. 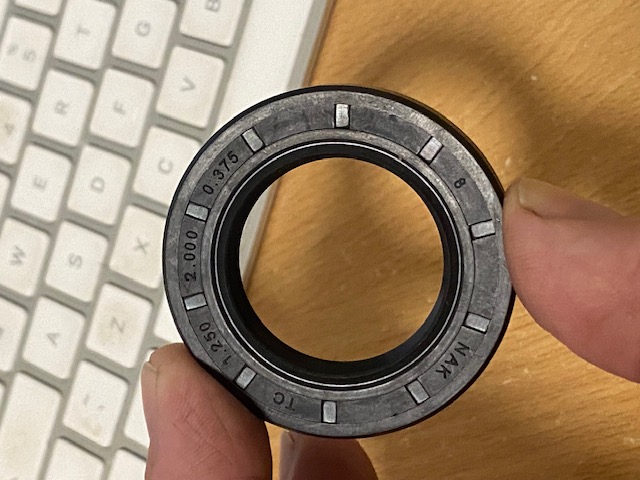 So the Fil pulls out some grinding wheel (sorry can't recall the proper name) that fits onto the lathe, and off we go.  Trouble was it didn't go that well. No matter how we tried we could not get a finish smooth enough suitable for a seal. So off to the engineering shop the axels go. $170 later there finished with a comment about being as hard as the hobs of hell and why we failed.  The same shop put a sleeve on the pinion for $150, which is a get out of jail card. The pinion and crown are not the greatest, and given all options start at $5000 its worth giving the OE a run. Next job is to make a few tools to set up the diff, which will come in handy if the P&C don't work out.  . | |||
Jason Watson Experienced User Username: crikeydawn Post Number: 90 Registered: 07-2023 |
Good day today, as it was almost as big as bringing home B269EK. Today I learnt the basics around a lathe and milling machine. Cleaned up the bottom of the diff to look like new, and machined down the drive flange to accomodate the twin lipped oil seal. Had a fail however on the pinion noise housing where that twin lipped seal resides to replace the old felt one, but more on that later. Probably not the smartest idea to learn on such a piece.   | |||
ChristopherCarnley Unregistered guest Posted From: 18.130.245.70 |
Jason, Hard chroming and polish grinding of the pinion nose would have been a better option. What is left is too thin and may break off in reaction with the crown wheel. The pinion bearing housing is rather narrow, and flexes in the alloy casing. (Message approved by david_gore) | |||
Jason Watson Experienced User Username: crikeydawn Post Number: 93 Registered: 07-2023 |
Yes all a learning experience Christopher. Time will tell and its hard to say as one gets many points of view. II understand and get your fix however. I guess it may implode, but I'm in two minds. One is the original diff which has already lasted 66 years rebuilt for under $1500 instead of just handing over 15k. Yes it may groan .....or it may not. What appeals however, is I did it and have a sense of accomplishment. The other is if it ever does explode, snap axels, shred the pinion or whatever else these 14 spline diffs do I'll track down a late 17 spline and start again. I presume 14 splines were in Mark Vl, R types and Dawns. I'm new to all this but all the homework I did on a Dawn before this Bentley came along, I found no comments on diffs failing. I'm sure they have, but the one I have seen in the flesh was stuffed from complete and utter neglect. Perhaps still running original Crewe oil, what little oil there was left had turned to mud. I'm feeling an auto is softer on a diff than a manual also. No nasty roll backs while heavey on the gas and clutch. Time will tell. | |||
Jason Watson Experienced User Username: crikeydawn Post Number: 97 Registered: 07-2023 |
The FIL had had the same thoughts as Christopher that the pinion nose housing would end up rather thin. And though it's possible to machine it from the rear, it then made the oil thrower redundant. It's been designed to fit pretty snuggly in the housing and must have a purpose to be in there besides a spacer. 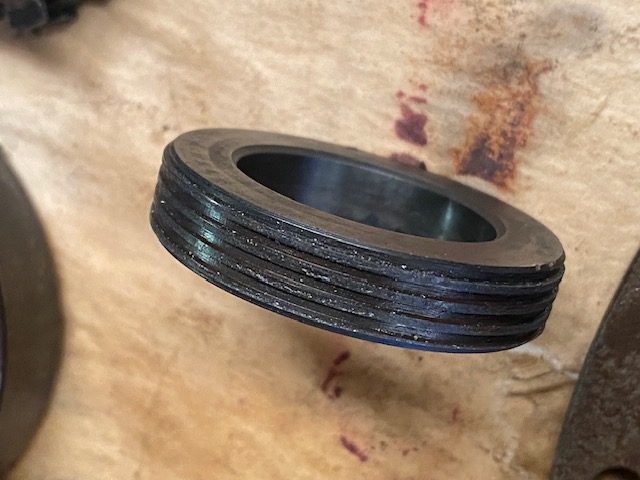  So a decision was made to fit the new seal from the front. To my mind, though the OE roll of the casting would be gone, its a detail only the most conscious would note especially as the pinion flange sits so close to the housing. Now the spec was 60mm OD diameter to what I presumed would marry the diameter of the old felt seal. Well I came in a bit hot and cooked it so I had to have my enthusiasm welded up. But in doing so I also discovered the felt seat is 62.5mm diameter. A 60mm seal was never going to be happy. I enquired if a 62.5 seal was available with the required ID, but the next size was 65. What I did discover though was a twin lipped spring seal 60mmm OD that is 8mm thick over 5mm. This gave me more seat and better spec and still only $5.  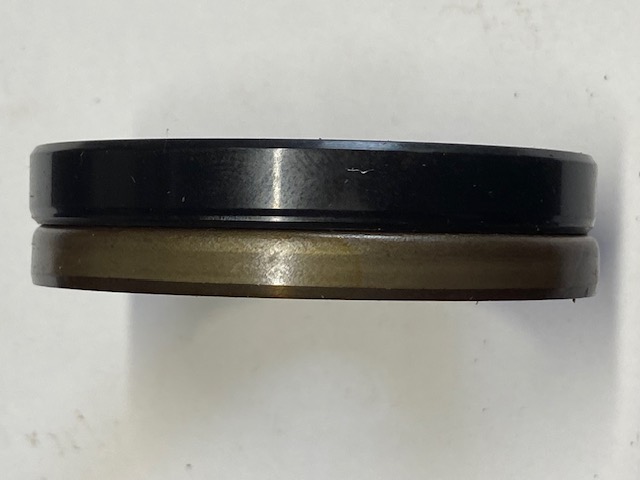 So attempt 2 on the lathe produced a better result. I have all my bearings ready to go. Onto the tools next.  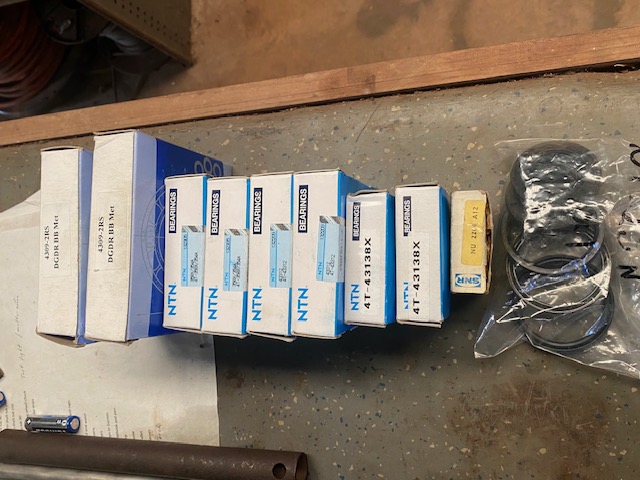 Can anyone tell me RR produced under bodies that look like this, scroll to 7.50. I tend to think the diffs were assembled and painted. I have heard the chassis were no master pieces. Is this how they were or more a concourse resto thing? https://www.youtube.com/watch?v=_TLYJaX1q90 . | |||
ChristopherCarnley Unregistered guest Posted From: 13.42.48.107 |
It is an old, old video. Over the winter of 2010/11, I gave Ralph,(In Louisiana) an email course in rebuilding an S1 Continental Park Ward dhc.diff with a 13/40 (hybrid) in place 0f the 13/38. He, an ex R-R apprentice, had no idea that all the gen was in the W.M. He sent me lots of pictures of the tools that he made for the job, and he was delighted with it. He confessed that all the diffs that he rebuilt whined badly and they were replaced by other second hand units. He said that he had no idea what the purpose of the depthing and setting washers were! A really good example of a "monkey see, monkey do" job. Be careful of what you read. I will try to find his pictures in the "archive". (Message approved by david_gore) | |||
Jason Watson Experienced User Username: crikeydawn Post Number: 105 Registered: 07-2023 |
Found this little gem the other day. One of the options Harold Radford offered was a rotating light called Rotaflare. Originally it turns via a cable that mounts to a white knob one turns manually on the dash. It's beam can also be adjusted from a flood to a spot I understand. The plan rather than clutter the dash with a white knob when the others are black, is to connect it to the steering so it correlates with it, and adjust it to a 55w flood so it lights up corners as the car turns. 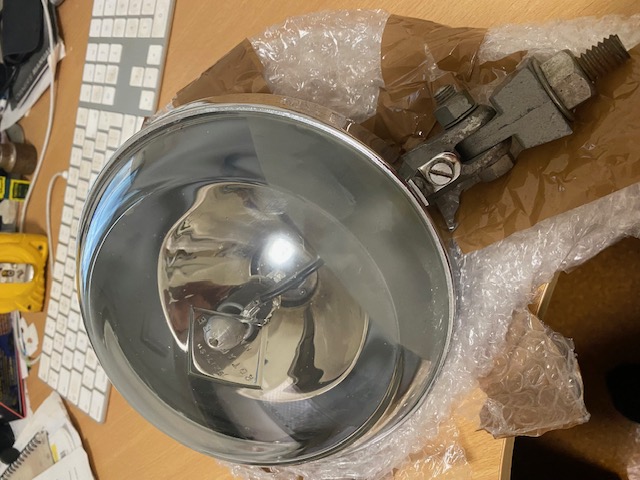  The car will probably work to pay for itself just as much as keep it active. However where I live there are no while lines in the side of the road, no street lights, and no ambient lighting also. Its dark as dark. So I started down a path of possibly swapping the original head light lenses to some Michal 435 lenses for better spread. My Lucus PL's need re-silvering so they are all coming apart anyway. Think however after finding the Rotaflare I'll stick with the original PL's. Besides being original, think most like a few bars in the lights, I sure do.  | |||
Mark Aldridge Frequent User Username: mark_aldridge Post Number: 859 Registered: 10-2008 |
Jason, I use my 1956 S1 for a lot of night driving and put the original Bentley lights in the store and fitted Cibie halogen units with upgraded bulbs. Now at 70mph I can see where I am going. | |||
Jason Watson Experienced User Username: crikeydawn Post Number: 106 Registered: 07-2023 |
70MPH wow, and good to know Mark, thanks. I suspect the originals a bit like candles. In the upgrading of the PL's I am fitting H4 55/60w bulbs and some little 3w park lights. I'd like to fit 55/100 but think there is a bit more fiddling there than I could be bothered with. I suspect an alternator will be replacing the generator somewhere in there. | |||
Mark Aldridge Frequent User Username: mark_aldridge Post Number: 860 Registered: 10-2008 |
I fitted a Lucas ACR alternator in place of the dynamo. Again dynamo is in the store if a future owner wishes to refit it. | |||
Jeff Martin Frequent User Username: jeff_r_1 Post Number: 590 Registered: 07-2018 |
Do you thinks that's fast at 70 mph Jason ? I would not trust some old fatigued RR pistons, but new custom pistons, yes. An R-Type engine let go at 80mph as the owner routinely drove it at that speed. One of the pistons failed, and the connecting rod went through the side of the block. | |||
Martin Webster Experienced User Username: martin_webster Post Number: 53 Registered: 09-2018 |
It depends on the axle ratio as well of course.. A standard 11:41 Mk VI or early R type cruising at 80 mph will be turning at approximately 3550rpm but with a 12:41 axle 80 is a very comfortable 3250 revs with a correspondingly lower piston speed. | |||
Jason Watson Experienced User Username: crikeydawn Post Number: 107 Registered: 07-2023 |
Haha I have shinny new pistons, rings, and bearings....and a rebore. Not so sure the rebore is such great thing in a 4.9 however. I guess 70mph or 110kmh is fast enough. They don't look like they are built for speed, and the revenue raisers are out there in ever increasing numbers doing their utmost to keep us all safe with a road toll that doesn't change. I have found driving trucks if you sit 5 or so under the limit than the traffic is alway leaving your behind. You are not catching nor too much of a menace. I imagine I'll be doing the same on highways. I have heard however the biggest issue is other cars coasting and wandering beside you having a gawk. As for the alternator, I have seen ones that look like old regulators. I'd like to go that path if possible. | |||
Mark Aldridge Frequent User Username: mark_aldridge Post Number: 861 Registered: 10-2008 |
I considered the alternator in a dynamo casing route,but opted for the ACR as these are easily available in the UK and fitted to 6 other cars of mine and my son's. I keep a couple of spares in stock. With regard to running high speeds on any old engine it is a lottery unless the crank, rods, pistons cam drive and bearings and every other part is new.I used to compete an Austin7 with the original crank and rods, original pistons with the skirts machined off, a lightened flywheel and rev to 5000plus! Never did understand why it did not fly apart ! but it lasted 8 seasons until the white metaling on the big ends crazed using castrol R. | |||
Jeff Martin Frequent User Username: jeff_r_1 Post Number: 591 Registered: 07-2018 |
Jason, we have a big highway, almost a free-way, that pretty much runs the better part of Vancouver Island where the speed limit is 120 KPH, and the cops will still leave you alone even doing 10 over. And about the old generator, it was designed to handle a tube radio, surely it could handle some better head-lights. Don't turn on the radio on at night though. | |||
Jason Watson Experienced User Username: crikeydawn Post Number: 108 Registered: 07-2023 |
yeh can't see 120 ever being allowed here. They tried for 0 tolerance but didn't go well, though still do for Easter, Xmas, school holidays. 3kph over is enough for them to get excited. Really anything over or under 10 should be a bookable offence, the rest is BS and does them no favours. Where I live all these people meander along doing 10-15 under here with no where to overtake, drives me nuts and many others apparently from the suicide overtaking manoeuvres often seen. No doubt the old school look in a modern alternator will cost many times what a standard does, I only have the one car so see how we go. The idea was born from fitting electric air con over the traditional engine powered version. The price of a clapped out second hand RR-B air con dwarfs a brand new electric. And its probably easier and more economical to draw on the electrical system over the motor, especially if a new harness is fitted. I have already bought a 60s HVM radio with fuses and inbuilt amp, opposed to valves and whatever. I am on the hunt for a 200X which was ordered with the car but is no longer. Not surprising really. The plan is to swap buttons, knobs, face plates over while keeping that classic AM sound. I'll use the phone with a mobile blue tooth speaker to pump the tunes when the wife isn't around. Its a bot like looking for tools, I image will take many years. | |||
Jason Watson Experienced User Username: crikeydawn Post Number: 109 Registered: 07-2023 |
Bought a Royce air compressor oddly enough the other day. 3 phase, 1000lpm delivery, fine bit of engineering with intercoolers, after coolers and stumpy space saving 260lt storage tank. Decided to go down a cadmium plating path so need the compressor for the sand blaster, and more bench space etc for an electroplating set up. Bit rough though when you can buy cheaper of FB marketplace than the auctions, and even buy the same brand sandblaster new on sale off the net locally cheaper than the new one at the auctions. Still its all good fun and interesting to watch. I did secure a steel topped steel framed bench with a back board sporting full set of ring spanners, sockets, air guns, breaker bars, ratchets and so on. What was not so fun was learning the auction was for the diff lapping shop I touched base with only a month or so ago. Shops been there for 45 years and I recall it as a kid, even had a diff or two set up there over the years. The guy is closing because he can't get staff, or a buyer, and has failing shoulders from his 35 years ownership and before hoists where common. The real sad thing is he has the only Gleason machine in the country. Others advertise they do lapping but they send the work to him from around the country. He said from around the world actually. I felt a bit numb and suggested if I was 20 years younger I'd buy this and focus on classic cars alone if you could say around for 6 months. He said we'd have a deal then and doubts I'd be looking back. I doubt whether he even got 60K for his life's work from the auction. I found a similar story with cam grinding. There are two in the country, one is the good oil but heading down the very same path as the diff lapping shop. He told me ontop of his work load the competition provides so much work for him he has a 4 to 5 month wait nowadays, but it's all being let go. Again if I was 30 I reckon it too would be great opportunity. So it's looking like new will be the only option moving forward. From where who knows but think Australia takes another hit in being self reliant, let alone skill less. Perhaps the person who bought the gleason machine will re appear. I would think however these stories repeat themselves everywhere through out the skills bank. | |||
Mark Aldridge Frequent User Username: mark_aldridge Post Number: 863 Registered: 10-2008 |
Same problem in the UK, many of the skilled engineers and classic car experts are now approaching or past retirement age. | |||
Jason Watson Experienced User Username: crikeydawn Post Number: 110 Registered: 07-2023 |
Yes, I ponder all the skills that have slipped away around sword making for instance, or horse and coach perhaps, steam; old cars may be just another in part making way for electric or what's next. Guess there will always be interest in old things to some part, but whether there is enough to keep skills is another question. Young males appear to be interested in little beside gaming, or easy money putting something meaningless on the net (not my post of corse). But if they could join the dots between the internet and skills, freight will do the rest as there is plenty of money around. Sadly the ones without the money, often with the skills, will slip away alongside warning interest. Guess in some ways my clumsy build thread is my contribution to encourage others who have little in the bag to have a go. And one with skills to come forward. Clubs are good but sometimes not close or 24/7, the internet can be. Most people want to share their wins or knowledge I have found. . | |||
Jason Watson Experienced User Username: crikeydawn Post Number: 111 Registered: 07-2023 |
Anyway back to the good stuff. I needed more bench space to set up this Cadmium dip. So my trusty timber bench got superseded with this beauty. Weld up a few holes in the top, clean and paint and its solid as a rock ready to work again. Trouble is I now have tools galore, furthermore they are worth little to sell. So thinking a bench set and a workshop floor set. I recall as a teenager always needing "that" spanner left under the car or up at the bench, but it was never where you were. You watch it still won't. I'll put a lower shelf on as it also came with a hand full of 1" drive sockets and breaker bar. I have some power tools and what nots that need a home also. But not bad for $330 I reckon.  And hows this for a nice bit of kit. V-twin, two bearing cam, 4 piston motor with bearings, intercoolers and after cooler, safety pressure valves every where it counts. Just run in being 2003 vintage with no oil or air leaks. Has to be one the better looking compressors if not a well thought out one. Royce brand, bit quirky. But can easily supply 6-700LPM to run the sandblaster at 100psi. I'll give it a paint and service while waiting for the blasting cabinet to show. 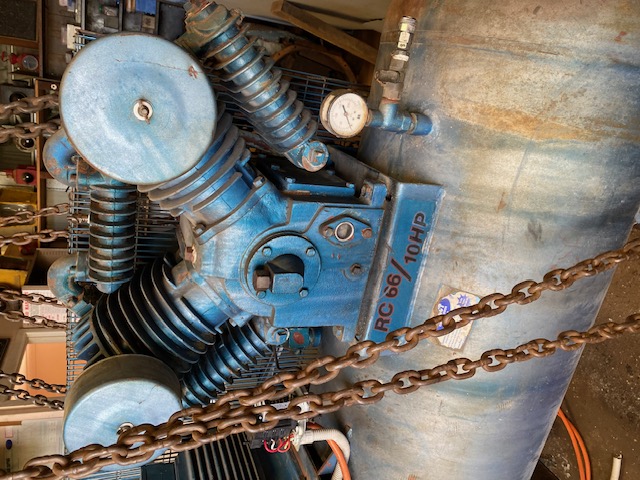 | |||
Jeff Martin Frequent User Username: jeff_r_1 Post Number: 594 Registered: 07-2018 |
That compressor is huge, was it meant for a military base Jason ? | |||
Jason Watson Experienced User Username: crikeydawn Post Number: 112 Registered: 07-2023 |
Yes have to admit when I saw it I thought ooo its big. Sort of came about reading a few forums on various types of blasting, there was more than one talking about making the mistake of thinking a single phase compressor will get the job done. I know from spray painting its most annoying when the compressor runs out of puff. So at $550 it was a no brainer. I tried for one in the diff lapping shop which was 300lt storage but not as flash. Glad that didn't happen actually as the tank was also narrower and longer, they take up enough space as it is. We started it up yesterday, and the father in law produced a loco whistle that has not blown in 60 years. Well this ol compressor put a big smile on an old boys face as it blew it with ease. Just about sent me deaf though. | |||
Jeff Martin Frequent User Username: jeff_r_1 Post Number: 595 Registered: 07-2018 |
If you need more air, you can always get an "up-right" tank that can go as high as your ceiling. It sounds as though you have enough capacity. | |||
Jason Watson Experienced User Username: crikeydawn Post Number: 123 Registered: 07-2023 |
Amongst xmas, holidays, tornados, floods, weeks without power and a whole lot more I finally got the lump compressor into position. Built the blast cabinet and now just working on 3 phase power to run the show.  In the mean time I bought my acids and neutralisers for the block and a little camera on a feed line that works very similar to a colonoscopy. Works well but creates huge files that even compressed are still huge, difficult to transfer and basically stuck in the phone, so not so great after all. I discovered looking down the water gallery all is not well even after the block had been cleaned at the engine rebuilders hot caustic bath. This greasy dirt was gathered at the end of the gallery for most part. I guess it gets compressed down there via water pressure, with the other derby making its way around the block. The first pile fell out when tapped on the bench, the second pile required teasing with wire from both ends. The intriguing part in the second pile there were 3 bits of crap that looked like concrete and as hard came out. The other intriguing part will be me learning how to braise up the first gallery hole to increased flow through the rest.   | |||
Jason Watson Experienced User Username: crikeydawn Post Number: 148 Registered: 07-2023 |
Been a while and its a bit of an eye opener how life gets in the way which is then used to mask procrastination because one has the restoration order of A, B, C in mind. Hopefully F, C, B, A, E has broken the seal and I get a move on. My refurbished shocks that came with the car have sat on the shelf now for perhaps 4 or 5 years. One had a slow leak which was annoying given the receipt put them at $500 each. Anyway after watching some you-tube it was time to address the issue. I suspected a fitters feel may be the cause of the leak, but had not proved this until after I purchased two new twin lipped sprung rubber seals to replace the 1957 rubber sleeve. New part SKF-12364. One shock had no oil at all, the other had brand new clear honey coloured. I removed the top cover and discovered the split pin had been inserted vertically opposed to horizontally. Kind of makes sense from a mechanical clearance application, however its quite difficult to remove and works the same horizontally. In the referb the old rubber sleeves had been replaced with this neoprene one. I was tempted to leave this as it appeared worth its salt.    To remove all of the oil I backed off the nuts and expanded the place where the leak was coming from. Back off is a bit of an understatement as the nuts were just past hand tight. So much for fitters feel. But really to get all the oil out I pulled the solenoid off. Then if you pump the connecting arm oil spits out, but take care as there is a square push rod, a round valve, and a small spring in there. Pump slowly and into a container. I also pulled the solenoid off to check its operation and replace the o ring.    According to the you tube I watched 99% of leaks come from the connecting arm seal and little O ring, so I left the rest as is. What is interring is this mechanic has put 90W oil in to slow the leaks. And what he achieved was a very stiff uncomfortable ride instead. It was suggested Automatic Transmission Fluid (ATF) be used, its around 20W. I put in Dextron 4 as its synthetic and has longer service life, and better shear point (viscosity) when hot. The honey coloured oil that came out was thicker than some 90w I had here so who knows what it is. Far too hard I feel as the connecting arms were very hard to move on the bench, well the one with oil anyway. With ATF in its a smooth movement with good resistance like you would expect a shock absorber to have. So one part done, another 999 to go.  . | |||
Jason Watson Experienced User Username: crikeydawn Post Number: 149 Registered: 07-2023 |
Well it was out with the old in with the new, and poly at that. It was put to me once poly snaps alloy shock absorbers off at the mounts. Amongst other things poly has the reputation of being too hard creating a stiff ride. Time will tell but through my process I discovered poly has 3 stiffness ratings, 30, 60, 90 with 30 the same as rubber. I also feel after discovering what 90w oil in shocks feel like, perhaps that could have something to do with any mounts snapping. 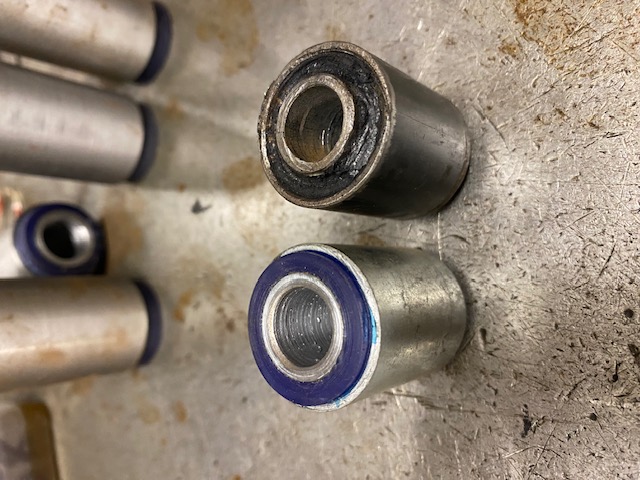 Went old school on the fitting as I don't have room for a press. Bit of fiddling to get the right socket depth but otherwise too easy.  After pricing up rubber, I approached a poly bush manufacture for numerous bits and possibilities. I was going to frankinstein my bushes from various sizes to make what I needed. That led to 3D printing and other possibilities. The quote came in 1/3 of rubber and they did all the work. I told them what its application was for and they decided on density. Large Z bar bush not pictured.  So this is the next bit of fun, putting these bad boys together. Well after making a spring compression tool. To my uneducated thinking, the leading bush will remain rubber. That is where the majority of jarring passes though from the road, and it's in good condition anyway. The smaller silentbloc bushes that do all the moving and address sideway forces are poly to deal with wear and tear better, but have the rubbers density. The spring slippers are now hard poly to slide better than the old rubber and resist waring better. Sway bar and Z bar bushings according to the manual have influence on ride stability not smoothness, their application deals with cornering, accelerating and braking stability. So a harder poly over rubber will only sharpen and tighten their performance. Well so I have told myself. I do plan to put the third parties heavier F and R sway bars on, but see how this goes first. 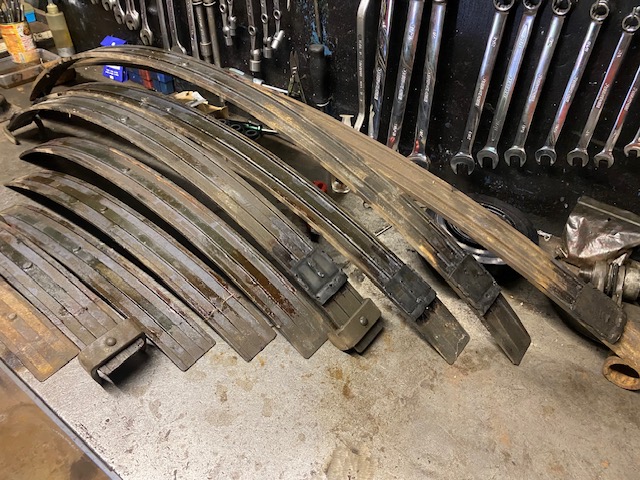 | |||
Jason Watson Experienced User Username: crikeydawn Post Number: 150 Registered: 07-2023 |
Looking for some feedback or observations on springs please. My 67 year old springs went through a flood 13 years ago. They had gators which I have which are good for a patten only. I presume the gator was removed after flooding and springs rinsed and separated allowing to dry. Upon inspection, rust, rub marks, or grease of any quantity is not present. The only signs of wear is on the tails of leaves 3 and 4 out of the 9 leaf set with 1 being the smallest. My pondery is to add slipper pads under these lower leaves to address wear or not, and would that that encourage failure as it will spread the tails 3mm each end. It does this for the longer leaves 6,7,8 now. I suspect the gators hold water as well as stop it. If grease is applied to the leaves is it a thinner application, or does one fill the grooves on the underside of the springs when re assembling? Probably what I'd really prefer is fill a gator with powder, like they use on truck turntables nowadays. I understand teflon skid plates and power is a far cleaner way of doing things opposed to grease. That however requires a gator to be pretty water tight, or re-apply on some maintenance schedule. The grease inside the springs was like a sticky film, so probably needs attention a little more than whats been in the past also. thoughts | |||
Jason Watson Experienced User Username: crikeydawn Post Number: 151 Registered: 07-2023 |
So father in law and I took the Munster mobile to the National Rally on the weekend. Just shy of 500km with most done at 80 to 85kmh. Everyone to their own but I can see how open top cars are not popular with the ladies. I'm with them, sun, wind, rain, noise, temperature, odours will all be a thing of the past when the ol S is on the road. Of which one passed us on the highway doing 100 easily, and with seat belts. Still its a good day out and nice to see plenty RR and B make a showing. image by Brian Carson  | |||
David Gore Moderator Username: david_gore Post Number: 4266 Registered: 04-2003 |
Jason, Of course modern cars have distinct advantages when it comes to driver and passenger comfort however the countervailing factor is they are dead boring for the passengers and, to a lesser extent, the drivers. Vintage and veteran cars are the opposite, they have character and the driving experience is always varied and never exactly the same each time the car spends time on the road. You will always gain attention and met some very interesting people each time you stop whether planned or unplanned. Modern cars rarely attract the same level of interest and appreciation from my experience of 60 years driving a wide range of vehicles from "paddock bashers" to Rolls-Royces. The choice is yours to make - I have made mine and it is in favour of veteran and classic cars when the circumstances are appropriate. The videos on the following link may be of interest to you. https://rrtechnical.info/miscellaneous/miscellaneousv.html | |||
Jason Watson Experienced User Username: crikeydawn Post Number: 152 Registered: 07-2023 |
I may well be in for a change as I have been encouraged to take over the drivers seat. Mastering the clutch seems the biggest hurdle, and I do like that exhaust by pass thing. Too right they attract interest. It took the FIL 50 minutes to fill up and make his way into the servo for lunch. Actually I had some part in that as I forgot to turn the fuel tank pressure release valve back to running position. So as it happened 5 blokes pushed him the last metre into a parking spot. Still he just loves responding to the endless stream of interested on lookers. Up comes the bonnet and he starts it off the ?. Look at this tool kit, yeh yeh look at the horn, look at...... I just get a coffee and let him run as his like a kid in a lolly shop. I think that is where the S will suit me better. Fill and go, or slip away quietly without the attention. Probably not the right car for that either but a bit less low key than a pre 1930 RR. I did go for a burn in 1925 P1 Continental. Have to say higher sides and brakes on all 4 wheel felt better. Dropping down gears with that exhaust thing growling then powering out of round a bouts was pretty good. | |||
Jason Watson Experienced User Username: crikeydawn Post Number: 153 Registered: 07-2023 |
Bit more magic today and some interesting findings. I took measurements of where the slippers were in relation to the end of the spring. However I noticed when some of the springs were placed on each other and sat snugly, the end of the spring fitted perfectly into the warn slipper. So I stacked and clamped all the springs to find to my surprise none of them passed the wear marks. I though surely with the cars weight on them they would sit at the warn end, not when out of the car. Appears not. So I remeasured so the slippers would be used to their full extent.  All was going well fixing the slippers with Sika 252 until I got to the last one. All the 9 springs have channels in them, with the first 5 all being 3mm deep. However on the 6th spring one is 3mm and the other 5mm. Here is my 5mm slipper made from the best rubber sample from all the springs. I rechecked the original slippers un-used end and yep they are 5mm too.  No problem I think, the 5mm spring will probably be the drivers side. I make myself a jig and grind down the slipper legs to 3mm and glue in. I then came across a bit of a baffling outcome. The spring in the for of the pic below contains the 6th spring with the 5mm deep channel (top one). The ones at the rear contain the 3mm spring(top) which is accompanied by a 5mm one under it, and are the highest two arching. So I guess if there is left and right for a drivers side, then the 3mm 6th spring is it. I received the car with no L or R labelling however the spring packs were zip tied together so presume they are matched correctly.  Now I'm cautious to think the springs have sagged. Firstly because they are RR-B. However I found the specs for the front coils and after 67 years they are still the exact free length to the millimetre. I'm not sure how you test or set the compression rate for leaf springs, but if the fronts are fine I'll take a punt on the rears. | |||
Jason Watson Frequent User Username: crikeydawn Post Number: 225 Registered: 07-2023 |
Amongst other things finally got round to greasing and gaitering the springs. I painted the exposed sections and lathered them with grease like honey and butter on fresh white bread. I looked into Graphite type grease but found the graphite content was pretty low, and the rest of the spec average. So went for a modern lithium extreme molybdenum Australian owed and made grease, in short Hi-Tec super molytac. Its a straight forward process and using 3 adjustable clamps was all that was needed. I found as the spring compresses, sometimes the central locating pin would drift left or right. By using the 3rd clamp on the side you want to push the pin from, worked good to recenter it. Far better than attempting to muscle it or tap it under load. Otherwise it�s a lot of completely relaxing the springs, re align, and have another crack. Once compressed I applied grease to the whole outer and applied the gaiter. Initially I started pulling in the gaiter each thread, that was hard so turned to pliers, which ultimately broke the twine. So after a quick knot, I thread the whole gaiter and just used elbow grease. That is all that is required along with a bit of massaging trueness to spring. Not sure if the gaiter should closed completely or not, hard to get info on anything to be honest. But this was as far as they could be laced. I popped my old plates off, cleaned, and refitted. All too little benefit as the springs are out of sight anyway. I did put the badge on the rear leaf however, at least with they wheel off you can read them, otherwise the shock absorber is in the way on the front. Bit on the gaiter pursuit here: http://au.rrforums.net/cgi-bin/forum/discus.pl 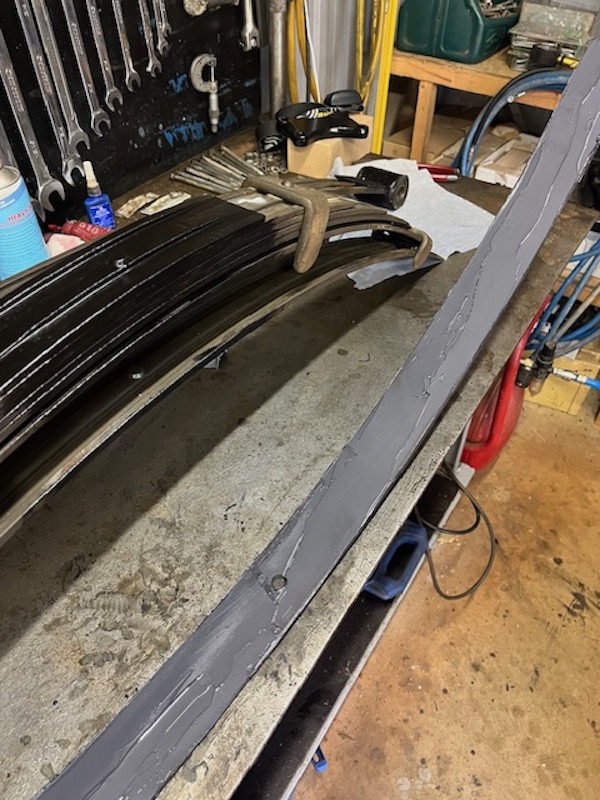  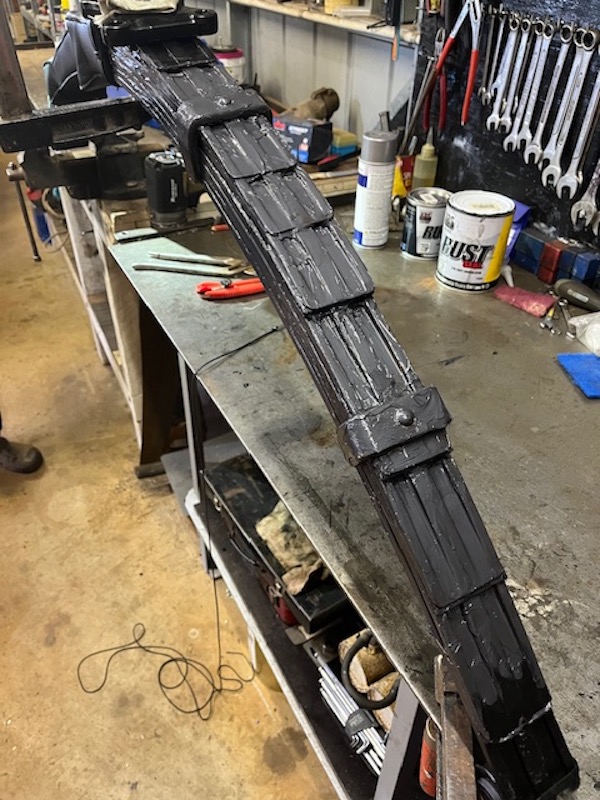 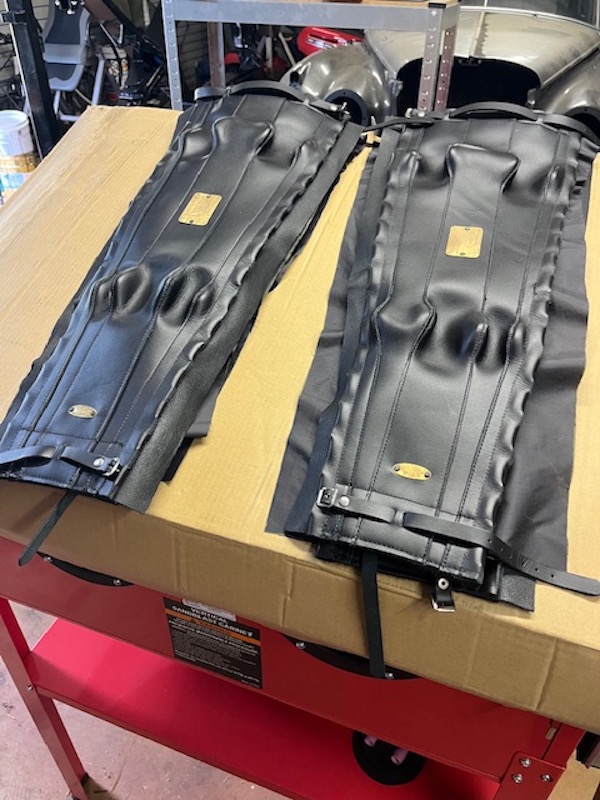 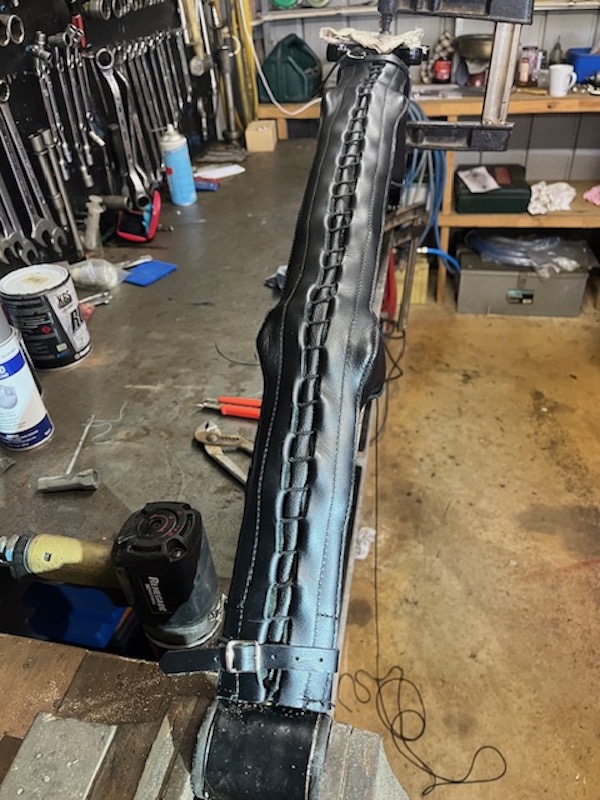 . | |||
Jason Watson Frequent User Username: crikeydawn Post Number: 226 Registered: 07-2023 |
Other fronts I have been mucking around with the original bellow thermostat, seems to have worked. http://au.rrforums.net/cgi-bin/forum/discus.pl I bought a bar for 90 poly to make the Z bar siletblocs. Been good mucking around with the lathe, discovering different process and gaining understanding. I am finding the real joy with this car is getting a greater understanding of it, how it works, and the satisfaction from doing so. Poly doesn't drill so great as it expands around the drill, or melts if your to slow. Machining is successful though never as pretty as steel. .2mm is required for resistance fit.  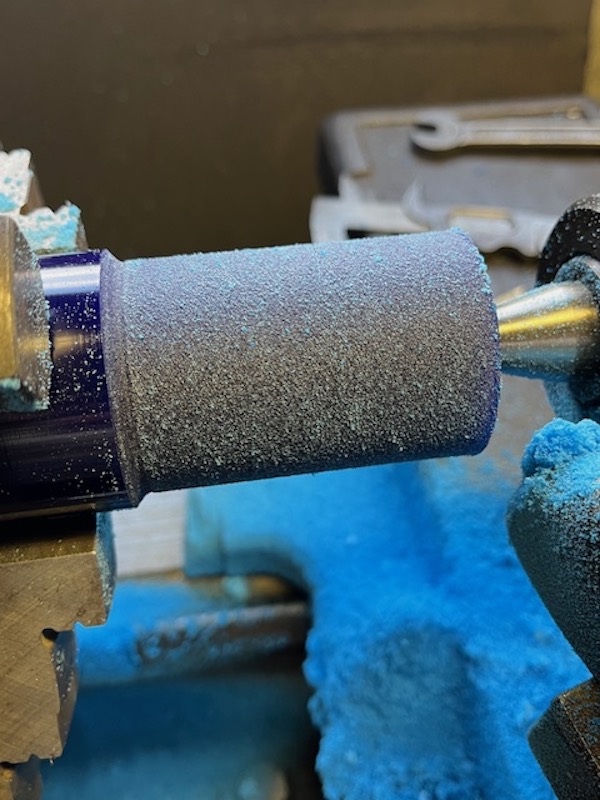 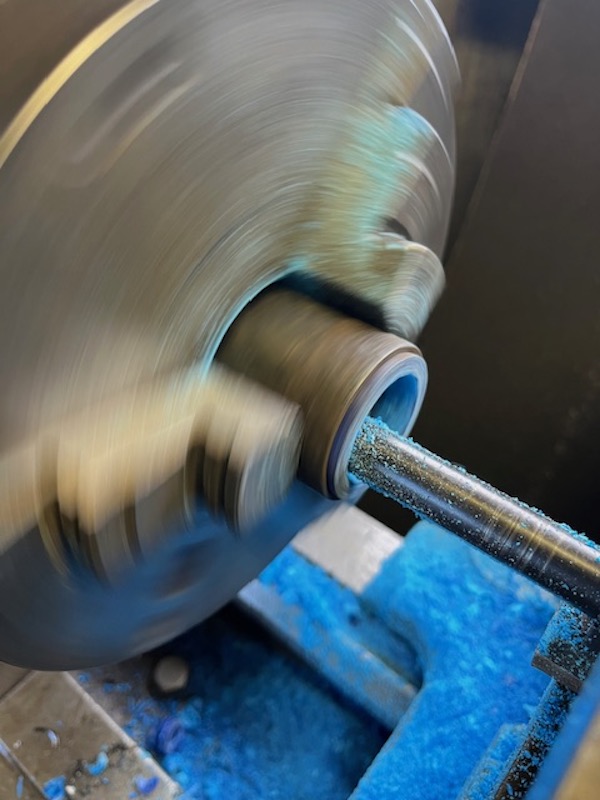 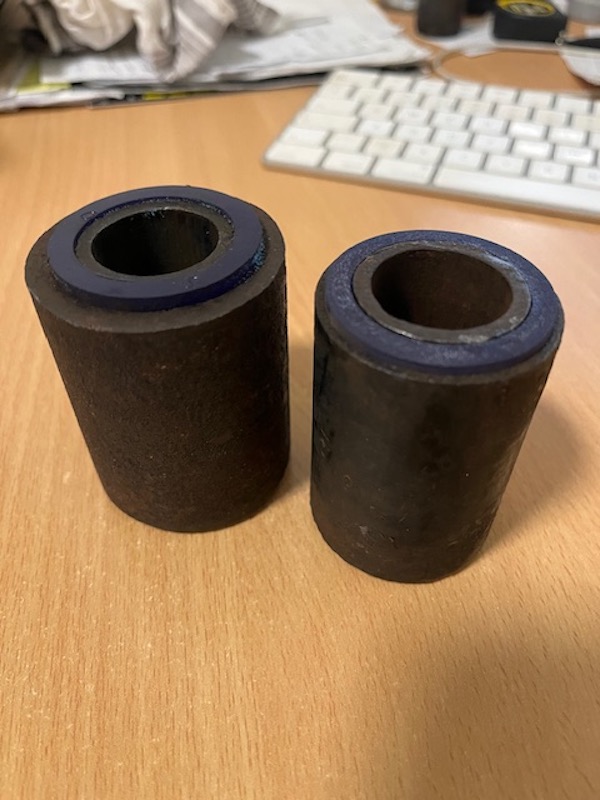 Otherwise cleaning threads, even just working out what it is has merit as I'm familiar with metric, what thread, what pitch, what size has been a journey. Think it will take the whole car before I can call it from just looking at it. Finally stopped one of the shock absorbers from leaking. Can't say the so called specialist who revamped then deserves a gold star, as who would have thought of a gasket. But got them hung as the diff is not far off. Cleaned up and fitted the other Z bar bushings. Will be interesting to see how the poly/3D printed path goes compared to rubber. Not that I have any issues with rubber, just there is not enough fat in the cars worth to follow that line of pricing. And finally settled on the mirrors, like I need them in a hurry. Gee I agonised over this and its a bit like the poly decision, is it the right one. From what I could tell mirrors were a 3rd party issued thing in 1957, not a factory thing. So the Lucas mirror appears a popular choice, however finding a set without 3 phillips screws to tighten the mirror is getting pretty darn hard. For my money they also appear to not protrude out far enough to clear the cars widening body. Then if you look at where manufactures mount mirrors opposed to what looks best, there is clear vision practicality side to it also. So these 4" swan necks got the guernsey . I will be mounting them on the doors body moulding in between the swing of the quarter glass and the windows leading vertical channel. Even with a 5" reach out from the body, they still fall within the body lines so passing bodies should not clip them. Time will tell but while the door cards are not fitted is definitely the time to fit them. 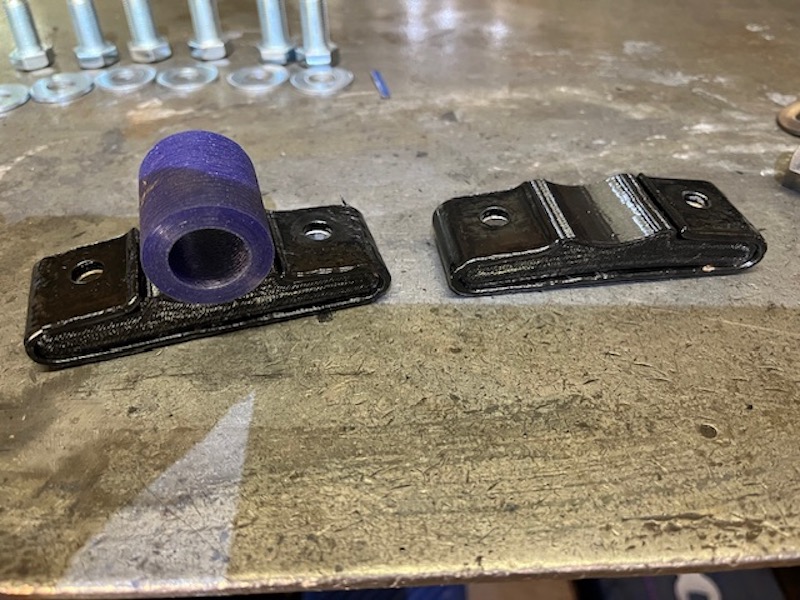  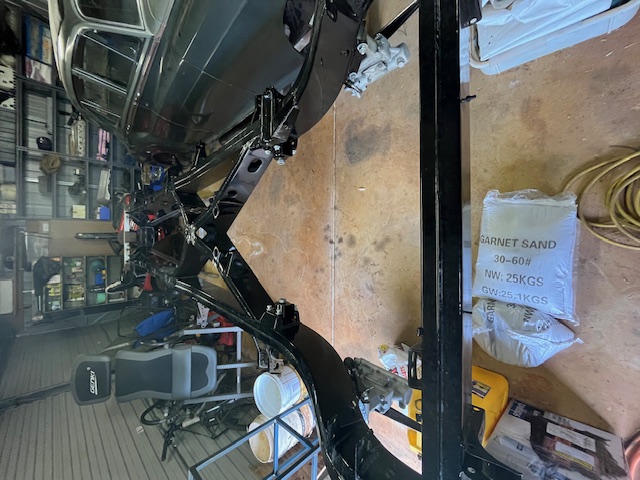  . | |||
Jeff Martin Frequent User Username: jeff_r_1 Post Number: 685 Registered: 07-2018 |
Just as well you didn't use graphite grease, it's old technology. Molybdenum Sulfide grease was the way to go, the particles of moly in the grease are generally much smaller then what one would find in graphite grease and do a better job. 5% is typical of the percentage of moly you would find in a modern grease, it doesn't take much to get things done. Over at the gramophone forum, many still insist upon using 50% graphite powder to Vaseline and at 50%, that's an insane amount. I would be suspicious of a so called modern graphite grease, because the particles are larger, they have a tendency for the carrier (soap) to dry up and the whole thing becomes this cakey mess. Worse case scenario is when the grease starts to dry up and the car is parked for long periods of time, instead of the grease lubricating things, it welds the leaves together creating cracks and eventually they break. | |||
Jason Watson Frequent User Username: crikeydawn Post Number: 227 Registered: 07-2023 |
Agree. The old ways, or what was original is best can be very selectively applied, plus modernisation does have merit, internet? Gramaphone forum hey.... The best % of graphite I found was less than 5%. I did find some 40% but one had to buy a 44 gallon drum at $2000 from the US I think. Then as you say the rest of the spec make up was wanting. I was on a lanolin path for a bit but have to thank my little ol local auto shop for putting me straight. Think I have finally cracked the home brew cadmium plating recipe. To buy a kit would be a whole lot easier, but surprise surprise its $300 for $15 worth of chemicals which is mostly water. Plus I can put a complete kit together for $250 instead of $800+. Honestly no wonder we have the Haves and Have Nots, and the cost of living is stupid. What happened to 20% mark up is good. I had started down just cleaning, treating, and painting bolts. Or buying new. New have funny markings, too long, too short, and different in shape. Painting is a long process that scratches when the end result is set in its final resting place. Cadmium look pressure pack paint is priced like cocain, decent brush to steel paint the same, and reasonable priced kill rust type paint doesn't work from my observations in the house painting industry. So to finally find someone willing to share detail, and runs on the board was a nice find. If I blow the shed up I'll let you know haha. | |||
Jason Watson Frequent User Username: crikeydawn Post Number: 228 Registered: 07-2023 |
Look at this mess, but gee I love it. Great day. So I get the job of making the mandrel to check the pre load on the pinion bearings for the diff. I print off the Section J from the RROC tech library, have a read, and take a leap. I find myself a 2" bar and cut a chunk off, that bit was easy except for the fact a cut off wheel doesn't like such a wide surface to cut. So one learns to rotate the bar and make numerous cuts. 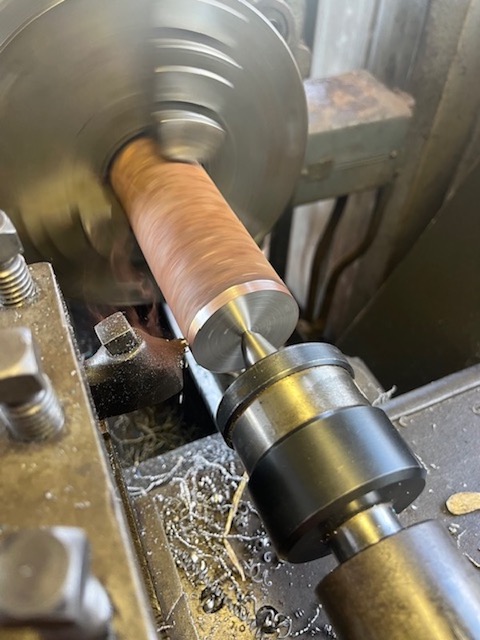 In the lathe it goes and some help arrives that knows their way around "their" lathe, not the 80 year old bit of kit I'm using. I pick up a few bits and bobs of technic, but ol mate moves in and is ripping into it like his a pro. We are attempting to make section G where the bearings slide over. First lesson, not all lathes are equal. 1 thou on this old girl makes for 1 thou on the operators side, but also 1 thou on the far side of the job, so 1 thou is actually 2 off the overall job diameter. Or if you want 1 thou of the job only move the dial .5 thou, make sense. Ol mates lathe which is newer, 1 thou is 1 thou, so his gearing must be .5 to the machine I'm on. So lesson 2, don't be in a hurry or assume 1=1, as we stuffed up section G making it to small. It now became the new J section. 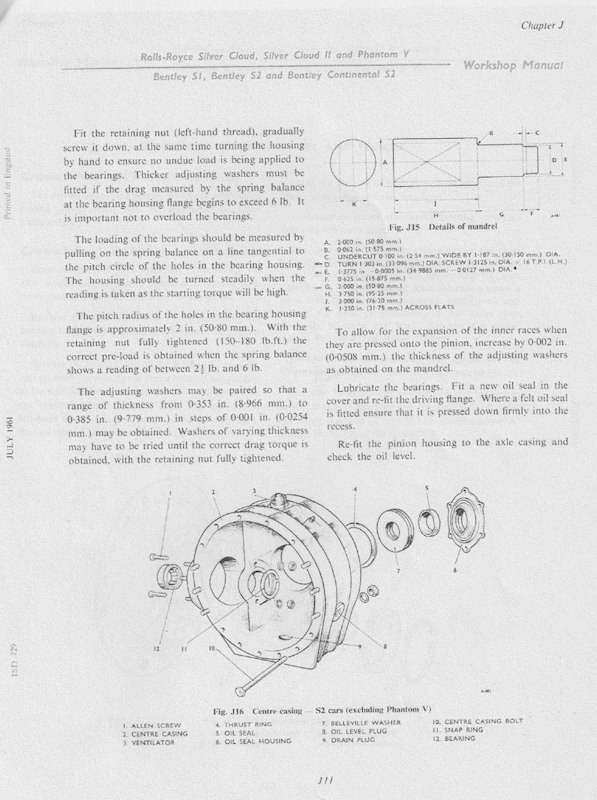 All good, we can save this. My turn now, lesson 3, check your bearings, your pinion, and your instructions. So off I go and turn it down to the measurement suggested in the workshop manual. However when finished the bearing just doesn't slide over it, they flip and flop. Ahh bugger, check the bearing ID, check bearings don't slide on the pinion, chuck pinion OD, and yep the manual is wrong. So out with the knurling tool. Who would have thought you can fatten up a shaft with putting cuts into it. But wow that is all it took to make the bearings slide over the shaft without wobbling. Nice. Time to make a thread, I find that just amazing that someone like myself can make a thread. So off I go machine the shaft to the right thickness. Lesson 4. Learn lesson 3. Check the ID of your pinion nut to what the workshop manual instructions say, because they are wrong again. The nut just flops over the shaft big time. Now I understand if you think this guy can't use a lathe. But I had the father in law hanging around checking my measurements with the manuals, and yep he was pretty disappointed in the results as his a RR fan through an through and always telling me to refer to the manual. Never mind we can save it. All we need is a nut to pull down. It doesn't have to be the pinion nut. No act of parliament I was told. So found a nut, worked out the thread count, and the depth. Found and set the thread cutting bit, and learnt a heap of new settings on the lathe. Off we go. What a joy watching this chunk of engineering mastery make a thread. After numerous passes all starting in exactly the same place as the last, I have a thread to screw a nut too. 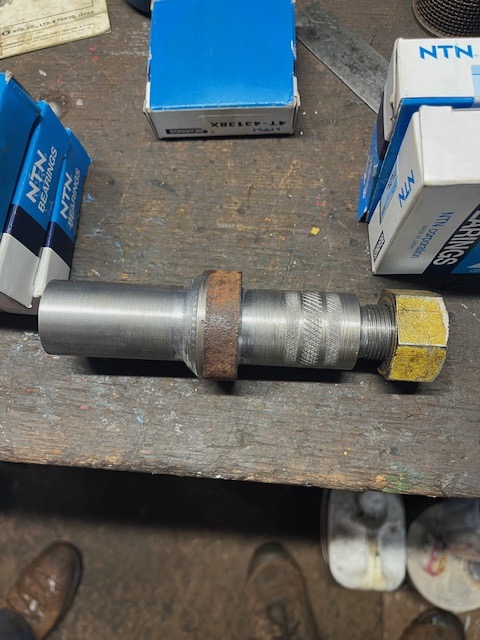 So a day of mishaps but an awesome day of learning, and I have a mandrel to do the measuring job to boot. It would be easier I guess to send it off to the diff shop and pay. But think I'd rather it just the way it is. | |||
Jeff Martin Frequent User Username: jeff_r_1 Post Number: 687 Registered: 07-2018 |
| |||
Jason Watson Frequent User Username: crikeydawn Post Number: 229 Registered: 07-2023 |
Jeff, as you know, and I keep learning these cars are just nuts and bolts. There is nothing special about them in that sense. If anything the workshop manual being wrong has benefits. I didn't have a left hand thread nut and given it doesn't matter which way it goes for required purposes, a right hand thread was cut. This then allowed for a standard socket to be fitted to a standard torque wrench. I had some shims that came with my work bench I bought from auction of a diff lapping shop closing. So was feeling somewhat happy of success. It is amazing what 1 thou does, such a small but significant measurement. Anyway after a bit of juggling my numerous but limited sized shims, success was found. A nice pre load of 5lb and 150Nm torque. That left me unsure whether it�s wise to put 6 or 7 thin shims in with a larger one, or take a measurement and make a large one to replace all. That�s todays fulfilment. Now this doesn�t solve RR-Bs need for a left hand locking nut, or the weird tool required to tighten it up, nor a left hand torque wrench. A torque wrench off the net can be solved for $40, however the �specialised� tool will make you walk funny for a week because it has the RR-B stupidly over priced thing happening. So I�m thinking going for a coffee while I wait the 5 minutes for the local diff shop to torque up the �specialised� waffle. About $40 me thinks with their standard tools. Honestly this "specialised" or RR-B thing does my head in. I had a go at buying some parts the other day. Ol mate took all this time finding, photographing, communicating, then pulls out a price that is more than a jeanie in bottle. When I look at all the cars in the Luxury Junk Yard, plus consider all others who are parting, it must be 50% or more disassembled by now and growing. So why then does a fairy ordinary designed RR diff attract what it does when a ford 9�, of a Dana 45 be worth $1000. I know which one is superior. Has to be greed on one side balanced by stupidity on the other. Perhaps wishful money on an imaginary gravy train while both sides count their projected wishful worth. Ol mate was not interested in negotiating so I left him to look as his gold on the dirty floor of his vault. | |||
Jeff Martin Frequent User Username: jeff_r_1 Post Number: 688 Registered: 07-2018 |
Don't take my smiley face the wrong way, good for you for finding better and affordable alternatives, I would too. I have a torque wrench that switches between right and left _ sorry, it only goes up to 50ft lbs., just checked. These guys that want your first born for their pile; the longer the stuff sits, the more they're going to ask. The catch 22 is that the price gets so far into the stratosphere, it costs less with today's modern machinery to make new bits (depends what it is). At the time my aluminum camshaft timing gear was shot, and the supplier wanted something in the neighborhood of 1200.00. I found a jobber willing to make new one, and he thought he was really going gouge me at 600.00$. You should have seen his face when I told him what a new ones costs. Later I happened upon some new-old stock with a matching pinion gear from Introcar, I don't think they knew what they had exactly, because the Wraith type damper's pinion gear is removable, unlike the later design. There couldn't be many engines around with the Wraith damper in it. | |||
Jason Watson Frequent User Username: crikeydawn Post Number: 230 Registered: 07-2023 |
This guy wanted $80 US for a Bentley foot brake rubber, I told him I can get a brand new one for $50AU. He was not interested in negotiating so meh. I somehow knew the father in law would come up with an alternative to my left hand torque issue. And gee I'm lucky to have the time to spend with him, and muck around with all this stuff. I'll start with my shim, I made it but was 1.1/4 though to fat after cutting it off. I was happy to have a crack on the lathe but he laughed, gave me some 100 and 400 wet and dry paper, and said have a go. Amazing....and confirmed with the micrometer all the way around. 3Lb at 150Nm sweet. He said for the left hand thread nut RR use, we can use math, an extension bar, and bucket full of old steel to get the torque. All we need is the tool. I suggested a socket with a bit of fabricating with a grinder, na. He pulls this weird looking thing out that has a chuck like a lathe, but bolts onto the milling machine. We'll make one he says. I said yeh we are not mucking around with a car worth a million dollars, he said would that matter, they are all just nuts and bolts. Just love it. | |||
Jason Watson Frequent User Username: crikeydawn Post Number: 233 Registered: 07-2023 |
So after some fiddling and dusting off the memory, I'm off making RH339 serrated box spanner. This mysterious machine makes gears, joints like in wood working, keyways, and probably a whole heap more. I just find that fascinating what people work out. Anyway before long I was proud as punch having made something I never thought possible. Welded an leverage arm on and job done for setting that part of the pre load. 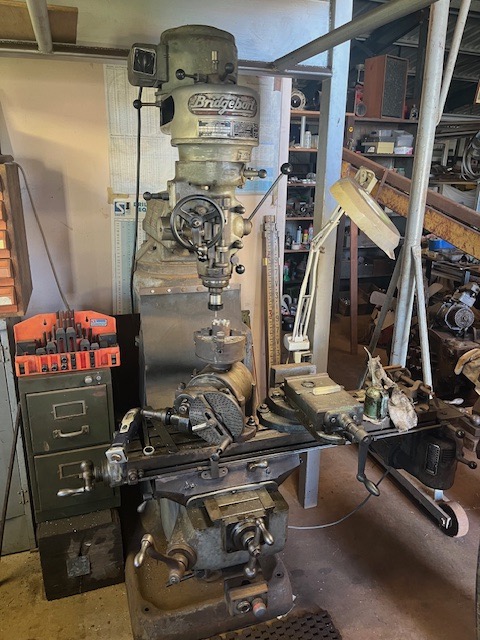 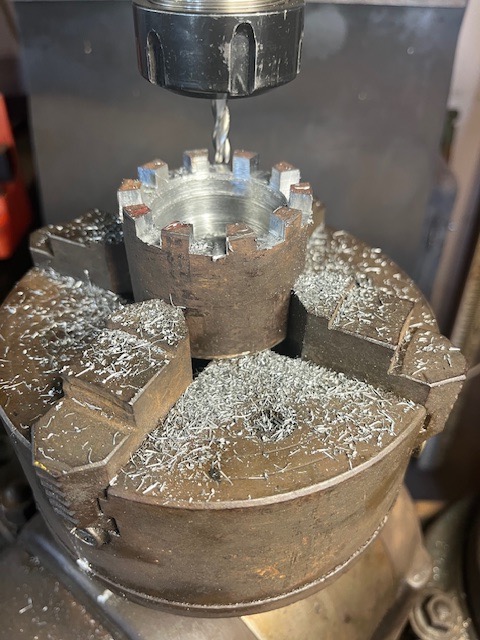 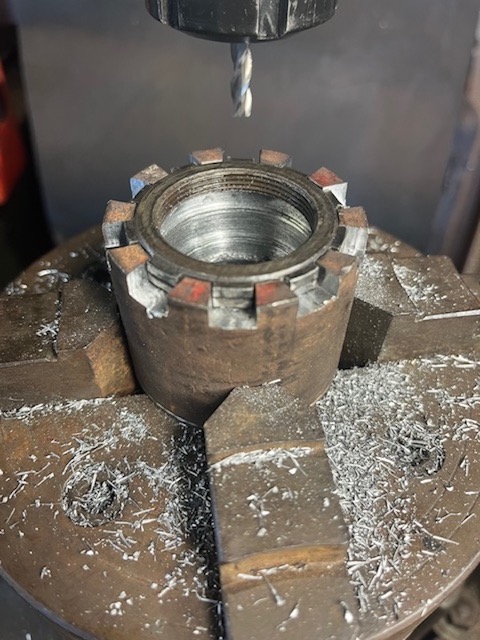 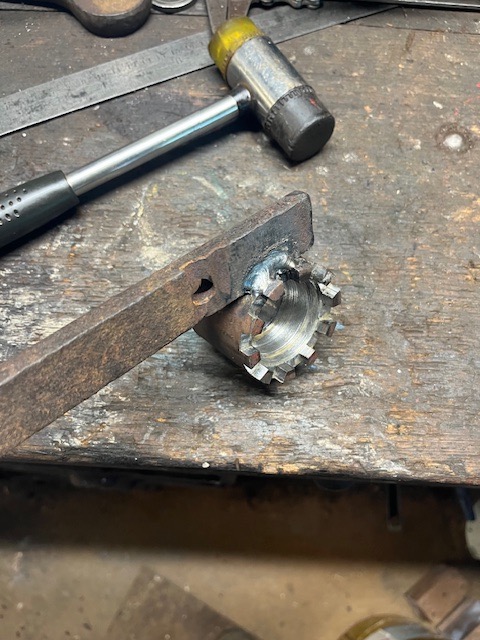 There was some concern my metric 20 threads per inch I cut on the mandrel was thinker (courser) than the fine thread on RRs locking nut. This may result in a slightly off reading with preload. More on that latter. I made a pinion nose mounting block. This tool clamps around the pinion nose and holds the pinion in place while the bearings are torqued. A concerned developed over morning tea that if the job slips in the tool, the surface of the nose may be damaged, which has implications for the bearing that it runs on. We decided too risky for us, and with the teeth on the pinion as hard as the hobbs of hell, it could be clamped between some wood in the vice. A little bracing would be required to stop it from tilting. Bit fiddley but overall safer. Time for some math using google, converting 150lb.ft to Metre per Kg. Divided Kg by the length of the arm I welded onto the tool, and came out with 27.2kg in the bucket measured via the bathroom scales. 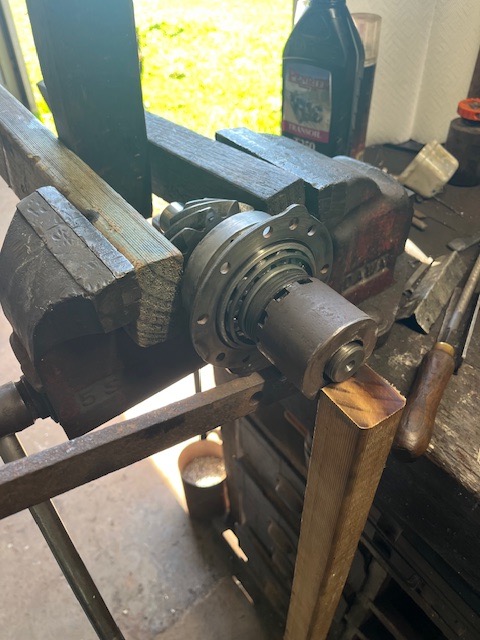 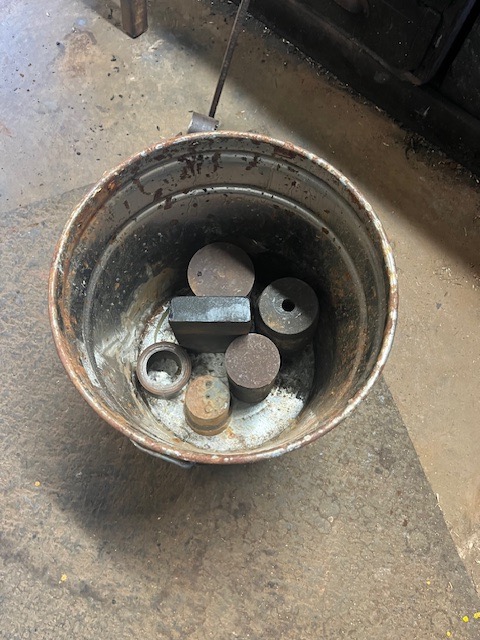 Now I can accept you may be thinking this guy is a cowboy. But the sole purpose of all the fun is for a 2.5lb to 6lb measurement of pre load between the two bearings. How that is done, or how much one pays, is open for interpretation. We pressed the bearings onto the pinion, fitted the oil thrower, locking plate, and locking nut. We were now at the moment of truth. I lower the bucket onto the arm as it takes up the weight. The FIL is spinning the bearings getting a feel for it. yep yep yep...STOP. The bearings tightened past 6lb, bugger. Was the weight in the bucket incorrectly calculated? Did our bathroom scales suck? Was it the difference between my 20 thread nut compared to RR's fine? Now what. Well, all good. On the bearing housing there is a lip about 80mm wide. An off cut of old poly sewerage pipe was found as it fitted over the pinion gear. Trim it up for trueness in the lathe and over to the press. Pushing down on the pinion in the opposite direction we had been (after loosening the locking nut) backed off the preload just enough to have another crack. This time my turn. If they were fixing this on the side of the road in the middle of the Peking to Paris, there is no fancy math, scales, buckets etc. Chuck it in the vice, clamp it down hard between two lumps of hard wood. I'll swing on the nut, you measure preload with the spring scale. Perhaps the real upside of a mandrel is one gets to play, test, and get a feel for what is required before committing to pressing the bearings onto the pinion. Done, 5lb of preload too easy, folded up the locking tab and time to look at the next part of assembling the diff. 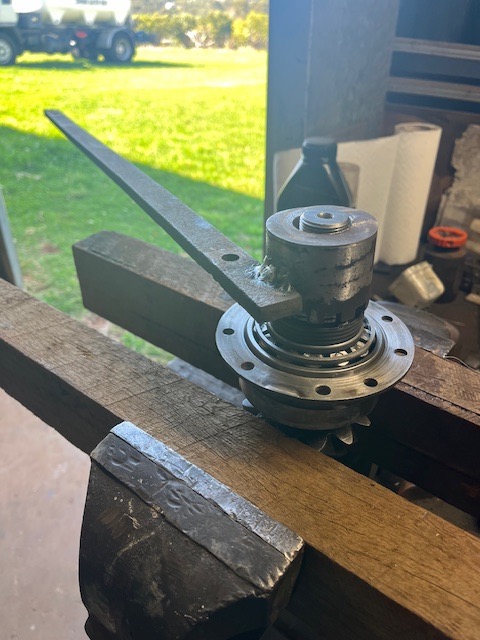 | |||
Jason Watson Frequent User Username: crikeydawn Post Number: 236 Registered: 07-2023 |
Because the Diff was disassembled when I bought the car, I don't have the privilege of learning how it all fits as one pulls things apart. This is my elaborate tool I used to back off the pinion pre load after making the mistake. I'm kicking around the possibility of buying another car, so got me thinking it would do to pull down another diff. 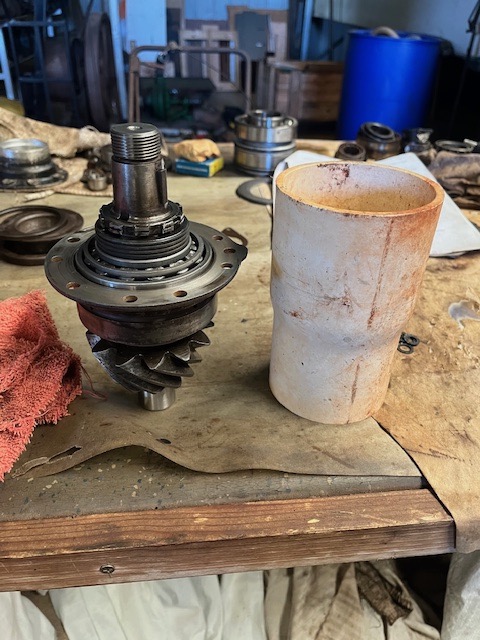 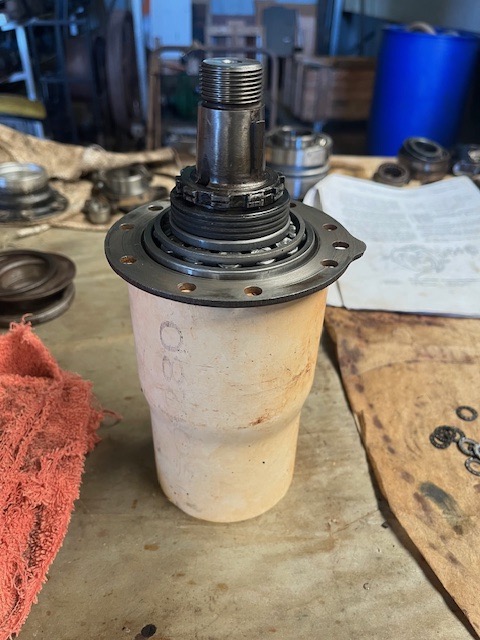 You live and learn as I'm sure Henry did along the way. Not sure alloy is the best choice of metal for a diff housing, but it is what it is. Fitting the pinion nose bearing called for something different then a mallet. A threaded rod, some nuts, spacers, and mobil press was created. 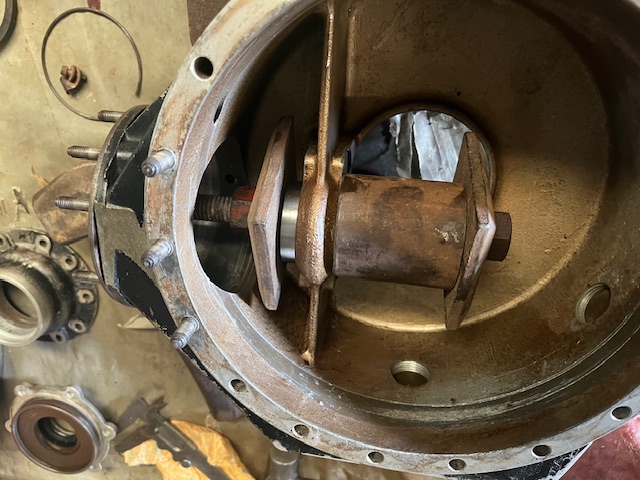 Now given my pinion nose bearing was only $45 opposed to $800, meant it was 3mm narrower . So a 3mm spacer was made from scrap brass to fill the void. I also made an an accompanying cover plate (not shown) to keep bits from moving. The manual suggest a snap ring which my diff doesn't have, or a for and aft cover plate. My diff appeared to have one.  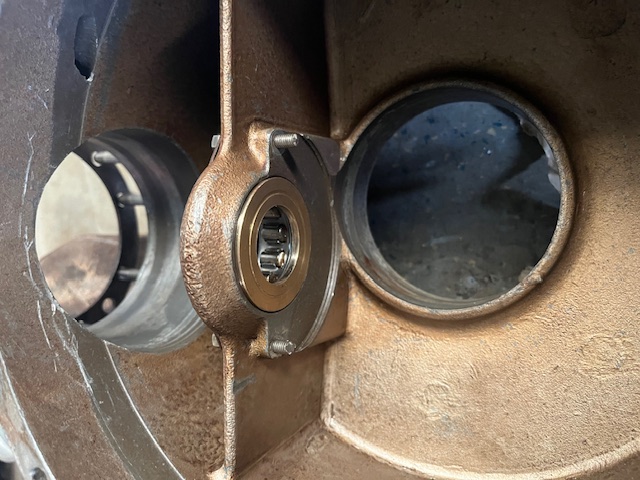 Some other interesting findings that have been a derr moment perhaps as much as why would you do that, is seating the bearing on the diff centre. This caused hours of mystery as RR's engineering didn't match the vague instructions. If one has to bolt a diff centre together, then perhaps there should be a throw out measurement to check for trueness, nope. So we carry on not twigging, looking for the only measurement given, and that was the the throw out on the crown wheel. There are few thing going on here. The spider gears have vague alignment instructions and marking to match, so we do the best we can figure. Then there are no markings to align the two halves of the centre, so have we have a crack. Then it is suggested to rotate the crown wheel on the diff centre until .0025 is found. One would think there could, or should, be a marking suggesting this measurement given RR's reputation for engineering, nope. Undo 12 bolts, move the crown wheel on the diff centre, re tighten, firm up in the press, and take a measurement. If incorrect repeat. A combined effort of 8 hours between the father in law and I confirmed the trow out was not possible. Bugger, now what. So the what if questions start. We go back to the diff centre as it has 4 possible ways to tighten, go through a rotating process this time checking it for trueness, ahh ha it's out, but why. Well back to the bearings. They measured exactly the same as what was originally there, and how we sourced them. We pressed them on with a flat spacer down to as far as they would go on the diff housing, both ends. Upon closer inspection, it was revealed they we not seated correctly. Blow me down RR have decided to engineer the seat 1mm bugger then the bearing. So out with appropriate spacer and seated them properly this time. Back into the press, firm up, take measurement and success, .0015 throw out on the diff mounting face for the ring gear, we are getting somewhere. 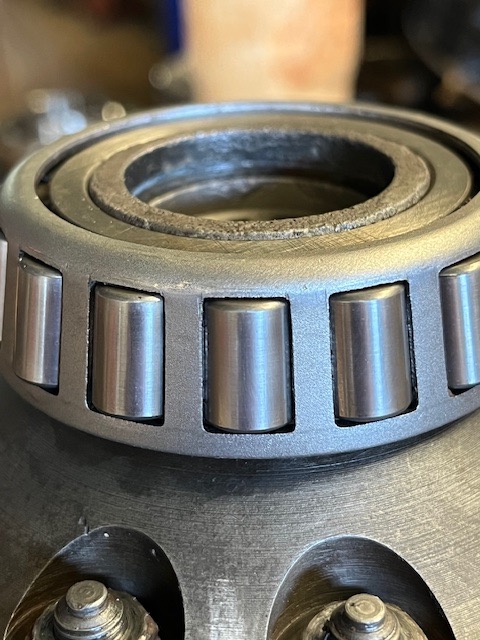 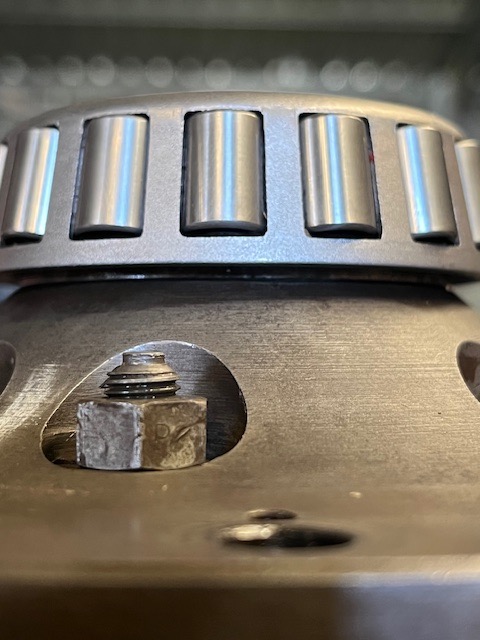 So now back to that hand crafted we have all day process of moving the crown wheel on the diff to find .0025 throw out. 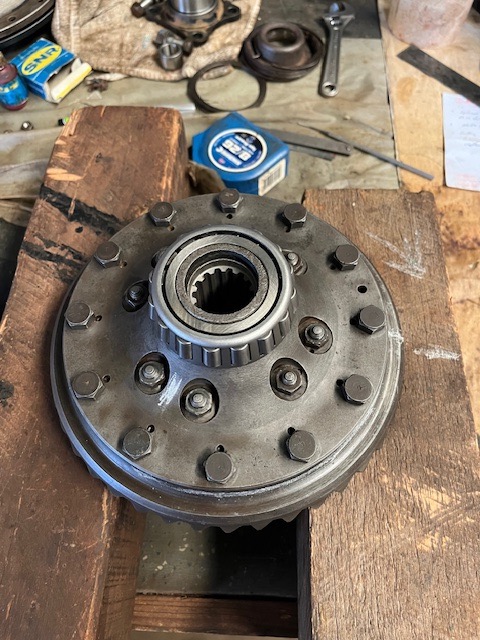 In the end .003 was all that could be obtained. All surfaces clean and smooth, measuring tools checked, lots of what ifs. It's believed crown wheels and their pinions are works of art, and true as true. In the end I figured humans are humans, cold dark wet English winters are cold wet dark English winters no matter where you work, no one is perfect and .0005 out will do. | |||
Jason Watson Frequent User Username: crikeydawn Post Number: 237 Registered: 07-2023 |
Today was a good day, well just better then the other good days. I was on the cusp of making another crowned tool to adjust the back lash. However the manual talks about using the press to control stringed load during disassembly. So we figured lets just reverse that for assembly. The manual does not suggest a back lash setting, just tolerances for adjustment. Of course being a RR diff there is little information on such detail, however in Norman Gleeson's technical notes there is a one liner new cars have .006 backlash. Bit of a sniff around the web and .004 to .006 seems fair. The diff centre is sandwiched between a fixed resistance that is sprung with shims, and a thread that tightens the centre. By clamping (tightening) the two, the gap (backlash) is determined between the pinion and crown. Then using a dial gauge backlash can be measured. Using the press also eliminates tightening and loosening the 20 something nuts and bolts RR use to hold the casing together. Yes its no different to adjusting the crown wheel. That adjusting nut only works if everything is perfectly shimmed. So quick sniff around for some appropriate pipe to true up in the lathe. Wind in the thread until we obtain a spot for the locking spring to do its job, and off we go.  It took 3 or 4 adjustments before we had obtained .006 backlash, and feeling quite good the mark had been obtained. Some more fun facts, EVERY thing I have read on setting up diffs, mentions the rub (connection) mark between the pinion and crown is the critical part of setup over the other important steps. Back lash will give you a bang and a clunk as you get on and off the accelerator. However how the gears rub will give you silence, or a whirring at whatever speeds it's happen to happen at, and it's not going away. You can drive through it, but if it's at 80 say, it's at 80 every time. RR have no mention of gear rub in the manual. So pull it all apart again so we can apply rubbing past to the gears to see the connection. The other issue we have is RR being who they are, have built a diff that is all enclosed with the only way to see how those gears connect, is pull the casing apart. So all those bolts come out again, or poke a little camera on a lead down the drain, fill, or breather hole. Thankfully the breather hole provided the opportunity. The father in law produced a 1950s book that keeps it simple. Off we go spinning the gears and using the camera identified we have Heavey Tow (bottom left pic).  It's hard to read but says move the crown wheel further away from the pinion. As in to the right of the pinion, not the pinion move further in or out. So using the press to take up the spring'd load we have to undo all these bolts again, to allow us to shim the fixed side with the belleville springs. Well that left us with the question of how far? Don't know. What have we got? Not much. All we had was some .0025 shim paper. Perfect....that will do. So we removed the cap, and using the existing shim scribed and cut a new shim.   Because we were moving the centre .0025 to the right, we had to allow for the back lash to also adjust via backing off the adjusting thread on the other side. I had a guess based on finding the back lash we had. But the Father in law produced a thread counting tool, counted the treads on the nut, did some fancy math I have no idea of, and calculated 1/3 of a turn or 2 locking spring positions. OK......holy smokes I'm impressed. The gears were re-buttered and the whole show reassembled again. Well, it's ugly but says to me success. The rub is in the centre of the tooth, not to left or d right, top or bottom (see top left pic in the book). Furthermore blow me down the backlash was still at .006.  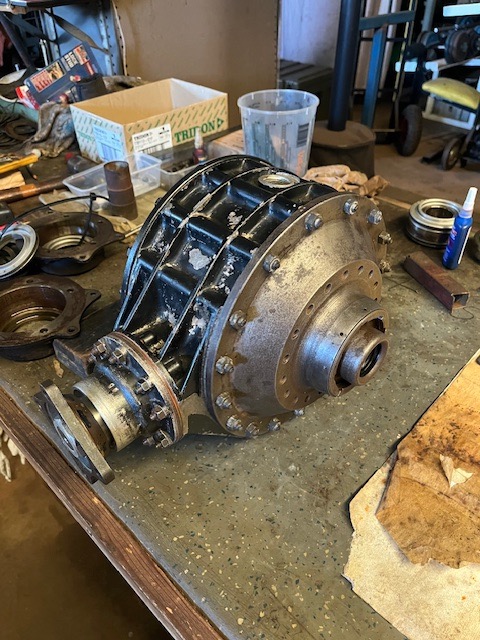 Now there a few things going on here. My ring gear is not the prettiest by a long shot. However at $6700 + postage to replace new, or $2500 second hand (unseen) I tried to source a replacement at a sensible price. That didn't work and numerous experienced inputs advised me to give what I have a run. If one thinks RR are superior, well a common Ford 9" also has a pinion nose and a gear set can be obtained for $800 new. It also would take a poofteenth amount of the time to set up, and absorb hundreds of horses opposed to RR sub 100. So the whole RR is worth every cent and the robbery around parts is BS. My car may has been flooded, but dried out within 10 days. The pitting on gears and bearings suggest water has been contaminating the diff for many years. Norman Gleeson suggest after lack of regular oil changes, contamination of water is another major factor. I put the diff breather up to my mouth, and one can easily suck and blow through it. So that says to me every time the car goes for a drive the diff heats up and expels air. Then when parked, starts cooling sucking in a fresh gut full of humidity. That air then cools, condenses, and contaminates. The whole process is heightened if it's raining. I guess one can spend $15,000+ on a diff rebuild but no specialist will probably suggest different as it drifts from originality. Plus it hinders return business. For me however the hunt is on to find a diff breather of better quality, and modify it to replace the OE. In the mean time I'm feeling a bit proud of myself as the first big fix on the car was the diff. The FIL helped but it was all new for him also. Looking forward to axels next. I had some $30 shims made to accomodate my $100 Japanese made bearings. As I didn't feel like paying the $750 + postage for the proper "modified" wheel bearings. Be good to see how that all goes. | |||
Jason Watson Frequent User Username: crikeydawn Post Number: 238 Registered: 07-2023 |
So the original wheel bearings are a thing of the past. Perhaps a good thing because they were not sealed. So the days of oil making its way onto the brake shoes are over. This also meant the original alloy oil seals were no longer of use. I can't recall the new amended bearings from the warehouses are the exact width, but the asking price stimulated a rethink. A sealed bearing was sourced locally though it was 4mm narrower than the original, so I had 2mm shims made by the local engineering shop. 2 big and 2 small to match the outer and inner seating face of either side of the bearing. The FIL made the compression collar that holds the whole show onto the axel. 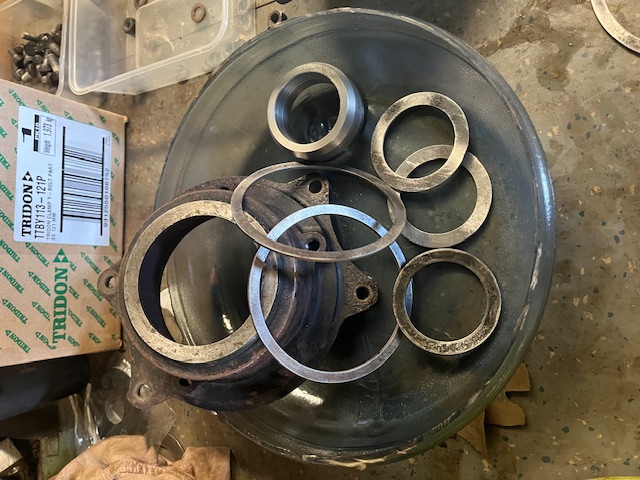 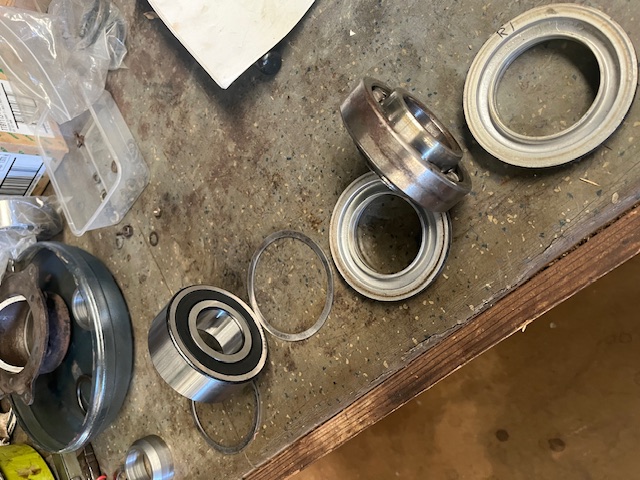 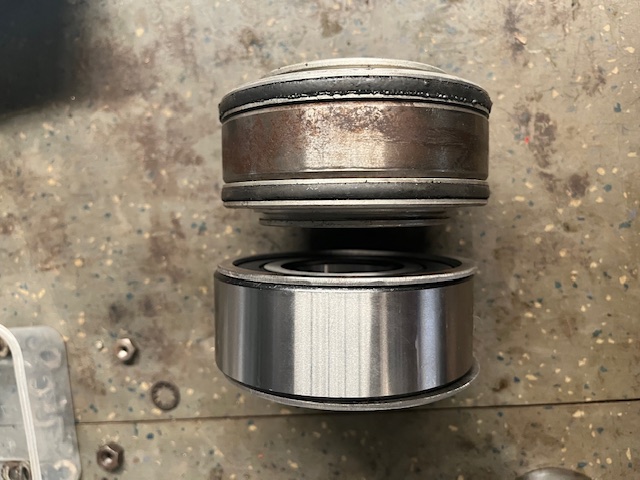 Turns out my expansive pinion holder fitted the wheel bearing perfectly. So for those trying to follow, one of the large 2mm thick shims went into the bearing housing before the bearing was pressed down onto it. 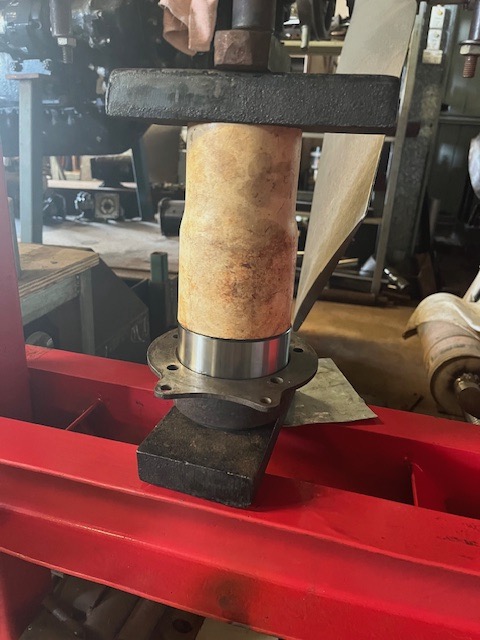 Now it was time to fit it all to the axel. We stood the axel on the bench, added the distance spacer, small 2mm shim, bearing, another small 2mm shim, the spring washer, and then the collar. Turned it upside down and positioned in the press and using some old modified collars and random press spacers, committed to fitting it all up. You can see the large shim on the outer of the bearing, ready to be sandwiched between the bearing housing and axel tube. All they do is simply fill in the original width of the original bearing.  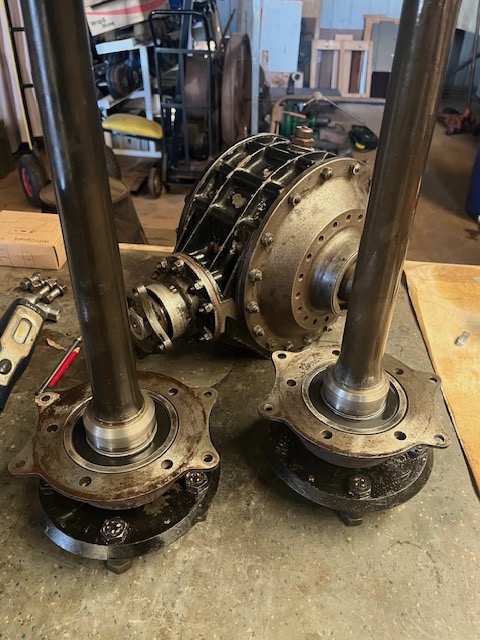 | |||
Jason Watson Frequent User Username: crikeydawn Post Number: 239 Registered: 07-2023 |
Oh one other thing. Originally the pinion has a felt seal as an oil seal. From what I read they don't do well, filling with dirt, water, and chop out and leak easily. Norman Gleeson has a modification where he machines a slot for a modern rubber twin lipped sprung oil seal. I guess for the purist if you come from the back it still leaves the housing looking 100% original.  As you can see I took another path. The reason being the cover is bolted down and uses sealant on its mountain face to stop it from leaking oil. That sealed surface also connects with a spacer, and then another sealing surface on the other side which all relate to the pinion being set in a position that the rest of the diff works off. By having the seal at the front, it's as easy as undoing a nut that holds a yoke on, pop it off, pop out the seal, replace, add yoke and tighten nut. It takes the process no further and disturbs nothing to do with the pinion set up. By the way the rubber seal is worth $4, you can get 5 of them for the cost of 1 felt one, without postage. |