| Author | Message | |||
Richard Treacy Grand Master Username: richard_treacy Post Number: 573 Registered: 4-2003 |
I invite contributions and photos of individual experiences on the final drive failure issue before I finalise an article on this matter. Many thanks in advance, RT. | |||
Patrick Lockyer. Grand Master Username: pat_lockyer Post Number: 323 Registered: 9-2004 |
To-day the job of the rear crossmember has started. Had to take the LPG tank out first. Leaving the car on its wheels on the hoist but with a support under the diff the crossmember was removed. The rubber mounts were removed and this in my opinon is some of the start of the probs. As the bushes wear they cause lateral excess movement with the crossmember. If left unrepaired metal fatique through stress weak points develop with the weak crossmember and floor mountings stress points. Spot welds round the bolt area dont help. On the crossmember n/s mount bolt fixing one had started to lift up confirming a weakness. The mods i will make and fit starting tomorrow. More to come as the work is carried out. Pix on the mounts and boot floor. 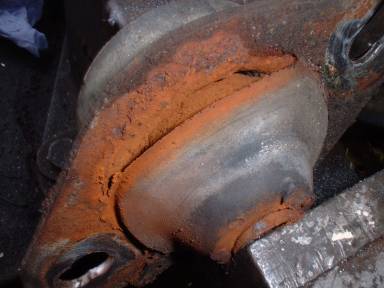 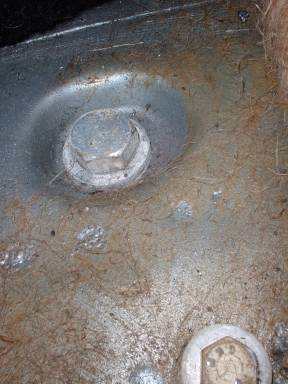 | |||
Richard Treacy Grand Master Username: richard_treacy Post Number: 565 Registered: 4-2003 |
Thanks, Pat. I look forward to more snaps. Has the crossmember been previously modified by the way (with through-bolts attaching the mount to the top and the bottom of the crossmember) ? Could you do me a favour and let me know the offset for the Z-bracket as I forgot to record it ? The details have aroused quite some interest, and I feel silly not having this basic measurement . Thanks, and Regards, Richard. ps it's good to see that you and others are taking this matter seriously and taking action. | |||
Patrick Lockyer. Grand Master Username: pat_lockyer Post Number: 324 Registered: 9-2004 |
To-day i fabricated the plates for locating the spacers and strengthening the lower crossmember section. The large 2" holes have to be flatened so the new new plate will sit flat on the crossmember. The threads are drilled out in the old mounting captive nuts and the lower section is then drilled useing the top hole as the guide. Once the lower holes are drilled they have to be opened up for size for an interference fit with the spacers. The two spacers must be made to stand just a little proud so that the plate compresses them when all clamped up with the mounts. I was not happy with just the two bolts clamping the plates to crossmember so have migged them in place with short welds. The first pix is of one spacer tube fitted and the new plate RT that is welded and clamped after the other spacer is fitted.  The next pix is showing the spacers with the plate welded to the lower section. Note at the end, the mounting plate with the four threaded holes is now welded in place externaly,this is for the harmonic dampers. 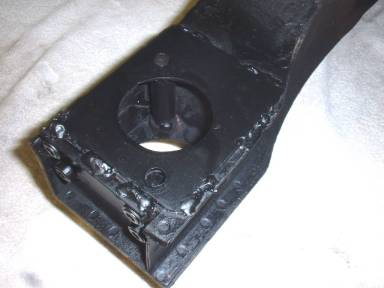 Last pix is just to show the diff asembly support. 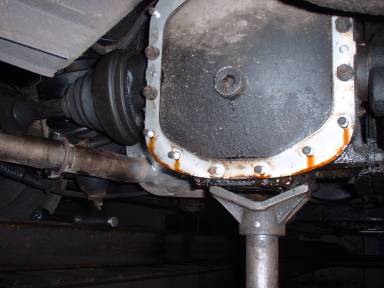 | |||
Richard Treacy Grand Master Username: richard_treacy Post Number: 566 Registered: 4-2003 |
Pat, This is brilliant work. The original factory lower crossmember mod indeed did not use just two bolts on the lower crossmember mount, but had two additional countersunk setscrews to keep the new lower plates flat and to spread the loads (see my earlier pictures). I am sure that your MIG welding will spread the load better than bolting, but a metallurgist or two may care to comment. Given the flaws which needed MIG repairs just recently on our '72 car's lower crossmember, despite having been modified anonymously by R-R in the late 1970s, you have pipped everyone at the post. Let's watch this space. I hope I may use the pictures with due acknowledgement to you, and shall hold back a few days on submitting a Praeclarvm aricle accordingly. I am most interested soon to see your own solutions to the subframe (Z-bracket I named our fix) and boot floor reinforcement. Maybe ours will prove a bit rough-and-ready by comparison. Useful to all would be details on any positive signs of imminent failure. The boot floor piece which separated on ours highlights the limitations of spot welds, and your previous pictures confirm this. I would personally be selfishly glad to hear that you have avoided a near catastrophe as our car suffered (thankfully it was only money in our case). RT. | |||
David Gore Moderator Username: david_gore Post Number: 396 Registered: 4-2003 |
Provided the welds have full penetration with adequate heat input; it is most unlikely these will be potential sources of future problems. | |||
Bill Coburn Grand Master Username: bill_coburn Post Number: 343 Registered: 4-2003 |
Richard relax. The cut offis stll yonks away and when David gets burried in rally stuff we will be among the last to be inserted. | |||
Patrick Lockyer. Grand Master Username: pat_lockyer Post Number: 325 Registered: 9-2004 |
Now the crossmember is completed the task of checking the body mounting structure,good news both sides are ok so i will be leaving as is. A good look into the floor mounts and i am not happy at all with the feeble inner spacer locating on the boot floor section. As this takes all the loading if the bolt becomes slighty loose through section fatique etc the top and bottom sections with spacer will pull out with the results of the whole diff assembly dropping with disastrous results as RT has brought this to attention after the Bentley suffered from this. The next job is to make some renforced plates for the boot. The one important job on all Shadows etc is to check the boot floor mounting bolt for tightness as the nut is without any locking device, I would recomend checking the silent block mounts with the rear wheels off if there is any strange noises within the rear end area. More to follow as the repairs take shape. 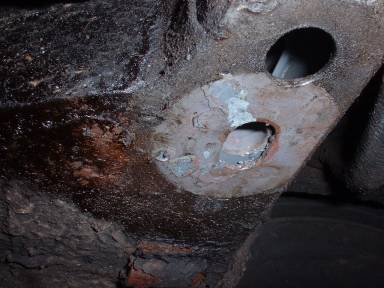 | |||
Richard Treacy Grand Master Username: richard_treacy Post Number: 569 Registered: 4-2003 |
Thanks again, Pat. The tightness of the main bolt is an impotant issue which you have raised. You will notice from the pictures in the other thread, on our car there is now a Nylock locknut on the main mounting bolt for the very reason you cite. A Nyloc nut is fine as it is a low-temperature application. RT. ps do I see flaring of the subframe in your picture due to the distance piece ? If so, by the way that's why we fitted the Z-bracket. I referred to a mismatch between the small-diameter distance piece and the subframe, and also the boot floor. Your idea of a new, far larger diameter distance piece seems to be an excellent alternative. It looks to me like you caught this just before it would have failed. | |||
Richard Treacy Grand Master Username: richard_treacy Post Number: 570 Registered: 4-2003 |
To avoid confusion, the inner spacer and distance piece are one and the same component. | |||
Patrick Lockyer. Grand Master Username: pat_lockyer Post Number: 328 Registered: 9-2004 |
Another day of progress, useing 14g sheet metal 6"+6"i made the recess and welded a heavy flat washer. This is the most important part as the bolt and all the load is carried on the plate recess. The washer is of larger diameter than what is used originally so the bearing surface circle has to be enlarged. Pix of recess and heavy type flat washer. 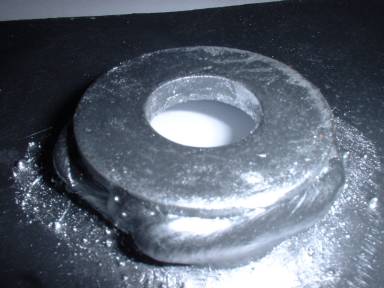 Pix of completed plate 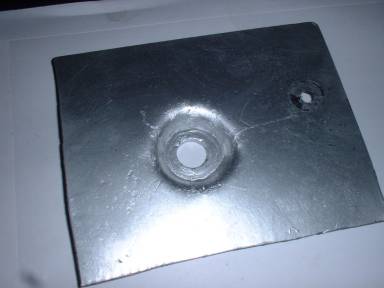 The O/s plate will be more or less a mirror image of this one. When the boot floor plates are bolted up with the crossmember assembly i will put some type of fixings for locating them if the bolts are removed at any time. Going back to the damper bracket that i welded in place,i was not happy with the reliance on welds alone so have drilled the centre and fitted one nut and bolt with washers on each. Pix crossmember fitted up with mounts and dampers. 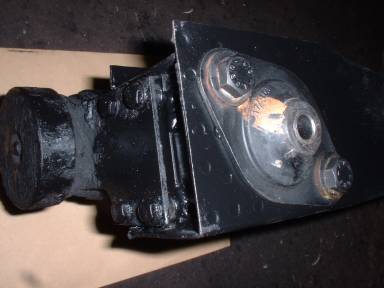 | |||
Patrick Lockyer. Grand Master Username: pat_lockyer Post Number: 330 Registered: 9-2004 |
Hummmm! Mirror image,well that was not to be, the fuel tank mountings come close and the recess is stepped so have made a different shape plate today. pix o/s boot floor mount. 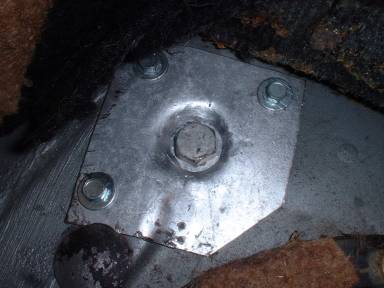 The n/s was completed first with four fixings and then the o/s but with only three. This i preffered than welding in place as the zink coating of the body would be burnt off,a source of corrosion in future years. The main stress loading is on the n/s due to the directional torque of the drive. The bolts were put in place and the crossmember assembly was bolted up with the single washer idea as Richard T suggested due to the drive shafts being more in line, be it just a little also i was able to use the stepped original bolts with Nylock lock nuts. All went ok and the lpg tank was refitted and the car tested with a clean bill of health. How lucky to catch the job in time before the failings occured,it would have been just a matter of time. The z plate was not needed in this case. Pix of the n/s boot floor mount. 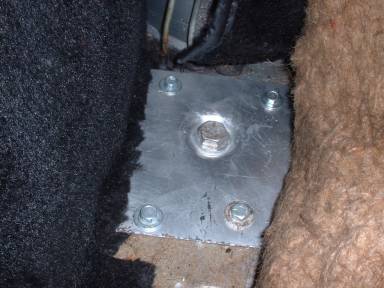 I will do some checks in the near future of other stress loaded points as these cars are getting on a bit,dont want to be an alarmist though. | |||
Patrick Lockyer. Grand Master Username: pat_lockyer Post Number: 331 Registered: 9-2004 |
two more pix.One of the single washer spacer insted of the two. The other is the crossmember installed. 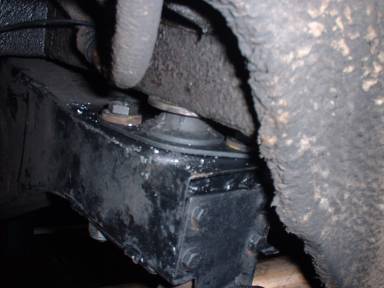 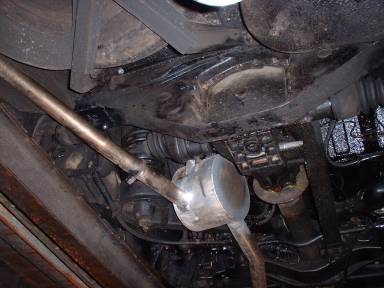 Job done. | |||
Robert Wort Grand Master Username: robert_wort Post Number: 185 Registered: 12-2004 |
Read the excellent article by Richard Treacy and introduced by Bill Coburn on the above topics in the latest Praeclarvm today. Excellent work gents. Let's not forget Pat's bit too which was also referred to in the same contribution. | |||
John Beech Prolific User Username: jbeech Post Number: 167 Registered: 10-2016 |
Folks, what is "Praeclarvm"? Also, it would have been very nice to have a wide angle photo showing the area to be worked on. | |||
Brian Vogel Grand Master Username: guyslp Post Number: 2198 Registered: 6-2009 |
PR�CLARVM is the RROC Australia's club magazine, with the subtitle, The National Journal of the Rolls-Royce Owners' Club of Australia. Even though I seem to have 2 PDF copies of said publication I cannot seem to locate any online archive at the club site or on rrtechnical.info for it. Brian | |||
Brian Crump Prolific User Username: brian_crump Post Number: 152 Registered: 2-2007 |
Brian - try this: http://praeclarum.rroc.org.au/ Regards, Brian | |||
Brian Vogel Grand Master Username: guyslp Post Number: 2199 Registered: 6-2009 |
Thank you very much Mr. Crump!! I don't know if this isn't better publicized on other parts of the RROC-Australia affiliated websites because it's supposed to be a members-only benefit or not. If not this should definitely be added so that it's prominently featured on both rrtechnical.info and on the main RROC-Australia web page. Brian | |||
Brian Vogel Grand Master Username: guyslp Post Number: 2201 Registered: 6-2009 |
Also, the article regarding reinforcing the final drive crossmember is posted on rrtechnical.info: http://rrtechnical.info/finaldrive/FinalDriveCrossmember.html | |||
BobJohnson Unregistered guest Posted From: 66.157.199.184 |
cannot find the torque spec for the main center mounting bolt 3/4" that goes thru the mount and thru the boot floor.Does anyone know?Can't find it posted anywhere.This would be most sincerely appreciated.1971 Shadow SRH12094 (Message approved by david_gore) | |||
David Gore Moderator Username: david_gore Post Number: 3895 Registered: 04-2003 |
Bob, Attached below is the section from the Shadow Workshop Manual TSD2476 relating to bolt torques. These apply to the bolt types specified and fasteners with non-standard torque values are listed individually.
If you do not have the TSD2476 Shadow Workshop Manual, it is a free download from the RR Technical library [make sure it is the high resolution version]: http://rrtechnical.info/  |