| Author | Message | ||
Jeff Cheng Experienced User Username: makeshift Post Number: 46 Registered: 2-2016 |
So digging further into SRH23650, I've realized that the test function of the dash warning lamps doesn't seem to be working. Pressing the 'Test' button only sounds the overheat buzzer and lights the Coolant level lamp (although I've read this is normal in some markets). No lights come on when cranking the engine. I'm not particularly worried, as all the warning lamps work when tested on their individual sensors (brake fluid level/pressure, coolant level, handbrake etc etc), so any faults or abnormal conditions are still highlighted. They just don't light with the "Test' function. Is there a relay somewhere dedicated to the test circuit? | ||
Bob Reynolds Grand Master Username: bobreynolds Post Number: 422 Registered: 8-2012 |
Yes. It is one of those in the middle of the dashboard, on a printed circuit. See the topic Silver Shadow: Relays. The Warning Lamp Test Relay is operated by the starter switch and puts Earths out (through diodes) to all the warning lamps to check the bulbs. | ||
Jeff Cheng Experienced User Username: makeshift Post Number: 48 Registered: 2-2016 |
Bob, Thanks for that, I have found the thread you mentioned. Looks like pulling the top roll might wait to become a winter project, along with maybe replacing the radio balance knob with a gauge of some sort.  | ||
Geoff Wootton Grand Master Username: dounraey Post Number: 1454 Registered: 5-2012 |
Jeff With the engine and ignition off, push the gear lever into D. Then turn the ignition key to it's full extent as if to start the engine. The engine won't crank as you are in D, but the warning lights should all illuminate. Geoff | ||
Jeff Cheng Experienced User Username: makeshift Post Number: 49 Registered: 2-2016 |
Geoff, I've tried turning the key to Start with the shifter in D repeatedly (I remember reading about a member whose lamps only tested once every 5-10 this way), but still no lamps. The test button only shows the coolant level lamp and overheat buzzer. Again, not an urgent matter for me as I know all the lamps work when the sensors are 'triggered'. | ||
Geoff Wootton Grand Master Username: dounraey Post Number: 1455 Registered: 5-2012 |
Hi Jeff I realize this is not a big issue for you as you know your warning lights are ok, but next time you are doing work on your car replace all the diodes in the fusebox. If some of these have gone open circuit it will explain why only some of the lamps light up when the warning light test button is pressed. The circuit fragment below is for my car, SRX18501. I can't recall whether your car is an SY1 or SY2, but the principle will be the same. You can see from the diagram the warning lamp test relay switches the warning circuits to earth, through diodes. If the diodes are open circuit, the earth connection will not be made. 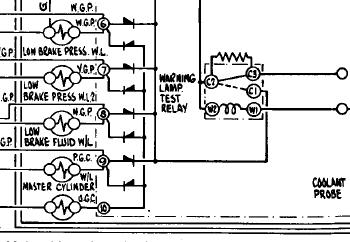 It's strange how these cars are wired differently. Some use the push button and others the gearbox cutoff circuit. The other thing is, I have searched for the fabled buzzer which sounds to let you know you have just destroyed your engine, but cannot find one. I suspect it was never fitted. Geoff | ||
Jeff Cheng Frequent User Username: makeshift Post Number: 52 Registered: 2-2016 |
Geoff, Thanks for that tidbit of knowledge regarding the diodes. Although dusty, all my diodes checked out functional. My car is an SY1. As the plot thickens, I now get some warning lamps holding the key to 'start' with 'D' selected on the column. All the lamps come on apart from the Coolant level and Brake 2 lamps. But they are really dim, almost invisible in daylights. Occasionally (once in 10?) I hear a louder (or another) relay click under the top roll and all the lights come on brightly as they should. So the relay is not completely dead. I'm hoping it's all part of the 'waking up' of my car and the functionality will come back with use. | ||
John Beech Experienced User Username: jbeech Post Number: 38 Registered: 10-2016 |
Jeff, I am chasing down a few gremlins of my own and as part of my process am cleaning terminals and such. I find a small needle oiler filled with CorrosionX quite handy. Reason I mention it is you said the relay occasionally triggers and lamps are dim but occasionally bright, and this sounds like a symptom of a poor ground (earth). For what it's worth, my way is to remove and replace the spade terminal in question a few times because the process is self-cleaning. E.g as you remove the terminals off the spade lug and put it back on, the metal is scraped, or cleaned for a better connection. And if it feels loose, either snug it up with duck-bill pliers or replace it. And for God's sake, don't use 'el cheapo' crimping pliers if you replace terminals but instead, buy a dedicated pair of good ones. They're not very expensive and well worth the small expense. Trust me. John, whose fuel gauge is still not working and who remains confused about the function of the test button because the fuel gauge needle sweeps full range when pressed, but is otherwise set in stone just a hair below quarter tank while the tank is assuredly full. | ||
Patrick Ryan Grand Master Username: patrick_r Post Number: 694 Registered: 4-2016 |
Hi John, I'm sorry I am currently traveling with work and don't have access to my car or my car images. Here is a pic from the net, showing the detail of the fuel gauge. During the test button pushing, it also doubles as an engine oil level indicator. So when it sweeps to full, it is just showing it is above the minimum amount required.  John, Does the gauge go down when the tank is below 1/4 as it empties? | ||
Geoff Wootton Grand Master Username: dounraey Post Number: 1484 Registered: 5-2012 |
John, whose fuel gauge is still not working and who remains confused about the function of the test button because the fuel gauge needle sweeps full range when pressed, but is otherwise set in stone just a hair below quarter tank while the tank is assuredly full. Since the gauge appears to be ok, insofar as you get full deflection when you press the oil level button (another fault related to the oil sender unit), I would suspect a frozen joint on the fuel tank sender unit. This is very easily accessible. Just lift the carpet in the trunk, remove the cover (4 screws) and then undo the 6 screws that hold the sender unit in place on the fuel tank. 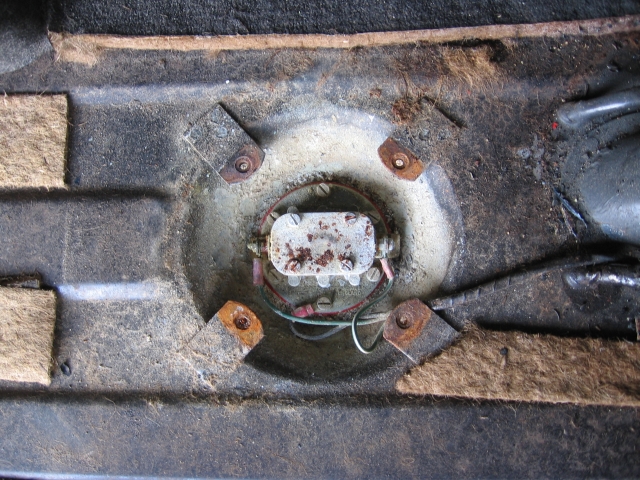 Once you have removed the sender unit you can try moving the float lever up and down whilst monitoring the fuel gauge. In the unlikely event the float is punctured and partially full of fuel, causing it to hover at the 1/4 full mark, you can get a replacement here: http://www.englishparts.com/products/FLOAT--Fuel-Tank-Sending-Unit--Plastic/7143349/JLM772OEM.html Check this float is the same on your car - it was a direct replacement for mine, but the earlier models may be different. Geoff | ||
Patrick Ryan Grand Master Username: patrick_r Post Number: 695 Registered: 4-2016 |
Hi Geoff, Is the gauge deflecting all the way to fulll showing that the oil level is not low, correct operation for the fuel gauge when the button is pressed? I was told it does not actually show any level, it just shows the oil level is above the sensor mounted on the side of the sump. | ||
Geoff Wootton Grand Master Username: dounraey Post Number: 1488 Registered: 5-2012 |
Patrick I did not realize that. The fuel gauge on my car also deflects full when I press the button. I assumed it was faulty. As they say, you learn something new every day. Geoff | ||
John Kilkenny Prolific User Username: john_kilkenny Post Number: 247 Registered: 6-2005 |
Here is a description of the fuel gauge circuitry. Shadow Fuel Gauge with Oil Level Indicator The Shadow Fuel Gauge normally indicates the level of fuel in the tank but while the Warning Lamp Test Switch is pressed, changes to show the level of oil in the sump. Both the fuel and oil level transmitters consist of a case containing a wire wound resistor of approximately 80 ohms, one end of which is earthed and the other end connected to a terminal at the top of the case. An arm with a cylindrical float is attached to the case with an earthed slider. Circuit Operation The resistance seen at the terminal increases as the float rises with the fuel or oil level. The fuel level transmitter is accessible at the top of the fuel tank in the boot and the oil level transmitter is located on the driver�s side (RH Drive car) of the sump. The operation of the gauge itself is based on two opposing coils, each with a resistor in parallel. One resistor is fixed , the other is variable and can be either the fuel transmitter resistor or the oil transmitter resistor. The ratio of the currents through the two coils decides the position of the gauge needle. The fuel tank transmitter also contains a switch which operates when the amount of fuel drops below about 12 litres. This switch operates the green Low Fuel Lamp in the Warning Lamp Panel. A dimming relay reduces the intensity of this lamp when the car lights are on. Fuel/Oil Gauge problems are usually due to open or short circuits in the wiring or switch contacts. A short circuit will move the gauge to Empty while an open circuit will move the gauge to Full. Care should be taken if removing the transmitters as it is easy to bend the float wire. It is also possible to slightly bend the float wire if the gauge needle position needs adjustment A useful check of the oil level indicator can be made during an oil change. After adding about five litres of new oil switch on the ignition and press the Warning Lamp Test Switch. The gauge should show a low level. Then add the remainder of new oil and press the switch again. The gauge should now indicate 'FULL' 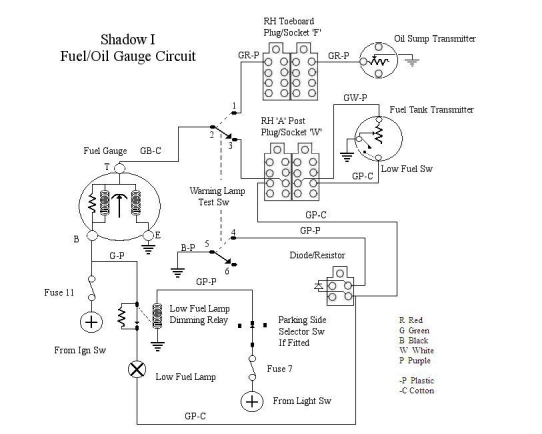 | ||
Geoff Wootton Grand Master Username: dounraey Post Number: 1489 Registered: 5-2012 |
Hi John Yet another gem of information. Thanks for putting it up. So repairing my oil level indicator is back on my todo list. The fact my gauge deflects to full means the fault may simply be a loose connector. Geoff | ||
Patrick Ryan Grand Master Username: patrick_r Post Number: 696 Registered: 4-2016 |
Or that the sump is full Geoff. I will do the test next time I drain the sump. Which reminds me. Does anyone have a diagram showing the order that all the rubbers, rings etc go onto the mounting bolt/tube on a Shadow I with a cartridge type filter? | ||
Geoff Wootton Grand Master Username: dounraey Post Number: 1490 Registered: 5-2012 |
Hi Patrick Check out Tee-One topics chapter 68 page 953. Bill Coburn shows the assembly layout. Geoff | ||
Patrick Ryan Grand Master Username: patrick_r Post Number: 697 Registered: 4-2016 |
Isn't it past your bedtime mate?? It's Friday for me, been traveling with work all week in Queensland. I've been entertaining journalists in our brand new truck released 2 weeks ago. Sleep in tomorrow YAY. OK thanks I will check it out. I've changed my oil so many times but never checked if the order of all the rubbers are correct. | ||
John Beech Experienced User Username: jbeech Post Number: 44 Registered: 10-2016 |
New truck release, Patrick? Pray tell, what's this about? If you're telling journalists perhaps you can share with us as well? Photos and details as well? I have a couple of trucks serving my needs - by no means a fleet - but they perfectly suit my needs and interests beyond RR. 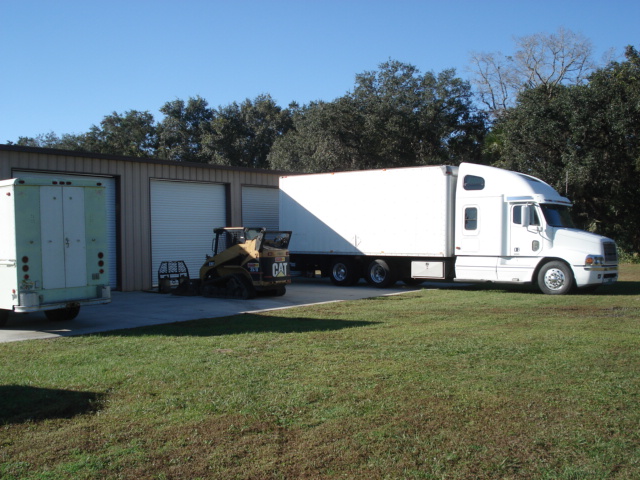 - 1974 Olson body P30 step van and 2001 Freightliner Expediter box van | ||
Patrick Ryan Grand Master Username: patrick_r Post Number: 708 Registered: 4-2016 |
Hi John. I work for Volvo Group Australia. We manufacture Volvo & Mack trucks at Wacol in Queensland plus UD Trucks in Ageo Japan. I have been involved with the launch of a new 6x4 truck into the Australian market. I also spend time with journalists regarding the road testing of the new models. It's been 16 months in the pipeline, which is a record in speed to market. I did a lot of work with Freightliner here in Australia when I worked with Eaton before I started at VGA | ||
John Beech Frequent User Username: jbeech Post Number: 60 Registered: 10-2016 |
I've noticed a huge emphasis on self-driving technology and follow the developments - not closely - but with interest. Especially those related to retrofitting the technology to existing trucks, which I find fascinating because it would, for us personally, mean dispatching the unit and retrieving it, more easily and reliably than securing the services of a professional driver (at present). The way it works is we send the truck a few days before an event (weekends 95% of the time) and then attend by flying our Beechcraft Bonanza. While it's not a jet, seeing as 99% of events are within the southeastern United States the door-to-door time is very much like that of a commercial carrier, but on my schedule despite flying at 180mph instead of 500mph (the benefit of living a mere three miles from the hangar - not by accident). Anyway, this makes very efficient use of me and my time versus flying commercial with the attendant delays involved by bookending the event by a day on each side of the actual dates I needs be present. To say nothing of it making it far easier for Maggie to attend versus being condemned to the tender ministrations of doggie day care. 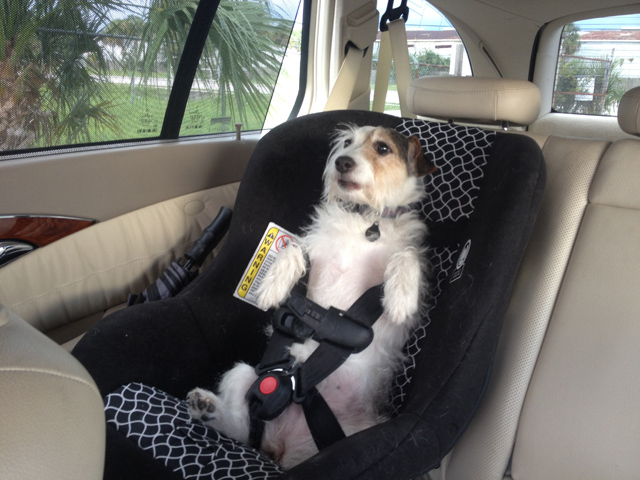 - Safely ensconced, Maggie travels in style 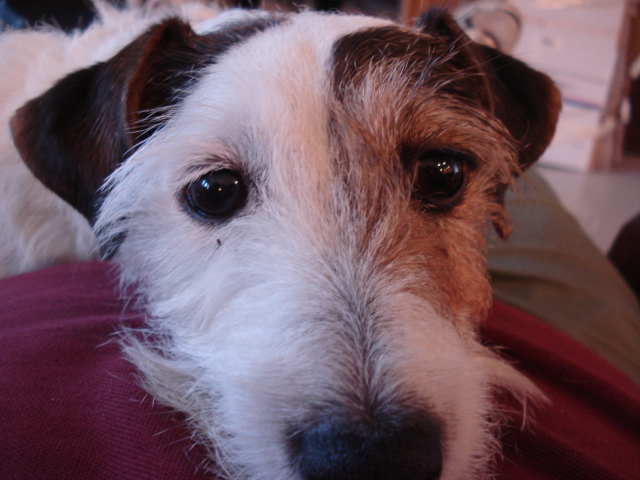 - My favorite bitch pretty much goes everywhere I go 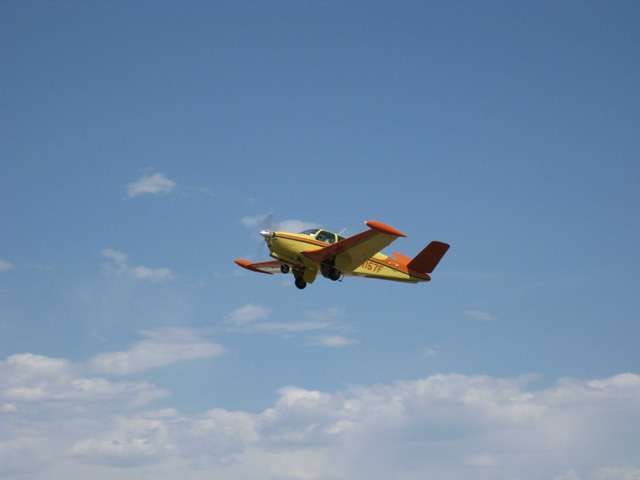 Sweet-E departing on another mission! | ||
John Beech Frequent User Username: jbeech Post Number: 69 Registered: 10-2016 |
Tootsie's coolant warning lamp (amber) isn't illuminating when I press the test-mode button. Keenly aware driving her this way is akin to driving naked because of the consequences due to overheating, before suspecting anything serious I am first going to replace the bulb. Am I correct in assuming I must merely remove the two common-head screws (one each in the upper corners of the center fascia panel) thereby permitting the fascia to hinge forward for ready access? I wonder because the air ducts are in this panel as well as the control knobs. 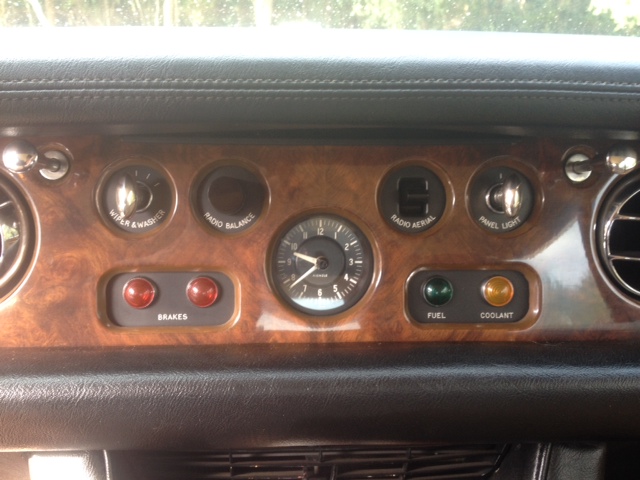 - Instrument panel, center 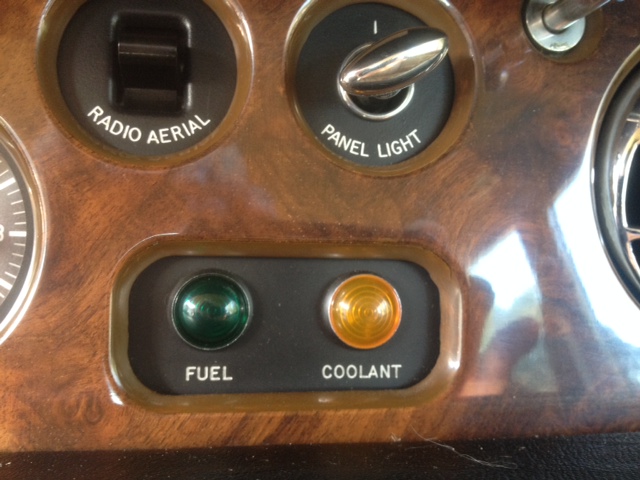 - Coolant indicator lamp, extreme close up Finally, does anyone have a clue what this mystery piece is near the top of the fascia? I tried (gently) pulling on it to see if it slides out but it's firmly fixed in place. 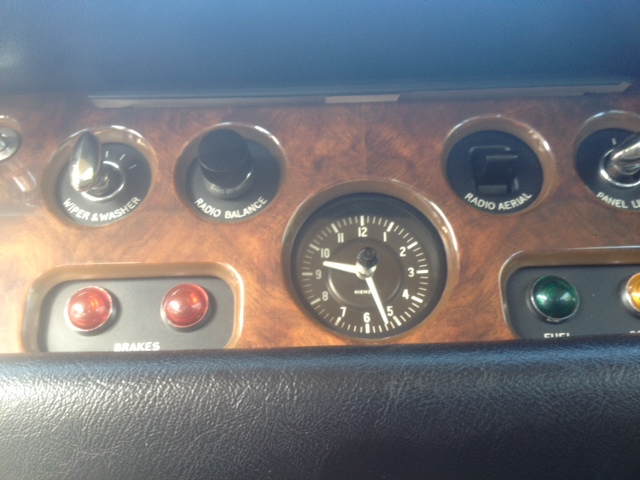 - Mystery piece1 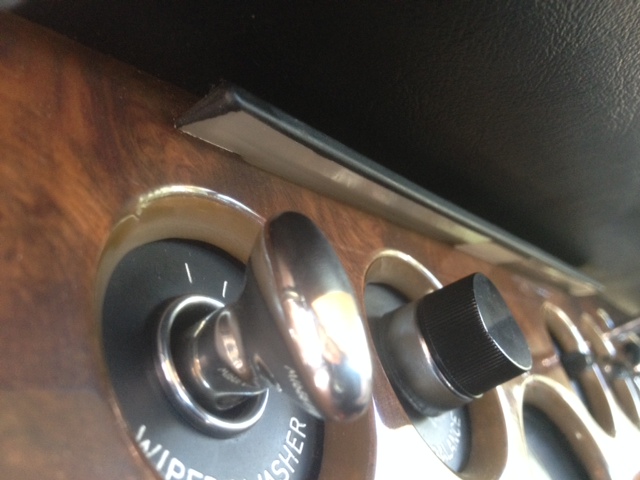 | ||
Patrick Ryan Grand Master Username: patrick_r Post Number: 718 Registered: 4-2016 |
Hi John, I have only had the dash facia out around the speedo, and they guys here on the forum kindly informed me there was a hidden screw below and to the right of the ignition assembly. It is hidden under the bottom dash padding nearest to the door. Please see my post here. http://au.rrforums.net/forum/messages/17001/19734.html I have not seen any hidden screws below the middle part of the dash, but I am sure someone here will let us know. The mystery item is the illumination for the centre part of the dash & the non illuminated controls.. Your dash is the same as mine. You should also see a small oval shape light above your heater controls as well. The below image shows the lamp held in by 2 screws above the centre vent. (yes I have fixed the screws since   | ||
David Gore Moderator Username: david_gore Post Number: 2327 Registered: 4-2003 |
John, does the coolant bulb light up when you test the warning lights? If so, the problem will be in the radiator header tank sensor/amplifier and a fix for this problem has been covered in this forum and possibly in Tee One Topics as well: au.rrforums.net/forum/messages/17001/4676.html?1412523601 | ||
Geoff Wootton Grand Master Username: dounraey Post Number: 1494 Registered: 5-2012 |
John The other thing to note when removing the centre panel of the dash is the chromed "knobs" at the end of the heater duct control rods have to be removed to allow the panel clearance. They are held by two small grub screws on the underside. The grub screws take a 1/16" allen key. Your car should be the same as my 74 model. On my car the windscreen wiper and panel light knobs have to be pulled off. I'm not sure if this is necessary on yours as the knobs on your car are smaller. This will become apparent when you try to remove the panel. On my car the coolant light illuminates in test mode. This indicates the coolant level system is working correctly. I'm not sure if this is the same on the earlier cars. Geoff | ||
Patrick Ryan Grand Master Username: patrick_r Post Number: 719 Registered: 4-2016 |
My lights work the same as Geoff's. Mine is 72 | ||
David Gore Moderator Username: david_gore Post Number: 2328 Registered: 4-2003 |
John, Further to Geoff's advice re the chrome knobs and associated grub screws - be careful, VERY careful with these little blighters as they love to jump off the allen key and hide themselves on the floor or under the seats and they are very difficult to find. I have forgotten if they are brass or steel so magnetising the allen key with a permanent magnet may or may not aid retention on the key after removal. I remember covering the floor and console with a white sheet when removing the screws to replace the instrument light bulbs to catch them if they fell off the allen key however I was able to keep them on the key and put them in a container. The sheet received further use when replacing the screws however I used a small dob of "Blu-Tac" to retain the grub screws on the key whilst positioning them to screw home in the knobs. The test mode only shows the bulb is working or not and not the probes and amplifier. | ||
John Beech Frequent User Username: jbeech Post Number: 71 Registered: 10-2016 |
David, the amber coolant lamp 'does not' illuminate during test mode. Hence my thought to first change the bulb (on the basis that when you hears hooves, you should think horses, not zebras). Further to the point, I looked at the radiator header tank and there are a pair of wires coming out and very neatly routed. Per my reading this is not for temperature but for coolant level . . . a pair of brass contacts that complete the circuit when there is liquid present, and otherwise illuminate the lamp because the circuit is open when the liquid isn't covering them - is this correct? Thus, the amber warning lamp isn't for over-temp but for inadequate coolant level only?!?!? If this is correct, all I can say is, ye Gods, what were the engineers thinking? Patrick, illumination never crossed my mind. In any case, because it's 2230 and quite dark, I strolled outside to verify function and unfortunately, it's not functioning. And neither is the lamp immediately above the ventilation controls. Moreover, it's not anything like what's in your photo because it is a nearly flush white, circular lens within a black plastic holder and perfectly inset in the padded section (and about the size of a US nickle coin). 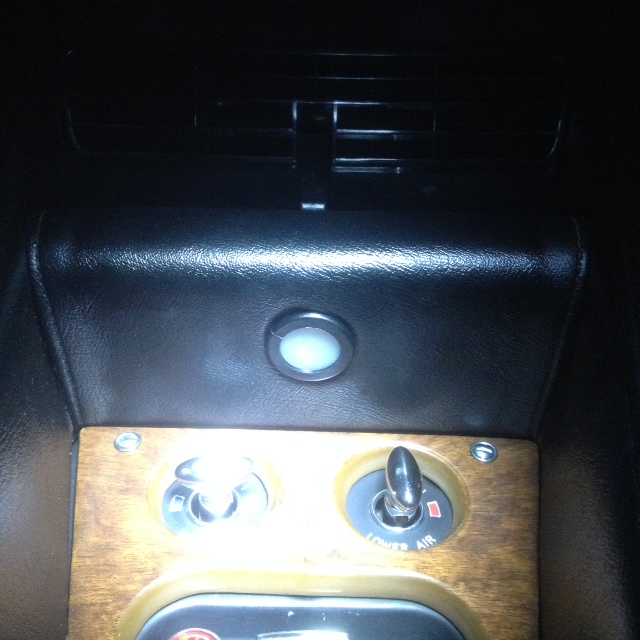 - Panel illumination for ventilation controls Finally, I looked and saw nothing illumination-wise above the central vent (and the radio), so Tootsie is a little bit different from yours in this regard. 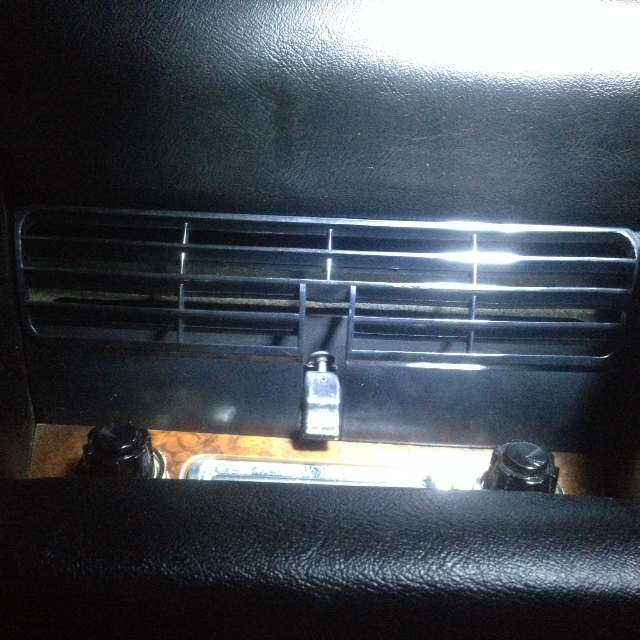 - Non-existent-radio-illumination} | ||
Patrick Ryan Grand Master Username: patrick_r Post Number: 723 Registered: 4-2016 |
Yes John, As everyone rightly states, no 2 are alike, even when they seem to have been built almost consecutively. I will try and get a pic of mine tonight with the lights on. | ||
Geoff Wootton Grand Master Username: dounraey Post Number: 1495 Registered: 5-2012 |
Hi David The test mode only shows the bulb is working or not and not the probes and amplifier. This is one of the rare occasions where I have to disagree with you. When the coolant level warning bulb failed to illuminate in my car, it was the first thing I changed. It would still not illuminate in test mode. I had to rebuild the amplifier to get it to work. Here's the circuit fragment provided by John Kilkenny:  You can see in the bottom left corner the test relay simulates the action of the coolant probes. In normal operation the probes are dipped in the coolant in the header tank, providing a route to ground. When the coolant level drops below the probes, the connection between the base of the transistor and ground is broken, causing the warning light to illuminate. The test relay simulates the breaking of this connection. So in test mode the amplifier is checked also. I agree the test circuit does not explicitly check the probes. Geoff | ||
David Gore Moderator Username: david_gore Post Number: 2330 Registered: 4-2003 |
Geoff, I plead guilty due to the passage of time - 15 years have passed since I did any serious work on the Corniche and I have forgotten more than I remember now. Grovel, Grovel plus gravel rash ........... | ||
John Beech Frequent User Username: jbeech Post Number: 73 Registered: 10-2016 |
OK, folks, let's summarize how I should proceed. 1. Check fuse 11 2. Check bulb 3. Check coolant level warning circuit board Everyone concur? And if someone knows off the top of their head, where is this circuit board? And a source of RR-specific fuses is Flying Spares, or I may just as well go to my local Bentley/RR dealer 8 miles away, or . . .? | ||
Jeff Young Prolific User Username: jeyjey Post Number: 282 Registered: 10-2010 |
Hi John, There are threads on rebuilding the coolant warning circuit here: http://au.rrforums.net/cgi-bin/forum/show.pl?17001/22638 and here: http://www.rollsroyceforums.com/forums/26-sy-series-i-ii-1965-1980/852-coolant-level-amplifier-rebuild.html and here: http://www.rollsroyceforums.com/forums/26-sy-series-i-ii-1965-1980/4185-coolant-level-check.html I think most of those are SYII-specific, but the coolant warning amplifier board is the same (it just might be in a different location on an SYI). Cheers, Jeff. | ||
Patrick Ryan Grand Master Username: patrick_r Post Number: 725 Registered: 4-2016 |
Hi John, Here is the pic I promised of the dash lights. If both of yours are not working, try turning the parkers on, and pull the knob marked "panel light" out. It will pull out to a hard stop. If they are still not working it may be globes. 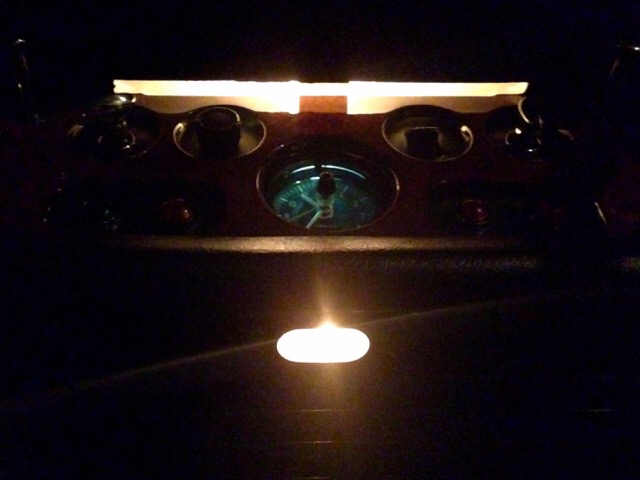 | ||
Patrick Ryan Grand Master Username: patrick_r Post Number: 726 Registered: 4-2016 |
Also John, I forgot to mention my 72 model does not have that bar of padding between the radio & the heater controls like yours does. As mentioned my light is above the vent, yours is in the padding below the radio. 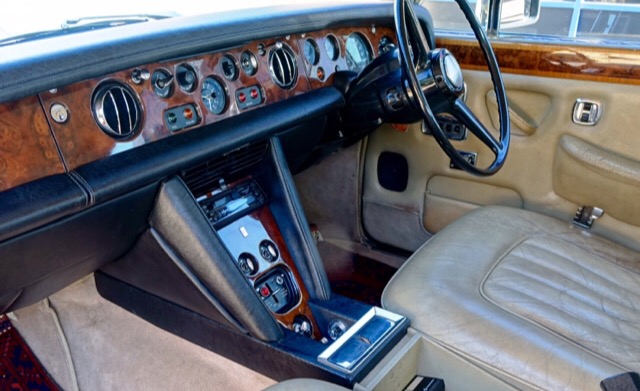 Also, I seem to remember reading that my model heater knobs & fan switch assembly are lit from around the switches them selves, but I have not pulled the console apart to check this out, they would have clear plastic around them if this was the case. Does anyone know if these knobs & fan switch assembly are internally lit gents? Maybe a project for the weekend, the cigar lighter has never worked, nor have I needed it until the wife wanted to charge her phone  | ||
John Beech Frequent User Username: jbeech Post Number: 74 Registered: 10-2016 |
Thanks, Jeff, for saving me the time searching, especially the reference to the other forum because whilst I've joined it, I don't split my time and stay on this one (by and large). Geoff, the link to your removing the speedometer in your car was brilliant. I saved the photos about disassembling the instrument panel within a directory beneath interior-directory (and also the circuit diagram for the coolant level warning). Plus a txt of the link you kindly shared so I may find it quickly if needs be (hopefully never). Meanwhile, other than the two switch-illumination lamps not working when the lights are on, as well as the coolant warning lamp not coming on during the test, all is well with Tootsie. FWIW, she has two switch-controlled levels of illumination instead of a variable resistor as fitted to other cars I recall owning. Low is perfectly adequate for highway use and high is fine for city driving. Thus, I need to sort out what's what. Before I go further, I will check the individual fuses. I have opened the swing away fuse-panel and once I saw the fuses, other than four diagonally-mounted at the very top, were 'different' from what I've seen before, I snapped a photo and promptly closed it. Actually, before closing it I did pull and replaced all of them (because this re-seating would clean the point of contact). I also noticed some spare glass-type fuses. By the way, I was rather surprised to see a row of diodes (lower left), which I've never seen in a fuse block previously. I feel I should source some of these (diodes and fuses both, just to keep on hand even if they all test fine). I do wonder what the winding of wire is along the right hand side. 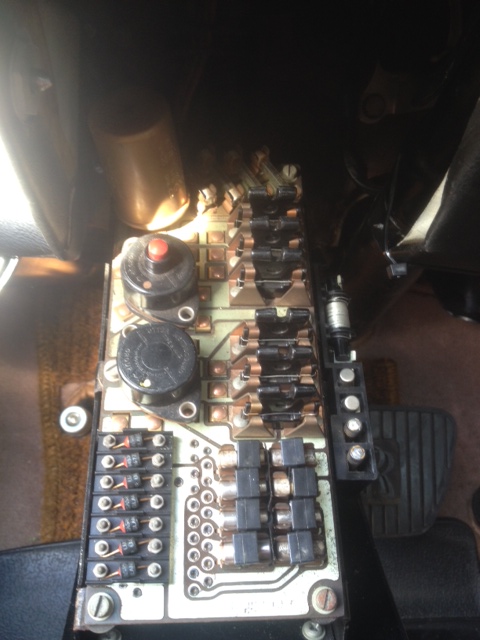 Tootsie's fuse panel Finally, off the top of your head, do you recall the numbering scheme for the fuse panel? If not, I can dig it up. | ||
Jeff Young Prolific User Username: jeyjey Post Number: 283 Registered: 10-2010 |
The winding of wire is fuse wire so you can make your own to get you home if you're stuck. | ||
Geoff Wootton Grand Master Username: dounraey Post Number: 1496 Registered: 5-2012 |
The winding of wire could be used as an emergency measure if there were no spare glass fuses, but it's primary purpose is to replace the wire on the bakelite fuses. It should be No. 30 S.W.G. (0.0124" diameter) tinned copper wire of 22 ampere rating (ref: Page 121 of the owners handbook (1975)). Geoff | ||
Geoff Wootton Grand Master Username: dounraey Post Number: 1497 Registered: 5-2012 |
John On the later models there is a pull out tray underneath the fuse panel which gives a map of the fuses. It would be worth checking if your's has one.  I replaced all my diodes with 1N4007s. Geoff | ||
Geoff Wootton Grand Master Username: dounraey Post Number: 1498 Registered: 5-2012 |
 | ||
David Gore Moderator Username: david_gore Post Number: 2332 Registered: 4-2003 |
Richard Treacy has numerous posts on this forum relating to the fuse board diodes. Just use the Forum Search function restricted to the Shadow topic using "diode" as the key word. You can also use Brian Vogel's very effective google search link [this link is set up for a Firefox browser]; https://www.google.com/search?q=site%3Aau.rrforums.net%2Fforum%2Fmessages&ie=utf-8&oe=utf-8&client=firefox-b-ab | ||
Brian Vogel Grand Master Username: guyslp Post Number: 2123 Registered: 6-2009 |
David, I'm not quite sure how that search link was generated, but one need not use Google nor Firefox. All I am doing is using the site: operator with the necessary information for the RROC-Australia discussion forum messages then adding the keywords I'm trying to search on. The site: operator works in every major search engine that I have any familiarity with. For these forums use: site:au.rrforums.net/forum/messages with whatever additional search terms you're trying to find on these forums. I keep this in a text file so that I can copy and paste it in as the first item in a search so that I don't have to type it every time and so I can't fat-finger it, either. If I were Google searching about the coolant level amplifier rebuild I'd probably try something like: site:au.rrforums.net/forum/messages "coolant amplifier" rebuild Using that phrase, "coolant amplifier" keeps an untold number of results being returned that contain coolant and rebuild. I get 7 very targeted results with that search, 14 if the quotes are removed, and if amplifier is removed it goes to 109. Brian | ||
John Beech Frequent User Username: jbeech Post Number: 77 Registered: 10-2016 |
Patrick, with the lights switched on (no key because lights come one without it), pulling on the panel light switch until I get the hard stop doesn't change anything - no strip of ventilation illumination. However I did notice the cigar lighter has a light (although I inserted a USB thingy for charging purposes). Geoff, no joy on the fuse diagram. Would you, or someone kindly scan theirs that I may print and laminate one for Tootsie, please? Brian, I've read about using site: but have never used it. So for giggles and grins I ran this search: site:au.rrforums.net/forum/messages "dash roll" remove . . . this returned two results including Patrick's very first post submission ;>) This thread had nothing to do with the dash top rll removal but instead dealt with dodgy 'parkers' and the solution. PLUS a delightful Robert Noel Reddington treatise on playing the axe while the traffic signal was green, which had me laughing out loud and chortling with glee. When he goes below 10 stone and dies it will be a tremendous loss. I doubt many realize just how ill he really is with Crohn's Disease. It's quite a cruel thing. The second result saw Bob_UK (an unregistered user whom I believe is also Robert Noel Reddington) going on about LP conversions. Anyway, between Robert Noel and Brian Volgel plus the rest of the gang this site is an absolute joy. Speaking of which, Brian, I still have not found the forum thread you reference elsewhere re: removing the dash roll (although your mention of S10 in workshop manuals found the official 'word' about how to do it). If you would kindly share the search that finds this I'd be grateful for what I will learn about searching using site: John, who has been enjoying the process of learning about Tootsie by reading threads within this forum. | ||
Brian Vogel Grand Master Username: guyslp Post Number: 2124 Registered: 6-2009 |
John, Terminology matters. You'll notice that the phrase "top roll" has been used because that's what Crewe called it. I have learned much simply by observing what "the old timers" (of which I now consider myself one after over 10 years of RR ownership) call things. Heaven only knows how some of these things came to be called what they are by Crewe. Crewe liked "roll": Top roll, knee roll. Try, site:au.rrforums.net/forum/messages "top roll" remove. The devil is, indeed, in the details!! [P.S. Bob_UK and Robert Noel Reddington are indeed one and the same person. There was once an issue with his former userid that caused the new one to come into existence.] Brian | ||
John Beech Frequent User Username: jbeech Post Number: 78 Registered: 10-2016 |
Aha! Top roll removal = 41 results. I'll dig through them tomorrow because I am sleep minus at present due to several consecutive very long working days and about to turn in early. Thank you Brian. | ||
David Gore Moderator Username: david_gore Post Number: 2333 Registered: 4-2003 |
Brian, I generated that link in Firefox to put it in my bookmarks for easy access to the Google search engine when needed. It opens a Google Search page for our Forum and if the search term is typed into the search box at the top of the page, the results appear by magic . | ||
John Beech Frequent User Username: jbeech Post Number: 82 Registered: 10-2016 |
Brian, I saved that search-example in a .txt and suspect I'll use this query technique for other sites as well - a superb unexpected lesson of the day - attaboy! John, who values anything that makes life easier! | ||
John Kilkenny Prolific User Username: john_kilkenny Post Number: 248 Registered: 6-2005 |
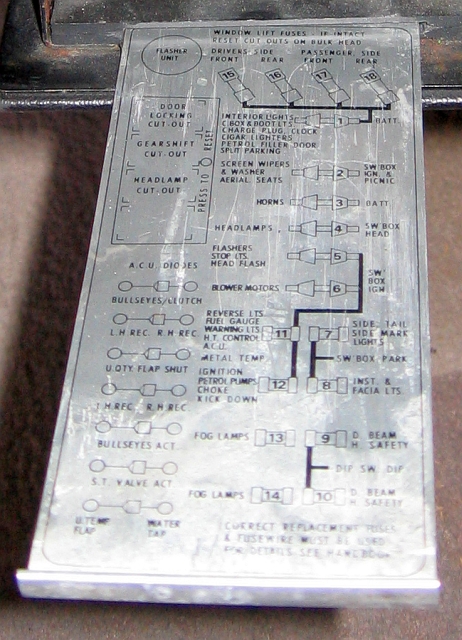
Here is a photo of the fuse panel slide out. A bit worn but it is 50 years old. 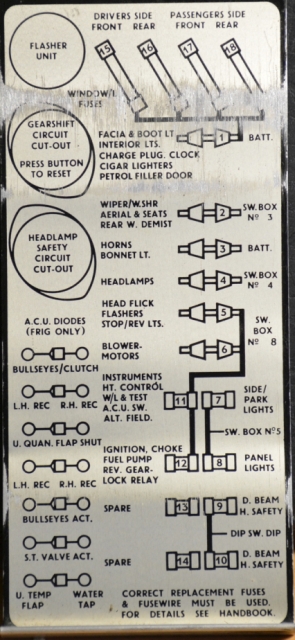 | ||
John Beech Frequent User Username: jbeech Post Number: 87 Registered: 10-2016 |
Fantastic, John, many thanks. What year did this come from? It certainly looks like Tootsie's fuse layout. Last thing, if it's not inconvenient, would you kindly share approximate dimensions, please? I make it at 1-1/2" x 3-1/4" . . does this seem right? | ||
John Kilkenny Prolific User Username: john_kilkenny Post Number: 249 Registered: 6-2005 |
Hello John, My car is SRH1405 a 1966 model. The plate dimensions are 2-5/16" x 5-3/8" with a 1/4" turn-up at the bottom to hold it in. | ||
John Beech Frequent User Username: jbeech Post Number: 89 Registered: 10-2016 |
John, thanks but I am wondering about the dimensions of the printed card itself. Or are the dimensions you shared of a rigid plate (aluminum?), which has the printed card attached? Would you kindly send a photo of the whole thing so as to better appreciate the item, please? Anyway, I suspect your 1966 and my 1969 share the same circuitry. | ||
John Kilkenny Prolific User Username: john_kilkenny Post Number: 250 Registered: 6-2005 |
John, That is a photo of the actual plate. There is no card, the info is printed on the aluminium plate, or perhaps a very thin transfer. It is hard to tell. | ||
Geoff Wootton Grand Master Username: dounraey Post Number: 1502 Registered: 5-2012 |
----------------------- 1966 ----------------------------------------- 1974 ---------------------  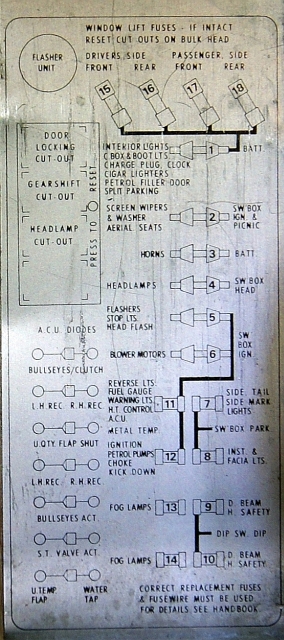 | ||
John Beech Frequent User Username: jbeech Post Number: 93 Registered: 10-2016 |
Best source for spare fuses? Flying Spares, otherwise? | ||
Martin Taylor Frequent User Username: martin_taylor Post Number: 58 Registered: 7-2013 |
Mine was missing, scan the page from the handbook, shrink it slightly, print it and laminate, then slide under the fuse board, picture is the same | ||
Brian Vogel Grand Master Username: guyslp Post Number: 2131 Registered: 6-2009 |
John, Any auto parts store worth going to should have a wide selection of glass tube fuses to fit your needs. Unless you absolutely must have Bulgin fuses, Bussman fuses in the sizes and ratings you need are easy to find. Brian | ||
Geoff Wootton Grand Master Username: dounraey Post Number: 1504 Registered: 5-2012 |
Also a reel of No. 30 S.W.G. (0.0124" diameter) tinned copper wire for the bakelite fuses, if the wire on the reel in your fusebox has gone brittle. This is more specialist would have to be purchased from an electrical/electronics supplier. Geoff | ||
Stefan Ihnat New User Username: stefan87 Post Number: 8 Registered: 8-2017 |
I have similar and yet a little different problems. When I do the test - change gear to D and turn key to the starting position, all warning lights are on except Coolant warning. But when I press the test button, a buzzer sounds, but warning lights no light. But for example, I pull the handbrake, the warning light light. Should the lights be switched on when the buzzer is on? At what amount of fuel the indicator light comes on? I'm going to find that the fuel is not too bright but the light is off, just over the first test. | ||
Jeff Young Grand Master Username: jeyjey Post Number: 359 Registered: 10-2010 |
I'd replace all the diodes first. Even if they test OK, they'll be long past their sell-by date. (When diodes fail open-circuit it's no big deal. But some of mine failed shorted, keeping me from using anything else on that fuse circuit till I fixed it.) Cheers, Jeff. | ||
Stefan Ihnat New User Username: stefan87 Post Number: 9 Registered: 8-2017 |
Thank you. I replace two diodes Which, according to the multimeter, they seemed bad. I will therefore exchange all of them. |