| Author | Message | ||
Patrick Ryan Experienced User Username: patrick_r Post Number: 24 Registered: 4-2016 |
I'm sorry to be asking for help yet again in such a short time frame but this one should be easy for you guys. One tiny little annoyance for me is that the left hand blinker/indicator arrow at the bottom of the speedo dial, seems to have had the green plastic drop slightly thus only allowing a small sliver of green to be seen when the left hand blinker/indicator is on. The right hand indicator glows like a magnificent beacon that can be seen from the moon  My questions are: 1)Does the top roll need to come off before removing the dash wood facia to access the speedo head? 2)Once out can the speedo be disassembled from the front allowing easy access to the dial to maybe shift the plastic up into the correct position? 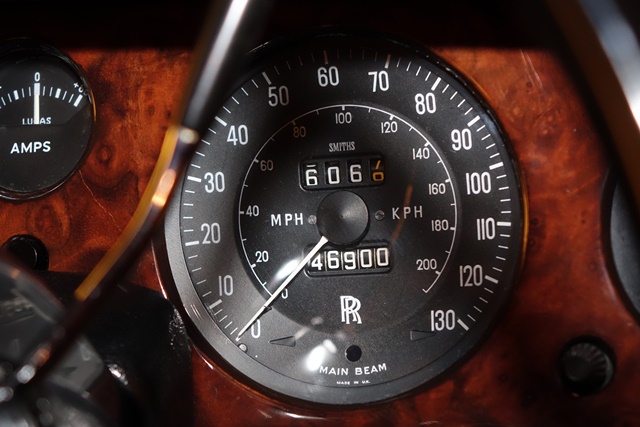 | ||
Jeff Young Prolific User Username: jeyjey Post Number: 243 Registered: 10-2010 |
On an SYII, yes and yes. I would image same for SY, but I'm not sure. Cheers, Jeff. | ||
Patrick Ryan Experienced User Username: patrick_r Post Number: 28 Registered: 4-2016 |
Thanks Jeff. I'm not really looking forward to taking the top roll off. However this little annoyance is little, but it's big for me as the rest all works beautifully. I would hope the glass just comes off, remove the 2 screws either side of the needle, remove the needle and there you go. | ||
Geoff Wootton Grand Master Username: dounraey Post Number: 1173 Registered: 5-2012 |
Patrick On the SY1 no need to remove the top roll. I'll send detailed instructions later. Geoff | ||
Patrick Ryan Experienced User Username: patrick_r Post Number: 29 Registered: 4-2016 |
Awesome, Thanks Geoff. Much appreciated. | ||
Paul Yorke Grand Master Username: paul_yorke Post Number: 1512 Registered: 6-2006 |
Also don't take the screws on the front out or the needle off. Once removed turn the glass bezel and then the Screws from behind. Search for recent posts on speedo juming i think. . Photos snd tips can be found there. Cheers. Paul. | ||
Patrick Ryan Experienced User Username: patrick_r Post Number: 30 Registered: 4-2016 |
Ok, Ill check them out as well Paul. Thanks | ||
Geoff Wootton Grand Master Username: dounraey Post Number: 1174 Registered: 5-2012 |
Hi Patrick My car is a 1974 SY1, SRX18501, so it should be the same as your car. Simply remove the two chrome setscrews at the top of the panel, remove the rubber block on the top of the steering column housing, move the cruise control switch out of the way and then carefully pull the panel off from the top. It "hinges" against the lip of the trim panel that abuts the bottom of the dash panel. The red arrows in the pic below point to the position of the chrome setscrews. The yellow arrows point to the two chrome nuts that hold the cruise control switches in place. If you remove these the cover can be pulled forward, out of the way of the dash panel. On my car there is a rubber block on the top of the plastic steering column housing. The photo shows the top steering column housing removed, but this should not be necessary. The block should just pull off. So, having removed the two chrome setscrews and cleared the obstructions at the bottom edge of the dash panel it is just a case of carefully pulling the panel off. Carefully pull from the top half. On my car there is a small gap between the top of the speedo and the panel. Enough to get a bit of purchase to pull it forward. Be very careful though. If your panel has not been removed in forty years, the top roll may have adhered to the dash panel. Careful use of a thin spatula will help to free the two parts. If it is really stuck, remove the center section. This is done by removing the two chrome setscrews at the top of this section and removing the chromed knobs of the heater vent levers. They are held by small grub screws. Use a 1/16" allen key. The center section is removed in the same way, from the top. But here's the thing: if you open the glove box you can get your fingers behind the edge of the center panel and gently flex it to free it off. The same goes for the speedo panel - you can get to the edge of it once the centre panel has been removed. This only applies if the speedo panel is stuck. Hopefully it will come off without too much difficulty. You can see from the photo the speedo is held by four woodscrews. Undo them and pull the speedo forward. It will be stiff, however you should be able pull it forward by about an inch or so and get your fingers in to disconnect the speedo cable, the trip cable the 5 lamp holders. When you have the speedo on the workbench follow Pauls instructions. With my car the glass bezel turned easily. If the tabs have been pushed in you may have to carefully prize them back slightly, so the bezel can be rotated until the tabs align with the slots. Again, as Paul says, remove the two setscrews on the back of the speedo housing and carefully lift the mechanism out. There are some more photos in the following thread. http://au.rrforums.net/forum/messages/17001/19535.html?1458867311 I have written this very quickly so apologies for any bad grammar etc. Also, it has just occurred to me your car is a RHD whilst mine is LHD. It should be the same, but mirror image. 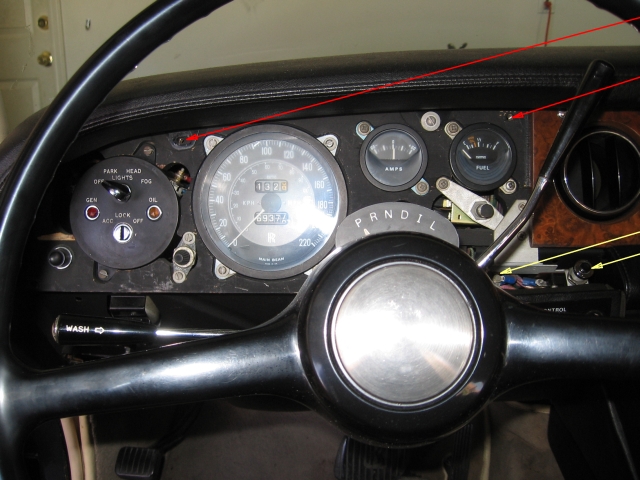 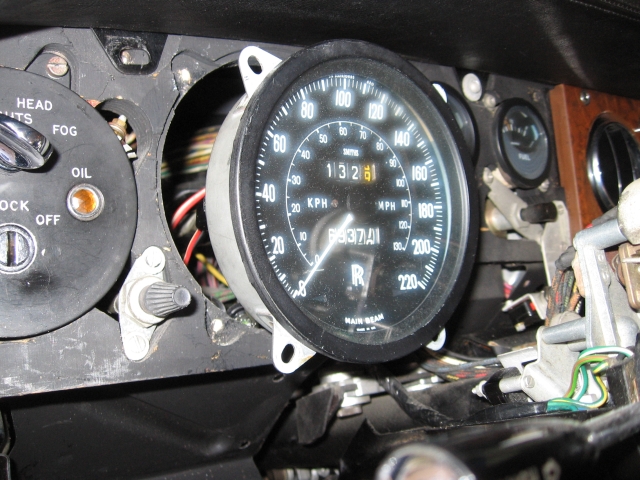 Geoff | ||
Geoff Wootton Grand Master Username: dounraey Post Number: 1175 Registered: 5-2012 |
Forgot to mention, there should be three rubber "grommets" over the coloured filters. They will probably drop out when you separate the speedo from it's housing, but are easily re-fitted. In fact one may have moved, causing the problem you have. | ||
Patrick Ryan Experienced User Username: patrick_r Post Number: 31 Registered: 4-2016 |
Hi Geoff, That's awesome info and images. Thanks for sharing. My car does not have cruise, so one less op In regards to your last post re the 3 rubber grommets, I am assuming 2 x green, & 1 x red? Are these accessed by separating the black portion of the speedo facia in the above image, from the grey speedo can/body? Or do the extract from the back and push in towards the front face of the speedo dial? | ||
Patrick Ryan Experienced User Username: patrick_r Post Number: 32 Registered: 4-2016 |
Sorry Geoff, I should have read the link first you sent. I see now, that this is where the globes enter. My issue is in the right hand hole on the back shown above, thus the left hand indicator when viewed from the drivers seat. 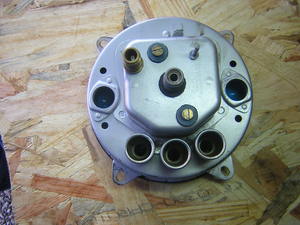 | ||
Paul Yorke Grand Master Username: paul_yorke Post Number: 1513 Registered: 6-2006 |
Watch out for a concealed screw below and to the outside of the ignition switch. Ease the trim down slightly. Once apart you can see the green filter taped on to the dial on some speedos. | ||
Geoff Wootton Grand Master Username: dounraey Post Number: 1176 Registered: 5-2012 |
Hi Patrick By coincidence I am dismantling my speedometer either today or tomorrow (as time allows) so I will put up some more pictures. The "grommets" I mentioned are in fact short rubber tubes, about 1/2" long. I used the word grommets in the absence of a better term. They are used to channel the light from the bulb directly onto the respective filter. I suspect one of them on your car has moved slightly, obscuring the light path. As I said I'll put up some pics over the next day or so. A picture is worth a thousand words. I am impressed with the quality of the veneer on your car. It looks like new. If you have a picture of your dashboard to hand it would be interesting to see the differences on your car to mine. Our model years are very close, however from the pics I have already seen it looks like there are many detail changes. Geoff | ||
Jean-christophe Jost New User Username: jc_jost Post Number: 8 Registered: 3-2016 |
Patrick, I recently removed the pannel on SRH25085, 1976. The pannel seemed stuck but there was a third setscrew hidden at the bottom right end of the pannel (picture). I could access it by uncliping the pad. It may not be the case on your car but check for such "hidden" fasteners before pulling the pannel too hard. Cheers! 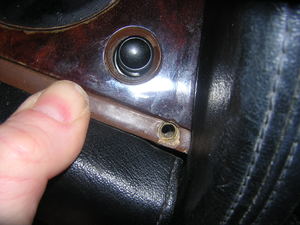 | ||
Patrick Ryan Experienced User Username: patrick_r Post Number: 34 Registered: 4-2016 |
Hi Jean, Thanks for that vital piece of information. I could just imagine me breaking something due to not knowing about the hidden screw. I will be sure to keep a look out for it. Thanks again  | ||
Patrick Ryan Experienced User Username: patrick_r Post Number: 35 Registered: 4-2016 |
Hi Geoff, I'm looking forward to seeing how you get on with your speedo job. A shame I am not close bye, it would be good to observe or give you a hand. I just hope mine is the grommet, and not an issue with the dial of the speedo itself. Sure: Sorry these are poor quality snaps from my phone. 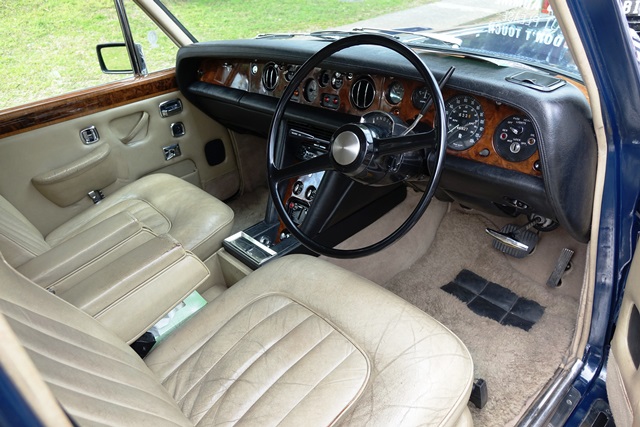  The seats are nicely aged but still completely untouched except for RM Williams leather conditioner. They are not quite as bad as the pics show. The lambs wool rugs are still the factory originals that show on the original build sheet. | ||
Patrick Ryan Experienced User Username: patrick_r Post Number: 36 Registered: 4-2016 |
Hi Geoff, As one of my fellow club members says. There are no 2 Shadows alike, and they are all different to drive in their own way. | ||
Nick Adlam Experienced User Username: crewes_control Post Number: 17 Registered: 12-2015 |
Hi Pat That's a really nice interior- just gently mellowed. A credit to you and previous custodians. I really should get those lambswool rugs- they're on the list. I've also pulled my speedo- it's pretty easy. Removing the wood did make me a little nervous- just eeeeasy does it. I just wanted to make sure the gears were ok and changed all the bulbs and cleaned the coloured filters. As others have mentioned- the lights are really dim and I was tempted to remove the filters, but they cleaned up ok and all's good. I went silly and changed every single bulb in the car and they're everywhere!. Was a good experience as it allowed me to check wiring and bulb-holders while I was about it. | ||
Geoff Wootton Grand Master Username: dounraey Post Number: 1177 Registered: 5-2012 |
Hi Patrick I agree with Nick, it is a really nice interior. The walnut dash is in superb condition. As I thought, the RHD and LHD dashboards are mirror images of each other. The only slight difference in the later SY1s are the warning lights in the centre panel. I particularly like the clean line of the trim panel at the bottom of the dashboard. In the later SY1 cars this is broken by the incongruously fitted cruise control switches. Interestingly the bottom photo captures the cossetted feel of the car, with the view through the windscreen acting as a backdrop. Thanks for putting the pics up. I'll get the speedo pics up later in the week. I've gotten a litle bogged down with a relay problem. Geoff | ||
Patrick Ryan Experienced User Username: patrick_r Post Number: 38 Registered: 4-2016 |
Hi Nick, Thanks for your comments. Im very proud of the old boy, but it does keep me busy with the Mr Sheen and Windex. The lambs wool rugs were used between 1972 when the car was delivered in the UK, until it was transported by the second owner to Australia in 1975. He then removed them and placed them in a large linen bag (along with a giant car cover) where they stayed until I purchased the car. They are like 90% good, and are super thick & heavy. A fellow member has changed all his dash lights and interior lights to LED, but I like the dull green glow of the originals. I'm unfortunately a stickler to how the car came from the factory. So if it had LED's when I got the car, I would have changed them back. I still even have the original Yale keys, Valet & master. However I don't use those I use a spare set that was supplied with the car, and I keep the Yale keys locked away. I'm glad you had the experience with your speedo, and I'm sure she is spot on and smooth now. | ||
Patrick Ryan Experienced User Username: patrick_r Post Number: 39 Registered: 4-2016 |
Hi Geoff, Thanks for your comments. Your very welcome, you can probably tell I like posting pics LOL. Funny thing is when I was searching, I really wanted an early series 1 with the single separate dash warning lights, and no cruise control. Funny as that may sound, it is what I was looking for as I just loved this early dash since I was a kid You're right the front areas are very cosy, and you feel great safe in those front seats. I posted this on another links, But my clock and these lights are my favourite part of the car. 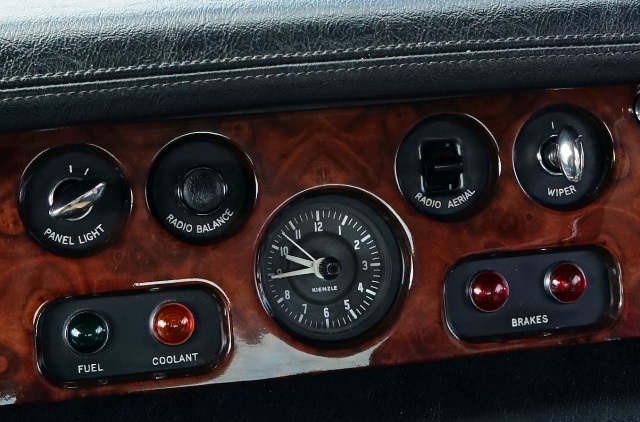 | ||
Geoff Wootton Grand Master Username: dounraey Post Number: 1180 Registered: 5-2012 |
Hi Patrick Here are three more pics of my speedometer. I removed it to replace a damaged gear wheel. I would like to extend a big thank you to Jim Walters for sending me the part. I really appreciate it. The first pic shows the tabs on the bezel (arrowed). The bezel is twisted until the tabs line up with the slots in the case of the speedometer. One slot is shown, the others are obscured by the mounting flanges. 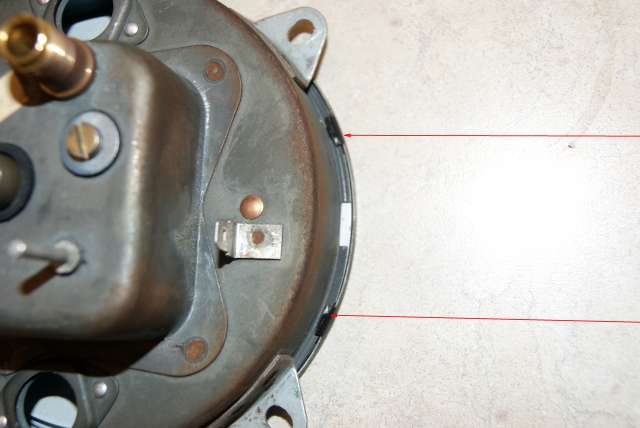 The next pic is of my misnamed "grommets". They are a bit misshapen after all these years, but perfectly functional. 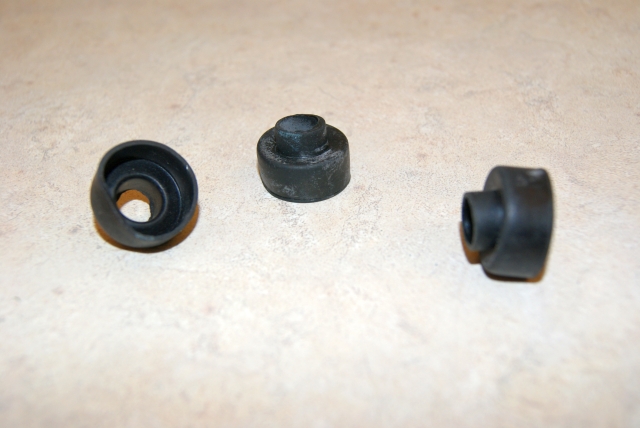 Finally a picture of the "grommets" in place in the speedometer case. You can see the two green and one blue filters (on my car) are just taped in place. After I had carefully lowered the speedo mechanism into the case I checked I had not dislodged the "grommets" by shining a torch through the light bulb apertures. 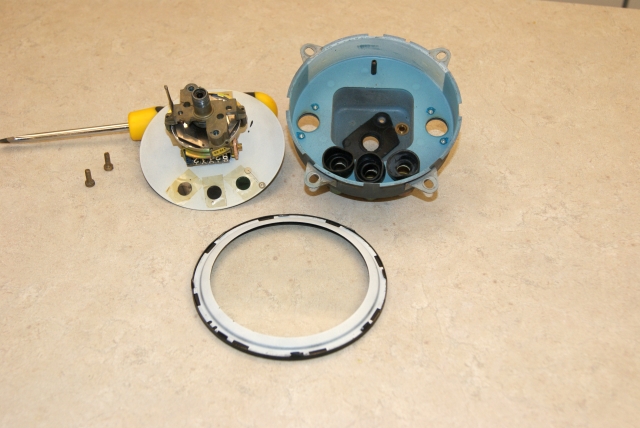 Job done, and since my milometer is now working I am now fully legal again. Geoff | ||
Patrick Ryan Experienced User Username: patrick_r Post Number: 48 Registered: 4-2016 |
Geoff, Fantastic images and information. I guess if it is not just a dislodged globe in the back of the speedo, I will need to do this dis assembly to get at the grommets. I gather, the tabs for the bezel first, then the 2 large screws in the back and were apart? Congrats on being legal again | ||
Geoff Wootton Grand Master Username: dounraey Post Number: 1182 Registered: 5-2012 |
Hi Patrick Yes, if you need to get to the rubber grommets you will need to dismantle the speedometer. As you say, Bezel first, then the two screws on the back. Needless to say, be very careful not to rest the needle on anything when the speedo is dismantled. Geoff | ||
Patrick Ryan Frequent User Username: patrick_r Post Number: 51 Registered: 4-2016 |
MAN! You watch me break this LOL Ill give it a shot. On Saturday morning, I will just see if it is a dislodged globe (please god) and I will be happy. If not, oh well. Thanks for the great images mate. Love your car BTW, awesome. |