| Author | Message | ||
Geoff Wootton Grand Master Username: dounraey Post Number: 1060 Registered: 5-2012 |
Hi Folks I need to replace the wire that runs from the starter relay to the starter solenoid. The wire is supported by a bracket that bolts to the engine. I am wondering if it is safe to undo this bolt in order to remove the old wire. The following photos illustrate the problem. The first is just to show which part of the car I am working on and the second a close up of the bracket: 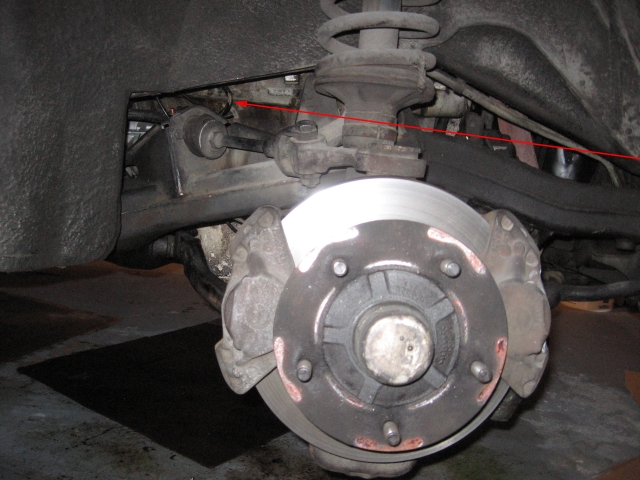 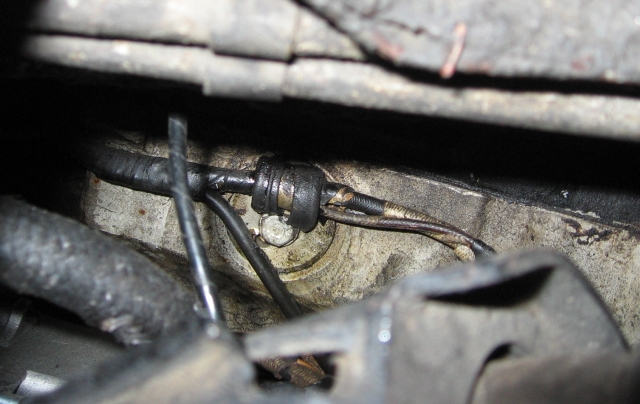 In addition to fastening the bracket, the bolt also appears to be fastening a plug of some sort to the side of the crankcase. Am I likely to be covered in coolant if I loosen this bolt? The wire is too tightly held for the wire to be pulled through, it is clamped. Geoff | ||
Paul Yorke Grand Master Username: paul_yorke Post Number: 1432 Registered: 6-2006 |
Hi Geoff, you should still be dry if you take that bolt out. It's a core plug with a threaded hole in it. It should not go through to the water jacket though. Do it when the engine is cold though. Just in case ;) As an aside, is it just the photo or are the wheel to hub contact areas shiny/polished? Could the nuts have been a little loose or the stud holes be oval? | ||
Geoff Wootton Grand Master Username: dounraey Post Number: 1061 Registered: 5-2012 |
Paul Many thanks for your help. I will check the wheel to hub contact tomorrow. I am always careful to torque the nuts to 50 lb/ft as specified in section P of the workshop manual. I pay attention to this as 50 ft/lbs is very low for wheel nuts, so make sure they are correct i.e. no less than 50. I will check for ovality on the stud holes as part of my investigation. Geoff | ||
gordon le feuvre Frequent User Username: triumph Post Number: 98 Registered: 7-2012 |
I have just done same task, you will not get covered in coolant. Still fiddly though. The trouble with brass wheel nuts is that they are prone to close up on stud threads if at all over tightened. This means that with torque wrench if the nuts bind on stud threads it will give false reading of actual tightness. I have a taper punch that I use to "open up" wheel nut taper by putting nut in vice with contact taper face up and tapping with hammer, so that nut does not bind on stud until the threads make contact. | ||
Robert Noel Reddington Grand Master Username: bob_uk Post Number: 837 Registered: 5-2015 |
The shinny spots are not loose nuts but the steel wheel flexing. Like the springs in the seats, the flexing of the wheel is part of the suspension/ shock absorber system which is oft forgotten. By the seat I mean the seats you sit on. When the nuts are tightened the area around the holes in the wheel springs in like a Belleville Spring washer. As the car is driven the " Belleville washer" flexes a bit thus polishing the the hub. For a while I was using 70 ft lbs until I discovered that 50 is correct. No damage was done to the nuts. Phosphor bronze is not like brass and about as strong as steel. So to damage the wheel nuts requires a lot of over torture. Such as rattle guns. 70 ft lbs is a default setting that works with most cars. | ||
Geoff Wootton Grand Master Username: dounraey Post Number: 1064 Registered: 5-2012 |
I checked out the stud holes on the wheel of my car and thankfully, they are round. The shiny area on the wheel to hub contact areas appears to be ingrained red paint. I suspect this is an undercoat of the painted wheel. The nuts were a little stiff on the stud threads but I was able to finger tighten them down the length of the thread, so concluded there was not sufficient binding to cause erroneous readings on my torque wrench. I did increase the setting to 55 ft/lbs, just to be sure the wheel nuts were tight enough. I have a couple of questions regards the work I carried out yesterday. Does anyone know the location of the starter relay? My car is a 74 SY1 (SRX18501). I checked out Bob Reynold's and Jeff McCarthy's relay thread which gives the position of the relay as by the screen wash bottle in the engine compartment. However, on my car the starter relay appears to be in a different place. This would not surprise me as there are so many detail changes in these cars. I tried to identify the relay by unplugging the starter solenoid and getting my long suffering wife to operate the starter switch, from inside the car. I was listening out for the telltale click of the relay, but the only one I could hear was from below the top roll inside the car. I was under the impression this relay is for the lamp test circuit. Was the starter relay ever positioned under the top roll? The other question: There is a wire adjacent to the main wire that runs from the starter motor main power connector to the starter relay. This is pictured in the above photo. It is live at all times. On my car it goes nowhere. It terminates short of where the main wire connects to the starter motor. There is no other loose wire that would indicate a break. Does anyone know the purpose of this wire? It looks original. It is not the feed to the oil level sensor. I cannot determine what it is for and have therefore just taped it up. I reproduce the link to the "relays" thread as it does not show up on the default search. Hopefully future readers can pick it up from here: http://au.rrforums.net/forum/messages/17001/12646.html?1394734910 Geoff | ||
Paul Yorke Grand Master Username: paul_yorke Post Number: 1442 Registered: 6-2006 |
Hi Geoff, Good news on the wheel front. Photos often mislead . . . even though they are supposed to never lie  Have you got a wire going to the sump oil level sender? Is it working? If not, if you earth the wire and press the oil level button, does it go to max? The relay on a RHD is mounted near the accelerator linkage pivot bracket. Behind and lower than the washer bottle. | ||
Geoff Wootton Grand Master Username: dounraey Post Number: 1065 Registered: 5-2012 |
Hi Paul The oil level gauge does not work on my car. It is on my "todo" list. When I press the button on the dashboard the gauge just jumps to maximum. If you look at the above photo (not the one below), the part of the loom to the left of the bracket contains two wires that connect to the sender unit. It looks original to me. Maybe I should just touch this mysterious live wire to the engine and see which fuse blows The starter relay is a mystery to me. I have checked the one you mention. It's just that when my wife turned the ignition key I could not hear or feel it clicking. Maybe I am under a misapprehension when I expect to hear/feel relays clicking. 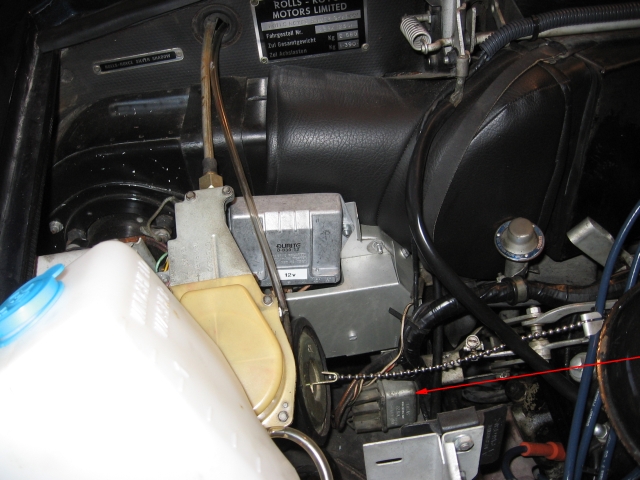 BTW - Before Vladimir jumps in, my wife definitely got it right - she could hear the relay under the top roll click. Geoff | ||
Paul Yorke Grand Master Username: paul_yorke Post Number: 1443 Registered: 6-2006 |
Sorry Geoff = I really must stop peeking at here inbetween jobs! Re-read your post properly about the oil sender wires being there already! Can you identify any of the wire colours to the relay? Match it across to the wiring diagram? Off the top of my head and depending on year, the key feed should operate the relay which is a double closed when energised relay. When operated it should feed the starter to crank it and send a feed to the coil by-passing the ballast resistor and give it the the full 12v if possible. The key wiring could be wrong at the relay so the key feed goes to the starter instead. Can you get any close ups? There is another wire to the starter - sometimes from an extra terminal or (yours I think) with a thinner ring terminal on the larger terminal. (Chassis number dependant.) This means that the fairly large starter solenoid is fed from the battery feed, not the start feed from the switchbox. Had a look at the wiring diagram . . . 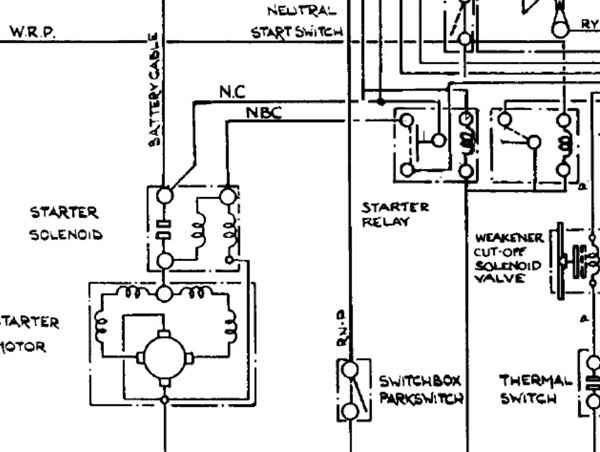 | ||
Geoff Wootton Grand Master Username: dounraey Post Number: 1066 Registered: 5-2012 |
Paul I really appreciate your help. I will be continuing with this exercise this weekend. The reason I want to identify the starter relay is so I can replace the brittle wire that runs from the starter main cable connector, to the starter solenoid. It is marked NC in the above wiring diagram. As an interim I have wrapped the wire with insulating tape and replaced the rubber sleeve in the bracket that attaches to the crankcase. My car is now back in daily use, but I did want to do the job properly and replace this old and brittle wire. Maybe it's overkill. I am very poor when it comes to vehicle electrics but it occurs to me the thick wire (NC) may not necessarily appear at the starter relay. In practice it may be connected to a connector and then a separate wire, with the same color coding (NC) may run out to the starter solenoid. I'm guessing here. Looks to be an interesting weekend. Geoff | ||
Robert Noel Reddington Grand Master Username: bob_uk Post Number: 838 Registered: 5-2015 |
NC is brown cotton covered. It's ok to use brown plastic covered. NP instead if you like. The oil level gauge is like a fuel gauge in operation. If the wire from the oil level gauge is earthed the needle will go full deflection or hard over. The fault you discribe points to the wire from the sump unit to the gauge is earthed some where. Disconnect the wire from the sump gauge and press button if needle goes hard over then find engine loom multi connector and the other end of the sump wire. By using a dental pick or similar depress the tang and with draw wire from connector. With connector plug in depress button. If gauge goes hard over the fault is from the engine loom connector to dash board if the needle doesn't move at all then the fault is in the wire from the sump to engine loom connector. Probably where wires are clamped down near hot stuff. To fit new wire cut old close to the brass connector that goes in the engine loom connector block. Bare what's left and solder new wire to the brass connector and heat shrink. Then plug it back into the connector block. If copper wire from Brass connector has plaque, spread the wires out like a fan and stroke with sand paper until bright copper shows. I use multi core solder and plumbers resin flux to supplement the resin flux in the solder. Wipe off after soldering and apply petroleum jelly before heat shrinking. The sensor in the sump as said is like a fuel sensor, float and resistance. These can wear out but usually open circuit and no needle movement. Caution. These sump sensors are brittle and can break so be very carefull. Even if the sensor is internally shorted it can be repaired at little cost. But break it then a new one will cost. If it is not leaking unduly. That is not dropping oil when parked. Using a ohmmeter disconnect wire and measure ohms between connector and good earth. If it shows a reading then it's probably good. Zero ohms dead short. Infinity open circuit. I should have put the last bit first but forgot. The older Rovers such as P4 used the same system and the sump sensor MAY be the same and cheaper should a new one be required. | ||
Geoff Wootton Grand Master Username: dounraey Post Number: 1067 Registered: 5-2012 |
Thanks for the info Bob. This was a job on my "probably won't get done" list but I will check it out this weekend. I need to remove the top roll to fit the coolant amplifier, currently being repaired, so then will be a good time to check out the oil level circuit. Geoff | ||
Robert Noel Reddington Grand Master Username: bob_uk Post Number: 840 Registered: 5-2015 |
When the button is depressed it disconnects the fuel gauge and connects the sump gauge instead. For some reason I can't explain I have never trusted the sump gauge and prefer to dip the engine. I might as well while checking every thing else under the bonnet. | ||
Vladimir Ivanovich Kirillov Grand Master Username: soviet Post Number: 404 Registered: 2-2013 |
I would whack that bolt with an aluminium or brass drift to shock the treads so you can loosen and remove the bolt without breaking it as there is every chance its been in there for a long time and that when it was put in nobody put anti-seize on it. Blind hole bolts are notorious for getting seized and snapping and you don't want to get into the drama of having to drill and tap the mongrel out. Chances are its tight so also go for single hex socket to avoid rounding off the bolt head and dealing with that nightmare. I always have a good think about what will happen if I do something a certain way. After you have been on the spanners for decades you develop a mental warning alarm that rings in your head and predicts a nightmare before you create it but then if you are in a rush which you always are in this trade, you takes risks which nearly always ends up with something broken or skin off knuckles, deep bloody cuts or bruising. | ||
Geoff Wootton Grand Master Username: dounraey Post Number: 1068 Registered: 5-2012 |
Hi Vladimir It's ok - I removed the bolt and completed the job last Sunday. I'm fortunate in having a car that spent most of it's life in California, Hence very little rust. A 7/16 socket was all that was required. I know what you mean though, from when I lived in the UK, where they have to salt the roads in winter. This causes all kinds of problems with rusted up nuts and bolts. Geoff |