| Author | Message | |||
Brian Vogel Grand Master Username: guyslp Post Number: 468 Registered: 6-2009 |
Now I'm on to fixing "trivia." Here is the page from the Illustrated Parts Manual related to both of these items, as well as the low fuel warning. The first thing I want to ask is whether I have the "sequence of events" correct in my head for each of these, since the diagram is completely unclear to me: Low Coolant Sensor -> Amplifier UD14927 -> Left Relay UD11471 -> Warning Lamp Ice Warning Sensor -> Amplifier UD19103 -> Right Relay UD11468 -> Warning Lamp Low Fuel (from level sender signal) -> Center Relay UD11471 -> Warning Lamp I intend to make an attempt at fixing the low coolant amplifier using these instructions:
However, here's a photo of the PCB in my UD14927, which is slightly different, particularly in regard to the diode that's lower on the picture. If anyone knows whether I need to do something different in terms of replacing that diode with a 1N4007, please let me know. In the other photos I've seen the two diodes appear to be the same, but they're not on this PCB. 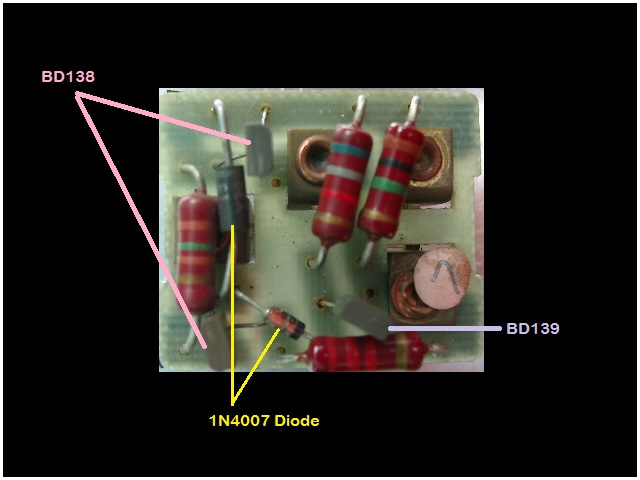 I have had a spurious ICE light, on as often as off, ever since I've owned the car. I have not seen anything ever written up about repairing the UD19103 amplifier (or whatever it is). Is anyone aware whether a parallel set of issues with a constantly on, or frequently incorrectly on, ice light results from something failing in this item? Are there any repair instructions out there? [I'm tempted to take the thing apart myself just to see what's inside it and whether it shares any of the failure prone components that are in the low coolant amplifier]. Brian | |||
Brian Vogel Grand Master Username: guyslp Post Number: 469 Registered: 6-2009 |
Oops, forgot the Illustrated Parts Manual page attachment on that last post, here it is:
Brian | |||
Jeff Young Prolific User Username: jeyjey Post Number: 169 Registered: 10-2010 |
Brian, My coolant warning amp also contained the zener diode in the lower position. I replaced it with another zener just to be safe, although I don't think it matters. The ice warning amp is similar, but also contains a variable resistor for setting the temp at which it comes on. I'm not sure if the transistors are the same or not; in any case since it was the diodes that failed in my coolant amp, I just replaced the diodes in my ice amp and left the transisitors alone. Cheers, Jeff. | |||
Brian Vogel Grand Master Username: guyslp Post Number: 474 Registered: 6-2009 |
Jeff, How does one test if only the diode(s) have failed? I ask because the replacement transistors are quite a bit larger and have far more substantial leads than the originals in the low coolant amplifier. If I could test the diodes and found that these were the culprits, I would replace only these. I'm presuming that the issue is that they no longer complete the circuit at all in the direction they're supposed to. Of course, I guess it's possible that they could fail in a way that they essentially become a wire, but I'd think that's less likely. Brian | |||
Jeff Young Prolific User Username: jeyjey Post Number: 170 Registered: 10-2010 |
Hi Brian, I had the opposite failure: the diode exhibited a dead short in both directions. Some helpful PO had solved this by cutting the 12V feed somewhere; when I spliced in a new one it started blowing fuses with abandon. Jeff. | |||
Brian Vogel Grand Master Username: guyslp Post Number: 477 Registered: 6-2009 |
Jeff, I cannot begin to imagine how difficult it would be to find the +12V line to cut!! It's actually easier to remove the fascia and warning bulb holder to remove the blub than to do this. I just finished refurbishing the low coolant amplifier, but am taking a break before testing. I also took out the ice warning amplifier, but its "innards" are quite different though there are two rectifier diodes and several transistors. I can't tell if any are in common with the low coolant amp, and looking at the originals that came out of it they have three different markings. I did test the diodes in it and am getting about .66V in the expected direction and nothing in the other. That was also true of the diodes in the low coolant amp, but "in for a penny, in for a pound" and replaced the three transistors and two diodes. While the whole process is simple, it's maddeningly slow with only two hands and a "third hand" stand, particularly the desoldering process for the existing components. It took me several hours to get through the process. I'm presuming a professional solder station probably has a solder vacuum and a third hand setup that allows you to pull much more easily that I can by holding the whole PCB stable. Brian, who will cry if any fuses start blowing now (but I also know my situation is not what yours was) | |||
Richard Treacy Grand Master Username: richard_treacy Post Number: 2837 Registered: 4-2003 |
Brian, I oversized the transistors for good measure, suggesting BD137/BD138/BD139/BD140 types. A samller, lower-rated type is quite alright and will be easier to fit exactly in place of the originals (usually the originals are OC204 PNPs and a 2N2926 NPN). Remember Mullard OC72s and OC204s in your 1960s English transistor radio ? Below you will see an OC204 I replaced in a very early SY coolant level amplifier a week ago. The 2N2926 has a more usual TO92 or TO98 package like a PN100 which is a TO92. You could happily use PN100 transistors in place of the NPN (BD137 or BD139 which will do fine for a 2N2926) and PN200 s in place of the PNPs (the BD138 or BD140 s which are in place of the OC204 s). RT. 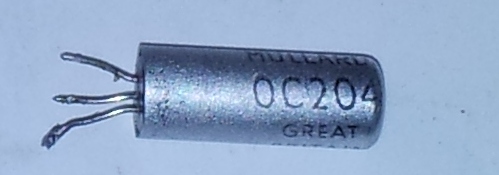 | |||
Richard Treacy Grand Master Username: richard_treacy Post Number: 2838 Registered: 4-2003 |
To give a diagnostic on that last module I repaired: The 2N2926 was blown: short circuit collector to emitter, and a voltage drop of 0,51V base to emitter (should be around 0,7V), One OC204 had a short circuit collector to emitter, and base –emitter 0,58V. The other OC204 had vaguely workable characteristics, but leakage was about 30uA at 12V C-E. The diode had short-circuited itself too. Hence, I would always recommend replacing all transistors and diodes in these modules if there is any doubt. Silicon devices of the era have proven to have a life of 20-30 years, whilst into the 1980s they are far more reliable albeit vastly more proliferate to spoil things. The total parts cost for transistors etc is less than $1, but allow an hour or so for the repairs of the module itself. That puts a repair into the satisfaction zone for a DIY or into hundreds of dollars for a professional. RT. | |||
Richard Treacy Grand Master Username: richard_treacy Post Number: 2839 Registered: 4-2003 |
Now, if you think that the coolant probe system on your Silver Shadow is weird, here is one on an early coachbuilt SY. The bulb and electronic module are combined and are mounted as a unit on the instrument panel. No, it is not a cigar lighter, it is the coolant level warning indicator. RT. 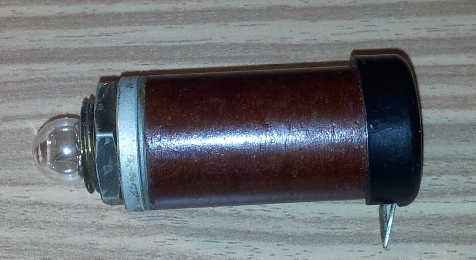 And its guts: 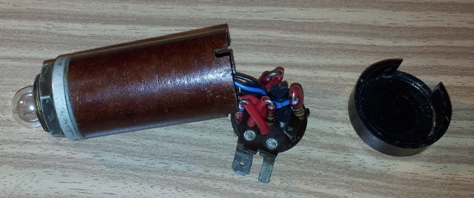 A bit cramped 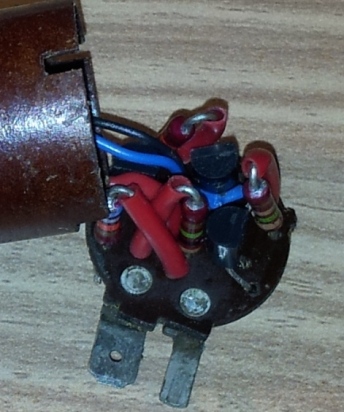 | |||
Brian Vogel Grand Master Username: guyslp Post Number: 479 Registered: 6-2009 |
Richard, Thanks for the additional updates. The size of the replacements is not really a problem as there's plenty of space in the shell for them (and you can, and will, "fold them down" a bit to make them fit). My biggest difficulty was with "leg routing" on the transistors where the legs on the tiny and thin-wire-legged originals were very close to the board edge and/or beneath a resistor. I ended up doing two transistors with a leg going around a resistor case rather than beneath it because you simply couldn't get the right bend on the thicker legs that would have allowed original placement. If you have any insights into whether the Ice amplifier is the likely culprit in a "more on than off, particularly in the heat of summer" situation please let me know. Also if there's a cure for same, even if it's not in this "link in the chain." Am I safe in presuming that the phrase "short circuited" in this context means that the connections in question are simply acting like a wire would, conducting with abandon in either direction tested? I always take "blown" to mean precisely what it does when a fuse blows - nothing conducting at all. Brian, who wishes my understanding of electricity and electronics went beyond the "I can repair this when instructed correctly" level | |||
Richard Treacy Grand Master Username: richard_treacy Post Number: 2840 Registered: 4-2003 |
Thanks, Brian, By blown I mean, well, ruined to be polite. In this case a component such as a transistor is usually short-circuited when it fails. If something else fails it may blow like a fuse I agree. However. By oversized, I meant all: physical size of the transistor, its electrical rating and the diameter of its leads. The BD13x transistors have slightly largish rectangular cross-section leads to make things worse I admit. The PN100/200 transistors are easier to fit with their slim circular leads like the OC204 and 2N2926, BC109 etc. RT. | |||
Brian Vogel Grand Master Username: guyslp Post Number: 480 Registered: 6-2009 |
Based upon Richard's latest input regarding options for transistors and my own experience in "leg tracing," I have updated my annotated photo for the UD14927: 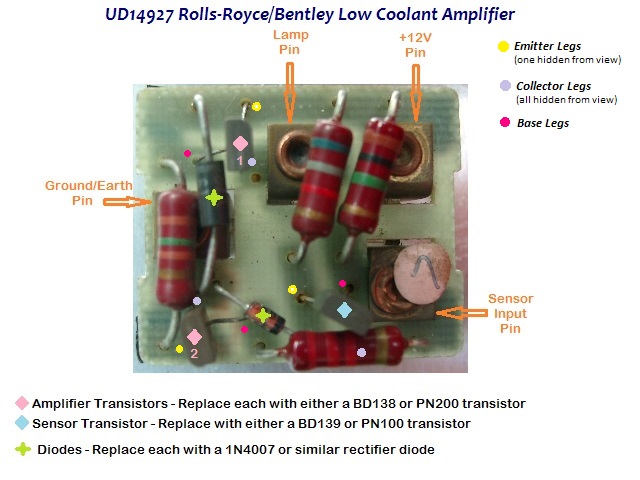 and made corresponding changes in the instructions:
Brian | |||
Brian Vogel Grand Master Username: guyslp Post Number: 481 Registered: 6-2009 |
I thought I had asked this question explicitly somewhere, but can't find it in a search: Is it OK in this application to use a 1N4007 (or similar) rectifier diode where the zener diode was used in this circuit? That's what I did, but I don't want to reassemble the top roll only to learn that I must use a zener diode and need to tear the whole thing apart again. Brian | |||
Richard Treacy Grand Master Username: richard_treacy Post Number: 2841 Registered: 4-2003 |
Brian, In this application a 6V breakdown diode (often incorrectly referred to as a Zener diode as Zeners were very early types of breakdown diodes) is required as it sets the threshold where the light illuminates. These diodes cost about 30 cents (at Jaycar in Australia, RS Components globally etc). In any case, best test the unit before refitting the top roll ! RT. | |||
Brian Vogel Grand Master Username: guyslp Post Number: 483 Registered: 6-2009 |
Richard, It seems that "Zener diode" is still much more commonly used terminology than breakdown or avalanche breakdown diode if web searches are any indication. My most easily available local source is Radio Shack. Would, by any chance this 1N4733A 5.1V 1W Zener Diode work? I ask because 6V isn't on their list. Otherwise, I'll probably order from futurlec.com, which is where I got the transistors from. They have 1N4734 5.6V 1W, 1N4735 6.2V 1W Zener, and 1N4736 6.8V 1W Zener diodes. Which of those three would be the best choice if the 5.1V cannot be used? I presume it's safe to run the car with the low coolant amplifier out (I don't have low coolant). It will be at least a few days to a few weeks until I can get back to desoldering and soldering again. Brian, sorry to drag this out, but really appreciate the guidance | |||
Richard Treacy Grand Master Username: richard_treacy Post Number: 2842 Registered: 4-2003 |
Here is a schematic of a coolant probe amplifier. I have indicated values for the resistors which should work. However, Brian, if you have the as-built values it would help. The critical value is the probe preload resistor which I have estimated at 2.2 megohms. Note that the breakdown diode is essential. A normal (blocking) diode would prevent the lamp from illumjinating. RT. 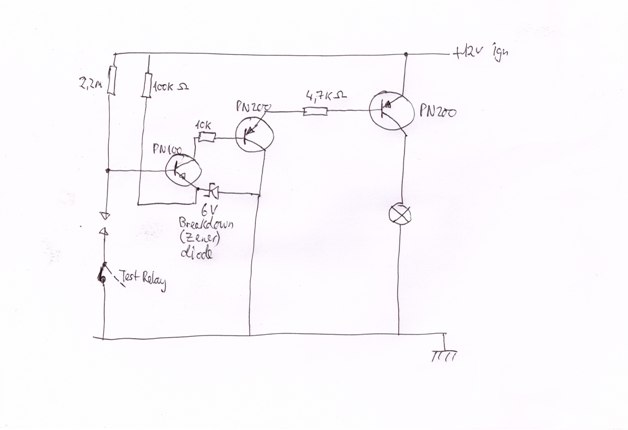 | |||
Richard Treacy Grand Master Username: richard_treacy Post Number: 2843 Registered: 4-2003 |
Brian, Just about and will do, and yes Zener is the colloquial term used even though it is strictly incorrect. A University student would fail his exam were he to call it a Zener. Zeners are ancient, and have a rather soft breakdown characteristic. 5V should do fine. Most common values are 5V, 6.2V 6.3V 6.8V etc. The wattage is irrelevant as the quiescent current is rather small. RT. | |||
Brian Vogel Grand Master Username: guyslp Post Number: 484 Registered: 6-2009 |
Richard, Since no one, including you, has ever proposed replacing the resistors I'm just leaving those in place. The only question I really have right now is whether there's any "variation on the voltage and/or wattage values" allowed for the zener/breakdown diode. Even for the 6V zeners I can find on the web the wattage varies widely from 500 mW at the low end and going up. That's the reason I was constrained and specific in the original question. I don't know what I'm working with here, and the schematic, while interesting to me, still doesn't answer my question. Brian | |||
Brian Vogel Grand Master Username: guyslp Post Number: 485 Registered: 6-2009 |
Richard, I apologize for the last post. We must have been typing at the same time. I tend to get somewhat peevish when I feel like I'm utterly incapable of making any sort of informed decision by myself, and this is one of those situations. You have answered my question and I thank you. Brian | |||
Jeff Young Prolific User Username: jeyjey Post Number: 171 Registered: 10-2010 |
Hi Brian, If memory serves, I used a 6.2V on mine. It's fairly easy to bench test; just hook up a battery, and use a couple of bare wires to emulate the probe (connect one to the probe pin, and the other to the battery -). Cheers, Jeff. | |||
Richard Treacy Grand Master Username: richard_treacy Post Number: 2844 Registered: 4-2003 |
Jeff, I fitted a 6.2V ---zener too. No problem. A 5 volt one will surely be equally effective. As a designer of electronic devices, it is always important to design out sensitivities to component characteristics unless stretching the envelope. Only in our late undergraduate and postgraduate studies did we push components to their limit. Brian, wattage is V*I (volts across the Zener times the maximum continuous current it sees.. With a 6.2V Zener, there are about 7 volts left from the battery. Assuming an hFE (large signal current gain) of 200 (conservatively low estimate, probably more like 1000) for the combined Darlington pair and amplifier configuration reflecting the location of the diode, the current could be up to a maximum 1mA. That means 7 milliwatts. That is why I suggest that the wattage of the Zener is unimportant !! RT. | |||
Brian Vogel Grand Master Username: guyslp Post Number: 486 Registered: 6-2009 |
Thank you gentlemen. I have two final questions, purely for curiosity: Since I've already used a rectifier diode where I need to use a zener/breakdown diode, were I to start the car with the amp in place as is: 1. Would anything end up being damaged? 2. If the answer to #1 is "no," would the expectation be that the low coolant light should be out and stay out? Worry not, I have no intention of leaving the rectifier diode where it is permanently. I just want to take the car out for some exercise and would like to know if that's possible without screwing any electronics/electricals up. It would also be novel to have the car running without the low coolant light being illuminated just for the fun of it. Brian, getting ready to call my local Radio Shack to be certain they've got those zeners in stock | |||
Richard Treacy Grand Master Username: richard_treacy Post Number: 2847 Registered: 4-2003 |
Absolutely not. No damage.
It will almost certainly stay out permanently. If you reversed the diode it could just work perfectly by the way. Best put in a ---Zener. RT. | |||
Richard Treacy Grand Master Username: richard_treacy Post Number: 2848 Registered: 4-2003 |
ps: if you piggyback a Zener in parallel with the 1N4007/EM513 rectifier diode that you have fitted with the stripes (anodes) soldered together at the same end, and likewise the cathodes soldered together, it will be fully functional as a final solution. RT. | |||
Brian Vogel Grand Master Username: guyslp Post Number: 488 Registered: 6-2009 |
Jeff Young wrote: It's fairly easy to bench test; just hook up a battery, and use a couple of bare wires to emulate the probe (connect one to the probe pin, and the other to the battery -) Jeff, I'm at the point where I need to bench test the repaired unit since I've still got the Low Coolant light on and need to determine whether the amplifier is working or if my issue lies elsewhere in the system. Let me do the "Dummy's Guide to Bench Testing" based on what I think you've said, using this photo as my guide (note that my "bench" will likely be the boot of the car since that's the easiest place to hook up +12V): 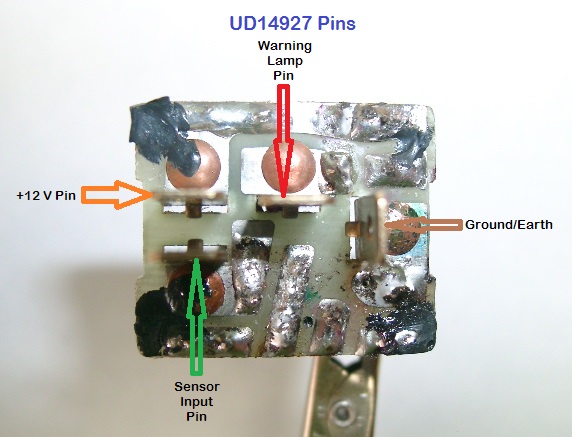 1. Hook +12V pin to the positive terminal of the battery 2. Hook the ground/earth pin to the chassis (or negative battery terminal) 3. Hook up a test lamp with one lead on the warning lamp pin and the other on the chassis (or negative battery terminal) 4. Hook up a wire to the sensor input pin. a) if the opposing end is not grounded to the chassis then the test lamp should be out b) if the opposing end is grounded to the chassis then the test lamp should illuminate Brian, who's fairly sure there's got to be something wrong in there | |||
Brian Vogel Grand Master Username: guyslp Post Number: 489 Registered: 6-2009 |
Hello All, Given the amount of additional information that's been shared in this thread (thank you, thank you, thank you) I finally realized that I needed to put the UD14927 Refurbishment Instructions out on Google Drive so that I can make revisions as the need is revealed and prevent a trail (already existing here) of partially incorrect instructions. I will update the document with whatever bench testing instructions turn out to be correct after the deficiencies in my guesses above are revealed. This would really make the instructions complete. As an aside, here's what my reworked PCB looked like after putting in the zener/breakdown diode this afternoon: 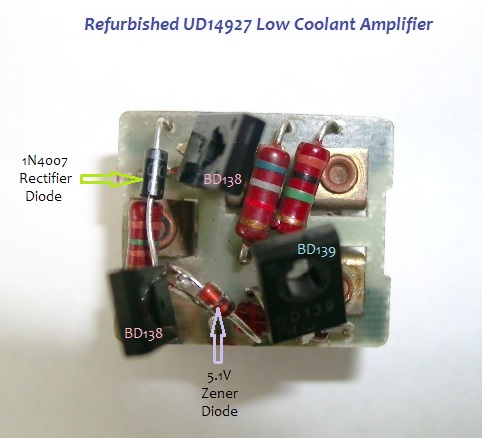 Brian | |||
Jeff Young Prolific User Username: jeyjey Post Number: 172 Registered: 10-2010 |
Brian, You've got that right, except the sense is backwards. If the probe wire is ground to the chassis, then the light should be -off- (the coolant grounds the circuit when covering the probe). When the probe wire is -not- grounded (ie: no coolant), the light should be on. One other thing: use an inline fuse holder in your test rig between the battery and the +12 pin. Jeff. | |||
Richard Treacy Grand Master Username: richard_treacy Post Number: 2851 Registered: 4-2003 |
Also, it is important that the wire connected to the amplifier's probe input be placed in coolant - water in a glass will do - with another wire to 0V chassis paced in the water about 5mm away. The lamp should go out in that case. Lifting one wire out should see the lamp illuminate. Simply shorting the probe input to the chassis should also extinguish the lamp, but will not test the sensitivity set by the breakdown diode. Water gives reasonable impedance (maybe 100k) rather than a short circuit. The probe voltage will drop to maybe 2V when placed in water near chassis potential, hence the need for the 6.2V + 0.6V (or 5V + 0.6V in your case) offset threshold voltage provided by the diode and the base-to-emitter voltage drop of the first transistor of the Darlington pair, the PN100 NPN transistor. Were the Zener replaced by one of a low voltage (or by a short circuit), then the amplifier would trigger and the lamp would illuminate at the Zener voltage + 0.6V to 0.7V. Were that level too low, then the lamp would always stay on. The Zener/breakdown diode is required because water can only pull the probe voltage down from 12V to 2 volts or so. The diode ensures that the lamp extinguishes when the probe voltage is drawn below around 7 volts. RT. | |||
Brian Vogel Grand Master Username: guyslp Post Number: 490 Registered: 6-2009 |
Jeff & Richard, Thanks again to you both. Long ago, on Richard's advice I believe, I created a simple power source cable for use with the battery that has both an on/off switch and inline fuse. This is always what I use when I need to supply power directly from the battery. Having had the fuse blow once from a short circuit showed me how important that little feature was!! I wondered if a "water feature" was going to be required for this test and am glad to know that it is and exactly how. I also have plenty of actual antifreeze around so could use that as well, but will at least try water first. If the test doesn't show the amplifier is working I'm not quite sure where I'm going to go from there. But I shouldn't get ahead of myself here. Brian | |||
Brian Vogel Grand Master Username: guyslp Post Number: 491 Registered: 6-2009 |
Good news - The amplifier is working perfectly. This also means I've successfully tested my testing procedure. An extensive revision on the refurbishment document has been made, including instructions on how to make a fused, switched power supply cord, test lamp, and the actual testing procedure. Unfortunately, Google Drive has been down all morning (for the first time I've ever experienced). I would appreciate editorial feedback either here or via e-mail (guyslp at gmail dot com). I will post a follow-up when I can finally get this revision uploaded for review. If anyone wants a copy by e-mail just let me know. Brian | |||
Brian Vogel Grand Master Username: guyslp Post Number: 493 Registered: 6-2009 |
Here's the latest revision of the: UD14927 Coolant Level Amplifier Repair document. Don't know what happened with Google Drive, but it would not ever let me manage revisions for the prior version. The above is a fresh link and the older link from yesterday will now fail. Brian | |||
Brian Vogel Grand Master Username: guyslp Post Number: 958 Registered: 6-2009 |
I'm back on this thread for two reasons: I now have "chronically on" low coolant and ice warning lights. I will eventually recheck the low coolant amplifier to make sure that I don't have a solder break or any other malfunction there, but I'm doubting that. The coolant is not low and running a jumper between the two terminals on the coolant probes does not extinguish the lamp. The only things I can think of that would result in this symptom is either a fault in the amplifier or discontinuity somewhere in the wiring between the probes and the amplifier. Beyond the amplifier must be OK since the lamp lights. If anyone has any other theories about where to look I'd appreciate them. Also, if anyone knows how to trace through the ice warning circuit to find faults I'd appreciate hearing about that, too. Brian | |||
Jeff Young Prolific User Username: jeyjey Post Number: 193 Registered: 10-2010 |
Hi Brian, Did they fail at the same time? If so, it seems unlikely that it would be an amp problem, as the two amps are distinct. They might share the same test circuit, though, which could explain it. (Or, I suppose, a high-current spike from jumping the car or something might have blown both of them at the same time.) Cheers, Jeff. | |||
Brian Vogel Grand Master Username: guyslp Post Number: 959 Registered: 6-2009 |
Jeff, I don't think that this started simultaneously. I've had spurious ice and low coolant warnings off and on for years. I thought I had the problem with the low coolant warning licked after having rebuilt the amplifier. However, several months after that the light came on again and simply refuses to go out. The ice light used to seem to have a connection to whether the climate control was on or not, which I realize it shouldn't. It was generally out, but would come on if you turned the climate control on and then would generally stay on for the time the car remained running. I know where the object that's supposed to feed the ice amplifier is located behind the grille, but have no idea of what it is or how to test it. I'd imagine a thermistor of some sort, but what you can see appears to be more substantial than that. I've also yet to stumble upon any instructions for testing and/or overhauling the ice amplifier. Brian | |||
Jeff Young Prolific User Username: jeyjey Post Number: 194 Registered: 10-2010 |
Hi Brian, The ice warning amp is similar to the coolant one, with the exception that it contains a variable resistor to change the temp at which it triggers. FWIW, my coolant warning circuit had a broken wire within a couple of inches of the coolant probe. (Which was bound to be the case as I started testing the circuit from the other end.) The easiest way to check all the wiring in the engine compartment is to ground the coolant probe and then see if the relevant toeboard socket reads ground. Cheers, Jeff. | |||
Bob Reynolds Prolific User Username: bobreynolds Post Number: 138 Registered: 8-2012 |
My coolant probe wire was also broken somewhere within the wiring loom. I had to run a new wire. Altogether, there were 7 faults on the coolant warning circuit when I bought the car! I managed to fix them all (eventually). | |||
Brian Vogel Grand Master Username: guyslp Post Number: 961 Registered: 6-2009 |
Bob, Thanks for that report. I'm going to have to figure out the way to disambiguate whether it's either one of the two wires or both of them. I've already considered running replacement wires, but I just need to figure out where each of those wires terminate and how alternatives would need to be routed. Brian | |||
Bob Reynolds Prolific User Username: bobreynolds Post Number: 139 Registered: 8-2012 |
The black wire goes to Earth, so that's easy to test, and replace if necessary. The other wire is Black/Green and ends up at the Coolant Probe Relay behind the dashboard. Mine is a late SS1, SS2 might be diferent. | |||
Brian Vogel Grand Master Username: guyslp Post Number: 965 Registered: 6-2009 |
Bob, Thanks much. Brian | |||
Stefan Ihnat Experienced User Username: stefan87 Post Number: 17 Registered: 8-2017 |
Is Low Coolant relay interchangeable for Low washer fluid relay? Thanks. | |||
Luis San Juan Bueno Yet to post message Username: guillesanjuan Post Number: 1 Registered: 10-2018 |
Hello All, I am a happy new owner of a Rolls Royce Silver Shadow 2 (1979). My ICE light is always on and I would like to understand what can it be. I have read about the ICE sensor behind the grill and on this post I have also read about a potential problem with the UD14927, a third problema could also be due to a not properly adjusted sensor. I was wondering what could be the easiest way to know what is wrong from all the above... Not sure if it is related to this problem but the engine temperature indicator does not work either. Btw, the outside temperature gauge Works in case it reads it from the same sensors. Thanks again for your help. Luis | |||
Jeff Young Grand Master Username: jeyjey Post Number: 384 Registered: 10-2010 |
Outside temp indicator is not the same sensor. Failing "on" is almost certainly the amplifier (UD14927). It's probably one of the diodes, but if you do rebuild it then change out the transistors too. Cheers, Jeff. | |||
Luis San Juan Bueno New User Username: guillesanjuan Post Number: 3 Registered: 10-2018 |
Thank you Jeff for your quick reply. I have seen on the internet a UD14927 selling so I will go ahead and buy it. However, they sale the UD14927 as coolant level and it is the UD19103 the one they really sell as the ice warning. So, which one would it be the one I need? It may sound basic but I do not know where is located in my car so I would also appreacite if you could help me to identify. Thanks again! Luis | |||
Jeff Young Grand Master Username: jeyjey Post Number: 385 Registered: 10-2010 |
They're both plugged into the same board which lies under the top roll in the centre of the dash. While similar, the ice warning amp (UD19103) has an additional trim pot for adjustment and a darlington output pair (probably for more gain). So you definitely need a 19103, not a 14927. | |||
Brian Vogel Grand Master Username: guyslp Post Number: 2660 Registered: 6-2009 |
Luis, See: UD19427 Rolls-Royce/Bentley Coolant Level Amplifier Repair Jeff has already mentioned where these are located and I have photographs in the document referenced above. Even though I have not done it, given the simplicity of these things, I have little doubt that a rebuild or the ice warning amplifier would be any more complex. It is a completely different animal, though, from the coolant level amplifier in terms of its inputs, so the two are not interchangeable. Brian | |||
Luis San Juan Bueno New User Username: guillesanjuan Post Number: 5 Registered: 10-2018 |
Thank you Jeff and Brian, I will tomorrow afternoon get hands on to complete your challenge and I'll let you know. I'll take pictures of the process so it will be easier for others with similar problem in the future. Thanks again! Luis | |||
Luis San Juan Bueno Experienced User Username: guillesanjuan Post Number: 12 Registered: 10-2018 |
Hello Brian and Jeff, Today my Rolls Royce Silver Shadow 2 (ALfred as I have named him) decided to make the ICE light desappear after a while. I noticed that when I started it, it was on like always. After a while of running the outside temperatura went out of scale (even though the outside temperatura was around and it was at that point when the ice light went off. I have already ordered a rebuild ICE light relay though as you told me but I decided to share this with you in case it is relevant. Thank, Luis | |||
Brian Vogel Grand Master Username: guyslp Post Number: 2665 Registered: 6-2009 |
Luis, If the original ICE light relay is to go into the trash, I'd love to have it. So far as I know no one has opened one of these up and documented what's in there as has been done for the low coolant level amplifier. Given their history of "getting cranky" that's something that needs to be done. If you plan on opening it up yourself please carefully photograph the "guts" on the PCB that are enclosed by the case as well as a shot of the underside where the terminals are so "two and two" can be put together to figure out what's what. Brian | |||
Jeff Young Grand Master Username: jeyjey Post Number: 386 Registered: 10-2010 |
Hi Luis, It's possible that it just needs the pot inside adjusted, but the components aren't the sort of things to drift unless they're nearing end-of-life, so after adjustment it's still not likely to last long. Cheers, Jeff. |