| Author | Message | ||
Jeff Young Experienced User Username: jeyjey Post Number: 38 Registered: 10-2010 |
The front 2/3 of my exhaust was a bit of a bodge job by some previous owner. It had two right-hand middle boxes with some custom "work" to make the left-hand one fit, and only the rear crossover pipe. The result leaked and the crossover pipe was cracked. The rear boxes and the right-hand middle box are SS Crewe parts in decent nick, so everything from there back will stay. I got a new SS Crewe left-hand middle box, intermeidate pipes, and a pair of front boxes, and new SS pattern-part downpipes and front crossover (Crewe only does those in mild steel). I think original spec (SBH37222) would have been both front and rear crossover pipes (system I), but I'm going with the export market front-only crossover (system J) to save a bit of coin. Jeff. | ||
Jeff Young Experienced User Username: jeyjey Post Number: 39 Registered: 10-2010 |
Most of the exhaust clamps are pretty easy to get to, which is good because after a few thousand heat cycles and nice humid Irish weather they can be pretty hard to get off. The O/S/F is the exception, being wedged up between the steering and the O/S accumulator: 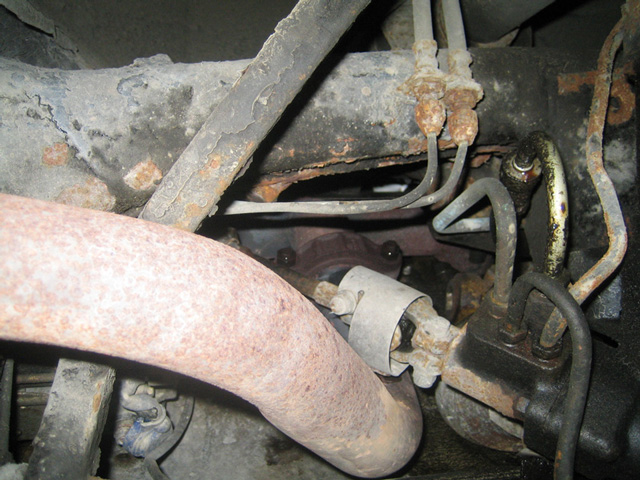 | ||
Jeff Young Experienced User Username: jeyjey Post Number: 40 Registered: 10-2010 |
I must have tried 10 different combinations of ratchets, spanners, extension bars, wobble bars, u-joints, etc. before I found one that would get more than one click on the ratchet (this view is from the rear): 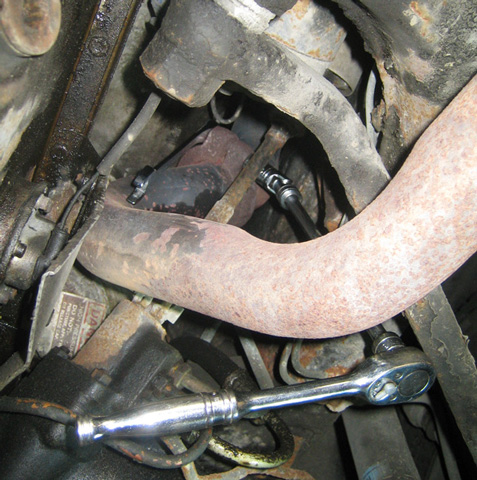 | ||
Jeff Young Experienced User Username: jeyjey Post Number: 41 Registered: 10-2010 |
A few hours later I had all the bits on the ground. That's enough for today; my neck is killing me. 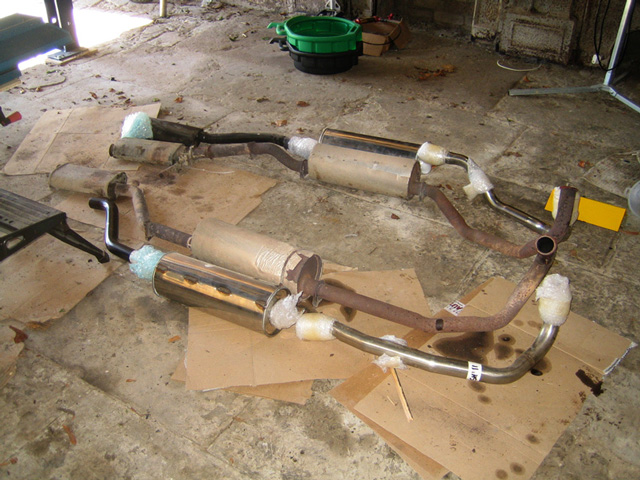 | ||
Paul Yorke Grand Master Username: paul_yorke Post Number: 740 Registered: 6-2006 |
Hi Jeff, I've only seen either front or rear balance pipes. The rear ones were only used for a year before realising the front one was much better. It is exhausting work, especially without a ramp. My top tip is to weld bumps or nuts onto the clamp bolts so they can not spin so you do not need to Hold the blind side. | ||
Jeff Young Experienced User Username: jeyjey Post Number: 42 Registered: 10-2010 |
Thanks, Paul, sounds like I'm on the right track with just the front then. Welding bumps is a great idea; I was hoping there was enough of a shoulder on the top clamp to keep the bolt from rotating, but no dice. On a related subject, did you get my email last week on proposed dates for wheelarches, sills and respray? (I noted a bit of rust peeking out from under the mid trim strip too.) Thanks, Jeff. | ||
Richard Treacy Grand Master Username: richard_treacy Post Number: 2337 Registered: 4-2003 |
Paul, that is a must ! That was standard practice at York Motors when the cars were near new (I have receipts to prove it on our T when a damaged downpipe was replaced just after warranty). It certainly makes it easier to reassemble, and of course for future removals it is a gift ! 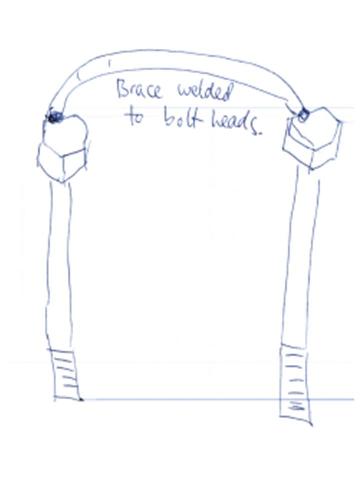 | ||
Jan Forrest Prolific User Username: got_one Post Number: 199 Registered: 1-2008 |
I wish I'd seen this thread last weekend! I've still got the bumps, bruises and scrapes over both hands, forearms and even shins to testify that these clamps are a pig to remove and replace without any kind of captive nut or bolt. I'd considered for a moment that one or t'other could have been welded to the clamps, but rejected it as being a little too permanant for my liking. Fortunately both manifolds have now been dressed back and reinstalled with new gaskets (the other side about 3 1/2 years ago) and the rest of the exhaust system looks to be quite sound. On The Old Girl (SRH 24518) theres's just the single exhaust system and only one joint - the one under the 'B' pillar, between the front and centre boxes - that has caused any problems. Part of one of the mating surfaces has rusted away. For the time being I've braced it with a combination of "Fire Putty" (guaranteed to 1,000 C) and a section of epoxy exhaust bandage backed up with more fire putty inside the clamp. That should hold for a few more K. Now all I've got to do is break out the CO meter and refine the tuning that had to be ... modified ... to cope with the lack of back pressure from the previous leaks. Without denigrating the quality of the technology and components, at least it's based on 60's and 70's technology which I understand and have the tools to work on it with. No damned computers to go wrong and that require �00's or �000's in equipment to service or diagnose faults. As an aside: A Brit car mag - "Practical Classics", Spring 2011 issue - has quite independently come to the conclusion that the Shadows and Shadow2's are truly a 'practical car' for the commited DIYer. This is no more than 2 years after I told them the same  At least it's official now, so prices may rise a little before I need to sell her when our fearless guv'mint decide to take my driving licence away due to age and/or disability in a decade or two. At least it's official now, so prices may rise a little before I need to sell her when our fearless guv'mint decide to take my driving licence away due to age and/or disability in a decade or two. | ||
Paul Yorke Grand Master Username: paul_yorke Post Number: 742 Registered: 6-2006 |
RT - Also standard practice at M.V.Yorke Motors. (What my father's garage was called when he started it in the 60's)  Jan, I've tried a few ways but always went back to an elongated blob reaching out from the bolt head. Welding bolts to the clamp or braced together makes them a little too fixed for the clamp to 'settle' and seal properly if the clamps , olives , and flares are not all fairly new. Also some of them are easier to fit if you put one bolt in, swing it around then put the 2nd in. Definitely makes a horrible job that little bit easier! | ||
Jan Forrest Prolific User Username: got_one Post Number: 200 Registered: 1-2008 |
Oh ... heck (and other expletives)! I've just checked and the MOT ran out nearly a month ago. Very much OOPS and D'OH. As it's financially inconvenient to have her tested again before the end of the month - by which time I'll be relatively solvent again - I'll just have to fall back on the Toyota in the meantime. At least it gives me more time to get the fuel tuning (petrol and LPG) correct for the emissions part of the test. | ||
Jeff Young Experienced User Username: jeyjey Post Number: 43 Registered: 10-2010 |
I decided to go with the "wings" plan for the half-clamp bolts. Here are a bunch of wings hot off the chopsaw and grinder: 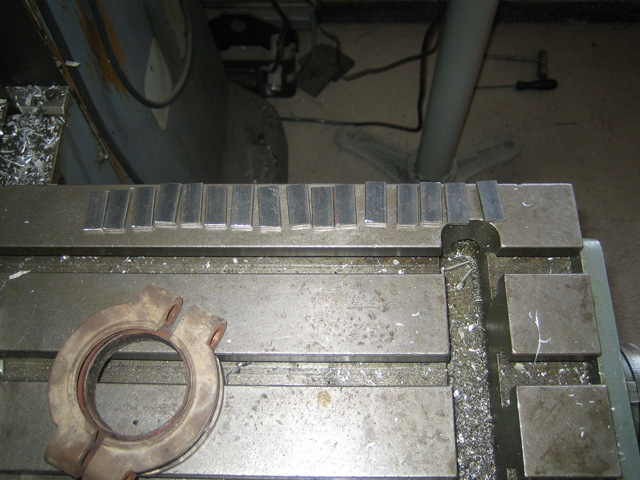 | ||
Jeff Young Experienced User Username: jeyjey Post Number: 44 Registered: 10-2010 |
I sand-blasted one side of the wings and the bolt heads, and then wiped them down with MEK. Here's me getting ready to weld them up: 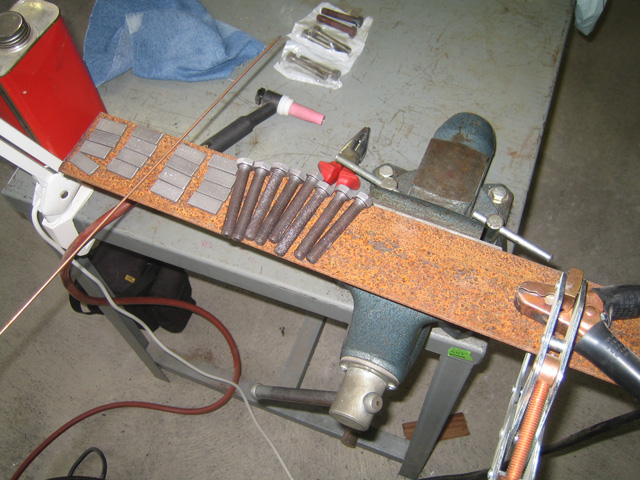 | ||
Jeff Young Experienced User Username: jeyjey Post Number: 45 Registered: 10-2010 |
My welding skills were more rusty than that piece of angle iron I'm welding on, but I got it done in the end. 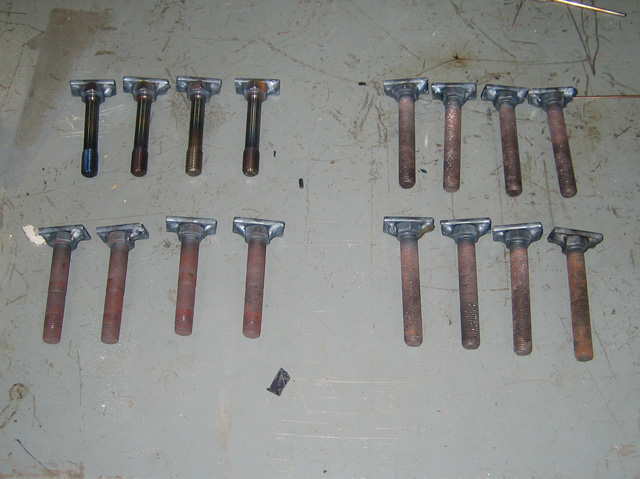 | ||
Jeff Young Experienced User Username: jeyjey Post Number: 46 Registered: 10-2010 |
My plan is to use Holts Firegum on the olives, and copper anti-sieze on the bolt threads and in the half-clamp grooves so everything will be nice and mobile when I go to line it all up. Does that sound about right? Thanks, Jeff. | ||
Jeff Young Experienced User Username: jeyjey Post Number: 47 Registered: 10-2010 |
Oh, and thanks Paul and Richard for the heads-up on the bolt wings/shoulders/blobs! (Hopefully I'm on the right track, although I haven't actually tried one of them out yet....) Jan, I think the key word is committed DIYer. ;) Cheers, Jeff. | ||
Paul Yorke Grand Master Username: paul_yorke Post Number: 743 Registered: 6-2006 |
Wow - Jeff - I'm impressed. Certainly done a job on them! I hope they are low enough to catch If your clamps and olives are good, I'd go for copperslip on them as well instead of fire gum. As long as everything is clean and have not rusted and eroded they are pretty good at sealing. Fire gum or similar if olive has rusted away . Good luck with her | ||
Jan Forrest Prolific User Username: got_one Post Number: 201 Registered: 1-2008 |
When I took the clamps off the manifold to downpipe joint they were already full of 'Firegum' or similar. As I'd already got a tube of 'Fire Putty' I refilled them before refitting. I've always believed in the belt & braces approach. I like the look of your 'new' bolts, Jeff. If/when I have to break any of those type of joints again I'll have a go at making a set. Even my limited welding skills should be up to the task. My welds may not be pretty, but they're usually quite strong. One of these days I may even spring for a MIG or TIG welder. Untill then my old stick welder will do most jobs that I throw at it. Ps. It's got a brazing attachment, but the copper coated carbon electrodes cost the earth per pair and don't last long, so I hardly ever use it. | ||
Jeff Young Experienced User Username: jeyjey Post Number: 48 Registered: 10-2010 |
> "I hope they are low enough to catch." Hmm..., yes, about that.... Turns out I have two different styles of half-clamps: the one I used to measure up my wings, and all the others. The oddball (right in the picture) is narrower and has a higher web (and a smoother surface finish - forged perhaps?). The wings work well on it. The wings don't work at all on the others (left in the picture). And as said, I have one odd-ball set and 10 sets of the others. Sigh. 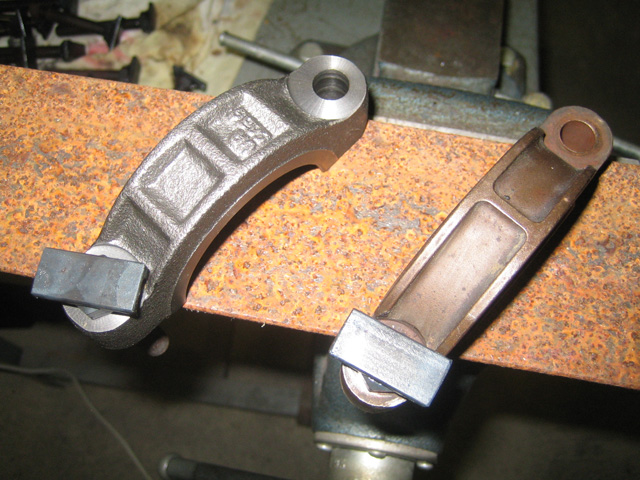 | ||
Jeff Young Experienced User Username: jeyjey Post Number: 49 Registered: 10-2010 |
I had wanted to try out the "nut welded to the side of the bolt head" idea, but by the time I had ground off my wings the heads were misshappen enough that it was hard to get the nuts parallel to the heads. So while not ideal, I figured welded-up clamps was better than nothing. I rolled a piece of paper around the tops of the bolt shanks to get them centred in the holes. (Most of it burns off when welding.) The first one ended up at a slight angle (I welded one side of the bolt head and then the other), but on the rest I tack welded the first side, welded up the other side, and then came back to the first. 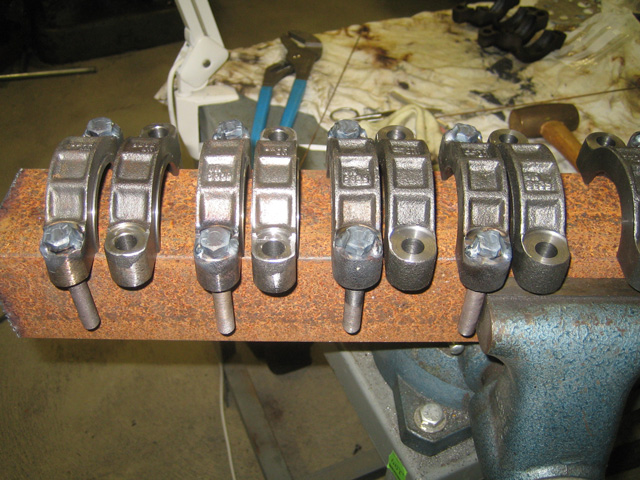 | ||
Jeff Young Experienced User Username: jeyjey Post Number: 50 Registered: 10-2010 |
I had assumed the bolt-fixing was mostly for disassembly. However, when taking it apart, the exhaust is where it is, and you have two hands, one for the bolt and one for the nut. When assembling, this is not the case. You need one hand to hold the exhaust and half-clamps in place, one for the bolt and one for the nut. That's more hands than I have, and the welded-up half-clamps made a huge difference. I didn't have much trouble getting the welded-in bolts to align well. So I think the biggest detractor of this method for me is that the half-clamps probably have a service life 2 or 3 times that of the bolts. No big deal as I've got at least 6 spare half-clamps, but I think the welded-on nut or brace ideas are better if you're starting from scratch. Jeff. | ||
Jeff Young Frequent User Username: jeyjey Post Number: 51 Registered: 10-2010 |
My "stainless steel" pattern-part balance pipe turned out to be a stainless bellows welded to two sections of mild steel pipe. The end in the picture also had to be shortened by about 1-1/2" to get it to fit. There's a reason I normally shy away from pattern parts.... ;) 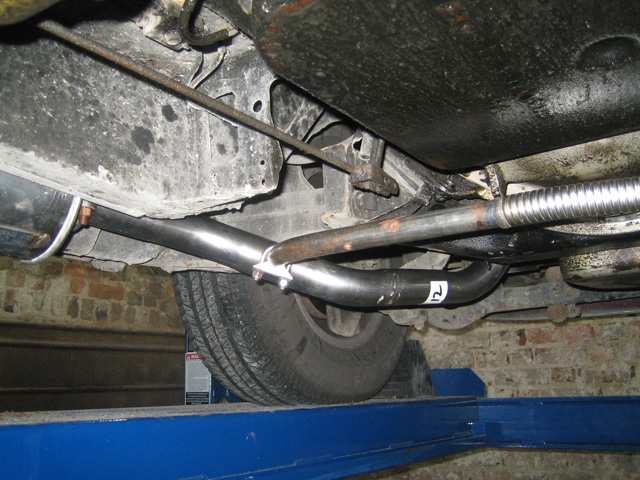 | ||
Jeff Young Frequent User Username: jeyjey Post Number: 52 Registered: 10-2010 |
It required a bit of fiddling to get all the clearances to spec (from chart Q2-3 in TSD4200), but the end result looks fairly neat and tidy. 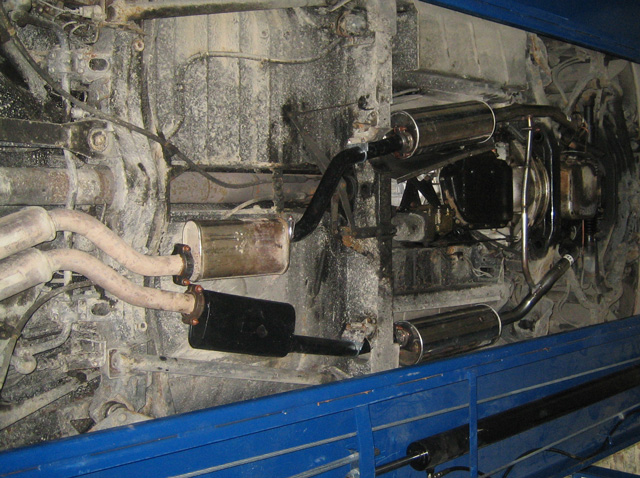 | ||
Jeff Young Frequent User Username: jeyjey Post Number: 53 Registered: 10-2010 |
Jan, I got a TIG machine back when I was racing Formula Ford (to be able to do Aluminium). It's the low-end Miller EconoTig, but it's a great little machine. (In fact, it's the only welder I brought with me when I moved to Ireland.) It's a bit slow (compared to MIG or stick), but as an amateur I get much better control (particularly of penetration depth), and as a hobbyist I don't really care much about speed. I do wish I still had an oxy/acetylene setup for brazing, heating and cutting, but I can't find non-rental bottles over here and the rents are way too steep for something I use once or twice a year. Cheers, Jeff. | ||
Jan Forrest Prolific User Username: got_one Post Number: 202 Registered: 1-2008 |
Jeff: Part of your difficulties in aligning the new parts of the exhaust system could stem from them being pattern parts, but it may yet be the method of attachment you used.It's usual for professional fitters to suspend all the components roughly in position (where possible) before moving them around to join them loosely and then jockeying them into alignment before tightening up any of the bolts. Often if they have any doubt about the shape or fit of a full system they will take the old one off and 'dry assemble' the new one next to it to compare them side-by-side for a better overview of the situation. Although time consuming in the first instance, it can save a lot of head-scratching, cursing and scraped knuckles in the long run. As for buying a mig/tig/gasless welder; I just don't have enough work to justify the cost. 3 years ago I sold off all my thicker - 4/5mm - welding rods as I just couldn't control the blow-through with them, but then needed a couple of 2/2.5 rods to complete a repair. A friend gave me 5 or 6 while the ones I'd ordered were delivered. I didn't open the new pack until a couple of months ago! Obviously I've kept this new pack of rods in the house where they're warm and dry. One of these days, though ... | ||
Richard Treacy Grand Master Username: richard_treacy Post Number: 2347 Registered: 4-2003 |
Jan, the professionals here make up the pipes and mufflers and do the final assembly in-situ. Removable sections are joined first by olives (NO U-clamps or telescopic fits please - Crewe never used them nor would any professional), and the final part is the welding once all the mountings have been finally secured. The welding is done with automatic pipe welding apparatus � no human skill required. The locals here give a lifetime warranty on stainless systems � and that includes the lagging and baffles inside the silencers. That they cost only twice as much as mild steel systems makes them a bargain. Using the correct gauge stainless makes them even quieter than any original mild steel on older cars, and op course stainless was increasingly the norm for most Crewe exhaust components since 1966. I have full stainless systems on all three cars, so needless to say each has only been attended to once since they left Crewe. The system on my R-Type is now over 30 years old and quiet. | ||
Richard Treacy Grand Master Username: richard_treacy Post Number: 2349 Registered: 4-2003 |
If anyone is puzzled by the system I or J etc, in the technical library under: http://rrtechnical.info/SY/spare/Other/qrg.pdf you will see the various configuartions used. Also see: http://rrtechnical.info/miscellaneous/TSD5681extract.pdf RT. | ||
Jan Forrest Prolific User Username: got_one Post Number: 204 Registered: 1-2008 |
I can't speak for all the exhaust systems available in the UK, but the 'stainless' Shadow 1 single systems I've been able to track down appear to have mostly mild steel interconnecting pipes welded (brazed?) to the stainless bits. I've found this PDF file which indicates that those specifications are pretty much standard. With them costing GBP � 530 and more - not including suspension hangers or fitting - for the 4 box single system I was relieved to find someone who was scrapping a Shadow less than 100 kilometers away and spent last Saturday driving over there and removing it. After spending Sunday wire brushing the rusty bits and then giving it 3 coats of paint in places, and 2 coats everywhere else, it now looks just like new. All for a few hours of sweat and GBP � 200! Between the 2 systems I also have a full set of sprung hangers plus a spare Not having any steel bar stock to hand I've pulled a couple of old cylinder head bolts from when I rebuilt the engine in the Toyota, cut each of them into three X 4.5cm lengths and welded them to the exhaust clamp bolt heads. Not as pretty as the ones Jeff Young made, but probably just as strong. I'd intended to start on fitting it yesterday, but it started to rain and it's still raining this morning. Not having anywhere that's under cover to do the work it will simply have to wait for better weather. Ps. Part of the work required for The Old Girl to receive her annual roadworthiness certificate (we call it the MOT) is the fitting of a new left hand outer track rod end. I've bought a new one in 'kit' form (GBP � 143 + delivery), but I'm unsure if it's complete. Do these kits usually contain a new seat? I got it from here and although they sell the seats separately there's no indication as to whether the kit includes one or not. | ||
Jan Forrest Prolific User Username: got_one Post Number: 205 Registered: 1-2008 |
It stopped raining - Hoorah!! Working on my own and with just the aid of a hydraulic trolley jack, a pair of axle stands and a pair of heavy duty ramps I fitted the front downpipes and the front box on Wednesday and the rest of the system on Thursday. With the exhaust no longer in the way I took the opportunity to blast some more underseal in the places I couldn't do as well as I might have liked when I did it last year. Now, once the track rod end has been fitted and a little welding done to the rear of the right hand outer sill, she should be good for another year of luxurious motoring Unfortunately I must be a glutton for punishment as I've contracted to buy a non-running Rover 216 Cabriolet from a fellow TEOC member. I just can't resist the idea of 'wind in your hair' (and probably bugs in your teeth) motoring without the need for a crash helmet and wobbling around on just 2 wheels | ||
Jan Forrest Prolific User Username: got_one Post Number: 210 Registered: 1-2008 |
Oh-Oh! Although I'd asked a local mechanic to overhaul the track rod end while he's doing the welding I decided to strip it down in case the seat was badly scored and also needed replacing. On disassembly the seat fell out in a shower of greasy shards of metal! Even the hardened ball end of the pin was deeply gouged, so it's hardly surprising that the tester rated it as *dangerous*. The new seat has been ordered and paid for and I hope to have it by tomorrow or Monday at the latest. However ... The manual indicates that it takes "800 - 1250 pounds of pressure" to fit the seat into the joint. Has anyone on here done the job themselves, and how did you achieve this pressure? At the moment the only method that might work that comes to mind is to put the lot in a large engineer's vice, along with a large socket to prevent damaging the dome, and tightening it up with a long extension on the vice handle. Do you think it likely that I can achieve around a half tonne of pressure by these means? In the meantime I'm reading through the old threads to see if this topic has come up before. | ||
Paul Yorke Grand Master Username: paul_yorke Post Number: 752 Registered: 6-2006 |
Jan that should do it, if not a socket and hammer to tap it in. It sounds tighter than it is | ||
Jan Forrest Prolific User Username: got_one Post Number: 211 Registered: 1-2008 |
Thanks Paul. I'll try that - assuming that it ever gets here and the rain stops  |