| Author | Message | ||
Chris Browne Frequent User Username: chrisb Post Number: 58 Registered: 2-2010 |
Hello everyone, I am restoring a 1958 Cloud 1 "from the ground up" as the saying goes. I am now at the stage where the body shell is completely stripped out and the final job is to remove the wiring loom so the shell can be prepped for painting. Whilst all the electrical equipment on the car worked and there is no physical damage, the wiring which is located on the bulkhead in the engine compartment, is very dirty and oil stained and will detract from the overall standard of the car when it is completed (see attached photo). 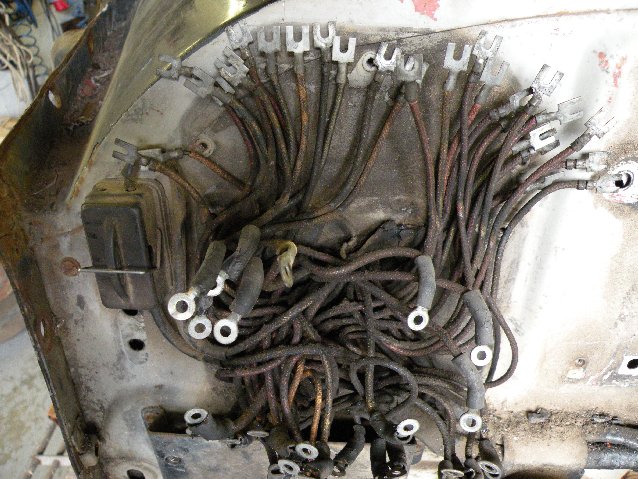 Does anyone have any tips on how I might clean up the wiring insulation as I am loathe to actually replace it all as the problem is a cosmetic one rather than electrical? Can anyone suggest what solvents I could try which might have the desired cleaning properties but which will not damage the insulation or am I asking the impossible? Any experiences or advice would be gratefully received. Thanks in advance. Kind regards, Chris | ||
David Gore Moderator Username: david_gore Post Number: 1041 Registered: 4-2003 |
Chris, my advice is leave this wiring alone as the insulation underneath the cotton becomes very brittle due to heat and age and crumbles very easily when disturbed. I am currently rewiring a 1950's home unit with similar wiring as a result of this crumbling problem. | ||
David Hughes Experienced User Username: wedcar Post Number: 31 Registered: 7-2004 |
Hello Chris CRC make a Contact Cleaner in an aerosol can that leaves no residue, I have used that product with success in the past on similar components. Regards David Hughes} | ||
Stefan Morley Grand Master Username: myupctoys Post Number: 330 Registered: 7-2009 |
Chris, Over the years I've rebuilt numerous valve radios and replaced the wire. Stuff under the chassis I don't care about but stuff thats visible including the top hats I like to make them look as original as possible. Agree with David, can be a bit hit and miss mucking around with them, especially the ones that are cloth covered rubber. Can buy it, do a Google search. http://www.sundialwire.com/ http://www.magnetoparts.com/wire.htm Are two for a start. Cheers Stefan | ||
Chris Browne Frequent User Username: chrisb Post Number: 59 Registered: 2-2010 |
Hi David, David and Stefan, Thank you all for your prompt replies and advice. I will make some enquiries about the product and companies mentioned. Kind regards, Chris | ||
Bill Coburn Moderator Username: bill_coburn Post Number: 1318 Registered: 4-2003 |
Chris, I am sorry to have to rain on your parade but I must disagree with the advice offered so far. All Post55 cars, like John Cleese's parrot, are dead. But then any 50 year old car is well beyond its use-by date, so aspiring owners/users need to do as complete a laparotomy as they can do, or afford to have done, to assess the safety of the unit and the durability of each component. Crankshafts seldom break but if you want to make sure you are not going to make history, get the thing crack tested. (Australia incidentally has the distinction of breaking a crankshaft in a Mark VI, a calamity sheeted home to by-pass filtration of the engine oil and the absurd practice of the bloody colonial owners insisting on rounding up sheep in their cars and burying them in bulldust!) At the other end of the task list is usually paintwork, the restoration of which is usually a primer for bankruptcy but usually highly desirable to prevent or remove rust, although a true believer hopefully would not prostitute the overall recovery of the vehicle by having a concours paint job and running bananas in the rear axle to cut down the noise!! Wiring is certainly the Achillesian (?) Heel of these cars. The last decent installation in this area was on the immediate postwar cars, which even now, with a bit of care can be de-wired, the stuff cleaned and put back. It seemed that things went down hill from then on so that only last week when replacing a relay mount in my Spur I kept my incense burner for the Gods going lest I snap an embrittled wire on a chassis some 25 years old!!! My advice is, armed with a large wiring diagram you extract each loom (there are about seven depending on the build) clearly label each terminal to record from whence it was removed and pack the lot off to a wiring specialist who has a machine that will duplicate the loom with modern wire and cover it with the correct cotton cover in the correct colours and you can refit them to your freshly painted car. Those looms will probably see you out. You can save money by doing your own termination (the loom company will supply new terminals) and taping which is done with a special non-stick plastic tape. I have used an Australian firm, Vintage Wiring Harness in Victoria who are quite used to overseas orders http://vinwire.com.au. I have found these people to be excellent. I would however be suprised if there is not an equivalent in you country! | ||
Dave Puttock Experienced User Username: ariel Post Number: 22 Registered: 5-2010 |
Don't tell my wife, but I found that an hour in the dishwasher, worked wonders. It will never be immaculate but at least you can read the colour code. I made my own looms with cable from AutoSparks, but I wanted to clean all the Lucas connectors. | ||
Chris Browne Frequent User Username: chrisb Post Number: 60 Registered: 2-2010 |
Hello Bill and Dave, Thank you for your thoughts. It is interesting that I am getting a lot of conflicting advice on this topic. Some saying leave it alone, others saying it must be changed. For the time being as cost is deciding factor, I will examine the wiring, in detail, to check the condition of the insulation, particularly in the engine bay where it is subjected to extremes of temperature and oil contamination. Depending what I find will determine which route I take. The last thing I want is to see years of work go up in smoke for want of replacement wiring. For now, I am content that my fire extinguishers are fully charged, I know how to use them and the battery will always be disconnected when the car is unattended! Kind regards, Chris | ||
Bill Coburn Moderator Username: bill_coburn Post Number: 1319 Registered: 4-2003 |
Chris I do understand, when you talked of complete stripping I thought it was a pity to not replace the wiring. The picture you supplied showed dirty but intact looms because they were protected from the maelstrom under the bonnet by the fuse box and juction box. The ones further over to the relays et al will surely have shed their cotton by now and no amount of dishwashing will cure that. One other approach I have seen from a professional restorer was to cut the affected wires back to under the dash board and replace them with new, taking great care with the joins. I quaked at the thought of linear connections but the end result certainly looked good as long as you dont look behind the dash. To my shame I started this job some 14 years ago and have yet to replace the looms. They are all made up and ready to go. Perhaps I will start again tomorrow. The pictures I think are in the second issue of Tee One Topics!!! Good luck. PS Don't please carry a chemical fire extinguisher, it is better let the car burn.. carbon dioxide units will avoid this crisis! | ||
Chris Browne Frequent User Username: chrisb Post Number: 61 Registered: 2-2010 |
Hello Bill, Thanks for your second thoughts. I, too, am considering doing exactly that, trim back the worst condition wires to just inside the bulkhead and then solder new lengths to build them back up again. I am now busy trying to source the correct colour coded cotton covered cable to effect the repairs. I appreciate your help. Kind regards, Chris | ||
Jan Forrest Prolific User Username: got_one Post Number: 269 Registered: 1-2008 |
To a great degree that is much what I've been doing with the door wiring on my SS1 (RSH24518). Since it's all out of sight (and out of mind) then the pursuit of originality is just too OCD to worry about (cross my heart I'll do a better job next time around). As has been stated in another thread: These are merely cars which, no matter what the cachet they may appear to have, possess no mystical qualities which make them anything more than one of the most luxurious limousines of their era. | ||
Francois Charlier Experienced User Username: vonplum Post Number: 42 Registered: 3-2011 |
You have this: http://www.autosparks.co.uk with kind regards Francois | ||
Brian Vogel Experienced User Username: guyslp Post Number: 40 Registered: 6-2009 |
Chris Browne wrote, in part: "and then solder new lengths to build them back up again." Chris, I'm certain that opinions will vary, and you'll hear the other side, but I must say do not solder your wires together. I had considered this recently for an issue on my SS-II where wire overheating had occurred. As someone pointed out, were you to have wire overheating of any significance (and mine had "toasted" insulation near to the crimp connections) it is very often quite sufficient to melt soldered connections. There is a reason that you don't see soldered connections virtually anywhere in automotive electrical systems. The physical integrity of the connection cannot be guaranteed with a solder connection. Get yourself either insulated butt connectors or uninsulated ones plus heat shrink tubing applied afterward (that's slid on to the wire before the butt splice is made, of course [yes, I've forgotten that in the past]). Brian RR Forums Administrator's Note: It is inadvisable to use different fonts in posts, as not all browsers can render them. I have edited this post to remove the 'Greek (Symbol)' font so it should now be readable by all. | ||
Jan Forrest Prolific User Username: got_one Post Number: 278 Registered: 1-2008 |
IMHO a good soldered joint is mechanically and electrically superior to almost any other method of joining two lengths of electrical wire together. I exclude post and wire-wrap technology as it's got little to do with car wiring, although when applied correctly the joint will actually be airtight! Yes, under extreme circumstances any joint could get hot enough to desolder, but if it was that hot the insulation would have become compromised long before the joint parted. Any joint where the resistance of the conductor is raised above the levels either side of it is prone to such localised heating with a decent, well fluxed solder joint exhibiting the lowest impedance of all. If shrink tubing is used on such a joint it should be as good as the original wiring before it was repaired. Why solder joints aren't normally used in the original wiring is open to debate, but with whole wiring looms being made up well away from the car and then fitted to the relevent components later it doesn't make financial sense (even in a RR/B) to then solder the ends to those components. Also it makes repair/replacement so much more difficult and time consuming if not also more prone to future failure. However the replacement of a section of wiring using solder joints is not the same as this and should be well up to the job as long it's done with care and the new cable is of equal or superior quality to that being replaced. As soon as I've had a good go at the 'new' cabrio I will be completely rewiring all 4 doors on The Old Girl as well as replacing all the door speakers, the quarter lights and door mirrors. Then with the warmer weather the paintwork can be tackled. | ||
Chris Browne Frequent User Username: chrisb Post Number: 64 Registered: 2-2010 |
Hello Brian, I appreciate your post but it appears to be in Venusian script and I failed the exam in school! Kind regards, Chris | ||
Brian Vogel Experienced User Username: guyslp Post Number: 41 Registered: 6-2009 |
Chris, Don't ask me what went wrong. I was trying to use formatting to make the message easier to read. Below is the text I posted earlier. I hope you can read it this time: I'm certain that opinions will vary, and you'll hear the other side, but I must say do not solder your wires together. I had considered this recently for an issue on my SS-II where wire overheating had occurred. As someone pointed out, were you to have wire overheating of any significance (and mine had "toasted" insulation near to the crimp connections) it is very often quite sufficient to melt soldered connections. There is a reason that you don't see soldered connections virtually anywhere in automotive electrical systems. The physical integrity of the connection cannot be guaranteed with a solder connection. Get yourself either insulated butt connectors or uninsulated ones plus heat shrink tubing applied afterward (that's slid on to the wire before the butt splice is made, of course [yes, I've forgotten that in the past]). | ||
Chris Browne Frequent User Username: chrisb Post Number: 65 Registered: 2-2010 |
Hi Brian, Received that one loud and clear, thank you! You have raised a valid point which I will include in my decision making, when the time comes. Thank s again for re-posting. Kind regards, Chris | ||
Geoff Wootton Frequent User Username: dounraey Post Number: 83 Registered: 5-2012 |
What is the general concensus on the issue of crimped or solder connections. I recently read an article in which it was stated that professional wiring shops always solder connections. However, this could well have just been the opinion of the person writing the article. Is there any definitive answer on this? | ||
Brian Vogel Prolific User Username: guyslp Post Number: 256 Registered: 6-2009 |
Geoff, I will go on record as saying I now believe that the "best" is dependent on the circumstance. When you've got large (and I do mean large, like the ammeter shunt wire) there is really no practical way to do a decent solder connection, so I use a butt connector for those, with either heat shrink tubing or the kind of electrical tape (I don't have it here right now) that's very thick, doesn't use adhesive, and is made to adhere to itself by stretching it as it's put on. For smaller connections I've used solder for some splices but with a physical addition like heat shrink wrap or conventional electrical tape. For things like slide connectors, lug connectors, etc., I've sometimes simply used crimp connections and sometimes I've crimped and then added solder. One thing's clear, if you look at what comes from the auto makers' factories it's virtually always a crimp connection of some sort (in my case, it's always been a crimp connection - but I'm sure someone, somewhere has encountered soldered connections). This is very likely because it's fast and it serves its intended purpose in virtually all cases. "Overbuilding" is a thing of the very long ago past. Brian | ||
Peter Talbot Prolific User Username: squerryes Post Number: 184 Registered: 7-2010 |
I agree with many of the comments posted previously - my suggestions would be: 1. Leave well alone, old cotton covered cable is really fragile - you only have to move it a bit and the insulation will crumble to dust. 2. I prefer a soldered joint both on grounds of physical strength and electrical conductivity. Rather than use a standard lead solder a better route, in my opinion, would be to use a lead-free alloy solder, containing a non-corrosive flux, 4% silver, 95.5% tin, 0.5% copper. 3. Heat shrink tubing is fine but you MUST get a residual high temperature variant - the stuff from your local DIY store will have only a fairly low residual temperature compliance. Peter | ||
Geoff Wootton Frequent User Username: dounraey Post Number: 84 Registered: 5-2012 |
Could I also ask for any recommendations on soldering irons. I do have an old low price radio shack 40W iron but am sure this is not up to the job of soldering auto connectors. I'd be grateful for any info this. | ||
Brian Vogel Prolific User Username: guyslp Post Number: 257 Registered: 6-2009 |
Geoff, We're back in "tool appropriate to the task at hand" territory again. If you're doing work with a PCB or soldering diodes inline with wire, etc., then a 40W iron is the maximum you should be using to avoid damage to the electronic and plastic components. If you're doing work like soldering together wire to splice it or soldering on connectors, etc., then a 100W iron is much faster and generally gives you much better flow. I never "solder with gas torch" unless it's for plumbing. Brian | ||
Bob Reynolds Experienced User Username: bobreynolds Post Number: 33 Registered: 8-2012 |
After 40 years working in the electrical industry, I am quite surprised at the above advice not to solder joints, but to use crimped connectors instead. If a crimped connection is to stand any test of reliability against a properly soldered joint, it MUST be done with the correct tool from the manufacturer. These are usually ratcheting pliers that can't be released until the correct force is applied, cost several hundred $$, and you will need a different one for every type of connector. If you are using a cheap universal crimping tool that looks like a pair of flat pliers - forget it! As the average car enthusiast is unlikely to posess the correct tool, it is better to solder all connections. The reason wires are crimped on new cars is purely for speed and convenience, not because soldering is inferior. And they have the correct crimping tools for doing the job properly. I would say that it's virtually impossible for a wiring joint to get so hot that it melts the solder. As already pointed out, the insulation would have failed long before then, and the entire car would probably have gone up in smoke! Having said this, there are good and bad soldered joints. It is important to make a good electrical and mechanical connection before applying the solder, as solder itself is not a good conductor. Then apply the solder and make sure the joint is heated up so that it flows properly, otherwise you will get a 'dry joint' which may soon fail. If you don't have the correct crimping tool, then you can always crimp the connection first and then solder it. | ||
Paul Yorke Grand Master Username: paul_yorke Post Number: 969 Registered: 6-2006 |
Soldered joints are certainly better if properly done. Crimped and soldered are best if you have the time, equipment and correct terminals. Crimping pliers of the type Bob R is suggesting are now available for about £30, so a good crimp can be made. Always tug the connector to make sure it is sound afterwards, even with the correct crimpers. . We swear by Gas soldering irons for most jobs. Not naked flame ones though !!  Adjustable with different size tips available. Adjustable with different size tips available. http://uk.rs-online.com/web/p/soldering-iron-kits/4053367/ | ||
Steven Spencer Yet to post message Username: sspencer Post Number: 1 Registered: 1-2013 |
This is my first response to my Rolls Royce brothers across the sea so here goes. Been in the US RROC for a while. I vote for soldered joints being a elect. engineer. I use https://www.britishwiring.com for proper connectors, wire and tools in the US. I use the soldered connectors not crimp. They offer both types. Also I would never put wires in a dish washer as stated previously in this string. That would be like buying a car that had been in a flood which will never turn out good. The wires subject to the heat under the hood were the worse on my SC11 and SC111. The inside wiring was in good shape considering the age. I replaced most wires back to the bulk head and fuse box. Takes a lot of time and patience. | ||
Chris Browne Prolific User Username: chrisb Post Number: 145 Registered: 2-2010 |
Hello everyone. I was just browsing through the various forums and came across this thread and realised that I had never reported back on the final outcome. After having taken lots of advice, including from members of this forum, my partner in crime and I decided to bite the bullet and change the entire wiring system for new. Our method was to strip out each complete section of the loom in turn then lay it out on a large sheet of card. We then drew out the various strands of wire, in the positions they fell, so we could break the new wires out of the new loom in the correct places. We also labelled every terminal with what it had been connected to. We were able to obtain all the correct colours of cotton covered wire (24 from memory!)and the work took three weeks to complete. On reflection, it was a ridiculous idea to even attempt to clean up the old wiring. As the old looms were taken out of the car, we came across numerous bits of damaged insulation, any one of which could have caused a catastrophic fire. As the last poster said, it takes a lot of time and patience but was definitely worth it in the end. 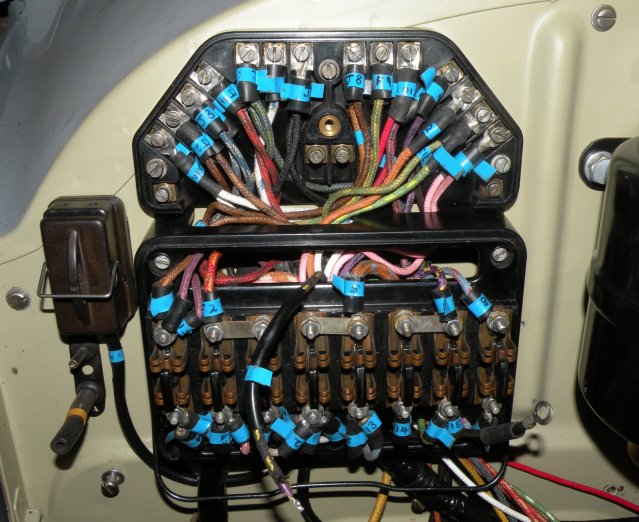 Kind regards, Chris Browne | ||
Geoff Wootton Grand Master Username: dounraey Post Number: 464 Registered: 5-2012 |
Chris Superb Job. Any chance of a photo or two of the car in it's present state of restoration. I note that your original question was sent in October 2011. The bulkhead has obviously been spray painted to a high standard. Would be great to see some more pics. Geoff | ||
Bob uk Unregistered guest Posted From: 94.197.122.78 |
I like that robust period look. It gives an air of simple neat functionality. (Message approved by david_gore) | ||
Chris Browne Prolific User Username: chrisb Post Number: 146 Registered: 2-2010 |
Hi Geoff, Thanks for your interest. My fellow restorer and I have just passed the 5,000 man hour mark in our project. We bought the car in February 2011 and hope to have it completed by the end of this year ready for the Cloud sixtieth anniversary celebrations in 2015. We have just spent the last six weeks completely restoring the front wings and these have now been refitted onto the car for the final time. We are about six weeks away from taking the car to the paint shop where it is to be finished in its original livery of Shell Grey over Velvet Green. The chrome is at the platers being replated (all 124 pieces of it!) so once we have the painted car back, we will have a very intensive period of carefully refitting all the interior - new headlining, new cloth upholstery, new leather bound carpets , refinished wood and the restored seats. After so long, we can at last see the light at the end of the tunnel. It has been a long, sometimes difficult, but very satisfying and enjoyable project to do and we are looking forward to driving and showing the completed car during its Diamond Jubilee year. Here are a few photos (of over 5,000 I have taken), as requested. 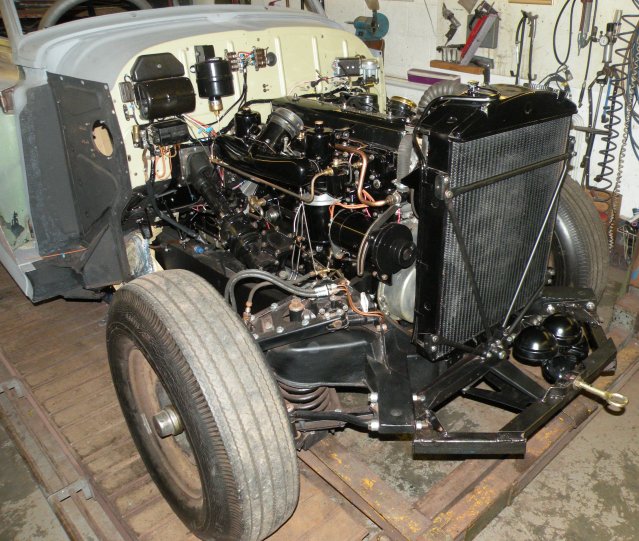 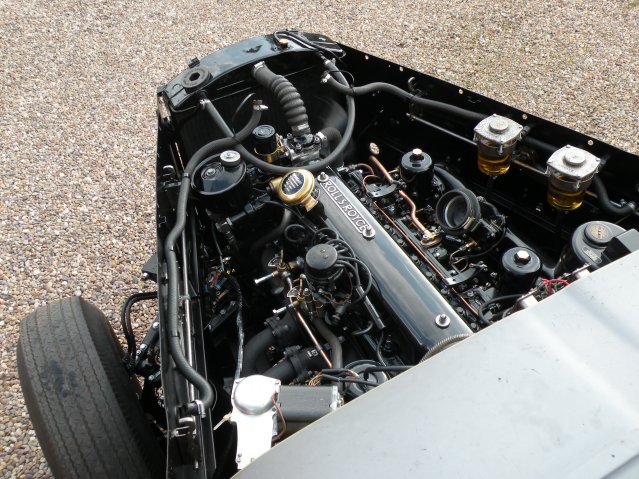 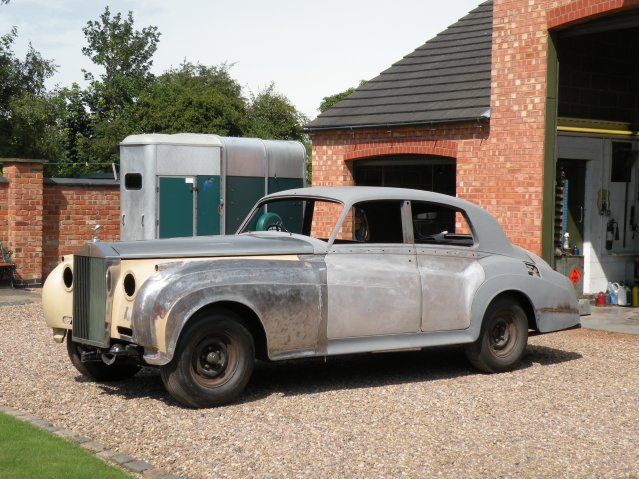 Kind regards, Chris | ||
Geoff Wootton Grand Master Username: dounraey Post Number: 466 Registered: 5-2012 |
Hi Chris Fantastic. A quality restoration. I love these cars. When the paint and brightwork are on it's going to look superb. This may be a silly question, given the size and weight of these cars, but did you lift the body off the chassis for the underside restoration? Thanks for putting up the photos Regards Geoff. | ||
Chris Browne Prolific User Username: chrisb Post Number: 147 Registered: 2-2010 |
Hello Geoff, Yes, we removed the body from the chassis. Before we decided to do it, we took advice from probably the two best qualified Rolls-Royce gurus in the UK. Independently, the first one advised that we must take the body off as that is the only way you can access the top surfaces of the chassis and also much of the underside of the body shell. The second said, whatever you do, don't take the body off as you will never get it back on again! We gave this considerable thought and in the end, decided that the body had to come off if we were going to do a thorough job. We made a jig for the chassis using the fifteen body mounting holes as datum points. We braced the door reveals in the shell and then gently lifted the body off the chassis. We did this using a four post ramp with a wheels free facility, two very thick planks to go under the sills and six commercial bottle jacks. We were always very careful not place undue stress on the body or chassis whilst they were in their unrepaired state. Taking the body off was the right thing to do as there was a huge amount of repair work needed to the sills, particularly, but also considerable repair work required on the chassis itself. As an example, we had to replace the entire off side rear chassis leg as far as the rear axle line as it had corroded away. This is a fairly common fault on Clouds as the battery sits on the end of this chassis leg and over the years, acid spills down and rots the leg away. All our careful work and planning paid off as when we came to refit the body onto the chassis, after the repairs had been completed, all fifteen mounting bolts actually dropped into their holes, without being forced, so the chassis jig which we made had done its job. A big relief at the time, I seem to remember! Here are another two photos. 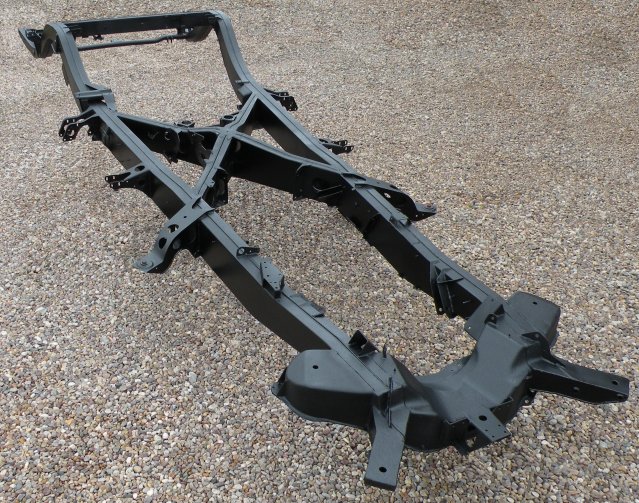 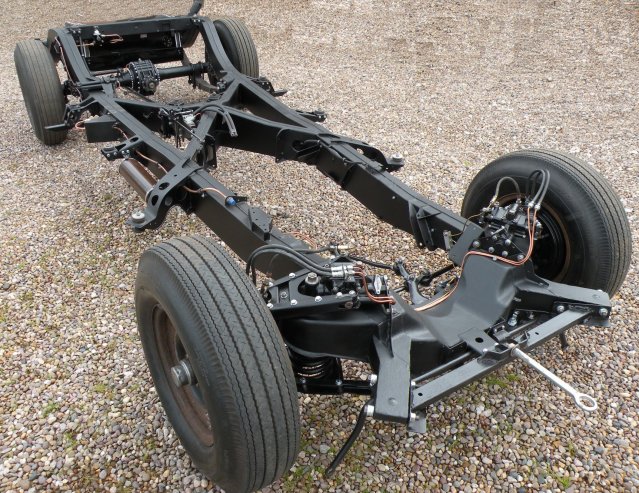 Kind regards, Chris | ||
Geoff Wootton Grand Master Username: dounraey Post Number: 467 Registered: 5-2012 |
Chris Thanks for posting the information. I know that separating a car body from the chassis is a major undertaking; it doesn't come much harder than on a Rolls Royce Silver Cloud. Geoff. | ||
Geoff Wootton Grand Master Username: dounraey Post Number: 494 Registered: 5-2012 |
Hi Chris How is the restoration going. Will you meet your target of the end of October for the respray. Now that you are only a few months out from completion of the restoration, have you thought of contacting any magazines like Practical Classics for publication of an article. I am sure they would be interested. Geoff | ||
Chris Browne Prolific User Username: chrisb Post Number: 155 Registered: 2-2010 |
Hi Geoff, The work continues. During the last month, we have reassembled the ducting and motors for the heater and demister and fitted these onto the inner wings. The metal repairs on the front wings have been completed and the underside of the wings sprayed with stone chip paint. The wings have been refitted for the final time although there is still some surface finishing to be completed where we have welded in the repair panels. The heater and demister matrices have been fitted along with all the associated pipework and we have wired up and tested the heater and demister motors. The cooling system has been refilled with 50/50 antifreeze and we have no leaks (there are twenty-two joints in the pipe work and therefore considerable scope for leaks, but thankfully none!) We have had a large set back when our painter rang on Monday and told us he was no longer prepared to paint our car. He gave what he felt were valid excuses but it has really hit us hard as we did not have a plan B as this guy had been on board for almost 10 months and we were expecting a call from him asking us to take the car to him in the next couple of weeks. We are now trying desperately to find someone else willing, and capable, of doing the work. Needless to say, we have crossed him off our Christmas card list! I have attached further photographs and will keep you up to date with our progress. 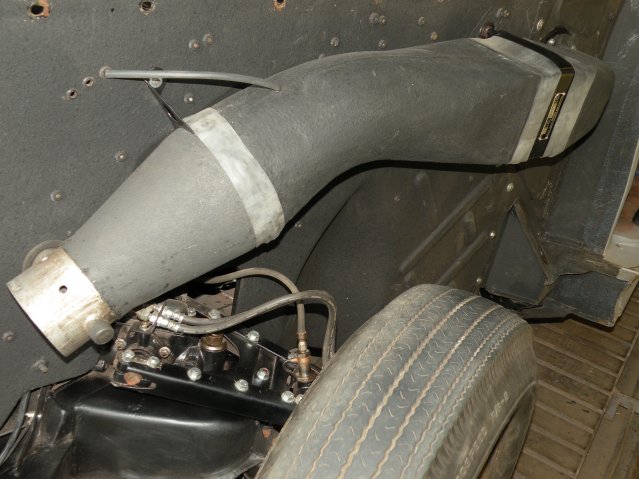 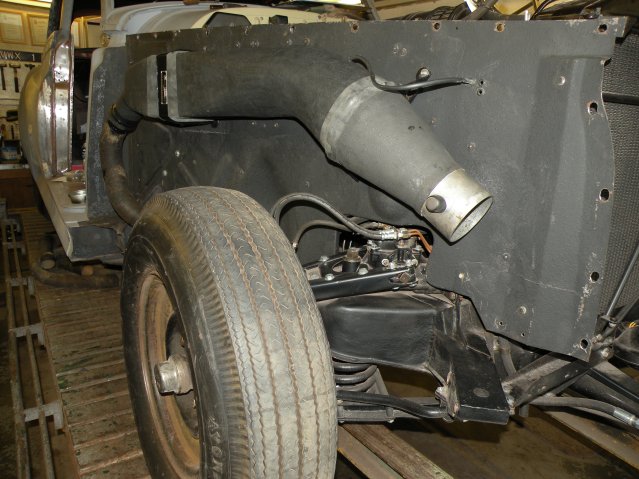 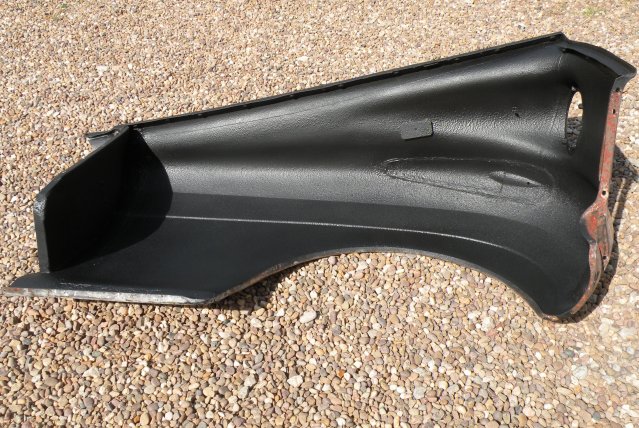 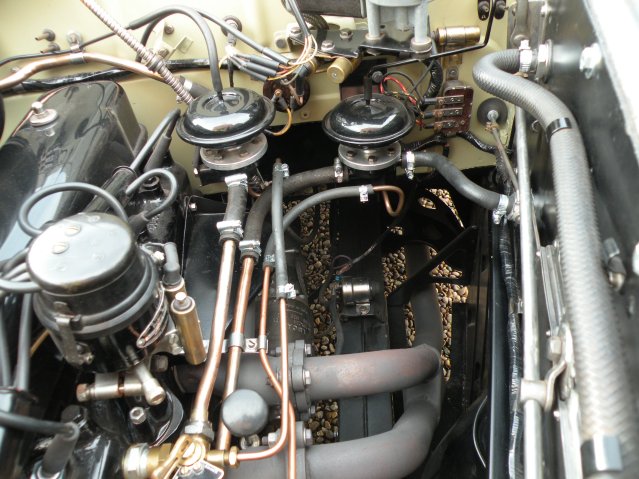 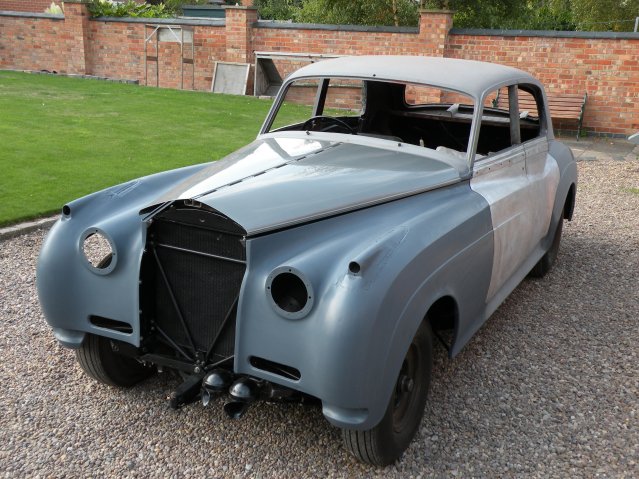 Kind regards, Chris | ||
richard george yeaman Prolific User Username: richyrich Post Number: 219 Registered: 4-2012 |
Hi Chris credit where it is due good luck with plan B. Richard. | ||
Geoff Wootton Grand Master Username: dounraey Post Number: 495 Registered: 5-2012 |
Hi Chris Thanks for the update and the pics. A really interesting project. Regards Geoff. | ||
Bob uk Unregistered guest Posted From: 94.197.122.91 |
This car is being done the correct way and the rust in the chassis and the sills is so common and why the body and chassis have to be separated. Although it is daunting and requires bracing etc. The time spent is quickly regained when welding is so much easier. Their is no way to get a chassis to look that good without a demount. Especially considering modern media blasting. Plan B paintwise could be diy. If after applying the primer you don't feel competent enough to tackle gloss bit then I am sure a paint shop will finish it for you. Proper masking is paramount and easy but tedious. Gaffer tape is useful. Light Solid colours such as primrose are always easier. I if I were painting this car I would use a white primer then use 50/50 primer and top coat as the last primer coat. Once finished you well have a car for 50 years of use. I want to do a Wraith, I saw.a 53 Dawn and the guy also had a empress Wraith limousine which he was restoring. Since then I have been looking for a Wraith. It is the headlights that grab me. (Message approved by david_gore) | ||
Chris Browne Prolific User Username: chrisb Post Number: 156 Registered: 2-2010 |
Hi Richard and Geoff, Thanks for your interest and kind words. Bob - it may well be the case that we will have to tackle the preparation of the body ourselves but we are under no illusions that we are capable of spraying the final finishes. We have invested too much time and effort into the project to jeopardise the end result with an amateur paint job. The fit and finish is, after all, the first thing people will see and as the saying goes, you don't get a second chance to make a first impression. The added difficulty is that we want to finish the car in it's original colour scheme of shell grey over velvet green. So as well as being a two tone finish, with all the additional masking that entails, velvet green is almost black in poor light so is a very unforgiving colour if the surface isn't absolutely perfect. Onwards and upwards (and trying to stay positive!) 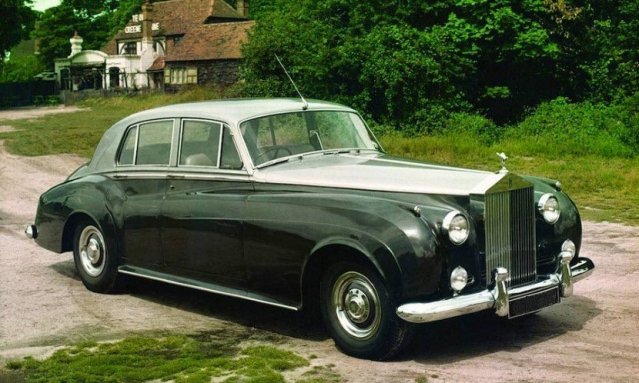 Kind regards, Chris | ||
Bob uk Unregistered guest Posted From: 94.197.122.78 |
I know the green you mean. Actually that's an easy colour to spray. The shell grey is a metallic which is a spray oven job. Plus with a pro job you get modern 2 pack stuff which is very good. I saw a Shadow in Brewster green with mid greeny grey leather which looked very good. I thought from the photo of the fuse box that the colour was primrose.. (Message approved by david_gore) | ||
Bob Reynolds Prolific User Username: bobreynolds Post Number: 175 Registered: 8-2012 |
Might we be told the excuses given for the original painter backing out after 10 months? If he wasn't up to the job how come it took him 10 months to realise! | ||
Jan Forrest Grand Master Username: got_one Post Number: 675 Registered: 1-2008 |
Preparation is everything! Dark colours will not forgive the slightest blemish in the underlying surface, which is why nearly all kit cars come in white or at least very pale colours. Every hour spent here can save 10 later. If anyone doing the job has the slightest doubt in his abilities is almost sure to be right. | ||
Chris Browne Prolific User Username: chrisb Post Number: 157 Registered: 2-2010 |
Bob, The painter has his reasons which are important to him which, he feels, have justified his decision and it would not be fair to air them on this forum - even without naming him. Needless to say, it has thrown a real spanner in the works so the hunt is now on to find someone who is willing to take it on. Not an easy task. Kind regards, Chris | ||
Bob uk Unregistered guest Posted From: 94.197.122.74 |
Dark solid colours do require a blemish free surface but once the blemish free surface is done one can get away with murder. I saw a FX4 taxi cab sprayed in black using gun wash for thinners and it looked smashing. However that was a taxi not a RR, and the owner has made the decision to not diy. In the UK there are hundreds of places that could do a good job. My shadow was refinished by a Porsche approved body shop and the colour (black) was a Porsche colour. Which is about the same as Masons black which is about the same as carriage black which I painted the car in. If the original painter feels he can't then better now than messing the job up. I had an argument with a spray shop, over a very good paint job but they had got overspray on the underside of the car which had a powder coated chassis. To cover up the mistake they sprayed piant over the powder coat. The car had to be stripped down and the chassis repowder coated!. Then assembled then repainted again. The finished car a Triumph Vitesse won a prize at a show. (Message approved by david_gore) | ||
Mark Aldridge Prolific User Username: mark_aldridge Post Number: 153 Registered: 10-2008 |
Chris this is a most interesting project and I look forward to reading a complete write up , if you are intending to produce it. Having a "well used " S1 , which I have carried out panel repairs etc to keep it presentable , I well appreciate the huge task that you have undertaken, and the inevitable cost in money, time and effort. Are you going to paint in two pack or cellulose, or an acrylic 1k lacquer over base coat? From my own experience, bodyshops do not want to get involved with this type of work, at least, not at affordable figures hence the reason for the DIY route myself, using the acrylic over basecoat finish.With kind advice from a professional show car bodyshop. Also , how much refurbishment was necessary on the engine and transmission, and did you do this "in house" ? Mark | ||
Chris Browne Prolific User Username: chrisb Post Number: 158 Registered: 2-2010 |
Hello Mark, We have received news today that we may have found a paint shop which is prepared to paint the car in 2 pack, I think, but at a price!! We dare not skimp on the paint job otherwise all the effort we have put into would be wasted if the finish was anything other than perfect. The engine was and is remarkably sound as befits it's 27,000 miles from new. It was badly sludged up due to old or incorrect antifreeze being left in it when it was parked up. Whilst the engine and gearbox were out, we removed all the inspection covers from the water jacket and withdrew the brass water gallery through the back of the engine. It was then thoroughly flushed out, rodded, bottle brushed etc. etc. We removed a huge amount of sediment from the block but are now confident it is as clean as it can be without resorting to chemicals which we were loathe to do. Since refitting the engine and driving the car, we have dropped the coolant out several times and refilled it and as the last fill was clean when we drained it, we have now filled it with 50/50 Bentley coolant. We removed the gearbox ourselves and as we had had an issue of a heavy second to third gear change when we first bought the car, we entrusted it to a professional overhauler who rebuilt it for us. The car is the subject of a series of articles in the RREC Bulletin. Kind regards, Chris | ||
Mark Aldridge Prolific User Username: mark_aldridge Post Number: 154 Registered: 10-2008 |
Chris, I look forward to reading the articles. 27,000 miles is amazing, and presumably the original interior will be refurbishable without retrim ? Given the value of low mileage examples of these cars sold recently ( in excess of �70k), the project hopefully will not be too much of a "labour of love". I find that the gearchange on my S1 was considerably better using Dexron 111 fluid rather than Dexron 11 especially cold.As for coolant, I use nothing other than Bentley Green in all of my cars , and am of the opinion it is well worth the extra cost. With my Shadow and my Bentley8, we have had the panels bare metalled before having professional paintwork,as paint reaction is a risk with old paint. The S1 could really benefit from a baremetal respray, but the cost is eye watering and difficult to justify on our example but on a 27k mile car is a must. Mark | ||
Mark Aldridge Prolific User Username: mark_aldridge Post Number: 155 Registered: 10-2008 |
Chris , in my opinion, the Cloud series cars have the most comfortable ride, particularly back seat, of any of the postwar Crewe cars., I use mine for my weekend drive to my holiday home more often than any of the others.This in itself justifies the effort in the upkeep. Mark | ||
Chris Browne Prolific User Username: chrisb Post Number: 159 Registered: 2-2010 |
Hello Mark, Sadly, our car had been kept in less than ideal conditions when we found it so the cloth headlining and the rear three quarter panels around the vanity units had suffered from damp and there was evidence of a considerable number of expensive cigars having been smoked in the rear compartment so the cloth was quite discoloured in places. We bit the bullet and bought several yards of the correct, light grey, West of England cloth. A seamstress friend of mine has made a new headlining using the old one as a pattern, and I replaced the material on the vanity units and the cantrails and beading throughout so all the cloth upholstery is new. The leather was not too bad but I have been able to restore that myself using proprietary products and am pleased with the results. We have also sourced new Wilton carpet as that, too, had suffered from storage in a damp environment. We need to have all the carpet bound in leather and I was lucky enough to find a half Connolly hide, of the correct colour, with a Rolls-Royce label, on E.Bay for only �40. Another stupendous piece of luck is a new neighbour has recently moved in next door and he has set up a workshop in a large shed in the garden. He has been a leather artisan all his life and has offered to bind the carpets, on the correct machine, for me. What are the chances of that happening?? I have attached a couple of photos of the cloth interior. 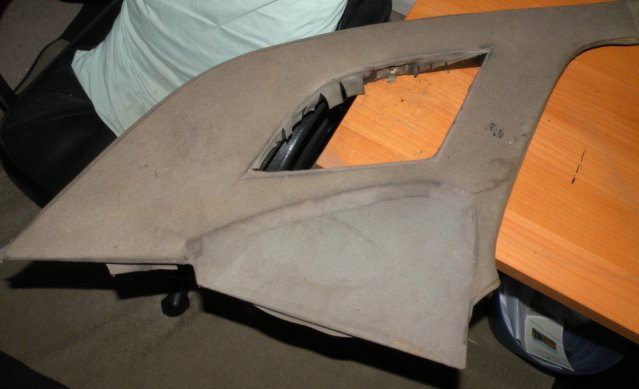  Thanks for your interest. Kind regards, Chris | ||
Chris Browne Prolific User Username: chrisb Post Number: 168 Registered: 2-2010 |
Hello all, To everyone who has shown interest - good news, at last, on the Silver Cloud restoration front. The car was delivered to the paint shop today. Although work will start very soon, it is a big job (two tone paint) and Christmas and New Year are looming so it is likely to be away for at least six weeks. We are, however, back on schedule to get it finished for mid-April. Fingers crossed! Kind regards, Chris | ||
Geoff Wootton Grand Master Username: dounraey Post Number: 540 Registered: 5-2012 |
Hi Chris Great news. I'm one of those following your restoration. I look forward to seeing the pics in the New Year. Really pleased to hear you are back on track. As an aside, have you approached Practical Classics or any other publications. It would make a great article. Thanks for keeping us up to date. Best Regards Geoff. | ||
Bob uk Unregistered guest Posted From: 94.197.122.73 |
Another milestone ticked off the restoration journey. Hopefully the rest of the journey will be smooth. When the car is returned leave for a few days so that the paint is harder. A week is good. Beware that dust covers can imprint the weave into soft paint over days. Ask the painter for advice. Gaffer tape on bumper corners. use white spirit to remove gaffer tape glue residue. After using white spirit on chrome use wax polish to seal the chrome. (Message approved by david_gore) | ||
Chris Browne Prolific User Username: chrisb Post Number: 170 Registered: 2-2010 |
Hello all, Further update on the Cloud restoration. The car has now been in the body shop for 3 weeks. I have been allowed to go and work on the car doing the body prep to try to keep the costs down. I had no idea how tedious it is preparing body work for paint! I have spent most of my time on the near side front wing and I am just starting to get the hang of it. There is no rushing this work, as I had been warned previously, but I can see weeks and weeks of sanding and skimming and more sanding ahead of us until it is anything like ready for paint. I think I have probably chosen the most difficult panel in the world to start on as it is all concave and convex curves and includes two swage lines which have to be preserved and kept sharp. 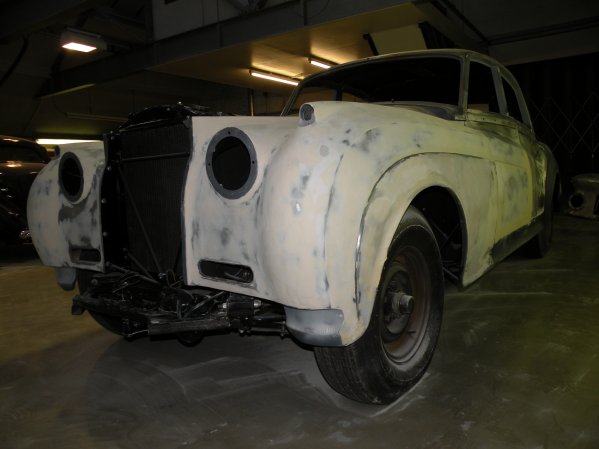 Really looking forward to getting on to the roof and boot lid panels as they are relatively straightforward shapes. This work certainly builds up the arm muscles and the good news is that I am losing weight! A Happy Christmas to all our readers and I will report further in the New Year. Kind regards, Chris | ||
Jim Walters Experienced User Username: jim_walters Post Number: 26 Registered: 1-2014 |
Chris, just a tip from a professional restorer. Get several sheets of light weight plastic and wrap around as much of the chassis as you can, over the front suspension, and all around the engine, differential and springs. Tape it in place. You want to completely seal off everything you have already painted from the filler and primer dust. The best way would have been to lay a sheet of plastic over the chassis before you dropped the body back on but you're past that now, so just cover it all up as well as you can. The dust from sanding will get everywhere and is difficult and very time consuming to clean up. SRE22493 NAC-05370 www.bristolmotors.com | ||
Chris Browne Prolific User Username: chrisb Post Number: 171 Registered: 2-2010 |
Hello Jim, Thanks for your advice. The annoying thing is that the entire chassis was wrapped in pallet film and brown paper before we refitted the body. It then became difficult to refit all the engine bits and running gear so in a moment of madness, we tore it all off. Our intention is to mask off the engine bay where the bonnet will be and also the underside of the engine and the front uprights before we get much further. As you say, the dust gets everywhere but, at the moment, regular blasts of compressed air are keeping things pretty dust free. There will, of course, be a major clean of everything once we are done - whenever that might be!! Kind regards, Chris | ||
Bob UK Unregistered guest Posted From: 94.197.122.77 |
Body shops use thin plastic sheet and cling film. This is water proof. Often this is replaced with new before it goes into the booth. I cannot stress how important correct masking is over spray, filler dust and rub down slurry are time consuming to put right if you can that is. When rubbing down don't dwell on the crown lines. As a guide dust the panel with matt black aerosol or carbon black with a soft make up brush. When the black is rubbed off the panel flatted. To get dead even flat surfaces never use fingers only use a pad, the larger the pad the straighter the rub down. Note some fiddlely bits are best done with fingers. Also deep concave curves ie wheel arches. I have a selection of round plastic tubes to support the rub down paper. Last week I saw a car with paint in the bottom of the tyre tread. This is sloppy masking. At least the owner will know when the tyre is worn out. Now you know why good paint jobs cost a lot.  (Message approved by david_gore) | ||
Chris Browne Prolific User Username: chrisb Post Number: 172 Registered: 2-2010 |
Update. I collected 117 pieces of replated and polished stainless steel parts from the plating works today. They have done a fantastic job - very high quality work. The only parts left to finish are the two bumpers (currently in copper plate finish), three hub caps and the two opening quarter light frames which are all in nickel finish, awaiting the final chrome. I was told that the bumpers and hub caps are particularly difficult to chrome plate perfectly due to their complex shapes. The one hub cap that was complete has a flawless mirror finish so well worth the long wait. They will be ready for collection in mid-January after the works Christmas and New Year shut down.. We have also taken delivery of four new Avon 820x15 crossply tyres which had been on order for almost six months. Apparently Avon only produce limited numbers of this size twice a year. The car is currently in the body shop having the body prep done so everything seems to be coming together at last and once the car is painted and back with us it will simply (!!) be a very careful reassembly job. Kind regards, Chris | ||
Geoff Wootton Grand Master Username: dounraey Post Number: 569 Registered: 5-2012 |
Chris This is a mega restoration. When the car is returned from the paint shop the reassembly is going to be so enjoyable, after all the hard work. Thanks for the update. Best Regards Geoff | ||
Mark Aldridge Prolific User Username: mark_aldridge Post Number: 183 Registered: 10-2008 |
Chris, who is your plater, all of the companies I have approached have refused to re plate the hubcaps. Mark | ||
Chris Browne Prolific User Username: chrisb Post Number: 173 Registered: 2-2010 |
Hello Mark, I have sent you a private message. Kind regards, Chris | ||
Mark Aldridge Prolific User Username: mark_aldridge Post Number: 186 Registered: 10-2008 |
Thanks Chris, I have not received your message due to me carelessly not updating my Email address on this site. Just found the problem and corrected it. Could you kindly resend. Apologies Mark | ||
Chris Browne Prolific User Username: chrisb Post Number: 177 Registered: 2-2010 |
Hello Mark, Message resent as requested. Kind regards, Chris | ||
Mark Aldridge Prolific User Username: mark_aldridge Post Number: 187 Registered: 10-2008 |
Thanks Chris, I will look into this when sanity returns after Jan31st , and I have completed a mountain of Income Tax Returns ! Regards Mark | ||
Vladimir Ivanovich Kirillov Frequent User Username: soviet Post Number: 96 Registered: 2-2013 |
Chris its great to see one of these beauties going through a restoration. Absolutely a fantastic shape. I had an S3 Bentley that I bought from Arizona with two aimed bullet holes through the rear window and I didn't get to do much on it except chop the roof off. I had to do this because I wanted a convertible. Sadly around the same time my first marriage went off the rails so I had to sell the car and bolt back to Russia for some serious hand to vodka bottle combat. Your first message in this thread showed the wiring. Yes cloth covered wiring. My S3 had cloth covered wiring and when I saw it I thought what a headache it was going to be because the cloth on many wires was falling off and the nice brown plastic wire underneath was clearly visible and there were quite a few wires like this. I decided that I was going to yank the looms after marking everything and then set about making my own looms. Then after I had finished installing the new loom I was going to put the old loom in a kind of circle type arrangement, pour petrol on it, light it and have a stiff drink to whoever at Crewe came up with the brilliant idea of using a cloth covered wiring loom. I always carry a good fire extinquisher in all my good cars because I have seen pictures of Ferraris and even very late model RR/B go up in flames. Why can't politicians spontaneously combust like that? Good luck with your resto. | ||
Chris Browne Prolific User Username: chrisb Post Number: 185 Registered: 2-2010 |
Update. Just in case anyone thought the project had been abandoned, I hope next week will be the final week before paint starts to go on our Cloud 1. Believe it or not, my co-conspirator and I have just passed the 300 man hours mark on the body preparation. Can't believe it has taken so long but we have had professional advice all the way through and although I am sure that professionals could probably have done the work in half the time but it has taken us nine weeks. As an example of where the time has gone, it took us a full day to fit and adjust the shut lines on the boot lid. We have a bit more work to do on the rear wheel arches and the roof but then we should be home and dry. For any other owners contemplating this type of work, be aware that the front wings, in particular, are an absolute nightmare as firstly, they are all compound curves and swage lines and secondly, they are huge! I have attached a couple of recent photographs. 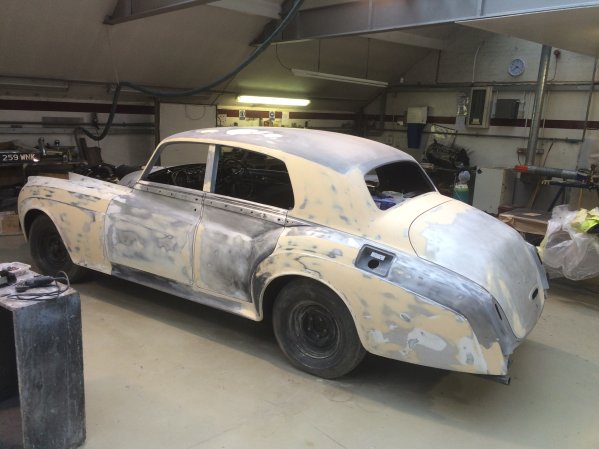 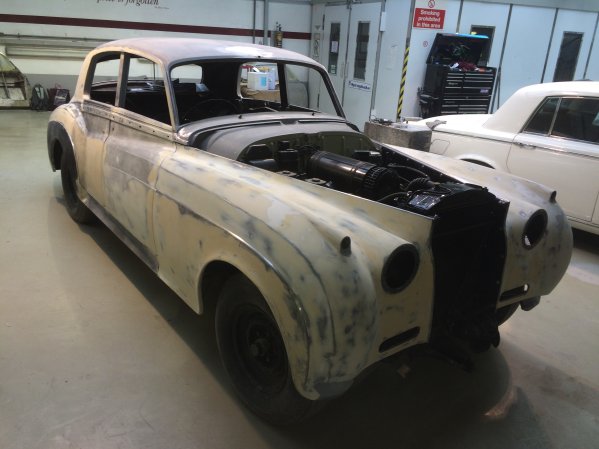 Hopefully, the next instalment will include photographs of painted surfaces. We live in hope! Kind regards, Chris | ||
Vladimir Ivanovich Kirillov Prolific User Username: soviet Post Number: 106 Registered: 2-2013 |
Nice going Chris with the 300 hours of preparation but I can tell you this: I have worked with a pair of total lunatics whose attention to detail was a shade off insanity but they took out best panel and paint in custom hot rod shows for quite a few years in a row. Putting the paint on is the easy part. Preparing the body for the paint sorts out the amateurs from the professionals and considering this is a timeless car you are restoring you need to disregard how much time it took you to get the body ready because any shiny paint you put on the body is going to both mirror and magnify any little defect in the body. You have to be a perfectionist if you want to get the car up to the standard RR/B produced when the car was new. Nothing is going to annoy you more than when light hits it and you can see a defect in the workmanship for that will gnaw at you worse than the taxman. So what colour is it going to be and what type of paint? | ||
Chris Browne Prolific User Username: chrisb Post Number: 186 Registered: 2-2010 |
Hello Vladimir, You are absolutely right about the reflections showing up the slightest fault which is why we have spent so long on the preparation. The car is going to be shell grey over velvet green, its factory original colour scheme and will be in two pack paint. We have seen samples of both colours and the finish is superb. I posted a photograph of a car in these colours earlier in this thread so just scroll up until you find it. Thank you for your interest. Kind regards, Chris | ||
Michael Faircloth New User Username: fairfalcon Post Number: 3 Registered: 6-2005 |
Guys, I agree with all the above concern with taking your time in the prep work... and I have painted a few cars myself. What I think is interesting are the car shows on TV that take some junk car and in a weeks time strip it to the frame and completely fix all the rust, complete a brand new interior, do all the body work and paint the car to concurs perfection. I would like to find some of these guys here in south west Florida. Mike in Naples | ||
Geoff Wootton Grand Master Username: dounraey Post Number: 637 Registered: 5-2012 |
I watched one of those programmes once. Classic Car Rescue. Biggest load of tripe I've ever seen. I do wonder what part of the viewing audience the programmes are aimed at - certainly not serious car restorers. One of the other essential requirements appeared to be finding the biggest pair of low-life's possible to present the programme. Geoff (in Tampa) | ||
Vladimir Ivanovich Kirillov Prolific User Username: soviet Post Number: 131 Registered: 2-2013 |
There is always a buck to made by getting a dream idea and presenting it like an easy, anybody can do it caper. Mass media knows this and has always done a steady business. I once saw a 1959 Cadillac panelled and painted. I should of said plastered and repainted because from front to rear the entire car received about one eighth of an inch bog. And the finished job looked great, but I doubt a magnet would have clinged anywhere along its sides and I can just imagine the screams and moans that will arrive if and when the bog in the Aussie sun decides to curl and raise its head right though to mirror like paint finish. It will be horrible | ||
Chris Browne Prolific User Username: chrisb Post Number: 191 Registered: 2-2010 |
Hello all, As it is over two months since my last update, I thought those of you who have shown an interest would like to know the state of play. No - I haven't been posting because I had slit my wrists (!), it has just taken a further two months to finish the body prep. If anyone is contemplating a restoration such as ours, it is good to be optimistic about the time frame but you need to be realistic as well. However long you think your body prep will take, I think it is a safe bet to at least double it if you want a really good finish. We must be getting close now as I have spent today masking the car up. The self etch primer and high build primer were delivered today and the paint booth and painter are booked from tomorrow onwards. We have allowed 130 hours labour for the paint work to be completed, bearing in mind it is two tone, including a final polish. I have attached two final photographs before the transformation takes place. Next time you hear from me, the painting should all have been completed. I live in hope!  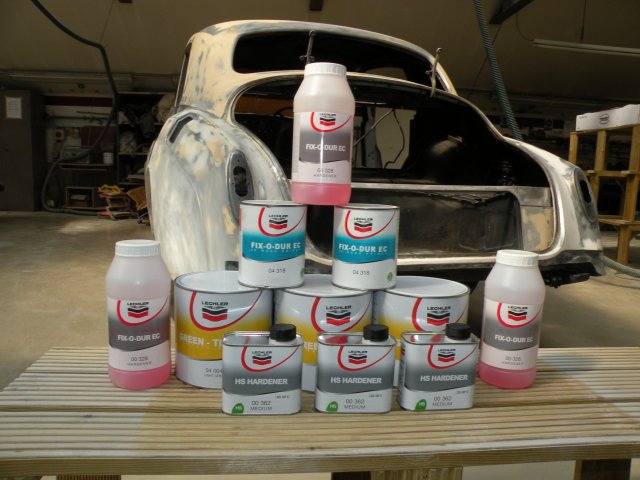 Kind regards, Chris | ||
Chris Browne Prolific User Username: chrisb Post Number: 192 Registered: 2-2010 |
Hello all, We have finally reached the paint stage after close to 500 hours of body prep. The photos are after two coats of self etch and four coats of high build primer. All four doors are at the same stage. Now begins the wet flatting and I am hoping to see the first colour going onto the car in the next week or so. Watch this space! 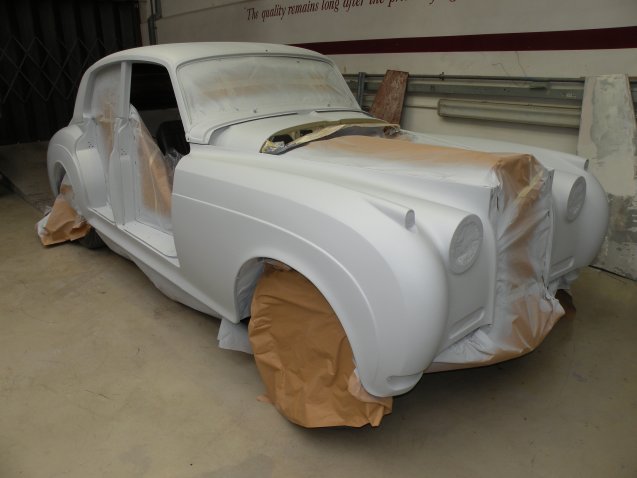 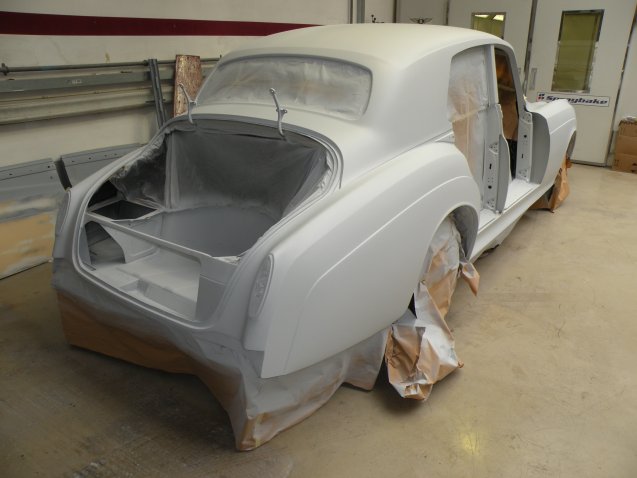 Kind regards, Chris | ||
richard george yeaman Prolific User Username: richyrich Post Number: 278 Registered: 4-2012 |
Hi Chris looks great your Hard work is starting to bring satisfaction you should feel proud I will watch this space. Richard. | ||
Chris Browne Prolific User Username: chrisb Post Number: 193 Registered: 2-2010 |
Thanks, Richard. More photos to follow soon. Kind regards, Chris | ||
Geoff Wootton Grand Master Username: dounraey Post Number: 671 Registered: 5-2012 |
Hi Chris I am enjoying the pics as well. Great job. Regards Geoff | ||
bob uk Unregistered guest Posted From: 94.197.120.119 |
75% of the refinishing is done. Smashing, looks good. (Message approved by david_gore) | ||
Chris Browne Prolific User Username: chrisb Post Number: 194 Registered: 2-2010 |
Thanks everyone. I appreciate your encouragement. Kind regards, Chris | ||
Bob Reynolds Prolific User Username: bobreynolds Post Number: 248 Registered: 8-2012 |
Have you considered that when it's finished and painted to perfection, you'll be too scared to take it out on the road! | ||
Vladimir Ivanovich Kirillov Prolific User Username: soviet Post Number: 211 Registered: 2-2013 |
Chris, don't listen to Bob - he bought a Rolls and had it delivered to his address and didn't tell his wife. The humidity in Rockhampton makes people mad. You need to drive the beast to Scotland with two Union Jacks fluttering from each front mudguard and have a rubbery version of Toad Royal Toad of Toad Hall dangling out of your back pocket. We need information on your sighting of any inperfections in the final coat and in particular any psychological reactions you have thereof. On the net is a story of a Phantom owner who drove through China. Its scary. Looks like this Rolls is going to scream when its parked. Vlad | ||
Chris Browne Prolific User Username: chrisb Post Number: 195 Registered: 2-2010 |
Hello Bob, No, we won't be scared to drive it. The car is already booked into several events. It is pure coincidence that the car will be ready in the Diamond Jubilee year of the model so we are hoping for lots of extra interest. Vlad, I am sure there will be some imperfections, but hopefully only visible to us! With all the exterior fittings off the car for painting, small paint issues might be obvious but once all the chrome is back on, they will magically disappear (if, in fact, there are any!) Kind regards, Chris | ||
Vladimir Ivanovich Kirillov Prolific User Username: soviet Post Number: 212 Registered: 2-2013 |
Chris, just a tip with refitting all the parts onto your car after the final coat. I wrap up everything in thick cloth because there is nothing worse than scratching the paint during the refit - its painful and hideous. Fitting the bumpers can lead to permanent insanity even with a trusted friend helping so if all the sharp edges are covered in cloth the bumper can come in contact with the paint and leave it undamaged. Patience is a necessity and time should be of no consequence whatsoever. As for imperfections my experience is that you can go over and over the undercoat and believe that it is perfect and then when it comes to polishing these imperfections come leaping out at you like a court jester. This is why I still use acrylic because with that paint you can hunt every imperfection down and erase it but then just how perfect it needs to be is up to you and you are right only you will notice them - other people won't. Its so good Chris to see your photos on the forum, to see somebody is bringing a Cloud back to as good or better then what it was on the day it left Crewe. As an aside when I had a S3 Bentley and noticed the wiring was all the same colour with the hideous fabric over the top, most of which was rotting off, I was horrified, angry, twisted and loopy simultaneously and decided if I rebuilt the car that type of wiring was definitely out. I get over the problem/question of originality by my questionable behaviour of "I never sell I only buy". The S3 was the last car I sold some 17 years ago. I have zero tolerance for buyers even the genuine ones. | ||
Vladimir Ivanovich Kirillov Prolific User Username: soviet Post Number: 213 Registered: 2-2013 |
Chris can you inform me what photography equipment you use to get your photos onto this site. I have tried even a suggested software but the software played havoc on my laptop and I had to remove it. I have a dead cheap Canon Power Shot A480 camera I bought in Manila but the forum always rejects my photos regardless of how much I trim them. Your photos are reasonable quality and so I need to study your habits. | ||
bob uk Unregistered guest Posted From: 92.40.249.229 |
To justify the huge amount of work I say drive the car as often as possible. It's a given that piant will be stone chipped. So once a year get a small area repair guy to touch up any chips. (Message approved by david_gore) | ||
David Gore Moderator Username: david_gore Post Number: 1570 Registered: 4-2003 |
Vladimir, Would you please email me one of your Canon original unmodified photos for me to check out. I also have a Canon Power Shot camera and have never had any problems resizing photos for this forum so something unusual is involved. I will be able to help you solve this problem most likely through the use of user-friendly freeware. I will PM my email address to you for this purpose. Regards David | ||
Chris Browne Prolific User Username: chrisb Post Number: 196 Registered: 2-2010 |
Hello Vlad, My camera is an very well used Nikon Coolpix P80 and I use an photo editing software called Paint Shop Pro 7, which I have had for almost 10 years, to reduce the size of the photos down to 640 x 640 pixels. Hope this helps. Kind regards, Chris | ||
Vladimir Ivanovich Kirillov Prolific User Username: soviet Post Number: 218 Registered: 2-2013 |
Thanks for that Chris, I will wait to see what David comes up with first but maybe Paint Shop Pro 7 is the answer. Chris I have been ogling over your many splendid photos and I agree that body off restoration is the only way to go if you really love the car which you obviously do but I noticed something and it may be that my eyesight is getting worse with years though I am still not seeing Bob's ceiling dwelling Rhinos yet. However, one of the chassis pictures shows brake lines which look like they are copper. Perhaps they are some type of pipe that is steel but look like copper but if they are copper then you need to junk them and make up steel brake lines. | ||
David Gore Moderator Username: david_gore Post Number: 1571 Registered: 4-2003 |
Hi Vladimir, Have replied to your email with a step-by-step explanation of how to edit your images and post them on the Forum. The following is your test image resized to 480 x 640 pixels using the Paint software incorporated in WIN 8 [and possibly WIN 7 but cannot check this as my WIN 7 desktop decided to cook its motherboard recently]:  | ||
Brian Vogel Grand Master Username: guyslp Post Number: 1279 Registered: 6-2009 |
David, MS-Paint has existed in every version of Windows I've been using for decades. I can't swear it was there pre-WinXP, but I think it was. It's definitely on XP and everything that follows. It's included in Windows 10. I've been playing with the Windows 10 Preview and have used it on that machine. Brian | ||
Brian Vogel Grand Master Username: guyslp Post Number: 1280 Registered: 6-2009 |
Vladimir Kirillov wrote: However, one of the chassis pictures shows brake lines which look like they are copper. Perhaps they are some type of pipe that is steel but look like copper but if they are copper then you need to junk them and make up steel brake lines. They're far more likely to be cunifer/EZ-bend than actual copper. Since I learned of the stuff and started using it I'd never go back to mild steel Bundy tubing. The fact that it's both corrosion resistant and incredibly easy to bend as necessary makes it the brake line of choice for me. Brian | ||
Chris Browne Prolific User Username: chrisb Post Number: 197 Registered: 2-2010 |
Hello Vlad and Brian, Brian is correct in that the brake lines are all cunifer tubing, not copper but thanks for the advice. Kind regards, Chris | ||
Chris Browne Prolific User Username: chrisb Post Number: 203 Registered: 2-2010 |
Hello everyone, It is exactly a month since I last posted and here is the promised update with a couple of photos. The whole car is now in its final paint. It has taken many, many hours of very skilled work to get it to this stage. I am amazed at the finish that our painter has been able to achieve. It is glassy smooth and far above my expectations. There is still some fine finishing and machine polishing to be done but the only painting left to do is the beige on the undersides of the bonnet panels, the twin coach lines down the sides of the car and the beauty rings on the hub caps, all of which will be completed by the end of next week. We have been invited to give a presentation about the restoration and unveil the car in the Club marquee at the RREC National Rally at Burleigh House on Saturday, June 20th which is exactly four weeks away. We still have a huge amount of work to do in fitting out the interior and fitting glass and chrome but all the preparation work has been done so it should be an enjoyable assembly job. We have no doubt now that the car will be ready in time. 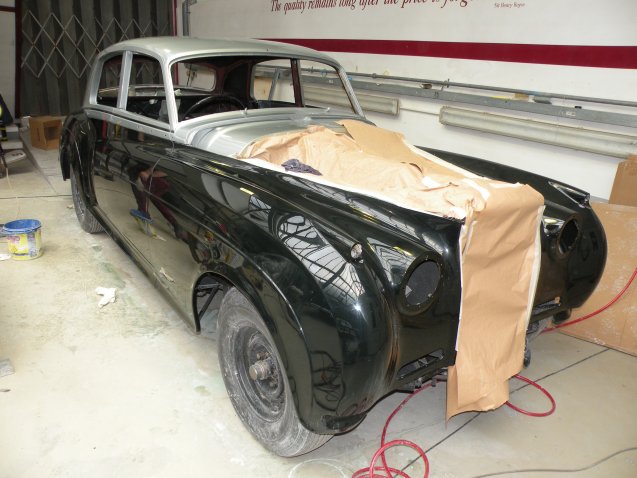 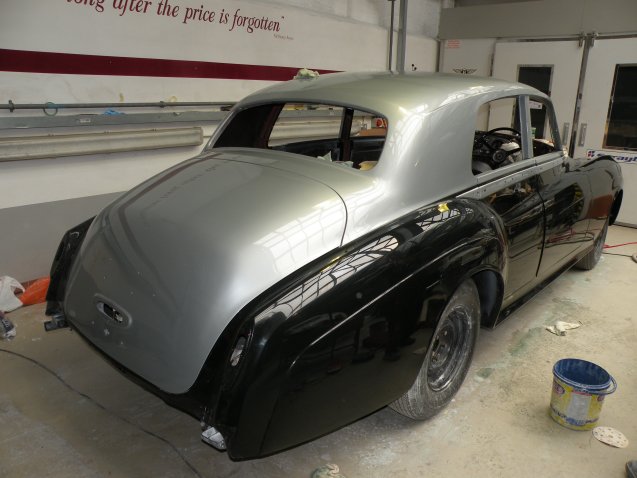 Kind regards, Chris Browne | ||
Bob UK Unregistered guest Posted From: 188.29.164.224 |
The reflections in the black paint show how straight this car is. Nice very nice. (Message approved by david_gore) | ||
David Gore Moderator Username: david_gore Post Number: 1617 Registered: 4-2003 |
Chris, Another example of the painter's creed - success is 95% preparation and 5% painting skill. A beautiful restoration and the quality shows. You are to be commended on allowing the time for and accepting the associated cost of the preparation needed for the final finish. May your car give you great enjoyment and satisfaction in the years to come and thank you for sharing your experience with us. | ||
Geoff Wootton Grand Master Username: dounraey Post Number: 702 Registered: 5-2012 |
It's going to be great to see this car with the brightwork on. Fabulous restoration. Geoff | ||
Chris Browne Prolific User Username: chrisb Post Number: 204 Registered: 2-2010 |
Bob, David and Geoff. Thanks you all for your appreciation. It means a lot. Bob, your comment about the "black" paint proves my point as it is actually velvet green and looks black indoors or in poor light. The green is only obvious in bright daylight when it really is a very deep green. Kind regards, Chris | ||
Geoff Wootton Grand Master Username: dounraey Post Number: 703 Registered: 5-2012 |
Chris I don't know whether you have been watching "For the Love of Cars" but it is interesting to see that beautifully restored cars are fetching premium prices at auction. The first episode of the current series featured an Aston Martin DBS which they were hoping to sell at 70k. In the event it went for 150k. The same is true for all the "lesser" cars they have featured. The quality of their rebuilds has led to very high prices. Not that I am in anyway suggesting you should auction your car. It's just that it's nice to know what you have achieved will be reflected in the value of the car. Geoff | ||
Chris Browne Prolific User Username: chrisb Post Number: 205 Registered: 2-2010 |
Hello Geoff, Thanks for your thoughts. Yes, it would be great if our car followed the same trend in terms of value. I haven't seen a restored Cloud 1 standard steel saloon sold for a long time so I have no real idea what our cars market value might be in the present climate. I do follow " For the Love of Cars" as I think it is one of the best programmes of its type. I have always loved the Aston Martin DBS but did you pick up on the number of man hours Ant Anstead said had been spent on it? Over 6,000 in only 10 weeks so how many people did they have working on it?! As 2015 is the sixtieth anniversary of the Silver Cloud and Bentley S, we couldn't have picked a better year to bring a car back from the dead - and it is pure coincidence that it is happening this year. It was never planned that way. Hopefully interest in the model will be at its peak. Kind regards, Chris | ||
Mark Aldridge Prolific User Username: mark_aldridge Post Number: 211 Registered: 10-2008 |
Chris, looking forward to your talk and seeing the car at the RREC rally. It is a huge undertaking to restore one of these , and you must be delighted at the result. Mark | ||
Chris Browne Prolific User Username: chrisb Post Number: 206 Registered: 2-2010 |
Hello Mark, Thanks for that. It will be good to meet you at the rally where I can show you round the car. Kind regards, Chris | ||
Geoff Wootton Grand Master Username: dounraey Post Number: 704 Registered: 5-2012 |
Chris I did indeed pick up on the 6000 hours comment. I like Ant Anstead's honesty, in that he does not pretend restoring these cars is a simple, quick job. It is a great advert for his Company. I quite like Wheeler Dealers as well, but am in no doubt there is a large team of professional restorers/mechanics behind the scenes. The other amusing thing is the ease they seem to have in sourcing parts. In the one episode Mike Brewer just happened to find a perfect set of rare body panels at a local car breaker's yard. Nevertheless, I still think Wheeler Dealers has sufficient credibility to be a good watch. Some of the other programmes like "Classic Car Rescue" are just plain silly. Geoff | ||
Chris Browne Prolific User Username: chrisb Post Number: 207 Registered: 2-2010 |
Hi Geoff, Yes, I agree with you about Wheeler Dealers too. I met both Mike Brewer and Edd China at the recent Classic Restoration Show at the NEC in Birmingham and they are a thoroughly down to earth and approachable pair. There is nothing precious about either of them and unlike some "superstars", at the end of their respective interviews, they positively welcomed members of the public to come and find them and have a chat while they were wandering around the show. Very refreshing in this day of "Divas" in the entertainment world. As an aside to this, I recently saw a Wheeler Dealers program about the Maserati 3200GT. Their car had a throttle body fault and the car was taken to "the Maserati Shed", a one man band on the south coast of England who does indeed work out of a large garden shed. He was able to diagnose the problem and repair it for �300. I have a friend with the same model car which was suffering with a similar problem. He has spent many thousands of pounds with main and franchised dealers none of whom could solve the problem of the car routinely going into limp mode and he had more or less decided to sell the car on as he was totally disenchanted with it. I found the details of the Maserati man through Google and he took his car down and left it with him. He collected the car a few days later and it was, and has remained, as good as new ever since. Apparently all that was wrong with it was a potentiometer on the fly by wire throttle pedal had not been calibrated to the throttle body so it was a simple adjustment that the muppets at the main dealers could not diagnose, even with their massively expensive equipment. Their way of dealing with it was to keep fitting new throttle bodies, none of which would work properly because of the calibration issue. My mate also happened to mention that the aircon was not working. When he collected it, that had been fixed too and the total bill was �350. Good old Wheeler Dealers! Kind regards, Chris | ||
Bill Coburn Moderator Username: bill_coburn Post Number: 1564 Registered: 4-2003 |
Chris/ Just been wading through this topic and wilting under the account of your restoration. Your Maserati tales brought back memories of an Aston Martin being bought by one of those people who buy a 'flash' car for some reason even the best psychs can't fathom. Seems the car had a periodic flooding problem that nobody including St Peter's mechanic could fix. For no apparent reason the car would start spitting smoke, choking and hunting. I am not a mechanic but I used to have a modicum of thinking talent and enough front to pursue tradesmen who I knew had the information but adroitly avoided imparting it to me. The car, a V8 had 4 Weber downdraft carburettors. Anyway, the new owner quickly despaired of the car with its problem and dumped it in my drive. I established that the problem was the number 2 instrument, having taken the obvious step of replacing all the float needles. I dismantled and checked every crevice and fitting of those instruments (at the time I could not even spell Weber) to no avail - still with the flooding. Nearing suicide or full time alcoholism I found myself in my little fibre shed with the car, the number 2 instrument in pieces on the bench and a bottle of Scottish diagnostic fluid I kept for emergencies. About 1.30AM having plastered myself to semi oblivion in sheer desperation, I was idly stroking the insides of the main body of the carburettor waiting for devine intervention or revelation, when my index finger detected a small roughness in the float chamber casting. I dragged out my old magnifying glass and there was the answer. For whatever reason the metal of the casting had decided to 'grow' a tiny stalagmite out of an otherwise perfect casting. The clearance in the instrument between the float and the chamber wall was very small and the fitting of the float pivot was intentionally 'slack'. I guessed that quite haphazardly when a the float was on the way up, or the car on a particular angle, it would catch on this tiny protuberance which was very difficult to see! The offending bit was quickly papered off, the carb reassembled and as far as I know the car is still running! Coincidentally that same day the owner took the car to an AM National. Since it was well known to other owners, the fact that a solution to its problem had been found was greeted with much incredulity and apparently I came close to canonisation that very day! This is the rambling of an old man, the event would be nearly forty years ago. The owner at the time died a few years back but still waxed on about the vehicle's recovery to anybody who would listen. The real reason for this ramble is that despite the dedicated and earnest interests professional trained engineers and mechanics have, not to mentioned enviable facilities and seemingly unlimited resources, an untrained, unbiased enthusiast can sometimes find an expianation for the inexplicable. | ||
Geoff Wootton Grand Master Username: dounraey Post Number: 707 Registered: 5-2012 |
Chris I've always liked Edd China but have found Mike Brewer a little loud for my tastes, a bit of a "wide boy". You have completely changed my opinion. How refreshing to hear they are so approachable and do not play the "superstar" game. I will watch their programmes with a renewed enthusiasm. I can well imagine the thousands your friend had spent on his Maserati if they were changing throttle bodies. I once owned a Jaguar XK8 that had a habit of going into limp mode. This would clear if I turned off the ignition and restarted the engine. I traced the problem to the potentiometer on the throttle body. When I checked out the part I found I had to buy the entire unit at close to $1000 just to replace the pot. Fortunately on further investigation I found the problem was with the connector. I cleaned it up and made a special clip to make sure the connector stayed fast. So, I do realize the annoyance your friend must have suffered before finding the "Wheeler Dealer man". Bill - anything but a rambling. I particularly like the humour in your posts. I think I may equip my garage with some of that Scottish diagnostic fluid. Geoff | ||
Brian Vogel Grand Master Username: guyslp Post Number: 1319 Registered: 6-2009 |
Bill, I presume expianations are the direct result of Scottish diagnostic fluid, and are ever so much more miraculous and powerful than garden variety explanations! ;-) Brian | ||
Paul Yorke Grand Master Username: paul_yorke Post Number: 1375 Registered: 6-2006 |
It's looking beautiful. Almost time for a big sigh of relief.  Velvet green is a beautiful colour but needs sunlight to set it off. As I found out to my embarrassment as a teenager!! My father bought a very elegant black Phantom V which was in beautiful condition except for lots of small chips on the door edges and various areas caused by living it's life as a hotel & casino courtesy car. I spent the morning going around touching the chips in and working around and around the car to get the level flush with the undamaged paint. Pleased with my work I went off to lunch while it went off enough to polish. By the time I came back, the sun had swung around illuminating the now Velvet Green Phantom which appeared to be plagued with some sort of black pox.  not a great moment! not a great moment! | ||
richard george yeaman Prolific User Username: richyrich Post Number: 284 Registered: 4-2012 |
Hi Chris great job looks like a million Dollars. Hi Paul a lesson learned is never forgotten. Richard. | ||
Chris Browne Prolific User Username: chrisb Post Number: 208 Registered: 2-2010 |
Great story, Paul. I can quite understand how that happened having seen our car in dull and then bright sunlight. It is quite a transformation which is what makes the colour so attractive. There is a dark red and a dark blue, from the period, which have the same characteristics. More photos next week as work progresses! Kind regards, Chris | ||
Mark Aldridge Prolific User Username: mark_aldridge Post Number: 223 Registered: 10-2008 |
Went to the RREC annual rally today and Chris gave a talk and displayed his car. The car is superb, and the bodylines are perfect . The car is a total credit to their skill and determination. Brilliant Mark | ||
Geoff Wootton Grand Master Username: dounraey Post Number: 782 Registered: 5-2012 |
Any Pics???? | ||
Chris Browne Prolific User Username: chrisb Post Number: 214 Registered: 2-2010 |
Hi Mark, You beat me to it. I cannot take all the credit as the restoration was strictly a joint effort with my friend and fellow enthusiast David Whitehead. The car was entered for the Best Personal Restoration Trophy at the RREC National Rally today, at Burghley House, and I am delighted to announce that we won the trophy! It was a huge surprise and a great honour to win this award at such a prestigious event and it made all our efforts worthwhile. It was a very long project and we had to put in a huge amount of hours, especially in the last week, to get the car there at all. It only came out of the paint shop on Saturday the 13th of June and in six days we fitted out the whole interior, fitted the door frames and windows and all the chrome. We actually drove the car for the first time for only 30 minutes on Friday evening to test the systems before driving it the sixty or so miles to the Rally on Saturday morning. We were inundated with congratulations from many, many visitors from all over the world, some of whom were friends but many who were completely unknown to us. It really has been an incredible experience that we will never forget but we are now looking forward to a long break from restoration - until the next project comes along?! Here are two of the best photos from todays event and what a setting! 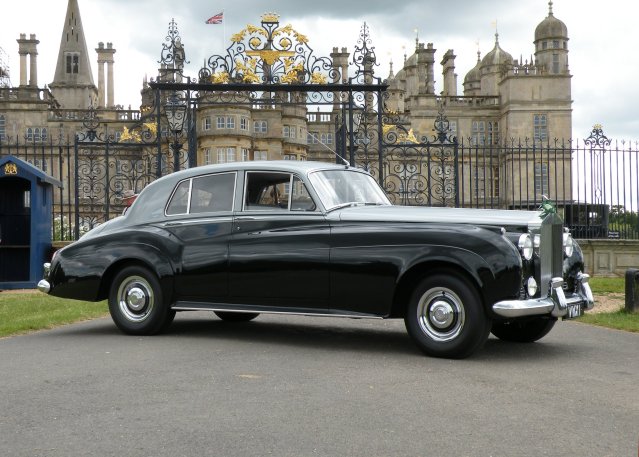 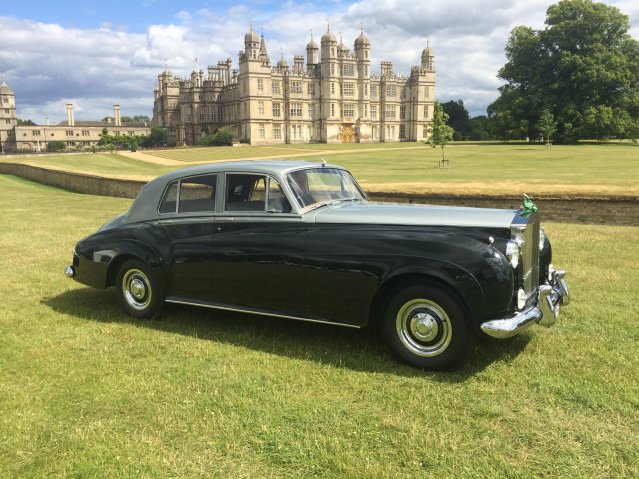 I can't thank my fellow posters on this message board enough for all your support and encouragement. Kind regards, and best wishes to you all, Chris Browne and David Whitehead | ||
Geoff Wootton Grand Master Username: dounraey Post Number: 785 Registered: 5-2012 |
Chris Congratulations to you and David. I am amazed you managed to finish the car in just 6 days. You must have been working well over 12 hours a day to achieve this. The car is magnificent, particularly to people such as myself who love Silver Clouds. Best Regards Geoff. | ||
David Gore Moderator Username: david_gore Post Number: 1654 Registered: 4-2003 |
Congratulations on a restoration that is an excellent example of the ethos that is associated with Rolls-Royce motor vehicles. May your future enjoyment amply justify the time and effort involved in the restoration - it was a "labour of love" and the result is all the justification you need for giving new life to a classic motor vehicle. | ||
Paul Yorke Grand Master Username: paul_yorke Post Number: 1384 Registered: 6-2006 |
Congratulations.  Looks very elegant, Good Job!! Best Regards, Paul. | ||
Chris Browne Prolific User Username: chrisb Post Number: 215 Registered: 2-2010 |
Geoff, David and Paul, Thank you all for your comments. Greatly appreciated. Kind regards, Chris | ||
Chris Browne Prolific User Username: chrisb Post Number: 231 Registered: 2-2010 |
Hello all, It has been over five months since my last posting. The Silver Cloud restoration was finally finished in the early summer so David and I have been enjoying the fruits of our labours by displaying the car at several prestigious venues. We were invited to display the car on the RREC club stand at the Classic Car Show at the National Exhibition Centre in Birmingham last weekend. It was a three day show visited by literally tens of thousands of visitors. We were right in the middle of the main hall surrounded by Mercedes, Lamborghini, Bugatti, Ferrari, Maserati to name but a few which really drew in the crowds. A very enjoyable event but exhausting. We drove the car to and from the event (about 50 miles) on perfectly dry roads with not a drop of rain so the underside of the car is still as pristine as when we finished it. No rain on two days, in November, in the UK, was a complete miracle. Sir Henry must have been watching over us! 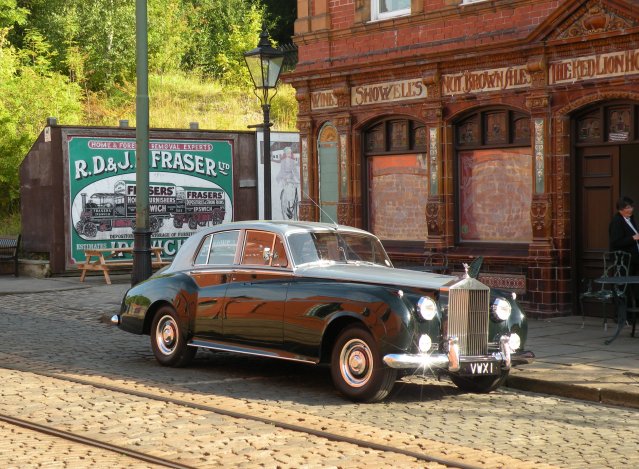  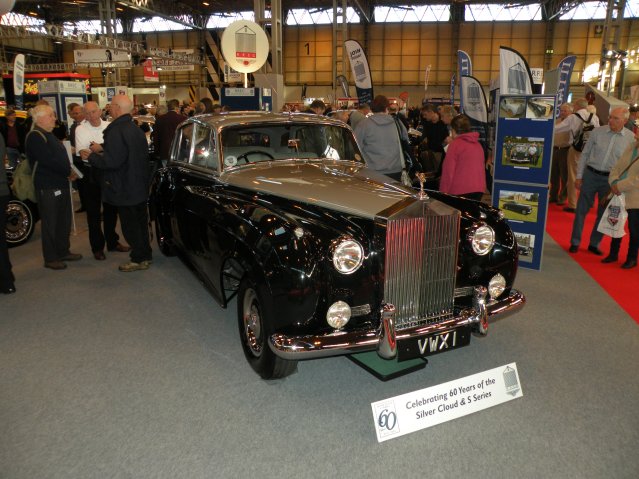 Kind regards, Chris Browne | ||
David Gore Moderator Username: david_gore Post Number: 1791 Registered: 4-2003 |
Chris, Experiences such as this and the photos must make all the blood, sweat and tears that went into the restoration worthwhile. Congratulations for the recognition you are receiving and may you always have fine weather when you take the car out for a drive. | ||
Robert Noel Reddington Grand Master Username: bob_uk Post Number: 699 Registered: 5-2015 |
Lovely car. The Cloud 2 looks less fussy around the front end than a 3. On sat TV the Baron is being re run. And the Baron a millionaire police chief drives a Cloud. The above car gives impetus, enthusiasm and motivation to others as they toil to do their Rolls -Royces. | ||
Chris Browne Prolific User Username: chrisb Post Number: 232 Registered: 2-2010 |
Hi David and Bob, Thanks for your kind comments. A point of order Bob - it is a Cloud 1, from September 1958, so it is towards the end of the straight six era which ended with the introduction of the Cloud 2 in 1959. Kind regards, Chris | ||
Robert Noel Reddington Grand Master Username: bob_uk Post Number: 709 Registered: 5-2015 |
Also an other point of order is the TV show is not called the Baron. Its called Burkes Law. | ||
Geoff Wootton Grand Master Username: dounraey Post Number: 1012 Registered: 5-2012 |
Chris Thanks for putting these photos up. They are always of great interest. How are you settling into restoration retirement. It's been 5 months now. Do you ever get the urge to start another restoration. Geoff | ||
Chris Browne Prolific User Username: chrisb Post Number: 233 Registered: 2-2010 |
Hello Geoff, After four and half years, we are quite enjoying a bit of a break from working on the car. We go back to it now and again to do some detail work (like the clock stopped working again which I have now fixed, the interior light was staying on because one of the door switches had settled and needed a shim behind it etc. etc.) It will probably never end completely which is part of the enjoyment of old cars (so they tell me!). I am sure if a suitable project came our way in future, David and I would not say no to another one - hopefully not as comprehensive as this one has been. Bob - the mistake in your original post about "The Baron" passed me by too but you are quite right. The Baron used to drive a Jensen CV8 and was played by Steve Forrest. Amos Burke in Burke's Law was played by Gene Barry. There is something very nostalgic about 1960's TV when you get to certain age. Funny what sticks in your mind after all these years. I must try and get out more!   Kind regards, Chris | ||
Chris Browne Prolific User Username: chrisb Post Number: 273 Registered: 2-2010 |
Hello everyone, To all who showed an interest in the restoration of our 1958 Silver Cloud. As you may recall, we tried to sell the car at the Bonhams auction at the 2016 Goodwood Festival of Speed. The car failed to find a buyer as the auction fell on the same day that the good old British public decided to leave the EU. Consequently, the majority of potential bidders decided to hang on to thir cash until the financial implications of the decision became clearer. Consequently, we decided to bide our time and decided to put the car into careful storage and wait for the market to recover. We had two potential buyers come to see the car, one from England and one from France. Unfortunately, neither were able to commit to buy the car. Fast forward to May 2017 when we approached by an interested party who lives only seven miles from the workshop where the car was restored. To cut a long story short, he bought the car and it was paid for a collected at the end of September. We were delighted that we sold the car for top money as I had kept a close eye on the Silver Cloud 1 saloon market for the past eighteen months and I am not aware of another Cloud 1 anywhere in the world to have sold for more. A final sting in the tail was that as we were recommissioning the car ready for the new owner, the car developed a troublesome misfire and was only firing on five cylinders. After much head scratching, we found as failed spark plug. We had fitted a brand new set of spark plugs at the end of the restoration and the car had covered less than fifty miles since they were fitted. It seems that even fitting quality parts is no guarantee of future reliability. Before the car left us, we had a series of professional photos taken as a memento the project. Thanks again to all who showed an interest and gave advice during the project. This forum is an invaluable resource to all of us afflicted by the Rolls-Royce and Bentley disease and long may it continue. Keep up the good work. Kind regards, Chris | ||
Brian Vogel Grand Master Username: guyslp Post Number: 2510 Registered: 6-2009 |
Chris, Congratulations on a successful passing on to the next custodian. I certainly hope that they appreciate all the work you did, and the standard to which you did it. This example is certain to have a long, long life (basically having been reborn, for all practical intents and purposes). I'm glad that you were able to command a price that is commensurate with the care you put into the project. Brian | ||
richard george yeaman Grand Master Username: richyrich Post Number: 870 Registered: 4-2012 |
Good job Chris, Defininetly a labour of Love, Would you commit your time and resources to another such project. Richard. | ||
Chris Browne Prolific User Username: chrisb Post Number: 275 Registered: 2-2010 |
Hi Brian and Richard, Thank you for your kind words. In answer to your question, no, I would not take on another project of that magnitude. I have no regrets about taking on the Cloud and it really became a labour of love. We never intended to carry out such a comprehensive restoration initially but the further we got into it, the more we realised that if we persevered and did the whole job to the best of our abilities, we would finish up with a rare and special car. We believe there are only about 120 standard steel Cloud 1 saloons left in the UK and very few which have undergone such a transformation as ours. Both David and I have suffered health issues since we finished the car so neither of us are as fit as we were and a project like that takes strength and stamina as we carried out almost all the work ourselves. I had my 65th birthday in April so time marches on. We may take on a lesser project in future if one presents itself but in the meantime, I content myself with maintaining my �79 Shadow 2 which I continue to enjoy and use on a regular basis. Kind regards, Chris | ||
Maxwell Heazlewood Prolific User Username: tasbent Post Number: 112 Registered: 9-2017 |
Hello Chris....I have been following this 'project' with rellish and am astounded at the dedication you two have placed in this projet. The results speak for themselves and we would be hard pressed to ever find another SC1 in such superb condition....my hat's off to you Sir!  | ||
Chris Browne Prolific User Username: chrisb Post Number: 278 Registered: 2-2010 |
Hello Maxwell, Apologies for the delay in responding but I have only just seen your post. Your kind words and appreciation for what David and I were able achieve are greatly appreciated. Being able to ask the experts on this forum various technical questions certainly helped to complete the project to the standard we were aiming for. Happy Christmas and kindest regards, Chris | ||
Maxwell Heazlewood Prolific User Username: tasbent Post Number: 136 Registered: 9-2017 |
Greetings Chris....my comments merely reflected the marvelous job that you did and i feel sure that the next custodian of this lovely car will be well rewarded with a useable car....after all that's what these cars are designed for to be used, not museum specimens. Thank you for your well wishes and may you and your family have a great festive season. |