| Author | Message | ||
Mark Anson Experienced User Username: mark_anson Post Number: 18 Registered: 11-2006 |
Hi folks, I am stripping my car down ready for bead blasting and a re paint. I noticed the door hinges are covered in layers of non original paint and they don't look very nice once the paint flakes off. Can you please tell me when the Mk VI was first made were the original hinges painted or left with the (bronze?) base metal showing? I am also trying to find what should go between the petrol flap button and the bodywork. I have removed said button and found a crude alloy homemade washer underneath to stop the button falling through the hole. Can someone show me a close up picture or explain what was there when the car was made? Many thanks Mark | ||
Martin Cutler Prolific User Username: martin_cutler Post Number: 133 Registered: 7-2007 |
Hi Mark, I painted my hinges, they where alredy painted on my car. The chrome cover plates then go over the top, but you can still see the hinges. I didn't take the petrol flap button off my car when I painted it, just masked it up, so can't help you there. Cheers Marty | ||
Richard Treacy Grand Master Username: richard_treacy Post Number: 2005 Registered: 4-2003 |
In case it's any use, I just took this filler flap photo of my R-Type, assuming that it's the same. Note that the bright surround has an insulating washer. Also behind the panel is an insulating washer and a straightforward thin retaining nut. It's very unwise to do any masking considering appearance, paint compatability, corrosion ans durability, and in my opinion it is far quicker to remove all the bits in any case. Best remove all glass, fittings, fenders and all to do a proper bare-metal job. It may take an extra 80 hours, but in a 400 hour job that's time well spent. Painting new waterbased enamel over 1960s-1980s acrylic over original 1950s nitrocelluloses can hardly be a good thing, let alone durable given the appalling thickness, so best start from bare metal with an all-new modern water-based Glasurit or Standox Standohyd. RHT. 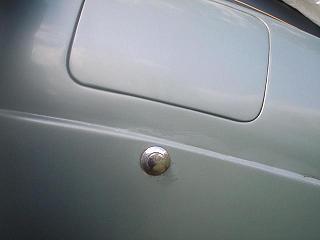 | ||
Mark Anson Experienced User Username: mark_anson Post Number: 19 Registered: 11-2006 |
Hi Richard, That is my plan. To strip he whole car so nothing is damaged with the bead blasting process. I am finding though everything I touch needs some sort of cosmetic tweak or renewal. A bit of me is sorry I even started the job. I am sure though it will be worth it in the end. I plan on painting the car in two pack (I have correct breathing mask) and coating it with lots of clear lacquer. With ref the flap button. The hole the button fits in is not much smaller than the button itself. This does not give the button much metal to grip onto so a large washer has been made to stop it pulling through. I will have to look round for a replacement washer. Any Idea of were I could locate one? Cheers Mark | ||
Richard Treacy Grand Master Username: richard_treacy Post Number: 2008 Registered: 4-2003 |
Hallo there Mark, Perhaps you could post a photo of the removed button. In my picture above, the button assembly removes as a unit. The button is the inner circle seen, about � the diameter of the outer shroud. As the outer shroud is shaped, there is no need for any washer other than the one to insulate the assembly from the carbody. The plunger and spring are inside the assembly, and a small rod protrudes behind to release the fuel filler cap. The assembly is diecast and plated. Retention is by a nut and plain washer behind the panel. As for special washers and fittings, I only know of a really good outfit in Fyshwick Canberra called Specialty Fasteners. http://www.specfast.com.au/view/page/1.html There are many others in your area for sure. These places sell all Whitworth, BSF, UNF, BA, metric threads and the like, and things like washers with plated finishes of all types too. You say �lots of clear lacquer� and I shudder. In the old days of acrylic paint, the clear coat was by far the weakest link. Clear has no body like the basecoat, and is prone to craze within a year if the residual thickness is much more than 2 coats. Metallic finishes were always far less hardy than solids, and by 1990 almost entirely due to the clearcoat as the basecoats had been largely sorted out by then. The trick learned early is to spray three clear coats and cut them back to 1�. Our T-Series and R-Type have survived without any crazing whatsoever that way. I have seen too many with 4 residual clear coats craze within just weeks. So acute was the problem until around 1982 that Crewe left a residual � clear coat. It was far too thin. That�s why so many Silver Shadows have a matt finish until resprayed. I used to park next to a 6 month old Silver Shadow II when I first graduated. It was shiny for a few months, but then quickly went matt as the valet polished it weekly. The thin soft acrylic clearcoat was only good for a few polishes with No2 cutting type polish. Two-pack is far, far better, but still susceptible to crazing if more than 3 coats are applied. However, it is as hard as glass once cured, so watch out for imperfections as they are more difficult to erase than with acrylics, and partial panel repairs are very tricky. Polishing my Turbo R is like trying to polish glass as it is so hard. Of course, only the clear coat is a two-pack lacquer. In my case, the system is Standohyd water-based enamel basecoat with two-pack clear finish. This is fairly much the norm these days. Basecoats are not two-pack: only the topcoats, clearcoat in the case of metallic finishes of course, are two-pack. RHT. |