| Author | Message | |||
Martin Cutler Experienced User Username: martin_cutler Post Number: 38 Registered: 7-2007 |
Just took delivery of R Type B558TN. Engine B479T, manual gearbox. Been sitting in a garden for 2 years, not a happy R Type. No compression #6, wish me luck!!! | |||
David Gore Moderator Username: david_gore Post Number: 789 Registered: 4-2003 |
Hi Martin, Fear the worst and hope for the best. May your intuition be sound, your hands blessed with healing powers and your bank account be always in credit. Seriously, congratulations on giving another car a second chance of life especially a manual. I hope you will be able to post some progress reports on your restoration of this vehicle for our interest. | |||
Martin Cutler Experienced User Username: martin_cutler Post Number: 39 Registered: 7-2007 |
Hi David, I got it to run as a 5 cylinder. Valves open and close, but good bubbles in the header tank, and water out the pipe. Hoping it is only a head gasket, but the head off is the next step. Started digging around the scuttle with a screwdriver, the metal seems sound, just 37 coats of paint that has decided to crack. Should have taken some photo's of it before I cleaned it, there was moss growing on the paint! | |||
Martin Cutler Experienced User Username: martin_cutler Post Number: 41 Registered: 7-2007 |
Not a lot of progress this week. My good friend Robert Norris of Dodge & Triumph fame donated a set of high low Lucas horns to the project, which are of unknown origin, but actually still work! The chromework is dissassembled, and waiting for me to take down to "Blu-Chrome" at Bankstown for a quote. Has anybody used them? Are they reliable? The rear bar especially is going to take some serious buffing! I have a lead on a new set of exhaust valves, which will hopefully come to light soon. I haven't got the head off yet, hope to have that done by the end of the weekend. I will then take the old head gasket up to Swanson's at Thornleigh for them to make me a new one. More updates as they come to hand. Cheers Marty | |||
David Gore Moderator Username: david_gore Post Number: 791 Registered: 4-2003 |
Hi Martin, When getting quotes for the bright Chromium plating; make sure it is for the "triplate" technique where successive coats of Copper, Nickel and Bright Chromium are applied. The Copper and Nickel coats are buffed after application to remove surface defects. This matches the original manufacture of these items and also gives the best-possible surface finish. However, it is more expensive than the alternative two-layer process which is not as good in my professional opinion. Most electroplaters either will not offer the "Tri-Plate"s process for fear of losing the job to a competitor who quotes a cheaper price for the two-layer process or because they do not have the facilities for the intermediate buffing which is the critical part of the process for high-quality finish. It is not uncommon for electroplaters to also claim this process is banned for EPA & OH&S reasons; it is not banned however the cost of disposing the plating effluent is expensive and is also reflected in the cost. If you wish to find experienced/competent bright Chromium electroplaters, the motor bike forums are a good place to start especially Harley-Davidson and classic British marques like Triumph etc. | |||
Martin Cutler Experienced User Username: martin_cutler Post Number: 42 Registered: 7-2007 |
Hi David, I had to fight tooth and nail to get the NRMA to triple plate the bumpers on my MG Magnette after an accident. They eventually gave in. Interesting that it is not banned by the EPA. I will let you know how I get on. Marty | |||
Richard Treacy Grand Master Username: richard_treacy Post Number: 1361 Registered: 4-2003 |
-------------------------------------------------------------------------------- About the best brightwork people in the world are Everlast. Area code is 02. http://www.everlast.com.au/chrome.asp As for valves, they are just �25 each new at Introcar but Introcar or Brian Thompson will sell them at a lower price used. Try to find prices as low for a Toyota !! Both can offer proper cylinder head gaskets too, and know of the seriously defective ones sold a few years back. I would not risk a one-off copy as they are tricky items, but the S1 UE5053 is preferred needing only an indentation to block the earlier inexplicable openings in the block blanked by the gasket. I had some new exhaust valves custom made years ago in Sydney for my R-Type, and have 30 or so as spares not for sale. Best buy from Introcar, Brian or the rest as they are far cheaper now than then in real terms. RT.
| |||
Martin Cutler Experienced User Username: martin_cutler Post Number: 43 Registered: 7-2007 |
Thanks Richard, might be worth a trip to Canberra for the chrome. Take your advice on the head gasket. So the one off the S1 is the go. Have you had any experience sending a head gasket out from England? Did it arrive straight? Marty | |||
Richard Treacy Grand Master Username: richard_treacy Post Number: 1364 Registered: 4-2003 |
Martin, Shipping head gaskets is no problem, and they are insured against damage anyhow. The merchants know all about safe packaging. I have had at least a dozen shipped from London to Canberra as I hoarded a bunch of new old stock when the materials changed. They are still mostly in my bedroom cupboard, but some are in my brother's Sydney cellar. I never used them as like the steel S1 gaskets myself, and have five spares of those too. They raise the compression ratio to about 7.2:1 and I think that they are also more resilient being steel. I have used them since 1978. However, the original type may be a more conservative option. A friend put one of my used ones from the R-Type on an S1 about 20 years ago in an emergency, and it works fine. The problem with the original type I believe is solved. They are made in New Zealand. When the asbestos was dropped for environmental reasons, the initial clay substitute was not up to the job as I experienced with a Silver Dawn in Geneva a few years back. If you search this site you may read about it. I then fitted an improved design replacement original type from Introcar, sourced from New Zealand, and it has been fine for tens of thousands of miles since. I think the manufacturer is Acme Impex http://www.acmeimpex.co.nz/ so you may email an enquiry to cut out handlers and reduce shipping costs. If they are not the manufacturers then they will surely know the firm that is. RT. | |||
Martin Cutler Experienced User Username: martin_cutler Post Number: 44 Registered: 7-2007 |
Thanks mate. I will keep you posted. Marty | |||
Martin Cutler Experienced User Username: martin_cutler Post Number: 46 Registered: 7-2007 |
Just had a reply from ACMEimpex, they do not make any gaskets for Bentleys. Maybe if I was Wiley Coyote??? :-) | |||
Martin Cutler Experienced User Username: martin_cutler Post Number: 48 Registered: 7-2007 |
OK guys, got everything dissassembled, ready to lift the head off. Turned the motor over on the starter with the plugs in and magically thought the head would move due to the compression. Well, it didn't. Should I put the rocker shaft and push rods back in and try to lift the head with compression? I thought the air in the cylinder would work even though the inlet valves where deactivated. Any thoughts? Apparently the head has been off the block about 20 years ago. Getting the exhaust manifolds off was a major job, took over 2 hours and drew blood....... | |||
Jonas TRACHSEL Experienced User Username: jonas_trachsel Post Number: 20 Registered: 2-2005 |
Hello Martin Yes, these heads are known to be sometimes difficult to lift, especially when not off for a prolonged period. The head studs corrode and swell in their holes and this prevents the head to lift off the block. Many tricks and different methods have been suggested, but it is very often a tedious and frustrating job. A lot has been written on this subject. For instance, go to http://rroc.org.au/wiki/index.php?title=Technical:Pig-Headed or to http://www.bdcl.org/forum/viewtopic.php?t=1107 or http://www.rrbew.co.uk/FeatureHtms/F-JWhetton-OffWithHerHead.htm. A tremendous amount of tech info on your model not to be found in the workshop manuals is on http://www.kda132.com/Technical/technical.html. Best wishes for an easy job! Jonas | |||
Martin Cutler Experienced User Username: martin_cutler Post Number: 49 Registered: 7-2007 |
Hi Jonas, thanks for your help. I spoke to Garth Selig today, he indicated that the studs above the exhaust ports where the usual culprits. He uses an air chisel with a flat blade, which he holds against the flat of a nut on the stud, to vibrate the hell out of the stud. He then uses hollowed out spark plugs with eye bolts through the middle of them to pull upwards on the head. I didn't see any mention of this method on the BDC website, but am willing to give it a go. The BDC guys also talk about wedges, but I don't want to go there with an alloy head, too easy to damage things. Of the studs down the exhaust port side, quite a few of them took WD40, only 4 of them had the WD40 still sitting on the top. You never know your luck in a big city, I will bore out 2 spark plugs and fit eye bolts into # 2 & 5, and see what happens from there. On another note, I talked to Liverpool Exhausts today about ceramic coating the manifolds, they only do silver at the moment, but will be trying gloss black in a few weeks, might look good whilst keeping under bonnet temps down. They quoted me $250 for the R type manifolds. I ordered a decoke gasket set from flying spares in the UK today, apparently an original type copper sandwich gasket. Will keep you posted. Cheers Marty | |||
Richard Treacy Grand Master Username: richard_treacy Post Number: 1365 Registered: 4-2003 |
I have never had a particular problem removing these heads, having developed a safe technique. I have read many horror stories of using pullers, cutters and even a block and tackle. However, in each of probably 40 or more removals, the same method has always worked with ease. Using a shortened broom handle, lever between the thermostat housing and the water pump. That cracks the joint at the front. By pushing it back down and levering it up again half a dozen times, it all frees up and the head slides from the studs gently. Do not remove the thermostat housing until the head is on the bench. RT. | |||
Martin Cutler Experienced User Username: martin_cutler Post Number: 50 Registered: 7-2007 |
Hi Richard, Would you believe I just came back up from the shed, having undone the 4 nuts on the thermostat housing! I was undoing these as I don't think the housing will lift past the radiator header tank. I assume you have always taken the radiator out to do this technique? Cheers Marty | |||
Martin Cutler Frequent User Username: martin_cutler Post Number: 51 Registered: 7-2007 |
Hi Richard, Ok, I see what you mean. I have a pry bar with a crook in one end, I used this to try and lift the front of the head, no go. I had to lift up, as the pry bar was too long to fit down inside the engine bay. Next I cut 14 inches off my broom handle. I snapped this. Will now have to sweep the shed on my knees.... :-) I then tried the largest phillips head stanley screwdriver (didn't want to wreck the handle of my snap on one), this fits quite neatly under the housing, and you can put a fair amount of downwards force on the thin end of the screwdriver. No go. Last night I set up the 2 spark plugs in the lathe, and machined off the collars, to remove the electrode. Today I purchased 2 M6 eye bolts, cost me all of $7. I fitted these into #2 & #5 plug holes. Tomorrow I am picking up my mates engine crane, and will use a strap across the eye bolts and the inlet manifold. Will keep you posted. If this doesn't work, I am going to think about making up the plate as per the BDC website, and pull up on the 8 studs in the head. BTW, exhaust ports 1 to 5 are dry, #6 is oily. I am suspecting exhaust valve trouble. Cheers Marty | |||
Richard Treacy Grand Master Username: richard_treacy Post Number: 1367 Registered: 4-2003 |
Huh. There is at least 10cm clearance between the thermostat housing and the radiatior. I have never removed the radiator to remove the head. http://rrtechnical.info/mkvirsd/section_d_cooling.pdf | |||
Laurie Fox Experienced User Username: laurie_fox Post Number: 34 Registered: 6-2004 |
Dear All I am gratified that the BDC topic has been referred to. I did say there that I would write up something about the best way to use the cylinder head removal plate. I am sorry this has not yet been done and my only excuse is that I am now nearly 93 and have an invalid wife to look after. Like Richard, I have never had any problems when removing the cylinder head on my MK VI (B420EY 4 1/4) but I have only needed to do it about three times on engine No 1 and not at all, yet, on engine No 2. My feeling is that whether it comes off easily or not depends on how carefully it was put on. I made sure that the holes for the studs in the cylinder hear were really clean and that the stud shanks were really clean right the way down to the top face of the block with no ring of old jointing compound at that point. Also I only use jointing compound rather sparingly so that it doesn't get forced up into the stud holes when the head is tightened. But, of couse, if you did not put the head on yourself there is no means of knowing how it was done. The eventual removal of the head from engine No 2 may perhaps be difficult and if it is damaged in the process then I (or the next custodian) will still have the head from engine No 1 as a serviceable replacement. Would it be a good idea to run an adjustable reamer down the stud holes in the cylinder head and increase their diameter by, say, about 0.010" ? Regards Laurie (Message edited by Laurie_fox on 10 April 2008) | |||
Martin Cutler Frequent User Username: martin_cutler Post Number: 52 Registered: 7-2007 |
Hi guys, A few photos. Looks like a 1cm interferance with the header tank, before you take into account the outlet. Maybe the radiator has been bodged? Marty 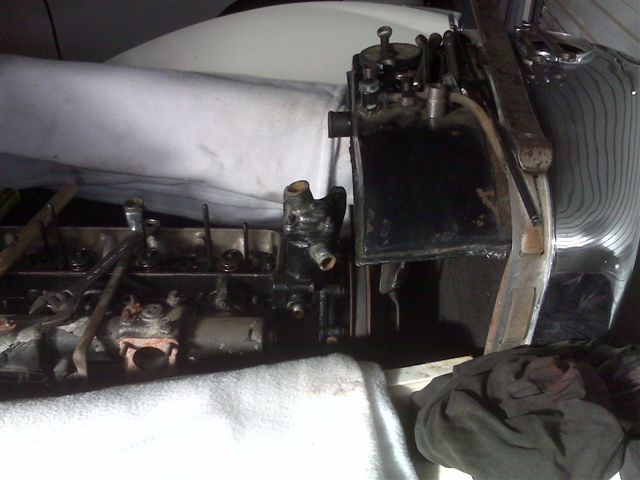  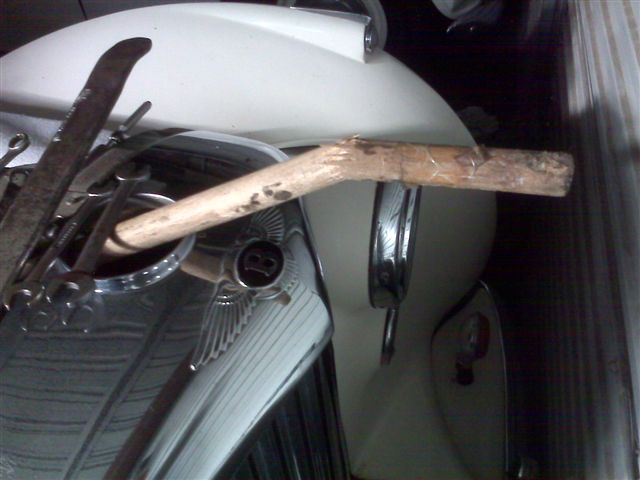 (Message edited by david_gore on 10 April 2008) | |||
Martin Cutler Frequent User Username: martin_cutler Post Number: 53 Registered: 7-2007 |
Thanks David for editing the photo's, I was going to ask if someone could fix that up, you beat me to it! Well, the engine hoist has been deployed, with straps front and rear, and it is currently sitting under tension, with another soaking of WD40. No movement yet, the front wheels are still on the ground, but a fair amount of upward force has been applied. I am out all day tomorrow driving Chloe, and am out collecting R Type parts sunday morning, so it will sit under tension until sunday afternoon. Will keep you all posted. Marty | |||
David Gore Moderator Username: david_gore Post Number: 793 Registered: 4-2003 |
Hi Martin, Pleased to be of assistance - the solution to the problem is simply hitting the "Enter" key twice between each image insertion; this puts a space between each image and avoids the "panorama" effect. Good luck with the "brute force and lots of finesse" technique. Regards David | |||
Martin Cutler Frequent User Username: martin_cutler Post Number: 54 Registered: 7-2007 |
OK, things are not moving at all. Today I moved the tension from being evenly distributed front and rear to just pulling up on the front of the head. Got the front wheels off the ground. Nothing. Whilst it was in that position, I put the nuts back on the studs over the exhaust valves, and with a large copper drift, belt the hell out of them. Still nothing. I have released the tension, as the thought of the entire weight of the front of the car hanging on #1 spark plug hole doesn't thrill me. I have a set of wedges in my hand.......... | |||
Martin Cutler Frequent User Username: martin_cutler Post Number: 55 Registered: 7-2007 |
What about some heat on the head around the studs while the head is under tension? | |||
Patrick Lockyer. Grand Master Username: pat_lockyer Post Number: 761 Registered: 9-2004 |
Long shot,refit a nut on one stud at a time then give a slight tap in varrious dirrections. See if their is any movement if so remove mark and go the next and so on. Lube arround the studs that move as you go. Mark the ones that appear to have no movement. With a stud remover first put some slight force to the direction to tighten the stud up, note if any movement. Then try to undo to get movement. Keep trying till some movement can be seen arround the studs then lubricate over time. Studs will be u/s because of damage to the threads! If the remaining are free the head should start to move off. Another way to help if you have no luck with the is to heat the block by filling with really hot water! Hope this helps and makes some sence. Keep us up to date if it does not work as there are several other methods still to try. | |||
Martin Cutler Frequent User Username: martin_cutler Post Number: 56 Registered: 7-2007 |
Hi Patrick, Just spoke to a mate of mine who is an engineer. He said he has had the same problem with Japanese motorbikes, where the studs basically weld themselves to the alloy. He doesn't use WD40, he uses ether (aero-start), as it penetrates well, and then heats the area. He has had some ignition of the aerostart, but advises this aids de-welding of the two dissimmilar materials. hmmmm...... Re tapping the studs, I have been giving them a bash with my copper mallet. I then read about the block that was destroyed when the puller forced the studs down into the block.... I don't think I hit them that hard. I today borrowed Garth Selig's air powered cold chisel, complete with flat blade, which he uses to vibrate against a flat on a nut. I have a can of aerostart, which I will try, (sounds like fun he he), then I will try the cold chisel. Front of the head has been under tension for 24 hours. Fun fun fun! Marty | |||
Richard Treacy Grand Master Username: richard_treacy Post Number: 1370 Registered: 4-2003 |
I'm surprised that the lever didn't work. Last time I used a pair of socket extension bars to obtain a really good upward force. With some thin copper plate on either side of the round end of a standard extension, the water pump and thermostat housing are in no danger of damage. Approaching the job from the right hand side square on. the round end fits down there rather well. You may use as many extensions as you need to achieve the lift without having a hernia. However, have you tried the old trick with oil ? Put Nos 1 and 6 2/3 up the bores. Fill those cylinders with engine oil to 2/3 of the remaining volume and replace the plugs. With the other plugs removed, wind the crank handle to crack the joint. I really don't like the air chisel, crane or reamers approches or the like. If all else fails, maybe John Vawser could oblige with special tools and or labour. After all, he has been removing these heads for about 45 years on a routine basis. He has seen it all many, many times, and spending a little to achive the best result could be wise. There are other people around Sydney too. It would be a shame to damage the head unnecessarily you must agree. RT. | |||
Richard Treacy Grand Master Username: richard_treacy Post Number: 1371 Registered: 4-2003 |
ps another approach I have heard of is to refit the rockers and fire it up briefly. I have never needed to do this, but hear that is safe and effective. Once the head has budged 1mm it is almost always plain sailing. | |||
Martin Cutler Frequent User Username: martin_cutler Post Number: 57 Registered: 7-2007 |
Hi Richard, Just been down the shed again, still no dice. I like the idea of firing it up, that could be interesting. I have been talking again to Garth Selig, he worked at John Vawsers up until 3 years ago, was there a long time. It was he that suggested the eye bolts through the spark plugs, and the air chisel. I just tried the air chisel, didn't like it, it wanted to jump around too much, hard to keep on the head of the nut. I bought some "wonder" new penetrating oil made by Sonax in Germany, the label says it dissolves rust! Impressive claim. I have just alternated with ether and Sonax MoS oil. I have the new flexolite filter adapter from the UK, I might drop the oil, fit new filter and refresh oil, and fire it up with the head stud nuts removed. No chance of damaging anything. The idea of puring oil down the bores and swinging around on the crank handle doesn't sound like it would work to me. The hydraulic lock would bend a conrod, whereas starting it up is relying on air pressure. Not giving up just yet.... Marty | |||
Patrick Lockyer. Grand Master Username: pat_lockyer Post Number: 762 Registered: 9-2004 |
Marty, pleased to hear that you are not going down the idea of pouring oil down the bores and swinging around on the crank handle,this is frought with many probs. Will wait and see how you get on with the magic fluid and maybe starting her up before further suggestions. | |||
Martin Cutler Frequent User Username: martin_cutler Post Number: 58 Registered: 7-2007 |
Hi all, Took the tension off tonight. After a week of pouring concoctions and tension, even just at the front of the head, no go. Next step, courtesy of Jim Lee, is to pull the motor, put it on the engine stand, and attack it from front and rear. Knowing that the previous owner ran it mainly without coolant for the last 5 years leads me to believe the corrosion in the head is severe. The motor has stood for the last 2 years without coolant or any inhibitor at all. Will let you all know how the next step goes, my 1925 Dodge 4 motor is occupying my engine stand at the moment, so I will be borrowing a stand on the weekend, and pulling the motor while I have the engine joist here. Thanks for all the imput, will keep you all postd. Marty | |||
Paul Yorke Prolific User Username: paul_yorke Post Number: 146 Registered: 6-2006 |
Hi Marty, My dad told me about cars hanging for a few weeks before they dropped off. That was at the factory on relatively new cars I guess. They used to come in one morning at it the car would have 'landed'. Maybe try a little longer if you can spare the time. I wonder if the engine will be 'steady' enough out of the car, you'll loose the advantage of something solid to lever against etc. | |||
Bill Coburn Moderator Username: bill_coburn Post Number: 960 Registered: 4-2003 |
Martin/ I have just come across a picture of the head puller and a dimensioned diagram should they be of any use. Some years ago I had occasion to remove the heads on a very old Shadow and among other tricks I had made some quite large nuts drilled with appropriate threaded holes. I screwed these onto the studs and shook Hell out of them until the head loosened. Bob Chapman in Mebourne has a puller which he swears will pull any head off! The problem of course is what to push on so you can't use big pressures. Do not be too comforted by other's experience. I have known these heads to require special tubular cutters that are forced down over the studs to release them. I also know of one case where the head had to be cut off with a hacksaw! | |||
Neville Davies New User Username: nev_davies Post Number: 6 Registered: 9-2006 |
Martin. If you have someone local that worked on Jaguar xk engines especially the early ones where the studs were not waisted he may have the cutters that Bill mentioned.This problem was commonplace sometimes shifted with heat and brake fluid as a penetrant but even when moved the corrosion would compress and make the fit tighter requiring a saw to cut the studs never saw one hanging on on the head succeed but certainly was tried.Good luck. Nev | |||
Richard Treacy Grand Master Username: richard_treacy Post Number: 1384 Registered: 4-2003 |
Martin, I guess you have the head off now. Let us know how you did it. I hope that you have it skimmed as they almost always blow first between 2&3 and 4&5 across the narrow section between the exhaust valves. This always burns away a little alloy, leading to another premature failure. As to removal methods, take note. Assuming that your motor can produce something approaching 200 ftlb torque while running, that is provided by three cylinders each revolution more or less in turn one at a time. That means each piston averages some 200 ftlb of torque for about a third of a revolution, plus more to drive the camshaft, water pump, generator and all, probably peaking at over 350 to attain that average. The system will be designed to exceed that by a factor of three at least. With a 1 ft crank handle, I defy you to pull 350-1000 lb without help from Samson and a hernia. By shifting the head by the oil-and-air-in-cylinder method using the crank handle or even the starter motor, the chance of bending a rod or doing any other engine damage must be nil. Mind you, you may twist the crank handle if you overdo it. RT. | |||
Richard Treacy Grand Master Username: richard_treacy Post Number: 1385 Registered: 4-2003 |
Oh, I overlooked something Martin, I omitted a major factor. Consider, yet much more torque is produced at the bigend to push the other pistond around, compress gasses ready for combustion, there is loads of friction, yet producing 200 ftlb nett after all that at the flywheel. The system will be designed to exceed that by a factor of much more than three at least in the conrod area. I defy you to pull 350-2000 ftlb at the crankshaft without help from Samson, his best mate and a hernia using the oil-and-air-in-cylinder method by practically any means to shift the head. RT. | |||
Martin Cutler Frequent User Username: martin_cutler Post Number: 65 Registered: 7-2007 |
Hi Richard, The R Type head is still very much in place unfortunately. Events with the MK VI have taken it's place in the priorities. The head is still away being skimmed. I have seen the results first hand of a hydraulicked piston on a Laverda triple. The fuel taps where left on, and the centre piston filled with fuel. Around it went on the starter, came back up, hit the non compressable fuel, and broke the rod. Then it came back down, and launched itself out the front of the crankcase. You are correct though, with gentle INITIAL application of the piston up to compression with the oil filled cylinder, it should not break, but I am assuming the shock load on the piston suddenly hitting the hydraulic lock is when the damage is done. How do you ensure that the starter GENTLY builds up presure on the piston that is hitting the solid wall of oil? | |||
Richard Treacy Grand Master Username: richard_treacy Post Number: 1386 Registered: 4-2003 |
Yes, I have seen a similar thing on a 1974 Silver Shadow at Yorks in the 1970s. Similar, except it was a blown head gasket which filled two cylinders with coolant. The owner fired it up at an unlucky part of the cycle and bent rods A2 and A3, ruining the pistons and liners in the process. They replaced the damaged parts without removing the motor. The difference here is that you are NOT firing up the motor just cranking it, so no damage can occur if the most basic Laws of Physics have any truth. Firing a motor with a pot full of liquid is an entirely diffent matter. RT. | |||
Bill Vatter Frequent User Username: bill_vatter Post Number: 47 Registered: 9-2004 |
Marty, If you are still struggling with the cylinder head, you might want to read in the Flying Lady May/June 2002 page 6605 an article regarding removing stuck cylinder heads using a cylinder head puller. Several have noted above corrosion between the steel studs and the aluminum head, which is correct. The very tightly packed corrosion between the stud and head is gripping one or more studs with tremendous force. When the head finally begins to move upward, the corrosion material will initially begin to pack tighter, and the force required to move the head will actually increase. N.B. it is not the surfaces of head and block that are stuck together. Therefore, the hydraylic pressure methods described immediately above WILL NOT WORK because as soon as the head moves a very small amount upwards, the fluid pressure will be released. Some have indicated different methods of dissolving the corrosion product. Perhaps one of these may work, but I have not found one that does. Most definately DO NOT USE WEDGES. That will destroy your cylinder head. | |||
Patrick Lockyer. Grand Master Username: pat_lockyer Post Number: 763 Registered: 9-2004 |
So it is not only myself that find these type of heads that are stuck. Most old type alloy heads with iron engines that it seems give the trouble are the ones that are repaired correctly in the first place and last untouched for years. FORGET LEVERS AND BROOM HANDLES they are for heads that get removed every few years through faults not corrected at the time. Martin can you detect any side movement on ANY of the studs? This can be checked by a side tap of the stud with the nut on, watching with some fluid round the stud. I take assume the studs did not turn with the stud extractor. | |||
Martin Cutler Frequent User Username: martin_cutler Post Number: 66 Registered: 7-2007 |
Hi guys, The head is back on B319LH, so that project has finished, allowing me to get back to the removal of the R Type Head. I am currently investigating Trepanning drills.........will keep you posted! One of my customers just had a Triumph Stag to remove the heads from, he resorted to cutting them off with a hack saw after the initial movement. I don't have any initial movement. | |||
Paul Yorke Prolific User Username: paul_yorke Post Number: 151 Registered: 6-2006 |
Is it still in the car Martin? Starter etc. attached? | |||
Patrick Lockyer. Grand Master Username: pat_lockyer Post Number: 764 Registered: 9-2004 |
Martin I had a different type of plan that has worked ok in the past. This is if useing the stud extractor does not do the job. Have done many Stags over the years with out big probs. They are not so bad as an R type head that has not removed for years. Main prob with the stags was the timing chains and tensioners if the head gaskets don't blow. Antifreeze of a special type[not disclosing that] and distilled water with improved water pump cured that prob. Real cause of the chains was the front of the cranks oscilating hitting out the tensioners. Used Hart racing balanced toughrided cranks with renalds tensioners. Back to the R type the way I propose will not be a quick job so let me know if you want me to proceed. | |||
Bill Payne New User Username: wimpy Post Number: 9 Registered: 1-2007 |
There is a product called Evapo-Rust, available thru http://www.pretooling.com.au/ The product is really great. See the main site: http://www.evapo-rust.com/ It truly works and since it appears nothing else does, certainly worth a try. Just have to figure a way to keep the area immersed in the solution, drain, rinse, use air to blow the crud out from around the stud, repeat until the crud is removed. | |||
Patrick Lockyer. Grand Master Username: pat_lockyer Post Number: 765 Registered: 9-2004 |
Bill this head prob is not rust but a build up of corossion crud from the bottom of studs to the top. If the product can remove some crud from the top and some movement is detected by a tap on the stud then my next plan may well work, never failed yet! Not in any books or manufactures manuals. | |||
Mernon Lollich Experienced User Username: mernon_lollich Post Number: 19 Registered: 5-2005 |
Hi All - I've posted this on the US forum too, but the more the merrier. The right front (passenger)power window chatters when it reaches the fully closed position - just bounces up & down a fraction of an inch and finishes up not tightly closed (wind noise). The other windows work perfectly & simply stop when they reach the closed position. This happens with both switches, the one on the door and the master switch on the driver's side. Before I take off the trim panel, does anyone have a clue about the cause and what to do about it? Thanks. Mernon 1958 SC LSJF72 | |||
Mernon Lollich Experienced User Username: mernon_lollich Post Number: 20 Registered: 5-2005 |
Sorry - wrong section, should have been in the Cloud/S section. Mernon | |||
Martin Cutler Frequent User Username: martin_cutler Post Number: 67 Registered: 7-2007 |
Hi Paul, yes, most of the motor still together, carbs are off. Hi Bill, looks interesting, I was thinking about molasses as well, works really well with steel, not so sure on alloy. Will investigate. | |||
Martin Cutler Frequent User Username: martin_cutler Post Number: 69 Registered: 7-2007 |
Hi all, Ok, a little bit of progress. Stud extractor has removed quite a few studs. (the easy ones). Then tried brazing nuts on the top of the studs,unfortunately it looks like the heat from brazing makes the studs brittle and they snap off rather easily. I got one more stud out this way. Lots more penetrating oil. Tried to take the thermostat housing off, well and truly seized on by the same principle, the alloy housing griping onto the steel studs. Applied heat to the housing and block of wood with a big hammer, success! One thermostat housing still in one piece. Next, off came the water pump. The water pump housing on the other hand was stuck fast. More heat and blocks of wood, and it eventually gave up the fight. This is well corroded. It was about to start leaking, eaten almost all the way through. It is going to take some serious welding to recover this part. I then took Jim's advice of thumping the hell out of the front of the head with my trusty sledge hammer and a lump of 4 x 2 hardwood. I have achieved 1/2 a mm of movement. I can tighten it back down, then thump it back up 1/2 a mm, but every time it only moves back up 1/2 a mil. The motor is still in the car, the next plan is to get the guy around with the diamond tipped drills, and drill out the remaining 19 studs. If the water pump housing is anything to go by, the head is going to be a mess........... Marty - keeping my chin up. | |||
Patrick Lockyer. Grand Master Username: pat_lockyer Post Number: 767 Registered: 9-2004 |
Martin, yes that is similar to what I have conqured in past problems of getting the head off. Brazing I have not used through to much heat down the top part of the stud! I have found stick welding best[ark] but have also used high amp mig, welding the nuts to studs. Tighten up first then undo the stud just a little at a time with a little lift on each repeating the proccess on all, it does take time. The head will be ok if you go steady! Best of luck. PS for the old crew,this and other methods are not in the manuals and can be used as shortcuts to save on specialist repairs that cost the EARTH. (Message edited by pat lockyer on 21 May 2008) | |||
Martin Cutler Frequent User Username: martin_cutler Post Number: 70 Registered: 7-2007 |
Just read the flying lady article on the PII head that Jonas sent to me, thanks Jonas! Using a Snap on stud extractor with a threaded collet made to suit BSF, very clever! I just bought a second Koken 3/8 AF stud extractor with a view to modifying it, but the snap on one looks a much better way to go. Thanks again Jonas. Marty | |||
Martin Cutler Frequent User Username: martin_cutler Post Number: 72 Registered: 7-2007 |
Last night I made a special right angled spanner to get the 2 nuts undone that hold the water jacket on the inlet manifold to the head. Never would have gotten it off without it. The water jackets of the inlet manifold are totally blocked full of corrosion...... |