| Author | Message | ||
Mark Glanville Unregistered guest Posted From: 121.44.9.126 |
I have had WVH38 for some time now sitting in the garage gathering dust. Hasn't run for many years until a few months ago when I started playing and have had the car running once again. At idle the car runs fine but under the slightest load the car struggles. Plugs have been checked, a crude check of the compression comfirms this seems ok. Carby will be next, but this will be a problem for another day. The throttle control and ride control at the steering column are not moving freely and have very little play and I have decided to fix this problem before tackling the poor running of the car. I have removed the controls at the bottom of the steering column in the engine bay as per the service handbook and as per the attached photos, but this still does not allow the hub of the steering column to move upwards as per the handbook and service bulletins. The threaded taper piece would suggest that the plate needs to screw off, however this is not possible as there are studs preventing this.What do i still have to do? The plate has some movement but only 1/8" and as per the notes on the subject this plate should fall away so the steering hub can move up for the bolts to be accessed the get to the problem of the controls. Can any one help? (Message approved by david_gore) | ||
David Gore Moderator Username: david_gore Post Number: 796 Registered: 4-2003 |
Hi Mark, Would you please register on the forum so you can upload photos - guest users cannot upload photos and this is why your photos are not included in your post. DG | ||
Mark Glanville Yet to post message Username: mark_glanville Post Number: 1 Registered: 5-2008 |
Thanks David. Here are the photos to help show my perceived problem. 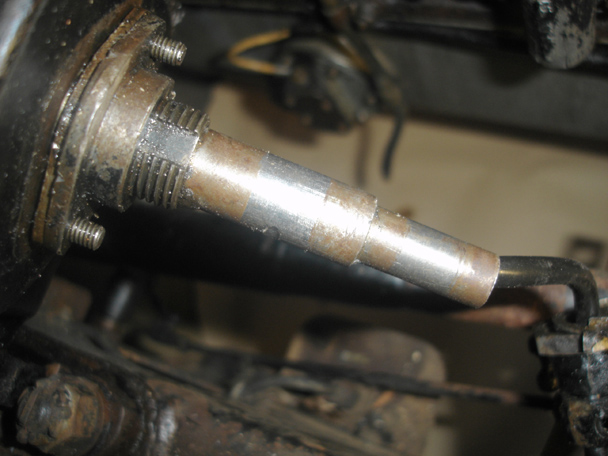  Hoping someone can help. (Message edited by david_gore on 07 May 2008) | ||
Bill Coburn Moderator Username: bill_coburn Post Number: 961 Registered: 4-2003 |
Mark You are dredging the memory banks now. The nut that you screwed off the outer tube should now be loosely screwed back on and using a soft drift tap on the lower face and the tube should release and slide upwards. I assume you removed the locking tab that was under one of the two side nuts. This actually locates the whole assembly in the steering wheel. The large nut is then removed and the whole assembly can be pulled out of the steering wheel centre. Given the age etc the shaft may be well stuck in the bottom plate so lots of WD40 in on and around the area. One lubrication point I have never seen mentioned is actually in the steering wheel boss. If you look at the rear side of the wheel boss with the wheels dead ahead there is a large hole. Get some light down there and you will find the main mounting plate of the controils with a clear oiling hole. I would use the fine tube that comes with WD40 cans and try to get plenty of the stuff down that hole which lubricates all the beautifully made tubes that go down the column. While you are tapping the nut at the bottom have someone at the top end judiciously twist the centre control disc back and forth (clockwise and anticlockwise). Once you have tapped that tube free the whole lot will spin around. You may also have trouble getting the tube out because the centre boss hits the roof. A little careful bending usually overcomes this. Issue 31 page 447 of Tee One Topics may be of help in the explanation. | ||
Stephe Boddice Frequent User Username: stephe_boddice Post Number: 60 Registered: 2-2005 |
Mark and Bill, If the design is similar to the pre-war cars then the small bottom collar has an internal taper that acts as a seal for the oil and a clamp on the main tube. It would then be necessary to remove the collar prior to any attempts to pull the column. SB www.boddice.co.uk | ||
Mark Glanville New User Username: mark_glanville Post Number: 2 Registered: 5-2008 |
Thanks Bill and Stephe. Bill, when you mention a soft drift tap, do you mean tapping the the plate its self with a centre punch? I have screwed the large nut back onto the taper thread and have been hitting this with a hammer and block of wood (so as to not cause damage). I have also tapped the plate itself using the same method. Maybe it needs more brutal attention in the form of using a centre punch hit direct to the face, with the same blows either side of the plate? thoughts anyone?? Further, should I apply heat to the plate area or will this cause damage to the seals inside, around the threaded taper area? Stephe, it feels like there is a collar preventing the plate from sliding off further as the plate does have movement by 1/8". There is also no evidence of any leakage from the steering box at this stage, so this could be due to the seal still in place or collar as you mentioned. The collar is not visible however, how do I access this collar? The service bulletins do not mention a collar. MG | ||
Bill Coburn Moderator Username: bill_coburn Post Number: 962 Registered: 4-2003 |
Right, I have consulted the oracle. The assembly is different to the earlier cars Stephe. Do not remove the plate. Screw the nuts back on to hold the plate on. Screw the large 7/8 BSF ? nut back on until it is level with the threads. Then get a suitable drift that has a wide nose to spread the load across the nut and shaft end and a heavy hammer and give the nut and shaft a bloody great wack. The threaded shaft is actually tapered as is the inside of the hole in the plate. Someone has overtightened the large nut and the thing is jammed together. | ||
Mark Glanville New User Username: mark_glanville Post Number: 3 Registered: 5-2008 |
It has finally come loose after plenty of tapping and having someone at the drivers seat pulling and twisting the steering hub boss, as suggested by Bill, thank you. I placed two tube spanners inside one another and as these have holes along the side of the spanners this allowed for the horn wire to poke through leaving the end of tube spanner available for maximium contact. Many taps later it finally gave way. Over coming this problem has allowed me to get to the heart problem and why I have taken this apart, to examine why the two controls dont move independant. I have removed the boss by undoing the 3 nuts to reveal the mechanism of the controls. The two controls are sitting opposite one another but are locked together and move as one unit when twisted back and forth. Shouldnt each control be individually connected to their respective rods? one inside the other, and hence leaving them to move independant of one another? Does this mean the tubes are ceased inside each other? (Message edited by mark glanville on 18 May 2008) | ||
Bill Coburn Moderator Username: bill_coburn Post Number: 967 Registered: 4-2003 |
Mark there are two tubes on the Wraith for ride and throttle one slides inside t'other. If they are stuck together it is simply muck gunge etc and lack of lubrication. They are beautifully made and close fitting. Make up a shallow box to hold the tubes lengthwise and line it with builders black plastic put the tubes in and buy a 5 litre container of WD40 or similar and fill the box and leave it a week. You can reuse the wd40 later. Ah just worked out what you asked. The word is seized! | ||
Martin Cutler Frequent User Username: martin_cutler Post Number: 68 Registered: 7-2007 |
Well done Mark, glad you got it apart. Let us know how you go with that exhaust manifold too, looks like a tricky repair. Cheers Marty | ||
Mark Glanville New User Username: mark_glanville Post Number: 4 Registered: 5-2008 |
The two tubes have been in a (closed one end) UPVC stormwater pipe with a mixture of kerosene and Diesel (50/50) for a week now, and they are still locked tight, with no movement. | ||
Bill Coburn Moderator Username: bill_coburn Post Number: 968 Registered: 4-2003 |
Well I did say WD40 or similar which would be Penetrene. Kerosine and diesel don't have any penetrating properties as far as I am aware. Don't hurry it get on with something else. You might like to talk to a corrosion engineer. This sort of problem is their bread and butter. | ||
Martin Cutler Frequent User Username: martin_cutler Post Number: 74 Registered: 7-2007 |
Hey Bill, who's your corrosion engineer? I could use her help on the R Type head! Do you have her measurements? Oops, I mean her phone number? If the tubes are steel, I would try molasses, as that will dissolve the rust. Did a little bit of work on the inlet manifold on the weekend, trying to get all the solid muck out of the water ways. Marty | ||
David Gore Moderator Username: david_gore Post Number: 804 Registered: 4-2003 |
Mark, Is there an antique farm machinery club near you? If so, the members have a lot of experience in freeing up "frozen" components of various types. The people responsible for the "Old Machinery Magazine" may be able to put you in touch with the nearest club: http://www.tomm.com.au/index.htm | ||
Paul Yorke Prolific User Username: paul_yorke Post Number: 163 Registered: 6-2006 |
Mark, maybe alternating some gentle heating and some 'freeze spray' Use a heat gun if it's covered in your 50/50 mix though . . . or it may solve your problems completely!  | ||
Bill Coburn Moderator Username: bill_coburn Post Number: 970 Registered: 4-2003 |
I too was thinking along the lines of Paul. Brass has a high coefficient of expansion (and contraction). I would be cleaning the whole thing inside and out and devise a way of freezing the inside. Paul says spray which I have never used but keep hearing how effective it is. Crushed dry ice dropped down the tube may also work.This will shrink the inner tube and heating the outer one should expand it. A little radial tension should break the grip. | ||
Mark Glanville New User Username: mark_glanville Post Number: 5 Registered: 5-2008 |
Thanks guys for all your ideas, appreciate all your feedback. I have heated the tubes and allowed it to cool and then heated again. There is collar inside the smaller tube, which i have utilised by placing a slightly smaller diametre bolt upon, which allowed me to tap the inner tube while securing the outer tube, without damaging the outer rims. Many taps later finally there was movement. Finally the two tubes were starting to give. The two tubes are now finally apart!!! and astonishingly enough with good lubrication. The corrison is located all in the same area. There is a mixture of light corrison and one heavy patch (approx 15cms) near the bottom of the tubes, hence locking the tubes together. Now seperated, I have the ends of the two tubes (not the brass ends)soaking in a 1:100 mix of molasses/water, to clean the rust. I remember reading about the steel needing to be treated after the molasses bath, to stop the reaction continuing. Does anyone have any knowledge on this? | ||
David Gore Moderator Username: david_gore Post Number: 809 Registered: 4-2003 |
Mark, Wash the items with hot water/detergent after removing from the bath, rinse immediately with more hot water and blow/wipe dry immediately. The steel surface will be pristine and will not have an oxide layer [better known as rust] to slow down attack by the oxygen and moisture vapour in the air. You can use temporary strippable coatings such as a 50/50 diesel/waste engine oil mix or straight grease to protect the surface - these can be removed with kerosine later. Otherwise you can apply bare metal primer to provide a more permanent protective layer which will require the use of lacquer thinners to remove if needed. If it is only for a day or two - just use WD40/Inox or equivalent and wrap the items in cloth. (Message edited by david_gore on 08 June 2008) | ||
Mark Glanville New User Username: mark_glanville Post Number: 6 Registered: 5-2008 |
The tubes have been in the molasses bath for over two weeks and to tell you the truth im not sure the Molasses thing is all that its cracked up to be. The corrosion was still in place (maybe i was expecting to much from what ive seen on the net) and so I removed the final patches, as best i could, with wet and dry. The two tubes operate freely inside one another again, as designed to do. The two tubes have been heavily drowned in RP7 lubricant to keep the parts moving and reduce further corrosion. Thanks for all the advice from everyone to get the tubes apart and functioning. Now to put it back into the car and connect up the linkages. |