| Author | Message | |||
Mark Taxis Experienced User Username: mark_taxis Post Number: 181 Registered: 04-2007 |
Hi I wish to remove the plate surrounding the horn button to repaint and re-mark the lettering , can anyone advise how to remove this plate? This is a Mk 6 bentley Many thanks  | |||
Bill Vatter Experienced User Username: bill_vatter Post Number: 99 Registered: 09-2004 |
You need to partially withdraw the central control tubes from the column to get at the screws that are beneath the plate you want to get off. Read the first part of the Service instructions for "Remove the Steering Column...." This will direct you to withdraw the control tubes, and how to do that. The control tube assembly must come all the way out to remove the steering wheel, but for what you want to do, raising it partially will be all you need. Interesting fascia. A special, perhaps? Got any other pics? | |||
Bill Vatter Experienced User Username: bill_vatter Post Number: 100 Registered: 09-2004 |
Also, don't get carried away with the horn button. You need to do some additional disassembly to get that off from the part you want to paint. Many have used ham-fisted methods and destroyed the button in doing so. Read and think first, then go to work is the approach that results in satisfaction. You probably know that, and I am preaching to the choir. | |||
Christopher Carnley Unregistered guest Posted From: 109.148.184.4 |
You have to remove the Christmas Tree of engine control levers below the steering box. The lettering looks OK to me. (Message approved by david_gore) | |||
Mark Taxis Experienced User Username: mark_taxis Post Number: 182 Registered: 04-2007 |
Thank you Bill, for the information. Yes, this is a Mk 6 Special built by my father back in the seventies. I inherited it 13 years ago and brought it to Australia. A rolling restoration since then. I managed to get the original UK number plate as a customized plate. Chris , the lettering looks ok in the picture but close up it is scruffy, will look into the work required to remove this plate before I start on anything.       . | |||
Larry Kavanagh Frequent User Username: shadow_11 Post Number: 629 Registered: 05-2016 |
Fabulous looking car and a lovely story behind it. | |||
Mark Taxis Experienced User Username: mark_taxis Post Number: 183 Registered: 04-2007 |
Not sure what has gone wrong with the photos, I uploaded 6 pictures | |||
Mark Taxis Experienced User Username: mark_taxis Post Number: 184 Registered: 04-2007 |
    . | |||
John Rowney Experienced User Username: johnrowney Post Number: 77 Registered: 02-2015 |
Hi Mark Early last year I replaced the steering wheel on my Mk VI Special B25KL with a smaller diameter one. I used the manual instructions and also advice from Steve Sparks on the removal. I attach my notes from the removal, which may or may not be useful. It took me a couple of days to do the full job. Our specials make the full removal easy, as the saloon needs the roof taken off according to Steve.
Ian Maitland also gave me a tip for repainting the engraved writing on any device. He suggested using a white crayon. I found a full packet of coloured crayons at Officeworks, and the white one should do the trick. | |||
David Gore Moderator Username: david_gore Post Number: 3694 Registered: 04-2003 |
Nothing can take the place of the traditional "square rigger" open sports car. British Racing Green paintwork and chrome-plated fittings are my idea of perfection. A vehicle that I would happily "sell my soul" for if it ever came on the market. | |||
Mark Taxis Experienced User Username: mark_taxis Post Number: 185 Registered: 04-2007 |
Thank you John for the information, i will have a look at this and then decide whether or not to go ahead. David, thank you for your kind words , my father spent 10 years building this car, it was a labour of love and it has given many years of good service and at times immense frustration! Just spent the last few days washing and polishing, looks good as new   . | |||
Mark Taxis Experienced User Username: mark_taxis Post Number: 186 Registered: 04-2007 |
John, you mentioned using chalk, I presume you rub the chalk into the lettering to avoid black paint going there, but how do you then highlight the letters in white paint? I am seriosly looking at just masking everything off and doing the job with the steering colomn in situ | |||
John Rowney Experienced User Username: johnrowney Post Number: 78 Registered: 02-2015 |
Mark I was mentioning crayon - this is the sorta greasy pencil type stuff little kids use for doing pictures. Maybe you are not familiar with it, but it was used by us kids to draw on paper 65 to 70 years ago. The residue it leaves is perfect for the furrows made by the inscribed lettering on steering wheels and other inscribed things like buttons etc. I will try and get some before-and-after shots of filling some letters on my Bentley instruments tomorrow when I get to my shed and post them tomorrow night. | |||
Christopher Carnley Unregistered guest Posted From: 109.148.184.122 |
Look up "Sugru", it is a much modified silicone based product, and with a bit of scraping out of the grooves, I have had success with it. "Sugru" is Gaelic for "hobby", but not the falcon. (Message approved by david_gore) | |||
Bill Vatter Experienced User Username: bill_vatter Post Number: 101 Registered: 09-2004 |
While it is true the center control tubes, with attachments, will hit the roof before they come out of the column, there is no need to remove the roof. Perhaps you know that, and saying "remove roof" was a private joke owners of specials appreciate but I didn't get it.🌝 To get the tubes out, you lower the column a bit. Remove split pins and loosen a few turns (don't completely remove) the castle nuts holding the steering box to the frame. Disconnect the bracket behind and beneath the fascia that holds the steering column steady. Take out the screws on the bulkhead that hold the rubber seal and let the seal hang there on the column. That's the seal keeping engine compartment air from entering the people space. At this point the column can be tilted down enough that the control tubes will come out over the top of the driver's seat back. Raising the control tubes is one of those tasks that is challenging until you do it once, and then it becomes easy and simple. The biggest problem is that the steering box oil will escape when the taper holding the outer-most tube releases. Have something ready to catch the oil, and don't forget to refill when you're done. Lots of tasks are difficult until you know how, and the instructions are a head-scratcher until you do it. You won't get it until you get it. | |||
Bill Vatter Experienced User Username: bill_vatter Post Number: 102 Registered: 09-2004 |
I like the car. Must be fun to drive and I'm sure it turns a lot of heads. I agree with making that plate and its lettering as nice as you can. You have a more intimate relationship with the steering wheel than almost any other part of the car, and it needs to be nice or you're not vompletely happy when you go driving. | |||
John Rowney Experienced User Username: johnrowney Post Number: 81 Registered: 02-2015 |
I have used the crayon to fill in the engraved lettering on my main dial on my 1938 Wraith WXA68. My engraved lettering on my Bentley Special B25KL is in much better condition, so I have used the example of the Wraith here. 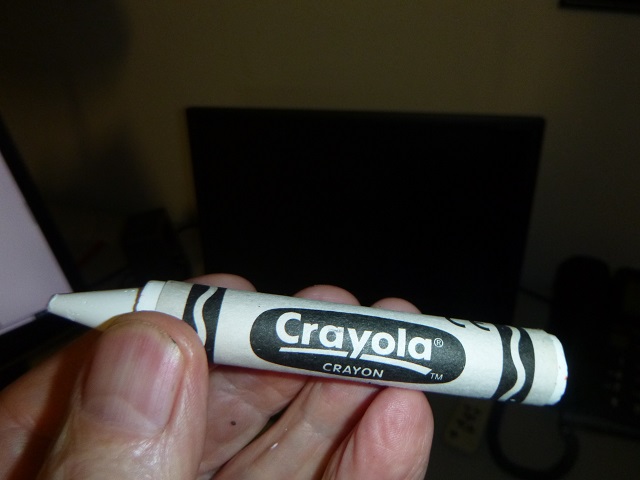 The Crayon 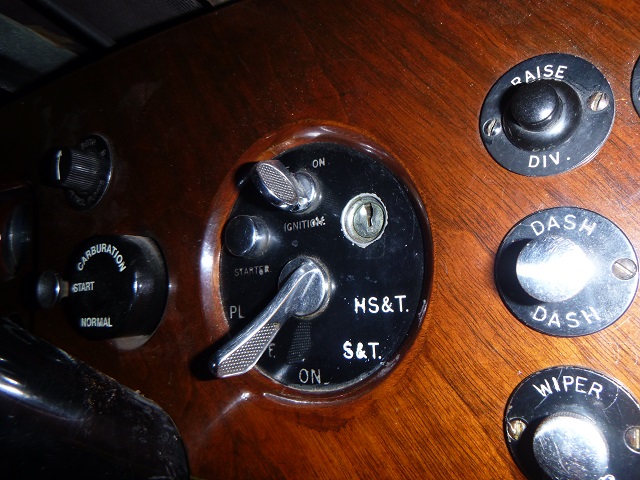 Crayon filling of 2 engravings 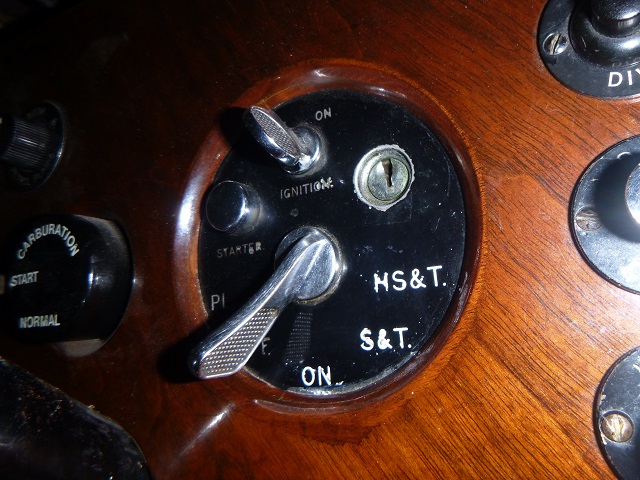 Crayon filling of 3 engravings The photos show there is a significant difference between the original filling and the crayon filling. The actual difference is more pronounced than the photos indicate. To do this I just worked the crayon over the embossed letters and rubbed off the excess with a microfibre cloth. I did no other preparation. After looking at the results I did quickly late this afternoon, I will do the whole lot tomorrow. | |||
Mark Taxis Experienced User Username: mark_taxis Post Number: 187 Registered: 04-2007 |
Thank you John, that is certainly a signficant difference, I have also done some research and come accros a product called laquer stik, but it seems that you have to order it from the USA | |||
Bill Vatter Experienced User Username: bill_vatter Post Number: 103 Registered: 09-2004 |
Lacquer stick is the right stuff. Crayon would work similaray, but would not have as durable result. Would crayon discolor, pick up dirt, and have you wanting to clean it? If so the crayon would not endure the clean up as well as the lacquer stick. In this time of social distance, staying home, etc. on-line shopping is really taking off here in US. Certainly must be the same in OZ. I also find that on-line searching is a skill. You need the right combination of search terms, and know different words that mean the same thing. For example, the place in OZ that sells lacquer stick may call it something entirely different, and therefore tricky to find it. Happy hunting | |||
Trevor Pickering Experienced User Username: commander1 Post Number: 139 Registered: 06-2012 |
Hve you tried "Tipex" liquid paper? Works very well for this  | |||
Jeff Martin New User Username: jeff_r_1 Post Number: 47 Registered: 07-2018 |
Lacquer sticks, or "stick Shellac" is what it's called here in Canada, requires a low heat iron to melt it in so it flows where you want it, so I'm not sure if that would be the right product here. You can get wax sticks that do not require heat to repair furniture that's better quality then a crayon. https://www.leevalley.com/en-ca/shop/tools/supplies/finishing/finishes/20071-lacquer-sticks | |||
Jeff Martin New User Username: jeff_r_1 Post Number: 48 Registered: 07-2018 |
Here's a video, I suppose one could use the burn in tool, but on such an irregular surface, it would be quite difficult. I used the stuff all the time doing in house furniture repair, it has to be heated up, it's rock hard and brittle at room temperature. There's no way to apply it with out the use of a hot iron. https://www.youtube.com/watch?v=V8z65RwW7Y8 | |||
Jeff Martin New User Username: jeff_r_1 Post Number: 49 Registered: 07-2018 |
Personally if I was going to restore the steering wheel plate I would remove it from the car, just for ease of restoration. I would then strip of all the original paint and get back to a clean surface, making sure that any old material is out of the lettering. I would apply a lacquer based paint in black over all, or even better an automotive paint with a hardener in it. After a few days of letting the black paint cure, I would the use a white water base acrylic to carefully paint in the letters with a very small brush. The water based acrylic paint would stick well enough to the alcohol based lacquer or automotive paint. If one were to make a mistake and get white paint on the black where it shouldn't be, it can be carefully removed with a lightly dampened cotton swab with water, while leaving the white paint in the lettering. If one were to use the auto paint then a white lacquer could be used for the lettering. Any mistakes made, and lacquer thinner can be used to remove the excess paint. The hardened auto paint would not be affected by the lacquer thinner _ to a point. The auto paint would be best left to harden for a good two weeks to lessen the effect of the lacquer thinner. Another approach is to paint it black using the auto paint. After letting it harden for two weeks, use white lacquer to paint in the lettering. If some were to get outside the letting, it's left to dry. Any dried white paint can be carefully wet sanded off with 2000 grit, being very carful not to sand through the black. This method would produce a very sharp image in the lettering. When done, a clear lacquer or auto clear coat can be applied to bring back the shine and protect the job over-all. Yeah, a lot of work, but you would end up with a very professional looking job. | |||
Mark Taxis Experienced User Username: mark_taxis Post Number: 188 Registered: 04-2007 |
I have stripped off the paint and polished the aluminium, I kind of like the effect, and as it is a special no need for me to worry about authenticity  | |||
Jeff Martin New User Username: jeff_r_1 Post Number: 50 Registered: 07-2018 |
That is cool isn't it !  It's very befitting to the car as something more racy then the slow and stodge saloon's. Very air plane like ! You could easily use some back lacquer to fill in the letters, it would match the black steering wheel very nicely. Just a thought. | |||
Christopher Carnley Unregistered guest Posted From: 109.159.182.193 |
Dazzly? (Message approved by david_gore) | |||
Mark Taxis Experienced User Username: mark_taxis Post Number: 189 Registered: 04-2007 |
Yes Christopher, that is my concern, more shiny stuff to dazzle in the Austalian Sunshine, will trial it for a while and see how it goes, The letters do need highlighting, will experiment over the next few days | |||
Richard Gray New User Username: mooney1el Post Number: 10 Registered: 08-2016 |
I think the is the Lacquer Stix that Bill Vatter is recommending and not the kind you have to melt into place. Notice it says "Fill In Paint"  | |||
Jeff Martin Experienced User Username: jeff_r_1 Post Number: 51 Registered: 07-2018 |
In all my years, I've never seen that in Canada or have come across it. Makes me want to restore my switch box, etc. Here's a video. The guy in the video is trimming the hardened end with a razor blade, so it looks like it cures after a while _ which is a good thing. https://www.youtube.com/watch?v=r3dSOiCkoBw |