| Author | Message | ||
Jeff Martin New User Username: jeff_r_1 Post Number: 3 Registered: 07-2018 |
As the title says, I twisted mine off trying to get it out of the head. Pretty sure it's BSPP (British Standard Parallel Pipe) thread, but I not sure of the size. After looking at the minor and major diameter, I think it's designation is 3/8, that would make it 19 threads per inch. I'll have to buy a tap to clean up the threads in the head after I dig out the broken tap. Thanks | ||
Kelly Opfar Frequent User Username: kelly_opfar Post Number: 241 Registered: 07-2004 |
If you know the part number, you might be able to buy the original drawing from Hunt House: https://archive.rrec.org.uk/search-result They don't have everything and it's not free but I find it very useful at times. Kelly BritishToolWorks.com | ||
Jeff Martin New User Username: jeff_r_1 Post Number: 4 Registered: 07-2018 |
It's 1/2 inch BSPP thread. I also talked to a club member who has worked on many of these cars and he's threaded a new tap in there with 1/2 NPT, which is also 14 threads per inch _ so I could see that working. | ||
Norman Geeson Unregistered guest Posted From: 81.99.138.38 |
Jeff There are at least four different heater tap adaptors and at least two different heater / block taps in the early post war cars, viz:-RE18826, RE9888, RE8952, RE17083 adapters and RE5150 , RE 16535 block / heater taps As you provide no data on the engine, chassis number or vehicle it is not possible to give you a definite answer, except to say these adaptors in the main are BSP to 20 tpi Whit form. With one exception of 24 tpi the others are 14 tpi BSP on the opposing side. In addition to the above data one would also need to know into which cylinder pocket the adaptor / tap was screwed eg. No.2 or No.4. Perhaps you could provide more data? (Message approved by david_gore) | ||
Jeff Martin New User Username: jeff_r_1 Post Number: 5 Registered: 07-2018 |
Here's a photo, I did get enough of the old thread out of the head and I was able to measure it at 14 tpi, so part# RE16535, block/heater taps. That equates to 1/2 inch BSPP. The car is 1951 Bentley Mark VI standard body, B297LH, not that it matters. 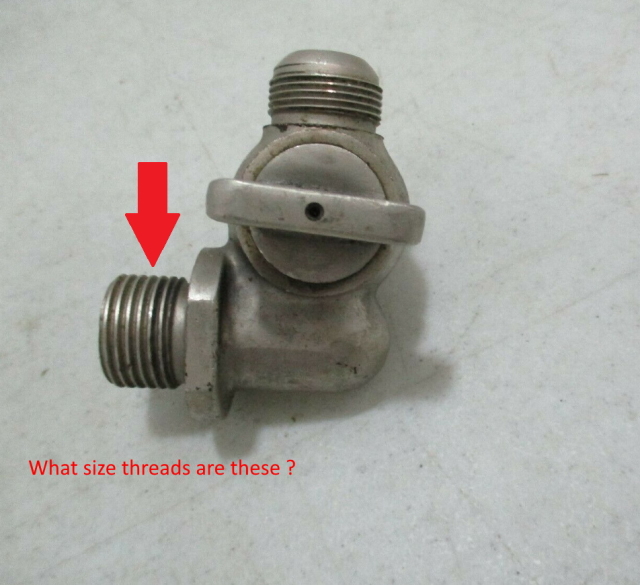 | ||
Norman Geeson Unregistered guest Posted From: 81.99.138.38 |
Jeff My message should have read, was �screwed eg. No.2 or No.5� not �screwed eg. No.2 or No.4�. For the record your heater tap (photo) appears to be a RE 5150 with two male couplings, one arrowed at � BSP 14 tpi, the other 7/8 Whitworth Form 20 tpi. On later 4.25 ltr and early 4.5 ltr engines that heater tap was used with a RE 9888 adapter � BSP x � BSP, so the adapter could be left in the cylinder head without having to unscrew the heater tap from the alloy head. The photo is NOT that of a RE 16535 as that particular tap has a �captured� female nut attached and it can only be used with a special adapter RE 17083. This arrangement was only used from about May 1953 on R Type / Dawn engines to allow the tap to be mounted/ demounted without disturbing the front exhaust manifold. (Message approved by david_gore) | ||
Jeff Martin New User Username: jeff_r_1 Post Number: 6 Registered: 07-2018 |
Thanks for all the info, very useful. Any reason why the tap was moved from cylinder number 5 to 2, maybe better coolant flow to the heater being nearer to the water pump ? | ||
Norman Geeson Unregistered guest Posted From: 81.99.138.38 |
Jeff I think you may have guessed the reason for the re-siting of the heater supply point. I have not come across any comment on the subject in the archives. However just about that time many changes took place in regard to cooling and heating, including the final positioning of the radiator grille shutters. The introduction of the MKVI chassis Continental and the demister matrix positioning under the front wing may have accelerated the decision to reposition the heater take off points. The introduction of the "commonised" Continental cylinder across the range in July / August 1953 might be another reason to tidy up cooling flows. (Message approved by david_gore) | ||
MGlanville Unregistered guest Posted From: 118.211.223.178 |
May I ask a follow up question on the subject of heater taps? Mine is not leaking fortunately at No. 2, (cant remove in any event because of manifold) the adaptor to the block or at the tap to the adaptor. It leaks at the tap into the tappered body. I have removed and applied grinding paste etc....still leaks. What are the thoughts of a small grove top and bottom of the tap with a couple of nitrate O rings? (Message approved by admin) | ||
Jeff Martin New User Username: jeff_r_1 Post Number: 8 Registered: 07-2018 |
It would work if you could properly machine the grooves to take the O-Rings, but being a conical shaped thing, how would one lock into a lathe. It would almost be impossible to file the grooves by hand and get the depths even enough for the O-Rings to seal. I was planning on soldering mine in the open position and be done with it, I leave it open all year round anyway. | ||
Christopher Carnley Unregistered guest Posted From: 109.156.10.92 |
Is the captive back nut cracked? (Message approved by david_gore) | ||
James Senior New User Username: jamess Post Number: 11 Registered: 09-2016 |
I managed to seal mine with Hylomar, which I believe was developed for the purpose. http://hylomar.com/hylomar-product-range/gasket-jointing-compounds/ | ||
paul hooper Unregistered guest Posted From: 122.58.90.161 |
To stop the petcock from leaking set the tap in the position you want ( open or closed) then support the petcock with one hand and tap the handle on the top with a hammer. This drives the taper shut.If you wish to change tap position a slight tap from underneath will release the taper. A copper hammer is best as less damage to fitting. The pressure holding the taper closed is normally done by the spring washer underneath but these brake. You can also add a washer between spring and nut to increase pressure to stop leaks. It does no harm to tap the petcock on the top, so don't be afraid. CHEERS Paul Hooper (Message approved by david_gore) |