| Author | Message | ||
Richard Treacy Grand Master Username: richard_treacy Post Number: 900 Registered: 4-2003 |
Some time has passed since the motor on a friend's Silver Dawn 4.5 suffered this. The temperature would rise slowly to 85C, mainly in traffic, then dive in a few seconds to 50C. That passed, but the motor had developed a poor idle on No 6 cylinder. Today I went down to see the car 300km away armed with my tools, and pulled off the cylinder head expecting the worst. What I discovered was not bad, but is like nothing else I have ever seen: a blown head gasket, but in a most unusual manner. The top copper sheet of the gasket has stretched outwards from Number 6 Cylinder along with the asbestos (substitute) substrate. Rather than give my own opinions in full first off, it would be great if someone would look at the pictures of the blown gasket shown below, or on: http://homepage.swissonline.ch/Richard_Treacy/SilverDawnHeadGasket.htm The first two pictures are of the bottom, and the last three are of the top of the gasket. I shall for now only state that I am certain that the gasket is to blame for the cooling irregularities and later the low compression on number 6 leading to poor idle. I removed all the valves (inlet and exhaust) and they are all perfect after just 20,000 miles since overhaul, so I refitted them without even any attention other than soot removal. I am still awaiting a new head gasket before I can finally refit the head, but everything else is prepared and ready to go. I was frustrated not to be able to finish the job today, but the gasket should arrive soon so I can put the car back on the road early next week after another 600km round trip. At least I was home by a reasonable hour I guess. I look forward to any opinions. Thanks, Richard.  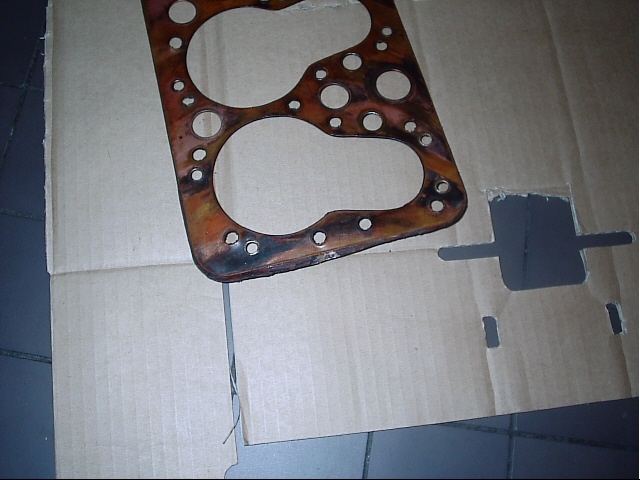 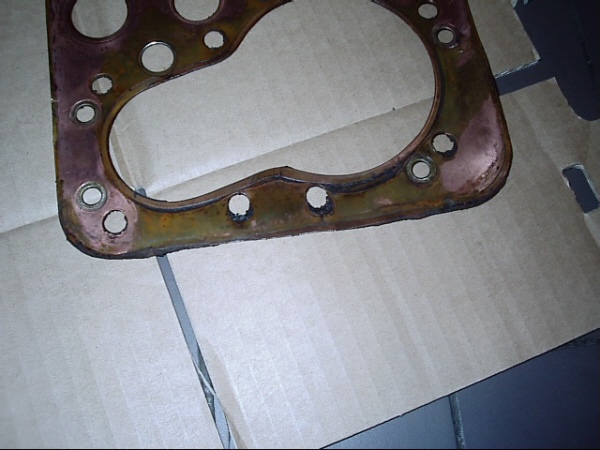  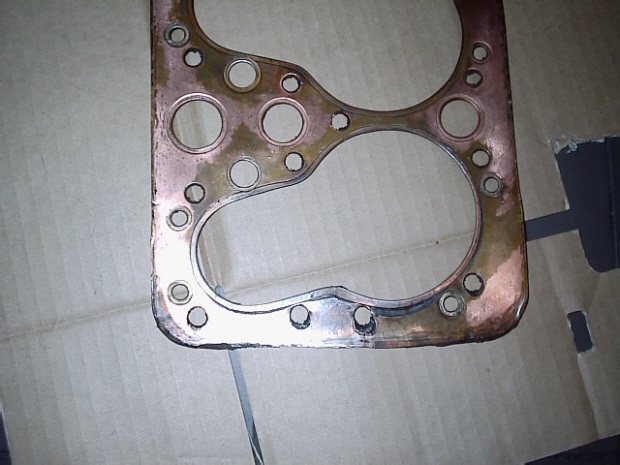 | ||
Laurie Fox Experienced User Username: laurie_fox Post Number: 17 Registered: 6-2004 |
Richard My guess is that the asbestos (substitute) at the rear end of the gasket was thinner than the rest to start with, resulting in low local clamping pressure. | ||
Richard Treacy Grand Master Username: richard_treacy Post Number: 901 Registered: 4-2003 |
Thanks, Laurie, That must surely be a prime possibility. I do hope that you are correct. Once removed, I checked the head and block for warpage and cracks and they are perfect. Strangely there were no coolant leaks into the oil or externally. It has 40% inhibited ethylene glycol. In every case of gasket trouble on these motors I have seen before, the heavy telltale condensation on the oil filler cap has given it away. My other guess is that the coolant change, done just before the fluctuations started, which I didn't oversee, left an air pocket at the back of the block, and allowed overheating for long enough to ruin the gasket. That was a year and 10,000 miles ago. For the first 10,000 miles before then there was no problem. In either case, presumably the large flow of hot gas stretched one of the copper laminates and melted the substrate. Thanks again, RT. | ||
Laurie Fox Experienced User Username: laurie_fox Post Number: 18 Registered: 6-2004 |
Richard I agree that local overheating may well have been at least part of the trouble but I have been trying to think of a cause for the indicted temperature variations mentioned. When I did my exploration of coolant flow (see "Mark VI overheating questions" in this forum) I did find that with poor flow it was relatively easy to get local boiling to a sufficient extent to get steam into the thermostat pocket and a correspondingly high indicated temperature while much of the coolant was still at about the normal temperature. Switching the engine off as soon as the quick indicated temperature rise appeared resulted in the steam condensing and the indicated temperature dropping straight away to about 78 deg.C (but not lower) with no significant amount of coolant being blown out via the steamvalve pipe. Where did the 50 deg. reading come from? Air in the coolant system is troublesome and it can get in both when doing coolant exchange and afterwards too. I think that there is no real way of getting rid of it except by a high rate of coolant flow to push as much of it as possible up to the header tank where it can get out. Because of this, when I put the new radiator in, I removed the thermostat and left the bypass open since I discovered during my tests (see earlier topic mentioned above) that the various pressure measurements that I took indicated that the coolant flow rate was substantially increased. There are probably some downsides to this but none have yet appeared so far as I am concerned since I have now passed my 90th birthday and motoring is not very energetic -mainly many frequent short distances in flattish country with virtually no high speed. | ||
Bill Coburn Moderator Username: bill_coburn Post Number: 544 Registered: 4-2003 |
My God Laurie and I thought I was the oldest codger on the web at 70!! Congratulations on beating the odds. I am remembering that the 'B' series engines had a coolant pipe fitted to the rear of the head or the block so the Factory must have been aware of a possible problem. Maybe the Jaguar approach of bleed points on the cooling system is worth considering??? | ||
Martin Cutler Prolific User Username: martin Post Number: 77 Registered: 10-2004 |
My uneducated guess would be that the compression from #6 would force an air bubble into the water jacket, that would find it's way around the system and accumulate in the chamber where the temperature guage was, hence the sudden drop in guage temp to 50 degrees. I am having similar head gasket issues on a mate's 1941 Indian Scout at present, both faces are perfect, and the head gasket keeps blowing. I am blaming the quality of the gasket coming from the US, and have gone to Swanson's in Sydney for a new set of gaskets, hoping that the quality of the material will be higher. Very interesting. Is the gasket on the Dawn a "genuine" one? Your "junior" correspondant, just turned 40. | ||
Bill Vatter Frequent User Username: bill_vatter Post Number: 14 Registered: 9-2004 |
Defective gasket I am sure. I suggest carefully cutting the gasket away from the combustion chamber edge to inspect the filler material in the location immediately adjacent to the combustion chamber. Maybe you can see in that narrow gap right next to the edge, it almost but not quite visible in the picture to my 62 year old eyes. (Everyone out of the closet now and disclose!) The gasket is supposed to seal on the copper surface where it is rolled around the edge and overlaps the lower copper sheet. That provides three thickneses of copper plus one thickness of filler in the 1/8 inch band around the combustion chamber compared with 2 thicknesses of copper and one thickness of filler everywhere else. The result is higher pressure in that small band to provide the best possible seal. My theory: If the filler is missing in that area right next to the combustion chamber, there will be a weak spot (low pressure on that spot of the band, and the gas will seep past the rolled edge, and get into the void where there should be filler but is nothing. Then the pressure will continue to push the filler and the lower (unrolled) sheet of copper outwards. | ||
Richard Treacy Grand Master Username: richard_treacy Post Number: 903 Registered: 4-2003 |
Martin, Bill V, The genuine gaskets are generally no longer available, although luckily I have sourced one new old-stock. I learned that Crewe had discontinued these gaskets back around 1981, and promptly snapped up a dozen spares, which are still in my cupboard in Canberra. However, I switched to the UE5053 steel S1 gasket in any case on my R-Type, and I am living far from Canberra at present so my stash is not so easily accessed. The new replacements were commissioned by a UK firm, and are manufactured in New Zealand. The failed gasket is marked "NZ Made". I understand that all the spares outlets are selling these gaskets sourced through that particular UK firm, and that there have been the same gasket problems noticed for the last three years or so. I have received an excellent response from a gentleman in the UK, who advises me that the NZ ones available are problematic, and that the failure I have witnessed is classic for these gaskets from NZ. If he agrees, I shall relay his message on this board. In the meantime I shall cut up the failed gasket as Bill V. suggests, and post some pictures on this site. Many thanks, Richard. | ||
Richard Treacy Grand Master Username: richard_treacy Post Number: 905 Registered: 4-2003 |
Richard By all means advise our Australian friends of the position. Regards Norman Richard Treacy (Tre05937) Rating: N/A Votes: 0 (Vote!) Posted on Saturday, October 15, 2005 - 4:55 pm: -------------------------------------------------------------------------------- Thank you so much, Norman ! To hear from the horse's mouth, so to speak, gives me enormous encouragement. May I relay your comments to the Australian site, where I posted the same with pictures ? Even though I was reasonably sure that I did not made a mistake, there is always a lurking suspicion that one has indeed made a foolish mistake. Your up-front reassurance has made my day. I was very particular in retightening the Silver Dawn's head, and it has never been loose. The first retightening was in the workshop after a test run for 15 minutes or so on no load with the exhaust gas vacuum attached to save us all from CO poisoning. It reached 72C on the gauge with newspaper to restrict the air flow through the radiator. From what you write, all cars with the NZ gaskets are pending failure. As an antipodean, I am very disappointed in this, as there are some great suppliers downunder, REPCO and JP Pistons included. I am relieved that the new gasket on the way is an old-stock Crewe item. Once again, your post is tremendously encouraging. Regards, Richard. Geeson, N (Gee06752) Rating: N/A Votes: 0 (Vote!) Posted on Saturday, October 15, 2005 - 1:00 pm: -------------------------------------------------------------------------------- Richard Sorry I have been delayed in answering.I must admit to knowing that the head gasket shown in your images was produced in NZ.That is not to suggest that other goods from those shores are not up to standard but this is the classic NZ gasket failure mode. These particular gaskets suffer from the original 1953 R-R problem, which in their case was a soft clay infil.They moved to a hard clay infil, (never was asbestos used)and the trouble was solved.I do not know exactly what sort of infil is used on these NZ gaskets, except to say I hope someone alters it b***dy quick. The infil crushes under load extremely quickly and then the expansion and contractions cause ratcheting. This ratcheting can be seen to have caused the elongated holes and the move rearwards by the infilling. In the worse instances the pull from ratcheting damages/ cracks the folded gasket edge around the combustion chamber, this appears to have happened in your case. Some of these NZ gaskets are not punched correctly around no 6 cyl head studs and the gasket is under strain rearwards from the start. Once again in the worst instances the most rear head stud holes on the exhaust side is up to + 0.125 inch out of position. This problem has been around for approx +3 years I would say and it is about 2 years ago since I was advising Ashley on the way to tighten these heads to try to combat these gaskets.Quite rightly he has already high lighted the problem to you. As you have laid your hands on a genuine old stock gasket you are unlikely to repeat the trouble. For anyone having to use one of the NZ gaskets it is vital that the engine is run at normal temperature for some ten minutes in the garage. On NO account drive on the road and subject the engine to gas loads. After running up to temperature let the engine cool for at least 8 hours and re-tighten the head, (30 lbs ft is enough). Run the engine some 30 to 50 miles on the road applying heavier gas loads as milage increases. Let the engine cool off completely, preferably overnight or at least 8 hours and retighten the head again. Repeat the head retightening at 300 / 500 miles and again at 1000 miles. Check the exhaust side head studs, diligently, at times between these mileages and if they appear under torqued then retorque all the head studs. I know this procedure is a pain but if anyone short cuts it, they are going to need to do it all over again! If the engine in question has any cooling system faults it will make the issue worse. As you may have gathered the fault, at least on those I have seen (about 10 engines)is confined to no 6 cylinder, which is the hottest point. Richard, I was going to warn you if the engine is a R type later than the SP series to look out for the steel circular disk adjacent to the front of the cooling gallery tube. This disk is usually corroded away and ceases to exist, a similar but different thickness disk is used on the Cloud 4.9 ltr. Often owners, and in a case of a specialist 14 days ago, do not realise it exists.A missing disk will allow the water pump output to short circuit the rear cylinders, having the same effect as a gallery which has moved rearwards. The disk or plate is part number RE16219 on the R tpe and UE 524 on the Cloud.The former is 0.128 inch thick the later 0.104, (R-R used some funny sizes!!)I do not believe the R type one is shown in the parts manual and I do not believe it is available. A suggestion if I might, obtain a Cloud type and make a pattern out of stainless steel (NOT brass or copper). I trust the foregoing will at least let you rest at night as you have done nothing wrong. Best Regards Norman Norman Geeson | ||
Richard Treacy Grand Master Username: richard_treacy Post Number: 919 Registered: 4-2003 |
A month ago I reported of a failed Silver Dawn 4.5L head gasket, which had been causing unusual temperature fluctuations for months, and eventually a slight missfire on pot No. 6. I am pleased to say that all is well now as I finally reassembled it on Thursday last week with a new old-stock genuine gasket, after awaiting parts delivery and finding the time for a little excursion down South. Shown are the revised inlet valve seals, and the method of sealing the valve collars with silicone. The valve heads are pictures before the excess silicone was cleaned off after polymerising for a few hours while cleaning up and refitting the head to the motor. The silicone is applied to the valve collars before releasing the valve spring compressor so it seals off the gaps. That stops oil from dribbling down the valve guides and being sucked into the motor. Silver Cloud, SY and SZ owners alike also take note: many of these cars use too much oil simply because most repairers don't know that it is mandatory on those motors to apply the silicone. The Crane Cams valve stem seals shown are new, but after 15,000 miles the motor was using no oil whatsoever, so I left the young existing ones in; they showed no wear and perfect resistance to movement: leave well alone for now. Try that with the original seals. Of course I removed the valves to check them out while I was at it. Oh, and before anyone shoots me, the cylinder head retaining nut seen mid-vertical at the right is wrong: It should be one with a raised head. RT. 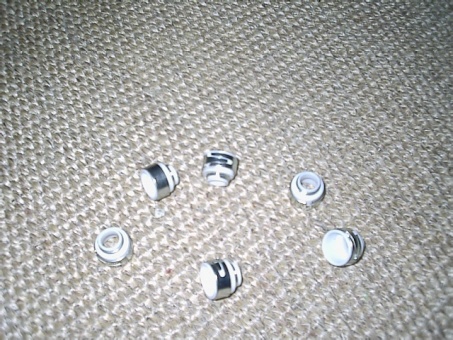 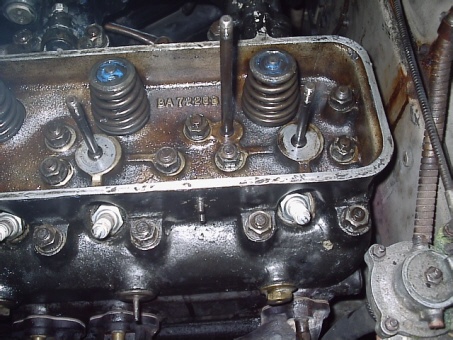 | ||
Bill Vatter Frequent User Username: bill_vatter Post Number: 16 Registered: 9-2004 |
Richard, I see your silicone, which I hadn't thought of before. I agree that will stop oil going down the valve guides, and for engines with an oil consumption problem, that will likely help. When I installed Enginetech seals (similar to Crane seals) in the spare engine currently in my Silver Wraith (but soon to be replaced by the original engine) the machinist who recommended those seals told me the issue is to control oil in the inlet guides, not stop oil. Quite reasonably he pointed out that if all oil is stopped from going down the guide, there will be excessive wear to the guide and valve stem. Now as I am finishing up the rebuild of the original engine for this car, I note that the inlet valve stems and guides are without any measurable wear after 135,000 miles, and that is saving me some gas money by not needing any replacement parts there. Apparently all of the oil that previously went down those valve guides is paying a dividend now. I would think there is an ideal amount of oil consumption in one of these engines, and that zero oil consumption is not enough to protect some parts. In my opinion if an engine consumes a quart every thousand miles, the owner should be happy. That is not enough to make any detectable smoke, and it will probably be time to change oil before it is necessary to top it up. The engine now in my car is consuming about a quart per 2000 miles, and I would not want it to be less than that. Oil is cheaper than valves and valve guides. | ||
Richard Treacy Grand Master Username: richard_treacy Post Number: 922 Registered: 4-2003 |
I take the point about the ideal oil consumption rate. Just a quick explanation is worthy. The Crane, Payen Seal HR336, or Enginetech, seals are all good, and make the originals look very silly. They are rather oil control devices and not purely seals. I personally like the spring-loaded teflon Crane Cams seals, but the Payen HR336 can be fitted without removing the head, not that removing an R-Type head is at all a difficult task. For the Crane seals you need to machine the guides using the Crane tool with the valves removed. Machining each guide takes only a minute, and the tool fits a standard hand-held electric drill. The advantage of the Payen is that you save the cost of a new head gasket, but no time as the added dexterity required in-situ makes it a zero sum exercise in terms of time at best. I expect that Bill Coburn can vouch for this, his having fitted a set to a V8 in-situ not long ago. The benefit of all these seals is not just reduced or eliminated oil consumption, but also reduced stem and guide wear. The seals make sure that the oil remains between the stem and the guide by sealing it in when it's needed. Poor sealing allows the oil to be sucked away while the valve is opening and closing, leaving poor lubrication inducing wear at the critical times. Also, oil sucking past the guide when the valve is stationary does no good and simply cruds up the back of the valve head. With the new seals and siliconed spring caps & collars, there is still plenty of lubrication from the oil mist circulating in the rocker cover. As an example, my R-Type's inlet valves are well over 400,000 miles old and unworn. Although acceptably within tolerance, I upgraded the guides 150,000 miles ago by fitting aluminium-bronze inserts and again Crane Cams seals, and there has been no wear since at all. Bronze inserts have the added advantage as being largely self-lubricating. The Silver Dawn of last week still has cast steel inlet valve guides but with Crane Cams seals. Although 15,000 miles is a miniscule distance, they are still as new as are the seals after that mileage since replacement after some 70,000 miles. I find the original seals useless after a few thousand miles, and with them the stems and guides are at their wear limits after just 100,000 miles. RT. | ||
Bill Vatter Frequent User Username: bill_vatter Post Number: 17 Registered: 9-2004 |
Richard, We are in complete agreement. I only point out that silicone on the valve keepers might be more than is really needed to have the desired performance. HOWEVER; for a car with factory seals that is burning oil, the silicone could be of great benefit. Removing the head is sometimes not easy at all, and the springs and keepers can be disassembled with the head in place. Your comment about self-lubricating guide inserts is very interesting. I have a bronze screw-in inserts in the guides of my spare engine that's in the car. My machinist said nothing about inserts with self-lubricating properties. Removing a cylinder head could possibly be the most difficult chore ever experienced if it has corrosion in the crevices around the studs. That can result in a cylinder head stuck so firmly it is nearly impossible to remove, and the early postwar engines have that problem frequently. If you have not had to face that, you are lucky indeed. | ||
Richard Treacy Grand Master Username: richard_treacy Post Number: 923 Registered: 4-2003 |
On head removal, I have read many a story on the difficulty in removing an early postwar cylinder head, but I just don't buy it. You hear of soaking the studs in WD40 for a week, special pullers, using pulley lifts, jacks, engine hoists, special lifting plates, filling the cylinders with oil and cranking the motor and the like: these are all the most ineffective techniques. All they do is bind the head on the studs if they are even the slightest bit off-square. These hit-and-miss brute-force methods are time consuming and can easily do all sorts of damage. It's time to explode the myth and to expose the "secret" so heavily guarded by the commercial practicioners. The surest way to lift the head in a few minutes is as follows: Leave the thermostat housing and inlet manifold (together with carburettor/s) attached. The manifold is a pain to remove anyhow, and is a darned good lifting handle. With a length of wood, lever gently between the thermostat housing and the water pump extension housing. The head will easily lift 1/4" at the front even on the most corroded head. Push it back down and repeat half a dozen times until the head is freeish. Now lift it as high as possible at the front without too much force on the wooden lever, and pack the centre with layers of cardboard between the head and the block/gasket. Push the front down so the rear lifts, pack the rear with cardboard and lift the front again. This may be repeated a few times if necessary, but at this point every MkVI/R-Type head I have removed has come off easily by rocking it fore and aft while lifting. It will slowly but surely come off gently-Bentley with no drama or damage. The last head I removed was a few weeks ago. Because it had only been on for two years and a mere 15,000 miles I didn't even need to use the cardboard spacers. I was expecting to find a burned exhaust valve and possibly reuse the gasket, so didn't want to squash the gasket, but the above pictures show that the gasket was the problem all along. RT. | ||
Bill Vatter Frequent User Username: bill_vatter Post Number: 18 Registered: 9-2004 |
Well Richard that's all well and good. Your statement is one of "I'll believe it when I see it," and obviously you've not seen it yet. | ||
Ashley James New User Username: ashley_james Post Number: 10 Registered: 2-2005 |
I'd say that Richard is about right, I've done a few and Mike Jones who has been breaking these things for years, has done a lot. Most come off much in the way that Richard describes but you do get the odd bad one - often with cars that have not been run for years and stored in the damp. I think people take these stories and run with them. | ||
Patrick Lockyer. Grand Master Username: pat_lockyer Post Number: 486 Registered: 9-2004 |
I have a gut feeling due to the discolouration around the part of gasket failing that infact the cylinder for some reason is running hot. Could it be the water transfer pipe at fault? Is there any pix of the 5/6 exhaust valves in the block for judgment. | ||
Richard Treacy Grand Master Username: richard_treacy Post Number: 927 Registered: 4-2003 |
Pat, Sorry, I took no pictures of the exhaust valves. Once the rot set in, the block may have been running a little hot from time to time, but all the exhaust valves were the same and looking perfect. The motor only ever reached a little over 80C which is very safe. Indeed, I took Norman's advice and checked the coolant gallery and end disc on rebuilding the motor and again this time. They are fine, presumably due to a healthy 40% pure glycol coolant. If there were overheating, it was very mild as the first place which usually goes is between 2-3 and 4-5 exhaust valves. This was not the case. I have always considered that the head gasket design for these motors is inadequate, especially having so little space at the hottest point between those valves: that is why I prefer to use the sturdy steel one from an S-Seies. Even then, the steel material is only slightly making up for the fundamentally poor design. With a good design, slightly poor materials or workmanship will have no adverse effect. Whereas I had only retightened the head on the Dawn three times after its initial test in the garage and initial retightening, always successful in the past, through painstaking and meticulous attention, Ashley James, in close consultation with Norman Geeson, seems to have avoided failure with the NZ gasket on his MkVI. Norman assures me that I was not at fault, but then he has developed special procedures to avoid this problem with the NZ gasket only. This is a typical example of the motto long-branded to Rolls-Royce that "workmanship can triumph over design". However, we always seem to achieve a good result in the end. |