| Author | Message | ||
John Beech Prolific User Username: jbeech Post Number: 259 Registered: 10-2016 |
Can anyone ID from which model RR these tools belong? They were included with Tootsie, but quite obviously are not a part of her original tool kit. Speaking of which, I have that one as well (it's fitted within two black plastic clamshell like pieces similar to those used when traveling for a soap bar and is rather less comprehensive than this one and slips into place above the battery cover). Anyway, the exterior of this tool kit assembly is gray, has a lock of the usual Yale keyed-type, and has a downward curve-shape on the left-side (just beyond where the box itself ends) as if to match another piece of trim. Anyway, it appears to be complete except for one wrench, which has gone missing (it wasn't until recently and worse, while it may turn up eventually, I fear it's been lost-lost to one of my new RR 'friends' whom have handled the tool-kit rather recently . . . heavy sigh). Last thing; one open-end wrench, the one to which a spark plug or points gauge has been riveted, is broken. And if anyone has any idea the value at which these may transact, I would appreciate the information because someone I know is keen to have it and as of yet, I have no way to judge its worth (a private message or email would be fine). 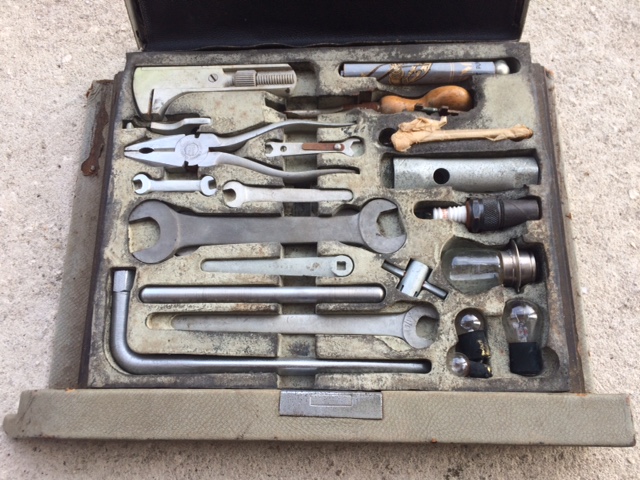 - Overall view of the tools in their enclosure 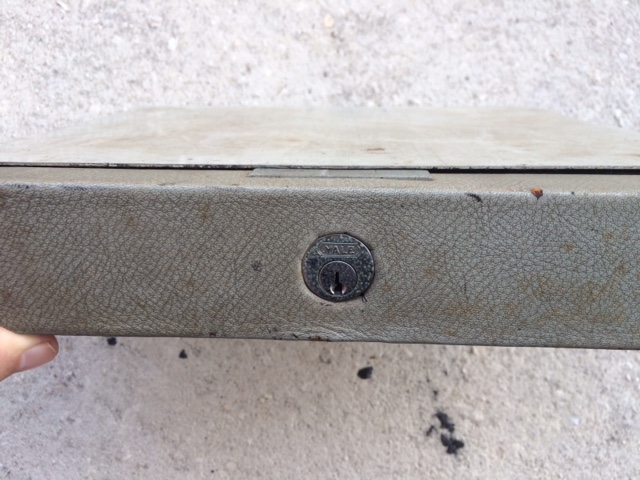 - Gray finish with Yale lock mechanism  - One wrench is broken (sorry for the blurry image) | ||
Graham Watson Experienced User Username: graham508 Post Number: 27 Registered: 3-2016 |
looks like MKVI or R type era to me based on the tools. | ||
Graham Watson Experienced User Username: graham508 Post Number: 28 Registered: 3-2016 |
If I recall there should be a Schrader valve body inside the tire pressure gauge, but I don't remember how to access it. | ||
michael vass Prolific User Username: mikebentleyturbo2 Post Number: 289 Registered: 7-2015 |
Hi John Can I hi-jack your thread? I was wondering what tools and spares to take on a long trip in my turbo r?(I don't have the original kit) I don't want to take all my tools just what I might need. Hoses belts? etc Cheers mike | ||
Mark Luft Experienced User Username: bentleyman1993 Post Number: 39 Registered: 10-2016 |
Mike, Northern Tools or Harbour Frieght have tool kits for around $60 US that would include just about everything you'd need for traveling. Throw in a multi meter and electrical bits, light bulbs, and of course a distributer drive belt and you should be good to go. Plus, just leave it in the car so you'd always have it with you. | ||
richard george yeaman Grand Master Username: richyrich Post Number: 717 Registered: 4-2012 |
John your so called friend thought he needed your spanner more than you, another lesson learned. Michael don't forget to take a couple of red triangles and a torch. Richard. | ||
Christian S. Hansen Grand Master Username: enquiring_mind Post Number: 551 Registered: 4-2015 |
John... There are now two people keen to have it, myself being the second, as the kit is missing from my Silver Dawn. It is awkward however as your other friend has dibs and I do not want to start a bidding war, so to speak, although we would both like it at a good price. I will PM you. Christian . | ||
Norman Geeson Unregistered guest Posted From: 81.97.73.87 |
John The kit originated from a Bentley R Type from about the U series onwards, or equivalent R-R models from October 1953 onwards. This kit fits under the drivers seat, not the dash board. From the image quality I cannot detect whether the tyre gauge or pliers are original. In UK, I guess the kit in that condition would be worth �350/�425. For more information see www.kda132.com....body...underseat tool tray. (Message approved by david_gore) | ||
John Beech Prolific User Username: jbeech Post Number: 263 Registered: 10-2016 |
OK, I have learned more about Silver Dawn/ R-type tool trays. Interestingly, the 1951 model on offer nearby is missing its tool tray as well. 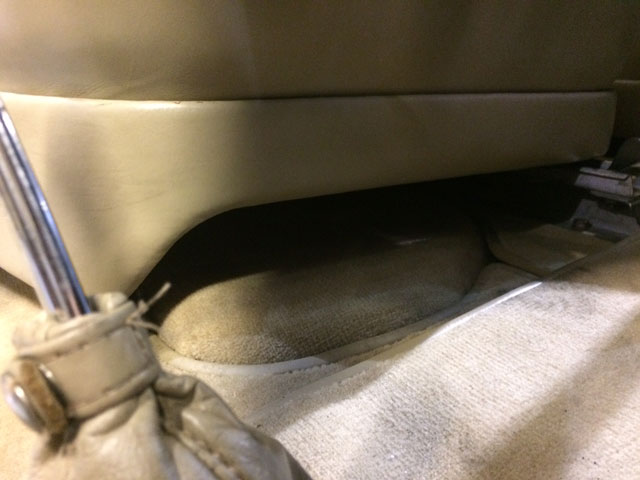 - Beneath the driver's seat of a 1951 Silver Dawn on offer locally - no tool tray, either! . . . I wonder why this happens? Most interesting is their apparent rarity (for example, when I mentioned their car didn't have the tool tray, the manager at Gateway Classic Cars inquired if I was interested in selling mine then took my name and number and asked me to send him a photo). Meanwhile, the tools for a Shadow are both relatively common and readily available (about �300). However, for the Silver Dawn, at present, there's only one on offer - details below. Meanwhile . . . 1. Flying Spares list them for �1500 ex-VAT: http://www.flyingspares.com/shop/rolls-royce-bentley-mkvi-r-type-dawn-wraith/tools-and-technical-literature/small-tools-in-tool-tray/complete-tool-tray-assembly-under-seat-rf9404u.html . . . however, as it turns out, this is vaporware because they don't actually have any stock. E.g. it's inquire and they're happy to add you to a waiting list. 2. Meanwhile, the most recent complete unit I can verify on offer and transacting was sold in CA in late 2014 for $2200. http://www.rollsroyceforums.com/forums/12-classifieds/2712-fs-silver-dawn-r-type-tool-kit-complete-foam-pad-tra.html . . . I contacted the seller via email and he called me on Sunday. It sold to the first caller and during the conversation the seller expressed a sense it may have been underpriced because of how easily it sold (buyer didn't negotiate, which may mean nothing). 3. Interestingly, there's one listed on eBay at present. http://www.ebay.com/itm/like/252629281893?lpid=82&chn=ps&ul_noapp=true . . . however, and most unfortunate, it's missing most of the tools. Anyway, the Buy It Now is USD$900 and there are 8 watchers. It will be interesting to see whether it sells, and for how much because only a very few replacement tools are available. So what are these things really worth? Difficult to say because they don't seem to come to market very often. While I suspect only a few owners care, some may care very much. Meanwhile, I'm toying with the notion of determining whether I can fit mine beneath one of Tootsie's seats (just for the novelty). Of course I'd fabricate a new enclosure instead of destroying the irreplaceable original because I'm not a Philistine. | ||
John Beech Prolific User Username: jbeech Post Number: 264 Registered: 10-2016 |
Oops, I forgot to address Norman. Since you asked, and while I'm not an expert, it's my opinion these tools are original. For example, someone asked about the tire gauge. Yes, it does have a tool in the butt-end for removing a Schrader valve. And it's wrapped in a very old sheet of instructions. Similarly, the feeler gauges are wrapped in oil paper. As for other tools . . . 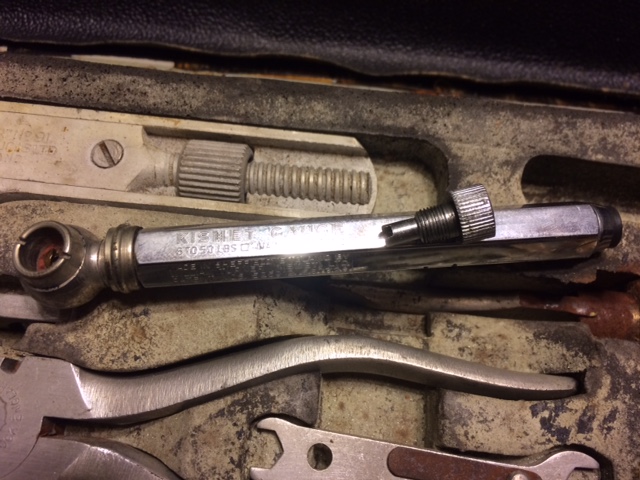 - Tire pressure gauge has tool for removing/reinstalling Schrader valves 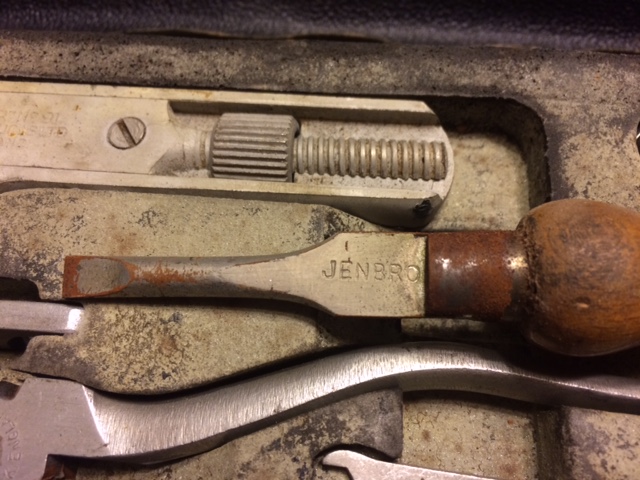 - Interestingly, the common screwdriver is marked JENBRO 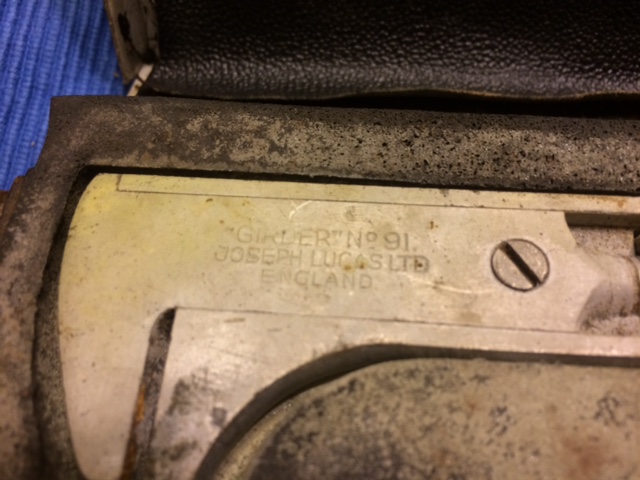 - The adjustable wrench is marked Joseph Lucas and Girder No 91 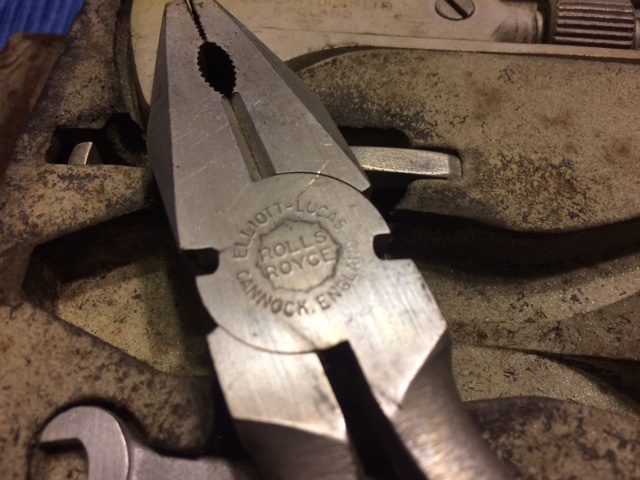 - Interestingly, the pliers are marked with both Elliott-Lucas and Rolls Royce. . . . and all the tools (as well as the bulbs) have a similar patina. This, leading me to judge they've been together a very long time. | ||
michael vass Prolific User Username: mikebentleyturbo2 Post Number: 290 Registered: 7-2015 |
Hi All Thanks for the travel tips. John I live in Cannock where the tools were made, Lucas long since gone. Mike | ||
Graham Watson Experienced User Username: graham508 Post Number: 30 Registered: 3-2016 |
John thanks for the great close ups. I believe that the tire pressure gauge had a spare valve body inside of it. Sadly B366NZ's tools are long since gone. I think people may have just used them as regular tools and they got dispersed over time. | ||
Patrick Ryan Grand Master Username: patrick_r Post Number: 1295 Registered: 4-2016 |
Great set of pics John, Good reference shots are hard to come by on the net. Usually just pics of items. Yours give great detail for someone looking for the right items. If anyone is interested I can post some close up pics of every tool in my fully original Shadow I kit for reference. | ||
David Gore Moderator Username: david_gore Post Number: 2490 Registered: 4-2003 |
Patrick, Please post the pictures - there will always someone who is interested or trying to identify/purchase a tool for their car. | ||
Patrick Ryan Grand Master Username: patrick_r Post Number: 1298 Registered: 4-2016 |
Will do on the weekend David. | ||
John Beech Prolific User Username: jbeech Post Number: 267 Registered: 10-2016 |
Well I'll be darned, Graham! I was curious about what you'd written so I fetched the kit and once again unscrewed the tip and lo and behold, after tapping the thing lightly on the palm of my hand a replacement Schrader valve dropped out. Frankly, I would have never guessed! By the way, the blue bit of paper wrapped around the Kismet pressure gauge are instructions for same - there's not a shadow of a doubt this is all original kit. Moreover, this is quite a thoughtfully designed tool. Are they still in business? They certainly deserve to be because beyond including a screw-in tool for removing tire valves (plus a hidy-hole for a spare), unlike run-of-the-mill gauges, this one features a hexagonal body, which precludes it easily rolling off a fender or hood (wing or bonnet) when you inadvertently set it down. Genius! 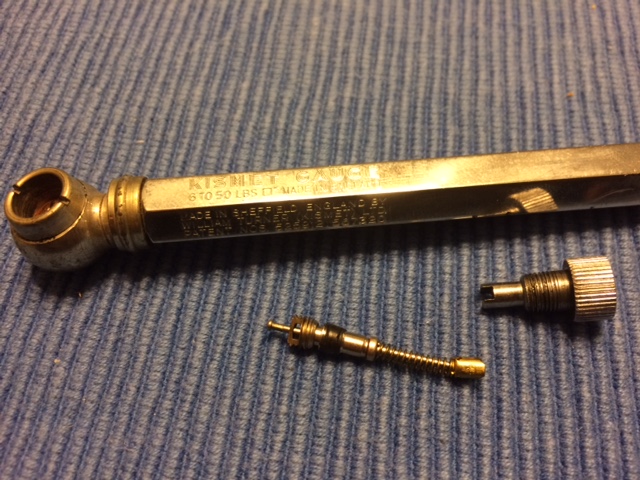 | ||
Patrick Ryan Grand Master Username: patrick_r Post Number: 1301 Registered: 4-2016 |
Good find and a great post John. | ||
Norman Geeson Unregistered guest Posted From: 81.97.73.87 |
John The local 1951 Dawn you mentioned would not have had an unseat tool tray, that kit would have been under the glove box. It is not obvious from your initial image whether you have both tappet spanners, or only one. I suspect the screw driver may not be original. (Message approved by david_gore) | ||
John Beech Prolific User Username: jbeech Post Number: 271 Registered: 10-2016 |
Hi Norman, Via email Christian pointed out the photo showing the under-dash tool tray of the nearby automobile. Meanwhile I have no clue which of the tools are tappet spanners, a diagram would be most helpful. Anyway, counting from the bottom, the second slot has a single-end wrench (with a smooth handle), which is missing a companion. Meanwhile, I'm trying to learn the size of the missing wrench (the existing wrench fits perfectly in either upper or lower slots leading me to wonder if they're the same size). This wrench only recently went missing (when several new RR-oriented 'friends' paid me a visit). Heavy sigh. -- John, who has derived great pleasure from this discovery process. | ||
Patrick Ryan Grand Master Username: patrick_r Post Number: 1304 Registered: 4-2016 |
John, The most distressing thing for me here is that those "new" RR orientated friends possibly did this. I certainly hope they are not friends any longer. | ||
John Beech Prolific User Username: jbeech Post Number: 272 Registered: 10-2016 |
Agreed, but the more serious issue is discovering which one of several visitors is culpable. I won't ever discover this. To say I feel betrayed is an understatement. | ||
Norman Geeson Unregistered guest Posted From: 81.97.73.87 |
Attention David Gore David can you send me your e-mail address. I have a sketch of the tappet spanners (thread "Tools")that I would like you to put up for me to John Beeches enquiry (Message approved by david_gore) | ||
David Gore Moderator Username: david_gore Post Number: 2499 Registered: 4-2003 |
Hi Norman, I will be very happy to help, my address [including added junk to confuse nasties that trawl forums like ours for addresses that can be added to SPAM mailing lists] is as below, just delete the obvious alphabetical garbage in Caps and the brackets only leaving the chassis number and address in lower case for the true address in the usual format: drh14434RRFORUMADDRESSAT[@]yahoo.com.au * | ||
Robert Noel Reddington Grand Master Username: bob_uk Post Number: 1361 Registered: 5-2015 |
My car has a complete original tool kit except screw driver. What does a 1974 SS1 driver look like? | ||
Patrick Ryan Grand Master Username: patrick_r Post Number: 1312 Registered: 4-2016 |
Hi Robert, I am in the process of photographing the tools in detail now, Will post in a day or so mate. But here is the tools in the kit. Remembering that my kit is from 72. I do understand that the 74 model, has the globes in a different area. Graeme Soderland, may be able to help with a pic of his tool kit from his 74 model.  The handle of the screwdriver has three bits inside. The bits are marked Lucas. | ||
Robert Noel Reddington Grand Master Username: bob_uk Post Number: 1362 Registered: 5-2015 |
Thank you Mr Ryan Sir. I await the photos. From your photos I may have a screw driver that looks like the one in your photos. | ||
Patrick Ryan Grand Master Username: patrick_r Post Number: 1315 Registered: 4-2016 |
Sorry Robert, The screwdriver and bits are marked Stanley. Pics to follow in the morning. | ||
Patrick Lockyer. Grand Master Username: pat_lockyer Post Number: 1195 Registered: 9-2004 |
Patrick R well done bringing this topic up thought I would look at my tool kit, it is all complete but it is showing some damp signs. One bulb has gone a sort of dark colour. 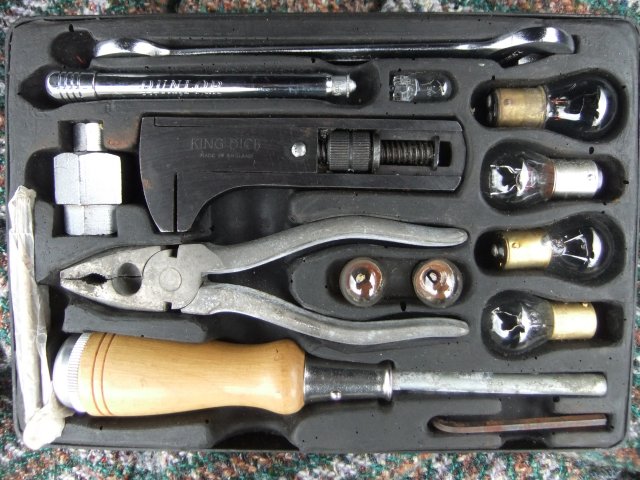 Talking tools I found this Plague for a Bentley off an old car years ago and this really old volt meter, test wire coiled up inside, anyone know the make? 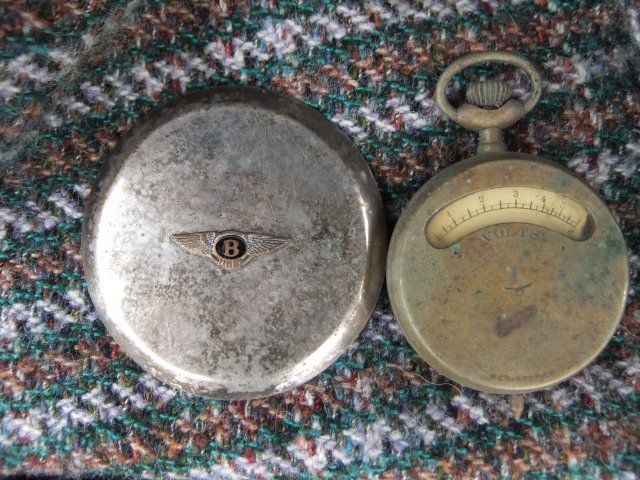 | ||
Patrick Ryan Grand Master Username: patrick_r Post Number: 1319 Registered: 4-2016 |
Images of tools as promised. 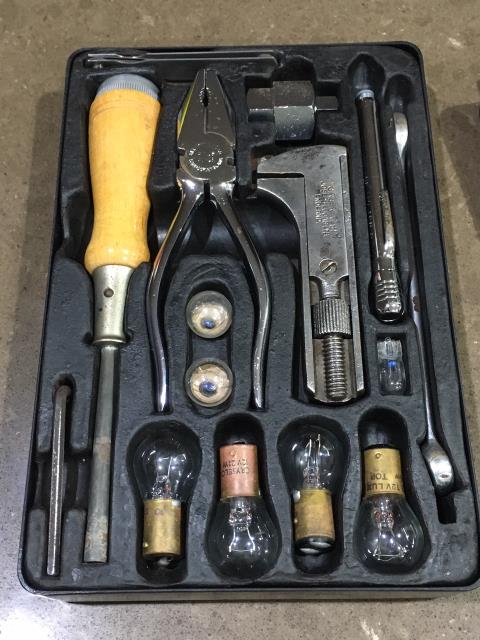 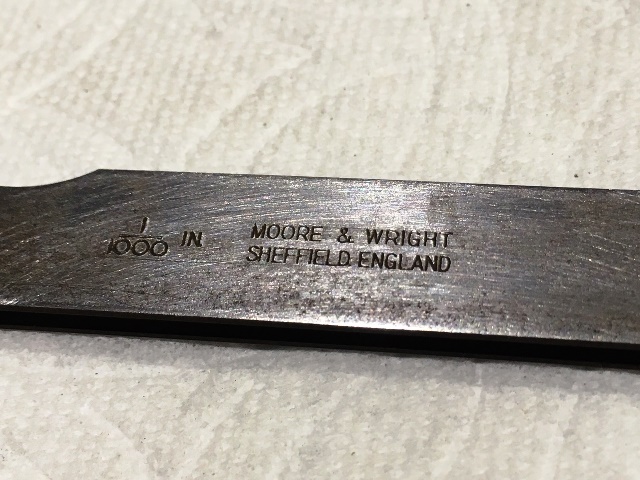 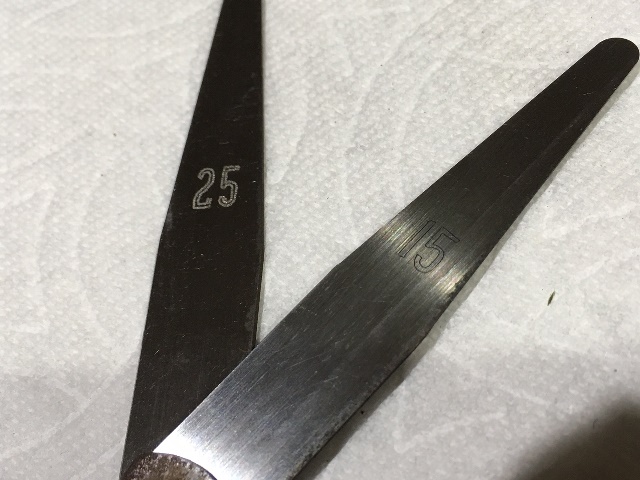  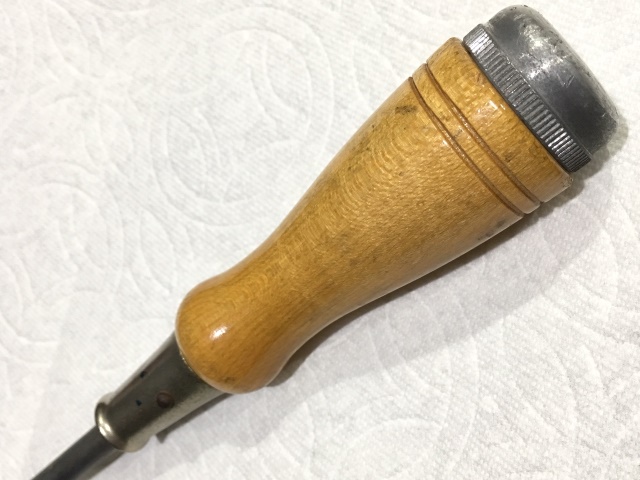 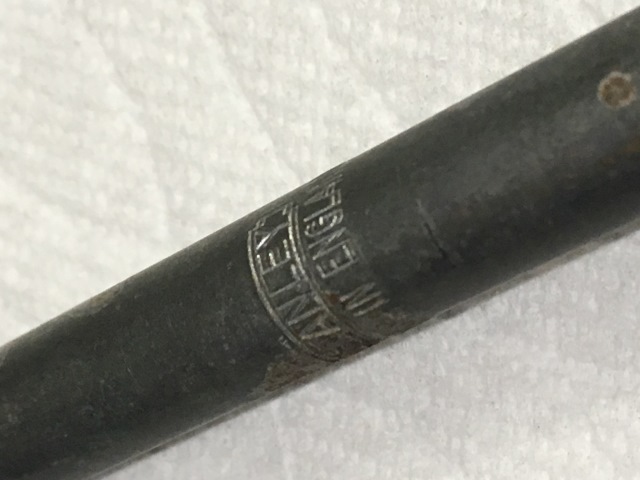 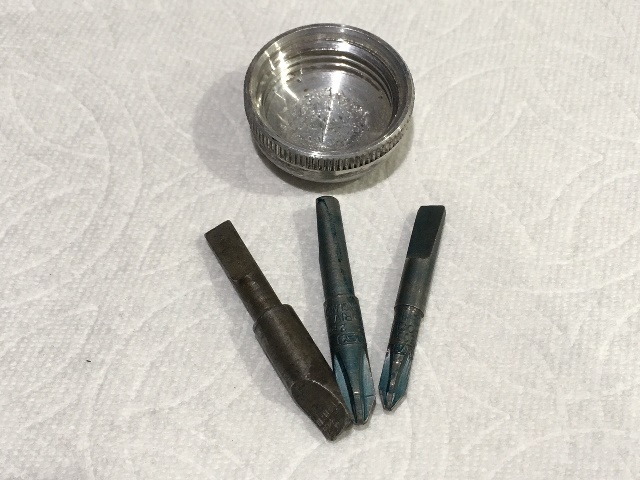  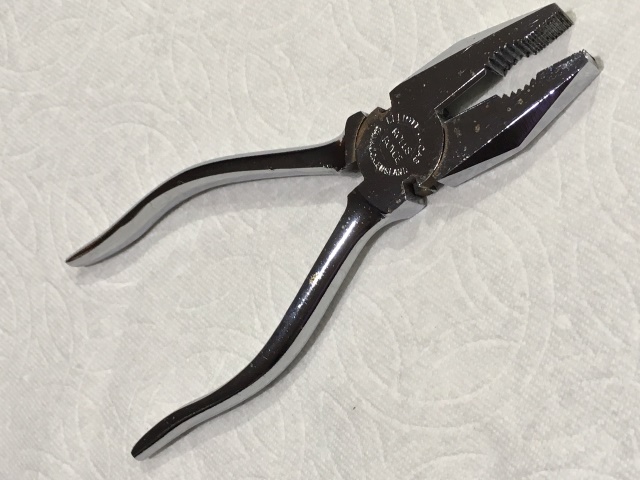 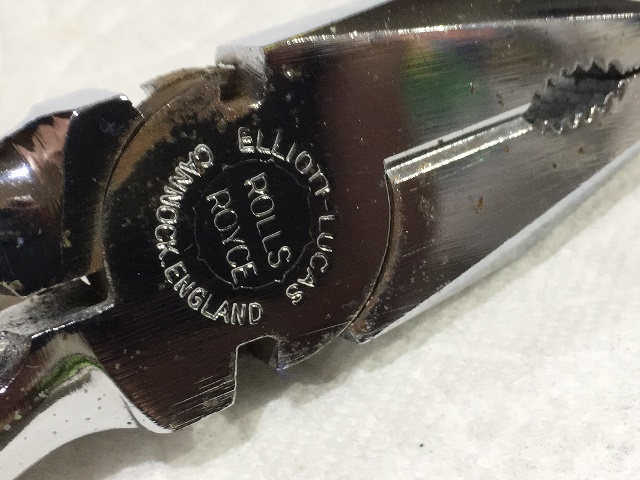   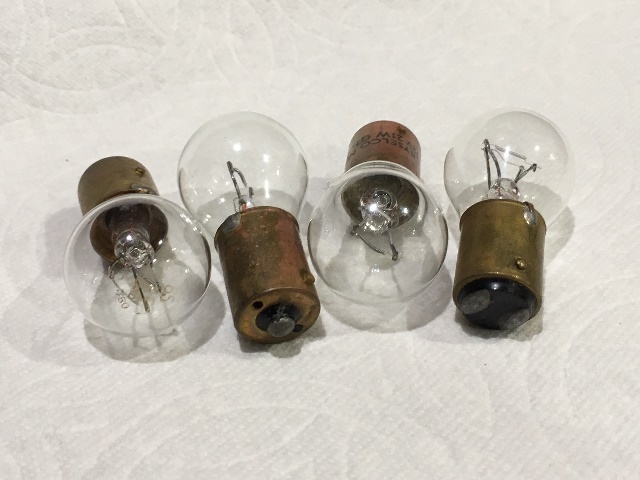 This item I am sure is not original to my kit, due to its condition. I will need to find a better one  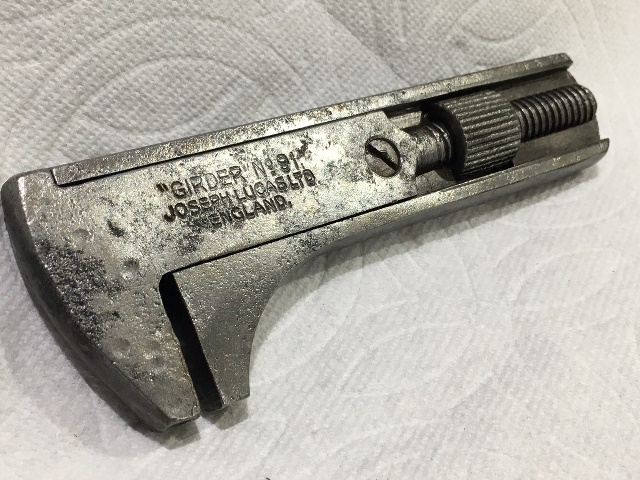 I forgot to photograph the tyre pressure gauge. It is branded Dunlop, and is made in England. It does have the valve tool that screws out of the top of the gauge tube. All taken on my mobile phone. Please PM me if any of you would like tips for taking pics, and uploading to this forum. | ||
Robert Noel Reddington Grand Master Username: bob_uk Post Number: 1364 Registered: 5-2015 |
Thanks for the photos. the screw driver I thought looked like the original is not right but I shall check out my collection of tools for a suitable driver. | ||
John Beech Prolific User Username: jbeech Post Number: 284 Registered: 10-2016 |
This thread has been fantastic! Patrick, since Tootsie's tool kit has what appears to be the exact same screwdriver, rather than laboring to reinvent the wheel, what if RR simply selected components for these kits from amongst best of breed tool-manufacturers? Meanwhile, I cannot confirm my screwdriver is marked Stanley because it's stuck to the foam. Rather than getting in a hurry (and putting the foam insert at risk of tearing), I'm going to investigate which solvent has the best chance of releasing it without damaging the foam (or the finish on the wood handle). I'm thinking ordinary mineral spirits may do the trick, but I'll first try dabbing a little bit somewhere inconspicuous with a cotton swab. Especially because something aggressive risks melting the foam (or dissolving the finish on the handle). That said, I rather suspect the wood finish to be an ordinary spar-varnish, or possible shellac. Gasoline may also work since RR might reasonably expect a road-side mechanic to have this available for tool clean-up. Anyway, first I'll try universal solvent (water), before trying other things.  - Tool kit for 1969 Silver Shadow Meanwhile, Tootsie's tool kit is incomplete. Missing are the wrench that fits in the upper pocket (of my photo), a large bulb, plus perhaps some wheat bulbs (small pocket between large bulb, tire gauge, and missing wrench). Do you have details for these? Photos would be nice. | ||
Patrick Lockyer. Grand Master Username: pat_lockyer Post Number: 1204 Registered: 9-2004 |
Thanks to Patrick I have two complete sets for both cars and one spare incomplete, this was the first pix. Both sets seem to be the same apart from a chrome Allen key! The wrench's are both stamped German made OK. 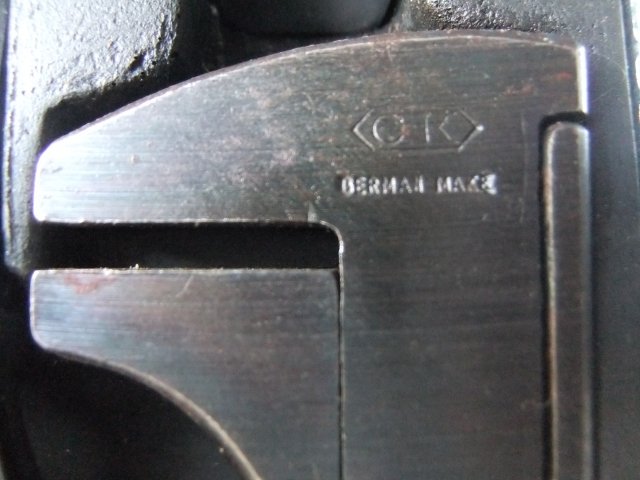 John The spanner that you are missing is 1/2" 9/16" AF made by Britool no 2j5056. Picture of both complete tool kits. 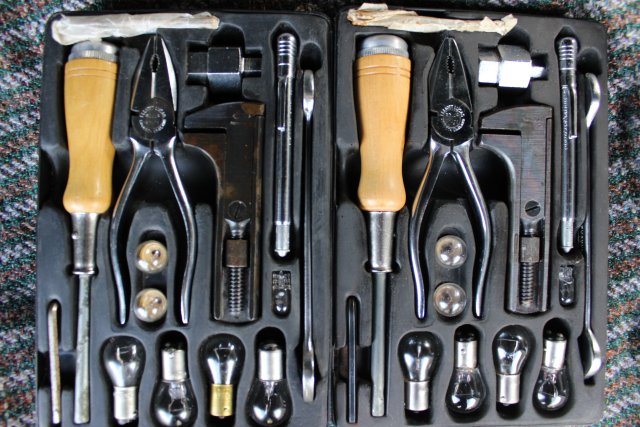 | ||
Patrick Lockyer. Grand Master Username: pat_lockyer Post Number: 1206 Registered: 9-2004 |
John pix of spanner. 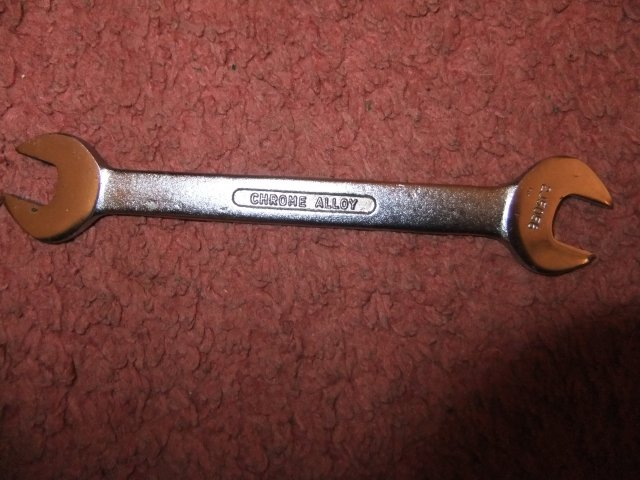 | ||
Patrick Ryan Grand Master Username: patrick_r Post Number: 1323 Registered: 4-2016 |
Good pics guys, John. I used WD40 in my tool tray as the screw driver and feeler gauges were stuck. Cant go wrong with that. I wouldn't be using any solvent or spirit near the foam or the lacquered handle of the screwdriver. The below pic shows the globes John. 2 x 12V straight bayonet, single contact for the 2 x front parkers, and 2 x rear parkers. 1 x 5V capless globe (that's what we call them here) it fits the 4 x side markers, and the 4 x red door lights (puddle lights are what the rears are called) 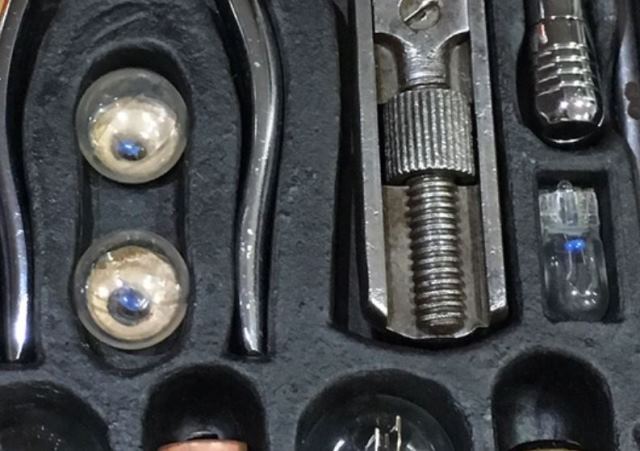 The below pic shows what I believe is the correct spanner made for the tool kit. As you can see it is a combination spanner (box + open) the angle of the ring end, fits perfectly into the angled moulding in the foam. It is a Britool 1/2 made in England.  I have seen many images of Shadow I tool kits, with this combination spanner fitted. What it is meant to fit on the car, I am not sure. Out of interest. The sump plug/diff plug opener is also marked Britool. | ||
Patrick Lockyer. Grand Master Username: pat_lockyer Post Number: 1207 Registered: 9-2004 |
John disregard the spanner picture it is not the type for your car. It seems the spanner needed on your model car is listed as a 5/16" UNF open end/ring spanner. So many changes over the years with models. The wrench is different as no capless bulb fitted in your kit maybe. Your kit should look like this maybe. 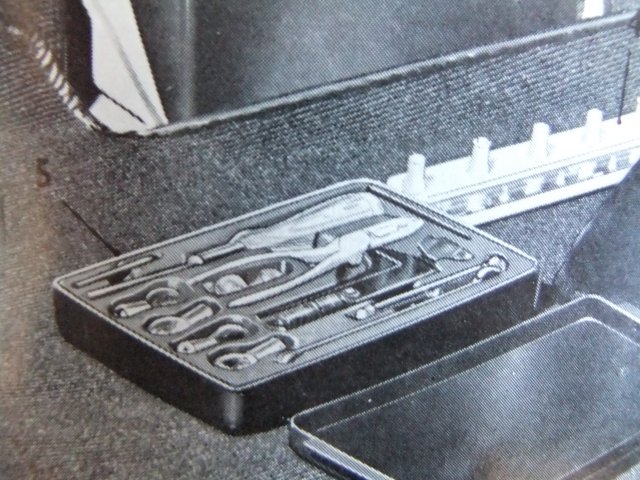 | ||
Patrick Ryan Grand Master Username: patrick_r Post Number: 1326 Registered: 4-2016 |
Patrick, That's a great picture. What does the full size pic of the boot look like? I also notice there is numbers and arrows. | ||
Patrick Ryan Grand Master Username: patrick_r Post Number: 1327 Registered: 4-2016 |
I'm very interested to know what number 4 is. | ||
Patrick Lockyer. Grand Master Username: pat_lockyer Post Number: 1209 Registered: 9-2004 |
Patrick, number four is for the battery filler trough. This set up is not for your car, this was the first series. The capless bulb for the side repeaters was not in this kit. They included the capless bulb in 68/9 maybe. The Combination spanner was also listed. The change to the open end spanner may of been 1973/4 Also the wrench it seems was maybe king Dick or what you have in your tool kit. This may have changed to the German one at the same time. My SS1 is early 74. the SS2 is 77 both kits are the same now! This is a mine field bet you could have some fun with the judges.  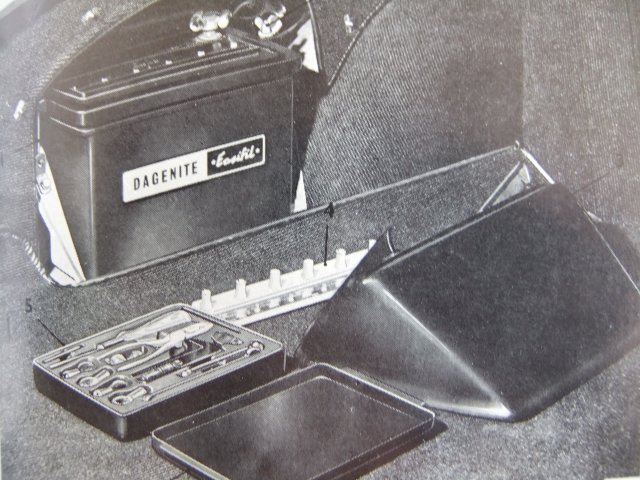 | ||
Patrick Ryan Grand Master Username: patrick_r Post Number: 1329 Registered: 4-2016 |
Thanks Patrick, Much appreciated. What publication are the pics from? | ||
Robert Noel Reddington Grand Master Username: bob_uk Post Number: 1367 Registered: 5-2015 |
My car SRH 17768 1974 has a combo 1/2 britool spanner. | ||
Patrick Lockyer. Grand Master Username: pat_lockyer Post Number: 1210 Registered: 9-2004 |
From Car serial SRH 17518 states the following: 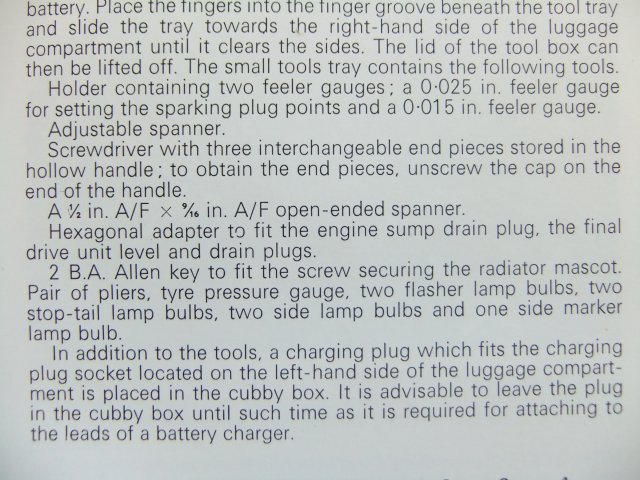 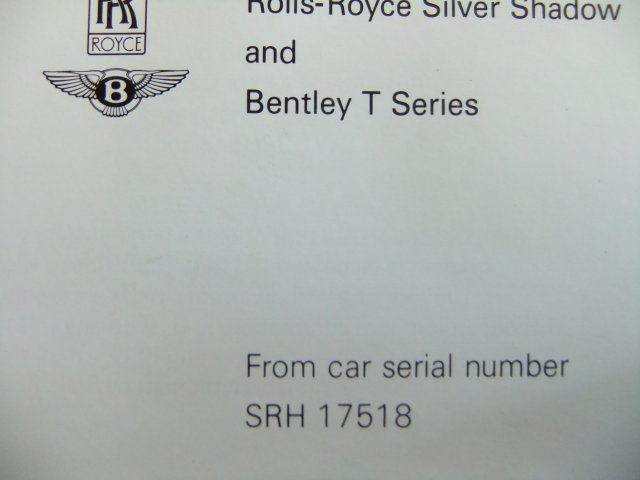 This is in the 1975 instruction book. | ||
Patrick Ryan Grand Master Username: patrick_r Post Number: 1333 Registered: 4-2016 |
Thanks Patrick, Great information. | ||
John Beech Prolific User Username: jbeech Post Number: 293 Registered: 10-2016 |
Is the charging plug the thing to the left of the King Dick tool? How does this thing work? | ||
Patrick Lockyer. Grand Master Username: pat_lockyer Post Number: 1216 Registered: 9-2004 |
To the right in the pix is the sump drain plug adaptor. The charging plug is in the tray but cannot be seen in the pix. Will show you how it works later. High on thinners, no pain without gain but wow I have no pain! | ||
Patrick Lockyer. Grand Master Username: pat_lockyer Post Number: 1220 Registered: 9-2004 |
John my plug was in the tool tray below the plier's but in most cases if not wired up it left in the socket.  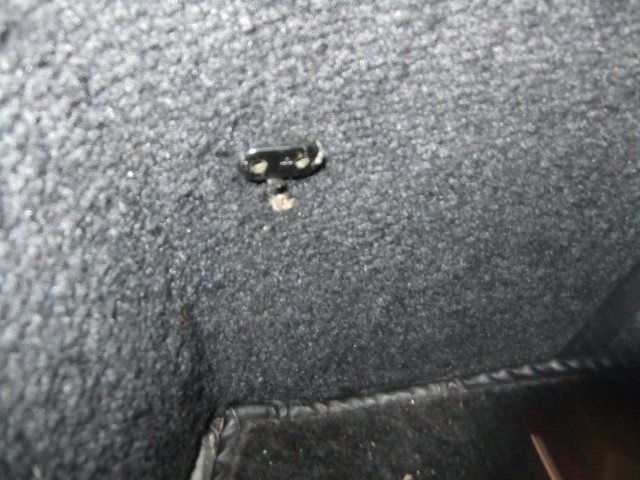 If wired for charging then remove after use to avoid a short circuit. The pix is of a smart charger, good bit of kit cheap as chips direct from China sorted out some batteries and more.  | ||
Graham Watson Experienced User Username: graham508 Post Number: 34 Registered: 3-2016 |
What a great thread, Seems like some of the data should be captured and put in the technical library. | ||
John Kilkenny Prolific User Username: john_kilkenny Post Number: 261 Registered: 6-2005 |
Here is a page from the Handbook for SRH1405, a 1966 Shadow 1 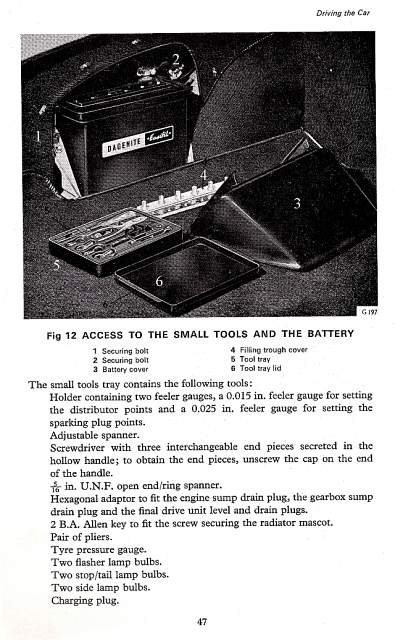 | ||
Christian S. Hansen Grand Master Username: enquiring_mind Post Number: 567 Registered: 4-2015 |
I find it odd that item #4 "filling trough cover" should be listed separately. Am I correct that this is the "lid" of the battery that allows access to the cells for purposes of adding water to the electrolyte, or is it something else? If the former, I would be very hesitant to treat it with the careless abandon as illustrated, that is, simply leaving it upside down on the boot carpet where the corrosive battery acid can get onto the carpet and cause damage. At the very least, I would put it on a piece of disposable paper, if not completely out of the boot area, during the topping up or electrolyte level checking procedure. Am I missing something here? My own anectdotal experience is that the presence of battery acid needs to be treated with the highest regard for caution as it just seems to "jump" out and get onto, and thus ruining, things. I am so paranoid about the stuff I wear old work clothes if I have to even touch a battery and wash them thereafter in order to avoid the mysterious "holes" that otherwise tend to appear on fabrics many days after the fact. . | ||
Patrick Lockyer. Grand Master Username: pat_lockyer Post Number: 1222 Registered: 9-2004 |
The first series of cars instruction books did not have the charging plug showing. What about the cars socket. 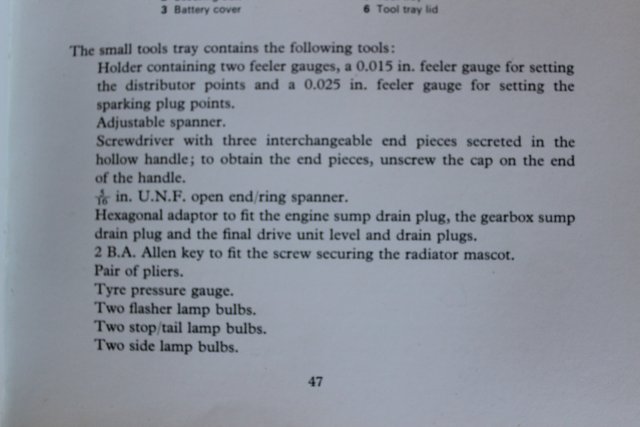 | ||
Patrick Lockyer. Grand Master Username: pat_lockyer Post Number: 1223 Registered: 9-2004 |
The illustration IMO is from the first series of cars made, the Dagenite batteries were shipped dry charged and filled with diluted acid when needed they had plastic balls that rose up when full. The cover new would not have acid contamination on untill filled. IMO this would have been carried out after the photo sessions finished. | ||
Robert Noel Reddington Grand Master Username: bob_uk Post Number: 1371 Registered: 5-2015 |
This type of battery is I believe unavailable. It was a design that solved a problem that didn't really exist. | ||
Christian S. Hansen Grand Master Username: enquiring_mind Post Number: 569 Registered: 4-2015 |
To which "problem" do you refer? | ||
Christian S. Hansen Grand Master Username: enquiring_mind Post Number: 570 Registered: 4-2015 |
I am also amused that in the illustration the "battery" is not identified while everything else is, which leaves those of us who are a bit slow on the uptake wondering "so...where's the battery that has been alluded to?". LOL . | ||
Patrick Lockyer. Grand Master Username: pat_lockyer Post Number: 1225 Registered: 9-2004 |
The vanguard is under the cover with instructions! | ||
David Gore Moderator Username: david_gore Post Number: 2515 Registered: 4-2003 |
Norman Geeson, our long-time occasional contributor of essential R-R maintenance information especially on the earlier models has asked me to post the following information and drawing on his behalf: "John Sorry for the late reply but I have been sorting out some health issues. The attached sketch of the head end of both tappet spanners will show you the relevant sizes that you are seeking. Both spanners are 6 inches long from point �A� on the images to the end of each wrench. You will see that the head diameter of the 0.312 inch spanner at 1.125 inch is slightly smaller than the head of the 0.250 inch spanner at 0.950 inch. There were a number of modifications over their service life. Originally the head end was 0.125+25 inch thick but later the head of the 0.250 inch spanner only was increased to 0.170 +15. Working from MKVI through to R Types.....In respect of markings they were originally marked with their part numbers and finished in gun blue, then the part number was deleted and replaced with the mark �Use on tappet adjustment only� finished in Cadmium plate. When the head thickness of the smaller spanner was increased the marking �Use on tappet adjustment only� was deleted, finish still in Cadmium plate. R-R had these spanners produced by Terry�s and they were also produced in Dull Nickel Finish for commercials and some R-R car chassis spanners were produced with two versions of Terry�s name marked on the sides. I have no doubt that there are a number of versions of markings that I have not caught." 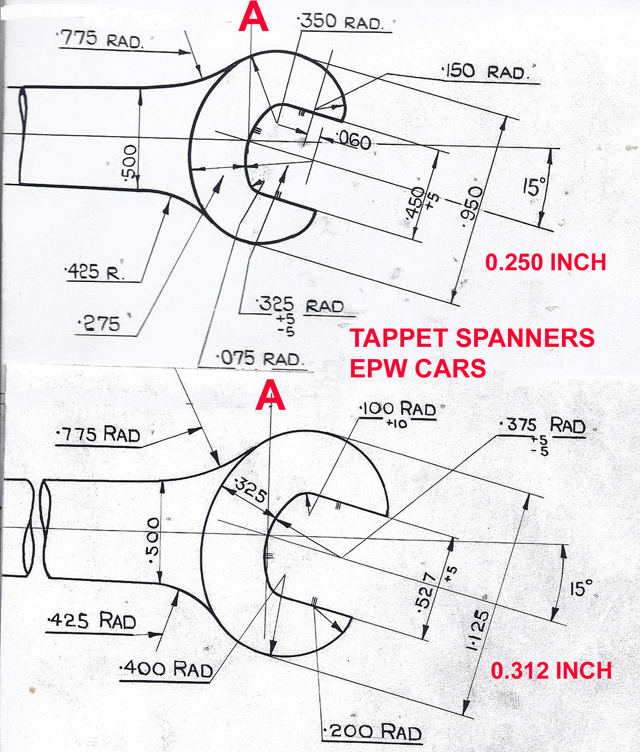 * | ||
Graham Watson Experienced User Username: graham508 Post Number: 35 Registered: 3-2016 |
Norman never ceases to amaze! | ||
ross kowalski Grand Master Username: cdfpw Post Number: 406 Registered: 11-2015 |
So, I was in the trunk of the RR and spoted the original Dagenite sticker from the battery cover at the bottom of the toolbox. 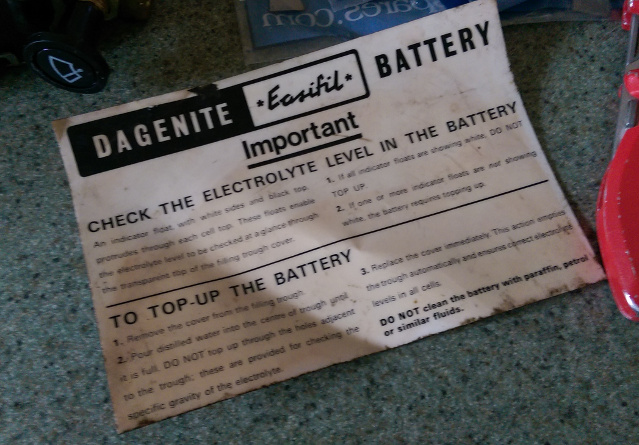 I really don't have any intrest in it. I'll scan it tomorrow at work, then if anyone want's it I can mail it out. | ||
John Beech Grand Master Username: jbeech Post Number: 374 Registered: 10-2016 |
David, please thank Norman for sharing this tool-drawing. Fantastic! | ||
David Gore Moderator Username: david_gore Post Number: 2550 Registered: 4-2003 |
John, I thanked Norman privately when he emailed the drawing to me for posting on our forum. Norman is a true gentleman in every sense and is always ready to share his extensive knowledge and experience when the opportunity arises. His philosophy matches that of our other contributors who also share their knowledge and experience freely and without reservation. Our forum would not be what it is today without the contributions of our participating members. | ||
ross kowalski Grand Master Username: cdfpw Post Number: 425 Registered: 11-2015 |
John, Sticker mailed. Now to find a OEM battery to match. | ||
Kelly Opfar Prolific User Username: kelly_opfar Post Number: 186 Registered: 7-2004 |
I had forgotten what this "Tools" topic referred to so I reread it and saw Ross's Dagenite sticker. I remember finding it interesting at the time because I love that kind of stuff. Since then, I bought a parts car and it had this same sticker - barely hanging on to the upper battery box. 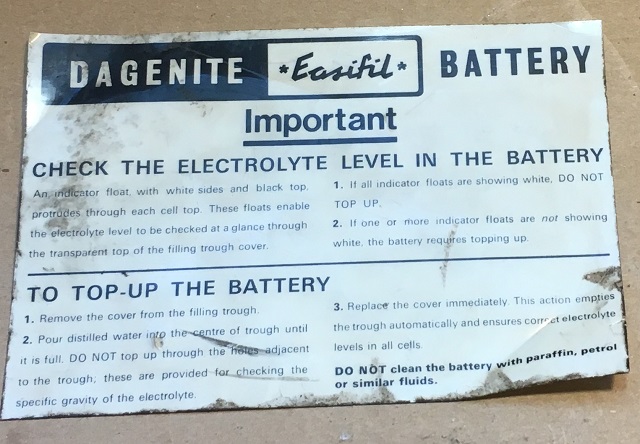 I took it to a local printing place and had it scanned and reproduced on high gloss vinyl sticker stock, just as the original. I had 50 of them made - which was 38� more than having one made. 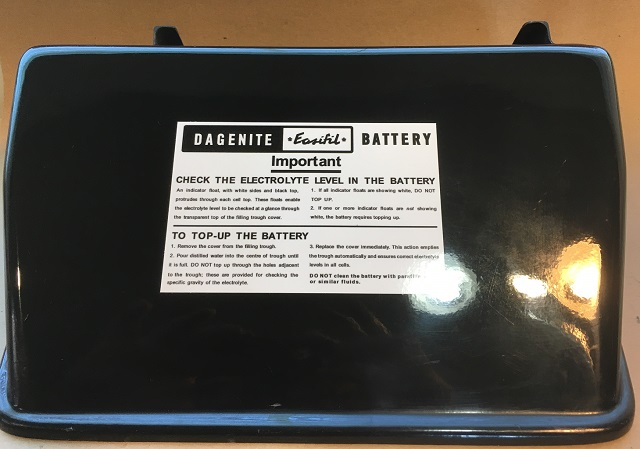 If anyone else is as nutty as me - and God help you if you are - placing this sticker on your battery box will be the most satisfying 13 seconds of your life. Kelly BritishToolWorks.com | ||
Patrick Ryan Grand Master Username: patrick_r Post Number: 1719 Registered: 4-2016 |
Ahhhhhhhhhhhhhhhhhhhhhhhhhhhhhhhhhhhhhhhhhhh!!!!!!!! I feel the satisfaction Kelly. | ||
felipe heuser New User Username: felipe Post Number: 9 Registered: 7-2017 |
Hello and very informative indeed... The tool kits with the one capless globe for side marker only for the US market as European were without these lamps? Mine has no insert for this bulb. Combination spanner can be a Gedore or only above mentioned brands? I've never seen a charging plug in any SS tool kit...any pics showing one? And lastly my pliers has no name but fits perfectly and identical to pics shown. Thanks |