| Author | Message | ||
Brian Vogel Prolific User Username: guyslp Post Number: 164 Registered: 6-2009 |
Hello All, Since this really isn't model specific I thought the miscellaneous section was the best place to ask this question. The latest bit of what is becoming my endless saga with SRH33576 is the need to put a bubble flare on the end of an existing line in situ. The problem I have encountered is that the line is just every so slightly "off straight" such that I can't slip the line nut on to the line and get it slid out of the way before flaring. Does anyone have some handy tips/tricks for straightening Bundy tubing, particularly taking out very slight off-straight bends near to the end of the tube? Thanks in advance for the insights of the cohort. Brian P.S. Any opinions on "the best tool" or "the best technique" for making a bubble flare in a relatively constrained space would be appreciated, too. | ||
David Gore Moderator Username: david_gore Post Number: 1170 Registered: 4-2003 |
Hi Brian, do you intend doing the straightening on-car or off-car? The best way to straighten distorted tube [and rod for that matter] is to fix one end and gently stretch the item from the other end [stretcher levelling] until the distortion straightens out. You usually "creep-up" on the necessary tension required to minimise damage by the grips holding the tube/pipe. If you are making new pipes from coiled bulk pipe, just cut the lengths longer than needed allowing for the type of clamps being used and trim to length afterwards. Lathe collets are ideal for gripping the tube as they tighten their grip as the stress applied increases. A screw jack or even a turnbuckle will provide gradual and controllable stress for stretching purposes. I would not use a hydraulic jack or cylinder as these do not have the "feel" of the mechanical screw. I would only use double flares on hydraulic system tube as these flares are stronger and less prone to leaks due to distortion when nipping up. I purchased a compact double flaring tool when I replaced the tubes on DRH14434 however I cannot find any reference to it in the current Blackwoods catalogue. The tool shown on the link below might be a suitable alternative: http://www.denlorstools.com/home/dt1/page_54326/calvan_tools_164_sae__in_line_flaring_tool_set.html | ||
Brian Vogel Prolific User Username: guyslp Post Number: 165 Registered: 6-2009 |
David, This straightening would be done on-car and for just the slightest bit of distortion. I'm thinking about using the collet of my bubble flaring tool, sans the forcing screw and former, to try to "squeeze it straight." I am using bubble flares since that's what's on all Rolls-Royce has used on its connections on every car I've worked on (or seen). I have the Kent-Moore ISO/DIN/Bubble Flaring Tool J-29803 (shown on eBay here, sans its deburring/chamfering tool). One of the alternates I am considering is the very tool you've shown, but in their bubble flaring version. There is a difference in how the underside of the flares produced by a double flaring tool and bubble flaring tool turn out. On a true bubble flare there is no bevel at all beneath the flare - it's flat. Though many use a partially formed double flare in place of a bubble flare these are prone to leaking if you have actual bubble flare nuts (which I do and which are "standard issue" on cars from Crewe at least for the SY and SZ series). If replacing the entire line were not such a nightmare, which I discovered when I started to get into that, I would simply have done that. It is so hellishly difficult to get at the piping where it enters a 4x2 way connector block behind the wheel well on the right side I decided it would be easier to re-flare the opposite end of the line in-situ and use an inline "splice" union connector (not a compression fitting, though the thought crossed my mind more than once since this saga started) than to try to get the darn thing out. Brian, who will still probably need to do a bit of tube straightening even if I get a second flaring tool | ||
David Gore Moderator Username: david_gore Post Number: 1171 Registered: 4-2003 |
Hi Brian, OK, the next best alternative is to use tube bending springs in reverse to straighten the tube, however, in this case it will not be practical as the spring I.D. has to be large enough to slip over the flare. Now to turn to "Heath Robinson" [a.k.a. "Rube Goldberg" in the USA] for inspiration; get a suitable length of steel angle and a couple of washers or similar to act as supports on either side of the bend. slide the angle behind the tube and rotate it such that the bend stands proud of one internal face of the angle and insert sufficient spacers at each end of the tube to lift the ends up from the face of the angle a distance equivalent to the height of the bend in the tube [this is to allow for the necessary "over bending" of the tube for straightening]. Use 3 "G" clamps; one at each end to lock the device + tube in position and the 3rd at the centre of the bend to push down for the actual straightening. A short "Vee" block under the face of the clamp screw should distribute the load to minimise any localised kinking. You might have to release and reapply one of the end clamps from time to time to compensate for the increase in the length of the tube as the bend straightens out. For the benefit of those who are not aware of the difference between a bubble and double flare; a bubble flare is used for a concave seat and a double flare is used for a convex seat. I speculate that many of the reported leaks have been due to the act that the female connector profile was not verified before the tube was flared and a convex/convex or concave/concave union resulted despite the compression involved when tightened. See following link for a graphic illustration of the shape of the flares and the procedure for making them with a double flaring tool: http://mgaguru.com/mgtech/hydraulics/ht120.htm Been there, done that with the connector assembly in the RHS wheel arch cavity. I found the only way I could undo, replace and reconnect this assembly was a little bit at a time and if I couldn't make headway, I would stop and have a couple of hours break before coming back to try again. Whilst the access is indescribably lousy, the main problem I had was avoiding cross-threading the fittings in reassembly due to inadvertent bending of the lines during disassembly and the lack of a jig to check their profile before installation necessitating realignment in situ to get the correct orientation between the pipe fitting and connector block. I recall this particular part of the job took more than two days of actual work before it was completed successfully whilst on a very steep learning curve. David, who knows exactly what you are going through especially if you do not have a hoist and the car is on stands.......... | ||
Brian Vogel Prolific User Username: guyslp Post Number: 166 Registered: 6-2009 |
David, I'm glad (well, not glad, really, but you know what I mean) that someone who's reading has actually gone through the sort of hell I'll face if I can't pull off this flaring in place exercise. I really can't stand the thought of it since I am using jack stands and the car is in a carport and winter is upon us in the northern hemisphere. Now, for dualing flare identification, with photos, I give you Fedhill Flare Identification Chart. I've been making DIN/ISO bubbles and using the correct 3/8-24 line nuts without lead threads. Looking at their photos it seems that a true, old-style bubble flare is somewhat similar to a incompletely formed 45-degree SAE double flare, but with less angling under the bubble itself. I'll have to check out the actual flare on the new PTFE-core high pressure hose I have that is not yet installed. I don't know if they used an incompletely formed double flare, but with the correct double flare line nut without lead threads or if it's an ISO/DIN flare with the correct nut for that style. Someone on the RROC-US forums offered this advice, which appears as though it will be sufficient for the precise situation I find myself in: Slip the line (tube) nut on as far as it will go, thread a 3/8 x 24 nut onto it. Grab the nut with a box end wrench and carefully bend the fitting back and forth as little as possible with the wrench while pushing and turning. You will need to hold your thumb tightly on the line right below the fitting on the side to which it needs to bend to become straight. Alternatively grab the nut with vise grips. I've done this many times to get tight tube nuts on or over slight bends. However, if this doesn't work or I find myself in a situation where greater straightening is required, your method is now "on file" as well. Thanks very much for taking the time to post with this much detail (and empathy). Brian | ||
David Gore Moderator Username: david_gore Post Number: 1172 Registered: 4-2003 |
Hi Brian, after my experience trying to hand bend the tubing in-situ to line up with the fittings; the force required for successful bending requires maximum leverage which may be greater than this set-up is capable of achieving. There is also a possibility that, instead of straightening the tube, you could end up with a kink from stress loading being concentrated at the end of the fitting and not distributed uniformly along the length of the tube. For what it is worth, when I was involved in high-pressure hydraulics on construction and mining equipment, it was virtually standard practice to make bubble and double flares using the ordinary double flaring tool. The most important part of the exercise was to check the profile of the opposite fitting before making the flare to ensure a convex/concave match. Remember the more trouble you have in the beginning, the better the outcome!!!!!! | ||
Brian Vogel Prolific User Username: guyslp Post Number: 192 Registered: 6-2009 |
Well, if Mr. Gore's last statement holds true then I should be coming into my millions and be able to retire to a life of leisure very soon. I still have not managed to get a line nut on to the segment of line I need to flare far enough to allow that action to be taken. I even bought a different in-line bubble flaring tool, which works very well in tight spaces. If anyone has suggestions as to a workable approach that avoids having to go through the hell of removing this line, which runs across the firewall as the bottom of three lines, please suggest away!! Brian | ||
David Gore Moderator Username: david_gore Post Number: 1183 Registered: 4-2003 |
Hi Brian, The first part of your statement is problematic; the second part is a certainty even if it is due to frustration convincing you it is time to retire  . . As far as your current problem goes, one look is worth a thousand words so would you post some photographs if you can get a camera to focus in the space available and the best light possible to increase the depth of field so we can see the problems facing you. | ||
Geoff Wootton Experienced User Username: dounraey Post Number: 50 Registered: 5-2012 |
Yes, a photo would be useful, particularly to series 1 owners like myself. The only solution I can think of is one that you have alluded to in an earlier post; could you not splice a shorter length of tubing to the original hydraulic pipe. It would save you from having to replace the entire line, making the job much simpler. Don't know whether the following vid will appeal to non-british humour, but it certainly sums up my frustration on occassions. http://www.youtube.com/watch?v=mv0onXhyLlE | ||
Brian Vogel Prolific User Username: guyslp Post Number: 193 Registered: 6-2009 |
Hello All, I now hope I have success!! I will also include photographs so that what I've been talking about, and my solution, will make more sense. Here are two photographs of the cut end of the line I needed to flare. If you rotate the second photograph 90 degrees left, it's as if you're looking straight in from the front of the car (for some reason this forums will accept 640x480, but not 480x640 pixel pictures). It occurred to me, after all these battles trying to get a new SUR&R line nut on to this tubing without success that I should, perhaps, try salvaging the line nuts from my old high pressure hoses and trying those, instead. Well, lo and behold, two of those were able to slide right on to the line as it was, no additional straightening necessary. After several additional hours of struggle dealing with the space constraints at hand and the finicky nature of the flaring tool, I managed to produce the necessary bubble flare. Here are some photos of the flaring tool in place and the end product. For those who think I've been kidding when I've said that for this particular job I have been stymied at virtually every step, consider the following -- I decided to take a look at the line union I'd purchased about 1.5 months ago and threaded a fitting into one side, which went just fine, then the other, which wouldn't screw in at all. When I looked at the recalcitrant side of the union it had no threads!! I have to be the one soul on the surface of God's green earth who could receive a defective brake line union after all I've already been though!! The next step is to get the small "splice line" made and installed between the brake line union and the UR14317 connector block. Let's see what can put itself in my way for this step!! Brian | ||
Brian Vogel Prolific User Username: guyslp Post Number: 194 Registered: 6-2009 |
Geoff, I can completely empathize with Basil. If parts (or determining their functional alternatives) were not so difficult to come by, and the amount of work I've already done on this car since 2006 not so extensive, I believe my "thrasher of choice" would be, shall we say, more substantial. Brian, who's amazed I haven't committed either suicide or motorcar-icide on multiple occasions | ||
David Gore Moderator Username: david_gore Post Number: 1185 Registered: 4-2003 |
Brian, Challenge met and now vanquished with a reminder to me of forgotten advice from a long time ago: always do a trial bench assembly of new components before attempting their installation. 100% quality control inspections have long vanished and defective parts will inevitably surface when they can cause the greatest inconvenience. Things will now go together with a minimum of fuss. David - who is a long-standing John Cleese [Basil Fawlty] fan especially his management training videos from the 1970/1980's. | ||
Geoff Wootton Frequent User Username: dounraey Post Number: 51 Registered: 5-2012 |
Brian, Delighted to hear that you are near to the resolution of this problem. | ||
Brian Vogel Prolific User Username: guyslp Post Number: 200 Registered: 6-2009 |
Is there a logical explanation for the "disappearance" of the photos I'd posted above? I certainly didn't edit the post to include only the original photo file names. Brian | ||
David Gore Moderator Username: david_gore Post Number: 1188 Registered: 4-2003 |
Hi Brian, I do not know how your post was edited as it includes undocumented formatting codes and hopefully our Administrator can delve more deeply into this matter on our behalf. I have tried to amend the connector block part number to the correct number UR14316 without success as my edited version will not be accepted due to the unacceptable formatting code included in the post. A Gremlin in the works????????? | ||
Brian Vogel Prolific User Username: guyslp Post Number: 202 Registered: 6-2009 |
David, Must be some sort of gremlin, because I certainly didn't insert any non-standard/undocumented formatting codes into that post. However, under the assumption those photos are probably gone forever, I'll recap most of that post here. --------------------------------------------- Here are two photographs of the cut end of the line I needed to flare. If you rotate the second photograph 90 degrees left, it's as if you're looking straight in from the front of the car (for some reason this forums will accept 640x480, but not 480x640 pixel pictures). 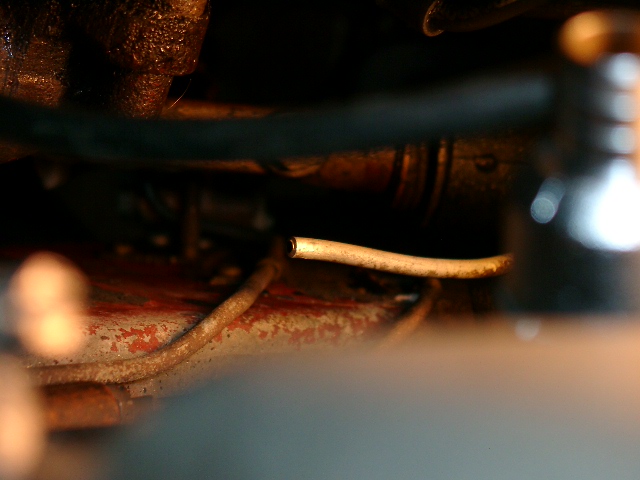 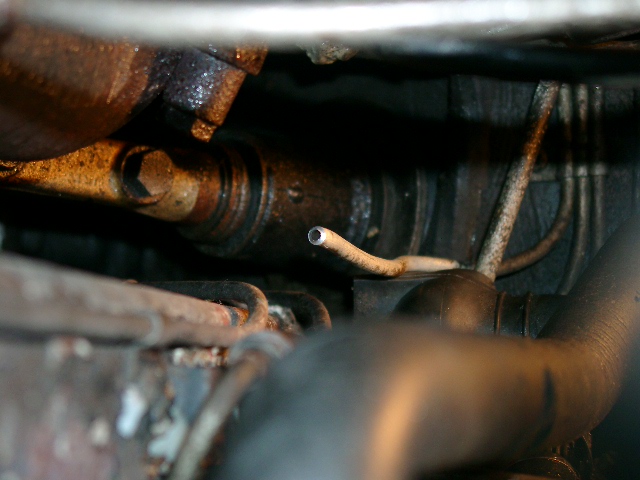 It occurred to me, after all these battles trying to get a new SUR&R line nut on to this tubing without success that I should, perhaps, try salvaging the line nuts from my old high pressure hoses and trying those, instead. Well, lo and behold, two of those were able to slide right on to the line as it was, no additional straightening necessary. After several additional hours of struggle dealing with the space constraints at hand and the finicky nature of the flaring tool, I managed to produce the necessary bubble flare. Here are some photos of the flaring tool in place and the end product. 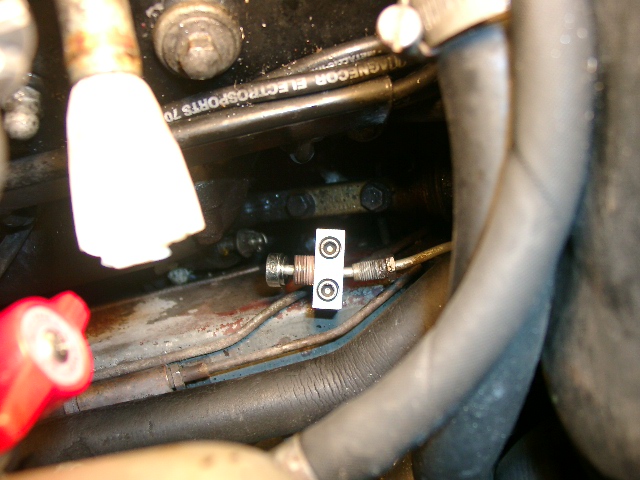 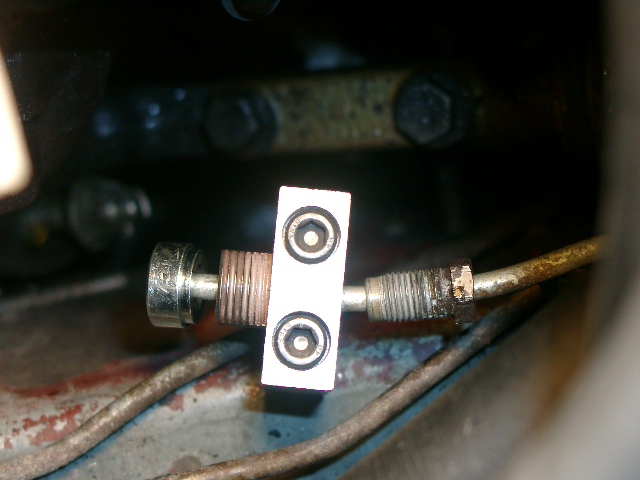 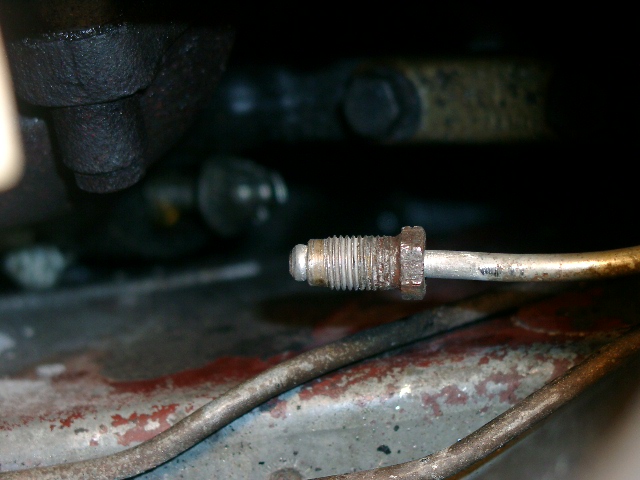 For those who think I've been kidding when I've said that for this particular job I have been stymied at virtually every step, consider the following -- I decided to take a look at the line union I'd purchased about 1.5 months ago and threaded a fitting into one side, which went just fine, then the other, which wouldn't screw in at all. When I looked at the recalcitrant side of the union it had no threads!! I have to be the one soul on the surface of God's green earth who could receive a defective brake line union after all I've already been though!! The next step is to get the small "splice line" made and installed between the brake line union and the UR14316 4-way connector block. Let's see what can put itself in my way for this step!! --------------------------------------------- Brian | ||
David Gore Moderator Username: david_gore Post Number: 1190 Registered: 4-2003 |
Brian - elegant solution to the problem; thank you. First time I have not been able to successfully edit a post or fix a problem........ David - who does not accept failure as an acceptable outcome. |