| Author | Message | ||
Stefan Morley Prolific User Username: myupctoys Post Number: 194 Registered: 7-2009 |
Hi, People will know the saga with my car. The fix worked well for a couple of months then progressively went back to the same point. I now know what is wrong. But trying to find the bits to fix it, is another matter. The problem stems from the slide bush (in the dump valve) being worn. This allows slop in the piston. The bush is supposed to spread the load on the spring evenly, thereby spreading the load on the piston evenly. This slop in the piston means relatively low air pressure is all that is needed to start lifting one side of the dump valve. Once it starts lifting it opens totally till the pressure drops. Where as if the load from the spring was spread evenly it would be spread evenly on the piston (thereby the dump valve seal) and would need a fair bit more pressure to get it to open. What is amazing and noted from other peoples comments is that the symptom seems to happen at very specific operational ranges. Symptoms almost making it look like an ignition or fuel starvation issue. Ideal is to get a whole new dump valve. Barring that I need a new slide bolt, bush and plate this all slides in. I've tried a number of places but to no avail. Where can I get a dump valve or spares for it? Thanks Stefan | ||
Omar M. Shams Prolific User Username: omar Post Number: 122 Registered: 4-2009 |
Stefan, Are you able to show us which part we are talking about? Thanks Omar | ||
Stefan Morley Prolific User Username: myupctoys Post Number: 195 Registered: 7-2009 |
Hello Omar, The bolt marked "A" has a long bush on it (not separated in the photo) the other part "B" is what the bush and bolt slide into. There is wear marks on the sliding bush which aren't that bad, but there is significant wear on the part this bush slides in "B". 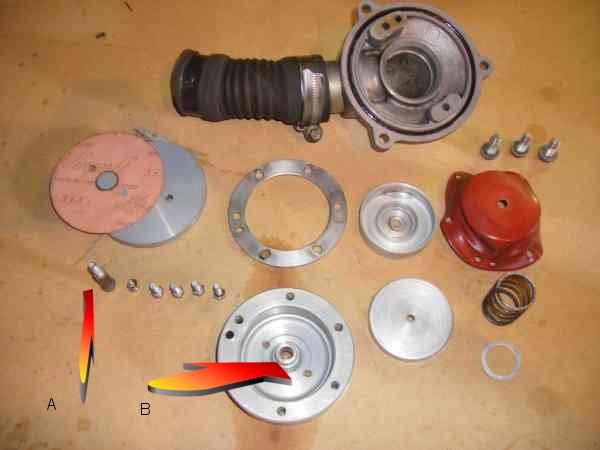 Stefan | ||
Stefan Morley Prolific User Username: myupctoys Post Number: 196 Registered: 7-2009 |
Omar If I cant find a source of the parts I'll either get something machined up or adapt a slide bearing/bush to achieve the same. Assuming I can find something close enough to do the job. Stefan | ||
Paul Yorke Grand Master Username: paul_yorke Post Number: 561 Registered: 6-2006 |
Stefan, I'd look at valve guides, they are available in many sizes, easily machined, and them reamed out to the correct I/D. There are also valve guide repair inserts which just reline the existing guide. | ||
Omar M. Shams Prolific User Username: omar Post Number: 123 Registered: 4-2009 |
Stefan, I will pull my assembly off and see what is the best option. Without taking it apart, my instinct tells me I will end up boring out the aluminium body and making a new bolt/bush to slide in it. The question is, which materilas would be best? alternatively, an insert may also work on the body. All the best, Omar | ||
Patrick Lockyer. Grand Master Username: pat_lockyer Post Number: 818 Registered: 9-2004 |
"What is amazing and noted from other peoples comments is that the symptom seems to happen at very specific operational ranges. Symptoms almost making it look like an ignition or fuel starvation issue." Now your talking!!! (Message edited by pat lockyer on 29 March 2010) | ||
Stefan Morley Prolific User Username: myupctoys Post Number: 197 Registered: 7-2009 |
Hi, Amazing in so far as the fault is something mechanical yet the specific range that the symptoms occur, gives the impression anything but mechanical. Wondering what to use myself. Scintered bronze insert maybe. BTW the dump valve statically doesn't leak. Aside from the slop in the piston, about 1mm lift on one side before the other side follows, the telltale is slight metal discoloration on the dump valve seal on one side. Rest of the seal is nice an clean. Presumably the side that is first to lift. Will keep peoples posted. Stefan | ||
Stefan Morley Prolific User Username: myupctoys Post Number: 198 Registered: 7-2009 |
Paul, Just read your comment. Valve guide inserts good idea. Still need to get a bush machined but least that might solve half the problem. Plus an engine machine shop is bound to have something like that floating around. Cheers Stefan | ||
Paul Yorke Grand Master Username: paul_yorke Post Number: 563 Registered: 6-2006 |
Stefan, Perhaps a valve stem with both ends cut off, drilled out so the bolt can fit through it, and the matching guide for the valve? Just a thought. Cheap and cheerful parts. Good luck with it though.  | ||
Stefan Morley Prolific User Username: myupctoys Post Number: 199 Registered: 7-2009 |
Hi, Quick update. Managed to source another dump valve from a wreckers in UK. It is worn worse than mine, 3mm lift before the other side of the valve follows. The slop is on the opposite side (facing the throttle body) from the one on my car (facing the dump return pipe). Press on the good side and there is less than 0.5mm lift before the other side follows. Least I have one to get machined and still have my car on the road. Looks like it might be a common fault for dump valves. Learnt a lesson, turn up to a machine shop with some bits and explain what you want done, no problem. Tell them its from a Bentley over the phone and thats the last you hear of them. Cheers Stefan | ||
Stefan Morley Prolific User Username: myupctoys Post Number: 200 Registered: 7-2009 |
Hi, Might be useful as a comparison on the Dump Valve spring compression for others. Length uncompressed both springs 37mm. Compressed to 27.7mm (1/4) my original requires 2.05 kgs pressure and the other spring requires 2.25kgs. About 50g error in reading. Stefan | ||
Llu�s Gimeno-Fabra Prolific User Username: llu�s Post Number: 113 Registered: 8-2007 |
Dear Stefan, As you see from my other postings, I am not very knowledgeable with these beasts, but have you considered whether is it possible to fit an after-market non-diaphragm discharge valve. They make them also for recirculating applications and they are adjustable. Best regards Llu�s | ||
Stefan Morley Prolific User Username: myupctoys Post Number: 201 Registered: 7-2009 |
Hi Lluis, Yes I have. The only real spot to fit an aftermarket dump valve is in the existing dump return air line. Means modifying the metal tube and moving the crankcase ventilation pipe. It might be a last resort but like keeping my cars as original as possible. Think the intention with the Bentley dump valve differs slightly from a typical aftermarket one. Aftermarket ones operate more as a differential pressure regulation mechanism under either boost or depression modes. Bentley seems to act as a final safety valve (when all other things fail) under boost conditions and totally open under manifold depression. Saw the turbo comments you made. They do have a tiny amount of play. Just about feel it on axis barely perceptible off axis. You can buy kits reasonably easily even off Ebay to redo the bearings and seals. Undoing the bolts is another matter. Mine leaks a tiny bit of oil, vaguely apparent at the air outlet of the turbo, but don't see anything from the exhaust. Cheers Stefan | ||
Stefan Morley Prolific User Username: myupctoys Post Number: 202 Registered: 7-2009 |
Lluis, Slight correction, see a bit of smoke after the car has been sitting for a while from the exhaust. Nothing while running or being started as a daily occurrence. Stefan | ||
Richard Treacy Grand Master Username: richard_treacy Post Number: 2114 Registered: 4-2003 |
I learned that when I was 14. When they ask "wozzifer" I answer "dunask" or "bildnaboat". It usually works. Postcodes can also be a problem these days. | ||
Stefan Morley Prolific User Username: myupctoys Post Number: 206 Registered: 7-2009 |
Hi All, Thought I should contribute and update people on the long drawn out saga of my dear girl. It is fixed, permanently this time. I tried to get someone to machine up the bits for the dump valve to little avail. So I bought a lathe and did it in 20mins. Dump valve works works like a treat. Not the problem. But I have since found the root cause. While there has been a few peripheral issue that needed fixing none where the major issue. There is a mounting bolt for the air-conditioner on the Oil filler tube. Missing. This mounting hole was allowing air to go into the crankcase, barely any depression. The fluttering issue at about 2200 >> 2500 was the crankcase breather trying to work but with the air leak inadvertently dumping air into the induction manifold when the pressure conditions where right instead of progressively drawing air from before the turbo. One M8 Bolt later all is well. Such a simple thing. Hind sight. Pull the dip stick out, measure the vacuum, even a thumb over the filler tube will tell the story. Should be somewhere between 4 and 6 inches HG. Much less and the crankcase has an air leak somewhere and the crankcase ventilation unit will never work properly. Other people have mentioned on the site about the Oil filler cap and the havoc this plays on operation. Well the missing bolt is exactly the same thing. Moral of the story, measure the Crankcase depression. I've learnt a lot about the car and know its working better than it has in a long time. Despite the extra grey hairs. Thanks for everyones input and patience. Cheers Stefan | ||
Richard Treacy Grand Master Username: richard_treacy Post Number: 2179 Registered: 4-2003 |
Stefan, That�s great news and a lesson for us all. It just shows how important the crankcase depression turns out to be. That applies especially to Turbos, but also to the naturally aspirated cars I may add. I had two such issues in the past coulple of weeks. First, I visited James in the T-Series to have a spin in his Turbo R. We even did a demo of the filler cap being incorrectly closed. During the visit, the T left a nasty splodge on his garage floor, with a dump from the front crankcase scroll. How embarrassing ! Sure enough, the flame trap was blocked causing crankcase pressure. The pressure forces oil out past the scrolls, and usually the rear main scroll shows up long before the front. Since I fitted the SZ PTFE rear main seal and housing over 20 years ago, the rear main never leaks, so I had become complacent and lazy with the flame trap. A quick cleanout of the flame trap gauze with the blowtorch on the next weekend and all was well again. Then, a week ago on driving early to Sydney in the Turbo R on Monday as I do most weeks, I felt that the boost wasn�t right all the time. When I stopped for a sandwich then restarted the motor, that huge horrible smelly cloud of burned oil escaped from the exhaust again. The filler cap was cocked, so I must have failed to close it properly after a few demos in Canberra the day before. There is at least the level of vacuum that Stefan notes, and the filler cap positively hisses like an adder if you lift it open slightly. Once cocked, it usually reseals itself sufficiently after a bit if enough vacuum can be found, but then opens up once the vacuum ceases with the motor stopped. On restarting, it may gulp oil down the breather, and as Stefan has taught us, it may also cause the boost to play up in some instances. Many thanks, Stefan, RT. | ||
Stefan Morley Prolific User Username: myupctoys Post Number: 207 Registered: 7-2009 |
Hi Richard, Slight Correction it was the top alternator mount not the AC mount. Fortunately no apparent damage to the alternator. Although accounts for some apparently unrelated light dimming issues I had at idle. I found a total of 9 things not right with the assorted systems. Only two where wear and tear, Mmmmmm. Assurances past owner always took the car to authorized Rolls Royce specialists. One wonders. 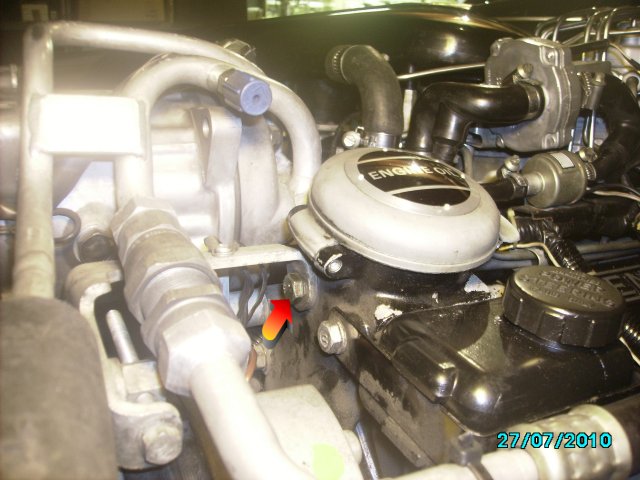 See arrow for guilty bolt now installed. Again thanks for everyones patience. Stefan | ||
Patrick Lockyer. Grand Master Username: pat_lockyer Post Number: 819 Registered: 9-2004 |
We use a smoke making machine for just these sort of problems. Finds the problem in no time! | ||
Stefan Morley Prolific User Username: myupctoys Post Number: 211 Registered: 7-2009 |
People, Just realized that is supposed to be 4>>6 inches of H20 not HG. Equivalent of about 0.3>>0.4 Inches of HG. The spring coupled with the diaphragm in the crankcase ventilation unit determines the crankcase depression. Stefan | ||
Omar M. Shams Prolific User Username: omar Post Number: 155 Registered: 4-2009 |
Dear Patrick, love the idea of smoke tests!!! I am now on the hunt for a smoke generator. All the best Omar | ||
Stefan Morley Prolific User Username: myupctoys Post Number: 214 Registered: 7-2009 |
Omar, Something else I did was replace the paper air filter with a K&N 33-2543 air filter. http://www.knfilters.com/search/product.aspx?Prod=33-2543 I did this before I found the missing bolt so not sure what this contributed to the fix. Certainly didn't hurt. Thought I'd better mention just it in case. Cheers Stefan | ||
James Feller Prolific User Username: james_feller Post Number: 151 Registered: 5-2008 |
Richard, Don't be embarrased... perfectly acceptable and all cleaned up now :o) You know I was crowing to you about how my Turbo doesn't leak a drop of oil.... well shock horror 2 drops appeared under where the Turbo sits a few weeks ago and I kicked myself for saying that line out loud to you... I seached with flashlight all underneath the usual suspects, rear of sump, front of sump, bell housing etc etc... all were perfectly clean but I could see oil dampness on the rear cross member near the bushes... This was very odd... I rang my mechanics and asked where this could be coming from as I then noticed fresh oil around the top rear of the motor around the exhausts at the rear near the firewall.... damn!!! ROCKER COVERS... These had not be tightened up in a while and unlike the my Spirit, they have not been changed to neoeprene. The rocker cover bolts were all quite loose as it turned out so the boys nipped these up tight for me a few weeks ago and, I hold me breath as I type this..., the oil now stays where it should, in the engine. Ie no more drips. Yes it was an interesting experiment RT and I perfomed on the filler cap suction, it does indeed whistle if left cocked slightly. RT, I am shocked you would forget you cap again!!! :o) Stefan, glad to see you have sorted this out re your flat spots and how amazing that you have gone through all that faffing about only to have a restituted bolt solve the issue!!!!! Oh well as an above post states... at least you are now very intimate with the inner works of your beast!!! Cheers J | ||
Omar M. Shams Prolific User Username: omar Post Number: 158 Registered: 4-2009 |
just bought a smoke machine today.......... | ||
Patrick Lockyer. Grand Master Username: pat_lockyer Post Number: 820 Registered: 9-2004 |
Well done Omar,now you can get to some interesting finds within the induction and other systems. Maybe R Treacy could use one his car to show up some invisible faults! A clever bit of kit. | ||
Richard Treacy Grand Master Username: richard_treacy Post Number: 2197 Registered: 4-2003 |
A note on the K&N air filter. Don't go there. There are several reasons, and the damage may be noticed immediately, then again maybe not for a while. For a start, these cars rely on a certain amount of air filter restriction for the crankcase ventilation. Not all types of vehicle use the methods employed by Crewe, but the Crewe system is meticulously designed in this regard. The K&N filter leaves the crankcase less ventilated, messing up all kinds of things. In any case, on Turbos, the turbocharger makes up for any filter restriction, so there is no advantage in induction breathing using a low or high restriction air filter. Even without a turbocharger, this is the case badly enough for injected cars, but on carburettor cars it becomes worse. With carburettors, when fitting the K&N the needles need respecifying by trial and error on a dynotuner with a CO datalogger to correct a dangerously weak mixture. The K&N may save a few cents in the long run, but it may just not. RT. | ||
Stefan Morley Prolific User Username: myupctoys Post Number: 218 Registered: 7-2009 |
Richard, I swapped the K&N back to the paper one to confirm if it made any difference and it didn't. Left it that way. Many thanks for the warning. Might be able to tell me. What does one have to do to get the Cast Elbow O-ring to seal. Driving me nuts. It wont seal. Tried a number of things. Flying spares replacement was a 3.81mm Nitrile 0-ring. Didn't seal. Tried home made 4mm Nitrile O-ring that didn't work either. Put grease on the 4mm Nitrile O-ring and it improved things but still doesn't seal properly. Tried a 4.5mm neoprene O-ring again to no avail, too soft. See photos. Quite obvious with the grease where the leak is. Only about 2/3 of the throttle body...... With grease holds 3>>4PSI. Without 1>>2PSI.  Even the side its partially sealing, there are tell tales its not quite working. See the blowouts of the grease. The back side closest to the fuel distributor seems to be sealing, almost like the whole cast elbow is offset. But there really isn't much latitude in locating the whole assembly. 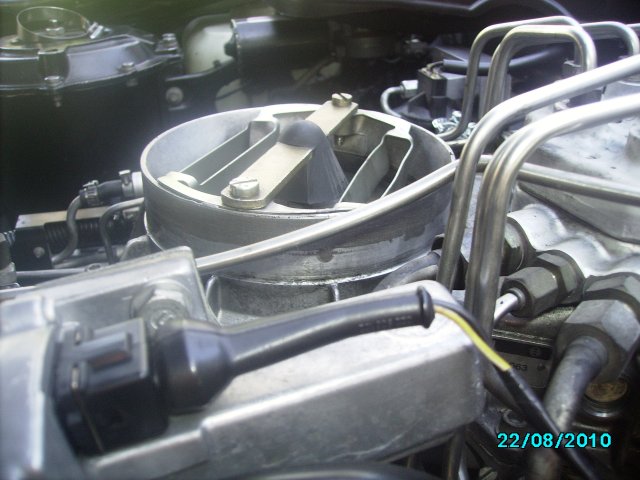 Why cant I get it to seal. The throttle body looks clean and smooth, the O-ring groove look good. I really don't want to put gasket compound on the seal. Thanks Stefan | ||
Stefan Morley Prolific User Username: myupctoys Post Number: 219 Registered: 7-2009 |
Richard, Just looking at the photos, its almost like its pinched closest to the fuel distributor and the opposite side has too much space to move. Got me how to get it centrally located so the Oring can do its job, when there is really almost nill latitude when installing. Stefan | ||
Nigel Johnson Experienced User Username: nigel_johnson Post Number: 45 Registered: 12-2008 |
Older S class V8 Mercedes use a 1/2 inch band to seal the air cleaner. This may be a better bet. Regards, Nigel. | ||
Stefan Morley Prolific User Username: myupctoys Post Number: 220 Registered: 7-2009 |
Hi Nigel, The way the cast elbow fits doesn't lend itself to sealing this way. Not without significant modification. The only thing I can think of is when the dump valve return pipe and turbo boot seals are attached, doing so must pull the cast elbow slightly forward and down. Tilting the whole unit slightly so that the back of the Oring pinches and the front has too much space. When it stops raining.... Stefan | ||
Richard Treacy Grand Master Username: richard_treacy Post Number: 2198 Registered: 4-2003 |
Just to be sure before I comment more, are you referring to the gasket SPM2005 ? If so, it is referred to as an O-Ring in the parts catalogues and is the same part for all Bosch fuel injected Crewe cars (in other words with a fuel distributor), turbo or otherwise. Note that the certain supplier mentioned, whilst mostly pretty good, in particular does tend to send very generic but somethimes unsuitable alternatives to the right components. RT. 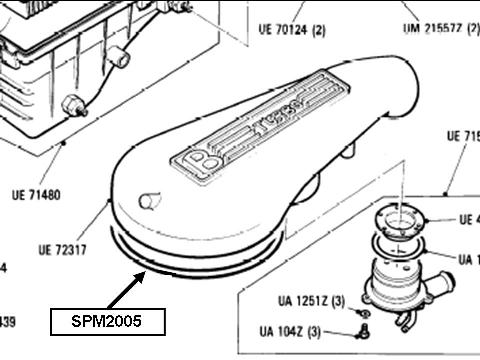 | ||
Stefan Morley Prolific User Username: myupctoys Post Number: 221 Registered: 7-2009 |
Hi Richard, Yes thats the one. Stefan | ||
Stefan Morley Prolific User Username: myupctoys Post Number: 222 Registered: 7-2009 |
Richard, Not absolutely clear in the picture, the O-ring sits in the groove of the cast elbow. Assume thats what the picture is referring to. Stefan | ||
Stefan Morley Prolific User Username: myupctoys Post Number: 223 Registered: 7-2009 |
Richard, Just had a look on the parts list for my car. Definitely SPM2005 for my Chassis 22888. The above picture looks a bit more like a gasket. No matter it is the O-ring. Stefan | ||
Richard Treacy Grand Master Username: richard_treacy Post Number: 2199 Registered: 4-2003 |
Stefan, It sure sounds as if there is an issue here. The intake duct (cast elbow) on my motor fits squarely over the fuel distributor with no preload, and is held properly in position by the mounting pedestals. The system is under no tension prior to tightening down. If the duct and distributor neck are not concentric before tightening down, tedious as it may be I suggest that be rectified before going any futher. With the sealing ring finally in place, the intake duct requires a little grit-free handcleaner as a lubricant to slip smoothly over the sealing ring with a rather firm hand push. I may recall incorrectly as it was long ago and an uneventful procedure when I eyed it last, but I think that the SPM2005 was not a standard O-Ring. Then again there is no reason why a properly-sized O-Ring would not do fine. If the duct is not a firm push over the O-ring, then there is something wrong. I would then seek a thicker O-Ring from an industrial supplier, or even from a Bosch fuel injection specialist. It is not the first time that the certain supplier has sent a part not suited to all its possible applications. I dare say that the substitute that you have been sent will be alright without Turbo boost. It may not help much, but there is a great outfit at Southport Qld. which looks after especially Bosch K-Jetronic and KE2 Jetronic systems. They may just be worth contacting in case they can send you the proper sealing ring as they seem to know R-R/B cars: http://www.southportfuelinjection.com/Bosch%20K-Jetronic%20Fuel%20Injection.htm Incidentally, an O-Ring with an oversized diameter but of the desired cross-section may be successfully spliced with a 4cm taper and silicone glue to achieve the correct diameter. In any case, surely you don�t need to go to the trouble of scouring the world to obtain a simple airtight sealing ring for that junction. RT. | ||
Stefan Morley Prolific User Username: myupctoys Post Number: 224 Registered: 7-2009 |
Richard, Thanks for the input and efforts. Will have a lot closer look at how things are aligned. Whatever the issue it's not glaring and not easy to see whats wrong after you put the cast elbow on. I think the clue from the photos is the directions of the grease "streaks". Closest to the fuel distributor the grease looks like its sucked in. Closest to the turbo looks like it is blown out. Fits with the thought of the Oring being pinched and not able to move in the groove, least on one side. Inevitably affect the whole Oring sealing function. Memory serves me there is a bit of tension when I tighten the mounting bolts. Based on your observations that shouldn't be there. Gives me something to focus on. I bought two Orings from UK. One of them was in a sealed Bentley bag, it looked like a standard Nitrile rubber Oring with a couple of coloured dots on it. The old one I took out had hardened and wasn't sealing. Thats not to say a "normal" Oring wasn't put in a resealed plastic Bentley bag. Drawings on the website not quite enough to go on. Useful to know someone specializes in KE2 stuff. Not too many people like getting stuck into the more mechanically based systems. Will chase them up and get them to source the seal. Least that can be eliminated from the equation. Thanks Stefan (Message edited by myupctoys on 27 August 2010) (Message edited by myupctoys on 27 August 2010) (Message edited by myupctoys on 27 August 2010) | ||
Stefan Morley Prolific User Username: myupctoys Post Number: 225 Registered: 7-2009 |
Richard, Apparently SouthPort Fuel Injection moved to Tassie, still operating. He doesn't stock the O-rings but said they was nothing special about them and are readily available. Least that is some comfort. Just had a play. If I fit the elbow with the Turbo Boot still attached the whole cast elbow leans forward slightly. If I fit the cast elbow without the boot there is about half an inch offset to the turbo. I can rock the cast elbow about 1 inch travel when looking at the turbo outlet compared with the end of the cast elbow. What I have done is slide the boot up the cast elbow. Rock the cast elbow till if feels in the center of its travel. Tighten the bolts then reattach the boot. The offset is taken up by the rubber boot. Doing it this way there was no tension on the bolts so that fits with your comment. Be nice if there where three mounting studs.... Will take it for a spin later. Supposed to be working :-) Stefan | ||
Richard Treacy Grand Master Username: richard_treacy Post Number: 2202 Registered: 4-2003 |
Sounds like you are almost there. The dots on the O-Ring are of course code, but Nitrile is the one to use here although Viton may be better. However, it's hardly critical once it is sealed. On another topic which I may post, I have been messing around with tuning the transmission on my car: 3L80 transmission like yours. I had it fully overhauled, and run ELF G3 Syn synthetic fluid (G3 means equivalent to Dexron III). I have recalibrated the governor springs and weights using a B&M kit and a spare governor from a Holden, and this weekend shall tune the adjustable B&M modulator. Previously, it upshifted annoyingly at just 4,000rpm WOT in D. So far it winds to 4400rpm WOT, that's 108km/h on the satnav 1-2 as it has the 2.28 final drive. I can't try it out in Oz, but it should do 2-3 at 180 clicks. It kicks down easily at 130 which is useful sometimes. Previously (in Germany of course) I had to hold it in gears manually to reach those speeds, but I prefer not to use the bands that way. Presently it changes down slightly too easily on part throttle, so a twiddle of the modulator will surely sort that out. It's far more sprightly, which means that it accelerates rapidly far more effortlessly on upper part throttle than beforehand. More later. RT. | ||
Stefan Morley Prolific User Username: myupctoys Post Number: 226 Registered: 7-2009 |
Richard, Hopefully, least its the right direction. Your comment about up-shifting and down-shifting. Until I'm totally comfortable the car is running correctly don't think I'm game to push it. One comment though, my car down-shifted a little too easily. After I replaced the one way air valve near the wastegate solenoid, down shifts feel a lot better. Think I read somewhere the cracking pressure of the original is about 0.4psi, the new one I put in is about 1PSI. Have a spare if you ever feel the need. Given the way they are made never likely to need it. My habit of buying two of everything. Sometimes Oz feels like the end of the world where getting bits is concerned. Stefan (Message edited by myupctoys on 27 August 2010) (Message edited by myupctoys on 27 August 2010) | ||
wayne adolfo Yet to post message Username: silverae97 Post Number: 1 Registered: 7-2012 |
does anyone have any information on a 1984 bentley turbo r emissions. I have one in california and need to get it smogged. however it is a non-catalyst vehicle from the factory. any diagrams or system details would be most helpful |