| Author | Message | ||
Dave Burbidge New User Username: ovation Post Number: 4 Registered: 8-2009 |
My 82 Spur has a knocking / rumble sound coming from the front left and fainter on the right when travelling over bumpy roads. I have had 2 RR mechanics and my local garage look for the problem but no one has managed to pin point it. Nothing seems loose and all bushings seem ok ie no movement. If I bounce the front of the car no noise. Am I missing the obvious ? Any suggestions on how to systematically diagnose the problem would be appreciated ( without replacing half the suspension bushes and ball joints) Cheers Dave | ||
Dave Burbidge New User Username: ovation Post Number: 5 Registered: 8-2009 |
I jacked up the car and put a flat piece of wood under the tyre - the wheel moves up and down about 2 or 3 mm and makes the knocking sound. Just need to find the culprit. Cheers Dave | ||
Bill Coburn Moderator Username: bill_coburn Post Number: 1171 Registered: 4-2003 |
Dave/ Do your lump of wood trick and have someone move the wheel up and down while you hold the top mount of the shock absorber. If you have one use a stehoscope (on the shock absorber not you)! If you hear a noise do this with the scope or a light bar against your ear and check the bottom joint of the shock. These are often neglected and wear their plastic inserts through. | ||
Paul Yorke Grand Master Username: paul_yorke Post Number: 442 Registered: 6-2006 |
Dave, from your description it does sound like ball joints. Probably damper as Bill pointed out, or maybe bottom. (or both) You can also get somebody to move the wood while you watch the movement underneath the car. Put a finger on the rubber boots and feel for movement to. Bottom ball joints usually rust pretty quickly once worn and the play disappears. Pull back the rubber boot at the bottom and make sure there is plenty of wet grease inside the ball. It goes through various stages of wet grease. Dry Dry with bright red rust powder. Dark red/black grinding paste goop. Rust coloured again. Most of the time they get tighter the worse they get, so not play or MOT failures. PS - repair kits are available if your balls are nice and shiny.  Catch them early! Catch them early! (Message edited by paul_yorke on 30 September 2009) | ||
Arthur F. Unregistered guest Posted From: 210.50.228.4 |
Dave, If you have had the car to more than one RR specialist then they should have checked all the usual ball joint and shocker bush suspects but may not have looked closely at the sway bar links which will cause the noise you have described. (Message approved by david_gore) | ||
Stefan Morley Frequent User Username: myupctoys Post Number: 92 Registered: 7-2009 |
Dave, Pretty unlikely given your symptoms but it happened to me. There is a tube that is part of the center of the rack. A pillow block connects the steering arms to the rack internally. This tube is supposed to be a close tolerance fit to the pillow block and over time the fit wore on my car. The tube is supposed to move with the pillow block, mine had a bit of play. Moving the steering wheel didnt reveal it, it was difficult to get it to happen statically. Took months to pin down exactly where it was coming from as it only really apparent when driving. Had a separate issue where the top mount of the front shock rubbers deteriated badly causing knocking if the center mount to knock on the spring mount. Used a bit of thick rubber padding as a temporary measure. Bought the right rubbers but havnt found a source of long high tensile threaded section to take the spring mount out. Least it doesnt knock for now. Probably not your issue but might save someone else a lot of time. Cheers Stefan | ||
Paul Yorke Grand Master Username: paul_yorke Post Number: 444 Registered: 6-2006 |
Stefan, you can replace the shouldered damper bush in situ (with an assistant) Take off the damper top nuts (NOT THE TOP SPRING PLATE BOLTS) Pull out the old rubber. Put the new rubber over the damper. Get the assistant to press the top of the damper down. (a socket and extension or tube that just fits over the top but not the thread is safest) Once down about 5mm you can move the damper around enough to get the new bush in. If necessary, get The assistant to stand on the spring plate to get enough weight behind it. | ||
Stefan Morley Frequent User Username: myupctoys Post Number: 95 Registered: 7-2009 |
Paul, Maybe I'm not understanding you right. There are two rubbers, one on the top and one underneath the spring plate. IE either side. Well thats what I got from flying spares. When your talking about pushing the damper are you referring to pushing it all the way through the hole enough to get the bottom one on, acessing it between the spring coils? Thanks Stefan | ||
Paul Yorke Grand Master Username: paul_yorke Post Number: 446 Registered: 6-2006 |
Morning Stefan, you should have two rubbers with ribs and two plain ones. The stepped ones fit at the top and the step isolates the damper stem from the top plate. When the rubber step part rubs through, it makes various noises. The lower, plain rubber, just sits there and never wears or or makes a noise, so just replace the top/outer ones. | ||
Stefan Morley Frequent User Username: myupctoys Post Number: 97 Registered: 7-2009 |
Hi Paul, That sounds reasonable and a lot easier. Been toying with how to tackle that for a while. Cheers Stefan | ||
Dave Burbidge New User Username: ovation Post Number: 6 Registered: 8-2009 |
Thanks to all for the sound advice , what a great forum Cheers Dave  | ||
Richard Treacy Grand Master Username: richard_treacy Post Number: 1989 Registered: 4-2003 |
If the damper rubber upper bushes are worn or loose, be aware that this is a very common fault due to the defective bush design. It has haunted these cars since 1965. The bushes are just not darned thick enough when new. The slop and excessive compression of the bushes leads to wear, and that leads to clonking, and ultimately ruins the spring tower lid. Even with near-new dampers and bushes, clonks often occur unless properly set. But continue. I have posted on this in the past with pictures from when I fitted new bushes to a 1992 Turbo R. The fix is incredibly simple. Whether you have new or old rubber bushes, place a fibre washer or two above the new rubber bush inserts and below the steel washer. The fibre inside diameter must clear the damper's shank. Choose one or more washers to give the bushes a good squash. Tighten it down, and the rubbers will be compressed just that little extra that even new ones need on SY and SZ cars. You may source fibre washers from a fastener shop or even a garden centre. This is a well known issue, whereby the rubber bushes wear quickly and appear to fail. Eventually they do fall apart without attention. Worst, when the upper bush half has degenerated very badly, then the lower is quickly ruined requiring the springs to be removed. By the fibre washer method of setting new or old bushes, you will extend the life of the bushes and preserve the tower lid against terminal wear. If the rubber is bad and you are awaiting a new one, you may place as many fibre washers as you need between the metal cap and the rubber bush. Usually, a seemingly worn bush often still has 100,000km left when reset as described. RHT | ||
Bill Coburn Moderator Username: bill_coburn Post Number: 1174 Registered: 4-2003 |
Well you learn something every day as they say. When I have had the front springs out I always place the bush with the collar upwards, ie it finishes up under the spring plate with the distance piece on the damper shaft. I then screw a brass 'bullet' shaped cone onto the top of the damper shaft and compress the spring until the tip of the cone is just below the spring plate. Judicious use of a large screwdriver with a slot at the end of it is used to spring the damper shaft until it lines up with the hole in the upper plate. More compressing with your third hand and the cone emerges through the hole followed by the distance piece then the flange on the lower rubber bush. The latter never centres perfectly but since the cone is about 4 inches long you can get hold of it and exert your influence until the bush flange pops into the plate hole! You can then put the unflanged bush on the shaft, followed by the compression washer and hardened washer then tighten the lock nuts down. Richard's washer trick is very simple and effective. The wear on the bush collar is very very common and so often you need to remove the top plate and have the hole built up and re-drilled. That fixes it until the next wear out. Paul's fitting of a new upper bush with flange is worth a picture. What is needed there is to push the car down on the damper to further compress the lower bush. Since all my friends are lightweights it is useless for them to stand on anything let alone the plate. I keep four 25Kg bags of sand under the bench for loading parts of the car and these can be carefully positioned around the spring cover to push the car down and the damper shaft up. If that is an embuggerance you can jack up the front wheel as high as your garage jack will go which will compress the spring and squash the lower bush while you fit the new upper one! | ||
Paul Yorke Grand Master Username: paul_yorke Post Number: 451 Registered: 6-2006 |
Bill - I think you've grabbed the wrong end of the stick - or damper in this case. "Paul's fitting of a new upper bush with flange is worth a picture. What is needed there is to push the car down on the damper to further compress the lower bush. Since all my friends are lightweights it is useless for them to stand on anything let alone the plate. I keep four 25Kg bags of sand under the bench for loading parts of the car and these can be carefully positioned around the spring cover to push the car down and the damper shaft up." This is all done with the top plate bolted down and the plate does not need to be touched. You need to take the load OFF the top inside rubber. This is so the damper"floats" in the hole and you can then move the damper stem about to manoeuvre the flange of the new rubber into the gap. If anything you should jack up the car underneath the central front pivot block so the wheels are hanging as low as possible and the damper is extended and needs the least pressure to push it down. Even if you have a flanged rubber on the bottom, you should be able to get another flanged one in from above. I hope this makes sense now. PS - I Will try and post a picture next time we do some! It wont be pretty - but will paint a 1000 words. | ||
Arthur F. Unregistered guest Posted From: 210.50.228.4 |
Two other causes of odd clonks in SZ cars are loose subframe mounting bolts (with bent brackets also causing trouble here) and a loose front bumper (washers left out of vertical brackets).The aforementioned worn sway bar links caused clonking on an SZ which had both front shocks replaced and attention to all the balljoints and bushes mentioned above. (Message approved by david_gore) | ||
Paul Yorke Grand Master Username: paul_yorke Post Number: 458 Registered: 6-2006 |
The 'boomerang' brackets at the rear of the front subframe are prone to getting bent by people using it as a jacking point. Tyre shops are the main culprits at this - usually used to more modern cars designed for two post ramps it's an obvious target for them. Never let them jack it up there! The brackets can usually be levered back to their correct position on the vehicle. Ensure you have at least a 5mm gap between the boomerang and the subframe. | ||
Stefan Morley Prolific User Username: myupctoys Post Number: 123 Registered: 7-2009 |
Paul, I removed the rubber bush from the top end and discovered the spring plate has been cut by the top of the damper. Only happening on one side and nothing else appears loose. Some stage it looks like the bottom ball joint has been replaced so maybe the issue started a long time ago and got rectified. Still the top spring mount has a significant cut in it. Bought a new mount. Question, what sort of threaded rod is supposed to be used. By my reckoning given the car is 2.5t each spring would be loaded to about 650kgs, divided by four threaded sections 162kgs. If the car was jacked to take some of the travel out that pressure would reduce. Although if the plate moved up unevenly then one might take the full load intermittantly till the pressure evened out. What could be used and how long should it be. The threaded section found in hardware stores by my reckoning seems to be cast not turned. Using that that doesnt seem like a good move. Also how much travel in the bottle jack would be ideal. Thanks Stefan | ||
Paul Yorke Grand Master Username: paul_yorke Post Number: 469 Registered: 6-2006 |
Hi Stefan, Firstly, how worn is the top plate? This fix is not ideal - but works well. If the wear is less than 8mm you can try tying the damper top away from the worn side and filling the worn side with a liquid rubber such as Tiger seal. Fit the new top rubber loosely while the rubber is wet, but do not tighten it down. The rubber will set and the top mount will now form the correct shape for your top hole and keep the damper central. Tighten down when dry. As for the tools to remove and decompress the spring. I would recommend getting somebody with the correct tools to do the job. If there is nobody around and you want to make your own tool (and I'm trying to talk you out of it) You had better ask Bill C. I use the factory tools and the power in the springs still scare me. If I walked into a workshop (Bill excepted)and saw something like that going on, I'd high tail it out of there. These springs really are projectiles waiting to happen and will happily travel 100 feet taking fingers, foreheads, and stamping their mark on as many other cars in the workshop as they can! Another note on top plate wear. If the camber bushes are worn, it puts a lot of lateral pressure on the damper top mount, so check them as well. This is twice the problem on wider shod cars. | ||
Bill Coburn Moderator Username: bill_coburn Post Number: 1182 Registered: 4-2003 |
Paul/ Despite having removed many springs on post war cars I still take the precaution of wearing a napkin when I do these jobs. I am reminded of a course I did in the army many years ago on battle simulation using fuze cord and detonators. The instructor advised we very green young officers that we should always crimp the detonators onto the cord holding them around to the rear of your body. As he explained 'blowing half your arse and a few fingers off is much better than losing an eye!" The other gem was when blowing a pound slab of TNT with a fuse, having lit the fuze you always walk briskly but carefully away from it. Never run and if the thing blows when you are still walking always shake your head to check that it is still fastened to your shoulders. At the age of 14 I was present but fortunately didn't witness the removal of most of a young apprentices head from about mouth level up! That was a simple old (then fairly new) Holden! I have not been quite the same since! If you delve into the cesspit of my scribblings in Tee One Topics you will find pictures of my spring removal kit which is quite safe. But I have pondered how I would get them out otherwise. The answer I think is to use threaded high tensile steel rods which come in metre lengths. Remove the pair of 5/16" bolts at nine o'clock on the cover, catching the threaded block underneath that they screw into and replace them with the steel rods. Having screwed them into the blocks lock them underneath with two nuts to ensure that the rods don't unscrew themselves. Screw two high tensile nuts down each rod preceded by a well greased thick steel washer. Repeat this installation at 3.00 o'clock. Next step is to don the napkin! At this stage you have four rods holding down the spring cover. You would then remove the 5 quarter inch bolts and nuts and the single 5/16" bolt and nut at midnight on the cover. By this stage your pulse rate will be at about 180! Remove, the shock damper upper nuts, washer and rubber bush. Remove the respective wheel and let the suspension hang which allows the spring to relax to the limit of the rest of the suspension. Grease the rod threads. Using a ratchet set spanner loosen off each upper nut about an inch then loosen the nuts under them an even number of turns. Don't be impatient. Just a few turns each time. If you get cocky and loosen a nut too far and the cover cocks and jams, screw the appropriate nut back down to level the plate and resume operations. After about 35,000 ratchetings the plate should be high enough to have no tension on the spring and the whole asembly can be lifted out. The upper nut on each rod can be screwed up by fingers keeping say a quarter inch gap. I would also have a third nut say a couple of inches above that. These extra nuts are to slow the spring down as the rods break and head for your head so that you can recount your experiences to the Head Mechanic in the Sky! By now Paul will have retired muttering to his corner with his favourite single malt so I had better stop. You will of course note that I am not recommending that you perform this operation, that I have never had to do it but if I had to remove a spring in Outer Mongolia, that is the method I would contemplate. (Retires sullenly to the opposite corner! | ||
Stefan Morley Prolific User Username: myupctoys Post Number: 124 Registered: 7-2009 |
Thanks guys, I will think long and hard about the course of action. All warnings heeded. I'm rather attached to my head. The slot is possibly managable by other means. Cheers Stefan | ||
Stefan Morley Prolific User Username: myupctoys Post Number: 125 Registered: 7-2009 |
Paul, Wondering, would the camber bushes being worn show up in a wheel alignment. Got it done after I changed the rack and nothing untoward showed up. Camber was where it was supposed to be. Bill, I've used your T One Topics countless times, even to the point of just reading them for the sake of a good read. The time you've saved me and probably countless others cant be measured. Thanks Stefan | ||
Paul Yorke Grand Master Username: paul_yorke Post Number: 470 Registered: 6-2006 |
Bill, I'm going to retire to the loo to have that Malt! | ||
Paul Yorke Grand Master Username: paul_yorke Post Number: 472 Registered: 6-2006 |
Did a front spring on site yesterday. Some pics on my tool Bill. ;) compressor:  Rods and top plate. Shadows don't need the steel plate. 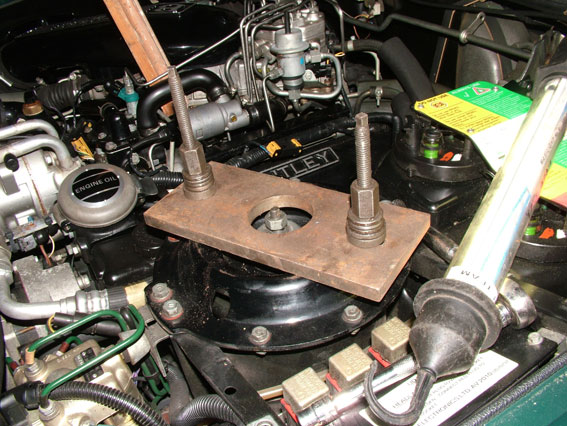 Bottom plate (yellow) Rod (Red) 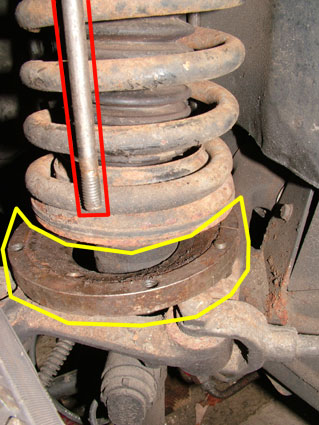 Decompresser (bearings inset in corner) 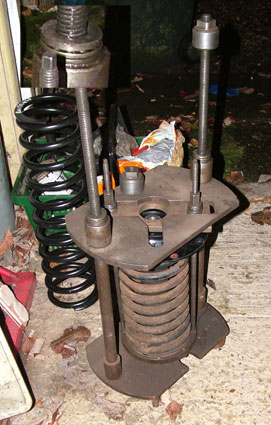 | ||
Stefan Morley Prolific User Username: myupctoys Post Number: 132 Registered: 7-2009 |
Paul, So you actually pull the springs out compressed, then decompress them outside the car with the tool in the last photo? Interesting Stefan | ||
Paul Yorke Grand Master Username: paul_yorke Post Number: 473 Registered: 6-2006 |
Stefan, Yes, I think that the idea behind it is so that you are changing the spring tension with large sized rods instead of of small ones. I can see the advantage of decompressing the spring as you remove it from the car though. But you'd need to be very certain it couldn't get away! All nuts have bearings under them, not just greased washers. And also a concave/convex washer pair to keep everything in line. Note the height of the compressed spring as it comes out of the car and how tall the new one is. It's not rocket science - unless the spring gets loose! (Message edited by paul_yorke on 23 October 2009) | ||
Dave Burbidge New User Username: ovation Post Number: 8 Registered: 8-2009 |
Thanks to all especially Paul. The Spur has now got new shock absorbers and ball joints and runs like a dream with no suspension noises whatsoever. I took the advice and engaged our local Rolls mobile mechanic to fit the units. Cheers Dave |