| Author | Message | ||
Charles Drakoulas New User Username: free_spirit Post Number: 9 Registered: 1-2016 |
I would say that I have read all the posts regarding the replacement of the rear spheres and viewed all of the you tube videos in preparation to attempt this seemingly easy enough job. However none of the instructional texts or posts outline the fact that a light rail system exists in front of both spheres thereby obstructing any attempt to remove them. To clarify, there is a curled hydraulic line in front of both spheres which needs to be removed prior to accessing the existing spheres. From what I could see the top fitting of these lines is impossible to access by the home mechanic and at the very least some sort of special tool would be required. In any event I'm rather ticked off as I stripped out the carpet etc in preparation only to discover that I couldn't do the job. Someone really needs to update the instructions for later spirits or tell us to take the car to a service garage as it probably can't be done at home. I now stand ready to be fleeced I guess. Chassis 54729 Charles  | ||
Paul Yorke Grand Master Username: paul_yorke Post Number: 1762 Registered: 6-2006 |
Hi Charles, where are you based? Can you post a photo? | ||
Charles Drakoulas New User Username: free_spirit Post Number: 10 Registered: 1-2016 |
Hi Paul, I am based in Melbourne. As per your request please find photo attached. Thanks Charles 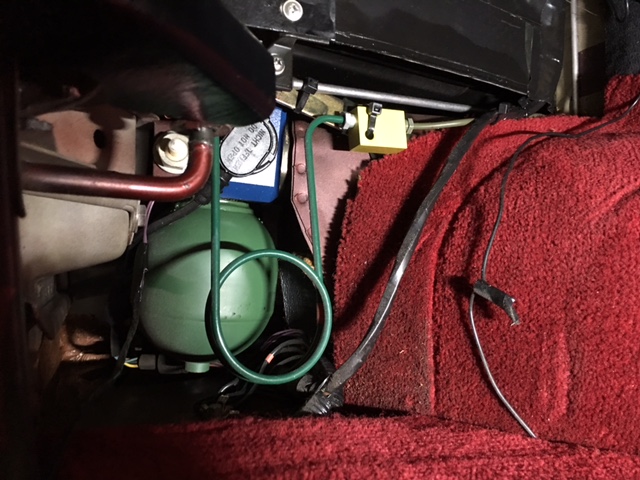 | ||
Charles Drakoulas Experienced User Username: free_spirit Post Number: 11 Registered: 1-2016 |
Paul, I've just had a crazy thought. It looks to me that it may be a deliberate attempt to stop owners from changing their own spheres. Would curling the line in front of the sphere serve any mechanical purpose? They could have taken it from the block connection straight over to the top of the strut. I look forward to your opinion. Charles | ||
Charles Drakoulas Experienced User Username: free_spirit Post Number: 12 Registered: 1-2016 |
Well people where there's a will there's a way. I figured that the offensive hydraulic line didn't grow there. It then dawned upon me to remove the top tray that holds the jack and tool kit. Unbelievable! Everything became accessible and I was able to remove the top fixing on both sides. Now to the dreaded gas springs! | ||
Paul Yorke Grand Master Username: paul_yorke Post Number: 1763 Registered: 6-2006 |
Great, was going to say what you have found but wasn't sure where you were up to. The pipe has a curl on it to allow for movement of the gas spring adaptor which is mounted on rubbers. Metal fatigue and all that. Good luck with the rest of the job. A bit far for me to pop over and do it on site. Lol. | ||
gordon le feuvre Prolific User Username: triumph Post Number: 178 Registered: 7-2012 |
Charles, Secret of working on R-R & Bentley is that you ALWAYS need to strip something off for access, just need to study problem a bit harder. Once you accept this basic rule, you will be in a much better place mentally to approach the task! | ||
michael vass Prolific User Username: mikebentleyturbo2 Post Number: 287 Registered: 7-2015 |
Hi All I do think it's crude to mount that brass block with a cable tie. Mike | ||
Charles Drakoulas Experienced User Username: free_spirit Post Number: 13 Registered: 1-2016 |
Thanks Paul, Gordon and Michael. Job done and dusted. Spheres came off easily with a rubber strap oil filter remover. Upon completion, I have no leaks from spheres or the curly pipes. I now look forward to my new improved ride. | ||
richard george yeaman Grand Master Username: richyrich Post Number: 820 Registered: 4-2012 |
Hi I am fitting new gas springs I too was wondering about the coiled pipe, having read the posts above I will remove the tool assembly, Just one question, in the photograph above there is a white push switch, does anyone know what its purpose Is. | ||
Omar M. Shams Grand Master Username: omar Post Number: 1305 Registered: 4-2009 |
Richard if only you listened and let us replace them in the car park of the hotel in the rain........ | ||
richard george yeaman Grand Master Username: richyrich Post Number: 823 Registered: 4-2012 |
I know Omar that would have made a good story, it would have taken the whole forum to have pulled that one off, Richard. | ||
richard george yeaman Grand Master Username: richyrich Post Number: 830 Registered: 4-2012 |
Gas springs fitted, finished them this afternoon, this evening I replaced my brake spheres, Vast improvement all round, used Paul Yorkes hammer and chisel method of removal. Richard. | ||
Alan Dibley Frequent User Username: alsdibley Post Number: 87 Registered: 10-2009 |
"Gas springs fitted, finished them this afternoon, this evening I replaced my brake spheres, Vast improvement all round, used Paul Yorkes hammer and chisel method of removal." But I hope you did them up only finger-tight, Richard. Alan D. | ||
richard george yeaman Grand Master Username: richyrich Post Number: 831 Registered: 4-2012 |
Alan I will put it up on the lift tomorrow and check for leaks, I tightened them with Oil filter pliers a very handy little tool I bought in Halfords. Richard. | ||
richard george yeaman Grand Master Username: richyrich Post Number: 840 Registered: 4-2012 |
Finally got the car out to test drive it what a difference those spheres make, well worth the effort, and no squatting down after sitting for a couple of days. Richard. | ||
Omar M. Shams Grand Master Username: omar Post Number: 1334 Registered: 4-2009 |
I have been losing oil from the hydraulic system. I also witnessed puddles of oil under the rear bumper. I investigated and found that the Azure has flexible hoses leading to the gas springs and both sides have leaky hoses. How unusual that they would choose to put flexible hoses for these cars and rigid pipes for the rest. | ||
Peter Maclaren Experienced User Username: ludo Post Number: 33 Registered: 4-2009 |
I have been following this thread with interest as my Turbo R (55635) has a disappointing ride standard and I wonder whether the gas springs are to blame. The car is now 22 years old and has covered almost 100,000k's.I have, I believe, the complete service and repair records, and there is no mention of sphere replacement. Like Charles, I removed everything required to expose the spheres and note that unlike Charles's mine are a dark grey, and not green as in his and all the videos I have viewed. The car does sag at the rear after sitting for several days but over 24hours has dropped only 40mm. I don't know what is an acceptable loss of height if any and would appreciate guidance | ||
Omar M. Shams Grand Master Username: omar Post Number: 1336 Registered: 4-2009 |
The ride should be fantatsic. not borderline. I would put money on your gas springs needing replacement. Bite the bullet mate. | ||
Paul Yorke Grand Master Username: paul_yorke Post Number: 1874 Registered: 6-2006 |
Peter, Disappointingly bouncy and hard? It sounds like they have been changed at some point - grey. Replacement ones often have a date and pressure printed on them. Tiny writing though. They all have the same size thread and look fairly similar but are not interchangeable. An RR&B the gas springs are aubergine shaped, the accumulators are orange shaped. A good way of testing gas springs is to run them up to their ride height and then try and bounce the rear of the car up and down. Sitting on and off the bumper. You should get a good 100mm of free/easy travel. This is easy to do on non active ride cars but on active ride cars the ARC will put the dampers into SPORTS mode. This makes it near impossible to tell without a diagnostics box to put the system into SOFT mode. | ||
Mark Aldridge Grand Master Username: mark_aldridge Post Number: 463 Registered: 10-2008 |
I have just replaced accumulators and gas springs with these products http://www.sphere-shop.co.uk/ .All good , ride vastly improved.However the accumulators had to be removed with a chisel, which I was not happy doing ( how easy is it to puncture these things ?) I have to change the ones on the Bentley8, is there any other method ? Mark | ||
Paul Yorke Grand Master Username: paul_yorke Post Number: 1876 Registered: 6-2006 |
( how easy is it to puncture these things ?) Pretty easy . . . . How easy is it to puncture one by accident? Almost bloody impossible! You should/must chisel at a tangent to turn the sphere, not at an angle that can puncture it. There are other methods to try first, chain wrench - snap on fabric oil filter strap (perfect for tightening them), Oil filter band tools - but none as efficient. | ||
richard george yeaman Grand Master Username: richyrich Post Number: 841 Registered: 4-2012 |
Mark If you are buying any tools to do this job don't buy the normal oil filter ones, I broke two of these doing my friend Stephens gas springs, he then bought a heavy duty one out of a machinery store it cost �90 but it made light work of the job, When I was doing mine I used a hammer and chisel like you did. | ||
Brian Vogel Grand Master Username: guyslp Post Number: 2432 Registered: 6-2009 |
It really does elude me how these accumulator spheres come to be screwed on such that they require hammer and chisel to remove (ignoring corrosion at the threads from years of inattention). And I hasten to say that I am not doubting that they do. 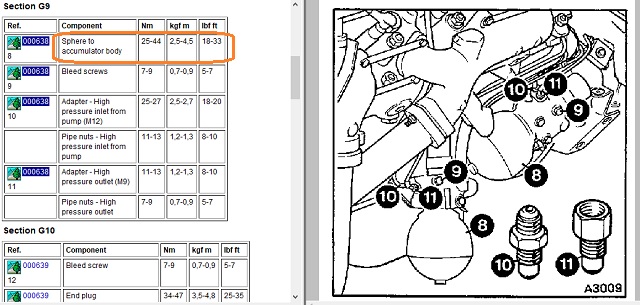 The maximum end of the torque tightening range is far less than a lug nut is tightened to and the low end could probably be done by hand (or not much beyond it using a strap wrench). It would seem that the tendency to "gorilla-cize" the tightening on these things is endemic. The last sets of spark plugs I installed on my Buick and my Cadillac called for 15 lbf ft and that was very easily achieved. 18 lbf ft should be comparably easy. The torque figures are precisely the same for the gas springs as they are for the brake/hydraulic accumulators. Brian | ||
Maxwell Heazlewood Experienced User Username: tasbent Post Number: 34 Registered: 9-2017 |
Hahahaaa....good to read that the art of the Gorilla Wrencher is not dead! A very light smear of nickel anti-seize on 180 degrees of the thread goes a long way to preventing these problems, as does a little plumbers tape and then the sphere should be no more tightened than an oil filter. | ||
Paul Yorke Grand Master Username: paul_yorke Post Number: 1877 Registered: 6-2006 |
It has nothing to do with overtightening when fitting really. It is what it is. Get over it. LOL They have a massive thread, are painted to a polished finish, have no flats on them to grab, are fitted in tightly confined areas where it's impossible to get a good turn on them. If you take the accumulators and the gas spring adaptors off the car and do it in a vice. Piece of cake. (How they first ones were done in the 80s lol at that now) But why turn an hour's job into a four hour pita job. It's all about access and grip. Try peeling an orange in your pocket ;) I've never had a problem with a too tight one but I know people who have had problems with too loose ones. Especially Shadow accumulators! Spirit spheres are never a job where I say 'crap. . I could do without this today"  Plus it's a once every ten years job. That's always got a feel good factor going on. Right? Have fun!! | ||
Maxwell Heazlewood Experienced User Username: tasbent Post Number: 35 Registered: 9-2017 |
Paul....I bow to your superior experience  | ||
Brian Vogel Grand Master Username: guyslp Post Number: 2433 Registered: 6-2009 |
Paul, Never having tried to remove an SZ sphere I was extrapolating from some of the SY experiences I've been a part of. Given that the tightening figure for the SY spheres is approximately the same as for a lug nut, it certainly doesn't take superhuman strength to achieve it (nor should it to undo it). Based on other fun projects, though, I know all too well about access related issues. I also hadn't really considered that there is nowhere on an SZ sphere that allows a "good grip". Based on the tightening specs it should be a cinch to get them off were you able to get a good grip somehow. It's another of those mysteries that no small hex fitting was ever added to what was the "charge port" location on the SY spheres at the bottom of the SZ spheres. It would make getting them on and off much easier, I'd think, unless you can't get to the bottoms of the spheres in situ with any ability to turn them. You should get together with Kelly and design the ideal SZ sphere removal tool!! Brian | ||
Maxwell Heazlewood Experienced User Username: tasbent Post Number: 36 Registered: 9-2017 |
Wasn't it the SZ's who had their spheres moved into the boot....or was that to come with the Arnages? | ||
Paul Yorke Grand Master Username: paul_yorke Post Number: 1885 Registered: 6-2006 |
Brian, access is the problem And i have seen peoples suggestions for cutting and bending parcel shelves and strut supports.  Luckily I have the perfect tools. Well two pairs of tools actually. One is a snap-on 3inch fabric filter strap wrench and 1/2" drive Snap-on ratchet. Used for first attempt at removing and always for tightening the spheres. I'm embarrassed to use the second pair but it happens to be the best method I've fpund and has never failed. Took about 5 years of struggling and a few chats to Citroen specialists to accept it and perfect it. If I'm using them at a customers premises or the customer is waiting and watching at my place . . Just before tool pair two comes out ALWAYS happens to be the time I get thirsty and I request they put the kettle on. Old ones are out before they return. I'm not saying that this is the only way, but it is my way, tried and tested. SZ were always in the boot. Arnage and Seraphs are remote from the struts and moved to the diff (Great location for dirt) and boot. | ||
Brian Vogel Grand Master Username: guyslp Post Number: 2434 Registered: 6-2009 |
Paul & Maxwell (and I know Paul knows this): The SZs always had the gas springs in the boot and brake accumulators in the engine bay. I have come to hate the generic term "spheres" when talking about the SZs because it can so easily muddy the waters regarding *which* spheres. Brian | ||
Omar M. Shams Grand Master Username: omar Post Number: 1337 Registered: 4-2009 |
Mr Yorke.............. Pray tell the secrets of tool number 2..... | ||
Patrick Lockyer. Grand Master Username: pat_lockyer Post Number: 1549 Registered: 9-2004 |
And myself and Citroen workings the old way is two tools ie hammer and blunt chisel. There is a new way with air etc. | ||
David Gore Moderator Username: david_gore Post Number: 2684 Registered: 4-2003 |
Brute force and no finesse.............. Works every time. P.S. Paul - I am assuming you covered the witness marks arising from the removal with your hand when showing the spheres to the client  . . | ||
Paul Yorke Grand Master Username: paul_yorke Post Number: 1886 Registered: 6-2006 |
Yes it is just the old way, nothing new! A 600mm Cold chisel with an asymmetric edge ground to grip the sphere, not cut into it and a 2lb club hammer. Sounds and looks brutal but . . . As with all tools, it is how it is used that is important. Finesse and care is important. You are not trying to pierce the metal, Just form a small ridge to get some grip, and then a blow tangentially. | ||
Paul Yorke Grand Master Username: paul_yorke Post Number: 1890 Registered: 6-2006 |
My clients aren't really interested in looking at old parts. Luckily :D | ||
Nigel stubbs Coombe Unregistered guest |
Changing my rear Gas springs/spheres recently I broke two chain sockets trying to undo them. I had used same system on my previous 89 Turbo R. Went to a Citroen friend and he broke the seals with an hydraulic chisel on compressed air very dramatic . Then I could do them easily at home and transformed car .My car is built 88 so he suggested could have been original ones. and we did not have the green hydraulic lines in the way. (Message approved by david_gore) | ||
Nigel Coombe New User Username: nigel_adelaide Post Number: 3 Registered: 10-2017 |
Hi I have an article I wrote for SA club magazine on changing the Rear Gas Spheres a page long so maybe too big for a post but can email it to anyone. | ||
Nigel Coombe New User Username: nigel_adelaide Post Number: 4 Registered: 10-2017 |
Replacing Rear Gas Springs - Spheres Spirit and Derivatives. (Have had several requests for article so have posted - hope not too large) Gradually I started to feel hardness in the suspension so I checked the tyre pressures but what we really know it is time to change what I call the Rear Suspension Spheres but are officially Rear Gas Springs. Generally they need changing about every five years as the Nitrogen Gas gradually leaks out and they don�t have sufficient pressure. They have replaced the accumulators fitted to the Shadows. There is one in each of the top back corners of the boot to the side of the tools. Luckily they are coloured green so hard to miss. Firstly they are available from Flying Spares at about 40 pounds each but as they are fairly heavy the shipping can add 50 % to the price if they are air freighted. There will certainly be some local source but as it is not ever an emergency job as they fail gradually and do not stop you using the car they can be sent by sea freight. Next I made the decision to do the job myself so I investigated and with the help and kind advice of a friend here and one in the UK I thought I would have a go and I now share what I have learnt. The following steps resulted in success: 1. Disconnect the battery as you have to remove the battery cut out switch and any short would be disastrous. 2. Remove all the boot carpets as the mineral oil can spray everywhere and ruin the carpets. (So glad I did this.) 3. Next release the pressure in the system by undoing the bleed screw (7/16�) under the right hand rear sill just behind the very small shock absorber parallel to the floor of the car and just in front of the rear wheel. It is best to have a container to let the oil run into and even put a hose on the bleed nipple. Let the fluid run for a minute and then tighten the bleed nipple before you attempt to remove the spheres. Cars 1988 on generally only have one bleed nipple on the right hand side but the earlier ones have another on the left hand side of the car with which you have to undertake the same procedure. Although this year is not a hard and fast rule so check for a left hand one. 4. It is best to do the job when the car has been standing at least overnight and preferably longer. I did it after being overseas for 5 weeks. 5. Unscrew the Battery Cut Out Switch Bracket and push it to the side. There are three small 5/16� screws. 6. Make sure the new sphere has its special rubber seal with it. Place chain around sphere and undo. They can be very tight and I used a chain and socket oil filter removal tool that I bought from Sprint Auto for about $10. They undo in the expected direction and you can look at the thread on your new one if unsure. Have plenty of rags available to soak up any spillage. Once you have broken the seal the sphere will undo easily by hand. Expect a good splash of mineral oil and it will dribble out the fitting but it is easily wiped up. 7. When you go to fit the new sphere first locate the round rubber seal in the unit remaining on the car after soaking it lightly in mineral oil. Then start screwing the new Sphere in by hand without disturbing the rubber seal. To do this you must centre sphere but it will screw in easily as the thread is fairly course. Check with a torch that the seal has not been disturbed several times right up to the time where the sphere meets the seal. The main problem that can occur is the seal being dislodged resulting in a hydraulic leak. Tighten the sphere very firmly with the chain and socket, not just by hand but once it meets the seal it will only be less that � of a turn to very tight. Repeat with the other sphere. Always do them in pairs. 8. Replace Battery Cut Out Switch and test for leaks by starting the car before you reassemble the carpets. Suspension should rise nicely now. My car stopped scrapping as I back out the drive after doing the job. 9. Replace all the boot carpet panels checking for anything that has fallen behind them like tools out of your tool kit. I always blamed the mechanic who sold me my Bentley for taking the wheel spanner and brace and I had bought another one in London but I have found the original behind the rear carpet panel. Now I have two. 10. Check and top up if necessary the Mineral Oil under the bonnet. 11. They tell me some people re-gas the old spheres so if anyone wants mine they can have them before I throw them out. Nigel | ||
Paul Yorke Grand Master Username: paul_yorke Post Number: 1930 Registered: 6-2006 |
Good job . . but I would edit . . . Delete the part that says "They have replaced the accumulators fitted to the Shadows." Nope. Also, open the bleed nipple and leave it open until you finish the job. No mess or just a few drips. | ||
Peter Maclaren Experienced User Username: ludo Post Number: 34 Registered: 4-2009 |
Earlier on this thread I expressed my disappointment with the ride of my Bentley CH55635 and seriously contemplated attempting the task myself. However the more I looked the less confident I became, especially with the pipes obstructing access to the springs and the thought that if I 'stuff up' I'm a long way from help. After consulting with the only approved Bentley repairer in the south of NZ I gave the task to him. It was expensive, but as well as replacing the spheres they reconnected a dislodged height control linkage, test box checked the auto-ride system, and cleared codes. I then felt confident that the 80km ride home would be much better, and it was. While I am happy to tackle many of the maintenance tasks, and there seem to be an inordinate number for these cars, the springs were beyond me but obviously not for many members of this forum. Nigel's tip about checking behind the carpet is a good one as I spent some time looking for my telescopic mirror that I had used to check code numbers on the old spheres, and yes they were underneath the carpet. . |