| Author | Message | ||
Jean-Pierre 'JP' Hilbert Frequent User Username: jphilbert Post Number: 97 Registered: 9-2013 |
I found the instructions in the workshop manual chapter E6-3 to be not very explicit, hence I write these few lines to illustrate how I did it, and why I�d give the work a difficulty factor of 2 out of 5. First, I found it very hard to reach the 4-5 rear bolts on the pan as they are hidden above the small slot between the rear of the subframe and the gearbox bellhousing. So I decided to ��move�� the engine/gearbox assemply rearward by an inch, that gap gets larger, and I can reach the bolts with my tools (and fingers). To shove the engine backwards, I unbolted the 3 engine mounts (but left them in place). I then placed a ��tower�� consisting of a sturdy 4-wheel caddy, our jewelry house-safe and a protective mat below the oilpan. I then lowered the car onto that tower until I saw the engine raising out of the engine mounts (I have a lift at home, but this manoeuvre can be done with 2 jacks as well). Pushing hard on the caddy made the engine slide the desired inch backwards, and I was able to undo all the oilpan bolts in total comfort. Now, in order to remove the oilpan, you need to slide it forward so its rear can clear the aft part of the subframe. But the front engine mount is in the way, it needs to be removed. So how to support the engine when one cannot lift it up via the oilpan? The workshop manual says to put a sling around the front pulley and support the engine that way. That�s what I did, but with the bonnet installed on the car, and no space for a crane on the side of the car in my garage, I went to the gardenshed, fired up my chainsaw and cut 2 smaller blocks of wood to be placed on the front shock towers, and a larger ��beam�� to be placed across. 2 sturdy slings were placed around that beam and the pully . Car was lowered with the lift to raise the engine and tighten the struts. Then the car was lifted again, and hoppla, engine hand on the straps, enough to remove the front engine mount. Then the steering rack had to go, and the steering trackrods had to be opened in order to slide the oilpan out. Also, the transverse beam where the front engine mount sits on had to be removed as well. Only 4 bolts to undo, but 16 washers rolling on the garage floor...Takes less than 10 seconds to type this, but is a good hour of work in reality. But wait, the oilpan was still fighting me, and my flashlight revealed that the oil intake strainer has a rather tight fit inside the pan. Some wiggling and french language later and the oilpan was out. It�s rather nice to finally see the mother of all crankshafts, and to touch all the pistons and to see that my car has them too, those infamous cylinder liners! Now, the main difficulty with this job is re-assembly: you put steel bolts into an aluminum block. The inevitable happened: I rightaway cross-threaded the first 2 bolts. I stopped early enough to limit the damage to 2 windings of thread, which I drilled away because I did not have the correct helicoils available. I judged that the remaining 16 windings will be sufficient to hold the small tightening torque. Let the purists scream. Standard re-installation of the steering rack, moving the engine 1in forward again, re-attachment of the trackrods and the engine mounts, replenishment of the steering system with Dex II, and 10 liters of Castol�s finest 20W50 and the car is ready for the summer again. 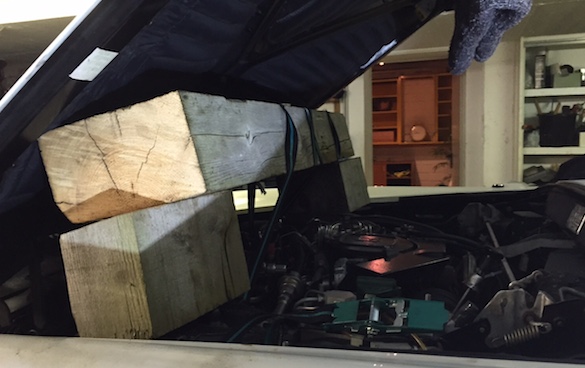 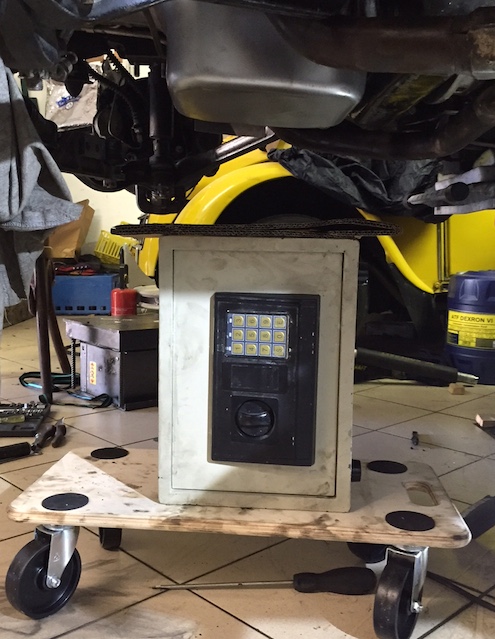 | ||
David Gore Moderator Username: david_gore Post Number: 1712 Registered: 4-2003 |
Jean-Pierre, You are the recipient of my award for ingenuity and dedication for undertaking what must be one of the most awkward and difficult tasks for a DIY custodian  . . Thank you for describing your experience and including photos showing how it was done. Congratulations on a successful outcome. | ||
richard george yeaman Grand Master Username: richyrich Post Number: 342 Registered: 4-2012 |
David you just beat me to it, Jean-Pierre you are indeed a battler and deserve Davids award. Richard. | ||
Christian S. Hansen Experienced User Username: enquiring_mind Post Number: 43 Registered: 4-2015 |
Masterful "workaround" genius at work, yes, but if that was a "2 of 5" difficulty factor, after reading the litany and trying to visualize it, I'm getting the nervous sweats even contemplating a "4 of 5", let alone a "5 of 5"!! | ||
Jean-Pierre 'JP' Hilbert Frequent User Username: jphilbert Post Number: 98 Registered: 9-2013 |
Gents, thanks for your unanimous thumbs up ))) Christian, other than the difficulties I had threading steel screws into aluminium, there was nothing really hard with it all. It was a calm flow of manoeuvres, fluent work. No swearing, no sweating. |