| Author | Message | |||
Mark Aldridge Prolific User Username: mark_aldridge Post Number: 213 Registered: 10-2008 |
Can anyone tell me the length of an uncompressed 1983 Mulsanne front spring. I cannot hire a compressor so it looks like making a set up as T1 Topics. I have a shockabsorber to change. Mark | |||
Robert Noel Reddington Experienced User Username: bob_uk Post Number: 35 Registered: 5-2015 |
I don't know for a SZ car. However the rear springs on a SY are approximately 21". On Shadows the front springs are removed by threaded rod or studding. Because the bottom of the spring is say 18 inches from the turret cap With front wheels off the ground. 20" rods should do the trick. Use nice thick washers. This gives 38 inches of room. Less nuts and washer thickness. Studding is helpfully available in 1/2 metre lengths 20 inches. And a rachet ring spanner. Grease the threads. Don't stand over the turret cap. Studding is handy stuff to have in stock in your man cave. It's cheap as well. My Veranda is held together with studding. also in Stainless and brass. Smallest I have seen was 4BA in brass and biggest was about M50 in steel. | |||
Mark Aldridge Prolific User Username: mark_aldridge Post Number: 214 Registered: 10-2008 |
Bob, the Shadow front set-up is identical to the Spirit. Any advice welcome. Thanks Mark | |||
Robert Noel Reddington Experienced User Username: bob_uk Post Number: 37 Registered: 5-2015 |
The idea is that each bolt that holds the turret cap to the turret is taken out ONE AT A TIME and replaced with threaded rod. Then the threaded rod nuts are evenly undone up the threaded rod. Thus gradually un loading the spring. I think M8 is the size. Obviously one must be careful because of the energy stored in spring. Once unloaded the rest in straightforward. | |||
Geoff Wootton Grand Master Username: dounraey Post Number: 733 Registered: 5-2012 |
Bob It occurred to me that would be a good way of removing the front springs. Have you any idea what type of steel to use for the threaded rod? Would mild steel be ok? We need the help of a good metalurgist  Geoff | |||
richard george yeaman Prolific User Username: richyrich Post Number: 293 Registered: 4-2012 |
Bill Coburn has demonstrated on Tee one Topics on several occasions how to remove the front springs on these cars using four threaded rods and a bottle jack, I have done this job on SRH19529 and from memory they have eleven coils and are about three inches longer than the rear approx. 25 inches hope this helps. Richard. | |||
Mark Aldridge Prolific User Username: mark_aldridge Post Number: 215 Registered: 10-2008 |
Richard, I am going to use the "Coburn" method, but could not find the length of rod required, although this will vary with the size of jack used.I now need to work out how far the spring will rise above the wing when uncompressed and hence the total length of each stud. Mark | |||
richard george yeaman Prolific User Username: richyrich Post Number: 294 Registered: 4-2012 |
Mark from memory 16"to18" is ok if I remember right Bill said a three stage jack might be better I used an eight ton jack with two stages it worked fine but I think Bills three stage idea would be better. Richard. | |||
Robert Noel Reddington Experienced User Username: bob_uk Post Number: 39 Registered: 5-2015 |
I like the bottle jack method better than my way. However I think 8 tons is a bit over the top. If the car weighs 600kg per corner and this compresses the spring when the wheels are on the ground then the preload on the spring isn't that high 8 tons. However if only an 8 ton is available then if obviously will work. But if a 2 ton is available I should think it's enough. M8 mild steel when pulled straight as in tension is quite strong. The more rods the better. I am sure my turret bolts are 5/16 unf. I took one out when mounting my LPG safety valve thingy. | |||
David Gore Moderator Username: david_gore Post Number: 1627 Registered: 4-2003 |
Geoff, I have an opinion but whether I can be classified as "good" is another thing altogether  . . Given the compression rates for the springs when installed and the consequent stored energy involved, I would prefer to see the threaded rods and nuts made from heat-treated alloy steel such as SAE4140/EN19 or, better still, EN25 [sorry about these obsolete names but there are modern equivalents available that any good steel merchant would know]. EN25 is an English steel specification which is arguably the most versatile engineering alloy steel for most applications requiring strength, toughness and/or rubbing wear resistance. I would prefer quenched and tempered rod to SAE Grade 8 or equivalent. To minimise thread galling when compressing/decompressing the spring, the nuts should be heat treated to a a hardness of 50 BHN [Brinell Hardness Number] less than that of the threaded rod or a good anti-seize EP grease used on the threads [do not use dry threads if the nut and threaded rod has a similar hardness/UTS [Ultimate Tensile Stress]. Above all, safety first at all times when unloading/reloading the springs during removal and installation. They are lethal weapons if the restraints fail or break free. | |||
Geoff Wootton Grand Master Username: dounraey Post Number: 734 Registered: 5-2012 |
David I am so glad you recognised my reference to you. BTW, "The help of a good metallurgist" is classic British understatement. I should remember I am talking to an international group and not use these nuanced phrases. "Expert" would have conveyed my true meaning. Thank you for the information. As a complete layman when it comes to metals and materials, the information you have given is invaluable. I have stored it for such time as I too may need to remove these, potentially lethal, front springs. Geoff | |||
richard george yeaman Prolific User Username: richyrich Post Number: 295 Registered: 4-2012 |
I only have an eight ton jack I think the jack that Bill used was a four ton jack the important bit is the height that the jack will lift to allow the spring to decompress this compression can be reduced by raising the front of the car thus letting the spring expand. Having done this job I found it to be less daunting than I imagined it would be. Richard. | |||
Geoff Wootton Grand Master Username: dounraey Post Number: 735 Registered: 5-2012 |
Richard Did you use the bottle jack method when removing your front springs, or did you release them by slowly undoing the nuts of the threaded rods? Geoff | |||
richard george yeaman Prolific User Username: richyrich Post Number: 296 Registered: 4-2012 |
Hi Geoff I used the bottle jack method and found it to be a fairly straight forward operation the procedure is well explained in tee one topics, I found it more straight forward than doing the rear springs. | |||
Brian Vogel Grand Master Username: guyslp Post Number: 1340 Registered: 6-2009 |
Long ago a then fellow member of the RROC-US, Ken Herrera, wrote the attached article and it was published in the Flying Lady under the title, The Most Dangerous Job.
He had already acquired an official RH8809 spring removal tool, but didn't have the adapter plate that has to be placed atop the spring tower top to act as its containment, so he and his son fabricated one. The entire RH8809 tool is very simple in design and should be relatively easy to fabricate. Of course, as has already been noted here, using the type(s) of steel that are up to the task of containing the energy of the spring is critical. Has anyone ever done this that haunts the forum and has lived to tell the tale? I'm trying to figure out what the two half-plates that are joined together around the bottom of the spring actually look like. From the photos in the article I imagine the respective ends of each half plate are half-thickness, lie on top of one another, and that two of the four long rods thread through holes at those locations to secure each half plate to the other, but that's not entirely clear. In the final photo it looks like the juncture of the half plates is located between the locations where the rods thread in. If anyone has the real tool, or photos of how the bottom half of the containment device is actually fabricated, I'd love to see them. Brian | |||
Robert Noel Reddington Experienced User Username: bob_uk Post Number: 40 Registered: 5-2015 |
EN steels were introduced in WW2. The EN means emergency number. The system worked ok so it got kept. Around 1970 I guess we went over to BS 970 steels. Part 1 carbon steel. The steels range from 070 M 20 which means 0.7 manganese and 0.20% carbon. To 080 M 50. Tensile strength ranges 400 N/ mm squared to 570 minimum. Part 2 high tensile steel. Only two. 817 M 40 and 970 ( 897 M 39.) Both 1500 N/mm squared. Proof is lower at 1240. The rest is stainless and exotic stuff. I use 070 M 20 for general stuff. Because it welds and machines well. This used to be EN 1A. For tougher stuff 080 M 40. This has 0.4% carbon. It machines well but will cause embrittlement if not welded carefully. 510 N/mm squared. 080 M 15 has 0.8% carbon this is for gears and sprockets because at about 0.8 carbon steel can be flame case hardened. 216 M 28 has 1.3 carbon and is good for cold chisels. 550 N/mm. From tables. ISBN 0-7487-0077-3. Dave Gore. Dave if this info is useful and correct, please transfer posting to tech data | |||
Geoff Wootton Grand Master Username: dounraey Post Number: 736 Registered: 5-2012 |
I may be missing or totally misunderstanding something here, but why is it necessary to use a bottle jack? Once the high tensile rods have safely replaced the bolts, why not release the tension by simply unscrewing the nuts, evenly at half a turn at a time? Geoff | |||
Mark Herbstreit Prolific User Username: mark_herbstreit Post Number: 128 Registered: 5-2005 |
Geoff, having just completed this job. I initially tried loosening the nuts evenly as you describe. Painfully slow. The bottle jack speeds up the process dramatically. | |||
richard george yeaman Prolific User Username: richyrich Post Number: 297 Registered: 4-2012 |
Mark that great that you have completed this task and for the record maybe you could describe how you accomplished this task as I get the impression that there are some members and others who if they were given enough confidence would be able to do the same. | |||
Robert Noel Reddington Experienced User Username: bob_uk Post Number: 46 Registered: 5-2015 |
I have never done this job. But I have done similar and it's painfully slow work. I think one turn at a time would be ok but 4 rods. The jack method does away with the stripped galled nut problem. Maybe a scissor jack would be better, because the minimum hieght is small. I would bolt the jack in though. | |||
Jean-Pierre 'JP' Hilbert Frequent User Username: jphilbert Post Number: 79 Registered: 9-2013 |
I've removed those springs 4 times by now, Corniche and Spirit, and I did not use an adapter plate on the top, I put the bolts straight onto the spring tower plate (with washers between) then undid them slowly, a ratchet helps a lot here. Takes 45 minutes, turn by turn, but I only used 3 rods, with 3 ratches in place to avoid losing time removing & repositioning the tool. My substitute for those bottom support plate halve are hooks from convention spring compressors, works just as fine! Really not rocket science! 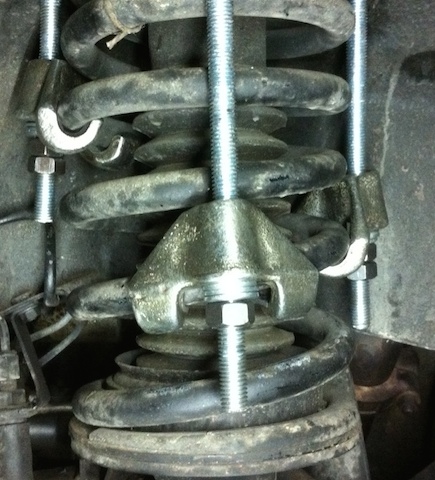 | |||
Brian Vogel Grand Master Username: guyslp Post Number: 1343 Registered: 6-2009 |
JP, Thanks for the photo. It seems that there are two distinct techniques, as Bill Coburn notes in Tee-One Topics, Issue 54. His method is to release the spring tension and remove it after that's done, while Crewe's original method is to contain the spring while compressed and remove it that way. It seems that no one who's contributed to this thread so far does it The Crewe Way. That's interesting, since containment appears to take less time and, given that I know of others who've done that more than once, is safe if done correctly. Brian | |||
Jean-Pierre 'JP' Hilbert Frequent User Username: jphilbert Post Number: 80 Registered: 9-2013 |
Doing it the ''Crewe's way'' will produce a contained spring on your garage floor. At first, this seems fine if you want to replace the damper or do work on the suspension. However, 1) you'll have a bomb on your floor all that time, 2) you'll need Crewe's second tool to release the tension on the contained spring assembly if you need to have the spring and the top plate separated. The method with the hooks is too wide at the base and does not allow you to pull the contained spring as per Crewe's technique. That's why Daniel (on this forum) had cut some form of a horseshoe, but the problem here is that the thing puts itself slant under the spring and hence won't fit through the dome hole either. One needs to build a slanted horseshoe that sits level under the spring in order to replicate Crewe's tool and technique. The technique of the bottle jack is tempting, but I can see the top plate coming out slanted and then hook up against the 3 (or 4) rods. The technique of undoing the 3 or 4 bolts will produce a nice, even release of the spring's force. As to Mark's initial question: a new spring is 22.6 in tall (as per FS website), 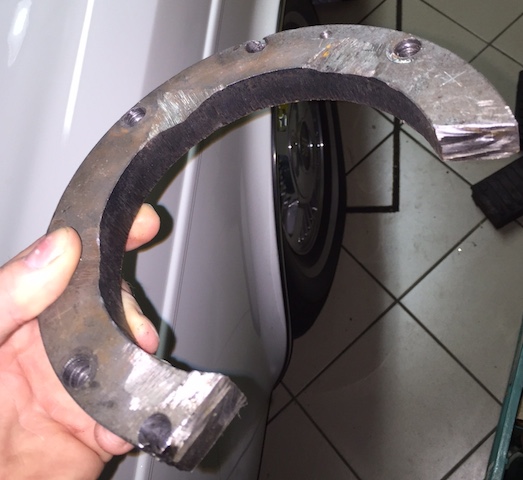 | |||
Robert Noel Reddington Experienced User Username: bob_uk Post Number: 50 Registered: 5-2015 |
The rod and unscrew the nuts a bit at a time is attractive because a thick round plate is not needed and the rods nuts and washers are cheap from the nut and bolt shop. having 4 rachets would speed up the process both hands 2 nuts at a time. I can't make my mind up. | |||
Robert Noel Reddington Frequent User Username: bob_uk Post Number: 51 Registered: 5-2015 |
Forgot. When I remove coil springs I like to tie the spring to a sturdy bit of the car with strong rope, old seat belt good. Should a spring compressor slip the spring can't launch itself. | |||
Jean-Pierre 'JP' Hilbert Frequent User Username: jphilbert Post Number: 81 Registered: 9-2013 |
Bob, that's EXCELLENT advice, but hopefully this insurance won't ever be needed! | |||
Robert Noel Reddington Frequent User Username: bob_uk Post Number: 73 Registered: 5-2015 |
Another safety tip is once the spring compressors have compressed the spring and the spring is on the floor is to put a tarpaulin over it. I think Bill Coburn saw a spring hit someone in the face which was fatal. Fortunately all I seen is holes in asbestos roofs. Newer spring compressors on the market have top hooks that close around the spring wire. Thus a bit more safe. Mine don't have this feature so one has to extra careful. Broken fingers hurt. I had a compressor slip the spring went banana shaped. That was scary sorting it out. Incidently the thread rod way is common to use on other makes of cars. MGB front Spring pan for instance. | |||
Daniel Diewerge Experienced User Username: didi13109 Post Number: 44 Registered: 11-2009 |
The horseshoe at work....spring removal takes 10 minutes. Cheers Daniel 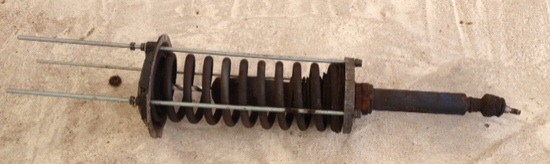 | |||
Robert Noel Reddington Grand Master Username: bob_uk Post Number: 351 Registered: 5-2015 |
That looks safe enough. One rod is inside the spring. The horse shoe is plenty strong enough. I think a good wire brushing will bring a bit of light into the job. Gloss black will look nice. |