| Author | Message | ||
Llu�s Gimeno-Fabra Grand Master Username: llu�s Post Number: 303 Registered: 8-2007 |
Dear list... My 1994 Continental R developed a major fuel leakage overnight from one of the four o-rings to from the fuel pressure regulator to the fuel rails. I will post pictures tomorrow, but for the time being it is clear that the offending o-ring was in pretty terrible shape... dry and cracked. My question to the forum is the following: I may only change the four o-rings, or change also the four hoses (which I guss makes sense) but I could also bite the bullet and take the whole intake appart and change the o-rings of the injectors. The last would require taking the intrincate manzfolds appart. What is your experience: Do you think I need to go that far? My guess was to change the hoses and o-rings from the hose to the rail, but not dismantle the injectors. We are talking of these: 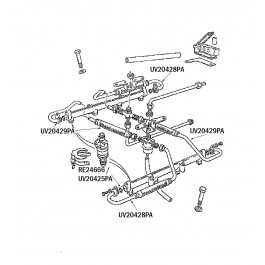 Any feedback is greatly welcome as I really need to order the parts. Merci... Llu�s | ||
David Gore Moderator Username: david_gore Post Number: 1506 Registered: 4-2003 |
Lluis - what does the service schedule for your car show for fuel injection system maintenance? I would expect a time-dependent replacement schedule for hoses and O-rings as the materials used are usually prone to hardening and cracking due to ozone, heat, chemical attack and other factors specific to their use. My initial reaction would be to replace everything whether it appears to be necessary or not - better to do everything at once as preventative maintenance rather than "bust and fix". | ||
Llu�s Gimeno-Fabra Grand Master Username: llu�s Post Number: 304 Registered: 8-2007 |
Allez donc. Bite the bullet... I will start posting pictures today. Llu�s | ||
Bob UK Unregistered guest |
Forgot. If you mean the seals that seal the injector into the inlet manifold. If these leak a vacuum leak will result. So if the inlet manifold is not leaking vacuum then the seals are good. But once the fuel rails are removed to change the top injector o ring then the injector should just pull out. The inlet injector seals are standard Bosch and tuning shops will have them. Once a system is pulled around, other things that are weak fail a short while later. (Message approved by david_gore) | ||
Bob UK Unregistered guest |
Luis, Although at first sight the job seems complicated it isn't. It just takes time. If one o ring has gone them the others won't be far behind. The o rings are std and available from engineers supplies. Do tell them that it is required for petrol. The pressure is less than 100 psi and therefore not difficult for an o ring to seal. Fit New fuel filter. Any suspicions that pipes may be less than good I would replace. All petrol pipes should have fuel sae written on them. Do not use pipe not so marked. The pipes and o rings are cheap. Also try tuning shops, they will have all the proper stuff. Also they will have a selection of pipe clips from fancy to plain. (Message approved by david_gore) | ||
Richard Treacy Grand Master Username: richard_treacy Post Number: 3160 Registered: 4-2003 |
You have a golden opportunity to do some really useful tasks. That Bosch series with the fuel rail and attachments all over the place makes many of these jobs outrageously time consuming as individual corrections. Earlier motors are simple for each of the following but the motors with the fuel-rail are definitely not. � Replace both brake pump covers and reseal them. No need to remove the pumps. � Replace all the temperature transmitters � Check the two turbo boost solenoids and replace as required � Replace the thermostat � Replace all the fuel rail o-rings � Replace the TPS � Replace all hoses, gaskets and perishables in there of course RT. | ||
Richard Treacy Grand Master Username: richard_treacy Post Number: 3162 Registered: 4-2003 |
With the cheapest Continental R for sale at $148,000 the cost of those items pales into insignificance. http://www.carsales.com.au/private/details/Bentley-Continental-1997/SSE-AD-3067605/?Cr=21&sdmvc=1 | ||
Llu�s Gimeno-Fabra Grand Master Username: llu�s Post Number: 306 Registered: 8-2007 |
Hi again, Thanks for the replies. I am indeed doing as suggestes, but the four bloody pipes cost in excess of 600 UKP in Flyingspares See here: http://www.flyingspares.com/shop/rolls-royce-bentley-fuel-feed-pipe-ue75045-uv20425.html I am whether a good hydraulic shop could recondition mine actually. In the previous post I also attach the thermostat removed from my engine. The one I have, supposedly genuine, does not have the leads, what do you think, should I risk it or not? For the sake of completeness these are the offending pipes as removed from my engine http://i1282.photobucket.com/albums/a537/gimenofl/imagejpg2_zpscdd1e363.jpg Furthermore we have the other side, which was not leaking but in equally dire condition (see o-ring) http://i1282.photobucket.com/albums/a537/gimenofl/P1040249_zps43478815.jpg TPS was on the way out as I am quite convinced that an intermittent check engine I got was the TPS not getting the idle position. The intake needed also a clean up and I might as well get the injectors ultrasonically cleaned. What do you think? | ||
Llu�s Gimeno-Fabra Grand Master Username: llu�s Post Number: 307 Registered: 8-2007 |
Hi again, This is the picture with the old and the new thermostat one next to the other. What is you opinion, should I run a thermostat without leads? http://s1282.photobucket.com/user/gimenofl/media/imagejpg1_zpsac3d11df.jpg.html http://i1282.photobucket.com/albums/a537/gimenofl/imagejpg1_zpsac3d11df.jpg I also realised that there are two metallic water pipes in the vee. Is there any maintenance I should to to these as the intake is out, like changing o-rings? There is also some oil spillage in the middle of the vee, I am putting new silicon rocker gaskets while we are at it, but is there something else that can leak oil down there? I will not go as far as the head gasket (which apparently sweeps in these engines???) but are there other components that could need new gaskets in this are? Merci again to you all, Llu�s | ||
Bob UK Unregistered guest |
Check the cover that the brake pumps bolt to. Also the metal pipes, check all over for pitting. I assume antifreeze is always used and there water ways are clean. Also stainless braided petrol pipes are the bees knees for looks. Bling. (Message approved by david_gore) | ||
Llu�s Gimeno-Fabra Grand Master Username: llu�s Post Number: 311 Registered: 8-2007 |
About the cover: What is the sealant that is used there, my impression is that it's something harder than universal engine silicon based sealant? | ||
Llu�s Gimeno-Fabra Grand Master Username: llu�s Post Number: 312 Registered: 8-2007 |
Introcar now stocks Stainless Braided lines, but I will rather go to a good hydraulic shop near by and see whether they can put new elastic pipes in the metal elements. Come on, over 600 pounds for the original ones is outrageous, not that I am in dire straights far from that, it's that it's simply outrageous. I guess there are no counter indications to this approach? See you, Llu�s | ||
Bob UK Unregistered guest |
The sealant if harder than silicon is probably red hermtite. A bead of silicon is fine but don't over do it. Just a bead. 600 is outrageous it's metal pipe with flexible hoses pushed on and clamped. I could make the lot for less than 40, for a nice looking job. Or 5 using plain fuel hose and worm drive clips. Check out a race shop, I should think they have braided stuff and swaged connectors. This stuff is very high quality. Don't forget to tell who ever is doing the pipes that it's petrol at 100 psi. ( probably 50 psi but play safe) and in a hot place. (Message approved by david_gore) | ||
Llu�s Gimeno-Fabra Grand Master Username: llu�s Post Number: 314 Registered: 8-2007 |
Hi, Expect a big update. All top of the engine is out to the heads (a nice job in the dual-ram engine. I discovered many interesting things is the process and will post many more questions. See also updates in linked threads... See you, Llu�s | ||
Llu�s Gimeno-Fabra Grand Master Username: llu�s Post Number: 317 Registered: 8-2007 |
Hello all, Let us start by the beginning. Take appart the dual ram system in post 1994 models is fun. I started with the front left pipe and continued by going to Nr 2 front right pipe and then following in X fashion... http://i1282.photobucket.com/albums/a537/gimenofl/imagejpg2_zps9a12e360.jpg It's a couple of hours work but all comes out appart nicely. IETIS recommends to start with the water rail, but I see no point as the pipes are always in the way. All in all this is what it looks like when it starts to be cleaned up... http://i1282.photobucket.com/albums/a537/gimenofl/imagejpg6_zps774094b5.jpg Now starts again the fun with Bentley's philosophy... the seals of the pipes. They are beautiful, non cracked and in perfect shape... but there is no sealant around them and with metal spacers in them, they there is no way you can tighten them to compensate for "loosening up" so a major source for air leaks. See here http://i1282.photobucket.com/albums/a537/gimenofl/imagejpg7_zps8300d09e.jpg I will be re-using them but this time I will be using sealant when installing them. The injector rail comes up very easily when all is out and it has now been ultrasonically cleaned, re-sealed and is coming back home tomorrow. The same applies to the fuel hoses. A local hydraulics shop did them for 20 Euro the piece. http://i1282.photobucket.com/albums/a537/gimenofl/imagejpg8_zpsffaf9fa2.jpg As suggested, I am taking appart the cooling galleries and re-sealing them, they have o-rings as does the heater take off so it's time to do them now that all is appart. Also evident is the fact that my engine vacuum is too high and the engine is swallowing oil... great. I am having a catch tank made to make sure, that even after overhauling the system and getting the right crankcase flow (possibly with a restrictor) I will not be accidentally contaminating the engine again. I found an artisan that will do the PAS reservoir and the coolant reservoir for a couple of hundred Euro to original shape and specification in aluminium so that will be one more to do. Please in case that you see something going wrong here, do tell me. PS to Richard: Increasing the turobo pressure to 0.7 bar is great, but when I will update the original post, I will indicate also that the complete sealing of the ram-pipes should be checked. I am positive that increased pressure has to do with opening leaks, as minor as they were. See you soon with more news. Llu�s People: Am I forgetting something? http://i1282.photobucket.com/albums/a537/gimenofl/imagejpg8_zpsffaf9fa2.jpg | ||
Bob UK Unregistered guest |
I reckon you have covered all the the bases. The thermostat elbow may be painted satin black to give a nice fast car look and contrast with the shiny braided hoses. And boot polish makes rubber hoses look good. Bottom hose and drive belts. I like to with water hose clips hid the buckle bit underneath the hose so it looks sleeker. I use all stainless with 7mm a/f head size and use 1/4 drive socket. } (Message approved by david_gore) | ||
Jean-Pierre 'JP' Hilbert Experienced User Username: jphilbert Post Number: 29 Registered: 9-2013 |
Lluis, Reading your posts, the thought of a recent discussion on the US forum comes to my mind, it was about the weak non-asbestos head gasket on those heavily turbocharged engines, their failure mode and the benefits of preventive replacement with the improved type. As you've got your engine stripped down to the heads, you may want to consider just that! Did your car ever get new head gaskets, is it still the original? | ||
Paul Yorke Grand Master Username: paul_yorke Post Number: 1360 Registered: 6-2006 |
Hi,just noticed this thread but I'm rushing by. Will try and read it more throughly. The cam cover is sealed with locktite flange sealant. Anything thicker will affect the hydraulic pump push rod height. | ||
Llu�s Gimeno-Fabra Grand Master Username: llu�s Post Number: 319 Registered: 8-2007 |
Thanks so much for the input, Head gaskets: Interesting point. Well I am surprised how easy everything went so far so yes, why not try them? I will post more photos this afternoon with everything clean, but the engine is a delight to work on, just very packed. I ordered a genuine TPS. To get to the heads the whole ancillaries, filler neck et al in front of the engine must come out. Correct me but my head-bolts are up to torque, the head does not seem to leak anything and at 60000 miles I am not looking forward to it unless it's a must-do. My impression was that these heads leaked because of warm-up tension, not combustion chamber related failure? To BOB: At the end I re-piped the original ones with SAE 100-R6 28Bar pipe, no shiny bits in my engine :-) but indeed I will be rust-proofing with black enamel paint some surface-pitting in metal parts. Again my open questions: Something against really sealing the intake elbow-to head? It looks really not tight to me in original specification. The PCV only vents to one throttle body, meaning that they must be out of balance (I will check as I have a Mini with four ITB's, so the Bentley with its two ITB's is do-able and I have all equipment. WHY NOT making a T-pieve to the twin vacuum intakes on the elbows and have the PCV vent there. I would then use the original PCV port for a vacuum-boost gauge. Any screaming advice against a catch tank. Richard's explanation in the oil leakage thread makes perfect sense, but independently of sealing the foam joint why should I risk flooding again the combustion chambers with oil accidentally because of a PCV malfunction when I can simply decant the oil and also get rid of humidity and sludge? Last but not least the water passage joints (some sort of cardboard) have a green and a black side: do they need to the be in a particular order? Would you seal additionally the coolant galleries (I am putting new o-rings) with universal sealant as well. As flimsy as they look are leaks common there? Thanks again, Llu�s | ||
Richard Treacy Grand Master Username: richard_treacy Post Number: 3167 Registered: 4-2003 |
Hardly. The Turbo boost pressures we are talking about are paltry. Many excuses have been given for inexperienced service people unable to bleed a cooling system like this properly. There are too many excuses out there for failures of head gaskets on post-1993 cars. It is not as blindingly simple as on a Silver Shadow or early SZ. Those who know SY and early SZs assume that the earlier agricultural methods will do the job. For a start, the fill point is below the highest level at the top radiator tank. Try an Arnage. They are diabolical to bleed even with tools and method. That is probably why almost every Arnage sent to a very competent but inexperienced workshop has had at least one set of blown head gaskets. RT. | ||
Jean-Pierre 'JP' Hilbert Experienced User Username: jphilbert Post Number: 30 Registered: 9-2013 |
The gaskets can fail when one pushes a cold engine hard. The static torque specified for tightening the heads is for a cold engine. The correct ''clamping force'' to fully seal the combustion chambers only happens when the engine (including the heads) is heat-soaked to normal operating temperature. Depending on how you and the previous owner(s) have driven the car, your head gaskets may live on borrowed time. As you already are that deep into the engine, I would do them if it was my car. All the horror issues like warped heads, cracked blocks don't apply to your car because the gasket has not failed. I strongly believe that you are in for a smooth procedure. Anybody would want to comment on this? | ||
Richard Treacy Grand Master Username: richard_treacy Post Number: 3168 Registered: 4-2003 |
Borrowed time starts at 600,000km of really hard driving if everything is in good shaped with these understressed motors. 6.75L and just 350-450 HP or so is a doddle. Besides, the turbocharged motors driven hard cold have no higher failure rates with head gaskets than naturally-aspirated 220HP wedding cars floating around at 60km/h using just 50 horses maximum. Too many excuses. | ||
Jean-Pierre 'JP' Hilbert Experienced User Username: jphilbert Post Number: 31 Registered: 9-2013 |
I wish my 1985 would produce 220HP ;) I have the US-spec with 7,3 pistons. | ||
Llu�s Gimeno-Fabra Grand Master Username: llu�s Post Number: 320 Registered: 8-2007 |
ohhehehe Much progress today much much. I got the injectors and rails back from the ultrasound cleaning as well as the whole induction, which is now degreased together with the coolant rails and thermostat piece. Looks lovely. Additionally all fuel hoses have been serviced and look equally nice. Flyingspares has supplies plenty of stuff incredibly fast. Basically all joints and seals I did not touch the hydraulic pumps as I have no tools for them and they were re-sealed 3 years ago. Richard: Can you please tell me how to bleed the cooling system? Photos follow when my daughter gives me the I-Pad. Merci, Llu�s | ||
Llu�s Gimeno-Fabra Grand Master Username: llu�s Post Number: 321 Registered: 8-2007 |
Let's start with this: 65000 miles and this is how the coolant o-rings look like (always with approved coolant). I bought the car with 24000 genuine miles all Bentley serviced... the model is Claudia, my daughter :-) http://i1282.photobucket.com/albums/a537/gimenofl/imagejpg5_zps94119eb7.jpg They are cracked on one of the edges, still elastic though and no clue how much would they have hold. Now the rebuilt fuel rail: http://i1282.photobucket.com/albums/a537/gimenofl/imagejpg2_zps8f293f3a.jpg Appart from the fact that it looks now clean, well the o-rings were quite fine. We will see that ultrasounds did to it. Engine valley all clean and ready for rebuilt of the coolant rails and intake. http://i1282.photobucket.com/albums/a537/gimenofl/imagejpg1_zpsa8b35fcd.jpg The view from the kitchen so that the family knows that I am alive (lol) I know it's not Bentley related but it can give you an idea on how to work on the car and talk to the wife simultaneouly... http://i1282.photobucket.com/albums/a537/gimenofl/imagejpg5_zpse64d53a2.jpg A 1000 Euro worth of filters, seals and staff. Tomorrow the TPS arrives, for 270 Euro. This week end I will start the assembly process. Voila... Llu�s | ||
Llu�s Gimeno-Fabra Grand Master Username: llu�s Post Number: 322 Registered: 8-2007 |
Oooops E-mail received that the TPS arrives on Saturday, but with a 26% discount. I pay then 228 Euro, not too bad. | ||
Paul Yorke Grand Master Username: paul_yorke Post Number: 1361 Registered: 6-2006 |
Quickly again while I'm having a cuppa. Crankcase ventilation should , I beĺieve, have a tube in tube to the opposite throttle body. Do not try to tighten down the inlet trumpets, they will have some movement when the bolts are tight. No special tools needed for pump body seals. I would change again. A quick job at this stage. | ||
Llu�s Gimeno-Fabra Grand Master Username: llu�s Post Number: 323 Registered: 8-2007 |
Paul, its impossible that this trumpets seal well under vacuum and pressure and yes with spacers no possibility to tighten, so why not a bit of sealant? | ||
Paul Yorke Grand Master Username: paul_yorke Post Number: 1362 Registered: 6-2006 |
I don't think sealant will harm. The rubbers are thick in enough to fill the spaces but do feel odd. We've had a few cars in that people had over tightened the bolts and they just snap as you go to loosen. I prefer lead shot thermostats. | ||
Bob UK Unregistered guest |
There are quite a few cars around where the filler is not the highest point of the system. If a cooling system won't bleed and there's air trap above the filler neck level. On Renault cars the method is to UN strap the expansion bottle and hang off the bonnet up high then fill the bottle with coolant and open the rad cap as soon as the coolant reaches the rad cap put the cap on. Then open up a bleed nipple. Some cars had seized nipples so to save snapping something I would half pull off the heater hose and when it leaks tighten up. I used to do this with engine not running then start engine and bleed by nipple only. Most times the air comes out before running engine. Is it possible to do similar on these cars. (Message approved by david_gore) | ||
Llu�s Gimeno-Fabra Grand Master Username: llu�s Post Number: 324 Registered: 8-2007 |
Hi there: Good, almost done now: The final list (no I did not do the heads :-) All seals and o-rings in the valley changed Trumpets cleaned and re-sealed Cork gasket replaced for the left tappet chest (did the right ages ago) with the modern silicone one. Injectors overhaules, all seals and o-rings replaced. Fuel lines re-tubes with SAE 100 R6 PCV system modified with an oil catch tank (1 liter). All air and vacuum hoses replaced with black silicone ones. TPS replaced. Thermostat replaced. Total cost (always nice to know in a forum): Seals and o-rings: 350 euro (there are MANY and all oil resistant so pricey) Filters (Oil, Air, fuel) 100 Euro Fuel hoses: 100 euro Thermostat and seals 85 Euro TPS: 238 Euro Fuel rails reconditioning: 195 Euro Catch tank: 70 euro Meters and Meters of silicon hose, includung the main air pipe and ram pipes: 140 Euro Various stuff: It's about 1500 euro... Let us us the result next week when all is put back together: one thing is for sure the engine bay looks very nice when it's all clean and smelling to fresh silicone. Will post pics later or during the week end. Moderator: Is it OK to publish the pics with photobucket or do you rather have real pics dowloaded? | ||
David Gore Moderator Username: david_gore Post Number: 1517 Registered: 4-2003 |
Hi Lluis, It is more convenient to upload the pictures into your post where they can be viewed in perpetuity. I have had problems in another forum which I moderate with pictures held in external storage subsequently being lost due to the user closing the external site or the site changes its location/address and the access links no longer work. Just use the command: backslashimage{anyname you choose} - delete backslash and use \ as I have used this to avoid confusing the current forum software. When you go to send your post, a new screen opens for you to link the photo's location on your computer for uploading the image to the forum with your message. This will be a short term method as I expect the anticipated introduction of new forum software will include a simple method of including photos in posts. Regards David |