| Author | Message | ||
Stefan Morley Prolific User Username: myupctoys Post Number: 264 Registered: 7-2009 |
Hi, Next step is the fuel distributor. Reason I'm taking it on is given the car idles fine and for the most part runs fine, I assume physically the parts must be in reasonable condition. Secondly over a year ago I measured the pressure from the upper chamber and it was within spec. Thirdly originally the fuel pressure leak-down was within spec but has since become a lot worse. Lastly while I haven't pulled all the injectors out to test spray pattern, I have tested the pressure they all open at. All clues the O-rings are a failure point. Question, what is the difference between the "old" rubber that fails with ethanol blends and the new rubber that is ethanol tolerant? I've read Merc and Porsche forums some people have used Nitrile successfully but others had to rebuild with Viton rubbers. Second question. Does anyone have an exploded diagram of the fuel distributors? The older distributors had a thin metal plate used as part of the diaphragm (ie on older porches) but from what I can gather the newer one uses rubber diaphragm specially moulded like in Merc's 500's etc. Details are not clear in the manual although the diaphragm is shown of a sorts. Once I get the job underway will post some piccies. Many Thanks Stefan | ||
Stefan Morley Prolific User Username: myupctoys Post Number: 267 Registered: 7-2009 |
Back again. Done a fair bit since the last post but hit a snag. Had a gut feel I would but never know your luck. BTW Viton is the way to go. Replaced all the Orings and diaphragm and the unit holds pressure now. Can see why the unit leaked, all the Orings where rock hard and the diaphragm, while not leaking looked like a piece of melted plastic. Step in the right direction. Useful tit-bit, had two injectors that leaked. Blasted air through them with a compressor. They now come to within 1 PSI opening pressure of the others and hold pressure. Knew the mix/idle would had been compensated iteratively over 23 years years and that I would be out. Sort of hoped I would be in the ballpark but no such luck. Anyone who has played with these knows you have about 1/4 turn between running and otherwise. All the gems on the web say you need a CO analyzer but thats pretty useless if you're not running. Once running, simple manifold vacuum will get you close, then the CO will get you spot on. Has anyone got a crude method to get the mixture in the ball park? Or any other tests that might help? Thanks Stefan | ||
Stefan Morley Prolific User Username: myupctoys Post Number: 268 Registered: 7-2009 |
All good. Pretty easy once you figure it out. The way I did it was pressurize the fuel system then turn off the fuel pump. Lightly press the metering vane whilst adjusting the mixture screw till you feel slight slop (about 1mm movement at the vane) between the metering roller and the bottom of the fuel distributor plunger. You can't see it but you can feel it. Final position was within 3/4 of a turn from this initial point. The above wouldn't work if you had a leak in the distributor but than again if it's leaking you won't get anywhere anyway. Haven't driven it yet but it is slightly smoother at idle and rev's without any sign of hesitation. Most noticeable thing is the rev's pick up a lot quicker than before and thats without the cast elbow attached. Once the crap in the exhaust clears from playing over the last couple of days, I'll hook my CO analyzer up and finish it off. Will post the piccies soon and the couple of gotchas I found. Cheers Stefan | ||
Stefan Morley Prolific User Username: myupctoys Post Number: 270 Registered: 7-2009 |
Hi, The gotchas. Take photos, more the better. Thought process was if I pull the distributor apart and keep all the bits in the right order, including which way the springs go, the only real variables should be the new rubber parts. Scribe the slot for the metering slit head in the base of distributor. This is important to ensure the original calibration of the head relates to the right injector port. Take close up photo of the plunger retaining screwed insert coupled with rubber pressure ring. It does not screw in all the way to the housing. Screwing it all the way in means the plunger can't close and will always allow fuel to pass to the injectors no matter what mixture setting you have. Whilst not a perfect test, can tell if the injectors are passing fuel. Follow manual to pressurize the system without running the car (use a wire link on starter inhibit and window washer). The injectors squeal even with quite small amounts of fuel. Checked all the Injectors with a modified tyre pressure gauge and compressed air, managed to buy one with 60psi max. Whilst probably not dead accurate, bourdon gauges tend to be repeatable. Bonus, two where leaking more than they should and the compressed air blasted them clean. All at 54PSI +/- 1psi and held air pressure well over a minute. With distributor back on, measured flow rate for each injector outlet. Set the meter vane to something that looked like idle. With all the injectors hooked up, one by one replaced each injector port with an tube to a measuring cup and let the pump run for 30 seconds. All tuned out to be within 1>>2ml of each other. Close enough that couldn't really tell. Getting the mixture wasn't too difficult as mentioned before. However there is only 1/4 of a turn in it. First time I replaced the distributor head no mixture setting would work. Thats because the retaining ring was screwed all the way in. Obvious once you know whats happening, clue was the injectors squealing when they shouldn't have been. Biggest gotcha I had was the depth the metering plunger retaining ring was screwed in. Photo saved the day. Photos Next Cheers Stefan | ||
Stefan Morley Prolific User Username: myupctoys Post Number: 271 Registered: 7-2009 |
Distributor removed. 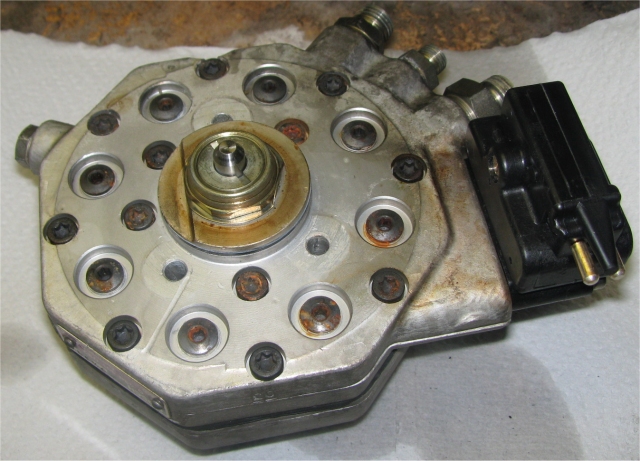 Slot in metering head and scribe mark 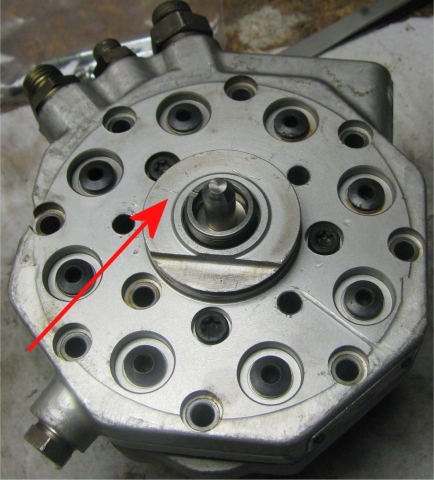 Disassembled, old Orings and diaphragm. Note numbering on parts to aid re-assembly 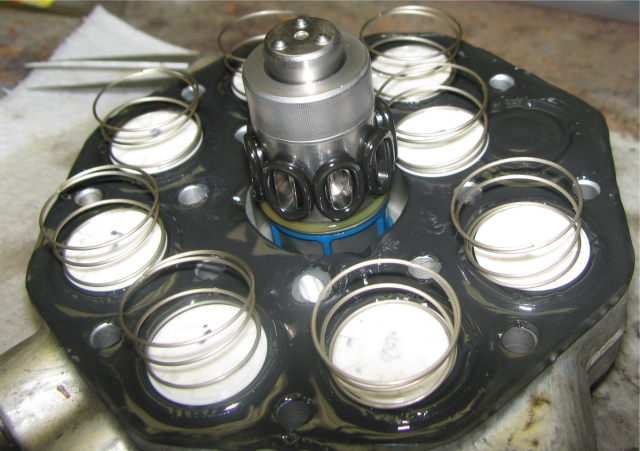 All the bits 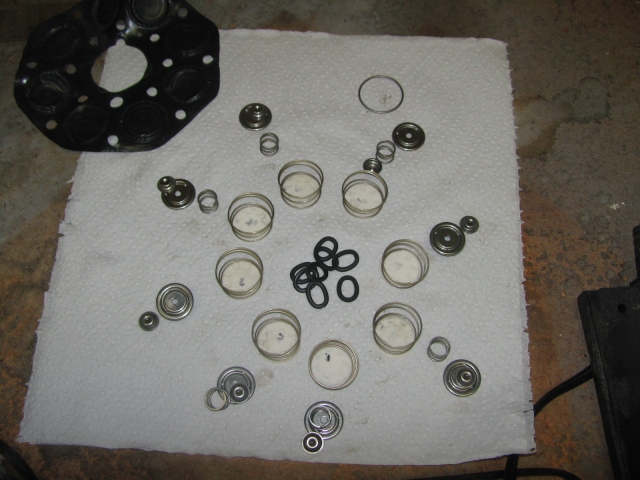 Metering plunger and retaining ring with nut  Metering head 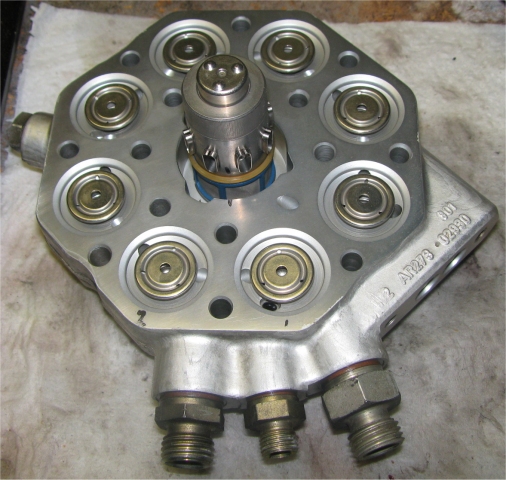 Just about ready to go back together 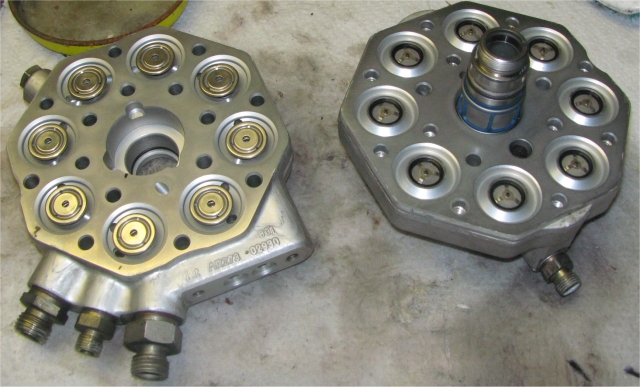 Retaining ring and nut, note depth. Also new Oring that mates with body of metering head.  Shows the roller that touches the base of the plunger. Can just about see the mixture setting screw. 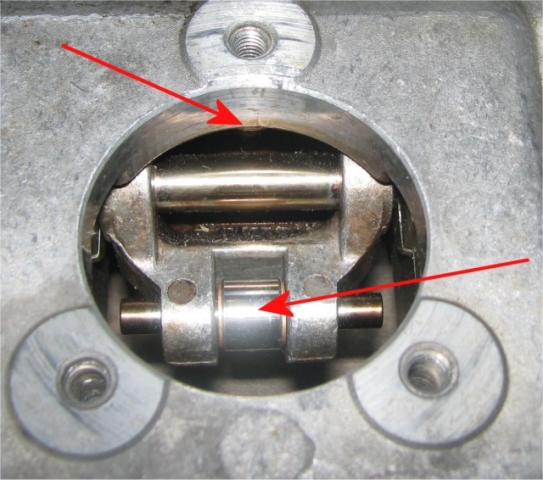 Finished. Well second time around anyway after I fixed the plunger retainer issue. 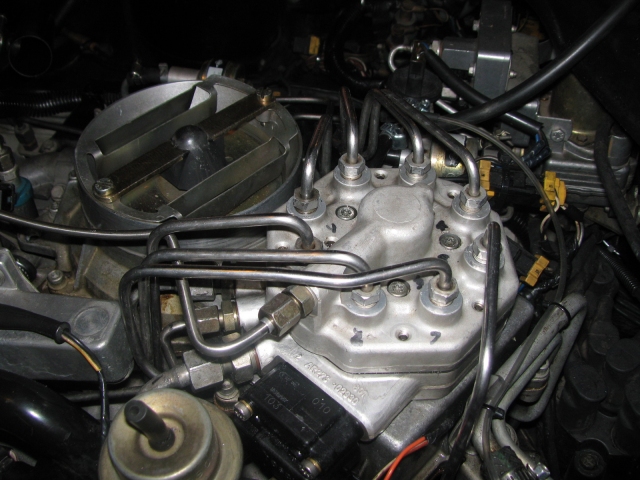 Although I was apprehensive taking this on it seems to have turned out better than I expected. Will know soon enough once I get the CO done. Cheers Stefan | ||
Stefan Morley Prolific User Username: myupctoys Post Number: 272 Registered: 7-2009 |
Couple of additional things. The Torx screws got tightened to 80 inch pounds. When pulling apart, other than the Locking ring and Torx screws there is nothing else holding the unit together. Take care all the bits don't fly out when dismantling. Once the Oring and diaphragm seals are broken there is plenty of latitude if your careful. When finally pulling apart keep the base towards the ground. The lower washers and springs are not physically retained. There is a hole that passes fuel between the bottom half and the top half of the unit. Make sure the new diaphragm is placed so this isn't blocked. When reassembling the unit the order that works is the base, the bottom springs and metal washers, then the diaphragm then the plastic disks with upper springs. Lowering the upper half with metering head already inserted, moving top half around slowly allows the springs to be located properly into the upper half and onto the diaphragm. Make sure you've considered the orientation of the metering head corresponds to the correct injector port and it corresponds to the scribe mark you placed on the base. Sized and bought Viton Orings from http://www.ludowici.com.au/web/ although I'm sure there are many others. The diaphragm was from Ebay in the states, bloke does RR and B spares. Search for BOSCH FUEL DISTRIBUTOR DIAPHRAGM ROLLS ROYCE & BENTLEY in Ebay and you should have it. Hopefully should help someone out. Cheers Stefan | ||
Paul Yorke Grand Master Username: paul_yorke Post Number: 734 Registered: 6-2006 |
Fingers Crossed then Stefan. Looks like a good job well done. :D | ||
Omar M. Shams Prolific User Username: omar Post Number: 189 Registered: 4-2009 |
you really are a brave man Stefan. i took one of these things apart from a renault when i was in my late 20s.......... I am still reliving the trauma when it all flew apart upon disassembly. Very brave indeed!! Looks like you have done a superb job too. | ||
Stefan Morley Prolific User Username: myupctoys Post Number: 278 Registered: 7-2009 |
Thanks for the good wishes Paul and Omar. Know what you mean Omar, rebuilt a Porsche distributor many years ago. Fortunately only two springs got mixed up and once put together, was quite obvious I had it wrong. Murphy has a lot to answer for. They used a thin metal diaphragm, difficult to pull apart and a royal pain in the butt to seal. The rubber one makes a life a lot easier. Got the CO set at idle to 1.1%, fluctuates a bit when you rev it but settles back down. Took it down the shops this morning, runs nicely and slightly smoother although yet to properly push it. Want to be sure the EHA is set right before I do. Don't need a leaned out mix under full throttle. Anyone got a good method of adjusting the EHA. I can't be far off as the EHA is included in the system at idle and would contribute to the idle mixture setting. However even with the mixture set right, the EHA could still be off given the idle speed and mixture screw would be set to compensate to get to that measurement. Hopefully that thought process makes sense. Fine at idle but possibly not where the EHA is really required in the boost/rpm mapping. Aside a Dyno any thoughts? Cheers Stefan | ||
James Feller Prolific User Username: james_feller Post Number: 169 Registered: 5-2008 |
jesus Stefan.... I look upon the photos with a mixture of terror and wonder. I concur with Omar, you are a brave man and certainly worthy of a medal for patience, consistancy and rectification. Your exploits are a delight to read on the forum and the best thing is you are providing at the very least, inspiration for old 'two thumbs' ( ME ) that nothing is as horrific as it may first seem.... Congrats! Cheers J | ||
Stefan Morley Prolific User Username: myupctoys Post Number: 279 Registered: 7-2009 |
Thanks James, Testament to the cars. They can actually be fixed unlike some other plastic fantastics. Figured out the path to getting the EHA sorted. Idling is great but know I'm running rich. When funds allow going to buy a broadband O2 sensor with data logging capability and hook it permanently to the car. Means I have the next best thing to a dyno and will know if something goes wrong in the future. Will post details when it happens. My car is KE2 so no O2 sensor unfortunatly, otherwise it would be a bit easier. Cheers Stefan | ||
Stefan Morley Prolific User Username: myupctoys Post Number: 282 Registered: 7-2009 |
Hi, Thought I'd add a note a month after the rebuild. The CO changed a bit over a couple of weeks. But seems to have stabilized. Can only put it down to seals/diaphragm etc etc bedding themselves in. The rebuild seems to have worked. Despite still needing to setup the EHA the O2 readings at idle is surprisingly stable. Adjustments of the EHA seems to behave as expected as well. Don't you just love mechanical fuel injection systems..... Bit of electronics goes a long way. Cheers Stefan | ||
michael vass Grand Master Username: mikebentleyturbo2 Post Number: 332 Registered: 7-2015 |
Hi All I'm thinking of overhauling my fuel distributor. If I undo my injector pipes fuel just about seeps out, is this ok or should none come out at all even over a period of time? My model number is 0438 010 040, how different to yours would this be? would I have to adjust anything if I keep all inline as you described? Thanks Mike | ||
Stefan Morley Grand Master Username: myupctoys Post Number: 384 Registered: 7-2009 |
Mike, Don't pull it apart unless you need to. That said. Yeah fuel will seep out for a while, there will be reserve fuel pressure from the accumulator and possibly some from the tank with expanded fuel vapors. Maybe 2>>300 ml would leak out with a fully charged fuel accumulator. No idea about the model number specifics but they all function similarly. Make sure fuel delivery from the eight ports is within 5% of each other. Mine was 1>>2% of each other so didn't need to adjust. Setting up the EHA and fuel mixture is a balancing act, really can only be done effectively with O2 monitoring. You'll get the car started and running without that, but not optimum. Measure the depth of the large slotted screw from the base of the distributor (after you've taken the retaining nut off) and the depth of the plunger. Need the two measurements in case your new O-ring is thinner/fatter than the original. Nominally the threaded section protrudes about 0.6mm. Give you an idea, 0.3mm is not enough and the car will starve for fuel if it starts at all and 1mm will make it massively rich and unstartable. The trick for getting the car started after a rebuild is to pressurize the fuel system and while moving the metering vane with your fingers, adjust the mixture screw till you feel a small (maybe 0.5mm) play of the metering arm knocking against the bottom of the plunger. Put's you in the ballpark at least to get it started. Stefan | ||
Stefan Morley Grand Master Username: myupctoys Post Number: 385 Registered: 7-2009 |
Mike, Long time ago I did this. The 0.6mm I refer to is the depth of the slotted screw from the lip of the retaining nut. I measured everything before I pulled it apart but this is the one that matters. Ie 1mm being too deep means the plunger is pushed in more, revealing the slots inside the distributor meaning the fuel would never be fully shut off. Anyway thought I should correct that. Cheers Stefan | ||
michael vass Grand Master Username: mikebentleyturbo2 Post Number: 333 Registered: 7-2015 |
Thanks Stefan You being the expert on this, how would I know if it needed doing? (without taking it apart.) Other than what I have seen the seepage from the unions when loosened and pressurised. Many thanks Mike ps my chassis number is 27650 | ||
Stefan Morley Grand Master Username: myupctoys Post Number: 386 Registered: 7-2009 |
Mike, Assume your referring to the eight unions going to the injectors and the ninth going to the cold start. Expect them to leak if they are loose. Be religious tightening them up if you do use the car, saw the results of a B that had a leaking fuel distributor in a wreckers. Don't go too nuts tightening them, the injector case is only alloy. Is the car rough at idle and you've discounted the usual suspects, aka fuel pressure, spark, air leaks. Air leaks easy to test, manifold vacuum depending on the state of the car, AC and temperature be anywhere from 18>>22 in Hg at idle. Should be reasonably stable, small vibration of the needle okay but not larger flickering. Not simple to totally isolate the fuel distributor discounting all others. They are part of a closed loop mechanical, partially electrical and combined fuel pressure and air pneumatic system. New cars do most of this in electronics. All these comments are based on my already having a wide band O2 sensor installed for monitoring purposes. Really one is a bit blind without a way of monitoring. But the way I'd tackle it is measure the primary fuel pressure, (cold Start injector), make sure that right, my car (1988 22888) is 85PSI and doesn't vary any more than 0.5PSI from battery operation to when the car is running. My original regulator was varying by 4>>5 PSI.... Then measure the differential pressure, (bolt on the side), this figure will vary depending on how hot the coolant sensor is. From memory my car is about 74PSI, about that anyway. But at idle it should be stable albeit changing as the car warms up. Look in the manual for your pressures. Different years did change pressures. Assuming these are right measure the hot start pressure drop point and make sure it takes a significant amount of time to drop. When engine is turned off fuel pressure drops below the injector opening pressure and in my case 43PSI and over the period of half an hour will drop maybe 10PSI. If it only holds for a short period there are a couple of likely suspects. Isolating them is not simple. BTW you can pressurize the system without running the car, in the manual but basically involves removing a relay and using a bit of wire between the windscreen wiper and one of the relay sockets. That's my car but manual for your year will clarify. Leak down can come from the pressure regulator, also the one way check valve (can't remember if that's in the accumulator or the fuel pump) or o-ring on the plunger of the fuel distributor. Never did it but guess you could test the small O-rings in the distributor by checking the opening pressure of the injectors. If the O rings where leaking it would struggle to achieve pressure for the individual injector lines. Guess it's also possible the Orings in the EHA could cause pressure leak-down problems. You would know you had this as an issue if you had problems with hot starts. Other issue is if the injectors are leaking, ie not fully closing but an injector pressure test will tell you that. They should hold pressure below their opening pressure, think it's about 55 PSI. Wideband O2 sensors when a car is running at idle are fast enough to see the AFR's of individual pots, depending on where in the exhaust the O2 sensor is mounted. Given your serial number my guess is it was made after 89 with a motronic management system, assume they have O2 but these will be the old style, Rick/Lean measurement totally no-linear and relatively slow response compared with the Widebands. Anyway wide-bands are good at being able to see if all the pots are doing their job and might help your decisions. In my case not perfect as it needed to be mounted after the turbo so the "packets" of gas through the system are smoothed out somewhat. Stefan | ||
michael vass Grand Master Username: mikebentleyturbo2 Post Number: 334 Registered: 7-2015 |
Hi Stefan Many thanks for your in depth knowledge of the system! What I did to clarify was loosen the eight unions and switched on the ignition which runs the pump for a few seconds then I watched as fuel seeped up around the pipes (all about the same amount) then retightened the unions, ran the car and checked for leakes(all ok). I think I'll leave it alone until I have checked that pressure in the primary circuit. The reason I suspected the diaphragm was it seems to cough & miss a little if started soon after being switched off, but not from cold or if stood for 1/2 hour or so. Wish you were nearer! Many thanks again Mike | ||
Stefan Morley Grand Master Username: myupctoys Post Number: 387 Registered: 7-2009 |
Hi Mike, No worries. Hot/Warm Start issue. Look at that hot start drop down point after you turn the engine off and how long the pressure takes to drop. Measure at the top injector (cold start injector outlet) pipe as this is the primary pressure point. Initially should be about 40>>45 PSI and take half hour to get to maybe 30 PSI. If the pressure is too low and the engine is still warm/hot the fuel can vapour lock making it difficult to start. Finding the leak is the trick. Fuel Distributor, Fuel regulator, Injectors, accumulator check valve and diaphragm assuming you can't find any external leaks. Just have to work out ways to confirm or reject the sources before deciding to rebuild the distributor. If your pressure drops close to zero on turn off the diaphragm or check valve associated with the accumulator is almost certainly the culprit. Otherwise likely to be a small internal fuel leak that will be more difficult to find. I say fuel leak but unless it's external the fuel will simply be returning back to the fuel tank by the normal paths. If you needed to the drop down point is adjustable in the pressure regulator. Do it by removing the pressure regulator and there is an Allen key in the bottom of the regulator, inside the fuel pipe attachment. Just count the number of turns so you can reset it back. Measure the primary pressure and go from there. Cheers Stefan | ||
michael vass Grand Master Username: mikebentleyturbo2 Post Number: 335 Registered: 7-2015 |
Many thanks again Stefan Would this be a suitable test gauge? http://www.ebay.co.uk/itm/302112963706?ssPageName=STRK%3AMEBIDX%3AIT&fromMakeTrack=true Thanks Mike | ||
Stefan Morley Grand Master Username: myupctoys Post Number: 388 Registered: 7-2009 |
Mike, Gauge will be fine. The hassle will be the couplings. This is mine. 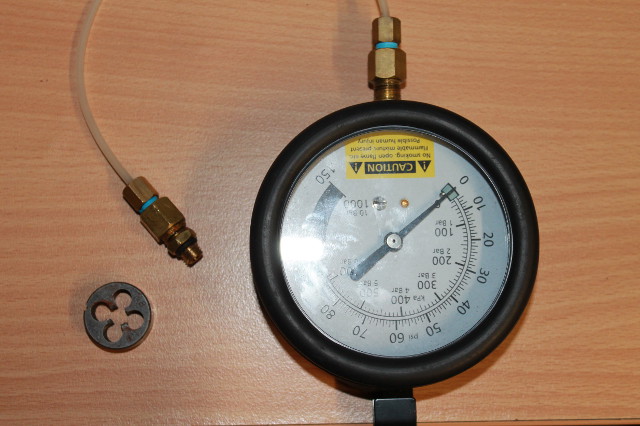 Gauge pretty standard but had to pick and choose couplings to end up with what you see here. This one is for the differential pressure (side bolt), and seems to be an M8 by 1mm, least that is the size of the die that fits. Pretty certain the primary pressure is imperial size. Don't know the size, but know that was the easier one to find out of the two. It was probably either a 1/8 or 1/4 NPT, possibly not the best given they are for pipe fittings and the injector thread look straight from memory. Not sure on the thread exactly. Anyway you get my meaning re the couplings. Stefan | ||
michael vass Grand Master Username: mikebentleyturbo2 Post Number: 336 Registered: 7-2015 |
Hi Stefan Hope you're well! Well my pressure gauge kit arrived today  So I connected to pipe from the centre of the FD switched on the ignition and the gauge shot round then fell back to 30psi, switched off the ignition and the pressure fell quite quickly to 15psi after only 10mins. I then stared the engine and got a steady 87 psi , I then stopped the engine and the pressure dropped to 40 psi in a min dropping only a couple of psi in the next 1/2 an hour. So I think it's fine, does that sound good to you? Thought it strange it dropped a lot slower once the engine been run. Do I need to test the secondary pressures now? Cheers Mike ps my FD is 0438 101 040 ( not 0438 010 040 as I said earlier , just my dyslxia playing up) | ||
Stefan Morley Grand Master Username: myupctoys Post Number: 389 Registered: 7-2009 |
Hi Mike, That sounds good, least it won't be a vapor lock issue. Not sure about the 30/15PSI thing, maybe your model pre-primes the fuel system pressure before cranking, my car management system (hardly a system with three separate modules) will be quite different to yours and it doesn't pre-prime the fuel system other than whatever pressure is left in the system from the last time it was stopped. Pre-priming makes sense from a developmental improvement perspective, although my pressure quickly builds up quickly enough on cranking, maybe less than a second. No matter your hot start issues won't be from the leak-down. Reason the pressure drops more quickly the lower the pressure gets is the fuel pressure assists the assorted seals and O-rings, as the pressure drops that sealing effort reduces making the pressure drop more quickly. While your inspired worth looking at the differential pressure, bolt in the side of the distributor. Be quite different at cold and hot. You probably want to measure it at hot as this would be the baseline operation of the EHA current plus or minus whatever your O2 sensor is telling the system. Think it's about a 7>>9psi difference from the main pressure point. Can't remember exactly. You'll have to refer to the manual for your year to see what it should be. Watch for leaks when you run the test on a hot engine!! Really if this second test is fine and the car idles smoothly once running then there would be little need to rebuild the distributor. Would start looking at other things. This second test could be as much about the EHA as the fuel distributor, and if my assumption about the pre-charge operation is true then could also be in that direction. In a hot start situation the cold start injector isn't used at all so it would rely on the base EHA setting and whatever pressure was in the system. I assume your car has the closed loop O2 sensor as part of the motronic system? Easy to tell if you have a motronic system, great big cover in the engine bay covers it. Mine has three module under the dash, quite different. Stefan | ||
michael vass Grand Master Username: mikebentleyturbo2 Post Number: 337 Registered: 7-2015 |
Hi Stefan Thanks for the explanation. Yes mine does pre-charge, pump runs for about 2 seconds. I have just looked at the spec and my primary (when engine ticking over)is about 4 psi down (if the gauge is to be beleived) would that matter? I don't have any O2 sensors I know to. I do have an ecu under the R/H plastice cover (I think my system is a KE3 Jetronic). I think I will have to replace the "O" rings on my EHA anyway it's showing signs of leakage. Many thanks Mike | ||
Stefan Morley Grand Master Username: myupctoys Post Number: 390 Registered: 7-2009 |
Mike, Not ideal with the pressure down, probably related to the spring in the regulator not being in it's prime, pressure can't be adjusted unfortunately. I don't know how far is too far but would have to be at least above the injector pressure and the pressure differential required for accurate metering of fuel. What matters more is that the primary pressure is steady (ie the same pressure at high and low fuel flows aka same pressure when cold and when hot) and the differential pressure is right. Exactly what is perfectly right is a bit arbitrary by pressures measurements alone as the mixture and the EHA adjustment and aging of engine components have a significant play on what is right. I had to replace my pressure regulator because it was varying by up to 5 PSI based on fuel flow, that becomes impossible to compensate for. Differential pressure across the plunger is what the pneumatic pressure of the metering vane coupled with the spring in the distributor works against hydraulically to meter the fuel. So the differential pressure matters. Fuel pressure being a bit low can probably be compensated for to a degree but the bigger question is has it been compensated for? Compensation happens by adjusting the EHA and the mixture setting. Just beware easy to get it horribly wrong if your going nuts on it. Just as a long shot have you checked your getting enough fuel flow? Just eliminates the low pressure coming about due to lack of fuel flow. Doubt it considering your only complaint is hot starts. Very obvious fuel flow was an issue if you give the car a bootful and it seemed to loose power at the higher RPM's. Doesn't take long to deplete the fuel accumulator and running on the fuel flow from the pump alone if the flow was low or even if the fuel filter was blocked. Manual has a detailed instruction how to test fuel flow. Mine is a KE2 Jetronic FWIW. Not sure of the KE3 differences but the fuel distributor will be pretty much the same. Compensating can really can only be done effectively knowing the AFR with an O2 sensor. Not that I recommend the one I have (Innovate Motor Sport LM2) as it is pretty ordinary but works well enough to get the info one needs. Reason I don't recommend it is while the Innovate unit has all the making of a great unit electronically it is let down by the total unreliability of their O2 control sensor control algorithms. Randomly freezing for no good reason and they have never really addressed the issue other than closing their forum due to too many people complaining. Thats another story. Anyway check your fuel flow and that the primary pressure is steady between cold and hot. If that varies more than 0.5 PSI then it's a problem. Cheers Stefan | ||
Stefan Morley Grand Master Username: myupctoys Post Number: 391 Registered: 7-2009 |
Mike, BTW there are other Wideband O2 units on the market, all based on the Bosch 4.2 or newer 4.9 Wideband sensor. Just showing you the thing I used. Not that I recommend playing with the mixture or EHA without the O2 sensor, mixture can be done with a vacuum gauge crudely. Optimal setting of the mixture screw can be found by seeing a slight dip in a vacuum gauge hooked to the manifold and normally one would then shift to the rich side of that setting. As I said crude but in a pinch. Theory being at 14.7 piston moves the most energetically pulling air in more rapidly per stroke dropping the vacuum. How close that dip is to the 14.7 not sure but the dip maybe 1>>2 in Hg is noticeable. EHA your flying blind without an O2 sensor. Might do a test tomorrow and see how close that vacuum dip is to 14.7. Done it on carby cars in the past and got me running but never tested to see how close it gets. But I digress. Both the EHA and mixture screw, CW is rich and CCW is lean. EHA especially change by small amounts and the mixture don't rev the engine with the allen key in the slot. Aka the proper mixture setting is only apparent after you give the engine a little rev with you finger blocking the adjusting hole. Blocking and unblocking that hole makes about 1>>1.5 AFR difference. EHA is the regulator for the differential pressure and is critical. Mixture screw changes the relationship of the plunger to the air metering vane in doing so changes the air fuel ratio. Stefan | ||
michael vass Grand Master Username: mikebentleyturbo2 Post Number: 338 Registered: 7-2015 |
Hi Stefan I'm pretty sure mine is a bit lean as the plugs are clean/white and never see any smoke from the exhaust. I think I'll do a fuel filter change first ,probably due for a change by now then I'll retest. I just know all the unions will be rusty and I'll end up changing all the plumbing. By the way will a vacuum guage work on a turbo car? Many thanks for your expetise. Mike | ||
Stefan Morley Grand Master Username: myupctoys Post Number: 392 Registered: 7-2009 |
Mike, Expertise, school of hard knocks more like. Useful to measure the fuel flow before you change anything. Only way you'll know you've improved the position. Yeah the vacuum test works on any car, the boost only comes on when enough exhaust gases are flowing through the turbo in sufficient volume. The vacuum is after the throttle buttlerfly so at idle the butterfly will be next best thing to closed giving the highest vacuum. Cold the idle speed valve will allow some air to bypass the butterfly but hot that should be closed. The air con will also have a play increasing the air flow when the clutch is turned on. So AC off for the test. As i said, measure fuel flow meets or close to spec. If thats fine measure primary pressure cold and then hot and ensure it doesn't change by more than 0.5PSI. If not fine, rectify, easiest is the fuel filter. Whilst changing the fuel filter worth testing fuel flow from the pump/tank as well. If fuel flow at the filter is an issue the other things that will restrict fuel flow will be the pump itself, the intank pre-pump filter. It's a small pump that is covered with a fine filter bag actually in the tank. But test to identify fuel flow issues. Can get expensive throwing money at the problems without knowing explicitly. Stefan |