| Author | Message | ||
Michael Carr Experienced User Username: carsie Post Number: 62 Registered: 07-2016 |
Morning Gents, Please could I ask for some assistance? Q: 1. Is there a spacer between the engine block (n/s and o/s) on the Accumulator body?; mine appears to be missing. Is it supposed to have the mounting bolt thread exposed when viewed from beneath? 2. In the reservoir there is a plastic float beneath which is a rubber "donut". Which way up is this mounted.? 3. Does anyone know of an alternative source for the aforementioned rubber "Donut"? they are priced at nearly �50.00 each which seems to be extortionate. Thnx for your help. Stay safe. Best. Mike | ||
Robert J. Sprauer Frequent User Username: wraithman Post Number: 623 Registered: 11-2017 |
No aftermarket replacement for the donut (seal). Note: The float goes in one way . Are the screens split? If so they MUST be replaced. | ||
Hubert Kelly Frequent User Username: h_kelly Post Number: 397 Registered: 03-2012 |
Point 1. The accumulator can be quite difficult to relocate after removal ..re weight of same and locating the bolts... seat/location. To answer you question, you won't see thread if bolt was seated correctly .. Infact from memory the bolts may well be of differing sizes depending one location, (this may well be the reason for same) Again from memory... one my only have, approx 10 cm from bolt to engine block.. to work with. Point. 2 the rubber "donut" slim portion touches base, with the wider side facing uppermost. If it's not disintegrating or (has not already disintegrated) , clean and replace, it just acts as a cushion that offers correct seating to the plastic float. | ||
Hubert Kelly Frequent User Username: h_kelly Post Number: 399 Registered: 03-2012 |
Michael, flying spares may have good second hand donut shaped rubber units for sale, at a more realistic price... | ||
Michael Carr Experienced User Username: carsie Post Number: 63 Registered: 07-2016 |
Gents, Thank you for prompt response. I've spent the past few weeks renewing every brake pipe and flexi I can. Along the way I've remedied a few lazy technicians work (rounded shoulders on nuts, missing clamps , broken bobbins etc) It's been a useful and heartening exercise. I've had the luxury of a two post lift and four, super strong, five feet axle stands, but my poor back is now hurting from bending into unusual postures whilst cursing lol! The good news is that the car has never been welded at all, albeit it now needs a lower wing repair and rear wheel arch, but frankly it's a nothing; I'm really pleased. The high pressure pipe on the o/s snapped at the gland, despite a week of Plus Gas application, before attempting to unscrew it. I'm thinking of putting a small section of Aeroquip, perhaps 6", to provide some flexibility in the pipe and facilitate replacement. Re. The Donut, I still have the old one but somehow, it's been torn, which I find hard to understand. I don't mind paying a premium to the specialist suppliers, after all without their business success we may be left in the "Stum" for obsolete parts but even that logic gets stretched at �50 a pop; I'm thinking along these lines https://uk.farnell.com/keystone/736/open-grommet/dp/2301299?gclid=CjwKCAjwltH3BRB6EiwAhj0IUNt41FPHg6ku-H9sfaul4g5r-Rsl86pW8X10akFP1pCoyLShkFrfQBoC1P8QAvD_BwE&gross_price=true&mckv=sYYY0cESa_dc|pcridplid||kword||match||slid||productpgridptaid|pla-902882462589|&CMP=KNC-GUK-SHOPPING-Cable-Wire-Assemblies-NEWSTRUCTURE-Test113-MarinBidding# Thnx again for your help. Best. Carsie | ||
Jim Walters Frequent User Username: jim_walters Post Number: 316 Registered: 01-2014 |
Michael, that grommet in your link is made from Buna S rubber which is not compatible with glycol based brake fluid which is what RR363 is composed of. It will swell and deteriorate fairly quickly and the bits could clog up the filters in the reservoir. Whatever you use, it must be an EPDM rubber compound like the original. SRH8505 SRC18015 SRE22493 NAC-05370 www.bristolmotors.com | ||
Omar M. Shams Grand Master Username: omar Post Number: 2047 Registered: 04-2009 |
whats wrong with making the ring out of PTFE? Can anyone see anything wrong with doing that? | ||
Larry Kavanagh Frequent User Username: shadow_11 Post Number: 644 Registered: 05-2016 |
Each accumulator valve body has a spacer (distance piece) part no. SPC1757 on the A-Bank and SPC1758 on the B-Bank. These distance pieces fit between the part of the accumulator valve body that sticks out like an arm at one end and the engine block. There should be no thread showing between the accumulators and the block. I think there could possibly be a risk of that portion of the accumulator valve body cracking off if tightened without a distance piece in place on the threaded bolt. | ||
Jim Walters Frequent User Username: jim_walters Post Number: 317 Registered: 01-2014 |
PTFE Teflon would work just fine, as would nylon, polyethylene, even ABS plastic. All those plastics are compatible with glycol brake fluids. SRH8505 SRC18015 SRE22493 NAC-05370 www.bristolmotors.com | ||
Michael Carr Experienced User Username: carsie Post Number: 64 Registered: 07-2016 |
As ever, from the informed collective- thank you! Mike | ||
Michael Carr Experienced User Username: carsie Post Number: 65 Registered: 07-2016 |
Evening Gents (uk  ) ) The more I'm underneath this ol' girl the more I find.. I hadn't noticed that all of the exhaust clamps were close to rotting through which took me to look at the middle hanger. My Giddy Aunt! Why use a bonded hanger as per Jaguar et al when a clamp, plus two springs, plus some spring filler, plus a secondary bracket, plus two more bolts and nuts and then an exhaust clamp  I thought my Meccano days were long since past- crikey!. Some more questions if I may be so bold. One of the reservoir towers has a couple of split pins but the other tower pins are missing, albeit the holes are there. I'm guessing they are to prevent the float (which was also missing) from dropping down? I would have thought, given my comment above that there might have been two locating pins engineered but no.. Do I replace the split pins? I found a large single,thin,strip of dense foam floating in the bottom of the reservoir, I'm guessing it sits across the bridge over the top of the gauze, albeit it's short in length. I bit the bullet and ordered a replacement seal; I'm sure it'll be gold plated when it arrives. Larry, thnx fr the info on the spacers. Hubert, to confirm , you said the slim portion touches the base, wider upper most? There doesn't seem to be any interference fit, frankly it just "slops around"; perhaps the new one I've ordered will confirm tolerances. Can anyone identify a bracket which hangs down o/s/r near the handbrake cable/Anti Roll Bar and Diff? It's definitely OE and I suspect something is missing but everything is functioning as is supposed to. The more my head gets into the refurbishment the more obsessive I become to ensure the high build standards are maintained. As ever thank you for your help. Best Mike 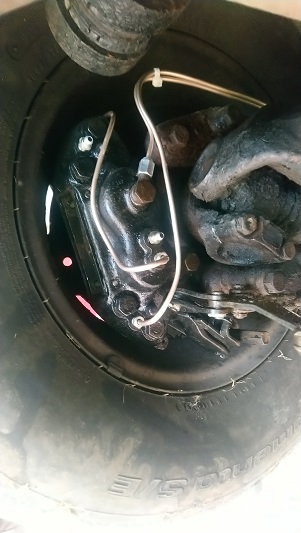 | ||
Hubert Kelly Frequent User Username: h_kelly Post Number: 400 Registered: 03-2012 |
Ok Mike , https://www.flyingspares.com/shop/rolls-royce-bentley-shadow-t1-t2-corniche-mpw/silver-shadow-t-1-2-brakes-pads-discs-fluid/reservior/seal-between-reed-switch-and-anti-surge-tower-ur18402.html From memory the piece showing is to the bottom of reservoir, it being narrow so the other side is slightly wider. Now of course this is for a shadow 2, a shadow 1 may be different. I only renewed the brakefluid and cleaned reservoir last month. Check out photo Mike, I realise it's difficult to view photo | ||
Robert J. Sprauer Frequent User Username: wraithman Post Number: 627 Registered: 11-2017 |
The rounded item shown in the pic has a identical one on the other end of the final drive carrier. They are there to cancel resonating frequencies developed from the rear carrier. | ||
gordon le feuvre Frequent User Username: triumph Post Number: 355 Registered: 07-2012 |
Michael, called harmonic damper. Early Lexus (1990's) had things that looked like piano tuners tuning forks hanging down under body for same reason. Lexus was a education in smoothness/and quiet. My chum was Lexus dealer and I was R-R and Jaguar, couldn't wait to let me test Lexus! | ||
Michael Carr Experienced User Username: carsie Post Number: 68 Registered: 07-2016 |
Thnx again for the replies Gents. Perhaps I slightly misled you; I know the harmonic dampers. The bracket I'm trying to identify sits inboard to the front of the rear subframe when viewed from behind. It sits next to the anti-roll bar and above o/s/r handbrake cable; I did wonder if it was associated with the handbrake but there's no correlation with indents, nut's lugs w.h.y. Having said the above, the mystery of why I couldn't fathom out orientation of the rubber donut in the reservoir is solved- see attached pic. It's quite amazing how much it has swollen; the new one fits as snug as a bug. Only problem is that I now need to shake that savings tin again for another one  Still no answer on the long strip of dense foam I found at the bottom of the reservoir. Does anyone know what the purpose of the split-pins are at the base of the aluminium tube which holds the float? They are on one tube but not the other. 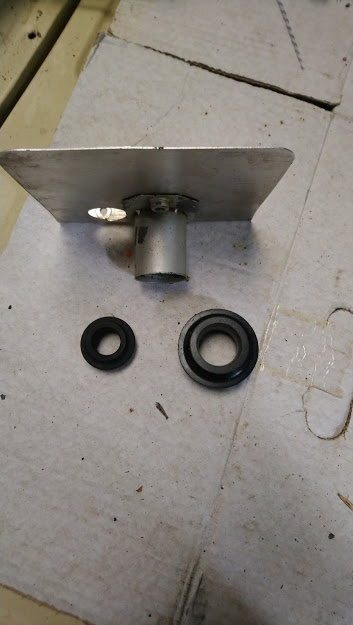 | ||
Robert J. Sprauer Frequent User Username: wraithman Post Number: 629 Registered: 11-2017 |
The foam strip sits on top of the reservoir divider. Check the parts manuals whenever in doubt. Better yet, enter your chassis number in the Bentley Heritage site and you will see the parts for your vehicle. You need both cotter pins. Note the orientation of the ring magnets. | ||
Larry Kavanagh Frequent User Username: shadow_11 Post Number: 651 Registered: 05-2016 |
There's a gauze under the reservoir lid and the strip fits over the gauze across the top of the bulkhead that divides the front & rear section of the reservoir. I reckon it helps to prevent brake fluid overflowing between the reservoir sections while braking hard on a downhill slope or accelerating hard on an incline. I think the cotter pins prevent the magnetic floats from dropping too low and sticking at the bottom of the tube. | ||
Larry Kavanagh Frequent User Username: shadow_11 Post Number: 652 Registered: 05-2016 |
That old rubber donut had swollen to such an extent that I would suspect someone had previously used the wrong brake fluid - possibly LHM - and if that is the case it's unfortunately likely that seals in other components throughout the system may also have suffered from similar contamination. | ||
Michael Carr Experienced User Username: carsie Post Number: 69 Registered: 07-2016 |
Thank you Robert and Larry. Fluid contamination was my suspicion and fear. Last night I changed the rear ride height flexi's and as you can see in the picture below, not a moment too soon. 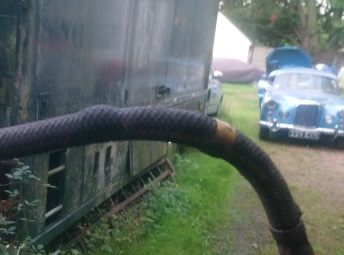 Other fun and games - I bought x3 2" replacement exhaust clamps to tidyup . Dozy brain hadn't realised that the exhaust box plus exhaust pipe actually equals 2 1/4" diameter. I was able to use one but not the others. The frustration is not the minor inconvenience of trekking back to the store but rather, getting a pass out from SWIMBO, moving all the cars around and off the lift. Swopping out a dead battery and non-start, aligning the Shadow correctly on the lift, dragging the HUGE Axles Stands under it to ensure I don't get crushed and then discovering.... The Arab world may have the red sky but this blessed plot, this earth, this realm, this England, was somewhat blue! Further questions requiring your knowledge, if you'd be so good. I have searched the excellent Bentley On Line Catalogue. 1. Still can't identify the bracket- any further ideas? 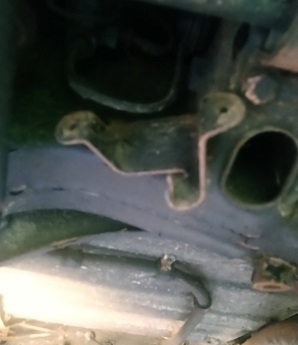 2. Any idea why there is a discrepancy in height/alignment of the exhaust bracket; it's about 1" adrift - surely not another bracket on top of the other brackets and springs? - The new clamp is shiny in the pic. 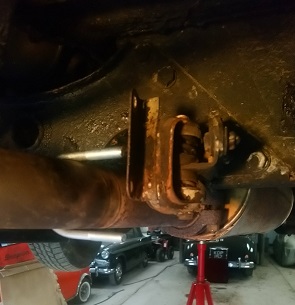 | ||
Michael Carr Experienced User Username: carsie Post Number: 70 Registered: 07-2016 |
Just studying some more of Kelly's amazing work and noticed this. Could this be for my mystery bracket and if so what is it? Mine's a UK RHD car. 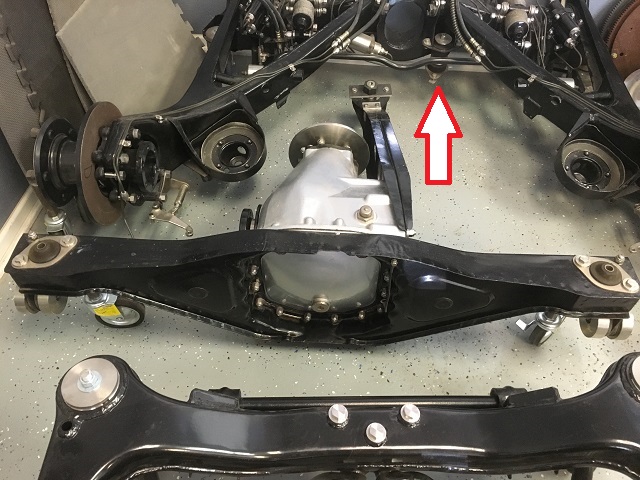 | ||
Robert J. Sprauer Frequent User Username: wraithman Post Number: 631 Registered: 11-2017 |
Here is the underside of a 1976 Shadow LWB. Do you see it here: https://www.youtube.com/watch?v=yjnsV_hvtUU&t=128s | ||
Brian Vogel Grand Master Username: guyslp Post Number: 3072 Registered: 06-2009 |
Unless I've missed something, the exact car being worked on (year & model) has not been mentioned. I have photos from beneath my Silver Shadow II that could potentially be of help if you're in the SY2 series (even maybe SY1), but I thought I'd ask first before trying to dig them out. Brian | ||
Geoff Wootton Grand Master Username: dounraey Post Number: 2219 Registered: 05-2012 |
Hi Brian I always find pics from the underneath of the car very useful. Thanks to Robert and Kelly for putting their photos and videos up. I always look at them in detail before carrying out any related work. Needless to say, in both cases - superb work. Geoff | ||
Brian Vogel Grand Master Username: guyslp Post Number: 3073 Registered: 06-2009 |
Well, here, entirely unedited, is a sequence of photographs I took of SRH33576 when she was up on the lift in 2013 (in a ZIP file). Undercarriage of SRH33576 They basically move from the front to the back, but things do "get kinda random" toward the end. Brian | ||
Geoff Wootton Grand Master Username: dounraey Post Number: 2220 Registered: 05-2012 |
Thanks Brian - added to my archive | ||
Kelly Opfar Frequent User Username: kelly_opfar Post Number: 255 Registered: 07-2004 |
Michael, the bracket you've pointed to on my photo is the mount for the torque arm. If you imagine pushing the differential and housing forward and to the right a little bit, it lines up. I don't recognize the bracket that you are trying to identify. http://BritishToolWorks.com | ||
Larry Kavanagh Frequent User Username: shadow_11 Post Number: 656 Registered: 05-2016 |
I've managed to get under my car (Silver Shadow 11 SRH37125) today and located the same redundant bracket so I don't think it's anything to be concerned about. I'm guessing but I think it's possibly the fuel pump mounting bracket for cars fitted with a Pierberg pump, I might be wrong but in any event it appears to have no functionality on my car either. | ||
Michael Carr Experienced User Username: carsie Post Number: 71 Registered: 07-2016 |
Apologies for delay in replying. Thank you Larry,! It would appear that our ladies are not a million miles apart in build (?) and as had previously been commented I did forget to post the Chassis No which in my case is SRH39723 1980 S2 SS. I may have mentioned my quest for a replacement metal pipe twixt the engine pump and the accumulator. During dismantling the olive snapped due to corrosion and it being f~~~g tight! lol! Spares wanted circa �110 for a replacement, for what is effectively a metal pipe with two 3/8" fittings at each end. I've said it before, I've no problem at all with supporting a low volume, specialist supplier but I couldn't get my head around �10 per inch! oh err Missus! I prevaricated for the past two weeks, contemplating a hydraulic flexi to overcome the missing last inch before my local motor factors helped me to make sense. "Surely" says he "If you've made the rest of the system up in Kunifer to withstand 2500 psi then this pipe will be the same? Why not make it in 3 1/8 Kunifer?" it never occurred to me that I could buy 3 1/8 Kunifer but of course, why not? The result cost me �10.00 Now I'm not being a cheap skate but that's a massive difference and needless to say I am very, very happy! ; fitting tomorrow! | ||
Larry Kavanagh Frequent User Username: shadow_11 Post Number: 657 Registered: 05-2016 |
Cunifer pipe won't corrode like steel bundy tubing and I see no reason not to use it provided it can withstand the same pressure as the original pipe but I'm not an engineer. I find that the fittings at the pump and the Accumulator control valve are easier to thread if both ends are screwed on a little at a time rather than tightening one end before starting on the other. | ||
Brian Vogel Grand Master Username: guyslp Post Number: 3080 Registered: 06-2009 |
A huge part of the braking and hydraulic system on SRH33576 was done in cunifer when the RHD to LHD conversion was made by whichever previous owner did it. Any time I've had to touch hard brake lines (regardless of car) if they weren't originally cunifer line they are now. It can absolutely withstand the pressure in our cars (which is really not all that high when it comes to what metal line designed for brakes, regardless of the alloy used). Larry, you could not be more correct about starting all the various connections, but leaving them very loose until each and every one has been started, then tighten them all completely. I learned this lesson the hard way when I didn't do it when trying to reinstall the height control valve, my first major project. I'm just grateful that I learned that lesson very early on in the learning curve for these cars. Brian | ||
David Gore Moderator Username: david_gore Post Number: 3757 Registered: 04-2003 |
Larry, Annealed 90/10 Cunifer tube typically has a ultimate tensile strength of 290 Newtons/Square Millimetre [42,600psi or 19tons/square inch]. The Shadow hydraulic system maximum working pressure of 3000psi is well within the 0.2% yield stress of 90 Newtons/Square Millimetre [13,053psi] or 23% of the yield stress. On this basis, you have no need to worry about the suitability of this material to replace the original steel hydraulic lines. https://www.copper.org/applications/marine/cuni/properties/mechanical/ | ||
Brian Vogel Grand Master Username: guyslp Post Number: 3081 Registered: 06-2009 |
One of the brands of annealed cunifer used to be (and may still be around) EZ-Bend, and, boy, is it ever. I think virtually all of it is sold annealed unless you really seek out unannealed, as it's presumed that forming will be a part of the process and some work hardening will occur as part of that. This stuff is such a pleasure to work with as far as flaring, bending, etc., compared to mild steel. Brian |