| Author | Message | |||
Mike Thompson Prolific User Username: vroomrr Post Number: 142 Registered: 4-2019 |
I bought a 1975 Rolls Royce Silver Shadow. The list of things that do work is shorter than the list of things that do not. I'm hoping with your help we can reverse this list. Here is my list, please jump in on any of them to help reverse this list. Windshield wiper do nothing Turn signals and Horn don't work flashers do. Fans don't work. Parking Brakes are stuck in park position. (Of course the brakes don't work, but that is another thread.) --------------------------- Engine Runs ! Yahoo Both headlights work high and low. When I turn on the flasher all lights work. Electric fan by switch on radiator works ( a worrisome thing, why put in an electric fan?) Please jump in on any you choose.  | |||
David Gore Moderator Username: david_gore Post Number: 3220 Registered: 4-2003 |
Mike, The electric auxiliary radiator fan was originally intended for "colonial" specification vehicles destined for places like Australia to cope with the heat loads from the A/C system in city slow moving traffic during summer. I cannot recall if the "standard" UK specification Shadows included this item or just the export and colonial versions. The non-working electrical items are most likely associated with faulty components, blown fuses and/or faulty diodes. These should be replaced in their entirety also be aware diodes can be tucked away in obscure locations in the wiring harness AND THEIR LOCATIONS ARE NOT DOCUMENTED IN THE WIRING DIAGRAMS. It is not unusual for the designated wiring diagramm for a specific chassis number to be incorrect as the RRMC Drawing Office could not keep up with the revisions occurring in the assembly shop. If you find unusual wiring connections not shown in the wiring diagram listed as applying to your vehicle's chassis number just go to the later diagrams until you find one that shows the wiring layout present in your vehicle. There is a large number of posts in the Shadow section of this forum relating to the electrical system and I suggest it is worth spending an hour or two looking up any specific problems you encounter. I suggest you should allow for overhauling most if not all electric motor driven components and actuators as it is highly probable these suffered severe neglect in the vehicle's final life and will either be worn-out, seized due to lack of lubrication/use or out-of-adjustment. Forums relating to British classic car brands from the 1960-1980 era will be a valuable source of information on the "Lucas" brand electrical components which were the most common items fitted to British-built cars of this era. These forums can also be a good source of information on availability of new and overhauled parts when needed. The parking brake pads and linkages are most likely severely rust-affected and "frozen". Check the cable actuation system as this will almost certainly be "out-of-adjustment". The parking brake pad linings are tapered and, to the best of my memory, the pad backing plate size and shape is unique to R-R/B. . | |||
Mike Thompson Prolific User Username: vroomrr Post Number: 146 Registered: 4-2019 |
David Gore first of all thank you very much for your insights. The only thing I can cross off the list is the fuses. As far as I can tell all fuses are OK. But then again I have never seen the Fuse Wire things these RR-SS have. I looked for any brakes and could not see any. On the electrical items as fan motors etc. it has been sitting in a harsh environment for 11 + years, and I know nothing about the switches. I have seen somewhere on here about the wipers. I'll have to look for it again. On the parking brake cables does anyone have a way to get oil etc. through there to get them working? A lot of stuff to do and little knowledge to work with. Deep learning curve ahead. | |||
David Gore Moderator Username: david_gore Post Number: 3223 Registered: 4-2003 |
Mike, I had quite a few problems with the glass cartridge fuses over the years where my stock of spare fuses had a significant number of corrosion problems involving the end cap soldered fuse wire connection. I suspect this was caused by residual soldering flux which picked up moisture from the atmosphere forming a galvanic cell that corroded the soldered joint. A continuity resistance test before installation is a wise move if you live in a humid environment. The parking brake system involves a single cable from the hand brake under the dash to a "T" connection under the body which connects to individual cables attached to each rear hub assembly. The cable adjustment is located at this "T" piece. I doubt if these cables will be "frozen" however there is a high probability the hub linkages will be frozen especially if the car spent time in a snow/ice region where de-icing salt has been used during its life. There is a lot of useful information in this forum on overhauling and adjusting the wiper motors and associated linkages as this can be a problem area. . | |||
Steve Emmott Prolific User Username: steve_e Post Number: 240 Registered: 11-2018 |
Mike re the handbrake you need to check the pivot linkage also is not seized. Its under the car just behind cross beam about rear of front seat. Loosen off rear individual cables and check its free. This should at least identify if problems are forwards or backwards of the pivot. There is also a pivot wheel at the front cable that can seize up and the pivots directly on the rear pad linkage. Again some good pictorials in section G of workshop manual Looks like David G covered this too whilst I was writing the response | |||
ross kowalski Grand Master Username: cdfpw Post Number: 941 Registered: 11-2015 |
Mike, You are 90% ahead of most car restorations because you made a list. The trick is keep it updated and prioritized. Knock off items one at a time sometimes because it's next on the list and sometimes because you need to feel accomplishment. Do you have a regular test light or a powered one? | |||
Mike Thompson Prolific User Username: vroomrr Post Number: 150 Registered: 4-2019 |
First on the hand brake, don't have one. I have a foot brake. Don't know if that is a North America thing or not. But when I was at the shop to pick up the car, I pushed the park brake to keep it from rolling. It stayed there. If you try to release it the pedal moves but the cable just stays there while the cable moves in the slot of the foot brake. Of course that is not conclusive it is the cable, it seem it is paet of the problem. I'll try the indidual test as Steve said. And on the wiper motor I am going to try a test that in thread "Windscreen Wipers" by Richard Greene of taking off the rectangle connector, to see if it comes on. Ross on testers I have two electric tester, one digital and a "clip sharp-point and light" tester. | |||
Mike Thompson Prolific User Username: vroomrr Post Number: 151 Registered: 4-2019 |
OK we can strike the fans off the list. That problem was ignorance, I did not know how to turn them on. The driver side LHD worked right off the bat. The passenger side was not working, I tapped it with a hammer and it started. Although it sounds like it is hitting something. The wiper motor not joy, I hit it, nothing, I pulled the plugs, nothing, and nothing on the steering column works so no washer. Seats work (kind of, fuse OK). There is however electricity to the plugs no matter how the wiper switch is turned. Seems like brushes (maybe). What do you think? | |||
ross kowalski Grand Master Username: cdfpw Post Number: 948 Registered: 11-2015 |
Mike, A powered test light is invaluable for working on pre computer cars. The powered part is you can add power or ground by pressing a button. Super helpful when diagnosing electrical problems. Harbor Freight probably has them for $20. | |||
Steve Emmott Prolific User Username: steve_e Post Number: 241 Registered: 11-2018 |
Mike the two wiper blade spindle shafts were quite prone to corrosion down the shaft to the worm box inner as part alloy casting. I suggest you remove the wiper arms/blades then undue the wiper motor and try to draw the motor and worm drive cable out of the guide tube and see if the wiper blade spline shafts turn OK. If you can mark the spindles where they are at present and when sliding the worm drive back in try to pick up 180 degrees so as to use some new teeth on the wiper box drives. It is a bit hit and miss but worth doing when removed and re-grease too. If the worm drive cable won't pull out of the guide tube then you will have to try some release oil/penetrating fluid down each spindle and just keep trying to turn each wiper arm spindle till they free up. Nothing wasted as when the motor is out you can strip down on bench easier anyway. | |||
Mike Thompson Prolific User Username: vroomrr Post Number: 152 Registered: 4-2019 |
Well I just shoot elec. down a wire with a hot wire and see if it sparks or lights something up. Had to do that for 3 month on the elec of the 64 Imperial. Because someone got under the dash board and just started to pull wires, then tried to put another wiring harness in there as well. Talk about a mess to figure out. Nothing worked, that's why it was junked. | |||
Robert J. Sprauer Prolific User Username: wraithman Post Number: 264 Registered: 11-2017 |
https://www.ebay.com/itm/Telephone-Phone-Network-Cable-Wire-Line-RJ-Tracker-Toner-Tracer-Tester-with-Bag/263291122474 A tone tracer is very handy when searching for cable and doing continuity tests. | |||
Mike Thompson Prolific User Username: vroomrr Post Number: 153 Registered: 4-2019 |
Steve Here is where I am at. I opened it and can't get that tube to separate from the (I guess) worm drive. I was just going to look at a bunch of pictures to figure it out (remember I think in pictures).  By the way why are there condensers on everything? 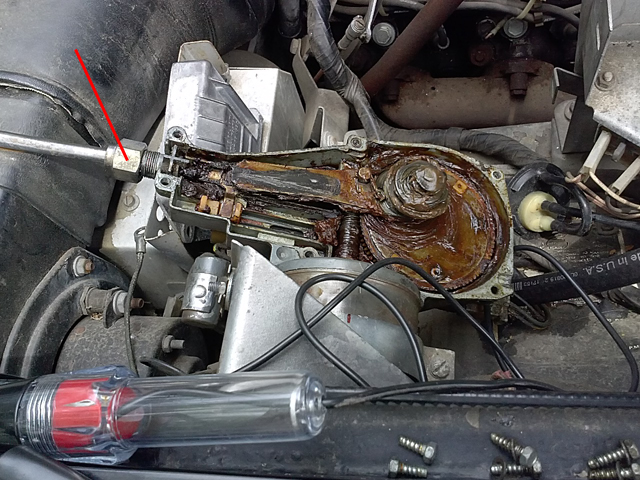 | |||
Steve Emmott Prolific User Username: steve_e Post Number: 242 Registered: 11-2018 |
Mike the outer tube is static you don't move that. Once you have undone that nut then the whole motor and inner worm drive cable just pulls out as one unit. Like I said if it is tight and won't move or pull out then your wiper spindles will be jammed up and corroded. There is NO mystery retention under the dash anywhere it is just a metal cable that slides in a tube. The outer tube just has two small slots to allow the wiper box worm wheel to contact the worm drive cable. Yes there are condensers everywhere on the car. I can only assume that with the engine being so quiet and so quiet inside even when driving then it kept suppression noise interference on the radio to a minimum. Not that with your carbs it probably matters. My 308 has 4 twin choke webers and very noisy on induction. | |||
Steve Emmott Prolific User Username: steve_e Post Number: 243 Registered: 11-2018 |
This is what the wiper blade worm drives look like and a wiper motor (not RR but similar) and drive cable slid out from outer tube as one unit 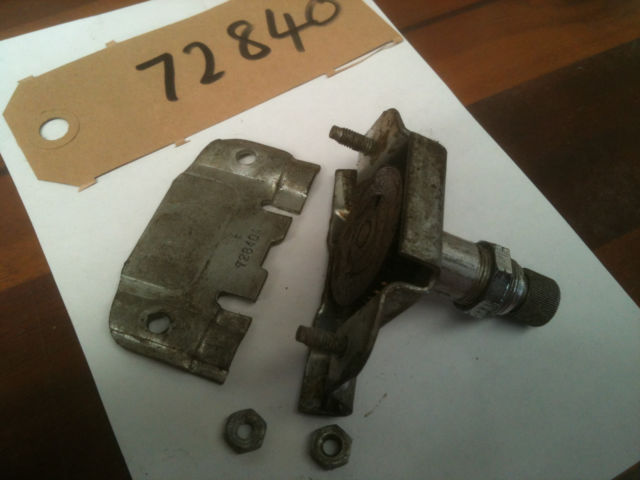 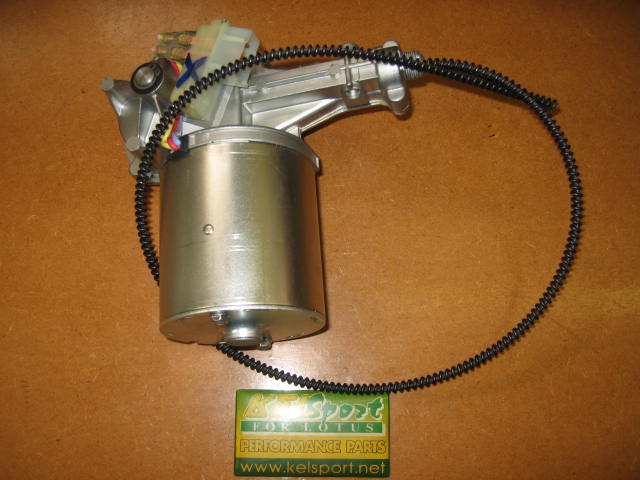 | |||
Mike Thompson Prolific User Username: vroomrr Post Number: 156 Registered: 4-2019 |
With this picture it tells me everything I need to know how to get it apart, then I will pull on the red line part and hope the wipers move, (as you said). Steve on the carb I did not notice any noise when I started it (again I love to say that). But Why the heck does it have 4 mufflers ? 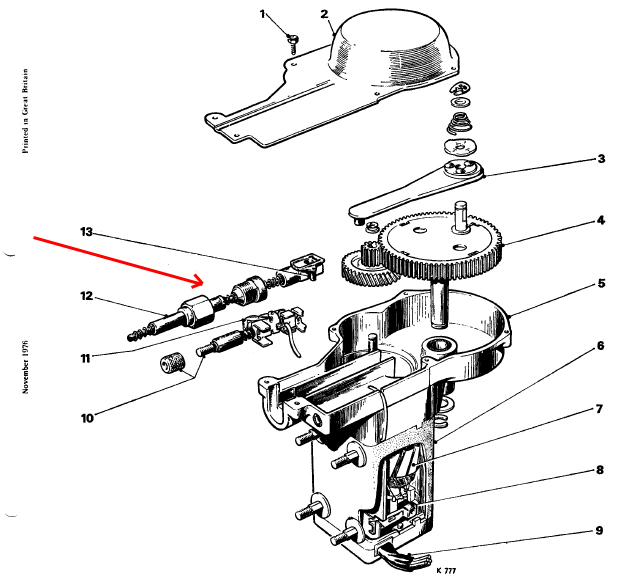 | |||
Mike Thompson Prolific User Username: vroomrr Post Number: 157 Registered: 4-2019 |
Well I finally got that red arrow part out, and it slides, but unless I move the wipers it is too tight to pull them by the cable by hand. And I don't want to get silicon any where near where I'm going to paint the body. Nightmares! | |||
Vladimir Ivanovich Kirillov Grand Master Username: soviet Post Number: 1356 Registered: 2-2013 |
Mike add to your list coolant inspection. Actually, drain all the coolant out tomorrow and put new coolant in with inhibitor and anti freeze. I have only been in Fort Worth Texas once and it did feel like a nice Russian Autumn or Spring day but was close to F freezing or 0 C. And you do want to take your family bear hunting in Alaska soon in your Rolls Royce, obviously. Right now you have aluminium block and heads that have been sitting for a decade plus and these engines are on the other end of the tolerance spectrum from your Crown when it comes to being forgiving when it comes to irregular changes of coolant. Plenty on the forum for you to giggle about in that regard. Replacement of ALL COOLANT HOSES MANDATORY for long drives in your pleasant Texas summer coming real soon. | |||
Steve Emmott Prolific User Username: steve_e Post Number: 244 Registered: 11-2018 |
Mike that will work too. Be careful not to lose any bits though. Just easier for me to do the work on a bench and the whole unit should slide out easily (unless spindles seized)... Also as I said useful to re grease the worm drive cable and allow new teeth on the worm wheels to be used if turned 180 degrees. If you take the wiper arms off you should be able to pull that cable a little more freely and it should not have any real resistance The 'webers' are carbs not mufflers so one intake per cylinder. Very slurrrrppy. | |||
Mike Thompson Prolific User Username: vroomrr Post Number: 158 Registered: 4-2019 |
Vlad there is a sort of joke commercial that shows a mock weatherman. For winter he says face it your guess is as good mine. And for summer he says HOT! The whole time. It stays 100 + degrees all summer. Someone said to me when I first came here, it gets 100 degrees in the summer. I asked how many days of the year? He said the whole summer, I could not believe it. Steve under the car mine has 4 exhaust mufflers we use one (back then). Oh and thanks for the pictures. And lose bit, man that was a worry, I hate things to go flong off some where to never be seen again. Keepers, springs, nightmare. So far no loss. OK a pic of the insides on the car, the rust inside, the half step brush, and how I shot 40 amps of 12 volts down the little feller and knew it would work or blow. It sparked a might and then started to spin, then revved up and now works fine.  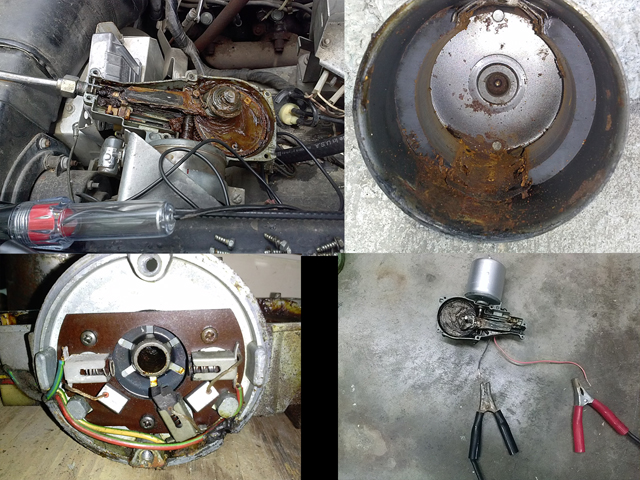 | |||
ross kowalski Grand Master Username: cdfpw Post Number: 951 Registered: 11-2015 |
Windshield wipers ... check. Good work. | |||
Mike Thompson Prolific User Username: vroomrr Post Number: 161 Registered: 4-2019 |
Ross well not quite, still the tight wipers is an issue. I'm still not sure how to get to them to oil etc. them. | |||
ross kowalski Grand Master Username: cdfpw Post Number: 952 Registered: 11-2015 |
I think you pull the vent cover 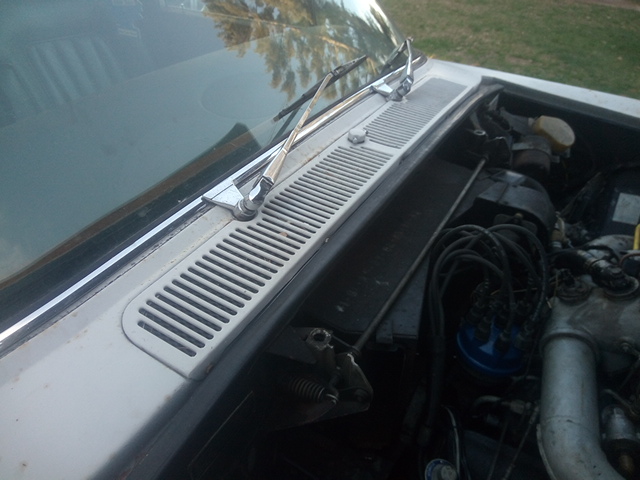 4 bolts along the front 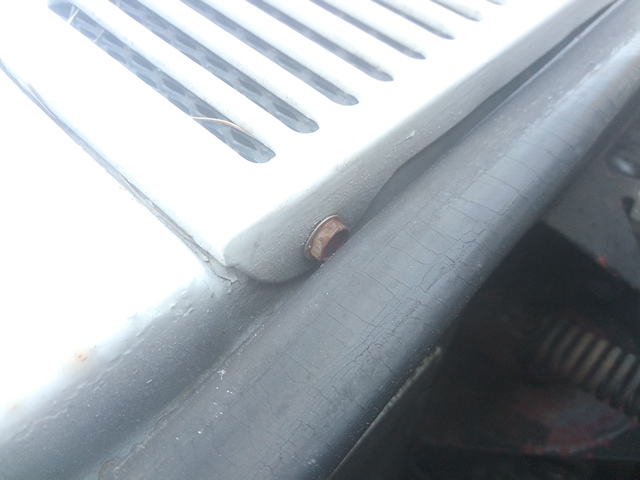 Then unscrew the nut at the base of the wiper. 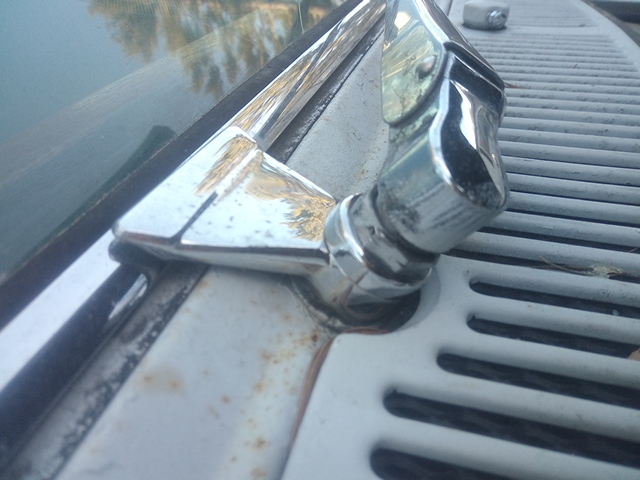 . | |||
Robert J. Sprauer Prolific User Username: wraithman Post Number: 267 Registered: 11-2017 |
Pull the wiper arms off the serrated post, then remove the finisher nut and trim hold-down. While here remove the fresh air vent. There is a foam filter behind it which is usually shot. In the well below you will usually find junk that has to be vacuumed out along with a drain in each corner known as a "frog mouth" that should be gently snaked, it's only a few inches long but must be cleared. | |||
Mike Thompson Prolific User Username: vroomrr Post Number: 162 Registered: 4-2019 |
OK I take off that nut, (which scares the hill out of me if it drops down in there). Then how do I oil it? The square bit is (I guess) under the dash. 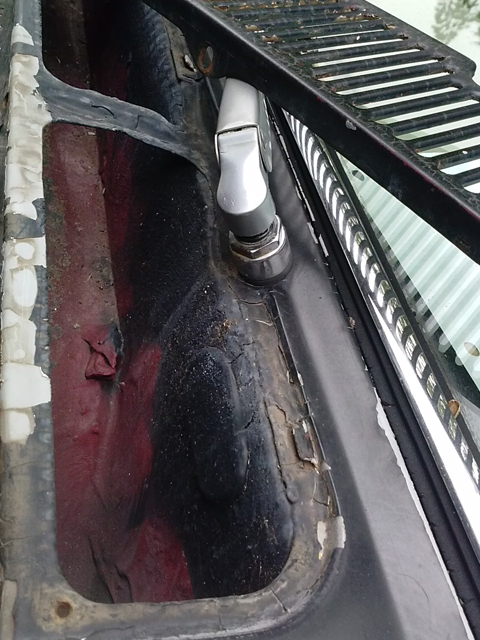 | |||
ross kowalski Grand Master Username: cdfpw Post Number: 957 Registered: 11-2015 |
Mike, The wiper comes off like the old GM ones where you pull up on the back edge and it slides off, then the nut squeezes the seal collar down to the sheet metal of the firewall. The little "gear boxes" pull out from the back. This is actually pretty common for british cars. Both mini's the jag, and the lotus all use essentally the same lkit. | |||
ross kowalski Grand Master Username: cdfpw Post Number: 958 Registered: 11-2015 |
Also, Robert is right on about cleaning out the drains while you are in there. I think they get neglected because they are mostly hidden. | |||
ross kowalski Grand Master Username: cdfpw Post Number: 959 Registered: 11-2015 |
Mike, I have a set of reprinted factory service manuals. ( I also have a set of originals) if you are interested in the reprints, PM me and I'll send them out. They are the same as what is online, but sometimes paper is better when you are under a car. | |||
Mike Thompson Prolific User Username: vroomrr Post Number: 163 Registered: 4-2019 |
Ross I just went out there in the dark (more or less) and lifted the wipers and it moves rather easy. I really don't feel any resistance until I put the wipers down. I'm going to tomorrow try it as is. But that brings me to the electrics. I still have hot lines on all + wires even when the switch is off. As far as the reprints, it is a very kind offer but in this place (being so little) paper tends to get buried alive, never to be seen again. I have an original service manual for my 1965 Thunderbird. Got it as a consolation prize after I designed a website for the junkyard that I got it at (and the 1964 Imperial). But they rejected it (even though it was a million times better than the one they have) because it was black and theirs is white. But bought the work for $500 and the manual (probably worth $200). They used many of the ideas and have improved the site, so it wasn't all for nothing. And I made some of my money back. | |||
Richard Greene Prolific User Username: benzjag Post Number: 129 Registered: 12-2012 |
Mike, You referenced a post from earlier about my windshield wipers not working. Long story short, it was the one of the wiper relays that was stuck. They are to the front of the wiper motor. Turn on the wipers and tap somewhat aggressively on each relay. When I did that, the wipers began working. There is also a wiper module (about the size of a cigarette pack) which is above the passenger main fuse box. I can send a pic of it if needed. For now, I would tap all the relays with the switch on to see if they start working! Richard | |||
Geoff Wootton Grand Master Username: dounraey Post Number: 2077 Registered: 5-2012 |
Mike Sounds like your wheelboxes are ok. As a point of interest they are really difficult to remove from the car. You have to remove the top roll and they are buried under a whole load of wiring that has to come out to access them. I didn't have a good pic of the wheelboxes but the pic below shows the top roll removed. The red arrow points to where the right side wheelbox is accessed - under that lot. The left side is even worse. 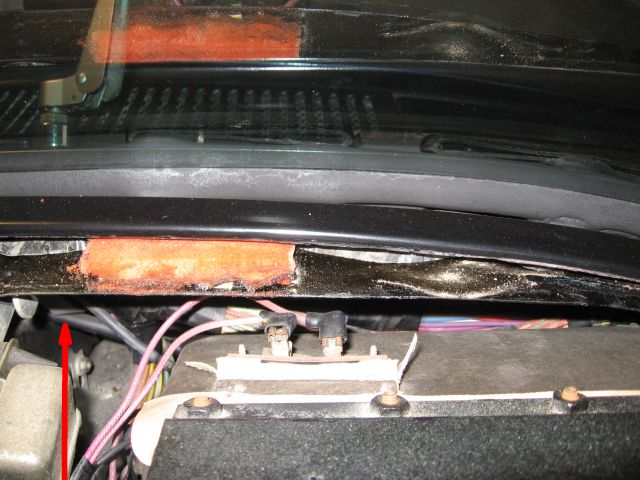 Each year the wiper should be removed, the large nut undone and a few drops of light oil trickled down the spindle. Seized wheelboxes can be free'd off with wd40 and turning the spindle back and forth with the drive cable removed, followed by light oil. A note about the wipers, since you indicated your's appeared to be hot wired. This may be because the system is quite complex and the control units are difficult to access. This pic shows a top view with the top roll removed. The arrow points to some relays on a circuit board that has to be removed to access the control units. 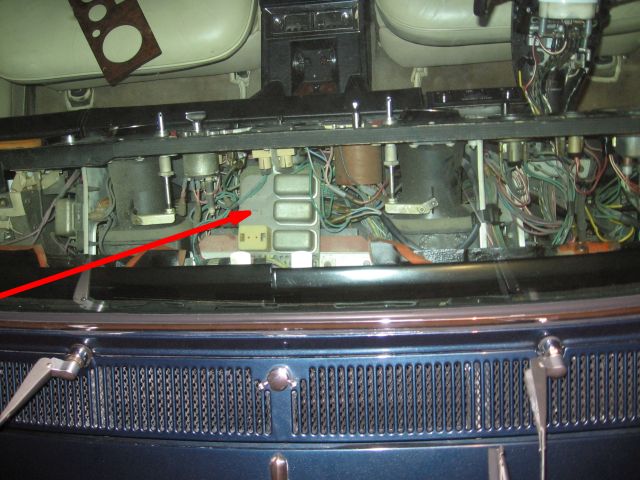 The red arrows in the pic below show the position of the windscreen wiper control units, with the relay board removed. 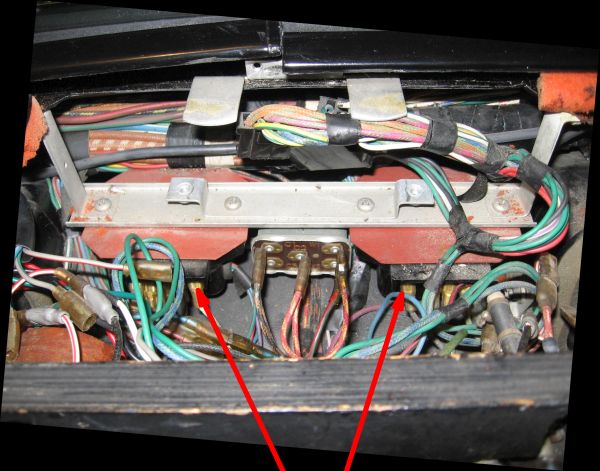 Finally a pic of one of the control units. 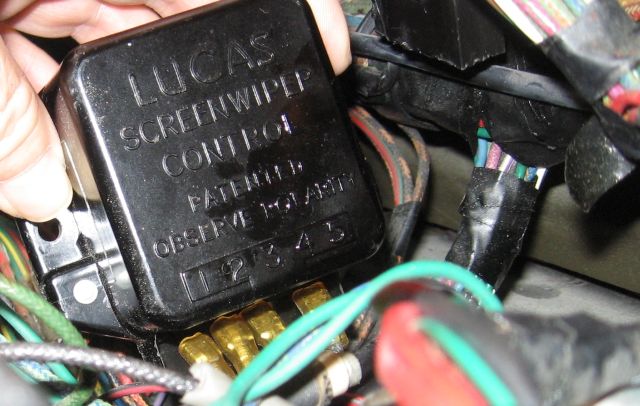 | |||
Geoff Wootton Grand Master Username: dounraey Post Number: 2078 Registered: 5-2012 |
Hi Richard Re: There is also a wiper module (about the size of a cigarette pack) which is above the passenger main fuse box. Does this refer to a Shadow II. Sounds much simpler than on my 74 SY1. Mike's car is a 75, so will be the same as mine, unfortunately. | |||
Steve Emmott Prolific User Username: steve_e Post Number: 245 Registered: 11-2018 |
Mike if you leave your wiper blades on the glass without lubrication (ie rain that you obviously don't get much of) then they likely will drag and go slow. The rubbers are probably hard and the screen got a bit of surface muck makes it even worse. Take the wipers and arms off the spline shaft completely, remove the nut and chrome finisher/spacer. You can do this without removing the scuttle filter, wrap around the outer shaft(where the fixing nut was) tightly some gaffa tape and make a cone shape then drop a small amount of penetrating oil in the cone. I have done this and left it overnight sometimes to help free up sticky inner spindles. Replacing those wheel boxes at the rear is a rotten job to have to do and usually mega strip down to get to them. Freeing up the spindles let the worm wheel change teeth by setting 180 degrees and they will last another 40 years. This way you should not get anything to worry about on the paintwork. BTW the parts as Ross says were used on lots of British cars including all British Leyland Mini, MGB, Triumph etc etc. The whole design is LUCAS and we know how much you guys think of old Joseph bless him (RIP). If you do remove the scuttle filter you will probably find the foam filter is all rotted and as Robert says all bits fall into plenum. IIRC the tubes for drainage run all the way down to the lower wheel arch. Rather than putting a foam filter back I use mosquito netting. I suppose it does not act that well as a pollen filter but lasts forever and stops debris/leaves etc getting in the plenum and blocking those tubes | |||
Mike Thompson Prolific User Username: vroomrr Post Number: 165 Registered: 4-2019 |
Geoff Wootton First thing that comes to mind is, Holy Crap! (In salute to Thomas Crapper the inventor of the toilet in 1596.) I hope it does not come to that or Buba gonna make one. Steve Emmott the cone idea is elegant (as in a mathematical term meaning it is surprisingly simple yet effective and constructive). I like it. | |||
Mike Thompson Prolific User Username: vroomrr Post Number: 166 Registered: 4-2019 |
I guess one should ask, do these motors pull an inordinate amount of power, so that it could it could be wired straight from an ignition source to the existing wiper switch. (I'm thinking not with only what looks like 18 gauge wire on it.) (And of course you would have to turn it off at the right moment to have the wipers down.) Hey it will pass inspection here. | |||
Steve Emmott Prolific User Username: steve_e Post Number: 247 Registered: 11-2018 |
Mike I suspect they do as unless my engine is running I notice my wipers definitely work slower on the sweep and don't always park quite as low down to the screen finisher. | |||
Geoff Wootton Grand Master Username: dounraey Post Number: 2079 Registered: 5-2012 |
Mike I wouldn't wire direct to the ignition switchbox as this is expensive to replace if the load destroys the internal contacts. Use a simple relay. Other than that you could wire it as an on/off system. Of course you would lose all the functionality, but it would do the job. | |||
Steve Emmott Prolific User Username: steve_e Post Number: 248 Registered: 11-2018 |
Mike....one other point as I do see so often people think they have a 'live' permanent 12v supply when actually it is not. It is quite common if using a meter to get a 12v reading especially where electronic devices are within circuits. Reading 12v on a meter does not necessarily mean you actually have a 'current' (amps) supply circuit but just the 'potential' of it. To test if you actually have a 12v live (power circuit) you have to use a test lamp as a load and see if it lights up. Also on some cars there is a permanent live to the wiper motor for park, so if ignition is switched off with wipers ON then the wipers still finish their park procedure. Not sure with RR will have to test later. I know my MGB wipers will just stop anywhere as soon as ignition switched off but the 308 will always park up blades if wipers on and ignition switched off during wiping action. | |||
Mike Thompson Prolific User Username: vroomrr Post Number: 170 Registered: 4-2019 |
Steve Emmott If you notice in my pictures of the insides of the wiper motor, on the fender is a light tester and is what I used. (The Ferrari 308 GTS is that the one where the engine heat and fumes are a problem? And did you take the backing class, how to hang your head out of the car?)  Geoff Wootton "Use a simple relay." Please explain more, the wiring concept to it. Thanks | |||
Steve Emmott Prolific User Username: steve_e Post Number: 250 Registered: 11-2018 |
Mike you are right  I am not as tall as Tom Sellick (Magnum) who just took the roof off and could see over the top front or rear. Still not as bad as the Lotus Europa I had. Beware of LED test lights though if that is what you have. I used one at a friends garage and got some false positives. Geoff's idea of a relay is 'sound' and simple to wire one in. Just takes heavy current through relay contact and a light current through relay coil. Principal used all over the car on electrics. I am just writing up about your foot park brake now. | |||
Steve Emmott Prolific User Username: steve_e Post Number: 252 Registered: 11-2018 |
Mike here is my best two pennies worth on foot park brake. Hopefully it generates some other ideas from someone that has the same system. Now you have sorted the wiper motor and lots of useful information from everyone provided lets see what the foot park brake issues are. Yes it seemed to be a quirk of North America wanting these park foot brakes (meant they could keep hold of their cup of mocca) but I did not realise it was used so early on. At Jaguar the NA market was one of our largest sales and we were often forced into providing features to keep customers happy across the pond. I think the worst one was the XJS automatic seat belt that travelled along from the front top of cant rail to B post as soon as the ignition switched on. As for the foot park brake again a pain in the ass for us to package it into the foot well, and we trialled several different designs so not exactly sure what one was fitted back then to RR. Some you just pressed to put on and then pressed again harder to release, another had two levers one to put on with foot and a smaller one above to release with a link up to the facia dash. Others were electrically released with a solenoid some requiring a push switch and others wired in so with ignition ON as soon as you touched the accelerator pedal out of park the brake automatically released. The modern auto park ones are variable too like on my LandRover it comes on and off totally automatically but also has a manual electric lever that can be used for hill starts. I drove a friends Ford SUV and that one unknown to me did NOT work automatically and although fully electric required manually each time to put on when stopping by lifting the console switch lever but did release automatically as you drove away.......he warned me beforehand as he had had to chase the car once down a slope when he forgot having previously had a LandRover. I think you need to loosen off completely the two rear cables at the fulcrum pivot underneath as mentioned before and check both forward and back individually the whole mechanics. If you leave the fulcrum lever return spring attached and make sure the pivots are all free then you should be able to prove out the whole front part works properly and no issues with the foot pedal mechanism and release operation. With the two rear cables slackened off technically if inner cables/linkages are not seized then the rear pads should release off the disc. In saying that many times I have had rear pads stick to disc so lots of things to check out from centre backwards ie. cables, pad linkage pivots and pads not stuck on. However it needs some others input unless you can explain which type you have as I am not sure if there is an electrical release interlock mechanism on yours that maybe in circuit with gearshift position and ignition on/off situation as depends on exactly the type was fitted. For sure looking at secondhand foot park brake parts for the RR on one of the mechanisms is a remote solenoid like what is fitted to remote door locks. Lets hope at least you get to strike this one as DONE off your list soon. | |||
ross kowalski Grand Master Username: cdfpw Post Number: 962 Registered: 11-2015 |
Steve, You seem to dismiss the mocca saving improvement. It wouldn't have been necessary if Crewe had given us cup holders. | |||
ross kowalski Grand Master Username: cdfpw Post Number: 964 Registered: 11-2015 |
Steve, I was reading the post where you said you do not have to remove the scuttle (vent cover) Ooops, you're right on that. I'm going to chalk that up to "it was a long day" rather than I "i know far less about this car than anything else I own" which is far more accurate! | |||
Steve Emmott Prolific User Username: steve_e Post Number: 253 Registered: 11-2018 |
Ross maybe they thought back then you should be sitting in the back with the picnic tables and wine cooler. Quite right though, we even had to then put cup holders in the Jaguars. Mind you I did make my own for the RR around 30 years ago. 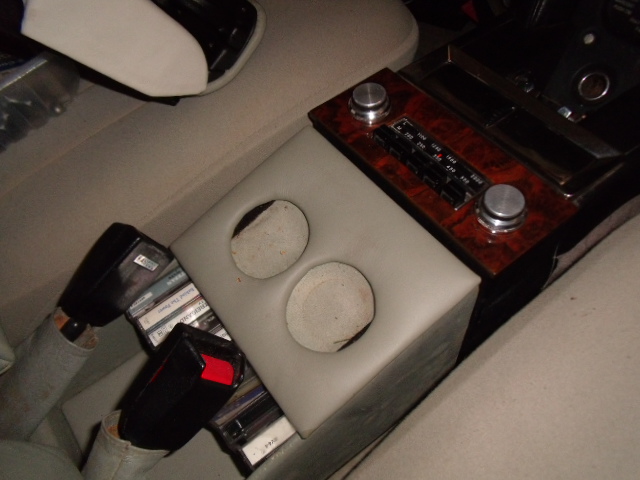 Ross I was not trying to contradicted you regards the front cover. Indeed it IS well worth taking it off at the same time and cleaning out the Plenum. The foam filters are useless and when they rot are a big problem even bits can blow in through the vents into your face. Hence I replaced mine with mosquito netting and so far lasted 20 years. I see Mike has nothing under the metal cover which means insects/leaves/debris can block up the plenum drains and also fly in your face from the vents whilst driving. Hope you are reading this Mike | |||
ross kowalski Grand Master Username: cdfpw Post Number: 965 Registered: 11-2015 |
Mike, My power steering cooler hose is leaking again (I put one in last year?? Who knows) so If I get a chance I'll probe the wires on the wiper motor for you, but the wiring diagram should tell you what needs to be hot for it to tango. | |||
Robert J. Sprauer Prolific User Username: wraithman Post Number: 268 Registered: 11-2017 |
The parking brake sytem is purely mechanical end to end and relies on the return spring to return to normal, so everything has to be lubricated. No need for another relay on the wipers. Relays are designed to do the heavy work of transferring voltage to a device alowing a light duty switch for example. There are 3 relays used in the wiper system. Again use your manuals for relay locations.hint they are in the engine bay located near the starter relay. | |||
ross kowalski Grand Master Username: cdfpw Post Number: 966 Registered: 11-2015 |
Steve, No offense taken, you might think that was the first time I was wrong. Spoiler alert,...no. Best. | |||
Steve Emmott Prolific User Username: steve_e Post Number: 254 Registered: 11-2018 |
Robert picture attached is the Spirit foot brake mechanism I found. I was not sure if there was any difference on earlier RR cars though. We prototyped quite a few variants on Jaguar as you say some ALL mechanical and others with release electric switch and interlocks etc On the side you can see the electric actuator. It looks too big for a 'brake on' warning light switch so at some stage later then electrics were incorporated. 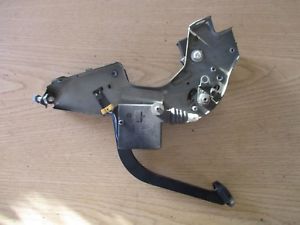 | |||
Robert J. Sprauer Prolific User Username: wraithman Post Number: 269 Registered: 11-2017 |
There is no electric release on a SS! or SS2, There is a black flap to release/return the pedal to normal. | |||
ross kowalski Grand Master Username: cdfpw Post Number: 968 Registered: 11-2015 |
Mike, Power steering line all repaired. ( notice the bubba factor) 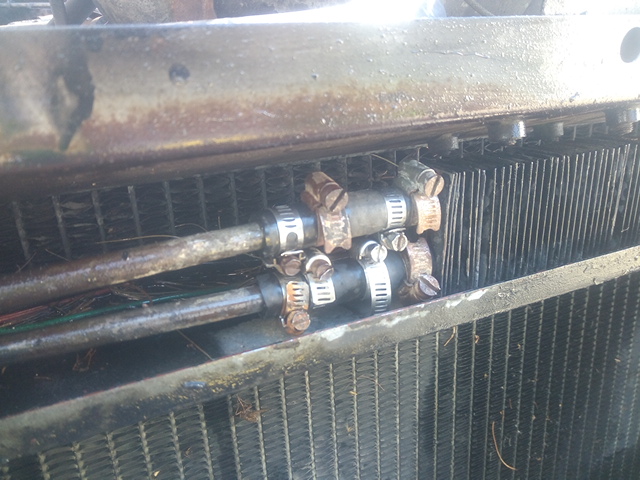 | |||
Robert J. Sprauer Prolific User Username: wraithman Post Number: 271 Registered: 11-2017 |
Correction..the parking brake release handle is on the left and chrome and sits in recessed well within the kneeroll. If the parking brake system is not exercised (I'm guilty of that myself ) it may hang up. The usual cause is a broken/weak spring and corrosion at the rear mechanism. The mechanism , because it sits very low , is prone to dirt and corrosion. I use waterproof grease on these areas. (Not that my car EVER goes in the rain..the bitch is always garaged.) The hood release is the "black" one close to the steering column. | |||
Mike Thompson Prolific User Username: vroomrr Post Number: 172 Registered: 4-2019 |
OK in the picture you can see the parking brake release, the parking brake foot pedal with caution light switch, and the parking warning light on dash. (The switch above the release I assume is only on cars unfortunate enough to have a sun roof, I hate them they always leak into my cars I restore.) 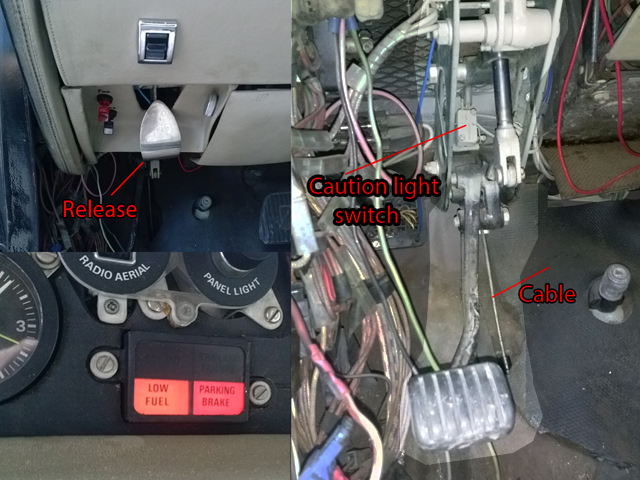 Ross nice Bubba job !  | |||
Steve Emmott Prolific User Username: steve_e Post Number: 256 Registered: 11-2018 |
Definitely as Robert says a basic mechanical operation. Mike does the cable go all sloppy when you release the dash panel lever? | |||
Robert J. Sprauer Prolific User Username: wraithman Post Number: 272 Registered: 11-2017 |
If that is your cable protruding from the mechanism it would be a safe guess the cable within the sheath is hung up. Most times cables are replaced due to stretching. I would go below and check for cables that are not moving within the sheaths. You may get away with a WD40 injection. Due to the inactivity it would be good assumption they are partially frozen along with the lever mechanism. BTW Factory installed sunroofs are rare and that would be your switch below the knee roll. They leak either because of seals, but if the seal is breached there are generally 4 drain tubes(in each corner) of the mounting pan and usually they clog since they are small diameter tubing. | |||
Mike Thompson Prolific User Username: vroomrr Post Number: 173 Registered: 4-2019 |
I WD40 and oiled that cable, as far as I know they are all stuck. Brake, cables etc. The sun roof when it did kinda work 11 years ago, only worked enough to leave over 1/8 inch gap and why there is no carpets left and no floor board in the back. I don't have any idea how to oil the horizontal cables, they have plastic over them. | |||
Mike Thompson Prolific User Username: vroomrr Post Number: 174 Registered: 4-2019 |
Well We Have Joy In Wiperland! It needs adjusting a bit, and it will win no prize in speed, and it does not auto retract, but they work and will pass inspection. Happy day. Next !  I should add to the list I have to have a horn and turn signals, Nothing on the column works, have to pull that apart now. And the elec. windows kinda work if I pull on them and the door locks are all stuck. (I have to leave the car unlocked.) | |||
Robert J. Sprauer Prolific User Username: wraithman Post Number: 273 Registered: 11-2017 |
here's pics for the parking cable junction. Many moving parts there that have to be kept greases. You may also be missing the return spring. 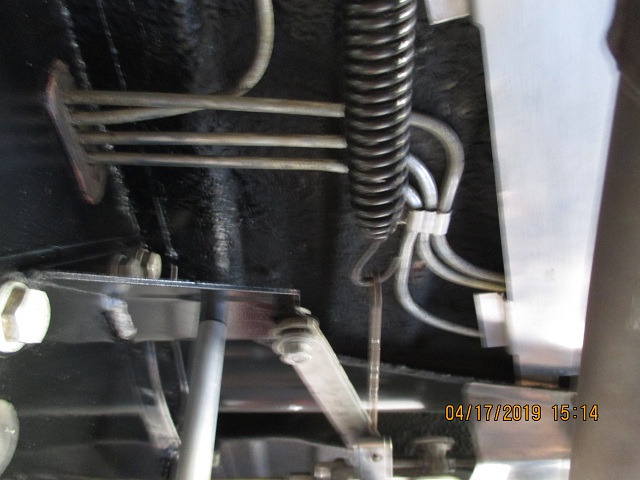 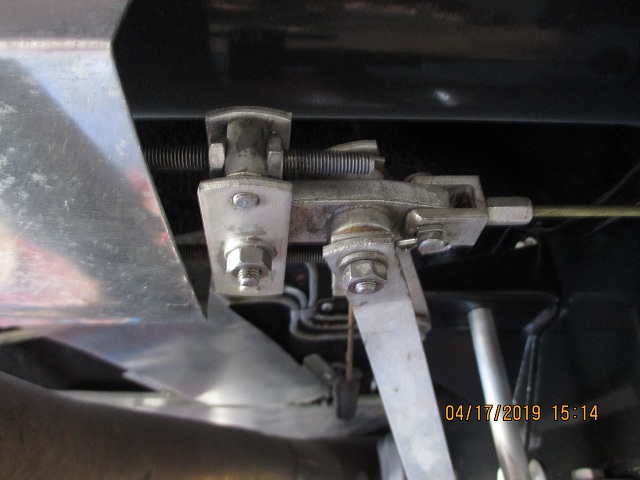 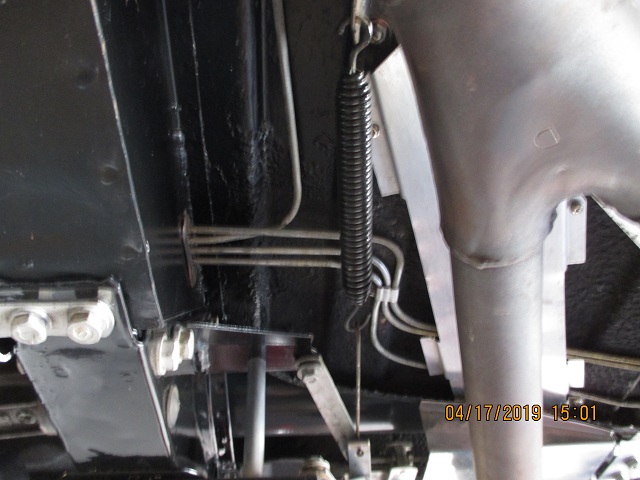 . | |||
Robert J. Sprauer Prolific User Username: wraithman Post Number: 274 Registered: 11-2017 |
wiper relays (3) The parking function is a dog to figure out. I think there may be a TeeOne topic on it. 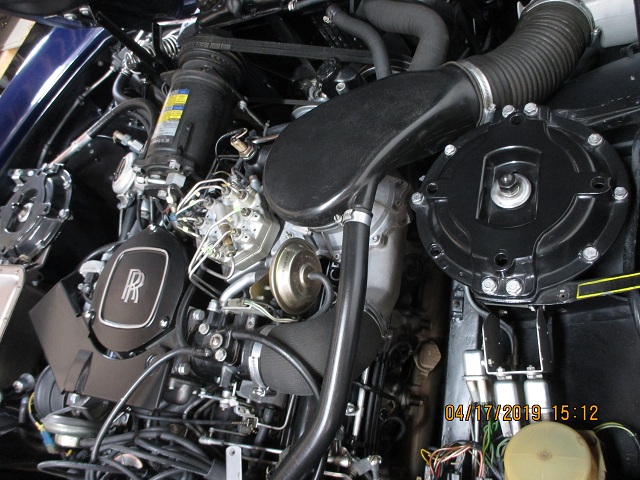 The three relays are grouped in the lower right corner near the tan wiper motor cover. | |||
Jeff Young Grand Master Username: jeyjey Post Number: 406 Registered: 10-2010 |
Robert, your car is immaculate! | |||
Robert J. Sprauer Prolific User Username: wraithman Post Number: 275 Registered: 11-2017 |
Thanks Jeff. | |||
Mike Thompson Prolific User Username: vroomrr Post Number: 180 Registered: 4-2019 |
While I was up under the car for the vacuum on the transmission, I wiggled the cables to the park brake and they move fine. It has to be between the foot pedal and the Y connector. 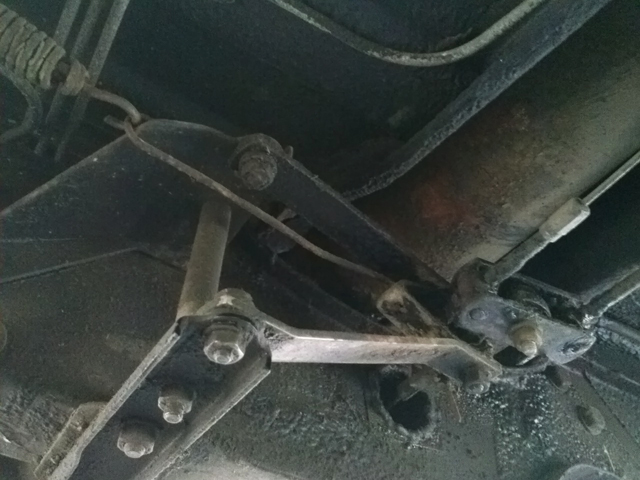 | |||
Mike Thompson Prolific User Username: vroomrr Post Number: 181 Registered: 4-2019 |
That spring don't look right does it? | |||
Robert J. Sprauer Prolific User Username: wraithman Post Number: 279 Registered: 11-2017 |
Its original..but is it hanging up on the sheet metal at the loop end?...maybe its the perspective. | |||
Mike Thompson Prolific User Username: vroomrr Post Number: 182 Registered: 4-2019 |
Steve "Mike does the cable go all sloppy when you release the dash panel lever?" Yes. I think the spring is not hooked up to pull it back. Look at the above picture. | |||
Mike Thompson Prolific User Username: vroomrr Post Number: 183 Registered: 4-2019 |
I'm getting nothing from the turn signals. (Does the front and back turn signals have separate switches, there are 4 wires and 4 nubs? When I ground the horn wire I hear a click. I don't think the horn wires are good at front they are cracked. The horns work. | |||
Robert J. Sprauer Prolific User Username: wraithman Post Number: 282 Registered: 11-2017 |
Most likely the flasher module is shot. It is mounted on the fuse panel..very common problem and easy to replace. | |||
Mike Thompson Prolific User Username: vroomrr Post Number: 186 Registered: 4-2019 |
Robert "flasher module is shot" would the emergency flashers work then ? They work. | |||
Robert J. Sprauer Prolific User Username: wraithman Post Number: 283 Registered: 11-2017 |
Just double checked the schematic and my own car. There are 2 separate flasher modules and both are located on the fuse panel. | |||
Mike Thompson Prolific User Username: vroomrr Post Number: 188 Registered: 4-2019 |
I doubt I can run to my local O'Reilly's Auto part store to get one either. But mine looks like this just one and the emergency flashers work. 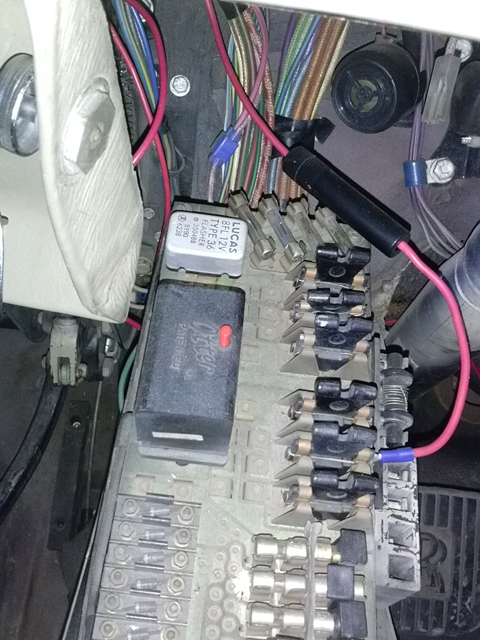 | |||
Robert J. Sprauer Prolific User Username: wraithman Post Number: 285 Registered: 11-2017 |
As long as it has 2 spades I think at 90 deg. The element heats and causes the frequency of flash. There are variations of it. I buy them on eBay. Google or search for the number stamped and they will appear. Very common. | |||
Glen Poolen Prolific User Username: wgipps Post Number: 163 Registered: 3-2018 |
Robert Sprauer - your engine bay pic above - Thats fancy! what is that out of? my 75 SS 1 doesnt look anything like that. | |||
Jeff McCarthy Grand Master Username: jefmac2003 Post Number: 581 Registered: 5-2007 |
Just caught up to this thread after being away a while. Years ago I produced a document detailing Repair and Maintenance of the wiper motor system.
The PDF is not the clearest but is adequate. If you want a digital master copy, pm me. Jeff | |||
Mike Thompson Prolific User Username: vroomrr Post Number: 190 Registered: 4-2019 |
Thanks, I'm sure it will prove invaluable when I tackle the auto reverse. | |||
Steve Emmott Prolific User Username: steve_e Post Number: 258 Registered: 11-2018 |
Mike I am seeing too what Robert sees and the spring extension bar does look like the end connection loop has got caught on the bracket plate and not allowing the lever arm to pivot return. It may just need twisting the loop end hook a bit so it can correctly travel under the bracket plate. If it is all free and you still have that cable in the foot well going sloppy then I suggest it will be the front cable seized. Like you say difficult to work on or oil up due to horizontal so think I would just remove it and bench test/fix it.....new ones are extortionate price. Robert your car should be in a museum hung up on the ceiling so people could walk underneath it and see. | |||
Mike Thompson Prolific User Username: vroomrr Post Number: 192 Registered: 4-2019 |
I look at the spring (before it started to hail) and indeed it was hooked, but I freed it with no effect. On the turn signals, it has to be something other than the flasher. What relays are there? I'll get out the tester, after I wake up, and see if any power is going to the wires. (For AU your time is 2 hour ahead in the day time (it's night 3:00 am) and the next day (usually). | |||
Steve Emmott Prolific User Username: steve_e Post Number: 260 Registered: 11-2018 |
Mike I would suspect the front cable then is seized. As for the flasher relay like you I only have one but it is a bit bigger than yours and made by KLAXON which were big horn manufacturers but it is a 3 pronged tubular relay. I do recognise the relay you have though and it is a common one on my other cars. The relay is just for the turn signals. I have just tested this and it does not click when hazards are put on. Indeed I can't even hear a relay clicking so I assume that one is buried somewhere else. When I operate the turn signals you can hear and feel the relay in the fuse box clicking. Pull out that relay and see if it is a two pronged one. If it is then bridge across the two insert contacts on the fuse board and then try your turn signals and the two lights should just stay on depending which way you operate the lever. If no lights then you have an issue with the contacts in the turn lever behind the wheel or an earth problem on the main steering shaft. If the relay like mine has 3 prongs I would need to check which two need to be bridged across from the schematic. If you want to test the relay then first check continuity across the contacts and/or just rig up a few wires and a couple of lights in circuit and see if it works. It is only a simple bimetal strip inside that warms up and makes and breaks contacts. I need to go get a couple of pictures of my horn push interior as I recall from another post your push was missing so just need to check other parts are still there on yours. | |||
Robert J. Sprauer Prolific User Username: wraithman Post Number: 286 Registered: 11-2017 |
Glen. To answer your question regarding what it is under there: It is a fuel injected car (53 built) for California. Mine is #47 out of that batch. It was one of the last RR cars built and actually arrived in June 1981. The injection is Bosch and runs like a watch. There is no air injection either and features dual exhaust out of the main cat with chrome tailpipes in each rear corner like the Corniche and Spirits. | |||
Steve Emmott Prolific User Username: steve_e Post Number: 261 Registered: 11-2018 |
Mike here are some pics. As I said mine is just a single flasher too but a 3 pin. I found one of the Lucas ones in my spares boxes and it is a two pin but clearly has the copper rivet for a 3 pin one. It has the same main coding as yours and the Type36 refers to 3.6 amp where mine is actually shown as 3.6 amp Albeit you need to pull yours out and just check the terminals. I will keep looking to see if I have a 3 pin one. Check for continuity across the pins if 2 pin and if good then best start looking elsewhere until you get the lights going. If the flasher relay is open circuit then it is faulty. However as it is a Lucas part they never went wrong!!!!  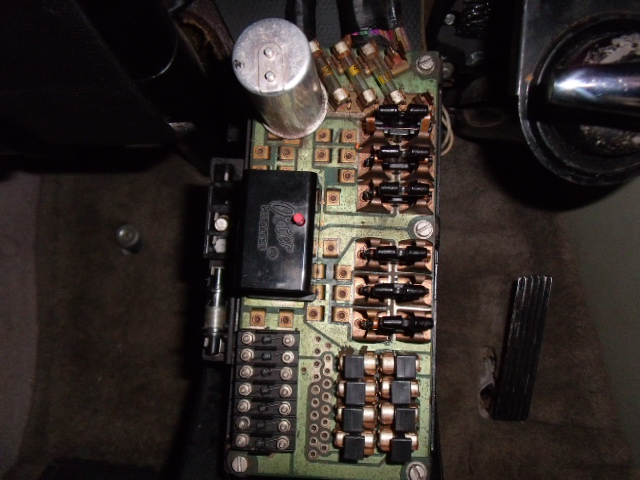 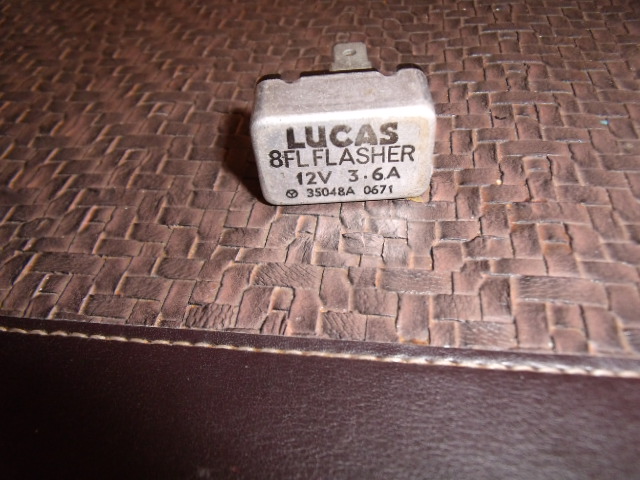 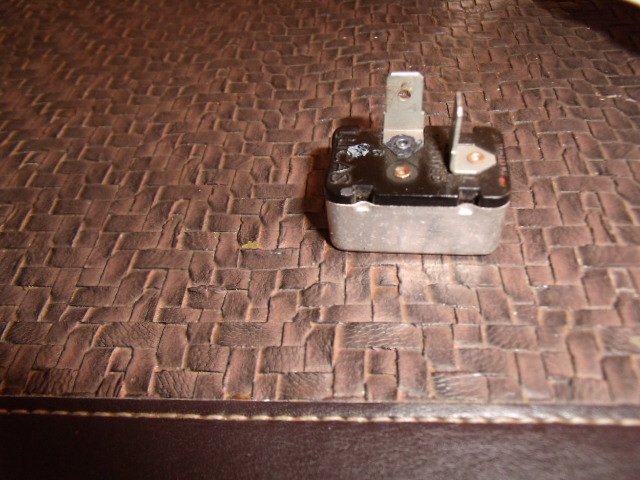 | |||
Steve Emmott Prolific User Username: steve_e Post Number: 262 Registered: 11-2018 |
Mike here are some components of the horn push. As I said above you posted sometime ago your horn push was missing and you made something up. If you look though at the actual horn push button it has a shaft that goes through to make contact with the plate underneath when horn button pushed. It should also have a spring around the shaft. There is a circlip at the end to keep the horn push then in place So if you just made a flat cover you are not going to get an electrical connection for the horn 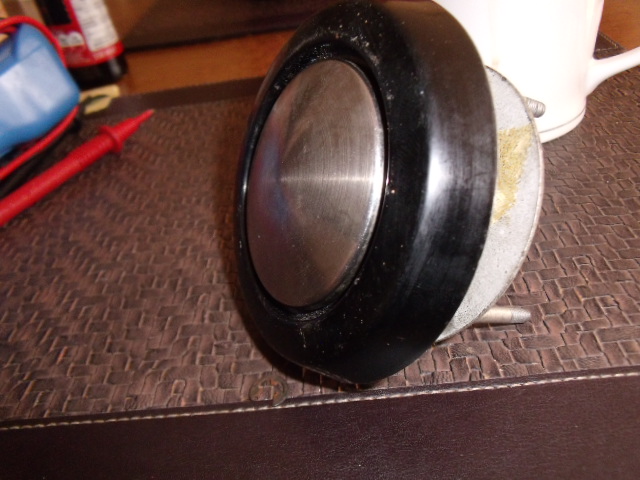 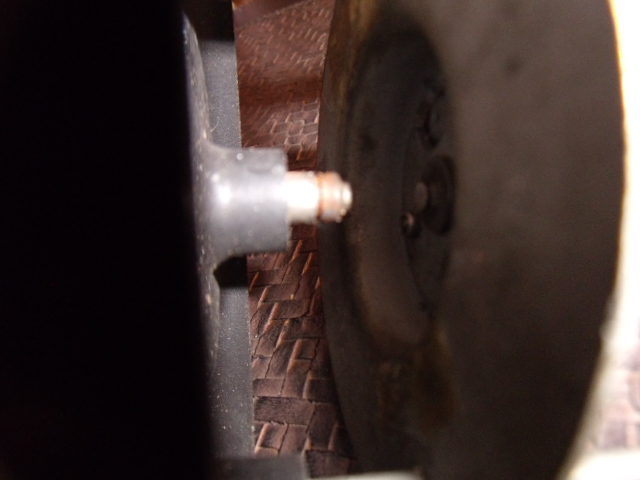 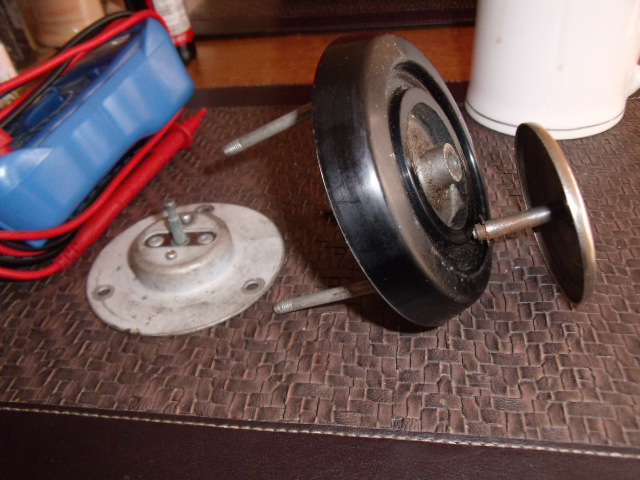 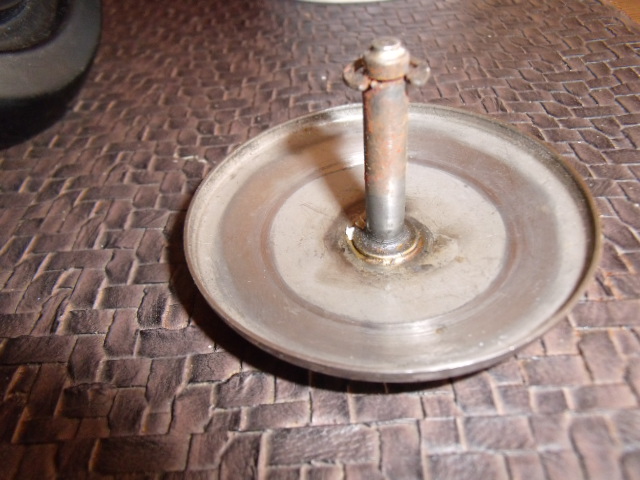 | |||
Mike Thompson Prolific User Username: vroomrr Post Number: 193 Registered: 4-2019 |
On my 1964 Imperial I had to make the existing horn mechanism work (which it was broken) by putting springs and wires that disconnect when not pushed. To test the flashers I only needed to run 12v to it and it would or would not start making the clicking sound. Generally to bridge a circuit like you describe I just use a paper clip. I do things simple. If you notice on the your plate where the horn push button touches, it is isolated and only grounded when the button touches it. I made a similar device. For this car I just bought a horn button and will glue the push to it, simple. It must be adapted to sink within the existing Nardi steering wheel however. 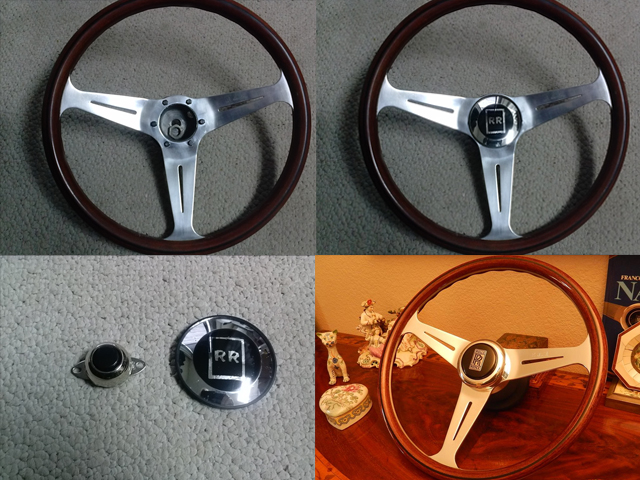 | |||
Mike Thompson Prolific User Username: vroomrr Post Number: 197 Registered: 4-2019 |
Here is the results of testing the Turn Signals (Direction Indicators). First picture is what we are looking at. I tested the nubs that the wires hook to on the turn signal switch. The outer nubs have power, the inner nubs must be ground or don't work (see the second picture, there are 4 nubs). The turn lights on the dash (now) work (I don't think the did before, but they are very little). I think the rocker transfers the power? There are two rockers inner and outer. The flasher relay works, I shot 2 amps of 12v through it and it started clicking. (I did not want to scare the little feller so I kept it low). My flasher relay is a Lucas 35048B (B not A ?). For some reason the electricity is not making it to the flasher relay nor the exterior lights. (But the emergency flashers work.) By the way I hit the washer lever and the wipers went back and forth then auto retracted. Now the dash button auto retracts as well. It healed itself. 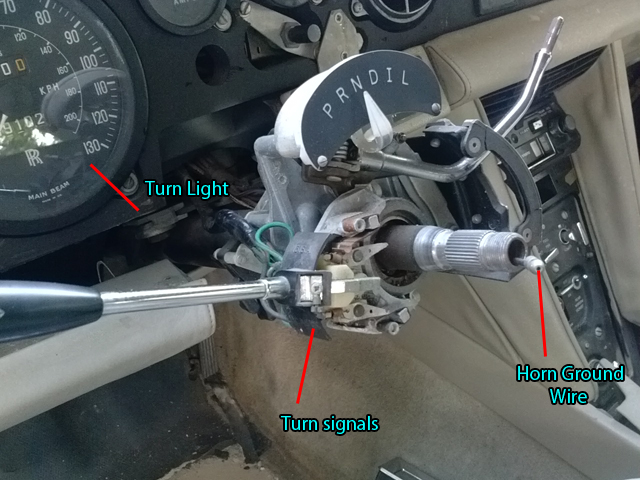 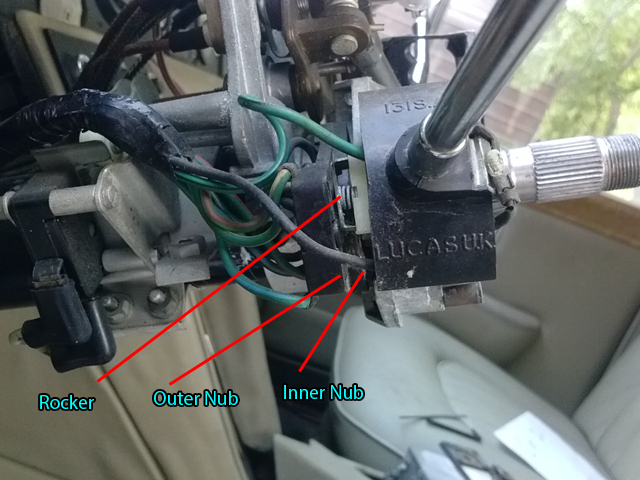 | |||
Mike Thompson Prolific User Username: vroomrr Post Number: 199 Registered: 4-2019 |
Park Brake Solved ! There was nothing wrong with the cable. What was wrong was the design. The vector of forces was wrong. I changed the position of the spring, and it probably works better than it ever did. (Now that sucker pops up.) Now you can see that cable is nice and tight. 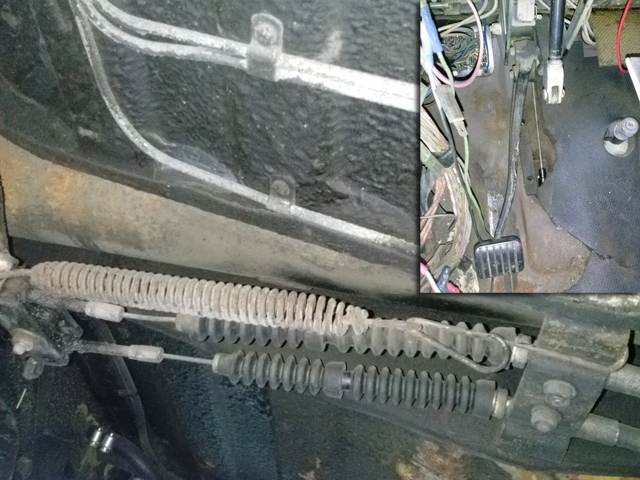 | |||
Glen Poolen Prolific User Username: wgipps Post Number: 164 Registered: 3-2018 |
Mike one thing i note is that the 'pole' on Nardi steering wheel the that turns the signals off during turns doesnt fit the RR mechanism. Its too short and not far enough out to collect the indicator switches. My best guess was to weld a small better placed pole to collect the signals. Any suggestions? | |||
Mike Thompson Prolific User Username: vroomrr Post Number: 201 Registered: 4-2019 |
Not sure what yours has, but this is what I have, easily replaced. 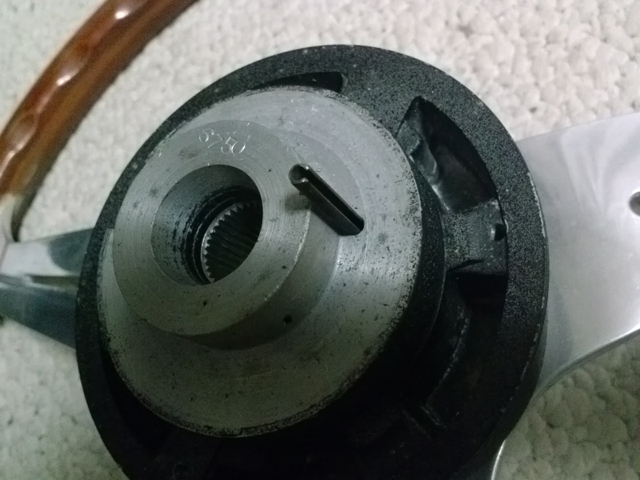 | |||
ross kowalski Grand Master Username: cdfpw Post Number: 972 Registered: 11-2015 |
Mike, I have to tell you I absolutely love your RR project and all the posts. Not only because you are obviously not lazy, but because you also don't even believe that "impossible" is a thing. Thanks, for all the great posts and problems and I can't wait for your youtube video of the car running. Also, I now have a second regret. The second that I don't live in Texas down the road. | |||
ross kowalski Grand Master Username: cdfpw Post Number: 973 Registered: 11-2015 |
Mike, I think the roll pin is correct. | |||
Mike Thompson Prolific User Username: vroomrr Post Number: 203 Registered: 4-2019 |
I have another What is it question. 4 pictures up, the one with Turn light, Turn signals, Horn ground wire labels, the elec. gear shift pointer is pointing at a button on the dash that is below my fuel gauge. What is it? And why is my turn signals making it to the dash speedometer and not to the flasher relay and on to the exterior lights? | |||
Steve Emmott Prolific User Username: steve_e Post Number: 268 Registered: 11-2018 |
Mike I think that is oil level and warning light test button. If you check your fuel gauge it should have the lower part double graphics. Press that button and it should give you oil level indication There is also a button on the far side probably your left side as mine is on right side as a RH drive car about the same level as the oil level switch and that is the fuel flap release. Second issue have to think that one out a bit as it could be there is another relay in the system so need to check schematic. Have you tried to put a 12v supply direct onto relay terminals in fuse box and just checked if all the lights come on or not. Just wondering not saying you should do it until referenced the schematic | |||
Jeff McCarthy Grand Master Username: jefmac2003 Post Number: 585 Registered: 5-2007 |
Mike, that button does 2 things: 1- it temporarily turns your fuel gauge into an oil level gauge (if the sender in the oil tank is still working); note the amber markings on your fuel gauge. With ignition turned on the fuel gauge needle should jump when you push it. 2 - it tests the coolant alarm; if the buzzer hasn't died this should sound. Pressing it is recommended as part of the startup procedure to check that oil is okay (it's set to measure cold oil level) and that the coolant circuit warning is functioning. Unfortunately the alarm only goes off about 30 seconds before serious overheating damages the engine so you'd need to pull over quickly - there are better aftermarket systems easily installed. Some of us replace the ammeter gauge with a coolant gauge or install a coolant gauge elsewhere If you look in the technical section there's a copy of the handbook which explains it. Also, if you don't have one, I have a near pristine copy of a US Shadow handbook (no name etc scribbled in) that I can send you for the price of postage (about $30.oo) and a six pack of beer (about $30.oo). | |||
Steve Emmott Prolific User Username: steve_e Post Number: 269 Registered: 11-2018 |
Jeff is probably right as yours is a Shadow 2 but on the Shadow 1 it brings on the low coolant light and the two low pressure brake/height accumulator warning lights as well as a buzzer. | |||
Jeff McCarthy Grand Master Username: jefmac2003 Post Number: 586 Registered: 5-2007 |
Steve, mine is a Shadow I. Next time you press it check your fuel gauge. If the needle doesn't jump it means your sender has died; it's very similar to a fuel tank sender. I discovered all this playing with the wiring - one of which goes from the button to the fuel gauge. | |||
Steve Emmott Prolific User Username: steve_e Post Number: 270 Registered: 11-2018 |
Jeff mine all works fine, I covered the oil gauge bit in my first response just before yours, but was not sure if after your response the button did something different on the warning lights as I know they are slightly different on a Shadow 2 so did not want to mislead Mike so bowed to your experience. If you're wrong you owe me  | |||
Mike Thompson Prolific User Username: vroomrr Post Number: 206 Registered: 4-2019 |
Jeff is right I remember when I pushed it the fuel gauge went wonky, and something about coolant lit up (no buzz). It took me for ever to find the fuel door release. And Steve in another post I revealed I have this habit of shooting elec. down a line to see what happens (blew more fuses that way). I'll try it and hope nothing blows. Fire in the hole, fire in the hole! On taking off door panels, do the little pins brake, as on the door opener cover etc.? I need to take all the door panels off to be able to lock up the car, but the little pins worry me. | |||
Jeff McCarthy Grand Master Username: jefmac2003 Post Number: 587 Registered: 5-2007 |
Steve, you're right as well - it does also test warning lights. I've been assuming Mike's car is a Shadow I because it's 1975. Replacing the buzzer is easy if it doesn't work. | |||
Steve Emmott Prolific User Username: steve_e Post Number: 271 Registered: 11-2018 |
Mike I covered the oil indication on the gauge and we agree with that....... it is whether the button also checks the warning lights on a Shadow 2. In operational mode having driven the car regularly there is no warning lights that will come on ie low coolant/low accum pressure so the button on mine also checks the warning lamps are not faulty. Otherwise if the lamps had blown you would have NO indication of a fault. With Shadow 11 it may have done it a different way and lamp function is checked when ignition switched on and car not started as most cars are like today. Regarding the flasher the drawing shows up to 1977 that the flasher relay is a 3 pronged and acts as a relay and cut off/bi metal. Yet the flasher unit looks just a bimetal so may indicate another relay was added on some cars. Need to know if your flasher is a 2 pin or 3 pin before delving. Robert says his had 2 relays in the fuse box so obviously there were some variants as mine is a combined relay and flasher unit. Update......Jeff I wrote this same time as you posted so thanks for the confirmation...... | |||
Robert J. Sprauer Prolific User Username: wraithman Post Number: 291 Registered: 11-2017 |
Mike Reading the workshop manuals will answer many of your questions. There is a technique with door panels and yes the retainer pins can break if forced . They are sourced from FS. Start from the bottom of the door card with a plastic putty knife or similar, BUT you first have to remove the window switch trim, etc Carefully pull away the plastic moisture barrier. 3M has a 08578 strip chaulk that is used by restorers and myself to re-adhere the film. It is very common product. | |||
Mike Thompson Prolific User Username: vroomrr Post Number: 209 Registered: 4-2019 |
My flasher relay is the 2 pin the 35048B. I've been thinking what good shooting elec. down the line at flasher relay point, and it don't seem like it would be useful. I know the emergency flasher work. The problem is between the switch on the column and the flasher relay. And reading the manual won't help when the electric wiring diagram is on 4 pages. I'm piecing it together into one whole page so I can follow the wires. | |||
Robert J. Sprauer Prolific User Username: wraithman Post Number: 293 Registered: 11-2017 |
Shooting electric down a wire will definitely get you in trouble. Your best is with a tone generator. You will destroy diodes and many other DC sensitive components. | |||
Steve Emmott Prolific User Username: steve_e Post Number: 272 Registered: 11-2018 |
Mike it is hard to keep up with you as you have so much going on so don't forget to reply to the above on electrics. Lets move to door cards removal...The metal clips are crap but were used by most car manufacturers in the 70's and indeed used all over the RR/B trim. Today's plastic fir tree fixing are definitely an improvement as they don't rust. You need to get between the inner door skin and door card and gently prize the door card off. Be careful as the door card if old and been damp the backing will tear around the clip as it is just a hardboard composite so make sure you pull off as close to the clip as you can. All this is obviously after you have removed switch covers, armrests etc. The woods can stay in place for now and no need to remove the actual switches just the chrome cover plates and surrounds. I have a special tool to insert (Ahermmmm does not get used much nowadays) but a decent barbeque meat two pronged fork also works and needs to be slid underneath the door card where a clip is. Start from the bottom as the top is tucked under the wood and the door card needs to be pulled out from the bottom and dropped about 6mm to release from behind the wood door cappings. The hardest clips though are a few around the centre where the armrest is but they pull out ok but more difficult to realign to refit. Actually more damage is done to the metal clips when refitting the door cards as if you don't line them up they will easily bend or break. Good news though they are readily available and 'cheap as chips' or maybe that should say cheap as clips  Robert generally I would agree but as a specialist Naval bomb disposal expert sometimes one does have to take a decision. I checked the drawings there is NO diode in circuit that would blow. The 12v supply merely authenticates if there is a relay prior to the flasher unit depending obviously if the flasher unit is 2 pin or 3 pin. Any chance of a picture of your 2 relay in the fusebox so I can work out and record the various changes as so many 'red herrings' can happen if people make unsubstantiated comments. | |||
Mike Thompson Prolific User Username: vroomrr Post Number: 211 Registered: 4-2019 |
Steve if you count 13 pictures up to my post I posted a picture of my fuse box. If you count 10 pictures up the back looks exactly the same on my fuse relay, but mine is a 2 pin the 35048B not A. (Don't know if there is any difference.) I'm not a social creature, usually the only contact with other humans is to say no I don't need that in a bag. (At Walmart, and plus I think in pictures.) So I guess I have trouble explaining what I am talking about. In a video by rollsroycenut (I think is its name) he said all the switch covers (as you called them) have plastic nubs that hold them in that brake. So with heart palpitations I removed two of mine, and they luckily do not have them. Just a simple push in (kinda like the chrome on the exterior). That has been the only reason I have not taken off the door panels (card) up until now (fear). (So thanks on that.) 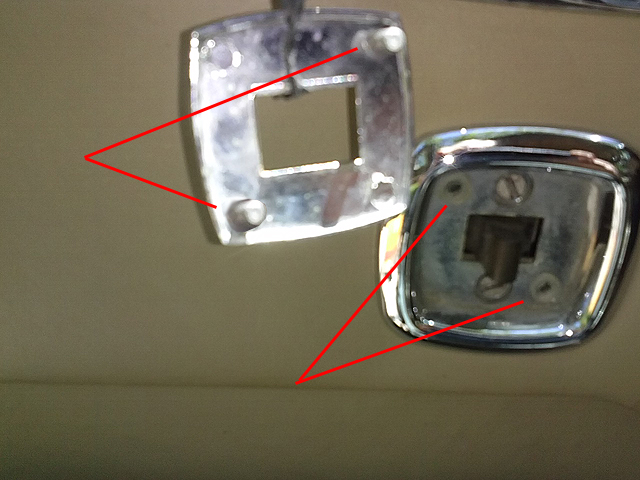 | |||
Steve Emmott Prolific User Username: steve_e Post Number: 273 Registered: 11-2018 |
Mike I have already explained to you the hazard flasher circuit is NOT connected to the directional flasher thermal cut-out/relay circuit in its initiation of supply down to the actual wing light units. The drawings clearly show up to 1977 that the directional flasher unit is a 3 pin and contains a relay AND AND a bimetal thermal current cut off device. I said my installation was a much bigger unit and I supplied pictures showing the larger KLAXON 3 pin as it contains the coil/relay AND the bimetal thermal cut-out as shown in the RR schematic drawings. Now the later 2 pin Lucas is I suspect just the bimetal thermal cutout (I have never actually opened one up) and NO coil and relay contacts inside so the click you here is just the heat produced by the current breaking the bimetal strip as current flows and warms up the metal. Of course it could be achieved in that little flasher unit space today using electronics but not much of that around in the 70's Given Robert said he had TWO relays in that position, if that is so, it shows 3 iterations possibly (picture please Robert) of design not made clear at all on the schematics (which is often the case as changes were made) so the fact you only have a two prongs suggests to me there is somewhere in circuit possibly separate relay/s that work in conjunction with the flasher thermal cut-out and indicator stalk. That said many cars did just have the straight forward thermal cut-out in series with the indicator stalk however that put more loading on the column switch contacts. Just trying to establish this as it is not clear on the schematic drawings. The flasher thermal unit being only the one HAS to be in series with the actual indicator wing lamps/bulbs circuit. Supply 'THROUGH' the flasher whether right/left has to be separately controlled from column stalk position which decides which side is chosen. Either my installation was updated to remove the need for relay or possibly the circuit was just modified and somewhere possibly relay/s added to reduce current through column stalk contacts. | |||
Robert J. Sprauer Prolific User Username: wraithman Post Number: 295 Registered: 11-2017 |
Keep in mind my car is a 1980 . It has a 2 pin (90 deg) Lucas flasher that is bi-metal. I opened it up to adjust the frequency of flashing recently. There is also a 3 prong hazard flasher on the circuit board also. | |||
Steve Emmott Prolific User Username: steve_e Post Number: 274 Registered: 11-2018 |
Mike it is not a picture of your fuse board I am after it is a picture of Roberts. I can understand a transition from the 3 pin to 2 pin flasher but get a wobbly when I find a 3rd iteration and just want to understand. As for the door cards I would assume the delicate pins referred to are the ones on the back of the die casting of the chrome finisher. The plastic inserts are readily available but I have a few chrome finishers in my stock missing the odd pin off the back and usually huge screwdriver scratches over the surface. (not by me) Silly money being asked for replacements too. The switch finisher plates just need to be teased out gently and there is a small indent on one side to help you get started. The two screws when removed just take the switch surround off and the switch stays in place so not difficult. Look after the small screws they are BA and not easy to get. Switches are just standard Burgess micro-switches screwed on the back so they are real simple if any are faulty. The fact your headlights work means the OTTER cut-out that sits below the flasher unit in the fuse-board is OK as it does door locks and gearbox and headlights IIRC so some investigation if door locks not working. When refitting the chrome finishers they always appear symmetrical, the door release definitely is not but generally they are often better put back exactly the same way as removed. Mike you have so much going with the car just ask as if the answer provided is misunderstood just ask again. Next week I got a friend coming in his 1973 Shadow to sort out poor acceleration and stuttering and the week after I have a Shadow 1 that the coolant light is not coming on when the test button is pushed. All good for the cats protection and RSPCA. I don't get to see that many people unless I am fixing their cars and sort of lost touch with many after spending 15 years in France | |||
Steve Emmott Prolific User Username: steve_e Post Number: 275 Registered: 11-2018 |
Robert that explains a little as I could not even hear my hazard flasher working so I assume buried under the facia probably behind the stereo/radio or under hood/bonnet. It was then obviously relocated by your model year into the fuse box. Back to basics then now knowing the directional indicator just went from my 3 pin KLAXTON (combined cut-out, relay and coil as per schematic) to a Lucas 2 pin thermal cut-out not shown on drawings left for owners to work out if any relays were remotely fitted or just done away with. BTW Flashing frequency on the Lucas unit can also be affected by bulb wattage that needs to be correct and bad earths/contacts on back of lamps. (and I know you don't suffer the latter).  | |||
Mike Thompson Prolific User Username: vroomrr Post Number: 213 Registered: 4-2019 |
Steve and Robert to me is seems the way you are phrasing things you are implying I am stupid, I don't appreciate this. I hope this is not the case. (I was going to stop coming here and write a nasty post, but I have taken some time to cool down. I need help or I probably would have. Plus there are other people that do/will benefit from this.) My 1964 Imperial is wired that hazard, and turn signals utilize one flasher relay only. Again 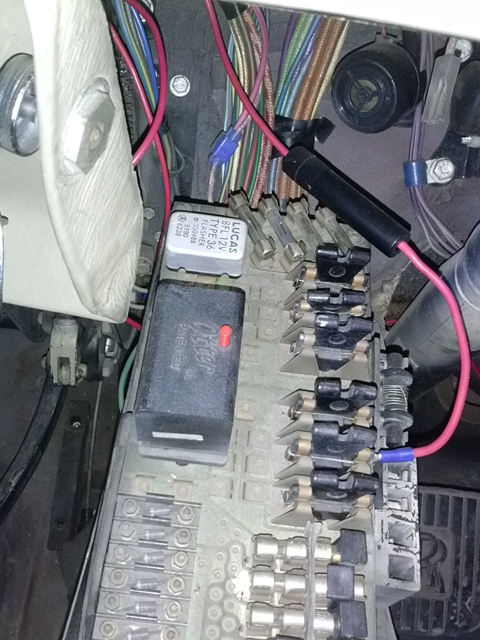 | |||
Steve Emmott Prolific User Username: steve_e Post Number: 276 Registered: 11-2018 |
Mike that is not the case at all and I don't see that in Robert's responses either. You have instigated some really interesting posts and a lot of fun and banter along the way and I would never belittle anyone. I hate having to even phrase a post when I can see someone has made an error in responses. You are doing so much and writing up too what you do which is great and I think everyone is behind you. | |||
Geoff Wootton Grand Master Username: dounraey Post Number: 2080 Registered: 5-2012 |
Mike I've been following this thread and can assure you I have not read anything from Steve or Robert that I thought was patronizing or belittling of you. Quite the opposite in fact as they have spent a lot of time in giving lots of great advice. I'm hoping you will stay with us and put up pics of your car as you progress in getting it back on the road. | |||
Mike Thompson Prolific User Username: vroomrr Post Number: 216 Registered: 4-2019 |
Well the one in question was this one I had just woke up excited to come in here and start to work on the car, and try to find out where the line from the transmission went to in among the million wires, and lines ect., and I got this response. Robert: " Ok did you follow the line from the modulator? If you follow the line you will come to the end, right?" To me it sounded like it should be follow with, stupid. | |||
Jeff McCarthy Grand Master Username: jefmac2003 Post Number: 588 Registered: 5-2007 |
Okay - Looking at the pictures (spare me if I've gotten a bit confused) it looks to me that Mike's electricals look similar to mine. If that is is the case then the indicator/hazard circuit has an extra flasher relay hidden up in the top roll. On cars to 1975 specifications (and back to 1972) the flasher unit on the fuse board controls the Indicators; the unit under the top roll controls the Hazards. This circuit has driven me to drink for years. It is possible for the hazards to work but not the indicators and vice-versa. If the hazards are working but the indicators aren't then replace the flasher on the fuse board On page 20 of the following RR booklet that I uploaded some time ago you can see the separate Hazard flasher unit near the Ammeter Shunt - this is on a right hand drive car (I have no idea where it is located on a left-hand drive car - perhaps someone can advise?)
| |||
Mike Thompson Prolific User Username: vroomrr Post Number: 217 Registered: 4-2019 |
Jeff the thing is, when I turn on the hazard, I here it at the fuse box. I almost put my ear on it. Please don't tell me it is under that roll. And Steve thanks. | |||
Jeff McCarthy Grand Master Username: jefmac2003 Post Number: 589 Registered: 5-2007 |
Also - it's worthwhile printing off this section of the Manual from the Technical Service Documents as a handy reference guide when working on the electrics. [Workshop Manual SY Cars 1965-76 Section M] http://rrtechnical.info/sy/tsd2476/tsd2476.htm Here it is in compressed PDF format
I have the entire theoretical wiring diagram for my car blown up into a single 2 metre x 1 metre laminated poster on my wall. I took the pages from the Workshop manual for 1975 spec cars to a printshop and they joined them into one document using adobe and then printed it off on their largest printer and laminator. It was the best couple of hundred dollars I ever spent on the car. | |||
Jeff McCarthy Grand Master Username: jefmac2003 Post Number: 590 Registered: 5-2007 |
Mike, Just to make sure I'm looking at the right one is it in this picture? 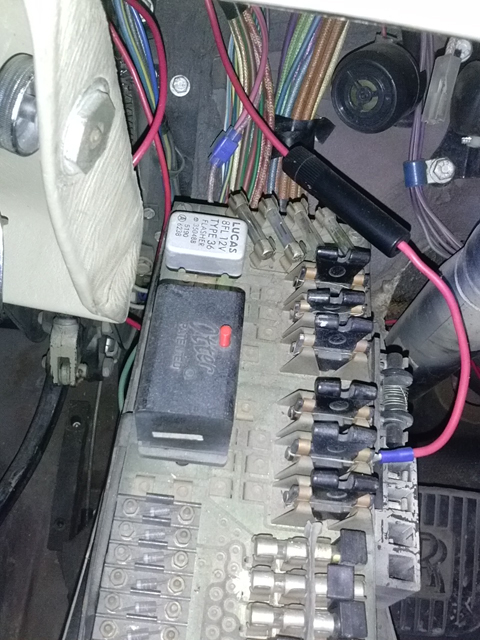 | |||
ross kowalski Grand Master Username: cdfpw Post Number: 975 Registered: 11-2015 |
Mike, What serial# is your car? It should be on the all too fancy cast AL plate in the engine bay. | |||
ross kowalski Grand Master Username: cdfpw Post Number: 976 Registered: 11-2015 |
Mike, I pulled one of the manuals from the shelf And opened it to a likely page. Not your car but probably the same. 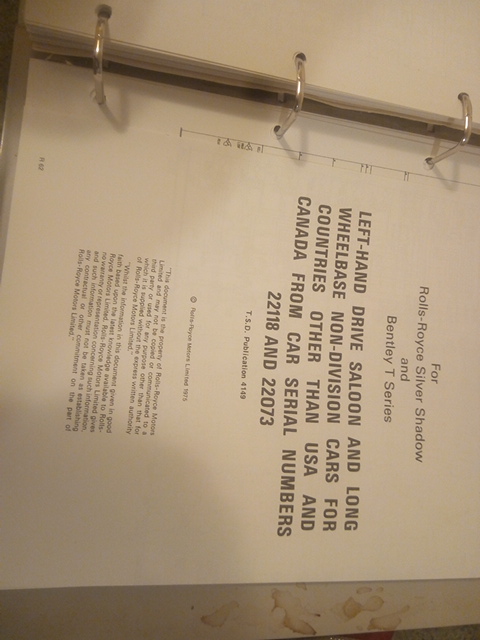 Does this look anything like what you are looking at for a diagram? 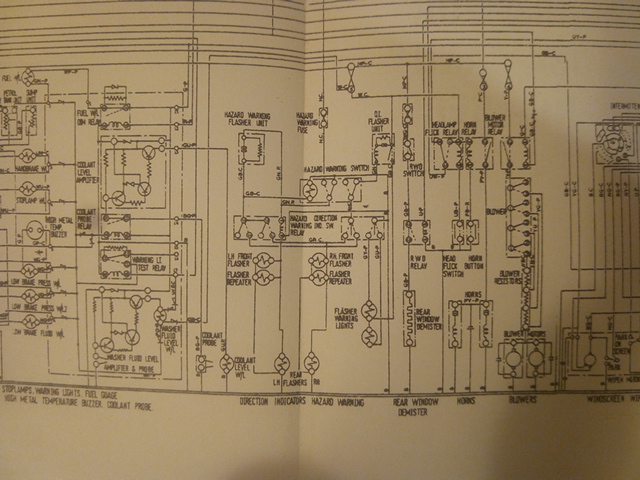 | |||
Robert J. Sprauer Prolific User Username: wraithman Post Number: 298 Registered: 11-2017 |
"other than USA" not the right one. Many of the schematics are very specific ie: country and LHD/RHD and of course by vehicle number. I would use the Bentley Heritage site for workshop manuals and parts location(put your ## in for exact parts for your car). https://heritage.bentleymotors.com/en/technical-library | |||
ross kowalski Grand Master Username: cdfpw Post Number: 977 Registered: 11-2015 |
Mike, Whatever diagram I am looking at looks like there is a hazard warning relay which allows the turn indicators to work, a hazard flasher and an indicator flasher. I think we might be able to troubleshoot this with a 12v probe. | |||
Jeff McCarthy Grand Master Username: jefmac2003 Post Number: 592 Registered: 5-2007 |
Here is the relevant section of the manual from "All cars to 1975 specifications" 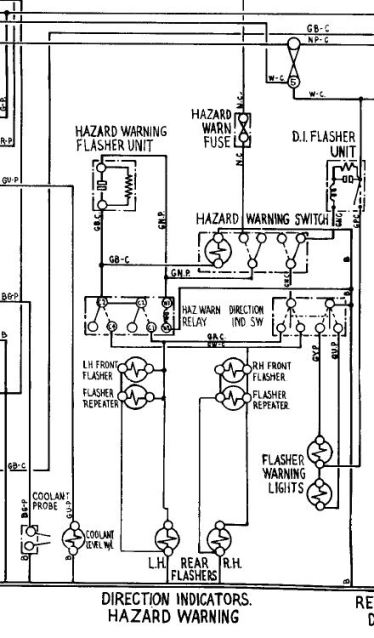 | |||
Jeff McCarthy Grand Master Username: jefmac2003 Post Number: 593 Registered: 5-2007 |
Also - there is nothing special about these flasher units. Any parts store like Supercheap Auto or Repco will have something to replace it with. Just count the number of pins on the original and buy something with the same configuration and it will work. It is unlikely to be the relay that's the problem, but if all else fails refer to the following diagrams from the section of the manual I compressed above. (Please note: In the written section [first picture] describing which relay it says refer to Fig M65 - this is a misprint it should be Fig M61 which has the pins as described) 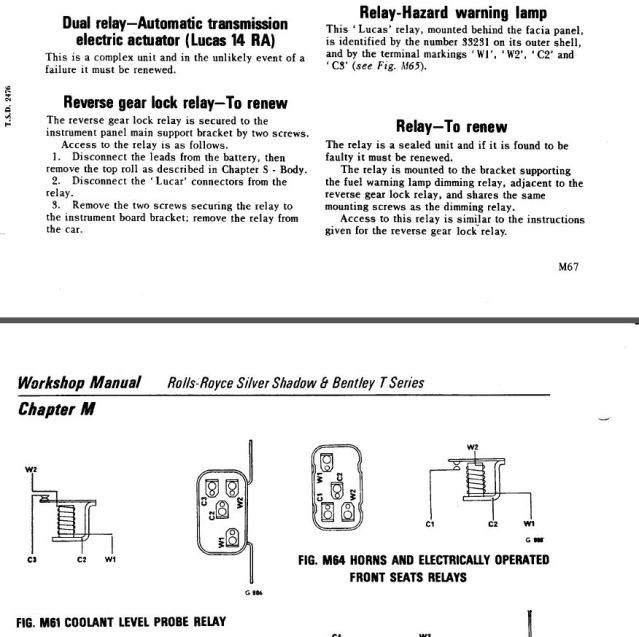 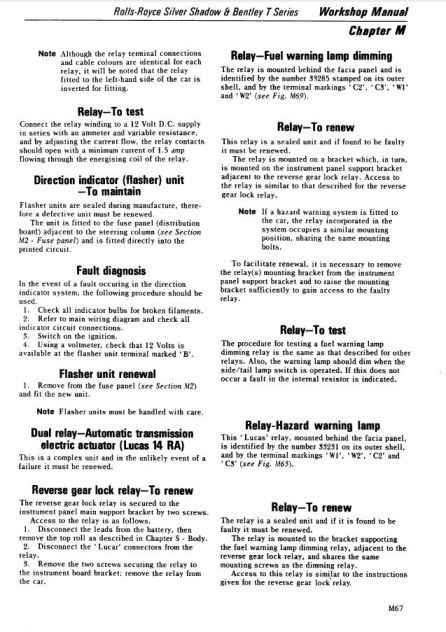 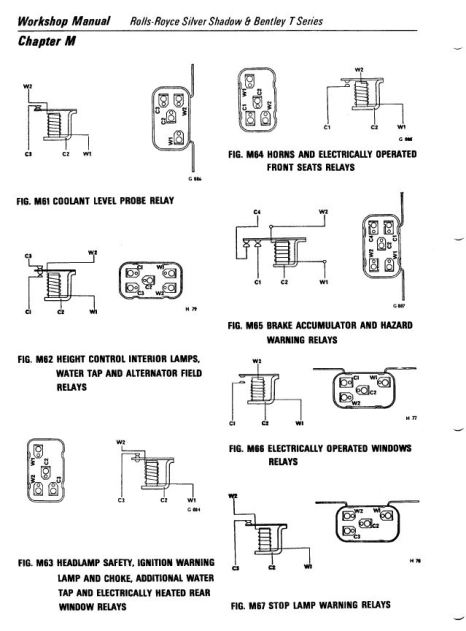 | |||
ross kowalski Grand Master Username: cdfpw Post Number: 978 Registered: 11-2015 |
Jeff, Nice sharp scan ( and proper white balance!) It even has wire colors. We should be able to get the flashers flashing with thi s. | |||
Jeff McCarthy Grand Master Username: jefmac2003 Post Number: 594 Registered: 5-2007 |
The relevant theoretical wiring diagrams are in "M - Part 3" here: http://rrtechnical.info/sy/tsd2476/tsd2476.htm Scroll down to "All cars to 1975 Specifications" | |||
ross kowalski Grand Master Username: cdfpw Post Number: 979 Registered: 11-2015 |
Mike, If you had a stuck hazard warning relay it would account for hazards but no turns. But that is an assumption, and I'm kind of a by the numbers trouble shooting guy and not really an assumption guy. | |||
Jeff McCarthy Grand Master Username: jefmac2003 Post Number: 595 Registered: 5-2007 |
Ross - I'm not doing scans - I use a "snipping tool" to take sections of screenshots that save as jpeg photos onto my desktop. Saves a lot of time. Also the RROCA technical scans are much higher resolution so even if you shrink them they're still readable, unlike my paper manuals which are reprints/photocopies. | |||
ross kowalski Grand Master Username: cdfpw Post Number: 980 Registered: 11-2015 |
Mike, If I were standing in your garage ( with a beer and that pdf) I would do it by the numbers. 1. fuses So pull out the little card under the fuse panel and your test light and confirm you have voltage at the turn and hazard fuses. Be sure to check the connector and not the fuse to ensure the fuse is making a good connection. I think you already did this, but if I were there I'd test them again. | |||
Jeff McCarthy Grand Master Username: jefmac2003 Post Number: 596 Registered: 5-2007 |
Mike - I forgot something bloody obvious that I was reminded of when I looked at the electrical diagram - the fuse! Here is where it is located from the handbook. It describes the position for both left and right hand cars. 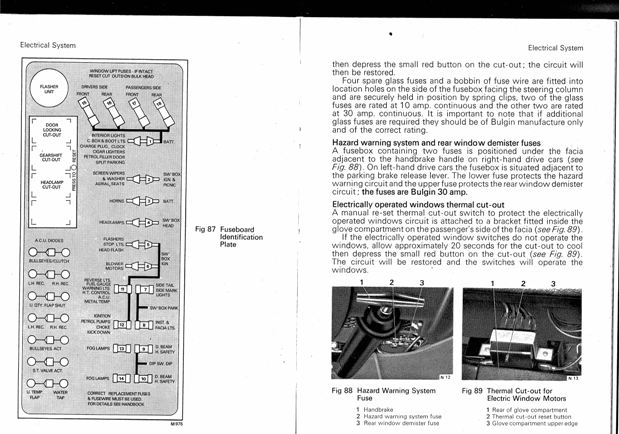 | |||
ross kowalski Grand Master Username: cdfpw Post Number: 982 Registered: 11-2015 |
Mike and Jeff, Next stop 2. The flasher and hazard unit. The flasher switch should have a N.C. colored wire with power and one of the three connections for the flasher should have power. We can infer that the hazard relay flasher unit works, has power, and has a path to the left and right indicator lights. So if you have power at the DI flasher and the hazard switch, you are left with the hazard switch being bad, the hazard relay being bad or both. | |||
ross kowalski Grand Master Username: cdfpw Post Number: 983 Registered: 11-2015 |
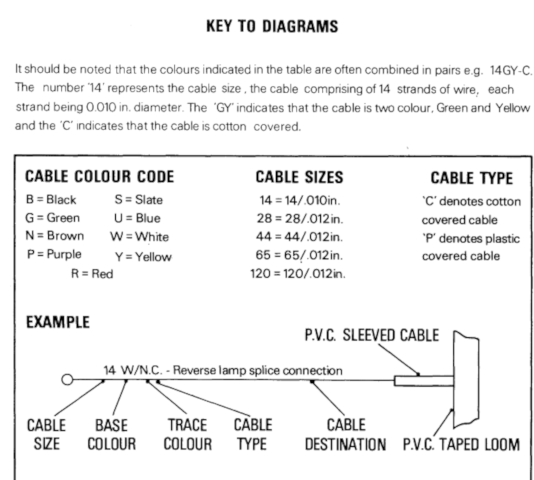
Mike, N.C. is brown cloth, I'll find the decoder ring and post it. | |||
ross kowalski Grand Master Username: cdfpw Post Number: 984 Registered: 11-2015 |
 | |||
ross kowalski Grand Master Username: cdfpw Post Number: 985 Registered: 11-2015 |
Mike, If everything is good to that point, the hazard switch should have a green and brown cloth wire going in and out of it. These are the wires from the DI flasher. In the on position of the hazard switch, one wire should flash and when the hazard switch is off both of the wires should flash when probed. (Make sure the test light is well grounded) That tells us you are getting flashing 12v into and out of the hazard switch. | |||
ross kowalski Grand Master Username: cdfpw Post Number: 986 Registered: 11-2015 |
Mike, If if is the hazard relay, I think you can bubba it out of there pretty "easily". I drew up a alternate wiring that eliminates some of the nonsense, I am looking at it right now to make sure it will work as I am thinking | |||
ross kowalski Grand Master Username: cdfpw Post Number: 987 Registered: 11-2015 |
I think the included picture would work to bypass the hazard fuse, the hazard flasher and the hazard relay. The red lines indicate cut and the green lines are connections. I can only guess the reason RR did the relay was that because flashing everything takes more juice than flashing one side. On the other hand, a lot of cars have one flasher for both hazards and turn signals. 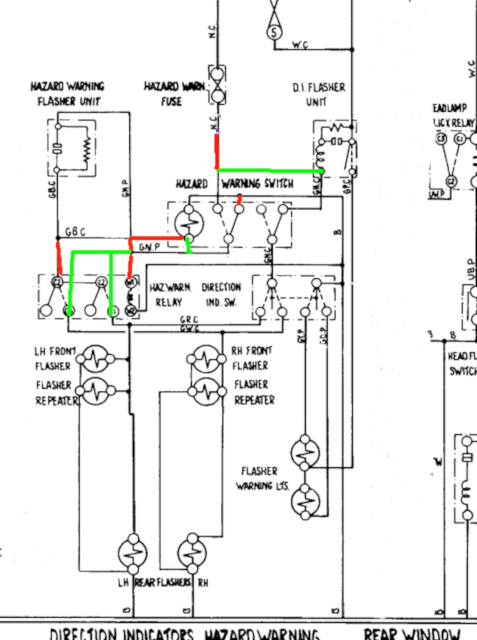 | |||
Jeff McCarthy Grand Master Username: jefmac2003 Post Number: 597 Registered: 5-2007 |
Ross that might be a bit risky. Okay to get the car passed in a rego check but some of the wiring was becoming quite thin by 1975; even if the Crewe design is a hammer to crack a walnut it's worth getting the original circuit to work. I would check (as you mentioned) 1-Fuse 2-Both flasher units* 3-Relay and only then 4-start mucking around with the hazard switch. This is one part of the circuit that is robust. If it stops flashing on the switch it's just a little bulb replacement - it screws out. If the hazards are working then leave it alone - under the console is a rats nest of wiring. If in doubt buy a replacement Hazard switch (on ebay fairly cheaply). *The hazard flasher is in a small bracket you can get to with your hand on RHD cars. Take off the cowling around the handbrake and shine a torch up there. The hazard relay is a PITA to get to even with the toproll off; easier to unscrew the whole bracket so you keep the connectors in place. If you remove them without marking the wire colours it's a long trudge through the diagrams to put them back correctly. Refer to the 1972 booklet I posted above. On left hand cars it is probably on the ammeter shunt bracket in the same place (i.e. on the right) if not then wherever the ammeter shunt bracket is on left hand drive cars. It'll be recognisable from the wire colours connected to it anyway: Green/Red Green/White Green/Black and Green/Brown. 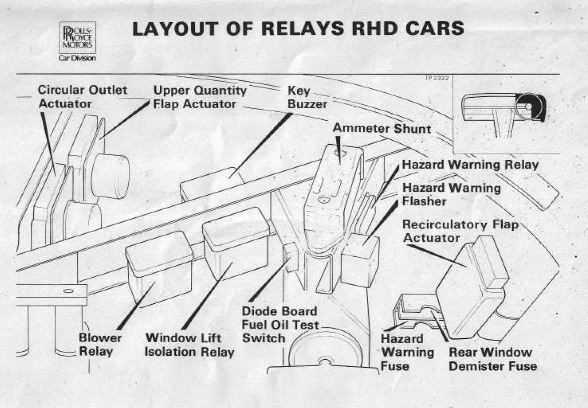 | |||
Mike Thompson Prolific User Username: vroomrr Post Number: 222 Registered: 4-2019 |
Sorry while I was away (ie I fell asleep) it looks like a service manual exploded in here. Questions: Jeff: silver says Lucas on it top left. Ross: SRD 21318, I don't have a diagram yet haven't pieced the 4 pages together yet. Probe, don't like them after the alien abduction, then the Doctor wanted to do the same thing, saying something about a prostrate massage (I think he said). The seats work so (I'm told the fuse is OK), and the hazard flashes work, I have power at the sheering column and the turn signals work but no intermittence nor no clicking anywhere nor lights. The Hazard Flashers Works. The Turn Signals Don't. It has power at the steering column, the lights on the dash speedometer come on (right or left). No clicking sound anywhere, and no exterior lights. I can Bubba it I did on the 64 Imerial with two flasher relays and a hot wire to both leads (but I had to install a turn signal unit at the steering column) but that works on this car. Where is the flasher relay for the turn signals (direction indicators)? The hazard lights don't need to work (but they do). | |||
Jeff McCarthy Grand Master Username: jefmac2003 Post Number: 599 Registered: 5-2007 |
That flasher is a 2 pin - any car parts store will have something to replace it with - usually from $10-20 dollars. There's nothing special about the Lucas ones. One obvious thing to check (I've made this mistake myself) is to check that the flasher switch is earthing properly! Myself, I really think sticking a cheap replacement flasher in the fuseboard as a test is the easiest way to at least eliminate that as the cause. Never hurts to carry a spare anyway. A flasher can fail but still "tick": the bimetallic strip in the old Lucas unit can keep flexing but not make proper electrical contact. Glad you like the workshop manual explosion ;-) | |||
Jeff McCarthy Grand Master Username: jefmac2003 Post Number: 600 Registered: 5-2007 |
SRD 21318: Mike, your car is close to mine (SRH20280) and the best wiring diagram should you ever go there is "All cars to 1975 specifications". Odd things can be found from diagrams on later cars and Corniches in the part of the Workshop manual in the technical section - Chapter M part 3. | |||
Mike Thompson Prolific User Username: vroomrr Post Number: 224 Registered: 4-2019 |
Straight from the manual: Direction indicator (flasher) unit -To maintain Flasher units are sealed during manufacture, therefore a defective unit must be renewed. The unit is fitted to the fuse panel (distribution board) adjacent to the steering column (see Section M2 - Fuse panel) and is fitted directly into the printed circuit. | |||
Steve Emmott Prolific User Username: steve_e Post Number: 277 Registered: 11-2018 |
Thanks Geoff for your support. I am thick skinned and capable of 'turning the other cheek'. Not sure though why I got a kick in the balls... Mike you are going to run yourself round in circles with the wiring diagrams. I have already done that and cannot find one drawing anywhere that shows the modification on the schematic that shows exactly what happened when RR changed over to the simple 2 pin bimetal Lucas flasher from the Klaxon 3 pin which WAS a relay and flasher combined as fitted on mine and shown in the schematics all have kindly provided. You have already correctly identified the fault is more likely between the indicator stalk and the indicator flasher unit. Forget the hazards or the hazard flasher relay you have no problem with that circuit or operation. The Lucas flasher is a simple item placed in series with the circuit. The indicator lamps are 2x21watt. The flasher relay is set/timed by the current flow hence it is coded 36 which is 3.6 amps. The lamps are 42w with 12v which is 3.5 amps harness wiring probably makes up the small difference. W=IV....so I=W/V That is why it is important to always install the correct wattage lamp to achieve the correct flash intermittence. You can't just put any other timer/relay either in its place and if you have continuity across the Lucas pins then it should still work to bring the lights on. The biggest fault with the Lucas part was they would open circuit and give no circuit so no lights, or the timing would go faulty and speed up or slow down the intermittence period. There will be NO earth on it..... the earth is achieved at the light fittings. The question is simply did RR then also fit additional relays in this modified circuit to be selective to left and right circuits with the simplified Lucas flasher or not. I just cannot find this information out on any schematics. The reason I wanted to see Roberts when he said he had two flasher units in the fuse board was to work out if RR may have split the directional circuits with individual flashers for right or left selection. Clearly they did not as now he confirms they are the hazard and directional fitted in there. So if they did install additional separate relays in the circuit the indicator stalk would energise selectively each relay. That said it is a bit unusual both would have gone faulty. On my other UK cars with similar all Lucas parts the set up is just the indicator stalk contacts alone and the Lucas flasher in the circuit. (see schematic below from one of those cars) The 12v positive is fed direct from the fuse to the Lucas flasher and then onto the turn signal selector stalk then onto the lights. I am not saying the RR is necessarily done in this very simple way as my other cars. In the absence of any correct RR drawings it is going to have to be fully worked through. For sure whatever you eventually find as the fault is going to provide a very valuable record here on the forum. You say there is 'no' 12v supply at the flasher but 'is' 12v at the column contacts, which suggests the column feeds the flasher but unless it goes through separate relays in conjunction then that is not possible otherwise ALL 4 indicator lights would come on. I am beginning now to think you may just have a bad harness connector/connection down from the column stalk wiring into the lower footwell connectors whether relays were fitted or not. Alternatively if it is typical of other British cars you have lost the 12v supply to the flasher unit. Hence I asked you give the board insert contact your own direct 12v. Pictures also show the inside of the Lucas flasher. There is NO adjustment possible on the flasher and it is not a relay just a simple NC bi-metal strip make/break. Any attempt to try to alter timing IMHO would be futile to expect to achieve the intermittent flash period. 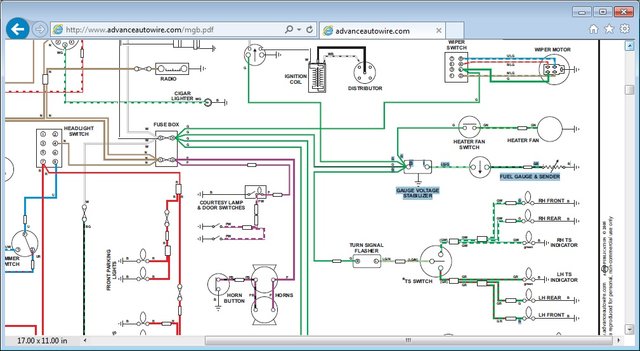 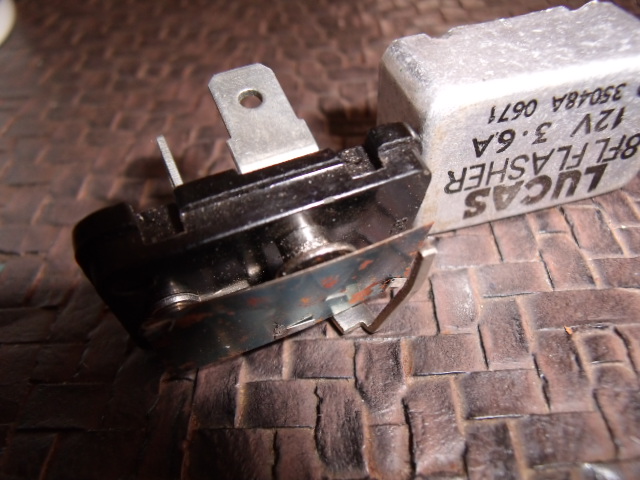 | |||
Steve Emmott Prolific User Username: steve_e Post Number: 278 Registered: 11-2018 |
Mike just thought of one other area of possibilities and that is the hazard push/pull switch. I have just been out and tested my car and with the hazard switch pushed in 'operational' you lose supply to the indicator flasher unit in the fuse board so the indicator flasher circuit supply goes through the hazard switch to make or break. Removed my indicator flasher relay and again hazard switched pushed I have lost 12v supply to the indicator flasher relay terminal in the fuse board as soon as I pull out switch 12v returns to the fuse board flasher terminal. I am just wondering then the supply to the directional indicators circuit goes through that switch internals. So when you push the hazards to on the indicator circuit becomes inoperative. Electrically it would be logical otherwise you may get back feeds.......... | |||
ross kowalski Grand Master Username: cdfpw Post Number: 991 Registered: 11-2015 |
Steve, The three pin flasher unit was added to have a second leg to flash dash lights. It was a design choice I think plus = slightly cleaner wiring minus = you can have dash flashes with no marker light flashes. I'm not a fan but I have a few on various vehicles. | |||
Robert J. Sprauer Prolific User Username: wraithman Post Number: 299 Registered: 11-2017 |
The column stalk provides the "switch" basically left or right and sends the current to the 2 prong signal flasher, thats why there is only one flasher. The hazard flasher in my car ALSO has 2 prongs (not 3) In the attached pic the signal flasher is on the left and hazrd on the right. The indicator lamps for the hazard "on" is the 2 arrows in the speedo cluster. 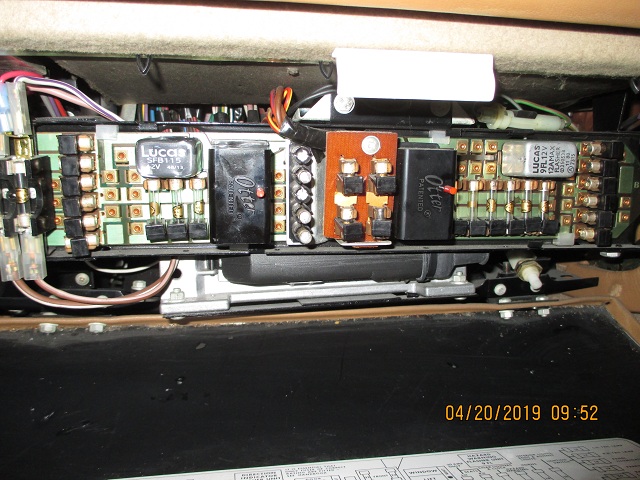 | |||
ross kowalski Grand Master Username: cdfpw Post Number: 992 Registered: 11-2015 |
Robert, Now that fuse board certainly looks different from Mikes. You certainly have multiple flashers there. | |||
ross kowalski Grand Master Username: cdfpw Post Number: 993 Registered: 11-2015 |
Mike, Do you have a three pin flasher? Your fuse panel looks exactly like mine and I have a three pin. Also, where did they put the hazard switch on the USA 1975? Mine is in the center console. | |||
Steve Emmott Prolific User Username: steve_e Post Number: 279 Registered: 11-2018 |
Ross my car is earlier than Mikes @1972 against 1975. My indicator flasher is the much bigger 3 pin Klaxon one and original and is a combined relay/flasher. The only real difference though is it energises the make/break contacts via the coil and a smaller bimetal strip instead of the Lucas 2 pin which is a straight make/break on the bimetal strip. There is no other function of the 3rd pin. The change was to the 2 pin Lucas as fitted to Mikes and is just a bimetal flasher (no relay) and not the other way round. Robert that fuse board sure is different. Sorry I am not agreeing (yet) with your synopsis of the indicator switch sending current to the flasher as it has to go then from the flasher to the lights so how is the split between left and right decided after the flasher.....(unless additional relays somewhere which I don't think there are). If there were two Lucas bi metal flashers ie one for each side then I would re consider but there is not. I have looked at 3 different schematics now covering 1970 to 1978 and none of them seem to show clearly the variation of changes that were made. Hazard switch is same place from all the pictures across the years I have looked at. | |||
ross kowalski Grand Master Username: cdfpw Post Number: 994 Registered: 11-2015 |
Mike and Robert, After looking through the factory service manual wiring diagrams. It appears that all shadows used the three pin until late then changed to two pin. It appears that all the three pin flasher cars use the same circuit and all the two pin cars use a second circuit. The two pin flasher system is better BTW. Mike, If you have three pins, we can just trace the problem down with a test light which should be pretty straight forward. If you have the two pin pins, it's simpler and probably just pull the flasher in and out a mess of times with the turn signals on and it probably will start working Here's the two pin circuit. 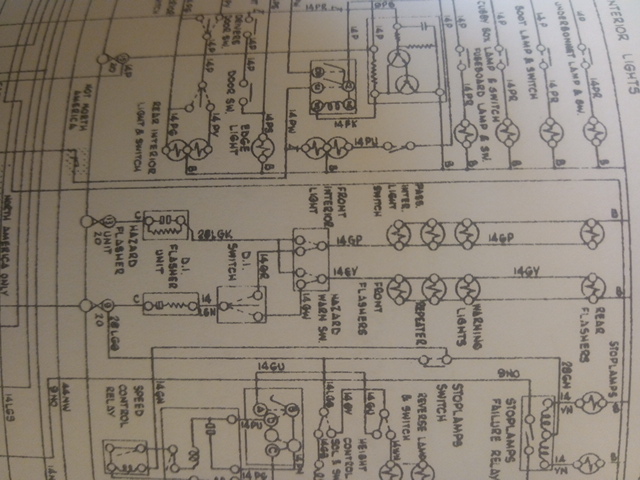 | |||
ross kowalski Grand Master Username: cdfpw Post Number: 995 Registered: 11-2015 |
Steve, I looked over all the pictures in the FSM and it apears that the flasher isn't a relay because it doesn't have an interrupted path to ground. Looking at the diagram it apears to have power coming in on one leg, and a load on the one directly across from it, and a third leg in between that mimics what is happening on the leg directly across from it. I pulled mine a minute ago and put + to the + leg, grounded the leg across from it and it clicked and the middle leg toggled to 12v. I then put + to the + and grounded the middle leg and nothing happened. Pretty sure this is just a three leg flasher and not a flasher relay as one might have on a modern car. | |||
ross kowalski Grand Master Username: cdfpw Post Number: 996 Registered: 11-2015 |
Jeff, I just took a look for the hazard relay on my car for "fun" Really,.... that's where they thought to put it. This location is just the kind of thing people think working on a RR will be like. Would it be easier to pull the front trim panel then pull the speedo? Let's hope it isn't that. | |||
ross kowalski Grand Master Username: cdfpw Post Number: 998 Registered: 11-2015 |
Steve, I just was under the dash again trying to take a picture of the hazard relay and took a look at the flasher again. It is stamped into the bakelite +,P,L. | |||
Mike Thompson Prolific User Username: vroomrr Post Number: 227 Registered: 4-2019 |
I just woke up and went out to the car. Interesting things out there. I turned on the hazard flashers and no speedometer dash lights flashing. I put in the key for the turn signals (direction indicators) and they work at the dash speedometer at the same time. Right and left come on as pulled. Conclusion, they are separate somehow. But remember this car sat out in the elements with the sunroof partially open to water onto the hazard button area, (the wood at the bottom of the triangle is rotted). So Sherlocks you have your clues for the day. So who killed Miss Marple? How does the triangle plate with the hazard button come off, mine wiggles around and looks to have a keeper at the bottom. The power from the hazards are not making it to the dash, and the power from the column is not making it to the flasher relay (something is not connected in between). Again I want to check that hazard button out as Steve's clues suggests. Miss Marple may have fallen down the stairs. | |||
Steve Emmott Prolific User Username: steve_e Post Number: 280 Registered: 11-2018 |
Ross it does not need a ground the make/break is achieved by the current/heat going through the bi-metal strip. Mike e you asking about the wood veneer panel or the metal plate. On the plate are some screws around the plate but the wiring is not that long to pull that far forward and you may need to get in from the side trim panel to get to the wires on the hazard switch. Ross have you had to get down under the hood yet to get to that relay board under the blower motor.....now that is a JOKE | |||
ross kowalski Grand Master Username: cdfpw Post Number: 999 Registered: 11-2015 |
Mike, The flasher is before the switch in the column. Did you measure 12v with a meter or test it with the test light? The test light should have flashed while the meter would have only shown 12v. Did you check if you had three or two prongs on the flasher? | |||
ross kowalski Grand Master Username: cdfpw Post Number: 1000 Registered: 11-2015 |
Mike, Sometimes if your light is low enough resistance, it takes a second for it to start flashing but it should flash at that wire in the column. | |||
Steve Emmott Prolific User Username: steve_e Post Number: 281 Registered: 11-2018 |
Ross it is a two pin LUCAS. Lots of pictures and references to Mikes fuse board and flasher in posts above but I do agree the flasher unit has to be before the turn indicators contacts. Mike cannot get a 12v supply at either of the two flasher terminals in the fuse board which is why I question the supply may be interrupted by the hazard pull/push switch which actually one of the schematics does show. Time for a bit of light hearted 'Pin the Donkey' though.(It's a UK party game) Can anyone place the Lucas flasher unit the other side of the indicator turn lever on the schematic below...........so it would work.......and no need to blindfold yourself.  I have 100GBP to give to RSPCA on behalf of a winner 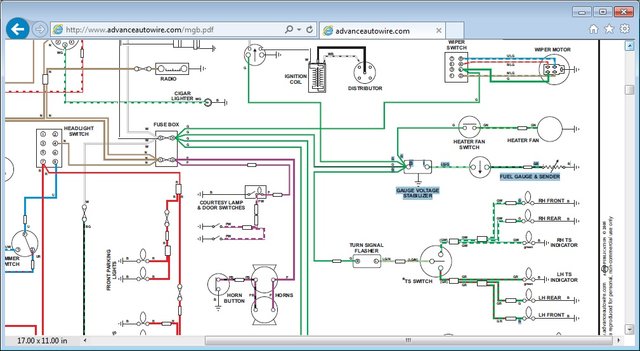 | |||
ross kowalski Grand Master Username: cdfpw Post Number: 1001 Registered: 11-2015 |
Steve, I think it is clearly before the turn signal switch unit so that if one grounded the incoming (hot 12v wire ) from the flasher to the switch with a test light it would flash. Soo, maybe we are not on the same page regarding before. I like to use the word "feed" or "source" The fuse box feeds the turn signal flasher, which in turn feeds the indicator switch in the column, so I put the flasher "before" the switch. | |||
ross kowalski Grand Master Username: cdfpw Post Number: 1002 Registered: 11-2015 |
Steve, The part I don't get about that diagram is it does not show the hazard switch in that circuit. Pretty sure it is. | |||
ross kowalski Grand Master Username: cdfpw Post Number: 1003 Registered: 11-2015 |
Steve, Here is the test you do. 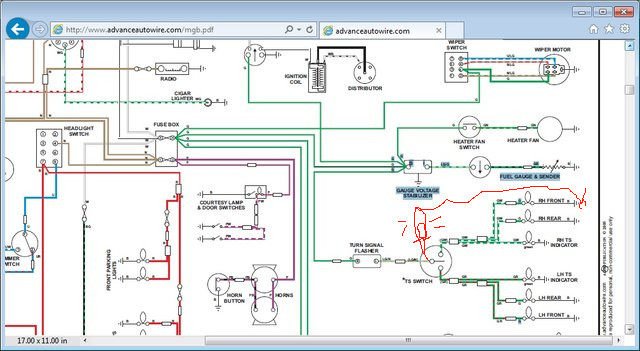 | |||
ross kowalski Grand Master Username: cdfpw Post Number: 1004 Registered: 11-2015 |
Steve, Do you have a picture of the hazard part of the circuit? Not sure why they didn't show it here, but if RR did it with diodes, they might have considered it electrically seperate. I would have drawn it in place like the RR manual anyway. | |||
Steve Emmott Prolific User Username: steve_e Post Number: 282 Registered: 11-2018 |
Ross as I said last post Mike cannot get a 12v read at either fuse board terminal. I totally agree with you I think there should be and that is why way up I asked him to jump a 12v supply to the fuse board terminal then try the signals left/right. Like you I think he has lost supply/feed/12v to the flasher unit and I think it is possibly the internals of the hazard switch and nothing to do with the hazard relay. It is also possible if the area around the hazard switch is water damaged as Mike says then someone has disconnected a wire at the back of the switch as it was grounding. | |||
ross kowalski Grand Master Username: cdfpw Post Number: 1005 Registered: 11-2015 |
Steve, I missed the part where he didn't have feed to the flasher. Ooops. I have been doing most of this on my phone while doing other things. Good call on the jumping 12v into the turn signal flasher plugs. One side should do nothing and the other give lights at the turn signals. I think if he has a two pin flasher, he does not have a flasher relay. I wonder if someone stuck a two pin flasher in a three pin port? Three pin flashers are a little rare in the states, and if someone stuck one into a three pin port it would "fit" but he flashers wouldn't work. | |||
Mike Thompson Prolific User Username: vroomrr Post Number: 228 Registered: 4-2019 |
Interesting plot development. My ears gave a false signal. The clicking is NOT at the flasher (below #2) it is behind the dash (near enough to sound like it is coming from the fuse board) up and to the left, right below the ignition switch. (see picture, the 3 pronged monster of Steve's picture Posted on Thursday, 18 April, 2019 - 09:38 pm.) We are closing in on the killer I feel it. 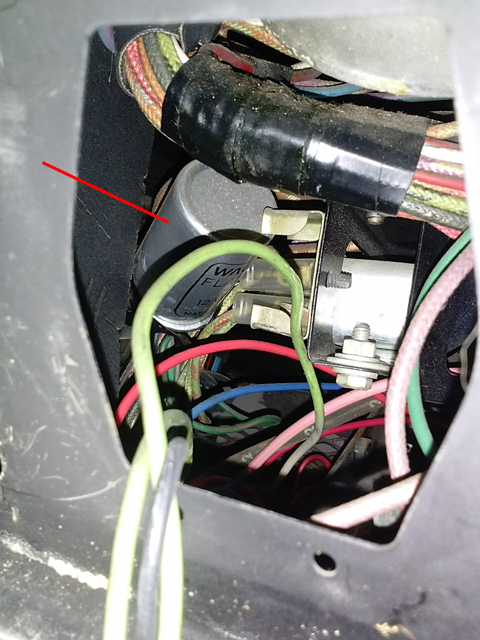 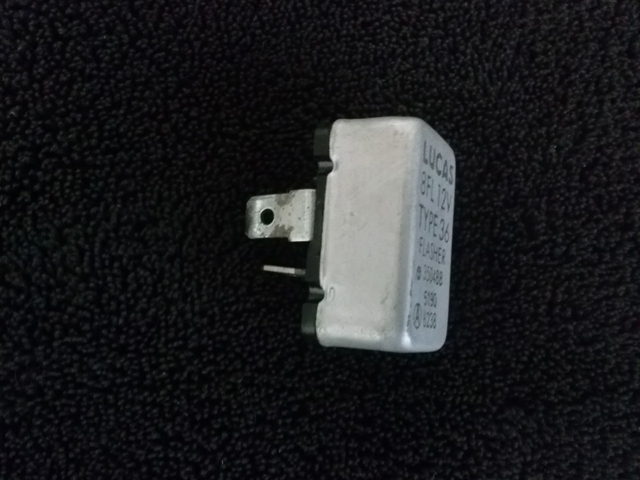 | |||
ross kowalski Grand Master Username: cdfpw Post Number: 1006 Registered: 11-2015 |
Mike, Take a look under your two pin flasher and see if it has holes for a three pin flasher. That would be funny. | |||
ross kowalski Grand Master Username: cdfpw Post Number: 1007 Registered: 11-2015 |
Mike, That looks like it is the hazard flasher. The oem would have been a little two pin rectangular unit from lucas and fit in that little spring clip it is resting against. Someone replaced it with a domestic round unit and left it hang. | |||
Steve Emmott Prolific User Username: steve_e Post Number: 283 Registered: 11-2018 |
Ross good call on possibility someone managed to fit a Lucas 2 pin inadvertently into the 3 pin fuse board and got the wrong part. Not so sure on the other as that I think maybe an original flasher and correct. I see the fitting which I agree looks right to take a Lucas flasher and with 4 lights would just flash at quicker intervals so could be someone just fitted the right ones in the wrong place. Super find Mike I finally know where they put that sucker. Ross can we agree for Mike it is good to jump a 12v supply into the fuse board terminals and then see if the indicators work. Sadly I don't know which one but if a continuity test was done from the pins in the fuse board to the indicator switch contacts then that would be where I put it where we had continuity. I forgive you Ross for not seeing the bit about the NO 12v I just got that in after I posted before the time limit so you may not have seen my comment.  Mike has a lot of things to do on other areas so lets keep the JOB CARD down to a minimum for him. | |||
Mike Thompson Prolific User Username: vroomrr Post Number: 229 Registered: 4-2019 |
Ross: I came to the same conclusion but only had the proof of black tape at the bottom. I now have proof of tampering with the electrics. That's right folks, the old girl was a victim of .... violation. (Oh No !) It is a Wagner 550, 2 prong that was inserted into her. One wire green and yellow, the other green and ? can't see it. There you have it, the wiring has been tampered with, all bets are off. Any thoughts? | |||
Mike Thompson Prolific User Username: vroomrr Post Number: 230 Registered: 4-2019 |
Thanks Steve, now that I see they are indeed separate despite what my ears first said to me (apologies). I am now willing to shoot the juice to her and like Frankenstein I hope to say "It's Alive"! | |||
Steve Emmott Prolific User Username: steve_e Post Number: 284 Registered: 11-2018 |
Mike I think Ross agrees it is a good approach so we will have to be co-defendants.........who is your next of kin  | |||
Mike Thompson Prolific User Username: vroomrr Post Number: 231 Registered: 4-2019 |
Well before I shot the juice to her I needed to test my light tester. Got it working and touched the top plug prong insert there was juice the direction indicator happened to be to the left side. I thought I'll plug the flasher back in. And the left side lights and flasher started blinking (why I don't know). But the right side does not work. Bummer. Going to get another flasher (I hope). | |||
ross kowalski Grand Master Username: cdfpw Post Number: 1008 Registered: 11-2015 |
Steve, I'd gladly take co-defendant. Mike, So maybe it works and is just dirty contacts on everything. | |||
Steve Emmott Prolific User Username: steve_e Post Number: 285 Registered: 11-2018 |
Mike I doubt it is you flasher as that is common to both sides of the directional indicator. Start looking now at contact quality around the indicator stalks and again the lower column connectors in the foot well as may just need a pull off and refit they do oxidise. Overall.... almost there but not quite. Update....just posted and then saw Ross beat me to it..........again we stand together  | |||
ross kowalski Grand Master Username: cdfpw Post Number: 1009 Registered: 11-2015 |
Steve, Jinx buy me a pint. | |||
ross kowalski Grand Master Username: cdfpw Post Number: 1011 Registered: 11-2015 |
Mike, Real safety item.... mount a fire extinguisher in the boot. I have one in each of the cars. I have not had a car I was driving catch on fire, but it I have used them on others cars as well as putting out a car I was towing. Tip 2, when towing a 63 Cadillac limo that hasn't been on the road for a few decades, disconnect the battery before putting it on the car trailer. | |||
Steve Emmott Prolific User Username: steve_e Post Number: 286 Registered: 11-2018 |
Mike helping with electrics is always difficult over the internet and certainly more time consuming but it does help though when there is consensus on approach. BTW we now need a new MENSA sheet of issues from you. That is this lot you posted done Ross.....au revoir, al veta zein, till we meet again.... OOOPPPSSS I just drank your pint in celebration  | |||
Mike Thompson Prolific User Username: vroomrr Post Number: 233 Registered: 4-2019 |
BLINKERS SOLVED ! It was a combination of corrosion and a nearly non-functional (old) flasher relay. The Flasher Relay can be replaced by a Novita (a standared American) LL552 Flasher. It is the barrel type and is a bit taller and just fits. But it works good, pins match up (two pins), and then you can replace it anywhere in the USA. We have joy in blinkerland. Thanks for all your hard work in solving this perplexing problem. Miss Marple died of old age. Oh and why did I get this flasher? Because it was the only thing around here (or in their warehouses) that was remotely close, and it is easily replaceable anyway (a "two fur" as we call it, as in two for the price of one). Yeep Pee! 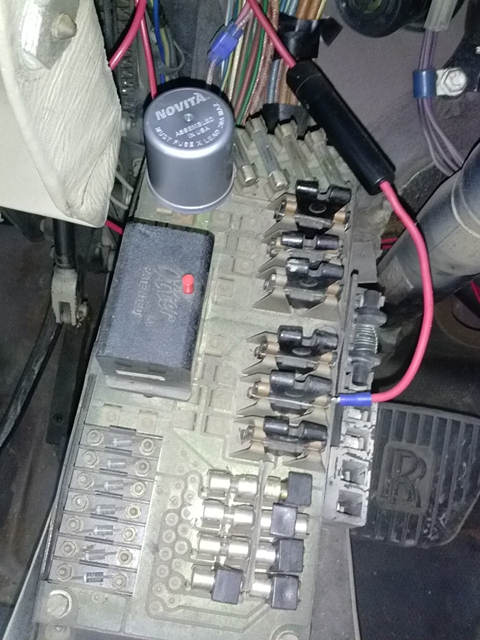 | |||
Mike Thompson Prolific User Username: vroomrr Post Number: 235 Registered: 4-2019 |
Next! All the original items on the list has been solved, good work guys! But I still need to get the locks fixed, (there are videos for that), and the windows have to be hand pulled, as help, to get the windows up and down. While I'm in there for locks, I would appreciate any help on the "Window Issue." And I only have one key, does that fit everything? It kind of works on the trunk (boot), but I have to wiggle it. | |||
Robert J. Sprauer Prolific User Username: wraithman Post Number: 300 Registered: 11-2017 |
There is one key for all locks. The glove box lock is actually the same cut except it does not have the channel on the side. Blanks can be found on EBay and cut at your local key shop. | |||
Robert J. Sprauer Grand Master Username: wraithman Post Number: 301 Registered: 11-2017 |
key blanks http://rrtechnical.info/miscellaneous/rollsroyceandbentleykeyblanks6.pdf | |||
Mike Thompson Prolific User Username: vroomrr Post Number: 236 Registered: 4-2019 |
Is the key 62HE X28, that is the code I have found? And the "Window Issue." | |||
ross kowalski Grand Master Username: cdfpw Post Number: 1014 Registered: 11-2015 |
Mike, Good news on the blinkers! It might be good to start a new windows thread or add to an existing one to keep scrolling to a minimum. | |||
Mike Thompson Prolific User Username: vroomrr Post Number: 242 Registered: 4-2019 |
Ross try this and see if it works on your computer. Hit ctrl + end to go to end or hit ctrl + home to go to top. And those little arrows in anyone's box with their names do the same thing. | |||
ross kowalski Grand Master Username: cdfpw Post Number: 1017 Registered: 11-2015 |
Mike, That will help when working on my computer, now I have to figure out how to do it on the phone. | |||
Mike Thompson Prolific User Username: vroomrr Post Number: 245 Registered: 4-2019 |
Windows have to be hand pulled, as help, to get the windows up and down. Someone(s) wrote how to fix the slow or stopped windows, runners or something. | |||
ross kowalski Grand Master Username: cdfpw Post Number: 1019 Registered: 11-2015 |
Mike, It's likely hard grease in the gearboxes, lack of lubrication on the drive chains, lack of lubrication on the top sprocket, and or binding of the tracks There are also locking solenoids that disengage when the window motors are activate and relock the moment they stop to keep the windows from going down on their own. | |||
ross kowalski Grand Master Username: cdfpw Post Number: 1020 Registered: 11-2015 |
Mike, BTW I pulled the locking solenoids on my car and the windows do fall down a couple mm when at the top of the door frame, but that's it. I might get a little wind noise, but as I have a roof rack the sized of a sun deck on my car, a little extra noise is not an issue. | |||
David Gore Moderator Username: david_gore Post Number: 3230 Registered: 4-2003 |
Mike, This is your best help especially fixing the "slow window" problem. http://rrtechnical.info/windowlifts/windowlifts . | |||
Mike Thompson Prolific User Username: vroomrr Post Number: 247 Registered: 4-2019 |
David I've seen that one before in my searches, and sorry don't understand it a lick. | |||
Robert J. Sprauer Grand Master Username: wraithman Post Number: 304 Registered: 11-2017 |
I have solved many of these. Lube the channels with silicone spray with a straw tube. Clean all electrical connections from switch to motor and to ground. Upgrading the motor supply feed with larger gauge cable makes the biggest difference. The use of a relay to pull power off the central door lock feed or rear cigar lighters can help if you understand how to do so. I do know electrical/audio engineering and found I did not have to go this route to solve the slow window issues. | |||
David Gore Moderator Username: david_gore Post Number: 3231 Registered: 4-2003 |
Mike, Most likely this is because you haven't experienced the "slow window" problem in your brief ownership as you haven't been able to use the windows!!! If I remember correctly, this fix covers renovating the window mechanisms and the associated wiring issues to the electrical components responsible for this annoying characteristic of Shadows and Spirits. | |||
Mike Thompson Prolific User Username: vroomrr Post Number: 248 Registered: 4-2019 |
Robert These are solutions I can get my head around. Wiring diagrams are hard for me without reference, now videos do it for me. rollsroycenut if I can see it I can do it. Abstract is hit or miss. Thanks David that is how I remember it too. | |||
Steve Emmott Prolific User Username: steve_e Post Number: 287 Registered: 11-2018 |
Well done Mike and that replacement flasher looks just right. There are actually two different keys for a RR/B. One of them is a 'fit all' the other is one that just fits doors and ignition. The barrels and keys are very slightly different but this allowed an owner to just give the one key to a garage if the car needed service or valeting and keep safe in the boot/trunk and glove-box locked any personal items ie a gun. Over time the keys wore and the barrels a little which meant often eventually the 'vanity key' which I think it was nick named did start to be able to open up if forced or wiggled a bit. Just that if you have a new key made you might suddenly find it works in the ignition and not the trunk or glove-box unless it is the 'fit all' key that has been copied. Just have one copied to test And don't forget when you shut the trunk/boot lid you do not slam it. All it should need is a gentle pressure till it clicks. If the boot rubber is all gone bad you can also find the latch cam sticking out from the bottom of the lower trunk lid as it may not always reset. These old gals rear ends need to be treated with respect.} | |||
Mike Thompson Prolific User Username: vroomrr Post Number: 252 Registered: 4-2019 |
I found out the hard way on the slamming the trunk. It has a gap and wiggles when you close it. I took out the latch and enlarged the slits to get it to close tight, and it still didn't, so I slammed it hard. It was (I guess) unlocked before but then it would not open. I got the key and put it in and it would not move. I thought the car has two keys. So I broke out the locksmith tools (I made of course) and tried to pick the lock. I got it, but I turned the wrong way (I thought). No luck on opening it. Then I picked it again and turned the other way, still would not open. I thought it is not turning far enough. So I used the key as a bump key and hit it with a screw driver while putting pressure on it to turn (look it up on youtube, bump key). Well finally it opened, I was freaking out hoping there is a way into the trunk through the back seat. Anyway I have not slammed it again. I'll just get new seals. So why not slam it? | |||
Robert J. Sprauer Grand Master Username: wraithman Post Number: 307 Registered: 11-2017 |
Valet keys are round headed . Ignition and door only. The square is glove box and trunk. Boot lids are never slammed to latch. If you have to slam it it is seriously out of adjustment. Read the manual. In fact on all RR/BB produced from 2004 the doors are pulled in to close when it is very close to the latch resulting in a quiet effortless operation. | |||
Steve Emmott Prolific User Username: steve_e Post Number: 289 Registered: 11-2018 |
Robert that would now suggest there are 3 different keys from what you have posted. 1. That does everything 2. Ignition and door 3. Glove box and trunk My experience is there are only the two variants 1. That does everything 2. Valet key for doors & ignition only....nicknamed vanity key as quite often the glove boxes used to contain a vanity mirror and we don't see much valet parking in UK. Mike window motors/regulators are real basic to re-condition. You should have the permanent magnet round type on your car where the electrical wiring is much simpler than the version on mine which are referred as the square motor. Look up inside the underneath of the glove box for a reset switch as if not you have the square type. When you get one of the door cards off just see which type you have as your car just seems on the cusp of the various electrical update changes. | |||
Robert J. Sprauer Grand Master Username: wraithman Post Number: 310 Registered: 11-2017 |
No confusion. 2 keys, 2 head styles.Round and square. Master key and valet key(ign and doors. Both have the same key code except valet key does not have the channel on the side. | |||
Steve Emmott Prolific User Username: steve_e Post Number: 290 Registered: 11-2018 |
Robert thanks for clarifying it is as I had always thought. | |||
Mike Thompson Prolific User Username: vroomrr Post Number: 253 Registered: 4-2019 |
I have the square key, key code 62HE ilco Yeep pee! But it is so worn it almost looks flat, maybe the original. The trunk (boot) is used less than the driver's door or ignition. The key cannot turn the door locks, but the solenoids are stuck. BMWs when new (I'm told) come with 6 keys (of 10 made) if you loose all 6 then you have to send to the warehouse for another at $300 a piece. How many keys did Rolls give with a new SS? | |||
Steve Emmott Prolific User Username: steve_e Post Number: 291 Registered: 11-2018 |
Mike I still have the original delivery invoice and all 4 original Yale keys. The invoice states 2 sets of keys which back then I would have said is normal. If you get a copy of the one you have then that should be good. Just don't leave the Magnum in the glove box..... With the 308 I had to send a copy of my logbook, proof of address and a payment of 250 GBP. Obviously paying a premium for the prancing horse logo and the folding end. Good job the RR blanks can be got 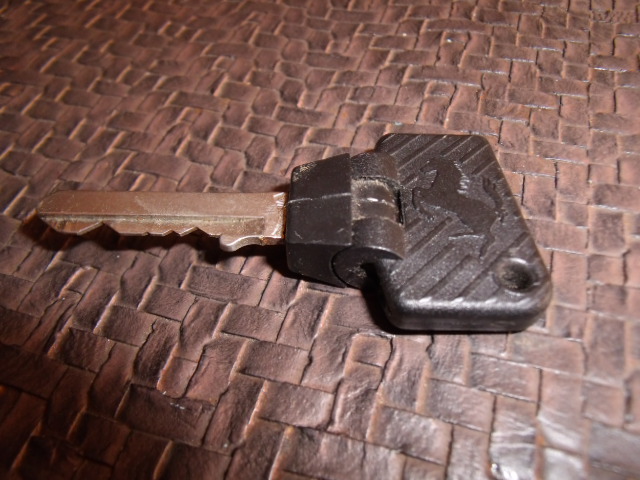 | |||
Mike Thompson Prolific User Username: vroomrr Post Number: 283 Registered: 4-2019 |
In fixing the electric door locks and being able to manual push and pull them. I found that now the trunk (boot) electric lock works and I no longer have to wiggle the key to get it open anymore. This car must have an immune system, this is a second thing that has fixed itself. Now if only it would heal the windows.  | |||
Mike Thompson Prolific User Username: vroomrr Post Number: 292 Registered: 4-2019 |
How hard is it to get to the antenna, mine does not work, maybe just needs some oil, or if they kept trying the motor might be trashed? On interior lighting, I have one overhead light cover that keeps falling off. I think someone tried to forced it, (banging on it like a monkey) now it seems the overlapping bits are going the wrong way. How to fix it? The knob on the electric gear shift, was I take it bakelite, (stinky old stuff, smells like vomit) and is missing. What held them on? Please pick one and answer. Thanks | |||
Robert J. Sprauer Grand Master Username: wraithman Post Number: 333 Registered: 11-2017 |
Ant. RF inner fenderwell cover (fiberglass) comes off. Many 1/4 hex screw that are 1/2. If they are corroded you can use a screwdriver since they are slotted. Once the fenderwell is removed look below and you will see a cavity where water and road dirt enjoy collecting which in many cars lead to rusting of the lower quarter. Good time to vacuum out. | |||
Mike Thompson Prolific User Username: vroomrr Post Number: 299 Registered: 4-2019 |
Thanks Robert. One more question to add to the list above is, can you take out the top of the front seats without removing the whole seat, to reupholster them. (The bottoms of the seats of course just come out). | |||
Robert J. Sprauer Grand Master Username: wraithman Post Number: 339 Registered: 11-2017 |
The complete seat has to come out. Armrests also have to be removed. 4 Allen fasteners on per seat track. | |||
Mike Thompson Grand Master Username: vroomrr Post Number: 303 Registered: 4-2019 |
Robert thanks. Not the news I wanted to hear of course and the armrests are welded in place with time. The little pullers are ripped off from someone trying to pull them down. That just leaves on the current list (more to follow of course): On interior lighting, I have one overhead light cover that keeps falling off. I think someone tried to forced it, (banging on it like a monkey) now it seems the overlapping bits are going the wrong way. How to fix it? The knob on the electric gear shift, was I take it, bakelite, (stinky old stuff, smells like vomit) and is missing. What held them on? Friction or glue. Thanks | |||
Mike Thompson Grand Master Username: vroomrr Post Number: 307 Registered: 4-2019 |
Robert I found out there is a way to take off the upholstery without taking off the seat. Just fold the seat all the way back, pull out the headrest, take out the two screws at the bottom of the back cover, then pull the back cover up and off. The upholstery only has clips and hog nose rings holding on the upholstery. | |||
Robert J. Sprauer Grand Master Username: wraithman Post Number: 341 Registered: 11-2017 |
We both do things differently....quite differently | |||
Larry Kavanagh Grand Master Username: shadow_11 Post Number: 430 Registered: 5-2016 |
Mike if you check and clean all the fuses in your fuse box and separate the various wiring connecting blocks in the front footwell & spray some electrical contact cleaner in the you may find that more electrical stuff will resume working. There's bound to be some corrosion in the wiring loom connections since the car was sitting outside for so long. | |||
Mike Thompson Grand Master Username: vroomrr Post Number: 309 Registered: 4-2019 |
Larry I agree, the shop I bought this car from said that it had sat "IN" the garage for 11 + years. No way! That much damage cannot be done to a car inside the garage. I think it sat outside for 11+ years. The floor boards are gone the triangle console wood is rotted. Wood and floors don't rot in a few weeks as they said the car sat outside. That's just bull. But electrical wise, I think everything works now. I have not tested the horn, now that the column stuff started working, I think the wiring in front is bad. The clear connectors to the horn just fell apart when I disconnected the horns. And the wires cracked when I moved them. I definitely need to replace the wires to the horn. Robert: "We both do things differently....quite differently" it is probably due to you do things right (and by the book). I do things the easiest way. This RR car is holding up all my other cars that will make money, this one is my toy for pride. I need it done as fast as I can and as good as I can, with a very limited budget. It'll be nice you'll see. From rags to riches.  | |||
Mike Thompson Grand Master Username: vroomrr Post Number: 310 Registered: 4-2019 |
Does anyone know what glue (or equivalent) they used on the dash board (leather etc.) and the door panels (cards)? If it can hold for 45 years it must be good. (Hoping you don't say contact cement. Texas don't like contact cement, just melts it like butter.) | |||
Robert J. Sprauer Grand Master Username: wraithman Post Number: 346 Registered: 11-2017 |
Weldwood contact https://www.dap.com/dap-products-ph/weldwood-landau-top-trim-high-heat-resistant-contact-cement/ The heat usually destroys the thin layer of foam between the leather/vinyl and the substrate. I and all the trimmers I know use this product with no issues | |||
Mike Thompson Grand Master Username: vroomrr Post Number: 314 Registered: 4-2019 |
Since the internet is working a little (I can't post pictures but) how does that long wood piece between the glove box and the hole (apparently for Grey Poupon because that was what was there 11 + yrs) come off. I tried to pull on it thinking it had clips but it did not budge. It has really nice wood under there, but they marked it with numbers then varnished it. | |||
Mike Thompson Grand Master Username: vroomrr Post Number: 329 Registered: 4-2019 |
Maybe a picture will work today. 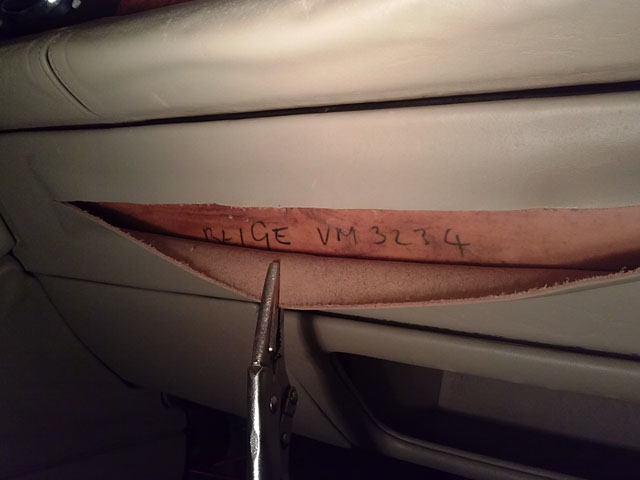 | |||
Mike Thompson Grand Master Username: vroomrr Post Number: 335 Registered: 4-2019 |
Two questions, how does that above wood piece come off. And I hate those ugly rubber bumpers. What year did they come out and can the nice chrome bumpers fit there? | |||
h_kelly Grand Master Username: h_kelly Post Number: 317 Registered: 3-2012 |
Hi Mike re chrome bumper, I have seen conversion on line from rubber to chrome park ward motors in USA has a a video of same https://m.youtube.com/watch?v=aOgQpZ08_Ek | |||
Robert J. Sprauer Grand Master Username: wraithman Post Number: 352 Registered: 11-2017 |
The rubber edge and chrome bumpers do not interchange due to the cut outs on the body shell. You can use a hacksaw or cutting torch to modify. The cost of buying used bumpers would be more than the car is presently worth. Maybe go green and use landscape ties? | |||
Mike Thompson Grand Master Username: vroomrr Post Number: 336 Registered: 4-2019 |
h_kelly That RR looks so much better, beautiful, and in the two tone scheme I'm going to do as well. (Except black for the dark blue.) Love it, thanks. | |||
Mike Thompson Grand Master Username: vroomrr Post Number: 337 Registered: 4-2019 |
Discovering the lies about my Roll Royce. I have told the tail that I was told my Rolls Royce was kept in the garage for 11 + years. Below is proof it was kept at the shop owner's house in a field with the rest of the cars he has (as he told me about a Buick). First picture is the pictures used on craigslist to sell the car. Top pictures correspond with location A in the 2011 and 2013 pictures of the shop Google took. Location B is the place I was told the car sat for 11 + years. Not there! 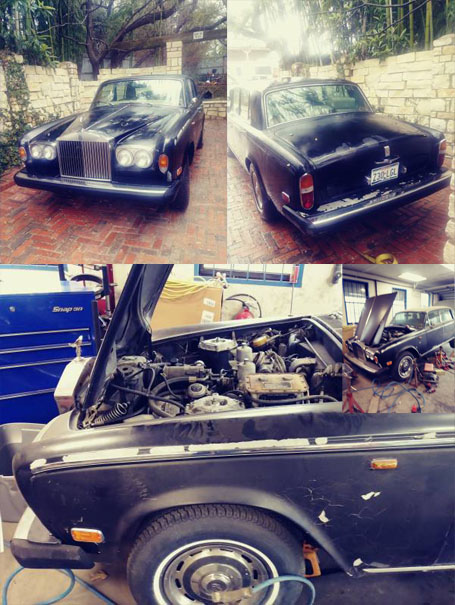   | |||
Vladimir Ivanovich Kirillov Grand Master Username: soviet Post Number: 1381 Registered: 2-2013 |
Is Arthur Daley in Texas now? | |||
Robert J. Sprauer Grand Master Username: wraithman Post Number: 356 Registered: 11-2017 |
Vlad any update on the parts list? Thanks | |||
Mike Thompson Grand Master Username: vroomrr Post Number: 341 Registered: 4-2019 |
The misadventures of a less-than-honest businessman, Arthur Daley, Minder? I like Sherlock probably better. How does that above wood piece come off. | |||
Vladimir Ivanovich Kirillov Grand Master Username: soviet Post Number: 1382 Registered: 2-2013 |
Robert no, but I expect soon, however, then another few weeks, for it to be sent from my country lair 3000 miles away to me. The builder also has some spare parts for sale. | |||
Mike Thompson Grand Master Username: vroomrr Post Number: 351 Registered: 4-2019 |
You know how some boats have glass bottoms so you can see what is under them. The last owner thought that was a good idea. Some cars have a sun roof, mine has a bum roof. 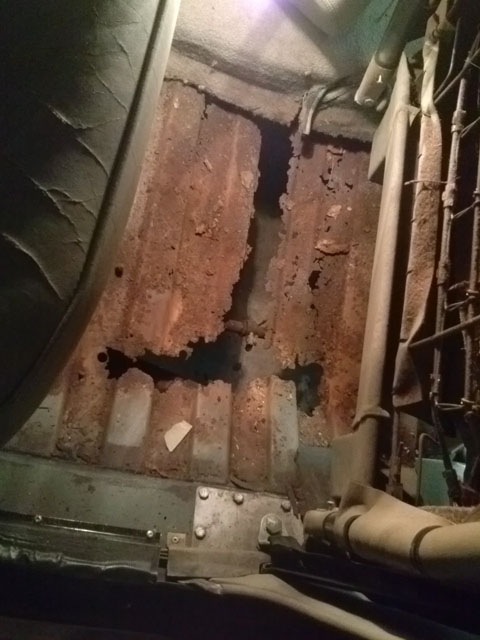 | |||
Mike Thompson Grand Master Username: vroomrr Post Number: 355 Registered: 4-2019 |
I have a million questions like what is it and how does the fans on firewall come off? I know "look it up in the manual". | |||
Mike Thompson Grand Master Username: vroomrr Post Number: 358 Registered: 4-2019 |
Belt driven turbo, is that new. I don't know much about them on Freightliners the exhaust runs it as all that I have seen. http://www.hydratechbraking.com/home/imag023.jpg | |||
ross kowalski Grand Master Username: cdfpw Post Number: 1049 Registered: 11-2015 |
Mike, Belt driven supercharging is quite an old concept. The centrifugal type was used on the Studebaker hawk back in the 60's. Oh and Gale Banks does not run belt supers and he's no dummy. | |||
Mike Thompson Grand Master Username: vroomrr Post Number: 360 Registered: 4-2019 |
Explain, as I said I don't know about this. Who is Gale Banks. | |||
ross kowalski Grand Master Username: cdfpw Post Number: 1050 Registered: 11-2015 |
Mike, Gale Banks is the Banks from Bankspower. He knows more about building and tuning turbo engines than,...mmm... anyone in the world. Are you still thinking about trying to go fast in a Shadow? | |||
Mike Thompson Grand Master Username: vroomrr Post Number: 363 Registered: 4-2019 |
Right now I would be happy with just going and stopping. Got the going, need the stopping. Another good discussion on hydroboost. https://www.stovebolt.com/ubbthreads/ubbthreads.php?ubb=showflat&Number=509913&page=all | |||
Mike Thompson Grand Master Username: vroomrr Post Number: 375 Registered: 4-2019 |
If you have been following these episodes of How The Rolls Turns, you know I had lots of problems with getting this Rolls from Austin Texas to Dallas TX. I could only drive 40 mph and it took 2 days to get it home. Slept in my truck at a rest area. Oh and going faster. I'm betting my Rolls with a 4 barrel will out run any scuba carb out there (without turbo). Below is a picture of the back brake, and if you look at the park brake it is worn. Again if you remember the episodes where the parking brake would not release, I believe that is the cause of the ware on the park brake, and possibly the violent whipping of the car down the highway anything past 40 mph. Some 300 miles with the park brake on and a 6055 lbs car. With a old truck, with bad brakes on the back. A truck brake system will stop that car. 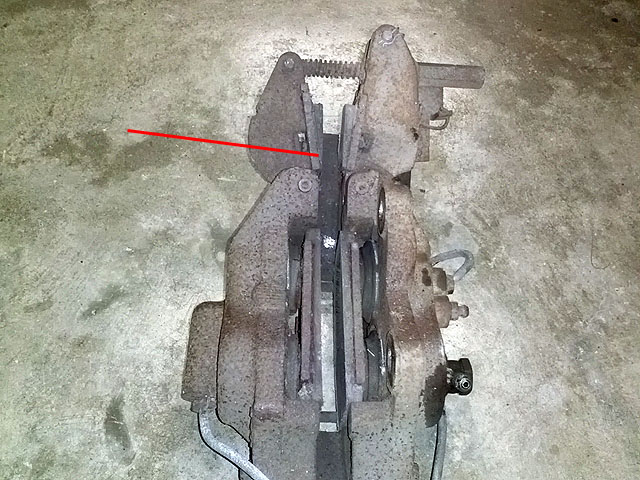 Oh and going faster. I'm betting my Rolls with a 4 barrel will out run any scuba carb out there (without turbo). . | |||
Robert J. Sprauer Grand Master Username: wraithman Post Number: 371 Registered: 11-2017 |
FYI You are off by 1000 lbs -too hi. The RR brakes when properly working will snap your neck when you need a sudden stop. I've been there. RR Aviation and car dept has great engineering. BTW Your carb and intake manifold may not yield what you dream for. The base of the carb and inlet manifold have to match up, bore for bore. If it is off the mark it can actually create a vacuum. Intake and exhaust are 2 areas of a engine that are highly engineered and throwing a carb on hoping for drag race results is pissing in the wind. | |||
Robert J. Sprauer Grand Master Username: wraithman Post Number: 372 Registered: 11-2017 |
RR Shadows were never about speed. Many owners had other cars for that in the stable  | |||
ross kowalski Grand Master Username: cdfpw Post Number: 1053 Registered: 11-2015 |
Mike, The carb probably does not increase performance because cfm is not the issue. If you wanted a fast one on the cheap ( >$1200 USD), install some tall profile speed rated tires, spray it up with the NOS, go larger on the main jets, make up a set of 4 into 2 headers, advance the timing until it just barely starts, port match the intake manifold, revisit your carb adapter, block off most of the radiator, tape the scuttle, put an air dam on the front, lower the car by 1.5 ~ 2" by cutting the springs, put a larger pulley on the alternator, remove the ac, replace the fan with an electric one, run high octane, then make a bunch or timed runs tuning as you go. To make it quick, kind of a "no" on that. Can't wait to see what you do. | |||
Mike Thompson Grand Master Username: vroomrr Post Number: 379 Registered: 4-2019 |
On my door it had (G.V.W.R.)The gross vehicle weight rating of 6055. I got confused. Everyone was saying 5000 lbs 2 1/2 tons. I'm not doubting the brakes worked, they don't and won't on mine, that is why a truck brake system will replace it. I still bet with 2 more barrels to push that much more gas air ratio down that little spout it will out run the same model and engine. Only one way to really find out, I'll let you know. 0 to 60 times please? Push it to the floor and watch your clock (watch) in seconds. | |||
Mike Thompson Grand Master Username: vroomrr Post Number: 380 Registered: 4-2019 |
It's raining again it is the monsoon season again, so my internet is bad, sorry about the double posts. I don't want it to be a race car, I just say it will be faster, likely. I have a Cadillac STS with 4.6L, not as fast as a Corvette (I found out the hard way) but fast enough, for now. In case you don't know any Cadillac with a V on it as CTS-V or STS-V is a race car. Has 500 hp to the wheels. I Know a guy with a Corvette that has gone up against a CTS-V and could not beat him. A reminder, if you do put enough power in any car it will go. (Not mine of course, just a bit faster than most, I think. We'll see. Still like to have those times 0 to 60.) https://www.youtube.com/watch?v=lT4R3hyB1oM | |||
David Gore Moderator Username: david_gore Post Number: 3254 Registered: 4-2003 |
Mike, Some results for 1977 specification Shadow II are on the following link - these would be for an European spec vehicle: http://www.zeperfs.com/en/fiche2207-rolls-royce-silver-shadow-ii.htm . | |||
Mike Thompson Grand Master Username: vroomrr Post Number: 381 Registered: 4-2019 |
I did not see any 0 to 60 times on above link. My internet is so bad only half the page comes up, and the below page won't come up at all. Maybe someone can post what it says for 1975 RR-SS. Thanks https://www.zeroto60times.com/vehicle-make/rolls-royce-0-60-mph-times/ P.S. my Cadillac CTS would do 0 to 60 in under 5 seconds, for comparison. | |||
Robert J. Sprauer Grand Master Username: wraithman Post Number: 373 Registered: 11-2017 |
RR never published 0-60 times | |||
David Gore Moderator Username: david_gore Post Number: 3255 Registered: 4-2003 |
Mike, The data is there but in metric language that the USA will not accept: 0 - 100km/hr [0 - 62.5mph]: 11.3 seconds 0 - 120km/hr [0 - 75.0mph]: 15.5 seconds RRMC did not reveal performance figures for their cars preferring the mystique answer of "adequate" with the same practice applying to engine power.  . . | |||
Mike Thompson Grand Master Username: vroomrr Post Number: 382 Registered: 4-2019 |
https://www.zeroto60times.com/vehicle-make/rolls-royce-0-60-mph-times/ 11.6 seconds, adequate for a turtle. The new ones aren't bad. 4.5 A slow mobile, I could heat up a cinnamon roll in that time  It took me all day to post this, speaking of slow. It took me all day to post this, speaking of slow. | |||
h_kelly Grand Master Username: h_kelly Post Number: 319 Registered: 3-2012 |
The rear emergency brake pads have a natural slop by design as in photo. | |||
Mike Thompson Grand Master Username: vroomrr Post Number: 383 Registered: 4-2019 |
Is expanding foam usually water proof, or holds water? | |||
h_kelly Grand Master Username: h_kelly Post Number: 320 Registered: 3-2012 |
Me reckons waterproof | |||
David Gore Moderator Username: david_gore Post Number: 3261 Registered: 4-2003 |
Waterproof if not exposed to the weather - have seen some that has been degraded from long term exposure to strong sunlight/high UV exposure here in Australia. | |||
ross kowalski Grand Master Username: cdfpw Post Number: 1054 Registered: 11-2015 |
Mike, Expanding foam? | |||
David Gore Moderator Username: david_gore Post Number: 3262 Registered: 4-2003 |
Yes, Comes in two main versions; one for filling cavities and another which carries a fire-resistance rating. I have used these products in both categories for real estate repairs and maintenance for some time with few problems. | |||
Mike Thompson Grand Master Username: vroomrr Post Number: 387 Registered: 4-2019 |
Ross Expanding foam, apparently dangerous stuff to people not too bright. https://www.snopes.com/fact-check/builders-foam-hair/ | |||
Mike Thompson Grand Master Username: vroomrr Post Number: 388 Registered: 4-2019 |
Expanding Foam, It has a thousand uses.  | |||
Mike Thompson Grand Master Username: vroomrr Post Number: 389 Registered: 4-2019 |
Fly on the wall. Honey ... I got to go to the emergency room. Eyes bug: Good Lord .... What the crap have you done this time. Then starts laughing hysterically and can't stop, finds it hard to drive her to the emergency room. Tears in eyes and keeps slapping leg while uncontrollably laughing. | |||
Richard Greene Prolific User Username: benzjag Post Number: 133 Registered: 12-2012 |
Mike, I understand you completely. I have the same negative comments in the Jaguar & Bentley clubs. Like you, I will not throw money away just because! Doing your homework can save you thousands! This is true especially with my Bentley Arnage! I found this link on Ebay. The company will rebuild a RR caliper for $199.00. This ad is for the series 1 Shadow, but I feel sure they would rebuild the series 2 as well. I'm going to use them when the time comes. My mechanic is currently installing a GM 350 in a 78 Shadow! I can't wait for him to finish. I drove a converted car a year ago and fell in love! My other 3 Shadows are low mileage restored cars. I could detect very little if any difference! Here's the link: https://rover.ebay.com/rover/0/0/0?mpre=https%3A%2F%2Fwww.ebay.com%2Fulk%2Fitm%2F272624130205 Richard | |||
Robert J. Sprauer Grand Master Username: wraithman Post Number: 378 Registered: 11-2017 |
$200 for a rebuild per caliper plus 12 ea for shipping. Talk about saving money??? You could easily do it yourself with genuine factory parts. They don't include pads either. | |||
Mike Thompson Grand Master Username: vroomrr Post Number: 396 Registered: 4-2019 |
Richard My pistons were almost welded in there after 11 + years sitting in a field with no brake fluid and rusting inside and out. Except for that, and it is not real fun getting them off on the back, you have to have both wheels in the air to get the joints of the shaft just right to get your socket in there, other than that it is not that hard to rebuild them yourself. (If you have the tools or can rent them.) But if you have the money go for it. I posted, (in a funny way, not to be taken serious) what comes off. How you do it proper see the manual I guess. | |||
Robert J. Sprauer Grand Master Username: wraithman Post Number: 379 Registered: 11-2017 |
Buy the stainless pistons from British Tool Works and you will have no issues with piston corrosion and therefore much better sealing with the internal O ring. If you are re-using old pitted pistons with the chrome falling off and pitted you are wasting your efforts because they won't seal. These are brakes that stop a 5000# car and used on public roads why put yourself, your car and the public at risk to save a few dollars? | |||
Jim Walters Prolific User Username: jim_walters Post Number: 234 Registered: 1-2014 |
That's sure expensive compared to what I charge out to do them, and I powdercoat them too.  SRH8505 SRC18015 SRE22493 NAC-05370 www.bristolmotors.com | |||
Robert J. Sprauer Grand Master Username: wraithman Post Number: 380 Registered: 11-2017 |
Kudos Jim! Nice work..no short cuts here and powdercoated too! | |||
ross kowalski Grand Master Username: cdfpw Post Number: 1056 Registered: 11-2015 |
Robert, You'd be surprised what seals. I don't remember what all I have rebuilt the calipers on over the years, but it's close to everything. I only bought a new piston once because it was made from phenolic resin on some modern nonsense and cracked when removing the frozen caliper from the disk. I just wire brush the pistons carefully and rebuild like normal. I've never had one go bad. | |||
Robert J. Sprauer Grand Master Username: wraithman Post Number: 383 Registered: 11-2017 |
The best finish on pistons will always be a mirror-like finish best for sealing. Wirebrushing can scratch, whenever I brush I use a brass version. Sometimes you get lucky and go for it, I've been there and that's how we learn. | |||
Mike Thompson Grand Master Username: vroomrr Post Number: 400 Registered: 4-2019 |
Well finally the rain has stopped today and the sun is supposed to peek out, so back to painting the inside. The interior was originally white leather. Someone painted it that cream color. It is not compatible with enamel, so you get one shot at it, if you try to paint it again after it drys it goes orange skin on you. And of course they used Armor All in other words silicon, so I get fish eyes as well. So I have to apply very thin layers of paint until I cover the silicon and it will stick. No fish eyes, no repaint and no orange skin. I have to sand (rub) down two door panels to fix them because of fish eyes and orange skin. Armor All a scourge to restorers. Hate it. Was going to post pictures, still not enough internet to do it. | |||
Robert J. Sprauer Grand Master Username: wraithman Post Number: 384 Registered: 11-2017 |
Simply wipe down any surface with Kleen Prep or a weak lacquer thinner (box store)and it removes everything. | |||
Mike Thompson Grand Master Username: vroomrr Post Number: 401 Registered: 4-2019 |
Expanding Foam, what is it like. Ok on the funometer it was not as fun as I hoped. I was expecting that like at an elementary school science fair where the kid adds just a little too much stuff to the obligatory volcano, and instead of a gentle flow down the side of the volcano, a 5 foot fountain of muck is now spraying all over the principle and parents. So I sprayed just a little and waited for the flow. No flow, no fun, it is like shaving cream or whip cream, it just kind of fluffs up. So on the funometer a 3 (so disappointing, I got up all excited to squirt away). As a product to fill cavities a 10. It has no strength, it is like Styrofoam, but it fills holes that are best left alone. (Wish I knew what that lady above was using on her hair, now that's a 10 on the funometer.) | |||
Patrick Lockyer. Grand Master Username: pat_lockyer Post Number: 2133 Registered: 9-2004 |
Pitted or flaking chrome on caliper pistons will very rarely cause a leak over time. They can however cause brake overheating on long trips. The imperfections will stop the pistons from retracting within the calipers holding the pads on causing the heating of the assembly . BTW the rears are more susceptible to this. | |||
Mike Thompson Grand Master Username: vroomrr Post Number: 402 Registered: 4-2019 |
Lacquer Thinner VS Silicon -- Fail ! I have never found anything that will get rid of silicon not even sanding. It is just one of those things that is like a Mummy, you just can't kill it.  | |||
Mike Thompson Grand Master Username: vroomrr Post Number: 403 Registered: 4-2019 |
Pictures of Fish Eyes.  Orange peal skin, that is black with lots of light.  And really thin coats of paint to cover silicon.  | |||
Patrick Lockyer. Grand Master Username: pat_lockyer Post Number: 2134 Registered: 9-2004 |
Wow what an effect for sore eyes! Good job its a breaker car for all the mods. | |||
Robert J. Sprauer Grand Master Username: wraithman Post Number: 387 Registered: 11-2017 |
painted leather...RR would be proud! Why didn't you dye it? | |||
Mike Thompson Grand Master Username: vroomrr Post Number: 405 Registered: 4-2019 |
It was already painted. This is junk car, a POS not a museum piece. I am restoring it on a shoestring budget. You want it done your, way buy it and do it! | |||
Mike Thompson Grand Master Username: vroomrr Post Number: 406 Registered: 4-2019 |
Robert You Can Kiss Every Part I Have GoodBye ! I would not sell you the sweat off my anus ! | |||
Robert J. Sprauer Grand Master Username: wraithman Post Number: 389 Registered: 11-2017 |
I'm not interested in your carcass...I find it sad but it's kinda amusing watching what you're doing..kinda like watching a fool parting with his money. Please don't stop! | |||
ross kowalski Grand Master Username: cdfpw Post Number: 1067 Registered: 11-2015 |
Mike, I am in agreement with Robert but for different reasons I suspect. If you are not familiar with The Race of Gentlemen it kind of answers this question. Old motor bikes are getting expensive. Old hot ones are even more money and more scarce because they were ridden hard and broken in ways that could not be fixed. So they were put in museums. In museums the bikes get the dust blown off of them by their current custodians and solomnly appreciated by hundreds of people over the course of the year. Other custodians blow the dust off of their bikes in the open sea air for one day a year in front of thousands of cheering people in a cloud of petrol and castor oil. The impedance mismatch is quite a lesson on this kind of thing. The museum people are not wrong that TROG is risky and the bikes could get damaged and would be "lost to future generations" and that it isn't "sustainable " When presented with these facts TROG follks, with grease up to their elbows, their cloths soaked to the bone with a cold mist, a disassembled steering head layed out on cardboard in the bed of their pickup and beer in their hand respond with "can you pass me that 9/16 box end?" The irony of TROGs ( vs Eloy) is not lost on me in this context, but the point is that the curatorial folks are in no better a position to get what the TROG folks are putting down than the TROG folks are to get the museum deal. Which am I? Look closely at the TROG race pictures and can answer that. Mike, Keep you hands dirty and keep the posts coming. | |||
Mike Thompson Grand Master Username: vroomrr Post Number: 419 Registered: 4-2019 |
Do you have to take off the fender well barrier to get the old air filter, (that whole air scoop thing and black box, whatever) to get it out of there. I'm thinking of one day using that area for a modern day paper filter and its box, to make space at the top of the carb. | |||
Mike Thompson Grand Master Username: vroomrr Post Number: 426 Registered: 4-2019 |
When you drive your Rolls how do you protect it from the mindless door wackers. Those that don't give a crap about opening their doors and hitting yours. No matter how far away you might park, they will park right beside you and ambush your car. Door Wackers. | |||
David Gore Moderator Username: david_gore Post Number: 3274 Registered: 4-2003 |
Mike, A world-wide problem and not unique to your part of the world............... SWMBO will go the the furthest extremity of a car park to get away from the door bangers and she guarantees even though there are heaps of empty spaces adjacent, someone always comes along and parks alongside her car as if their car requires social interaction with another car. The best protection is a broad fender strip along the "waist" of the car; this works well for front driver and passenger doors but not so well for rear doors of adjacent cars where the door hip over the rear wheel arch usually hits the body and not the fender strip intended to protect the body. These fender strips were often installed as a standard fitment in the 1960's however this has since ceased no doubt to increase profitability for the manufacturers and dealers by allowing them to be sold as a higher-priced accessory. Vehicle Side Body Protection The only alternative solution that might work is a rottweiler on a long leash!!!!  | |||
Mike Thompson Grand Master Username: vroomrr Post Number: 433 Registered: 4-2019 |
This is how I fixed one lady. It was at the end, she was driving and I guess my 1974 C10 Chevy truck looked like the one to hit. As you can see she picked the wrong thing to hit. She hit my bumper, mine bumper totaled her car. The scratches are really just her paint. I got a $1000 + dollars for that. She had liability insurance, she got a memory.    I only got $5500 for the truck plus the $1000 I was unemployed and out of money so I took it. Oh and I got the truck for free, a trade for my van.  | |||
Mike Thompson Grand Master Username: vroomrr Post Number: 437 Registered: 4-2019 |
On the chrome trim on the side of the car, how do you get at the bolts on the ends at the front? I took out both turn signals lenses and can't get to it. I'm going to do another two tone, metallic blue and black. | |||
Robert J. Sprauer Grand Master Username: wraithman Post Number: 406 Registered: 11-2017 |
It is explained in the workshop manual but I will explain. The front part has a shoe that slides into the trim with a stud and nut. You have to remove the front section of the inner fenders to gain access. The rest of the trim is held on with plastic retainers. Slide a stiff putty knife and gently pull outward. Door trim..open door and you will see a small acorn nut. This holds the trim and again snap off.Rear fender trim..same as front...except there is a shoe stud retain like the front and located inside the boot. Be fore warned...the plastic stud retainers are around 1.50 ea and there are 80+ of them holding all exterior trim. Rocker panel trim...From section held with another shoe/stud within rear lower fender well. Remove rear section of fenderwell. Once the stud is free the trim can be raised off the body by approx 2 inches and then pulled forward . The rear part of the trim slides into a tongue that is riveted to the body. The plastic retainers will also break and they ARE NOT the same ones used on the waistline trim. There are 10 per side. Again all of this info is in the manual. | |||
Mike Thompson Grand Master Username: vroomrr Post Number: 438 Registered: 4-2019 |
On the chrome trim on the side of the car, how do you get at the bolts on the ends at the front? I took out both turn signals lenses and can't get to it. I'm going to do another two tone, metallic blue and black. | |||
Robert J. Sprauer Grand Master Username: wraithman Post Number: 408 Registered: 11-2017 |
Upon further thought...you can remove the headlamps for the front retainer and the lower access plate on the rear section of the inner fender well for the sill trim stud. | |||
Mike Thompson Grand Master Username: vroomrr Post Number: 439 Registered: 4-2019 |
Thanks Robert, as for replacing all the plastic stud retainers at around $1.50 each, (now turned to like egg shell). What I will do is go across the street to the body shop guy and ask what metal replacements will it take, at some 50 a bag for $5.00. Saying look it up in the manual is like saying ignorance of the law is no excuse. Where, it's not in car body (that I could find). Again if you are going to tell me to look it up, give me a hint at least. Thanks | |||
Robert J. Sprauer Grand Master Username: wraithman Post Number: 409 Registered: 11-2017 |
You may get lucky with the fasteners..the RR design is unique since it fits into the trim and it has to slide so it can be positioned over the body receptacles and certain diameter to lock into the plastic retainer socket that is pressed into the body. It's a 2 part fastener. Manual Chapter S Part B believe me it's there after the bumper and Everflex roof section. | |||
Mike Thompson Grand Master Username: vroomrr Post Number: 440 Registered: 4-2019 |
Well I went over to the body shop and he found in his old restoration items a fastener that looks like a bug that walks on water. But then I needed to return some parts and took the chrome with me and one of the parts guy had an idea that I'm going to go with. 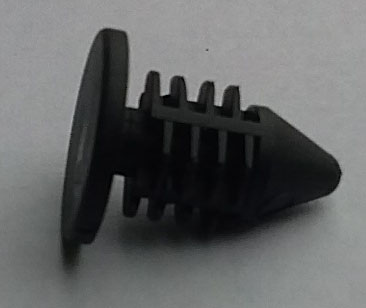 | |||
Robert J. Sprauer Grand Master Username: wraithman Post Number: 410 Registered: 11-2017 |
The original fasteners are designed to slide to help line up when installing the trim....it's not chrome..it's stainless. The original fasteners also also easy removal since they snap into the sockets on the body. The fastner pictured may be too wide and any attempt to force it into the socket or trying to pull away the trim will deform the trim as well. I'm sure you will try it. | |||
Mike Thompson Grand Master Username: vroomrr Post Number: 441 Registered: 4-2019 |
I already tried it, it slides just fine, holds securely and comes out with about the same force as the originals. If you use the highly specialized tool that you can only get in the cooking section of a store, made of Polytetrafluoroethylene (Teflon) fork, and gently get one started out they will come out the same as the originals.  | |||
Mike Thompson Grand Master Username: vroomrr Post Number: 442 Registered: 4-2019 |
I tried and tried to get the gas tank plug out. It was like it was welded in there. Plus I could not find a hex tool for it around here. So to try to take it off I had to make a too for it. It turns out the plug size is same as (or similar to) a half inch nut (or bolt head). I first tried to weld a nut on a 1/2 inch bolt and it just twisted the bolt. So I welded 3 nuts together with a bolt connecting them and welded the ends as well. Used a long cheater bar (forgot what it is called) and it finally came out. 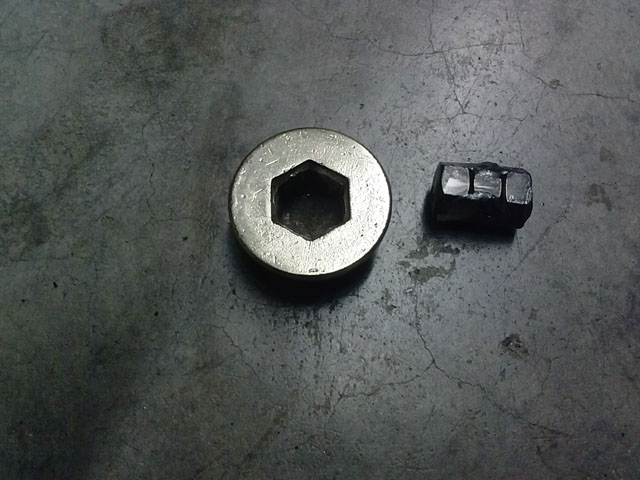 | |||
Mike Thompson Grand Master Username: vroomrr Post Number: 443 Registered: 4-2019 |
I can't see into the gas tank because there is a pipe in the way. I need to see if it has varnish in there or rust. How can I see in there? (Where is an alien with an anal prob when you need them.) | |||
Robert J. Sprauer Grand Master Username: wraithman Post Number: 411 Registered: 11-2017 |
Buy a boroscope on ebay, less than $20 hook it to phone or laptop and it is illuminated with pic capturing, etc. They are fun to have. | |||
Mike Thompson Grand Master Username: vroomrr Post Number: 444 Registered: 4-2019 |
You naughty boy, Santa is going to put you on the bad boy list. Just joking. When I worked at a Auto Parts store I got anything at cost. I thought about buying one, but I did not know in the future I would need one to stick in the back end of a Rolls Royce. There's a likely scenario. | |||
Vladimir Ivanovich Kirillov Grand Master Username: soviet Post Number: 1405 Registered: 2-2013 |
Mike any chance of you moving this thread to a new thread called "Help me restore.......Part 2" It has to be close to the longest thread on the forum and I have to get my pet black rat Honesty to run on top of my tablet for half an hour before arriving at the last post. | |||
ross kowalski Grand Master Username: cdfpw Post Number: 1077 Registered: 11-2015 |
Mike, You can get a usb phone borescope for $10 maybe they would work OK for this, but I would recommend pulling the sending unit. You get a pretty good view of the inside of the tank from there. | |||
Mike Thompson Grand Master Username: vroomrr Post Number: 445 Registered: 4-2019 |
Vlad it sounds like you have the third world country blues. I have unlimited everything so I use my phone for the internet. I use FoxFi to tether my phone to my laptop. I use a USB cable to my phone, and in places (other than here where I live in a dead zone) I get like 1.2 MBS (Million Bits per Second) anyplace your phone works you have internet. Great for truck drivers. http://foxfi.com/ Thanks Ross Walmart has them for $10 as you said. Now all I need is a space ship and I can fly to a planet and stick that sucker up ... never mind. (Good lord they took me aboard their space ship and probed me ... In where? Why? They traveled billions and billions of miles to do what?) | |||
Vladimir Ivanovich Kirillov Grand Master Username: soviet Post Number: 1406 Registered: 2-2013 |
Actually Mike, I am unfortunately living in a large Australia city which I hate but its reasonable loot. The problem is the tablet. I can't seem to work out how to scroll down on the mongrel. On the laptop its no problems. As for big city internet access, the internet access is far better and faster at my outback country lair in the middle of nowhere possibly because we have a telecommunications tower on the top of our mountain. This is a great thread Mike for do it yourself with bugger all..... Most informative and yes I am studying your habits. | |||
Geoff Wootton Grand Master Username: dounraey Post Number: 2098 Registered: 5-2012 |
Vladimir Just click on the downward arrow to go to the end of the thread.  | |||
David Gore Moderator Username: david_gore Post Number: 3285 Registered: 4-2003 |
You can also access the most recent unread posts in a thread using the following series of commands: 1. Open the forum with the following link: http://au.rrforums.net/cgi-bin/forum/discus.pl 2. Open the SEARCH button under UTILITIES in the LHS menu and select the "Search by Date" box. 3. Select the "Registered Users" field and enter your User Name and Password in the relevant boxes. DO NOT check the "Don't remember this check" box otherwise you will have to re-enter your user name and password next time you visit the forum. 4. Click on the "Perform Search" button at the bottom of the options. 5. A SEARCH RESULTS page will open showing threads with posts since your last visit to the forum. These are displayed under the relevant Topic with the previously read posts in the thread in red and the more recent unread posts in blue. 6. When finished, DO NOT log out of the Forum, just close the page using the "X" button in the top right hand corner of the page. The next time you want to access the Forum, use the link in Item 1, the Forum Home page will open and Topics with new posts since your last visit will have a "New" tag highlighted in Yellow. Use Step 2 above and the page referred to in Step 3 will open with your username and password already entered. Then proceed with steps 4, 5 and 6.  . . | |||
Mike Thompson Grand Master Username: vroomrr Post Number: 447 Registered: 4-2019 |
Maybe I do it easier, when I want to find if someone has posted, I just hit ctrl + home then click on the "Silver Shadow Series" link at top, and see if any "new" signs show up. Man on this car I don't know if it is a case of galvanic reaction due to the two metals used (aluminum and steel) making a source of electricity for a potato clock, or just really bad primer. I was told by the body shop man across the street (who has worked there some 30 years having taken over the shop from his father) that with aluminum you have to use special primer, and don't do any grinding around it or it will cause the galvanic reaction and the paint will bubble and fall off. It looks like on some parts of the car there is no primer (the hood/bonnet) and where it does have primer it looks like aluminum and is bubbling and falling off. I can't find anything that will strip it. I don't want to sand to metal the whole car. I did that on the 1974 Chevy C10 truck because some brain used house paint and brushed it on. Help on how to solve this would be appreciated. (If you say stripper or something please give the brand name, nothing I've used works.) | |||
Robert J. Sprauer Grand Master Username: wraithman Post Number: 412 Registered: 11-2017 |
Aircraft stripper works fine. RR used very good etching primers on their cars. I have stripped several to metal and followed the proper basecoats (epoxy primer, primer-surfacer and sealers) and colorcoat protocol without any problems. | |||
Mike Thompson Grand Master Username: vroomrr Post Number: 448 Registered: 4-2019 |
If you have found a brand name that works that is what I need to know, no Aircraft stripper that I have used works. You must have found a magic brand that does. What I have used just peals the black top layer, nothing else. Thanks | |||
Mike Thompson Grand Master Username: vroomrr Post Number: 449 Registered: 4-2019 |
This is what I feel like I'm going to be driving with those ugly rubber bumper car bumpers on my car.   | |||
Robert J. Sprauer Grand Master Username: wraithman Post Number: 413 Registered: 11-2017 |
Many coats of stripper are required and it gets brushed on in one direction. Some cover with plastic to keep it moist. The first coat takes off the topcoat and additional coats will do the undercoats. It took 2 gallons for my car without the roof (Everflex roof). Note: once the metal is exposed it must be primed ASAP or months from know you will be wondering why areas are lifting. You may not see the rust or oxidation to the naked eye but it is there. Metal prep would be a good choice because it etches and leaves a protective film. You need prep for steel and another for aluminum. These are the steps and requirements. Aircraft stripper is not a brand but a type of formulation. | |||
Mike Thompson Grand Master Username: vroomrr Post Number: 453 Registered: 4-2019 |
In every auto parts store, and Walmart etc has a can that says Aircraft stripper, none of which have the same ingredients. Maybe I need to ask you direct, what brand did you use? | |||
Robert J. Sprauer Grand Master Username: wraithman Post Number: 415 Registered: 11-2017 |
I use Kleen-Strip | |||
Vladimir Ivanovich Kirillov Grand Master Username: soviet Post Number: 1409 Registered: 2-2013 |
Oh Dear Mike. Strippers. Some have nice cleavage and some have none.... Oh sorry wrong type of stripper,....indeedy. My 76 Cadillac Fleetwood was rear ended and the trunk boot replaced in USA before being shipped here. The paint job on the trunk lid was lousy so I decided the strip it back to bare metal. I bought expensive automotive paint stripper from a large supplier who also using the Cadillac colour code in the VIN mixed me up 4 litres of Phonecian Ivory being what the car wore directly from the factory. Under the lousy job Phonecian Ivory was black paint so I deducted that the original truck lid was totalled in the rear ending. Ah the black paint - I will never forget it. The paint stripper took up to 8 applications to remove all the paint and that was applications going by the paint strippers directions on the tin. Not the first time I have used paint stripper either. So I think if I came across this caper again and the paint stripper did not rip the paint to the bare metal in two applications then I would apply the sanding disc. Quite whether there are different sanding disks for aluminium and cast iron for paint removal like there are for gasket removal disks I cannot tell you. If you sand where its been lead wiped I am sure you know what safety precautions to take. Oh get your neighbours onside before you start painting as not even the gentle odour of non two pack paints are appreciated. As for two pack sprayed out in the open well...yes that would be lawyer bait. | |||
Mike Thompson Grand Master Username: vroomrr Post Number: 454 Registered: 4-2019 |
Vlad I think the first would be under the brand name of PlayBoy, the second under Crap. I have lived here 4 years the rest around here less than a year I'm grandfathered in as they call it. And there is a body shop across the street, if don't like the smell of paint they sure moved into the wrong place.  OK the reason I came, is this the original speaker in a 1975 RR. It is dead as a door nail and has to be replaced. (Water damage.)  | |||
Robert J. Sprauer Grand Master Username: wraithman Post Number: 416 Registered: 11-2017 |
That is not the original speaker. RR would never had installed that Realistic speaker. Do not assume what you see is factory original. The original in many cars were Pioneer that had a square basket and fitted with a wood mounting plate. | |||
Mike Thompson Grand Master Username: vroomrr Post Number: 455 Registered: 4-2019 |
You sure that's not just a Wraith, in your video, on taking out windows, your car is not the same at all as mine. You might as well have been talking about a Toyota. | |||
Robert J. Sprauer Grand Master Username: wraithman Post Number: 418 Registered: 11-2017 |
Mike You have had this car maybe 2 months and claim you have knowledge...please. Shadows and Wraiths are the same car, just one is longer. I have collected, RESTORED both for over 30yrs. Can you claim the same experience? I don't think so. You come here for help and we all chime in. Please do not refer to your project as a restoration, we all know it can be a term that is a wish for some and a goal for others. If you want help respect those that have been here for quite some some and have the experience to guide you. Do not bite the hand... | |||
Vladimir Ivanovich Kirillov Grand Master Username: soviet Post Number: 1410 Registered: 2-2013 |
Ha ha top Marks for that one Mike! There is absolutely zero chance of a Realistic Speaker being put as original equipment in any Rolls Royce or Bentley ever because Realistic is oh so low quality stuff. I am certain you post that type of thing as a baiting joke. Bloody Hilarious though. | |||
Mike Thompson Grand Master Username: vroomrr Post Number: 456 Registered: 4-2019 |
The sun visors are not the same what so ever, the trim around the windows are not the same what so ever, the top roll is not the same. And if you can't tell the difference, then any claim of experience must show you did so with your eyes close. If I have to weigh your attitude up against your help, I'd sooner not get help from you. Arrogance is the only experience I see you have to offer. No one else here talks to me the way you do. I know you have been warned. | |||
Vladimir Ivanovich Kirillov Grand Master Username: soviet Post Number: 1411 Registered: 2-2013 |
Sorry you see my input as arrogant Mike....however not too long ago I thought you were being quite arrogant and indeed quite rude and I ignored you. The input you get from other contributors is free and for the most part extremely well informed. Perhaps its time for you to exercise some diplomacy rather demand info on this and that and attempt to dictate the content of any replies. | |||
David Gore Moderator Username: david_gore Post Number: 3287 Registered: 4-2003 |
Mike, Your car has has obviously experienced much abuse including some cheap, nasty and, almost certainly, non-compatible body filling and painting so expect the worst, hope for the best and you will learn a lot as you find solutions. Above all, seek help from product suppliers and experienced restorers who have faced your problems in the past. No doubt you have different types of paint being used over the years and specific advice is needed to ensure using one technique doesn't cause future problems with other types of paint and body fillers present in the area being prepped. I suggest you need to find a "classic car" restorer nearby who is willing to take you "under his wings" so to speak and can walk you through the appropriate procedures and products. I sense you are now getting some of the RRMC ethos from your experience so far and the unique character of your vehicle. This ethos is to do the best work possible with the resources and finances available to you and your current problems are testing your ability to achieve this without losing motivation. Please accept our contributors are a very diverse group of enthusiasts spread right across the world and many come from countries with cultures and practices entirely different to the USA. This may lead to misunderstandings and misinterpretations arising that hinder working through a problem to its solution. The golden rule "one look is worth a thousand words" certainly applies to body work from minor panel beating to major "bare metal" resprays and it is my feeling you may benefit from supplementing advice from our members with real life assistance from experts. In my life, the best example of this was a workmate years ago who was beginning the full tear down and restoration of a MG TC "square rigger" classic sports car and he went to technical college to undertake a trade course in panel beating and spray painting. The course took 3 years and he received his trade certificate at the conclusion [I am almost certain some of the panels of his car were used as demonstration pieces during the course] and his restoration has gone on to receive many concours awards for "best restoration", "best in show" and "most popular car". You may not wish to go down this road but the underlying benefits of "watching, listening then doing" remain as true today as they did in this example 50 years ago.  . . | |||
Mike Thompson Grand Master Username: vroomrr Post Number: 457 Registered: 4-2019 |
Vlad .. I forgot to put Roberts name on that post sorry. The post "The sun visors are not the same what so ever" Sunday, 12 May, 2019 - 02:33 pm:. Is directed only at Robert J. Sprauer and no one else on this forum, that have immensely helped me. I joke a lot and I find others from different cultures just don't see it as a joke. (We lost Steve Emmott because he misunderstood my joke, I contacted him by PM to personally apologize to him, but no reply or return). If you can find that post (where I was "quite arrogant and indeed quite rude") let me know and I will explain it. I am really bad at interacting with other humans and that is why I usually don't. I needed help and I was hoping others would benefit from it. But Robert on many occasions has ruined my day. When I was happy, a rare state for me. I try as hard as I can to not make any negative comments. So again if you feel I have, please let me know. (It was probably another joke gone bad, but don't know.) Maybe I should just leave and take my POS car with me, let you get back to your normal forum experience. | |||
David Gore Moderator Username: david_gore Post Number: 3291 Registered: 4-2003 |
Mike, The Rolls-Royce community is world-wide and eclectic as well as being renowned for the originality, enthusiasm and eccentricity of a significant number of owners[custodians} and enthusiasts. Differences of taste and opinion are inevitable and often quite vigorously contested however, in a very large majority of occurrences, the participants agree to disagree and respect the right of free but not aggressive or abusive expression of individual points of view. Differences between cultures in expressing humour and opinions is an inevitable problem for forum Moderators and Administrators; what may be acceptable in one part of the world and culture may be completely unacceptable elsewhere; what may be humorous may also be offensive, words may convey different meanings to different people. Certainly, there are major differences between Australia and America as well as Australia and Great Britain in this regard. The Administrator[s], Moderator[s] and forum contributors face "the walk of death" every day trying to reconcile these differences; mostly we get by but sometimes our decisions have unexpected or adverse consequences. Our defence can only be to reiterate we expect differences of opinion and respect the rights of individuals to hold these opinions; our responsibility is to ensure the forms of expression used comply with accepted standards whilst allowing alternative view points to be appropriately expressed and subsequently debated as appropriate. Australians have a reputation world-wide for being forthright, down-to-earth and intolerant of pomposity and privilege largely as a consequence of our convict past; we are forthright and speak openly and freely about things that are important to us both as individuals and a community. Others may use different terms in this regard however the end result is always the same "you know we believe in what we say" as I do now.  | |||
Mike Thompson Grand Master Username: vroomrr Post Number: 458 Registered: 4-2019 |
I know some of you people don't like what I am doing to this car. This car by the experts that restore these cars for a living everyday have told me that this car should be sent to a dismantler to scavenge parts off off. By all rights, this car should be crossed off the list of cars in existence. It's parts sold to those that will find it harder and harder to find parts for the existing Rolls Royces. There will come a day that a part will fail as brake pumps, and none can be found. All cars, as mine, have had their parts sold on ebay etc. There then needs to a an alternative to keep that loved automobile on the road. If there are not those who have explored these alternatives you may find your car is only worth the parts that can be scavenged off of it. As mine is, but I find these cars and restore these cars. Some may have in their mind that "restore" means bringing them back to show room perfection. Mine is getting them back on the road for others to see, touch, and own. If they want to bring it back to show room perfection that is great. But that car is available to do so, where as the rare 1964 Chrysler Imperial Crown that was the American equivalent to the English Rolls Royce was in a junk yard. It offered two Air Conditioners, an AM/FM Radio, Telephone, small Record Player (not even 8 tracks existed at the time), in a big fast luxuriant package now sitting in scrap yards or long since melted down for it's heavy body. I took this rotting car and have brought it back to road condition. Is it show room quality no, is it a car that one can own and drive, yes. That is my goal and my standard. Your's may differ, and so be it. I am going to do it my way, and one day when you can no longer find parts for these rare cars, and even the Flying Spares have gone out of business and no longer sell parts. You may look back to these threads and thanks those like me who have paved the way to keep your car on the road. Will it then be show room quality no, but you can still drive it and own it and it is not in a junk yard with owners fight over its parts. Like vultures over a carcass. | |||
David Gore Moderator Username: david_gore Post Number: 3292 Registered: 4-2003 |
Mike, Well said and you are continuing a long tradition of R-R and to a lesser extent Bentley custodians modifying their vehicles to suit their particular tastes and needs. Some of our members will have differing ideas and opinions how this should be done and be forthright in expressing their opinions in this regard. Personally, I am following your work with great interest as you are certainly "thinking outside the square" and your ideas and methods are worthy of consideration when assessing and restoring a traditional "barn find" or sadly neglected vehicle especially when essential parts are no longer available from the specialist suppliers and dismantlers and alternatives have to be found. Listen to the advice of our members as it is always offered in good faith and reflects their past experience however when you reach a "dead end" with unavailability of affordable parts, finding a practical solution is always a challenge. Our forum increasingly survives on the contributions of our members on their experiences and solutions to these problems and I am confident you will also be making contributions of this type as your project continues and you work within the constraints of the resources available to you. | |||
Vladimir Ivanovich Kirillov Grand Master Username: soviet Post Number: 1412 Registered: 2-2013 |
Mike Robert only gives excellent advice though perhaps conservative advice. I enjoy your posts and what you are doing to the Shadow. In any case Texas is part of the free world as they say and thus you are entitled to do with that car as you wish. That aside just chill out mate and don't take offense at what others say. Indeed don't give a bugger about what they say if it does not fit your plan. | |||
Mike Thompson Grand Master Username: vroomrr Post Number: 459 Registered: 4-2019 |
Vlad I found out that Realistic is a Radio Shack house brand. While I saw Tandy shops (Radio shack's owner) in England in the 1980's as you said not a chance these were original. I took out the one not working and it was round. The original was square. He beat a round peg into a square hole, he made it rounded. Why he would take Pioneer speakers out and put in Realistic one can only guess. And he wired it so that the ground wire went to the body, and only the positive goes to the drivers side only. I cannot find anything that went to the RH side. In the 80's when he installed the AM/FM Cassette player he just heard it out one side. If you listen to something like Pink Floyd you would only get half the music, where they used both channels aggressively. To test these speakers with era correct music that tests any speaker to its limit. I shot Emerson Lake and Palmer's Lucky man, which featured an analog Moog synthesizer that will show any rattling of speakers. I also hooked up the RH side to test the back speaker as well as the new speaker. The front LH side rattled in some spots and the back LH speaker rattled in some spots. The new RH side speaker of course did not rattle nor the back speaker on the RH side. Again conclusion the RH side was never used therefore no rattles. I have yet to take off the back panels (cards) to see what speakers are there (I'm not sure how to get out the ash tray without damage yet). | |||
Mike Thompson Grand Master Username: vroomrr Post Number: 460 Registered: 4-2019 |
Emerson Lake and Palmer's Lucky man, if you're interested. At the last is the highs and lows of the Moog. https://www.youtube.com/watch?v=89g1P_J40JA | |||
ross kowalski Grand Master Username: cdfpw Post Number: 1089 Registered: 11-2015 |
Mike, If the car had realistic speakers installed you might also want to phase them to make sure wires weren't crossed. It wouldn't be the first time a so called technician put them on backwards. | |||
Mike Thompson Grand Master Username: vroomrr Post Number: 462 Registered: 4-2019 |
Phase them? | |||
ross kowalski Grand Master Username: cdfpw Post Number: 1091 Registered: 11-2015 |
Mike, Basically speakers run on AC. Plus on one terminal the speaker cone moves out and the other terminal the speaker cone moves in. So you need the polarities on the terminals in sync (in phase) so that one does not cancel the other out. There are apps that have phase test samples that you listen to. Basically you listen to in phase and out of phase signal and the ones in phase should sound "better". Any app or downloaded test tracks should have instructions on how to use them. | |||
Robert J. Sprauer Grand Master Username: wraithman Post Number: 420 Registered: 11-2017 |
On a practical note; the + on the driver should be wired to the + on the amplifier, and neg to neg. One of the more noticeable effects is poor lo end reproduction, but with any reproduction system there are many factors to consider in the listening environment. RR uses a common ground system and wiring a modern head unit will cause problems: the audio output cannot share a chassis ground and has to be floated or isolated. | |||
Mike Thompson Grand Master Username: vroomrr Post Number: 465 Registered: 4-2019 |
I use these methods: https://www.techguys.ca/howto/speaker.html | |||
Mike Thompson Grand Master Username: vroomrr Post Number: 478 Registered: 4-2019 |
Is there a trick to the small side signal lights, it was working then I opened it to be able to sand and paint and it stopped working. The light is good. | |||
Mike Thompson Grand Master Username: vroomrr Post Number: 487 Registered: 4-2019 |
The interior is coming together nicely. Those seats (the upper cushions) are very complicated in trying to match where to start sewing. It is not like American cars (or trucks) where you use the old seat (as best you can) as a templet and cut them out and sew them back together. The Rolls seats kind of have to be done in order, and matched by putting curve middle to curve middle.  | |||
Patrick Lockyer. Grand Master Username: pat_lockyer Post Number: 2160 Registered: 9-2004 |
Cripes I am not getting into this! | |||
Mike Thompson Grand Master Username: vroomrr Post Number: 489 Registered: 4-2019 |
I sure the feeling is mutual. | |||
Mike Thompson Grand Master Username: vroomrr Post Number: 490 Registered: 4-2019 |
Beautiful 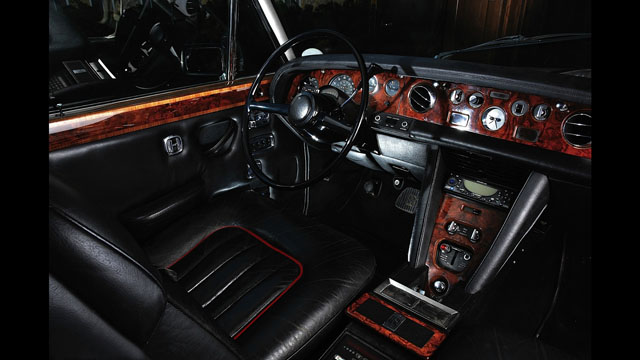 | |||
h_kelly Grand Master Username: h_kelly Post Number: 333 Registered: 3-2012 |
Mike is this your car, man it looks great, well done, love it!!. Fabulous work | |||
Mike Thompson Grand Master Username: vroomrr Post Number: 492 Registered: 4-2019 |
No not mine. Not yet, getting there, I'll post pics when it is finished. Should be close. | |||
h_kelly Grand Master Username: h_kelly Post Number: 334 Registered: 3-2012 |
Looking forward to same | |||
Mike Thompson Grand Master Username: vroomrr Post Number: 509 Registered: 4-2019 |
Which is better to clean out a caliper insides, spray brake cleaners or acetone? | |||
David Gore Moderator Username: david_gore Post Number: 3309 Registered: 4-2003 |
Mike, A three prong cylinder/caliper bore hone then acetone: https://www.repco.com.au/en/brands/repco/repco-brake-cylinder-hone-19-63mm-rst200/p/A9445108 | |||
Vladimir Ivanovich Kirillov Grand Master Username: soviet Post Number: 1437 Registered: 2-2013 |
Water followed by compressed air. Grunge can be removed with steel wool and a detergent followed by compressed air. With the caliper pistons do the same until they are shiney and inspect for pitting. If pitted where they come in contact with the seals replace them. Use a little tool pick to remove stubborn rust and grime so the new seals can be seated properly. If you have seized pistons use compressed air to remove. I have seen nothing better than water to clean brake parts. But naturally one needs to remove all traces of water. | |||
Mike Thompson Grand Master Username: vroomrr Post Number: 511 Registered: 4-2019 |
What scares me about steel wool is it leaves little fibers that rust. Not sure compressed air would have moved these pistons. I told David to delete the girly robot pictures in the other thread, don't be offended by them, more poor jokes. | |||
Glen Poolen Prolific User Username: wgipps Post Number: 169 Registered: 3-2018 |
Mike - got any more photos of your interior? What have you got in place of the original radio? What have you done with you console storage area? | |||
Mike Thompson Grand Master Username: vroomrr Post Number: 512 Registered: 4-2019 |
Glen it is all in pieces across the garage right now. When I get them all done and back in I will take pictures of them. The original radio I replaced with a Freightliner (18 wheeler) truck radio, that has everything but DVD screen. The console (8 track box) storage area I want to put a top on it so it will be like all modern cars. The carpet I have it posted in 1975 Silver Shadow How To Dismantle And Restore. All I have left to do is stain and Polyurethane the door wood, put in the carpet, put in the front seat cushion tops in now that they have been reupholstered. Finish the door panels. Paint the holes in the dashboard, but both cans of paint I bought were the wrong color. The black was blue and the brown was purple. I'll try to mix red with the blue and hope it comes out brown. That's it I think. | |||
Mike Thompson Frequent User Username: vroomrr Post Number: 516 Registered: 4-2019 |
Mom can I have one of these for Christmas?  | |||
Mike Thompson Frequent User Username: vroomrr Post Number: 520 Registered: 4-2019 |
For the Aussie crowd a hand built brake system, engineer approved. https://www.aulro.com/afvb/technical-chatter/169784-series-disc-brake-conversion-i-did-my-way.html | |||
Mike Thompson Frequent User Username: vroomrr Post Number: 527 Registered: 04-2019 |
I know windshield wipers have been done to death, but mine slowly flap back and forth any time the ignition is on. No matter if the switch is on or off. If you saw in my video of me driving the Rolls into the garage, the wipers are flapping. Rolls first start https://youtu.be/_Z5o1ljesno It only stops if I disconnect the connector closest to the firewall (motor brushes power). What is still wrong? | |||
Mike Thompson Frequent User Username: vroomrr Post Number: 531 Registered: 04-2019 |
To add to the above video stuff, I just found out one of my dumb videos has 1,761,117 views. Wow * TIME TRAVELERS ARE REAL https://www.youtube.com/watch?v=fm9DwwsCSb0 | |||
Mike Thompson Frequent User Username: vroomrr Post Number: 533 Registered: 04-2019 |
On the windshield wipers flapping back and forth with the switch off, I have already did all the tricks in most the threads I could find. Hoping for an easy fix short of pulling the plug and connecting it when it rains (kind of like with a convertible). Just for that I really don't want to tear the dashboard apart. | |||
Hubert Kelly Prolific User Username: h_kelly Post Number: 337 Registered: 03-2012 |
On the wiper motor, remove the dish like alloy cover (3 screws). Watch the motor move, (spray water on screen to reduce friction). You may notice a hook like piece at corner, from memory I think this is the off park switch. In other words it only works if current is turned off and then wiper has completed its cycle. FIRSTLY I'd check with a volt meter or lamp at the feed conection if you have on/ off ie current on with switch on and current off with switch off | |||
Geoff Wootton Grand Master Username: dounraey Post Number: 2104 Registered: 05-2012 |
In my 74 SY1 (SRX18501) the current to the wiper motor is always on, even with the wiper switch in the off position. The circuit is broken when the off screen park switch switches off, after the wipers have parked. The red arrow points to the park switch. If this switch fails in the on position, the wipers will keep running regardless of the dash switch position. 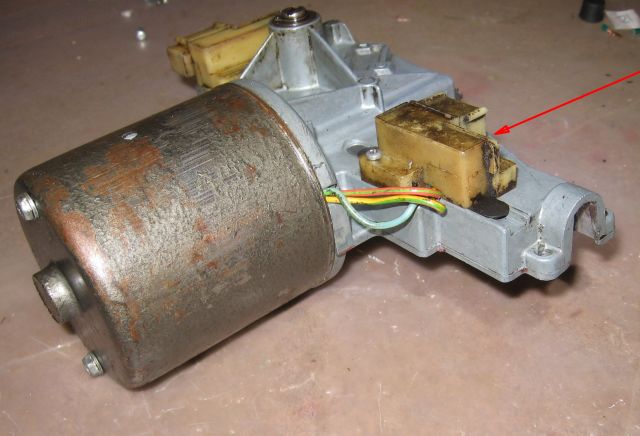 | |||
Mike Thompson Frequent User Username: vroomrr Post Number: 534 Registered: 04-2019 |
Thanks Geoff, I don't know if this helps or hurts in thinking it is the park switch. But when I do the washer it does retract and stops, then resumes the flapping. I could open it up and fiddle with the park switch though. | |||
Mike Thompson Frequent User Username: vroomrr Post Number: 538 Registered: 04-2019 |
What your back bottom cushion looks like if you take it apart (and cut your vinyl sparingly). 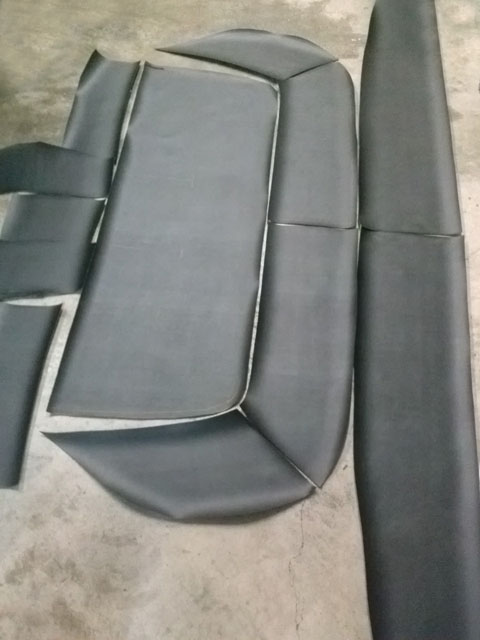 | |||
Mike Thompson Frequent User Username: vroomrr Post Number: 540 Registered: 04-2019 |
UK Inflation Rate, £100 in 1975 to 2017. In other words, £100 in 1975 is equivalent in purchasing power to about £797.40 in 2017, a difference of £697.40 over 42 years. The 1975 inflation rate was 24.24%. $18,000 for a 1975 RR-SS = today £125532 around $163189. https://www.rrsilvershadow.com/EAank/Prijsnw.htm http://www.in2013dollars.com/1975-GBP-in-2017 | |||
Mike Thompson Frequent User Username: vroomrr Post Number: 552 Registered: 04-2019 |
And here is the finished product. 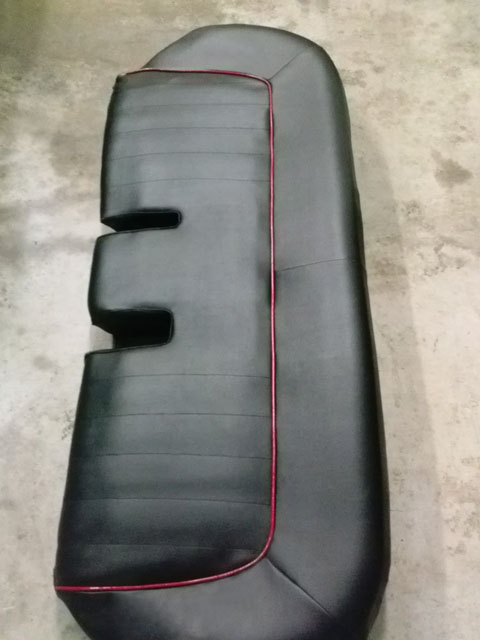 | |||
Mike Thompson Frequent User Username: vroomrr Post Number: 560 Registered: 04-2019 |
Trying to find a brake fluid remote fill reservoir is a challenge. I don't trust ebay, and the ones I have found either cost a fortune or are in England etc. I found that motorcycles have little reservoirs that might work. But some of them are expensive as well. Found some as low as $9.00 https://www.jbugs.com/product/98-6020-B.html Might get this one. | |||
Mike Thompson Frequent User Username: vroomrr Post Number: 563 Registered: 04-2019 |
The headliner is discolored and in sad shape in that respect. I have no desire to do a new one, (something other than upholstery) I detest doing. I used bleach on it, which usually gets rid of that kind of issue (mold and water stains). Not sure of a way to solve it. | |||
Mike Thompson Frequent User Username: vroomrr Post Number: 564 Registered: 04-2019 |
A hand sewn (with sewing machine) headliner I did for the 65 Thunderbird. I had no choice on it, there was more hole than liner after the rats got finished with it. 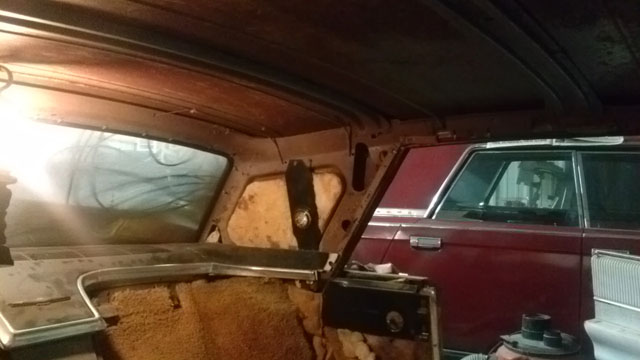  | |||
Jim Walters Prolific User Username: jim_walters Post Number: 244 Registered: 01-2014 |
https://mossmotors.com/tank-assembly-single-supply?assoc=5108 SRH8505 SRC18015 SRE22493 NAC-05370 www.bristolmotors.com | |||
Mike Thompson Frequent User Username: vroomrr Post Number: 566 Registered: 04-2019 |
I went with the: EMPI 98-6020 BRAKE FLUID RESERVOIR, VW TYPE 2 BUS, 1955-66, 211 611 301C Through Amazon $8.95 + $5.99 Shipping https://www.amazon.com/98-6020-BRAKE-FLUID-RESERVOIR-1955-66/dp/B00C2D9CF2 And the: 2 PSI Residual Brake Pressure Valve Also through Amazon $7.15 + $8.00 shipping https://www.amazon.com/Procomp-Electronics-PCE492-1001-Residual-Pressure/dp/B01LYXI829 To leave a paper trial. (Follow the yellow brick road.) | |||
Jim Walters Prolific User Username: jim_walters Post Number: 247 Registered: 01-2014 |
I would question whether the VW ones have enough volume. You're looking at larger diameter pistons in the calipers and twice as many as what that reservoir is made for. SRH8505 SRC18015 SRE22493 NAC-05370 www.bristolmotors.com | |||
Mike Thompson Frequent User Username: vroomrr Post Number: 572 Registered: 04-2019 |
That reservoir is just for the Rolls master cylinder to slave. The brakes master cylinder has it's own original reservoir. That came from a big Dodge (Ram) Mark III Van.  | |||
Mike Thompson Frequent User Username: vroomrr Post Number: 575 Registered: 04-2019 |
I have the panels (cards) off of the back doors and it seems the windows nor elec. locks work while the 3 wires are unpluged. How can I work on the windows to see if lubrication is working etc. | |||
Mike Thompson Frequent User Username: vroomrr Post Number: 587 Registered: 04-2019 |
Well I got my Bore cam and hooked it to my laptop, with the installed software (that had two malicious virus warnings out of 72 different softwares at https://www.virustotal.com/gui/home/upload - I always check .exe files before opening them). The camera was unwieldy because of the cord, so I taped the camera and cord to a coat hanger wire, and bent it so I could turn it back and forth. The below pictures are what I captured of my gas tank. That I worried had varnish and rust in there that would clog the ports of my new carb. First I went down the filling tube, through a hole and found the float. Not a bad sight no varnish and little rust.  Then a tour of the surroundings. A little rust in some fold.  Some flakes of rust around the float.  Some flakes of rust near I think the drain hole.  And some more flakes.  All and all I am quite happy. The rust is manageable and with 3 fill ups with water and drain should take care of those loose flakes. Then the filters (2 filter, I might put another one as well) ought to catch any flakes. For just $10 USD not a bad little camera. I'm a happy camper. . | |||
Mike Thompson Frequent User Username: vroomrr Post Number: 610 Registered: 04-2019 |
The only thing holding me up now from finishing the interior of the Shadow is the elec. windows. No amount of lubricant has helped. I think after 11 + years out in the Texas sun and weather, the felt-like window channel seals on the windows have bulged. Normally they would be replaced, but they are expensive. Not sure what I'm going to do. | |||
ross kowalski Grand Master Username: cdfpw Post Number: 1136 Registered: 11-2015 |
Mike, If your window motors are anything like mine, they would not be phased by swelled felt. Do your windows go slow or do they not move at all?? | |||
Mike Thompson Frequent User Username: vroomrr Post Number: 611 Registered: 04-2019 |
The driver side front goes down good and needs help back up (or is really really slow), the Passenger side front goes down slowly but will not come back up. Both the backs won't go either direction without help. All but the driver side front are really really hard to move even with help from the motor. Driver side front is hard to get up (not really really hard). | |||
Hubert Kelly Prolific User Username: h_kelly Post Number: 338 Registered: 03-2012 |
Video not for shadow but spirit, might give ya ideas?. https://www.google.com/search?q=rolls+royce+silver+shadow+window+motor+repair&oq=rolls+royce+silver+shadow+window+motor+repair&aqs=chrome..69i57.29722j0j7&client=tablet-android-samsung&sourceid=chrome-mobile&ie=UTF-8#kpvalbx=1&scso=_MjL9XNiwLPWr1fAPiKelkAs21:0 | |||
ross kowalski Grand Master Username: cdfpw Post Number: 1140 Registered: 11-2015 |
Mike, Do you have the round or square motors? | |||
Mike Thompson Frequent User Username: vroomrr Post Number: 616 Registered: 04-2019 |
Ross I guess the round ones. I worked most of the day on the Windows. I finally got the back ones to go down but not up. The driver side now works. I drilled a small hole in each worm box and squirted both WD-40 and white lithium grease into them and on the window slider bars. And WD-40 on the felt-like channels. It is not the electrics, it is the mechanicals. I made a test and ran a wire from the lighter purple wire to the bottom microswitch for the window and it did not help at all. So I just kept running the windows up and down, until they started to work (kind of). I don't think I can do anything else without replacing stuff or taking stuff out, which I don't want to do. Do the back electric locks only go up not down? I can't get either to go down. | |||
ross kowalski Grand Master Username: cdfpw Post Number: 1141 Registered: 11-2015 |
Mike, Two nice things about the square style window motors is they are field coil motors and they are open frame where you can inspect and lube without disassembly. "Permanent" magnet motors like the round ones are not always permanent. The fastest and lowest torque part of your system is the rotor in the motor. If you could lube those bearings it might give you some improvement. | |||
Mike Thompson Frequent User Username: vroomrr Post Number: 619 Registered: 04-2019 |
Thanks Ross and Do the back electric locks only go up not down? I can't get either to go down. | |||
Richard Greene Prolific User Username: benzjag Post Number: 140 Registered: 12-2012 |
The rear locks indeed go up and down. There is the black ground wire and two other wires going to the solenoid. When pushing the switch for locking, the current goes through one of the wires;likewise, when unlocking, the current goes through the other wire. The rod through the solenoid often gets rusty preventing the rod to move freely to move the lock/unlock plunger. Here's an EXCELLENT video explaining this and the rebuild: https://youtu.be/XAgqhqCrA-w Richard | |||
Vladimir Ivanovich Kirillov Grand Master Username: soviet Post Number: 1478 Registered: 02-2013 |
Yes Mike they definitely go up and down AND beautifully unlike lots of other really expensive cars they are made of metal, brass chromed I think from memory. Now remind me, on your engine block have you checked the weep holes for leakage? For the transmission a sensible modification is to toss the cheap nasty tin sump pan away and replace it with a alloy finned deep pan for better cooling. I always thought Crewe was bloody miserable not to remove tin pan stamped GMC common to even a low life form like Holden. Rotters! | |||
Robert J. Sprauer Grand Master Username: wraithman Post Number: 445 Registered: 11-2017 |
Most window and door solenoid issues can be traced to corrosion within the solenoid rod and corrosion on electrical connections especially grounds. Window channels benefit from silicone spray and thicker supply lines to the motors and cleaning/grease renewal within the gear housing. I could slice a loaf of bread with my windows. | |||
Mike Thompson Frequent User Username: vroomrr Post Number: 622 Registered: 04-2019 |
Since my old Rolls was exposed to the elements for at least 11 years (but now I don't think it even ran when it was obtained at the auction, because why buy it and have it sit at a garage owner's house in a field for 11 years until you die). So everything is corroded. As a result no doubt someone thought all you have to do is hold the lock button long enough and they will start moving again. Which Shadows etc. have the flaw of burning up the coils of the up solenoids. I believe that is what happened. And a good squirt of WD-40 down the shaft freed up the front locks so that both work. The back one are harder to get at but the work free enough that if the solenoids worked the button would go down. Vlad weep holes? Sound like a bad case of canker sores. Suprisingly my Rolls leaks very little of anything. Just oil, and while I have it up I will tighten the bolts to the oil pan, usually that helps. | |||
Mike Thompson Frequent User Username: vroomrr Post Number: 623 Registered: 04-2019 |
Whoops can't edit the above should read down not up of the buttons. Moderator Comment: Mike, I edited your post above to fix the problem. | |||
Vladimir Ivanovich Kirillov Grand Master Username: soviet Post Number: 1483 Registered: 02-2013 |
Well Mike Canker Sores or not there are 8 weep holes on your block, 4 each side and each about 1/8 inch in diameter.Each weep hole is just down from where the cylinder heads bolt onto the cylinder block. Look for any signs of seepage like a weird stain on the outside of the engine block. Check if they are leaking oil or coolant or both. Sadly your car has been sitting for a long time without a coolant change. That usually causes corrosion to build up in the aluminium block which crushes the steel liners onto the pistons causing a lovely engine knock which eventually results in a nasty piston failure. There are pictures of how nasty on the forum -- Texas rattlesnake nasty!!! Bang - end of engine nasty!!! Like yes time to fit LS1 GM nasty because fixing your block requires removing your cylinder liners without cracking your engine block and that entire procedure even when you have the special puller (no pun intended) is in itself a very nasty affair. Of course you may be lucky and your entire engine may have sat in a special space time continuum and for reasons way beyond chemistry the corrosion did not occur perhaps because the car had been transported by means unknown into the vacuum of outer space. Now that all is possible and if you are that lucky you need to buy a lottery ticket right now. | |||
Mike Thompson Frequent User Username: vroomrr Post Number: 624 Registered: 04-2019 |
Well Vlad I started it ran it into the garage and no knocking. I think it is OK, but the coolant smells like a wet dog, needs to be changed. I presume it takes the old green coolant as all cars had back then. They say everything is bigger in Texas, so bigger equals more mass, equals time dilation and the slowing of time. So the car only sat one year in Texas time as the rest of the world experienced 11 years (yeah right). So I assume weep holes are like freeze plugs. Pretty sure I will do a LS on the next car. got to get some sold first, (and get out of here in a place of my own). I Want to do a custom, like below to turn maybe a Crown Vic into a big ... Speaking of canker sores https://render.fineartamerica.com/images/images-profile-flow/350/images-medium-large-private-5/1969-dmb-at-afi-gate-steve-paige.jpg And what good is the above without a https://teepee12.files.wordpress.com/2019/01/weird-looking-car-mazda-meow.jpg  | |||
Robert J. Sprauer Grand Master Username: wraithman Post Number: 446 Registered: 11-2017 |
weep holes are not freeze plugs. They are there to let you know when the "O" ring seals have been breached. | |||
Vladimir Ivanovich Kirillov Grand Master Username: soviet Post Number: 1485 Registered: 02-2013 |
No Mike the weep holes are not anything like freeze plugs (also known as welsh plugs). Freeze plugs are there to plug up the holes where the casting sand is removed after the block has been cast. Also, freeze plugs hold in the coolant. On GM engines they are made of brass or steel and are located by a 1/4 inch lip interference fit. They are tapped into place by a hammer and a drift and can be right bastards to remove and replace when the engine is in the car. The freeze plugs on your car are a screw in type requiring a special tool with two pins that fit into the freeze plugs. But the weep holes are simply holes put there to indicate coolant or oil or a mixture of both is getting into an area where it shouldn't be and that is an indication that the rubber seals on the cylinder liners are damaged which in turn is an indication of a build up of corrosion caused by electrolysis. Obviously, if you have no knocking when the engine is running then that's a good sign. That aside however does not mean the mongrel corroding has not started to form and as I sure you know the corrosion eats out any aluminium engine part that comes in contact with the coolant. That said weight considerations aside GM cast iron blocks have a big advantage over RR aluminium blocks.You can leave an US made cast iron engine sitting with rusty water in it for decades without a problem. But an aluminium block just becomes an anchor for a boat if regular coolant changes are not made at specified intervals. As for the coolant used, the choice is yours. Red, blue, green whatever. For some extremely dopey reason a nutcase Queensland coolant manufacturer once put coolant on the market that was the same colour as rusty water. Myself I have a preference for green. Lying swine fleecing auto manufactures world wide yap like egg sucking dogs about having to use this or that coolant and that is about as mathematically true as the tooth fairy. I hope you are going to be lucky mate because it is no small task to change the cylinder liners. I won at lotto myself last night. Huge win $16.25 on a $50 million jackpot. Bastard! If it was raining virgins I would be locked up in a dunny with a bloke. | |||
Mike Thompson Frequent User Username: vroomrr Post Number: 628 Registered: 04-2019 |
Some before and after pictures of my interior. 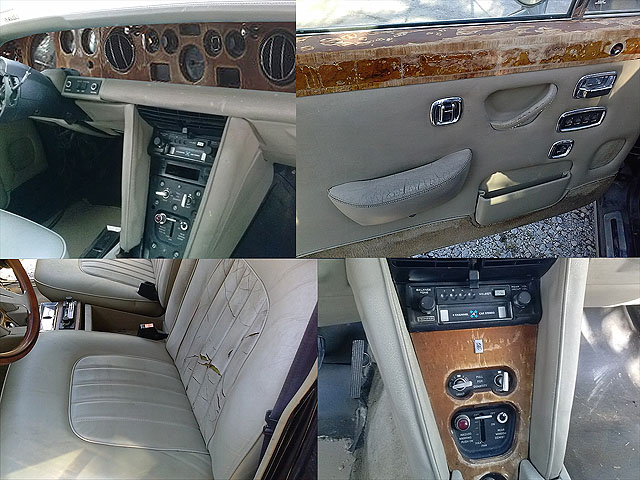 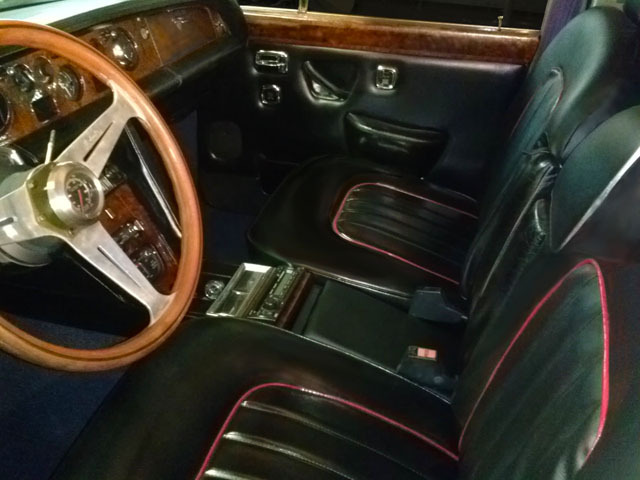 | |||
Vladimir Ivanovich Kirillov Grand Master Username: soviet Post Number: 1487 Registered: 02-2013 |
Nice tacky vinyl but hey if you can stand the smell and don't mind burning your bum on the seats in summer then whatever floats your boat mate. A better move may have been to go to a slaughterhouse and buy cattle skins, treat it to preserve it, then colour it and sew it. A chap as skillful as you could have done that. | |||
Larry Kavanagh Grand Master Username: shadow_11 Post Number: 455 Registered: 05-2016 |
The old girl is beginning to look very presentable Mike. | |||
RR Forums Administrator Board Administrator Username: admin Post Number: 109 Registered: 10-2002 |
This thread is now too long. If you wish to continue the conversation please start a new thread. |