| Author | Message | ||
Mike Thompson Prolific User Username: vroomrr Post Number: 105 Registered: 4-2019 |
I have a 1975 Rolls Royce Silver Shadow that I bought for only $2500 USD, and is in bad shape. This post is to show the progress and how I went about restoring this lost treasure. And to learn, as I will, how to do it. I have restored a few cars now, this will be the second luxury car I have restored. I hope to bring this Rolls Royce back to the road after 11 + years sitting and rotting. What shape is it in now? 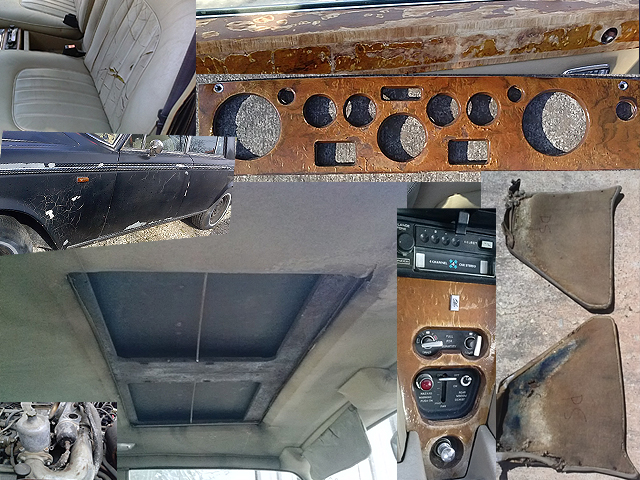 And here is an example of the before and after work being done. The dash comes off by unscrewing two screws on each panel, carefully pulling from the top out past the gauges and knobs then lifting up. The speedometer panel has a screw at the bottom making 3 screws to take off (for the LHD model).  | ||
Mike Thompson Prolific User Username: vroomrr Post Number: 116 Registered: 4-2019 |
To reupholster the bottom cushions of the seats (both front and back) they just pull out. To take off "the front top dash roll there are some bolts along the top/front which are easily seen and two hidden nuts that you have to get at from inside the glovebox. Those two are a bit awkward. Then there are two either side in the footwell at the lower corner." Steve Emmott 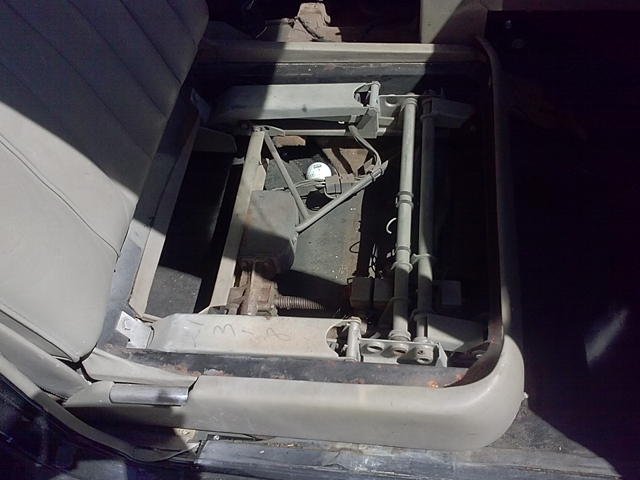 | ||
Jean-christophe Jost Frequent User Username: jc_jost Post Number: 63 Registered: 3-2016 |
For the dashboard you can also have a look here http://www.icipay.com/MyShadow/autoDB/show.php?action=fiche&id=26&l= and here for the widscreen finisher http://www.icipay.com/MyShadow/autoDB/show.php?action=fiche&id=36&l= | ||
Mike Thompson Prolific User Username: vroomrr Post Number: 119 Registered: 4-2019 |
I wish that I had seen this when I was taking out the dash, and for the windscreen finisher, the only thing holding it in was gravity. | ||
Mike Thompson Prolific User Username: vroomrr Post Number: 120 Registered: 4-2019 |
How to repair a very damaged sun visor. In the picture: 1. is the very damaged sun visor. 2. the sun visor has the damaged material pealed off. 3. there are two screws that hold the middle piece in place, then a clip you pull outward. Each visor then has a hex screw that hold them on. 4. get some vinyl place your sun visor on the back side of it, and use a pin and trace around the sun visor on one side then carefully roll it over to make a symmetrical copy of the other side. 5.-6. you then must measure 1/2 inch from that line at intervals of about 1/2 inch draw a little line out from the trace line repeatedly. Then draw a line around the trace using the little lines you marked to make the trace 1/2 inch bigger than it was. As in 6. Then cut it out. And it should look like 6. and it is obligatory to say "I am Bat Man". Now the original trace line is the line you sew around. 7. now you can sew around half (and only half) the trace line. Fold the chin of batman over so the pole can come out and sew it first. It is now the inside and pull it inside out. 8. slide the visor shown in 2 into the pouch. Then you have to hand sew the rest (with this method, sorry). 9. then you should have a reupholstered sun visor. 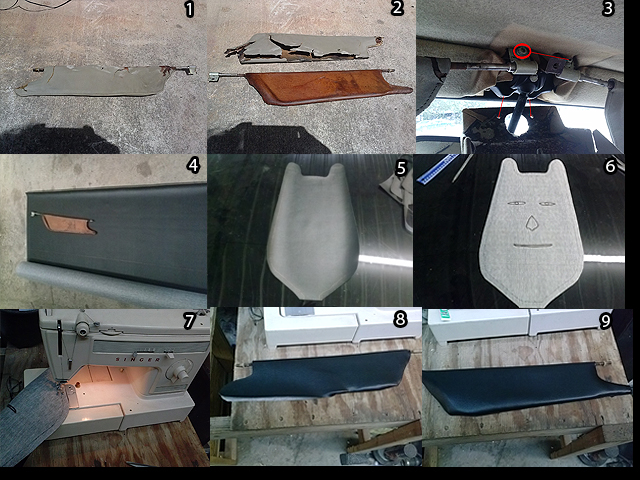 | ||
Steve Emmott Prolific User Username: steve_e Post Number: 230 Registered: 11-2018 |
Mike I always do mine a slightly different way and primarily as often two colours are involved. After cutting the two profiles separately then mating so inside of cloth is on the outer I sew all round apart from the long straight edge where the pivot bar is. I then put a fold on each straight length and sew individual each piece along the pivot bar then turn inside/out and fit the interior. Using the technique you see on steering wheel joint I then pick up each stitch along the length side by side with a crossover stitch. This way the hand stitched part is always hidden at the top inner edge of the screen but still looks like a machine finish. Picture is my steering wheel I leather covered using the cross over technique  . | ||
Steve Emmott Prolific User Username: steve_e Post Number: 231 Registered: 11-2018 |
Mike attached are the locations of the front dash roll top. They show the two side locations, the two studs that you need to get at the nut from inside the glove box and some of the brackets at the top where the bolts are. Obviously yours is opposite hand. 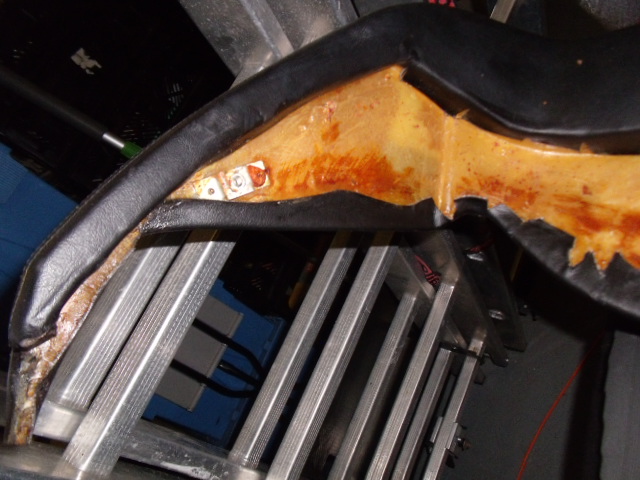   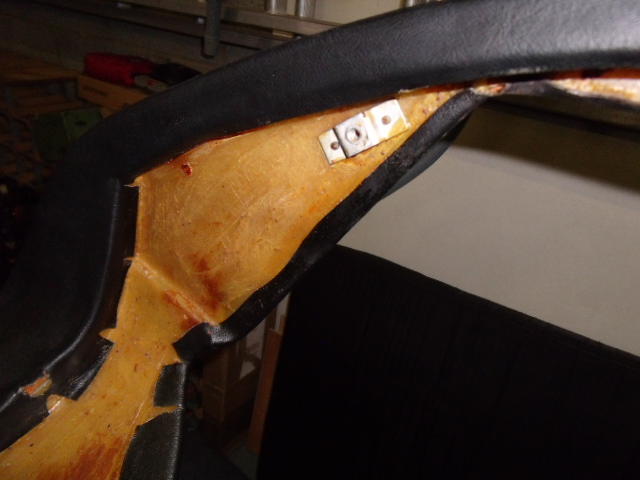 | ||
Glen Poolen Prolific User Username: wgipps Post Number: 162 Registered: 3-2018 |
i do like the idea of naming and dating the restoration. | ||
Mike Thompson Prolific User Username: vroomrr Post Number: 125 Registered: 4-2019 |
I did that on all the work I have done, put my name and date on the pieces restored. In hopes in the future some alien will take it off and reconstitute my atoms to ask me, why the heck did you do that? | ||
Robert J. Sprauer Prolific User Username: wraithman Post Number: 254 Registered: 11-2017 |
BTW all your major hydraulic components, ACC, press sw's, brake dist valves etc are initial by the RR factory tech and coded. They can be matched to your build sheet to see if they came with the car. | ||
Mike Thompson Prolific User Username: vroomrr Post Number: 129 Registered: 4-2019 |
I noticed that, even on the seat above you can see the number written on it. As well was the dashboard pieces. The only paper this car came with was under the seat, a label for a cassette tape, as well as the obligatory hidden golf ball, just in case. No build sheet. | ||
Robert J. Sprauer Prolific User Username: wraithman Post Number: 255 Registered: 11-2017 |
Build sheets (actually a booklet) are ordered for a fee from Hunt House and take a few weeks. All areas of the car were built in separate departments with work orders hence the car # on each. | ||
Mike Thompson Prolific User Username: vroomrr Post Number: 187 Registered: 4-2019 |
I have always wondered how they get the paint in the letters (as pictured) without leaving a drop around it. So how do the do it?. I want to restore this. (Its ugly.) 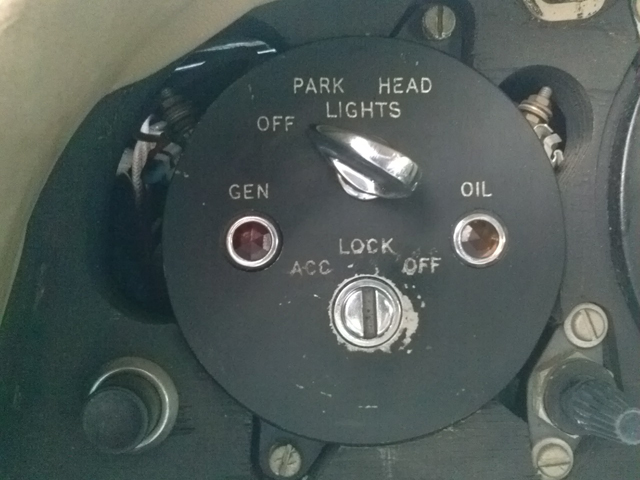 | ||
Robert J. Sprauer Prolific User Username: wraithman Post Number: 284 Registered: 11-2017 |
You can use a "Markal" paint stick. Earlier RR's were actually engraved to the base metal and it appeared as a white/grey paint. I have a vendor in PA I use for professional restoration but I do not think you would be interested in that. The original RR key FOB's were rubber so they would not mark up the face. | ||
Jeff McCarthy Grand Master Username: jefmac2003 Post Number: 582 Registered: 5-2007 |
The difficulty with restoring the switchbox faceplates is when you repaint the the base black the engravings then become a lot shallower and difficult to restore with the professional paint filler. I used Helvetica Medium Condensed White 3mm Letraset. This is the closest to the original it is possible to get. Use only the upper case letters. If you're unused to using letraset get some extra and practice. Non stick baking paper is essential to mask the switchbox faceplate areas you are not rubbing on - this avoids having random letters stick to the plate or messing up your work. After applying the letraset you put the paper over it and burnish it on by rubbing through the paper. After you've finished buy some matt artwork lacquer and spray infinitesimally small amounts over the whole to protect it. If you spray thick layers the solvent will buckle the lettering. Many very thin layers. Leave to dry. Repeat. Very hard to source this no longer produced product but it is available here: https://www.emeraldcrafts.co.uk/letraset-transfers-helvetica-medium-white-3mm.ir If you want any further hints on using the letraset just pm me. Photo of my restored barrel below. Note the slightly different choice of words. This is original. Different markets I guess. I found it easier to cut up the letraset sheet into individual letters as needed with a bit at the top or bottom to hold on to while I positioned it. A bit wasteful but much easier to get accurate alignment. 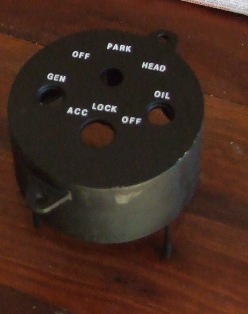 | ||
Mike Thompson Prolific User Username: vroomrr Post Number: 191 Registered: 4-2019 |
In restoring my dashboard wood, I chose to use Polyurethane over the other products. For its durability and longevity over varnish. I found out the hard way not to use the can brush on. It causes unevenness and bubbles. Always use the spray. As you can see with the pictures you get an even glossy finish to adorn your dash. 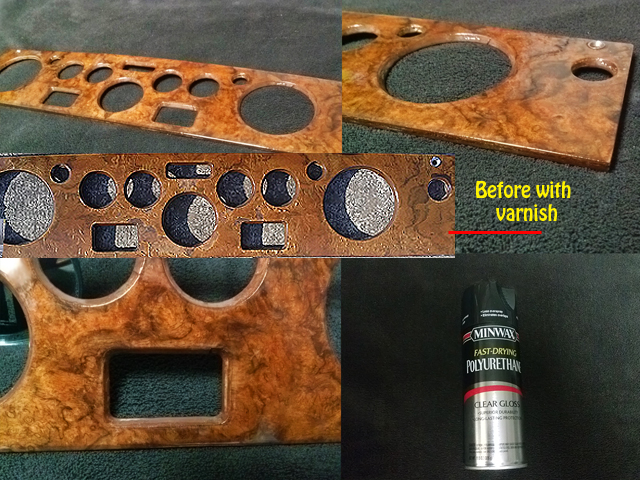 | ||
Steve Emmott Prolific User Username: steve_e Post Number: 259 Registered: 11-2018 |
Nicely done Mike........So many different names given to these 'top coats' I sometimes don't know what gets used. Yacht varnish Polyurethane clear gloss Lacquer Varnish French Polish My door woods were re-done early 90's by PA Wood Crewe in the traditional way (whatever that is/was) after about 20 years old. They were then OK for 10 years until I took the car to France where within a year in the hot sun the top surfaces started to crack. I picked up a used set and stripped them which I swore I would never do again as that was tedious delicate work. I then just used 'Yacht Varnish'....sprayed from a standard air compressor/spray gun. Rubbed down between 3 coats. Trouble was it took 24 hours to dry/harden before each surface could be rubbed down. It did say on the tin though 'polyurethane based'. These have lasted now over 15 years and still look good but finally I decided to have my originals professionally done (again) but no idea what the top coat is as so many coatings today are water based. I just hope when they are fitted they last this time. | ||
Jeff McCarthy Grand Master Username: jefmac2003 Post Number: 583 Registered: 5-2007 |
Yacht varnish is more usually called Spar Varnish. It is a Tung Oil based compound which is both UV resistant and forgiving in the application: I would give 48 hours rather than 24 between coats. The original laquer is beautiful if your car lives in an air-conditioned garage and you only drive it north of Hadrian's wall on weekends! If your local environment involves exposure to the local yellow dwarf star then consider either 2-pack or Spar Varnish; if the average summer temperature is above 25C then the RR lacquer reapplied is a very temporary (if original) use of your restoration budget. No new coating will help you avoid the hard bits: preparation involves removing the old stuff without stuffing the veneer. I've spent 10 years trying to learn how to do this with eBay scraps. It's not worth the effort and cost if you can get an expert to do it instead. It will be cheaper and better than any learning curve you may wish to try. If you do want to try it - please buy a used piece to practise on before you attack an original piece on your car. | ||
Robert J. Sprauer Prolific User Username: wraithman Post Number: 287 Registered: 11-2017 |
Mike it appears you did not repaint the bevels brown around the openings? Hint: many pro wood restorers have a warm box. The wood is put in to accelerate the drying process. It also reduces "solvent pop" and airborne dust. To the naked eye solvent pop appears as small bumps on the surface like a volcano. I have never seen a urethane finish flat as glass. Single stage urethane auto finish is always cut with 3000 and 5000 grit paper (wet) then buffed and polished to get the gloss back . Same as clear coats today. They are sanded and buffed and polished. | ||
Mike Thompson Prolific User Username: vroomrr Post Number: 194 Registered: 4-2019 |
I have not painted the bevels that is true. I bought black paint but have decided that won't look right, I'll try to find the brown. I'm not sure how Polyurethane would react to a warm box. I used 600 grit paper dry, seems to have worked. I will apply more coats and test the buffing (probably on the console piece, it is smaller). Here in Texas it gets 100 + degrees (in a car on a normal summer day anywhere may get 120 degrees, here it's an oven). I found that contact cement will just melt (the top cushion of the dashboard once secured with contact cement now looks like a very bad toupee). Once Polyurethane is dry it should not have any problems with this heat. On my car you can see what heat and moisture does down here. | ||
Mike Thompson Prolific User Username: vroomrr Post Number: 225 Registered: 4-2019 |
Ordered a roll of Marine Vinyl Fabric Upholstery Welt Piping Red to accent the black vinyl for the RR seats. Picture shows an example of part of a seat I made for my 1965 Thunderbird. The Piping in that case was hand made, not so good, so ordered some for the RR. Hope there is enough. Only $15.00 through Amazon. 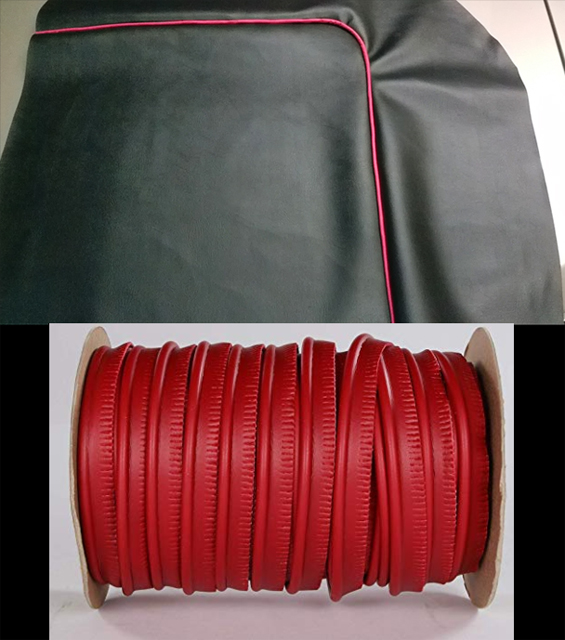 | ||
Mike Thompson Prolific User Username: vroomrr Post Number: 226 Registered: 4-2019 |
How you can sew these seats at home with your home sewing machine. I do it all the time. https://www.youtube.com/watch?v=I8NUOLFJdKs | ||
Mike Thompson Prolific User Username: vroomrr Post Number: 246 Registered: 4-2019 |
Here is a video of how to take off the door panels (cards). Nice video to have around for restorations. https://www.youtube.com/watch?v=XAgqhqCrA-w | ||
Mike Thompson Prolific User Username: vroomrr Post Number: 263 Registered: 4-2019 |
When it comes to replacing the carpets in your restoration project, you can go to a store that sells area rugs and pick out your favorite carpet. There is so little carpet in these Rolls it is not hard to reproduce with just a little carpet. I picked out this dark blue. If your carpets are in a shape to be used as a templet your job is easy. My carpets were rotted and moldy. I tried my best to use them as a templet. All you have to do is open the carpet face down so the back is up. Then do the same with your templet carpet from your car. Lay it on top of the area rug, face down as close to one of the area rug's edges as you can, so you can use as much of that rug as possible. Get a Sharpie (fine point permanent marker) and trace around your car templet onto the area rug back. And with good strong scissors or a box cutter cut along the mark that you made with your templet. Then just put them back in place where you got it. That's it.  | ||
Mike Thompson Prolific User Username: vroomrr Post Number: 267 Registered: 4-2019 |
If you take off your door panels (cards) make sure to replace or put back the vapor barrier (the plastic) or your wood will rot as did mine.  | ||
Robert J. Sprauer Grand Master Username: wraithman Post Number: 317 Registered: 11-2017 |
The RR carpets are bound for a professional appearance and the carpets will not fall apart around the edge. | ||
Mike Thompson Prolific User Username: vroomrr Post Number: 273 Registered: 4-2019 |
In the spirit of this thread, which is a Do It Yourself (DIY) thread, most people will not have a professional sewing machine to bind the edges with fabric etc. So as a DIY to solve the edge issue here is how one can do it. I have used house carpet on cars, so I know this method works. Edging 101 the Bubba way. Continuing the instructions from above, after you have cut your carpet get a hot melt glue gun. Appy a bead around the edge of the carpet on the interface between the backing and the carpet mat. You can if you want to spend more money use the method as in this video: Instabind carpet binding. https://www.youtube.com/watch?v=CXJTxOyZO8I Or you can if you want to do it cheaper and have a look as the picture below (thinner though) find fabric or vinyl the same color as your carpet, and hot glue this material to the carpet itself. Cut your material to be used in strips about 2 inches plus. For the face side of the carpet fold the material under so you have about a 1/2 inch folding of material to hot glue to the carpet. Put a small bead of hot glue at a corner about 1/4 inch from the edge and stick your folded material to the glue. Wait some 30 seconds and you have and material stuck to the carpet and can pull as you go to flatten your material. Now as you go along form a bead line (not too thick) about 1/4 inch away from the edge and push the folded material down on it. As you go along allow it glue to harden. As you come to an corner, if you have cut the material long enough, just continue around it (cut a V in the material at a 45 degree angle or if not quite right, fold it under a bit gluing it together). You can to have long strips and you have like a yard by yard material, cut the outside edge, the 2 inches rounding the corners, so that you have one long straight piece to work with. When you come to your starting place at that corner, cut a little extra material to be folded under. Then overlap a bit with this fold. And you have a professional appearance that will not fray. With or without the material you can still hot glue the edge so it does not fray. 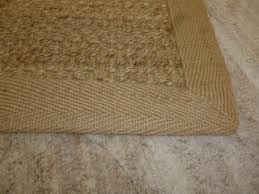 | ||
Mike Thompson Prolific User Username: vroomrr Post Number: 274 Registered: 4-2019 |
I forgot to say what to do with the back. Pull the material around the back and hot glue it to the back. There you have it a professional appearance the Bubba way. | ||
Mike Thompson Prolific User Username: vroomrr Post Number: 281 Registered: 4-2019 |
OK on this one I cannot recommend it, it is strictly a do it at your own risk. It might work as it did for me or you may be buying stuff. On the door locks they get stuck because water gets into them and rusts it to the point they do not work. Mine won't push nor pull at all. So last night I squirted a lot of WD40 down the puller button shaft with the rubber cover pulled up. Then this afternoon I took a hammer and put cloth over the button and gently hit it, (maybe not so gently). It went down. Now stuck down, so with the nail claw I put the cloth on the wood and pulled it up. Did this several time and it works freely. Hit the lock switch and it works as well. Like I said this is a risky method. The right way to do it is: https://www.youtube.com/watch?v=niyYAjFQd6Q 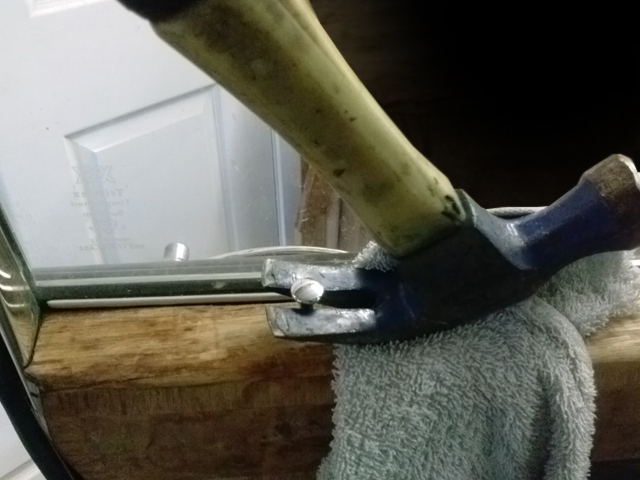 | ||
Mike Thompson Prolific User Username: vroomrr Post Number: 282 Registered: 4-2019 |
I used this risky method of freeing stuck locks on all four doors. The front left (drivers side) door solenoids both up and down (there are two) now work. The left back door lock push button now freely works manually but either both solenoids are nonfunctional or have been burnt out trying to get it to work. The front right side electric push button lock, moves kind of freely and with help both up and down solenoids work ( I think some WD40 will free it up). The back right manually works freely and the down solenoid works, but the up solenoid does not, probably burnt out trying to get it to work as well. So all in all I'm a happy camper. I now can lock my car. | ||
ross kowalski Grand Master Username: cdfpw Post Number: 1025 Registered: 11-2015 |
Mike, Not everything that looks like a nail is. That "nail" you are removing with that hammer is actually the door lock. For instance a bidet kind of looks like a toilet, but it's not. Same with applejuice and glenfeddich, and milk and pva. I would recommend that when you see other "nails" that have to be removed in your RR, doublecheck the manual first before pulling them. Also, this is a Rolls Royce so you should really be using a stilletto ti-bone. | ||
ross kowalski Grand Master Username: cdfpw Post Number: 1026 Registered: 11-2015 |
Mike, If that brown rug image is your work, looks real nice. | ||
Graham Phillips Experienced User Username: playtime Post Number: 45 Registered: 3-2019 |
G'day everyone,.... Just to add to Mike Thompsons post about using your old carpet as a template. When I was younger I used to sell carpet at the markets and we cut to size and over locked the carpet. I would suggest after you have made your replacements,.. take them to a carpet seller and for a few dollars you can have them over lock the edges for that professional finish, it wouldn't cost much but you would be surprised with the end result, if you had a contrasting colour in you vehicle you could do the edge in that colour just like the piping in your seats for example. Just a random thought of mine. Graham. | ||
Mike Thompson Prolific User Username: vroomrr Post Number: 293 Registered: 4-2019 |
If you are restoring old cars (as these) you are going to run into Bakelite, a type of plastic used on items as steering wheels, radio knobs, gearshift knobs, distributor caps, and many other applications. It brakes with age and usually you have to repair items as steering wheels. When trying to fix it, as sanding (rubbing) it stinks like vomit. Here is the history of Bakelite https://www.hemmings.com/blog/article/bakelite/  | ||
Mike Thompson Grand Master Username: vroomrr Post Number: 304 Registered: 4-2019 |
You might remember from another thread, that I asked what is this thing. It turns out it is part of the made for USA Rolls Royces (California emission control, smog). When I got this RR running it sounded like it had an exhaust leak. Well it did, that open pipe. How to fix it the Bubba way (until it can be welded). In the picture is the exhaust leak pipe. Down below the pipe connects to a joint. I made a round bit of metal and hit it with a ball hammer. I am going to use Muffler Weld to form a gasket, and put a little oil on the fitting so it does not stick to it. Because as the muffler putty is still wet I am going to wrench it down tight (then the fitting can be easily taken off). (Muffler Weld is good for all kinds of stuff, it gets very hard, heat resistant, and sticks good, another thing that does not last very long around my house/shop.) 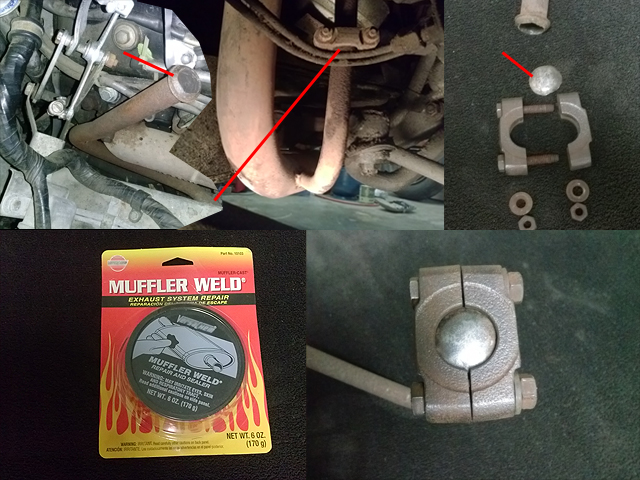 | ||
Mike Thompson Grand Master Username: vroomrr Post Number: 305 Registered: 4-2019 |
You might remember from another thread, that I asked what is this thing. It turns out it is part of the made for USA Rolls Royces (California emission control, smog). When I got this RR running it sounded like it had an exhaust leak. Well it did, that open pipe. How to fix it the Bubba way (until it can be welded). In the picture is the exhaust leak pipe. Down below the pipe connects to a joint. I made a round bit of metal and hit it with a ball hammer. I am going to use Muffler Weld to form a gasket, and put a little oil on the fitting so it does not stick to it. Because as the muffler putty is still wet I am going to wrench it down tight (then the fitting can be easily taken off). (Muffler Weld is good for all kinds of stuff, it gets very hard, heat resistant, and sticks good, another thing that does not last very long around my house/shop.) | ||
Mike Thompson Grand Master Username: vroomrr Post Number: 321 Registered: 4-2019 |
Well I just found out the hard way to check the fine print on Amazon. The (supposed) roll of Marine Vinyl Fabric Upholstery Welt Piping Red above, was in actuality a yard for $15.00. I freaked out, in the mail was this little envelope 4 3/4 X 7 1/2 came US post. I knew exactly what it was, a rip off. Shows a roll say only 2 left. Then send this dinky rolled up piece of tubing $15.00. Caveat Emptor buyer beware. | ||
Mike Thompson Grand Master Username: vroomrr Post Number: 322 Registered: 4-2019 |
White vinegar and time. No not for your salad. Take some rusty old thing that looks like it should be thrown away and put it into white vinegar for four or more days (depending on the thickness of rust) and it comes out looking brand new. Each day try to take a little wire brush and brush it off so the vinegar can make it's way through the muck. And when after brushing, it looks clean, dip it into water to give a final cleaning. Then the tricky part. You have stripped the metal of all its protection. All this oxygen in the air just wanting to attack that virgin metal. What you have to do is take it out of the water, and immediately use a blow dryer to dry it off. If not it will flash rust. Then to make it shiny just use a brass wheel and polish it. (You might want to oil it to keep it that way.) The picture shows the before and afterwards. (I love doing this.)  | ||
Robert J. Sprauer Grand Master Username: wraithman Post Number: 350 Registered: 11-2017 |
If it is not coated..oil won't work unless it is submerged. That's why raw parts are powdercoated, sprayed, plated, etc. These parts will show rust in less than 30 days. | ||
Mike Thompson Grand Master Username: vroomrr Post Number: 328 Registered: 4-2019 |
Understanding Rust. Rust is an electrochemical process that begins with the transfer of electrons from iron to oxygen, the oxygen is the oxidising agent that forms hydrated iron(III) oxides. When you clean iron (or its alloy steel) in vinegar it eats away the protective layer. The tightly adhered oxide coating, which is a passivation layer that protects the bulk iron from further oxidation. Flash rust is this layer reforming until it begins to protect the metal once again from the oxygen and moisture, (that's why you use the hair dryer). Oil protects iron (steel) in a way that is simple to illustrate, oil and water do not mix. When you go to a store and buy tools you will notice they are coated with oil for protection. Oil prevents the air moisture and water from reacting with the metal (giving up electrons) creating iron oxides. The hydrogen atoms present in water molecules (H2O) combine with other elements to form acids, which eat at the metal to expose more unprotected layers to react with the oxygen, continuing the cycle of degradation. Oil forms a protective coating for the metal and hence prevents it from rusting, oil breakes the cycle by cutting off the oxygen in moisture because water is repelled by oil. That is why if I'm not going to paint these parts, I put a little oil on them (don't put oil on there if you are going to paint it). Paint acts in the same way as does oil, it prevents the moisture from getting to the metal which causes the transfer of electrons from iron to oxygen that causes the rust. Make sure to paint the metal as soon as you can, if you are going to paint it. | ||
ross kowalski Grand Master Username: cdfpw Post Number: 1062 Registered: 11-2015 |
Mike, I would look into Phosphoric acid to prevent flash rusting. I leaves a iron phosphate surface that is very rust resistant. | ||
Mike Thompson Grand Master Username: vroomrr Post Number: 404 Registered: 4-2019 |
I showed you (up above) that you should always replace your moisture barrier or your wood will rot on your door panels (cards). I had a can of polyurethane that I am not using because it forms bubbles on dash pieces (with brushing). So I used it on the door panels (cards) to strengthen the wood. The theory behind this came from treasure hunters and museums putting old wooden ships that had been under water for some 2000 years, and the wood had turned to mushy paper like substance. They would put each board carefully into a bath of liquid plastic. They let it sit for up to a year so the wood would absorb the plastic instead of the salt water. Then activate the hardening of the plastic and carefully take it out. The wood was now hard as plastic, and they would reassemble the ship. I brushed as much as it would absorb onto the wood to turn the paper like substance into a hard polyurethane replacement. It worked very well. It is now hard as wood again. ready to go back onto the car. This time with a plastic moisture barrier in place. 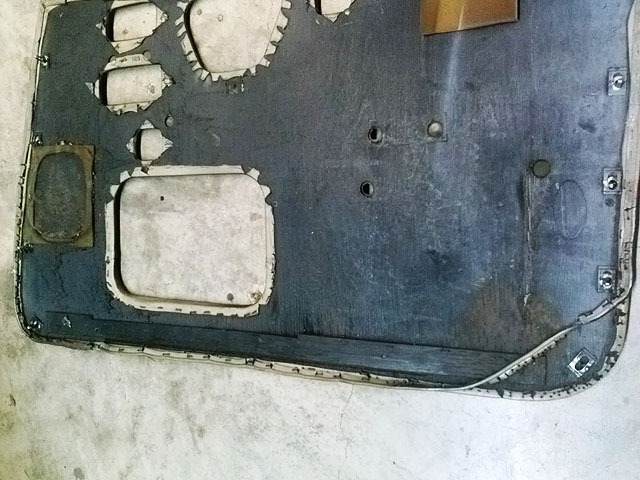 | ||
Mike Thompson Grand Master Username: vroomrr Post Number: 407 Registered: 4-2019 |
I found this one by a scary accident. I was told by someone to clean everything on the RR with lacquer thinner. So I was cleaning away on the speedometer, fuel, amp then the warning lights. Oh my God was the reaction. It had melted the plastic. I thought what am I going to do I have humped it up! So I took it out used the lacquer thinner to put as smooth a surface onto the plastic lens as possible to use the headlight lens restorer on it to fix it. To my amazement it turned out beautiful. So I tried it on the next one. It was taking forever to get it to polish with the headlight restorer. I needed to take more of the top coat of oxidized plastic off with the lacquer thinner. Another smooth rubbing on the lens, another headlight restorer rubbing and again a beautiful lens. Serendipity. 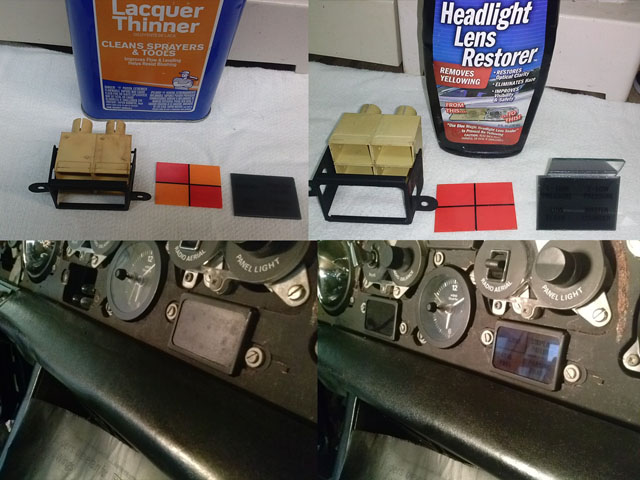 | ||
Jeff McCarthy Grand Master Username: jefmac2003 Post Number: 614 Registered: 5-2007 |
Thanks for this Mike. I was about to try something on these myself - plastic polish didn't seem to work & every photo of them I've seen showed them grungy. | ||
Mike Thompson Grand Master Username: vroomrr Post Number: 446 Registered: 4-2019 |
If you have a 6 bolt Nardi steering wheel (or any name brand) and need a temporary fix or replacement (for in my case an inspection) here is an overview of how I made one. I used bits and pieces around the garage, and a 800 degree BBQ thermometer (hey it's what I had with a post on it).  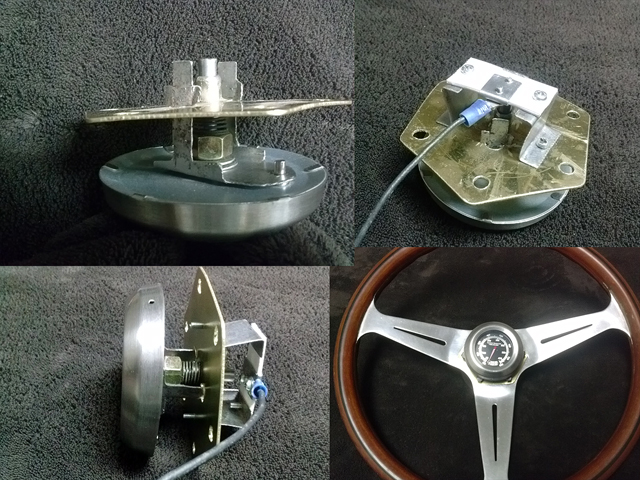 | ||
Mike Thompson Grand Master Username: vroomrr Post Number: 452 Registered: 4-2019 |
If you need to take off the headlight bezel, there is one screw at the bottom and you pull out slightly and up. Two big screws hold the bezel like a wedge. Three screws hold on the lights themselves. And if you need to get to the bolt on the stainless side trim it is the easiest way. RJS 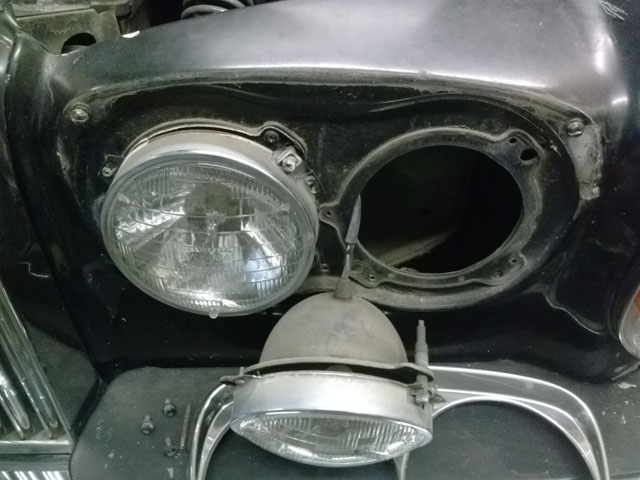 | ||
Mike Thompson Grand Master Username: vroomrr Post Number: 499 Registered: 4-2019 |
How To Take Off The Back Door Panel (Card, Overview). 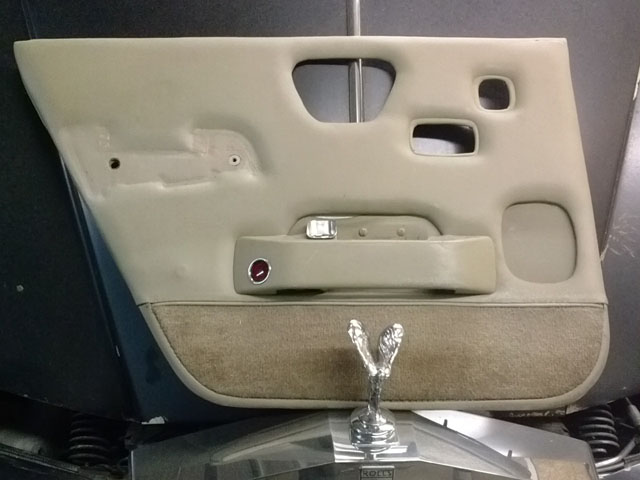 There are two inserts on the back door panel that must be carefully taken out to not damage the little plastic retainers, nor the chrome finish. (I used a small screw driver, try to find something plastic.) Then take out the ash tray. Open the door of the ash tray, gently pull up and slightly out. If it feels stuck use a plastic putty knife to slide around it. (Strictly speaking you don't have to take off the ash tray to get the door panel off.) 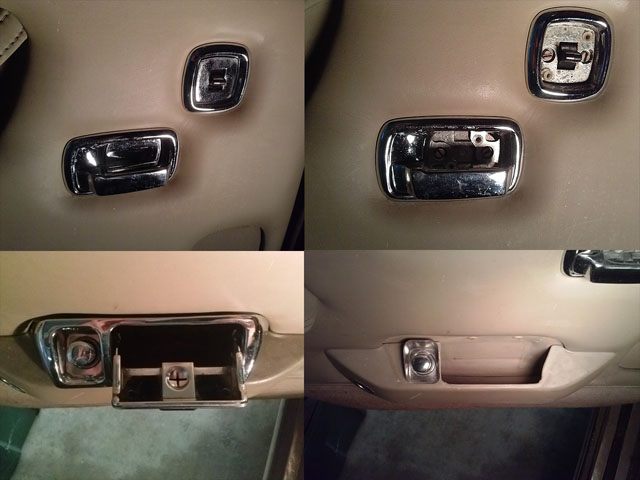 Then take off the arm rest. If you are lucky you can just gently pull up on it. But you may need to unscrew the little bolts under the arm rest a bit. They have to come out anyway so it does not matter how far you unscrew them (the wrench is a 3/8 inch). Also the arm rest maybe stuck and you cannot pull up on them. Gently use the plastic putty knife to poke down behind it to release it.  Then use the plastic fork to stick between the panel and the door to gently force the keeper pins out of the door. Slide the fork to the next pin and tap the fork with your palm. Don't let the panel just drop, there are wires that are connected to the door panel. Label the wires as A&A, B&B, C&C where they disconnect, so you can connect them correctly when you put the panel back on. 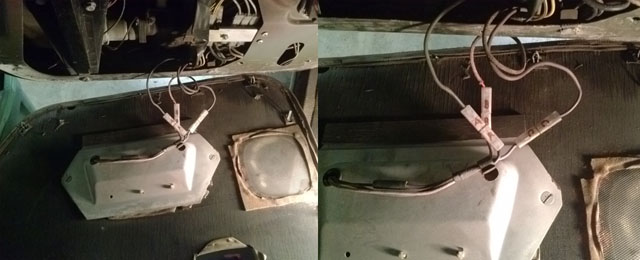 | ||
Mike Thompson Grand Master Username: vroomrr Post Number: 500 Registered: 4-2019 |
Forgot to add, take out the four screws under the inserts and put all your small parts into a bag and label it as L B, Left Back etc. | ||
Mike Thompson Grand Master Username: vroomrr Post Number: 508 Registered: 4-2019 |
One more correction on the arm rests I put the (wrench is a 3/8 inch), I had two wrenches there, one where I did not see it (the one I used). It should read (wrench is a 5/16 inch). | ||
Mike Thompson Frequent User Username: vroomrr Post Number: 514 Registered: 4-2019 |
Another restoring help I found by accident. I had a brass Dremel buffing wheel that I had sitting on my bench while I was drilling (not good). It was impregnated with that metal. I then wanted to get the dirt around the black flip push off, so used the brass wheel, with disaster. It marred the chrome (stainless steel whatever) so I needed to restore it to at least the way it was. I used the Headlight Lens Restorer on it and not only got it back the way it was (with effort) but took out most of the fine scratches as well. Believe it or not in the picture it is much better than it was. And I believe if I keep going (with a lot of effort) I can take out the big scratches as well. This polish is actually very fine abrasive, like very fine sand paper. So it takes a lot of effort to get anything done with it, but it works. 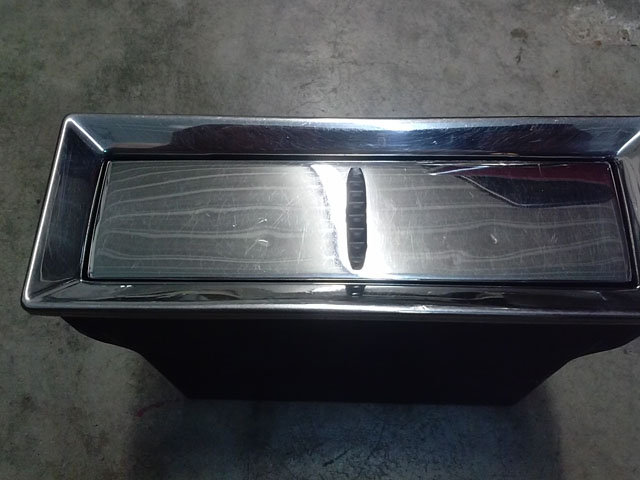 | ||
David Gore Moderator Username: david_gore Post Number: 3310 Registered: 4-2003 |
Mike, Try and find a cloth/calico "flap type" buffing wheel and some jeweller's rouge polishing compound. Just be very careful applying pressure to the wheel as it is very easy to overheat the surface and the metal will "oil can" [buckle] due the the poor thermal conductivity of stainless steel. With care and time, you can get a "mirror finish" with the jeweller's rouge - just remember to clean the wheel frequently to remove metal particles trapped in the weave. My after-market Dremel tool kit contains a number of these wheels and is a low-cost [cheap in Aussie-speak] source. . | ||
Robert J. Sprauer Grand Master Username: wraithman Post Number: 432 Registered: 11-2017 |
Rouge is color coded and small quantities can be purchased online or home improvement stores. Dark grey is cutting and light blue is for stainless. Sewn sisal wheels are aggressive and the "loose" wheels are for polishing. All of my stainless on the car is free of scratches and shines beautifully. Go to Caswell or TIP or perhaps Eastwood for buffing info/ordering. | ||
Mike Thompson Frequent User Username: vroomrr Post Number: 517 Registered: 4-2019 |
I had not seen jeweller's rouge since what was called Wood Shop where we made all kinds of stuff. Surprisingly enough Walmart has it. (Probably anyone out of the USA has no idea what a Walmart is. Well it is a very big store. In Spain and other Euro countries I laughed at what they call Supermarkets and the like. The bathrooms are bigger here. Anyway the rouge at Walmart. https://www.walmart.com/ip/Jewelers-Rouge-and-Metal-Polishing-Compound-1-oz-Bar-Red-3323-01/589648801 Average Walmart size in most cities: http://www.eccinc.com/sites/default/files/WM-Arlington02_0.jpg Walmart near you? https://image.slidesharecdn.com/presentation2-130913052608-phpapp01/95/walmart-supply-chain-management-5-638.jpg?cb=1379051376 Hypermart too big to fit in one picture (now closed they were too big) https://external-preview.redd.it/_xHOYIFMaxKCIOEFk9hkS3kM0NlP5Kp2o5C-hDPYoVQ.jpg?width=1024&height=475&auto=webp&s=b0dd285281d358e62129316cdfebba7f5f66a61b I made this buffer out of an old T-shirt. 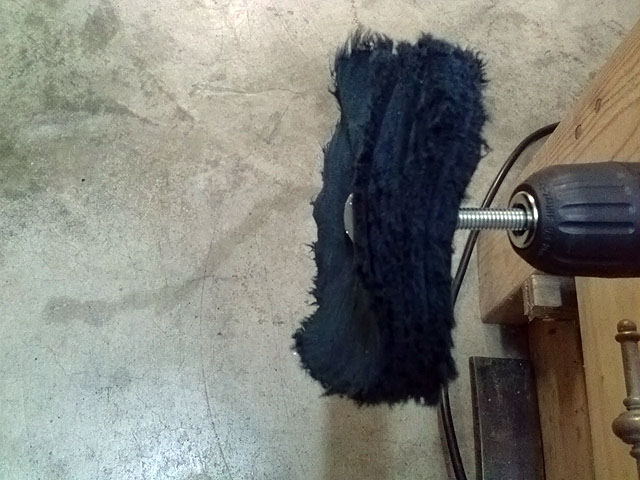 | ||
Vladimir Ivanovich Kirillov Grand Master Username: soviet Post Number: 1439 Registered: 2-2013 |
Mike I know what Walmart is. Indeed I also know that the homeless in the USA are permitted to sleep in their cars at night in Walmart car parks without being harassed by cops or renta cops. Enjoying very much your thrifty work on your Shadow. You have convinced me to fabricate my own timber window frames for my country lair stone cottage including cutting the glass. Soon I will proceed to progress on my final residence which will look so bloody flash I may be forced to purchase a Shadow to sit next to the Camargue and Spirit but I hope not. I think I have enough cars but I don't know why. | ||
Graham Phillips Frequent User Username: playtime Post Number: 96 Registered: 3-2019 |
G'day everyone,.... Well for chrome and stainless I have always just used JIFF. Its a cream cleanser and its just a very fine abrasive but it polish's brilliantly. I've used it on all my vehicles and metalwork with great success. A flannel cloth or even wool pad can be used to polish. Graham. | ||
David Gore Moderator Username: david_gore Post Number: 3311 Registered: 4-2003 |
Graham, In my Comsteel stainless steel days, I always carried a container of Gumption for cleaning stainless steel items [Gumption and its competitor Bon Ami were products claimed to not scratch polished metal items which was largely true] however I would have reservations about using these to "mirror polish" stainless steel based on my experience with machine polishing of pressed stainless steel sinks and tubs as these always looked "shiny" but close inspection would show residual "frosting" from the standard 2B finish of the coil used. High-quality "mirror-finish" items invariably utilised BA [Bright Anneal] finish feedstock. | ||
Mike Thompson Frequent User Username: vroomrr Post Number: 528 Registered: 04-2019 |
In restoring an old car that is not running nor driving as this one was. And you do not have the budget of Bill Gates to buy everything your heart desires (for some unknown reason why you would pick such a Piece Of Schiss POS) to restore to show room (concours) condition. And just want to get it running and driving to show off. Then you will often need to modify the original design to fit in your budget. In my case the original carburetor was shot (leaking everywhere) had most of the parts already taken off, and I knew nothing about it. I decided to continue the process that the shop owner before me had started, to put a 4 barrel onto it to replace the two 1 barrels it had. This took a lot of figuring out to do, and there was no guide out there how to do it. And many feel this is abuse of the Rolls Royce tradition so was met with anger and hostility. I prevailed, having no choice in my budget and got it running. I wish in this process to leave a record (paper trail) for others like me to follow. There are better ways to do this, but this is how I did it. In converting a 1975 Rolls Royce Silver Shadow I to a 4 barrel carburetor engine. Making the adapter overview, so you can come up with something better.  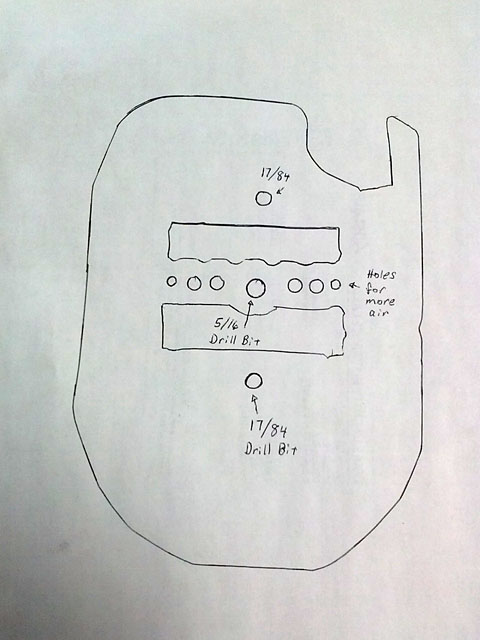 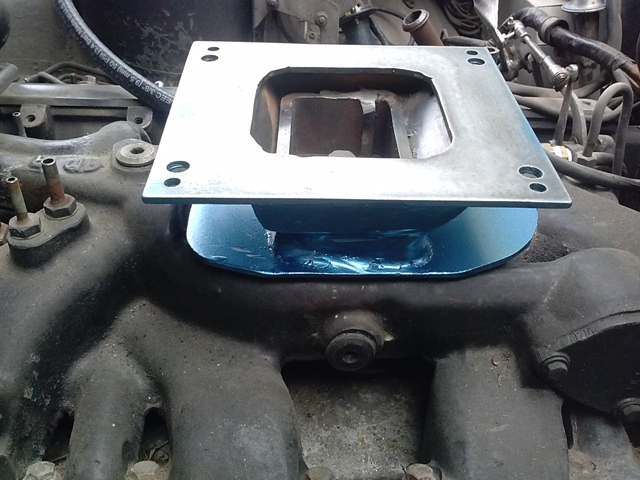 Then the linkage was a big problem because the travel of the Rolls Royce pedal is so short. I had to go through an evolution of two types to finally reach one that has enough travel to open the 4 barrel. I did so by using the linkage of the original RHD cars that are adapted to the LHD cars by a bar between them. I took off all the RHD linkage except the bar between them and used many of these parts to make a linkage that works. Here are the various parts I used. 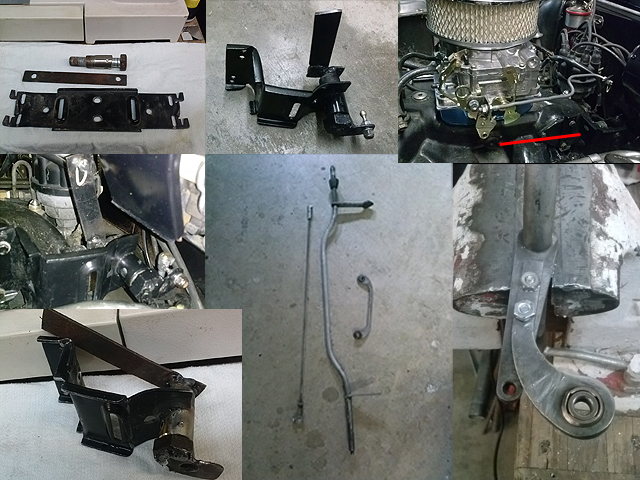 Multiplier converting 2 inch pedal movement into 4 inches carb movement. 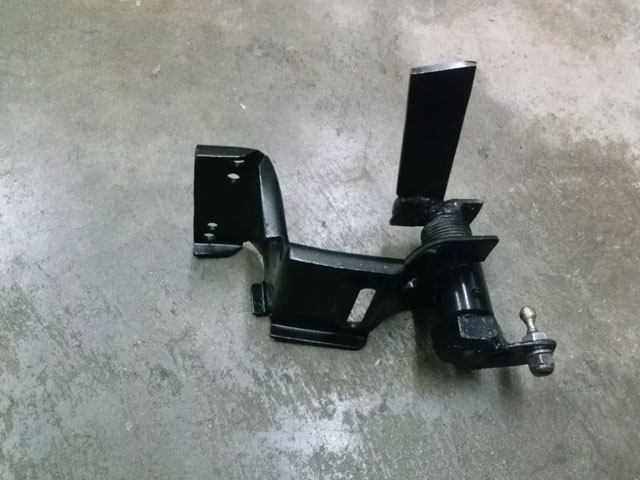 Linkage to multiplier. 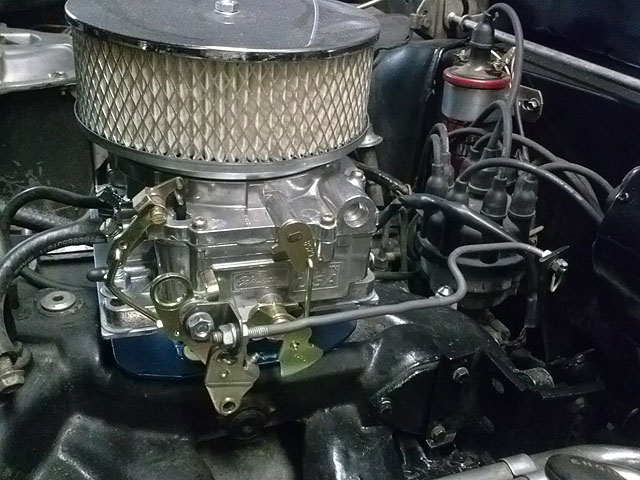 Linkage from Multiplier to pedal bar 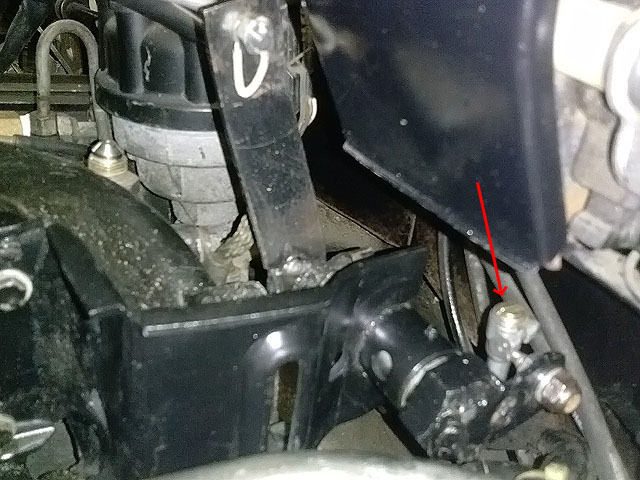 Adapter to pedal linkage 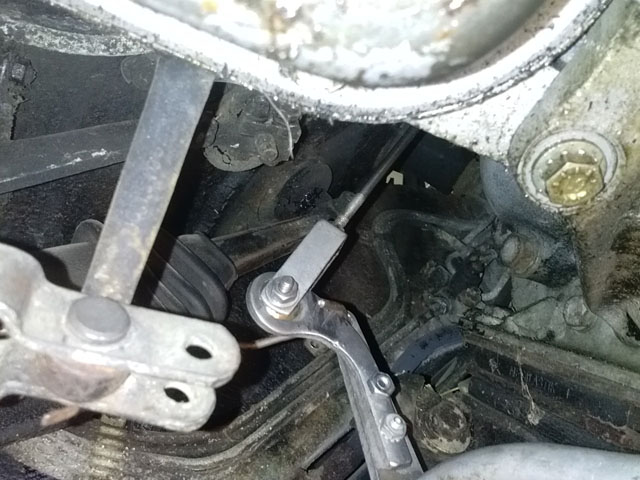 And the original spring to the RHD to LHD adapter bar that works all the linkage. 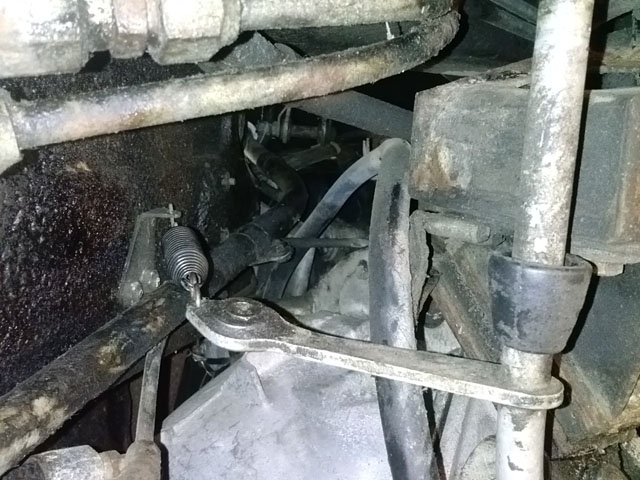 | ||
Mike Thompson Frequent User Username: vroomrr Post Number: 551 Registered: 04-2019 |
The components needed for the back seat bottom cushion. And finished product using a home sewing machine. 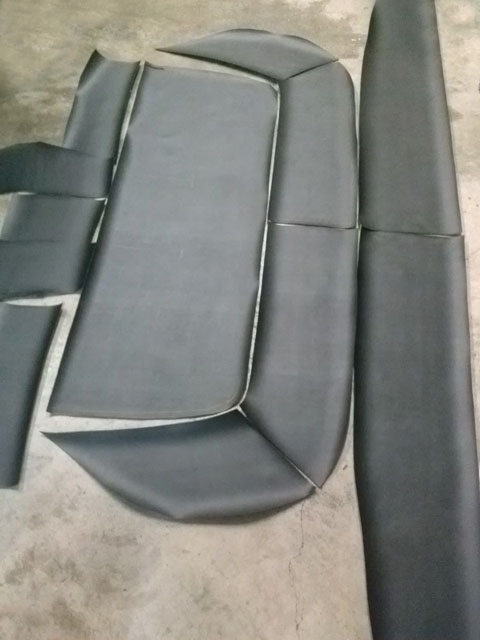 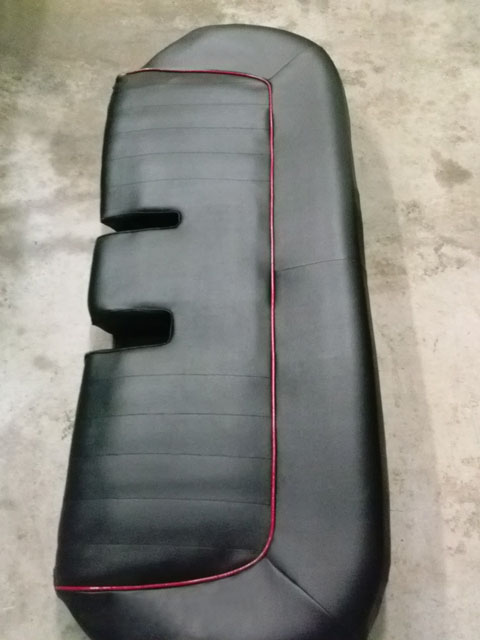 | ||
Mike Thompson Frequent User Username: vroomrr Post Number: 626 Registered: 04-2019 |
If your old RR-SS is missing a plastic retainer or screws. A lot of old spray bottles have a plastic tube that is just the right size to make a retainer. Cut a little piece off the tube, use a 1/8 inch drill bit (or something) inside the tub (to have it melt outwards) use a lighter to melt the plastic, then use the end of a screwdriver (or something) and push it down (all together bit and plastic in your bezel) to make the keeper on the plastic retainer. To make the screws if they don't fit grind them to shape, then use a hacksaw to make a screwdriver notch in it. 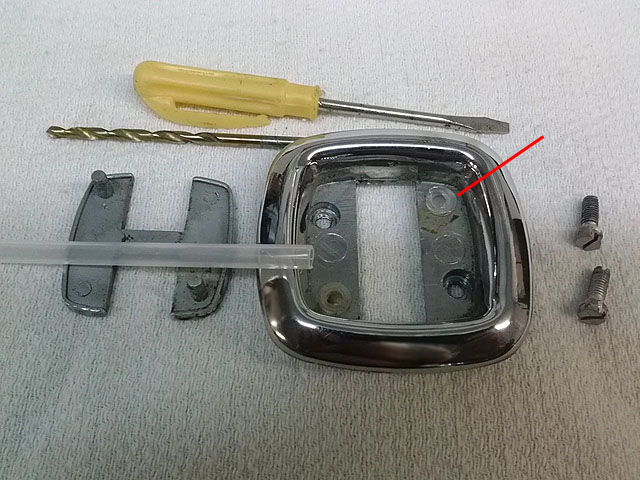 As you might have guessed I have two mottos: Use your brains not your billfold. Why buy it when you can make it. . | ||
Mike Thompson Frequent User Username: vroomrr Post Number: 652 Registered: 04-2019 |
Upgrading The Console. If you notice the 8 track tape box now looks a bit more modern. The lid makes it look like all the newer cars, an enclosed space. 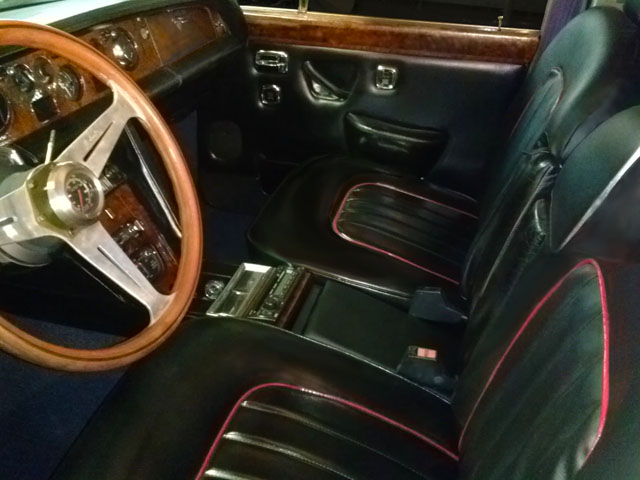 I used a piece of wood 11 1/4 X 7 1/4 X 1/2 inches. Then cut a finger lifting slot to help open the lid. 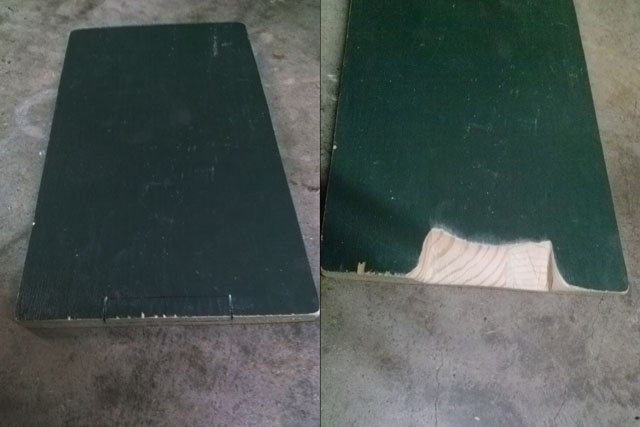 I covered it in vinyl, securing it with 1/4 inch staples and glue. 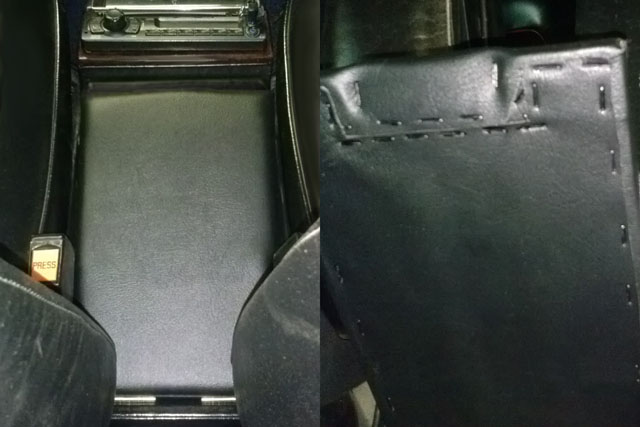 | ||
Mike Thompson Frequent User Username: vroomrr Post Number: 707 Registered: 04-2019 |
I found out the hard way that on the clutch slave cylinder the line fitting size is different than any brake fitting I have (maybe for a reason of not confusing the two). So I had to go buy one. For the clutch slave cylinder (for Jeeps) which is a Power Torque CS2235 the fitting is a 3/16 X 1/4 Edelmann 121034. (Shown to the right.) 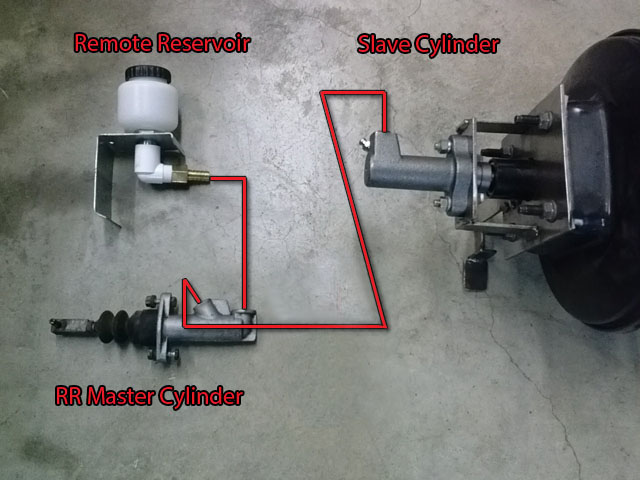 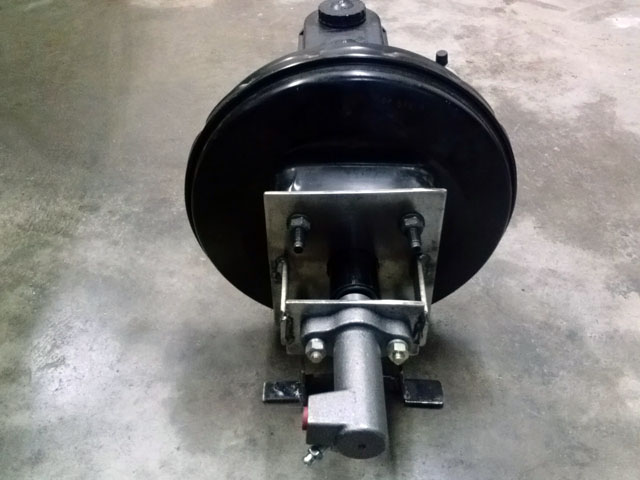 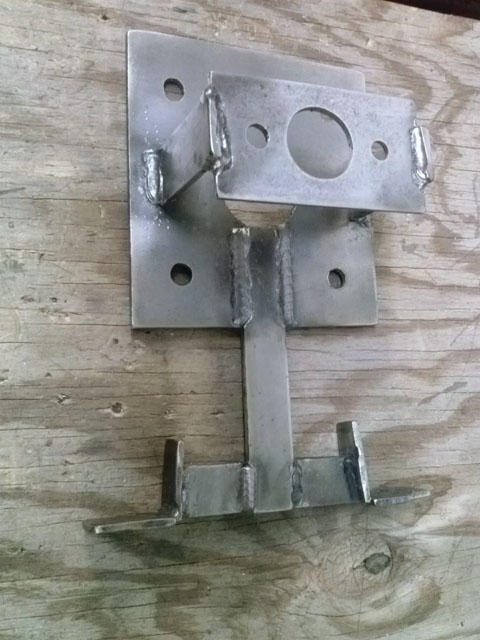 | ||
Mark Luft Frequent User Username: bentleyman1993 Post Number: 271 Registered: 10-2016 |
Mike, It's never easy, is it? | ||
Mike Thompson Frequent User Username: vroomrr Post Number: 708 Registered: 04-2019 |
Mark Ain't that the truth. But someone told me that it is not one big task, it is just a bunch of little tasks that you have to overcome. In other words break it down and pull the pieces apart that need to be done. | ||
Mike Thompson Frequent User Username: vroomrr Post Number: 821 Registered: 04-2019 |
How to convert an old cordless drill to a cord drill. On a lot of the cheaper models of drills either the battery costs as much as the drill and battery new. Or you just can't find them. So I convert them. I have two cord drills, both of which are powerfull enough to twist your wrist, the other is enough to brake it. So in tight spots I use these less powerful drills, that if the drill bit gets stuck it usually just slips on the bit and does not brake it. Nor do they twist your wrist, and bang it into the stuff around it. Probably the only good thing in this is the battery never dies and you can still use the drill. I currently use a 16 v transformer. (As with everything I show, do at your own risk.) Drill hand made connection.  Drill store bought connection, with batteries removed. 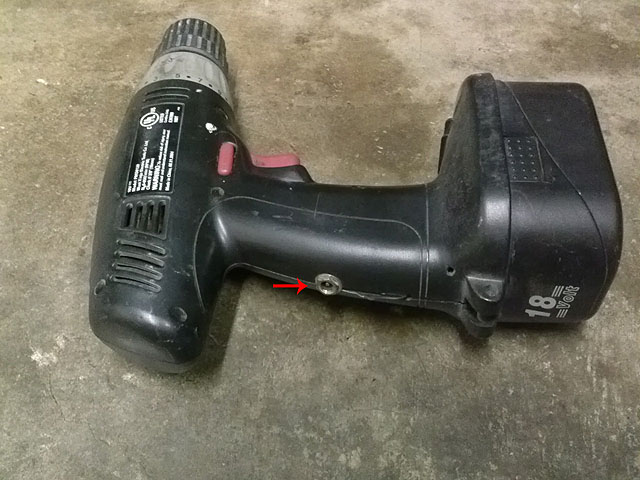 | ||
David Gore Moderator Username: david_gore Post Number: 3420 Registered: 04-2003 |
Mike, A question - how do you hold the black drill with the power cable plugged in? Your transformer output must be 16V DC not AC however my experience is the internal wiring in the cordless drills is very light gauge and I would have doubts if it could handle the extra current [approx. 10%] when extended or frequent heavy use is involved. Just saying......my cordless drills get a lot of use and I do not let my Li-ion batteries go below 50% capacity to maintain voltage for this reason. | ||
Mike Thompson Frequent User Username: vroomrr Post Number: 825 Registered: 04-2019 |
David, you know I have not used that drill in a long time and I wondered that myself (looking at the picture). It turns out that when my hand is holding it the way the thumb folds there is an opening for the cord. I did not design it that way, the female socket was placed there because the wire I attached it to only went that far. Yes it is 16 v DC I very rarely use them. (Just wanted to show it can be done.) But having been a truck driver I was gone for extended periods of time and the batteries, I guess, get lonely and no longer work. ;) I have one on its way to the grave now. Probably just buy another one, they are not that much. As I said the battery alone is as much or more than the drill. (Makes no sense.) | ||
Mike Thompson Prolific User Username: vroomrr Post Number: 1104 Registered: 04-2019 |
Questions keep coming up how to fix a parking brake cable that is stuck or sticking. Many will say grease it. In my case it did no good. The problem is the original engineering not the cable. Here is how I fixed it. The parking brake spring is pulled from the side. The vector force is wrong, so I corrected this. And as you can see it is prone to sticking with the connector spring extension catching on the bracket. 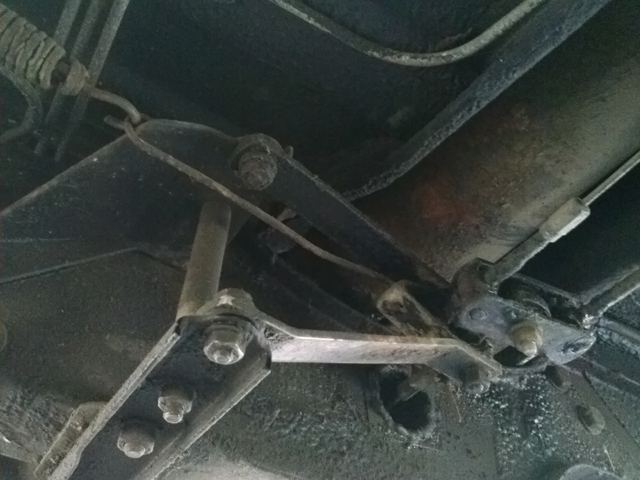 What I did is move the spring in line with the cables, so the vector is correct and the sticking cannot easily occur. You need to bend the extension spring connector in half and hook it to the bracket that holds the cables, and this solved all my sticking problems. 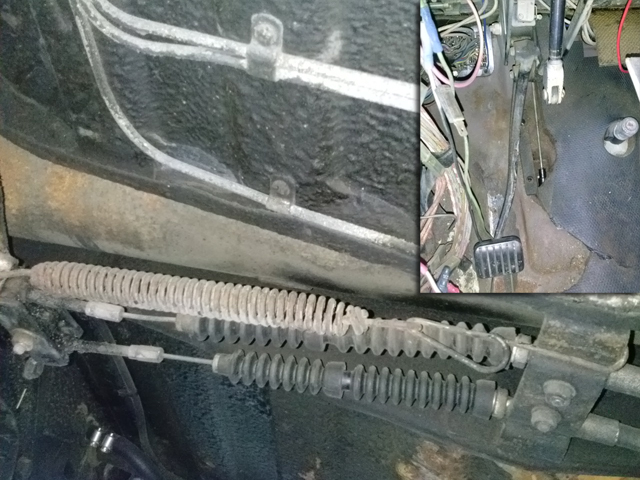 | ||
Patrick Lockyer. Grand Master Username: pat_lockyer Post Number: 2213 Registered: 09-2004 |
"how to fix a parking brake cable that is stuck or sticking. Many will say grease it. In my case it did no good. The problem is the original engineering not the cable. Here is how I fixed it." Have waited on this "bodge" expecting all the experts on here to exercise there engineering knowledge then I see its not in the workshop manual! First "clue" to the problem is the setting up with correct angles within the levers, but that is only the start with the foot or the UK handbrake. And IMO the return spring is doing another second job that RR may not have liked to announce. | ||
FrancisMcCallum Unregistered guest Posted From: 81.111.251.120 |
Hi, Wondering how you remove the windscreen washer jet from a Silver Shadow circa 1973. I haven't been able to find anything in the online manuals. The part number is UD16578. Thanks. Frank Chassis number SRH16290 (Message approved by david_gore) | ||
Patrick Lockyer. Grand Master Username: pat_lockyer Post Number: 2578 Registered: 09-2004 |
Each jet can be removed by undoing the the jet with the hexagon for adjusting. The whole unit can be removed after the removal of the ventilation grill. The foam can be replaced at the same time if needed. |