| Author | Message | ||
Geoff Wootton Grand Master Username: dounraey Post Number: 2067 Registered: 5-2012 |
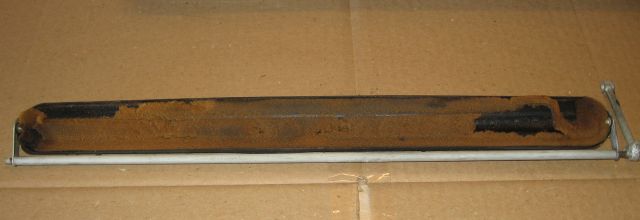
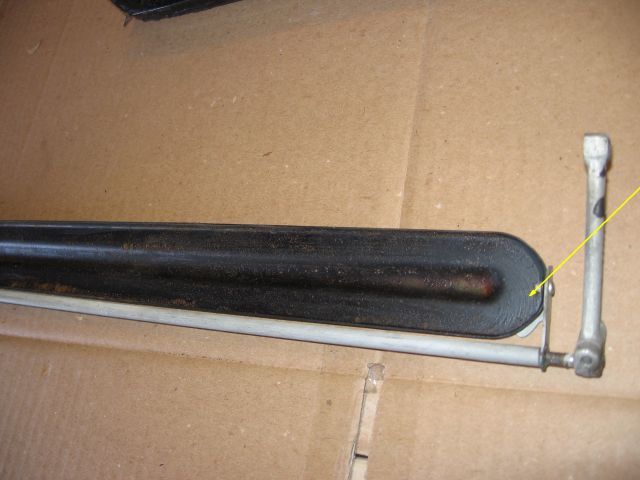
I've just restarted my heater renovation project - a house move got in the way. The car is a 74 SY1. I'm trying to find the best way of removing adhesive residue from the heater flaps. From the top pic below you can see the foam had all but totally disintegrated, along with the rubber bearings that the flap pivots in. I have removed the foam, ready for replacement. The rubber bearings had removed themselves long ago. So far I've tried denatured alcohol(meths), isopropyl alcohol and wd40, none of which touch the residue, which has hardened/bonded with the steel. My guess is sanding and repainting is the only way forward, unless there is some magic solvent that will remove the residue without stripping the paint. Has anyone had a similar problem and found a suitable solvent or method. The yellow arrow in the lower pic points to some of the residue - a lot of the detail has been lost due to the low-res picture.   | ||
Robert J. Sprauer Prolific User Username: wraithman Post Number: 187 Registered: 11-2017 |
Use a die grinder with a 2" Rol-loc scuff pad. Heat and scrape should work also. | ||
Steve Emmott Prolific User Username: steve_e Post Number: 140 Registered: 11-2018 |
Geoff from the pictures the residue does not look that bad and would easily be absorbed into the new glue and foam IMHO. (BTW never try to apply contact glue direct to foam by hand) I admire though perfection.... it is not seen that often today and frankly if you want to go that route I would strip the flap, chemical or sand blast or just scraping. I would even have it zinc/cadmium plated and powder coated or re-sprayed but it looks like you would have to take off the side fittings to do all that. The foam I am sure is just really a silencing damper and would easily form itself to any small imperfections. When selecting the foam for replacement be cautious as for density and type. Some of the modern materials are virtually indestructible but some just don't last. I can only say my 'addis' floor mop foam pad originally used to last at least a year. Nowadays the new ones probably made in China crumble to dust after a couple of months. I don't use the foam anymore on the front outer scuttle grill and have for many years just used mosquito screen mesh......lasted 10 years+ | ||
Geoff Wootton Grand Master Username: dounraey Post Number: 2068 Registered: 5-2012 |
Robert and Steve Thanks for the quick replies. It's confirmed my view/fear that there are no shortcuts - yes, I am a bit of a perfectionist so I will take the strip/sand/repaint route. I've just ordered some new self locking retaining rings so I can safely remove the side fitting and more importantly, refit it after I have reconditioned the flap. Thanks again for the help | ||
Kelly Opfar Prolific User Username: kelly_opfar Post Number: 225 Registered: 7-2004 |
How about lacquer thinnner? That's usually my go-to for everything. http://BritishToolWorks.com | ||
Geoff Wootton Grand Master Username: dounraey Post Number: 2070 Registered: 5-2012 |
Kelly: I called in at Home Depot earlier and picked up a quart of Lacquer Thinner. No luck though. The adhesive has been on for so long it is more akin to being baked on. On a related note: Does anyone have any recommendations for what adhesive I should use to glue the new foam to the prepared flap. | ||
Larry Kavanagh Grand Master Username: shadow_11 Post Number: 362 Registered: 5-2016 |
Maybe gentle persuasion with a heat gun and scraper might work on removing the adhesive but it may be somewhat toxic so try outdoors with breathing apparatus and a fire extinguisher at the ready. Keep the heat gun moving rather than concentrating on one spot. | ||
Robert J. Sprauer Prolific User Username: wraithman Post Number: 188 Registered: 11-2017 |
buy contact cement by Weldwood or similar. Its the kind you brush on both surfaces and when dry bring them together. Apply with cheap "acid" brushes from the plumbing dept. Also great for bonding leather, vinyl etc | ||
Steve Emmott Prolific User Username: steve_e Post Number: 142 Registered: 11-2018 |
Geoff firstly you need to select a soft 'open cell' foam as opposed to a close cell foam. It needs to be able to be compressed without too much resistance. However this sort of foam is NOT suitable to be brushed glued like any normal way of using contact adhesive which as Robert says you apply to both surfaces let dry and then bring together. I use a lot of this type of foam for my indoor swimming pool dehumidifiers and home dehumidifiers and have to stick them to the filter frame. I use a petroleum based contact adhesive but only apply to the solid surface and a reasonable even amount. Whilst still 'wet' ie do not allow to dry off I then place the foam direct onto the wet glue. It is a careful amount that has to be applied as too much it will just soak through the foam. You just gently feather touch the outer foam surface ensuring it keeps in contact but not pressing hard or you will create a crater if not careful. The glue then reacts and absorbs sufficiently into the foam so bonds completely when then allowed to dry off. Trying to brush glue onto this type of foam just does not work for me and indeed I have had the glue dissolving the foam as I have tried to apply it. The other alternative is you can now buy aerosol cans of spray contact adhesive. This works fine then for spraying on both surfaces and using in the normal way. However you have to be selective of the product as some come out the nozzle in strands like 'party foam'. When I did a lot of trimming years back I used to mix a weak solution of contact adhesive and had a small air spray gun kept just for spraying foam surfaces like door arm rests etc. This does work well and allows for the adhesive to be applied to both surfaces as would be the normal correct way to use the glue. I suggest you use a larger piece of foam and then when completely dried off carefully cut around the edge of the metal to shape it. | ||
Robert J. Sprauer Prolific User Username: wraithman Post Number: 190 Registered: 11-2017 |
I suggested using a small "chip or acid" brush due to the area. The same adhesive can usually be found in spray cans. I have used glue pots with special hun for larger areas on soft or hard foam. In fact the foam on door cards is very thin and it is sprayed. | ||
Steve Emmott Prolific User Username: steve_e Post Number: 149 Registered: 11-2018 |
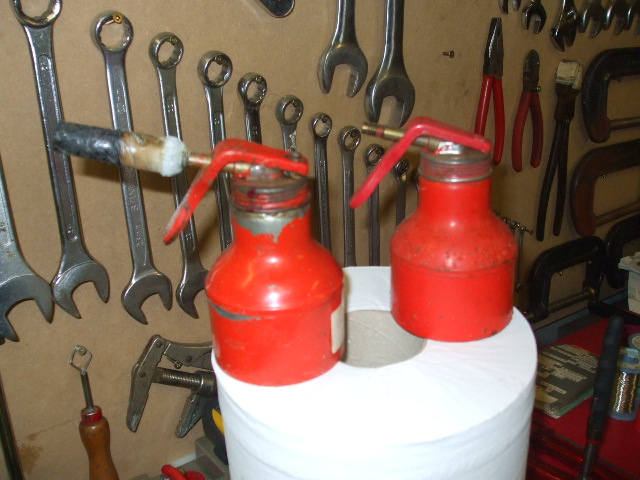
Robert I have those sort of glue guns too. They certainly are safer and stop the glue skinning in the tin with the lid off while trying to do larger areas. They are just like an oil pump gun with a brush screwed on the end. The brush can be screwed off and soaked in spirits and stays fresh for next use. They do need emptying though and also filling and pumping spirit thinners through if not being used for long periods.  | ||
Geoff Wootton Grand Master Username: dounraey Post Number: 2071 Registered: 5-2012 |
Wow - lots of great advice here. Thank you. I've already purchased the foam for lining the heater box and flaps. It is open cell. I researched this extensively before buying. I will do some test runs on scrap steel before applying the foam to the flaps. Steve - Earlier you said "The foam I am sure is just really a silencing damper". At the time of my research I looked for ages on the web to try and find out why foam was used to line the heater box. This was the conclusion I drew, but nice to have it confirmed in your entry. I guess without it you would get whistling noises as the air rushed through the heater box. Thanks again. | ||
Steve Emmott Prolific User Username: steve_e Post Number: 152 Registered: 11-2018 |
Geoff I think it is for a double purpose.....what you say and what I say. For sure the foam would prevent air bleed whistling effect no doubt of that we used to foam fill front pillars (great rust trap) on cars during manufacture to prevent air whistle up the 'A' post. Perhaps we could also add a 3rd reason and that would be anti rattle metal to metal contact when you drive over a UK pot hole  I also feel the foam does act too as a soft dampening effect as nothing would be worse than hearing a metallic clunk on a RR/B when the flap closed. The gentle whirring hum of the Lucas stepper motor is sweet.  |