| Author | Message | ||
luke vero New User Username: britcorniche Post Number: 6 Registered: 6-2016 |
Hi Chaps! Its that time of the year in the UK. We've just done a trouble free 800 mile tour of the west country in our 81 Corniche as weather is fast improving . My question is has anyone swapped out the Corniche window motor as mine passenger window is now extremely slow ( especially on downward direction prob against return spring) . Any help or knowledge of tools and finger tearing procedure greatly received as usual.  | ||
Robert J. Sprauer Prolific User Username: wraithman Post Number: 138 Registered: 11-2017 |
The door card removal is explained in the workshop manuals listed on the home page. The motor cable contacts will need cleaning and dielectric grease to prevent future corrosion. Once the window is raised, spray the window channels with silicone spray and exercise accordingly. The grease box coupling has a history of drying causing drag. If this doesn't work, it is possible there is corrosion with the motor. Car must be taken when removing the panel and again when installing. Gentle pressure to seat the retaining pins is all you need. Do not "wack" the panels to position because you will only deform the pins and most likely dislodge the pin base retainer. Insert a rigid putty knife between door card and door for removal. | ||
Steve Emmott Frequent User Username: steve_e Post Number: 92 Registered: 11-2018 |
Luke, from your chassis number in your profile your car I am sure is the chain driven mechanism very similar to the early Shadow 11 apart from the metalastik lower mount bracket. It was later chassis numbers which then moved to the scissor and spring mechanism. Not really any special tools required and a fairly simple restoration project depending on how your DIY skills are. I replaced one in a Shadow drivers door last week from my own refurbished spares stock and I will be restoring that when weather improves. Your motor is the permanent magnet type so electrically quite simple. There are some very favoured electrical mods you could do at the same time to give speed improvements(search Richard Treacy) but I do find if all connections are clean and chain and channels well lubricated the performance is quite adequate. Some also seem to have hardened grease in the gear mechanism from others comments I have read albeit I have never found much grease ever in the ones I have done. I have had the flock sprayed chain guide come loose and it slides in the chain channel and interferes with the top cog/chain, also the rubber ring seal around the gearbox opening come off and get squidged up in the worm drive, chain links can seize, top cog wheel spindle tightens up and window attachment on slide bar gets all gunged up. On a few occasions the motor commutators and brushes have needed cleaning and re-bedding.(probably the most technically difficult part of the whole job.) Also I have had the clutch mechanisms fail and on the last one I did at some time the glass window had been broken and the chain guide was full of glass particles. So reasons for poor performance are not easy to single out. All this though is restorable if stripped and rebuilt with no expense if you feel you have the DIY desire. When the motor and mechanism is removed you can support the window closed with a block of wood and still use the car until refurbished. Personally I would avoid just buying a used second hand one unless it has been refurbished. The only part I have not yet had to restore/replace on any refurbishment(albeit seen the odd one in poor condition) is the lower rubber metalastic bush and I am yet to find a source for this part. So in brief you have to remove all the door trim, carefully peel away the water deflector plastic film, remove electrical connectors (marking up exact positions) undo bolt on window glass channel to slide bar, support glass in fully closed position, remove some lower bolts that fit through door skin and window motor support bracket then carefully manoeuvre the whole unit out. Happy to go through a total window mechanism restoration if you decide to do a DIY fix which I was going to do when I restore my next one so I could take some pictures while doing it. There is nothing difficult in doing a refurbishment though. Then you could just try spraying all the channels and chain without removing anything and see if it improves things. | ||
Robert J. Sprauer Prolific User Username: wraithman Post Number: 139 Registered: 11-2017 |
I have found a padded pinch clamp is over the frame when the window is in the up position. There is a tendency for a shim or block to fail or get in the way when working within the door cavity. Whatever works for you. Avoid the chances of a window falling and added to your "to do" list. | ||
luke vero New User Username: britcorniche Post Number: 7 Registered: 6-2016 |
Many thanks for the prompt replies Robert and Steve! I've had the door cards off before ( I was replacing cracked brittle rubber door mirror gaskets- tricky little job) and have a pretty good track record of home fixes. I read Richards upgrade before when I had a 74 Shad but not sure its so relevant to 2 door wiring. Steve I will follow your lead with a careful clean up and analysis of what all the issues are and give everything a good lube job. There's no nasty noises- it comes up ok, just very slow on last 4-5 inches on downward motion. Its been steadily getting slower and after period of inactivity virtually seizes. I wonder if anyone knows- can the motor be removed (if that proves the problem) without taking out the whole upright/ chain mech? Flying spares have recon motors instock for �125 plus VAT which doesn't seem bad. | ||
Steve Emmott Frequent User Username: steve_e Post Number: 93 Registered: 11-2018 |
Luke, I doubt very much you have a motor problem if it works well going up. The later round Shadow 11 type permanent magnet motors really are very robust and reliable as even when old they have not done a lot of revolutions like a fan motor would have done. Your problem to me appears more a mechanical friction problem or a badly oxidised electrical connection. Certainly on the old Shadow square motor it cannot be removed as it is bolted with one of the bolts from inside the gearbox. Even if you could just get a motor off the access would be tight albeit the Corniche door is slightly larger and if you dislodge the connection coupling then even more hassle. Pictures show some of my Shadow 1 and 2 motors some restored and some awaiting restoration. A couple are only good enough for odd spare parts now. I think visually they are very similar to what you have but your lower bracket is bespoke to the Corniche. Sounds to me though you need a good lube with a PTFE spray from inside on the flock sprayed channels or try running some lube down the channel either side from outside between glass and channel 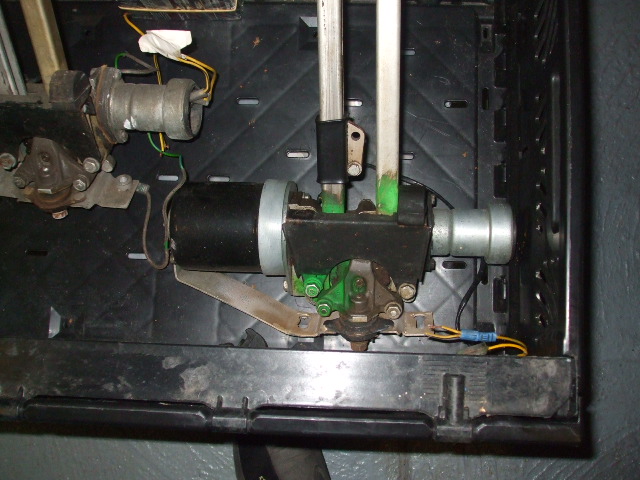 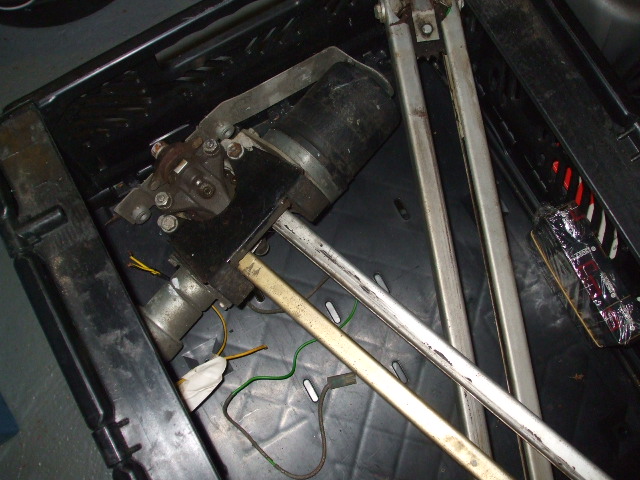  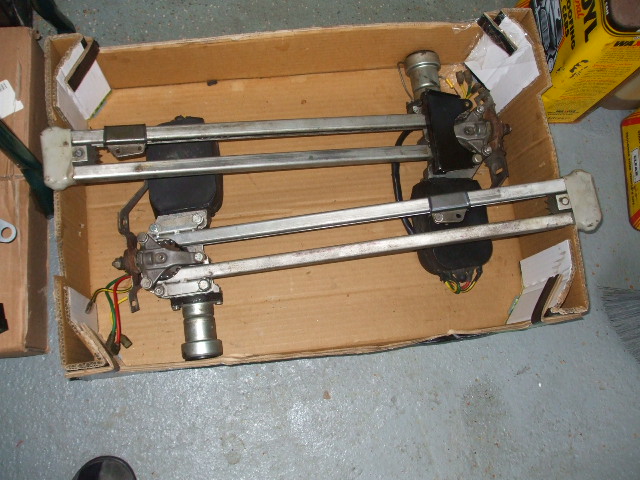 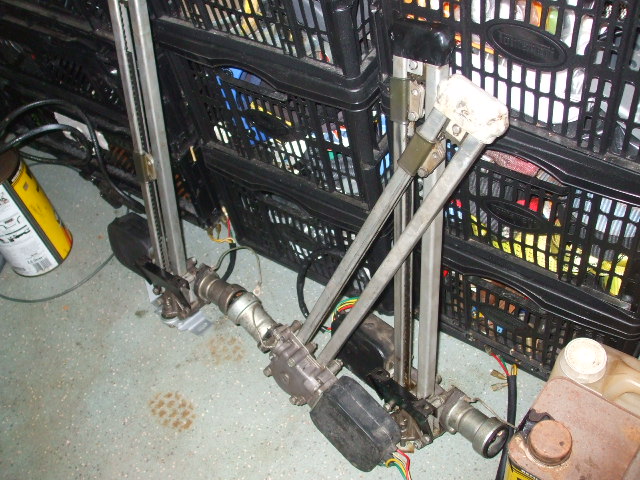 | ||
Steve Emmott Frequent User Username: steve_e Post Number: 94 Registered: 11-2018 |
One other thing I forgot to mention is at the top of the window channels there is a leather strip which is screwed in through the inner door skin and wraps around the channel bars. You should see two small screws about 3 inches apart at the top when you have removed the door trim. This retention strip has to be removed to release the assembly out of the door. | ||
ross kowalski Grand Master Username: cdfpw Post Number: 922 Registered: 11-2015 |
Luke, Thanks for the photo, beautiful car and beautiful backdrop. It is the middle of winter here in Massachusetts USA, and it will be months before the good cars come out again. |