| Author | Message | ||
Steve Emmott Frequent User Username: steve_e Post Number: 61 Registered: 11-2018 |
So some want to know why and what I did to the roof of my 1972 Shadow to fit the everflex vinyl. I am sure I won't write it all up in one go as I often digress and questions may come so I will make a start at least. Firstly let me deal with one specific question asked by Richard regarding the front and rear screens. These obviously have to come out and that in itself is a big job and quite risky as both front and rear screens are laminated glass. Laminated glass cracks very easily unlike the toughened glass used on the sides and usually on the rear screens of cars. I have no idea why RR would have used laminated on the rear screen but it may be a simple one. I certainly prefer to think I have laminated glass in the Front screen on any car after my mother was in an accident and went through the toughened glass front screen she was still having particles of glass removed from her face two years later as they came to the surface. Thankfully apart from facial scars she had no eye damage. My indoor pool is surrounded by double glazed doors, windows and roof panels. All of this though is also laminated glass. The thought of any glass breakage and thousands of glass particles as what happens with toughened glass scattered over the tiles or pool floor is just unthinkable. However we should not overlook the advantages of toughened glass as it can be broken in an accident should doors get jammed and allow occupants to quickly escape where as laminated glass is not so easy. With the risk of breakage in mind I did pick up a secondhand front and rear screen just in case and if anyone wants the rear one it is free to collect. I did not need to use either but will keep the front as a spare. Risk of glass breakage aside, to remove the screens still requires a lot of inner trim and woodwork being removed both front and rear to fully expose the inner rubber surrounds to facilitate removal and refit. I think a lot of this tear down work though may be covered in the workshop manual but for sure it is a lot of inner trim parts that have to be removed. When the front top roll and woods are removed though tape over the air demist vents prior to removing screen as particles of dry broken up mastic can fall into the vents. This maybe a reason why RR used laminated on the rear glass as I think on some cars where centre partitions were fitted air con was available on rear and vents came out the rear parcel shelf.......just a thought.......... Clearly having removed many screens in the past on old Jaguars etc I knew the pitfalls of the aged rubber breaking up and the mastic usually all hardened, so to reduce the risk of any glass breakage and the fact my rear rubber surround had small cracks in the top outer corners anyway I decided fitting new screen rubbers too was a must. This totally reduces the potential risk of screen breakage IMHO to virtually zero. From the outside the old rubbers can be cut with a stanley knife blade around the chrome finisher and peeled away allowing the finisher then to easily be removed without any bending stress or damage. Unlike some screens where the finishers are added/inserted after glass fit this RR/B type requires that the finishers are shaped and then fitted into the rubber after it has been placed around the glass and before it is then fitted to the car. This makes any attempt to try to remove the finisher from the rubber once the screen is fitted a task that will inevitably end up with damage to the finisher so best take the hit on the cost of new rubbers. OK you may be able to remove the glass with finishers in place but I would say your odds of breaking the glass will be well in excess of 50% Once the finishers though are removed from the rubber it is just then a case of slowly from inside gently pushing locally on the glass with one hand palm and peeling the inner rubber down with finger tips of the other hand to free up all around the sides and top of the screens. This will be several passes back and forth just allowing a small amount at a time to be pushed out. Once the tops/sides of the glass and rubber pop out the whole screen can be lifted up from the outside and the base will come free. It is not really possibly anyway to easily get to the inner base of the rubber with your finger tips as it is with access to the top and sides. Given the high cost and risk here often explains probably why so many re paint body shops just don't remove the screens and paint around them which to me always looks unsightly. Obviously as much protection covering the bodywork is essential. I will follow up with Part 2 tomorrow discussing older everflex tops as it is now time for a few of my five fruits of the day! | ||
Robert J. Sprauer Prolific User Username: wraithman Post Number: 115 Registered: 11-2017 |
Hey Steve. I added my .02 to the sheepskin post below.and then i see you started a new thread. I cut the old seal on the inside and it easily pushed out from the inside. Leave the trim inplace and carefully cut it out. Trying to pry it from the seal will distort it and will not contour and you will notice the bottom corners not seating. There are also 2 studs with plates on the top edge and the new seal has to be drilled for them. | ||
Geoff Wootton Grand Master Username: dounraey Post Number: 2059 Registered: 5-2012 |
Excellent thread Steve. Would it be possible for David (with your agreement) to move it to a technical forum - it helps when owners are searching for information. | ||
David Gore Moderator Username: david_gore Post Number: 3135 Registered: 4-2003 |
Have done using my Moderator privileges - This is going to be a very useful thread for the future. I have edited the title accordingly. Thank you Steve for significantly expanding both our personal and archived knowledge. | ||
Brian Vogel Grand Master Username: guyslp Post Number: 2758 Registered: 6-2009 |
First, let me state that I am not trying to hijack this topic. If anyone chooses to respond it would probably be best to start a separate topic, "Permanently removing a non-padded Everflex top," but this seems a good place to introduce the question. I am, at least at some point in the future, considering removing the Everflex covering on SRH33576 and leaving it off. I have always preferred the look of these cars sans Everflex, and the Everflex on SRH33576 is unusual on a Shadow II and is also not padded, like the Everflex is on LRK37110. Does anyone have any experience in removing Everflex permanently on an SY2 (and, probably, SY1) series Shadow standard wheel base? If so, what are some of the things to look out for when doing so? Brian | ||
Robert J. Sprauer Prolific User Username: wraithman Post Number: 116 Registered: 11-2017 |
Hi Brian, The padded version is down the center. Both roof coverings have finishing strips within the top of the door openings held by small screws. It's basically removing the old and then the adhesive which will most likely be done mechanically therefore requiring a refinish, The sticking point is removing the F&R windscreens which can be intimidating, especially the front. The seals from Replacement Parts are excellent. I restored the Everflex on my SWII with SEM products after discussing with factory tech dept. Roof and color are perfect. | ||
Steve Emmott Frequent User Username: steve_e Post Number: 65 Registered: 11-2018 |
As always there is something that you forget and I just remembered as I was writing up the second part and reflecting on the fitting of the rear window. On removal of the rear screen you have to be very careful of the heated screen wires. These need to be disconnected from inside the boot under the parcel shelf. They are just Lucar bullit connectors. The wires are attached/soldered to the element at the base of the screen which runs inside the laminated glass and the wires then pass under the inside rubber lip into the boot/trunk. It is very easy to break these off as I did, albeit my rear screen demist never worked so I assume the joint had already corroded the solder. As I had a spare rear window I thought I would try resoldering but was nervous I may crack the glass. I used to do a bit of stain glass lead repairing and occasionally the heat from the soldering gun I did crack the odd piece, however I managed to solder the wires back on to the rear screen without any problems and get the rear demist element functioning. Just be very careful not to pull on these wires as you remove the rear screen. Also Robert did place a note on another thread that he cuts the rubber lip from inside the car to remove the screens. Both ways would work fine albeit I prefer cutting the rubber on the outside but equally the decision is new rubbers are going to be fitted and no attempt must be made to try to remove the chrome finisher without having relieved the rubber or it will get damaged. Also if you do the rear using the cutting rubber method from inside then again be specially careful at the base where the wires are connected. Robert you also mentioned some studs and the rubber has to be cut. I am not aware of anything on the Shadow 1. I know the Spirit/Spur front screen is more complicated on screen finishers removal but not of anything on the Shadow. I recall our famous UK Wheeler Dealers Ed China screwing it up on a Spirit when he did the program as he did not know of the front screw finishers. I also remember him breaking the Lotus Elan rear wheel hub bearing casting under the press because he had not removed the circlip from both sides. In both cases I think it would have helped if they admitted it as we have all made stupid mistakes I am sure at sometime. Brian I have covered a little bit of doing away with a previously fitted vinyl in my second part. | ||
Steve Emmott Frequent User Username: steve_e Post Number: 64 Registered: 11-2018 |
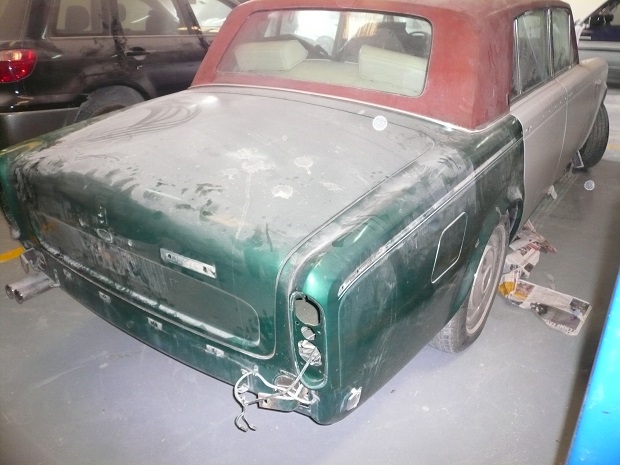
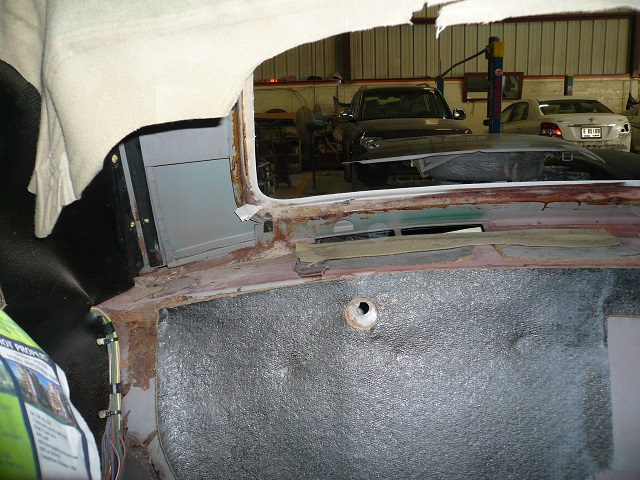
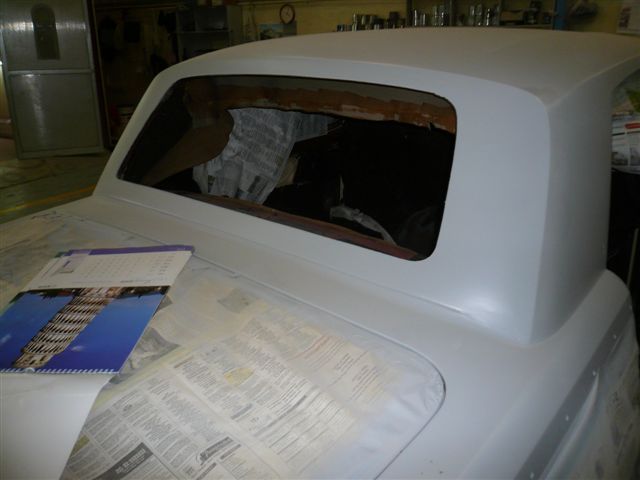
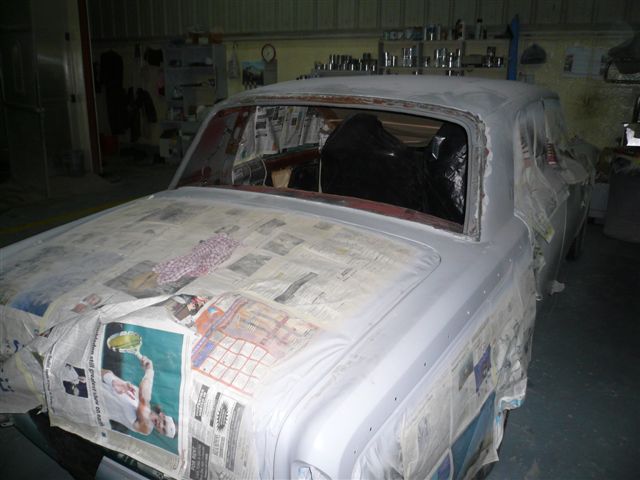
Hey you guys fooled me I lost my thread.... Just to follow on though as I knew I would not get it finished Robert on another semi related thread mentioned on the front screen removal he cuts the rubber lip off from inside the car whereas I do it from the outside. Either way decisions are same that rubbers were going to be replaced and never try removing the chrome from the rubber while in situ. So back to the Everflex....well whoever named the vinyl 'Everflex' needs shooting albeit they probably would not have realised 20 to 30 years on there is just about no flex in the material it dries out, shrinks, rots and goes hard.... Also I have seen underneath where skins have had to be renewed water has penetrated through and roof metal has rusted. Tell tale signs are always there of an old badly fitted everflex and believe me this is one area I don't accept enough attention was paid to the quality of how they were done. Metal would be exposed when the primed or painted surfaces were keyed by rubbing down the surface, This had to be done otherwise the glue would not adhere to shiny surfaces. It seemed not to matter what went on as this nice piece of waterproof vinyl covering was going over the surface and nothing would be seen........until years later sadly. First signs of the bad fits exposed very shortly and I remember seeing these faults apparent even back in the late 70's on cars that were just a few years old. This was the shrinking of the skin and you would see the gutter formed groove the vinyl would start to lift out. Eventually it would travel virtually the whole length down the groove. Vinyl roofs are very good at hiding imperfections and used widely where cars were stretched and rather than tool up for new roof panels they would 'cut and shut' two standard panels. Simple way to reduce finishing work was to fit vinyl roofs. It was also a practice used in the factory where any roof damage had occured and often by the dealers when transporter damage to the roof had occured. So before considering removing any vinyl roof to just repaint expect a lot of panel work will likely may be required. There was also the technique of fitting thin foam under the vinyl usually seen on those large stretched USA limos where they probably had to use 3 or 4 cut and shut roof skins and even just vinyl covering was not enough to disguise deformations. Sadly these ideas got accepted as 'features' and then even normal cars got foam padded vinyl roofs. I have seen plenty of this type years after with the vinyl flapping around as the sking would only be glued around the sides and into the screen apertures so as the vinyl rotted water was sucked in and rot accelerated both to underside and roof skin. Usually you will see the stretching and bubbling up of a vinyl covering on an older car and make your own decisions what to do if you take it on. It will for sure be a lot of work even removing the old vinyl and glue but to think of removing for a repaint instead absolutely momentus work as it would have to be totally stripped back to bare metal trim holes filled up and that is without the unexpected state of the metal work underneath.... So you may ask when my car did not have a vinyl roof why would I fit one knowing all the issues. For sure I put a lot of thought into it knowing the pitfalls and longlevity of vinyl roofs I figured I won't be around in 30 years and when a car is looked after and garaged the life is well extended anyway. However my main reason was I had always intended spraying the car myself while in France as I had lots of indoor space. I just know that a badly painted or imperfect roof just destroys the whole car as it is what the eye sees mainly at a flat level. The roof painting just seemed a daunting task to me albeit I had painted many car panels in the past and even the one front wing on the Ferrari I painted myself. So decision was taken first that fitting the vinyl roof was a must do. So I have no experience of actually removing a vinyl of a Shadow but I have done it on Jaguars, Triumphs, Ford Capris and several other makes. I have ALWAYS refitted a new vinyl top and only once had to deal with a Lotus roof skin where the owner wanted the aftermarket pop up sunroof removed and the roof re-glassed.........it was a long job to get it looking good even after paint it had to be continually improved until acceptable. Now the Shadow has this formed roof skin in the centre no doubt to give the panel some rigidity and then the deep formed gutters all a part of the roof so it is one of the most difficult cars to fit a vinyl roof. Firstly due to the size of vinyl rolls as they are produced few cars can be achieved without having a seamed joint on the top. Some USA cars I have seen achieve this with a single centre seam but the most common is the two side seams. However due to the form of the RR roof the position of these seams is very limited in order to avoid unsightly fits around the two side depressions in the roof skin. You can place them inboard of the metal form or outboard. Too close to the form either way and you could have quite a big eyesore, as duplicate formations side by side would have to be perfect. That is the lump line of the metal skin and the lump line of the 3 thicknesses of vinyl required to create the seam. So again a simple way to overcome this sort of dilemma was utilising a central piece of foam in effect disguising the form of the metal making it just look a flat panel. Works fine as i said until the viny starts to rot and then where it is not glued down it just tears off. Strangely enough this method somewhat takes the roof form feature off the car and the way the vinyl stitched seams are fitted actually styles the form totally the opposite way. My plan was to make my own vinyl roof so the seams would actually be fitted the opposite way round from the norm and fit tightly into the depressed metal form in the panel. This results in the roof panel looking exactly correct in its shape. Fully utilising waterproof button twine and sealing the seams ensures no water will penetrate and it allows for the vinyl to be totally glued everywhere and at this point there is no effective stretching over so shrinkage will not occur here. That said the gutters are really the big unsightly area when shrinkage start to occur so my plan here was to utilise the same accelerated glue that is used on the boot seal as when done correctly and this glue cures very little can shift it or the rubber from the painted metal. I also used this glue on the seams and the areas into the door closures. So vinyl to metal all sorted. i made some thin stainless steel strips to finish off areas in the door shuts where potentiall vinyl could creep back. However I also had one other problem to overcome. I was not yet ready to paint the car and certainly did not want to be taking screens in and out for fitting the vinyl then again for the painting. So on the front screen I just neatly taped over the excess material planned to fit under the screen rubber when it was removed for painting and actually it stayed like this for a few years and happily still drove the car around. At the rear though I did not like the genuine RR finishers. Indeed the way they flipped up to the rear screen at the side rear to me looked wrong. I had seen the wrap around finisher that is fitted to the Wraith Everflex and decided this would solve all my problems as I could finish off the vinyl, refit the rear screen and new rubber, get all the trim back and then when it came to repaint all I needed to do was remove the wrap around trim. Now any paintwork ever needing done on the rear will never require the rear screen to be removed. I was also able to relaquer the rear window surround and lower wood finisher so everything is complete. The front screen was not removed for painting and just the base cut away to allow paint fully underneath as I had always intended a new rubber would be fitted anyway. So now the inner trim has been stripped at the front and the screen removed the vinyl has been stuck down and just awaiting the screen to be fitted outside when the weather warms up. First picture is the car in South France before it was registered and the vinyl roof fitted. Sorry not the best quality picture   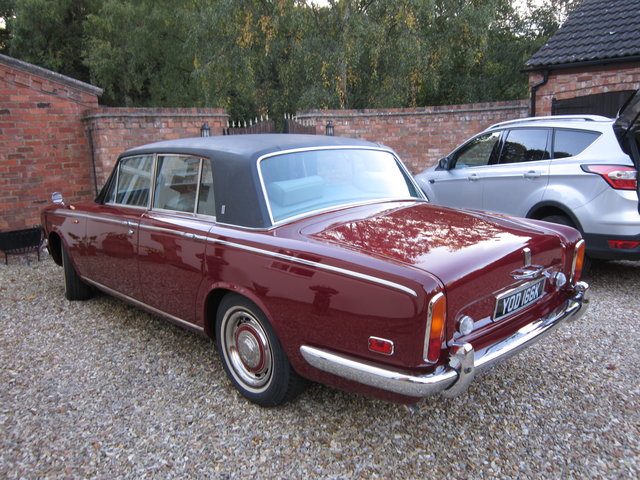 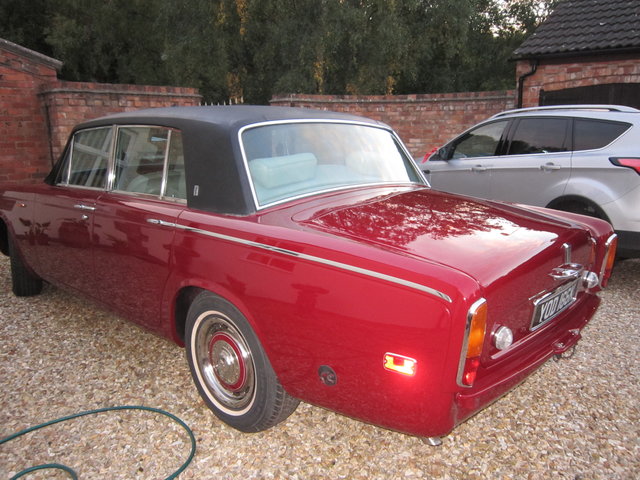   . | ||
Patrick Lockyer. Grand Master Username: pat_lockyer Post Number: 2111 Registered: 9-2004 |
Ah, found the thread, not Dot 5 in race cars. In extreme circumstances if the roof is not dealt with when water ingress occurs through stone or stitching etc, rust failure of the whole roof and surrounding area will present itself. I have yet to find a Everflex RR car that after say 18 years of normal every day use in rain sun or otherwise has not had shown shrinkage of the gutter section in some parts. BTW a stone penetration above the windscreen a dead cert for rain water ingress due to the wind pressure of the cars speed. Road salt does not help. 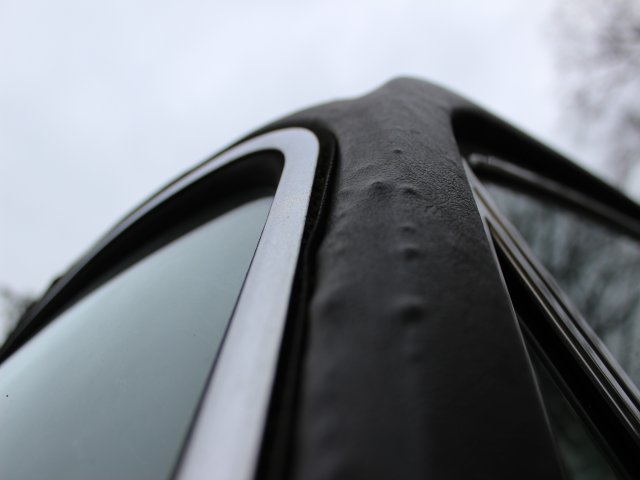 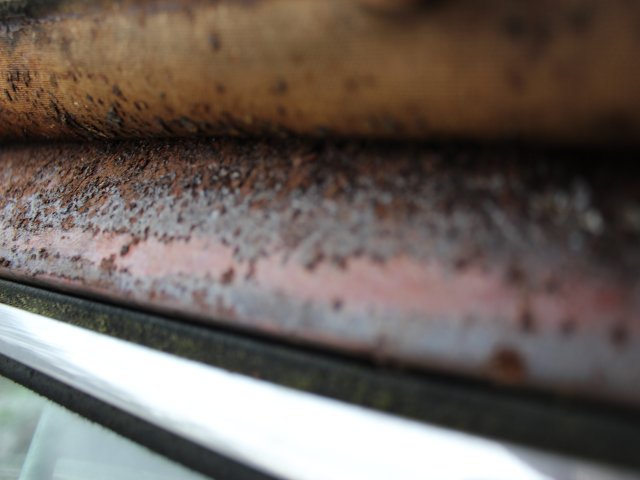 | ||
Robert J. Sprauer Prolific User Username: wraithman Post Number: 186 Registered: 11-2017 |
Personally not a fan of the Everflex roof. You could order a delete. There was a Wraith II delivered to the Hoover Vacuum family and it looks great without it. The car was black with silver sides. Elegant. | ||
Steve Emmott Prolific User Username: steve_e Post Number: 138 Registered: 11-2018 |
Patrick you have some good pictures there and also the one you put up on the other thread showing a torn back piece of vinyl and a very rusty metal skin. I think you need to add the 3 of them to this thread though..... link below http://au.rrforums.net/cgi-bin/forum/show.pl?17002/35015 This is where the question came up about rust under the Everflex from a car bought without seeing. My Everflex is 10 years on now and I have no shrinkage over the gutters as I always use along the gutter channel the activated 2 part glue that is used on the boot seal and it has a far superior bond. I agree though I too am yet to see any other RR/B old Everflex that has not stretched out of the gutters somewhere along the length. It is usually the rear over the 'D' pillar and rear door as this is where the vinyl has to be 'worked' as it is stretched over and down to the rear wing top. | ||
Omar M. Shams Grand Master Username: omar Post Number: 1795 Registered: 4-2009 |
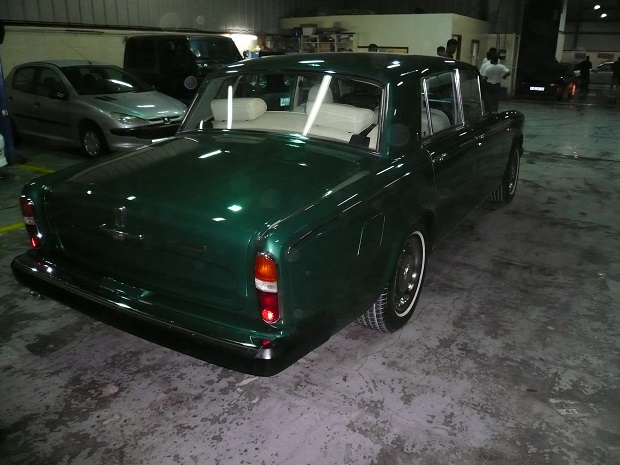
I removed the Everflex from my Wraith II and enlarged the rear window in order to see better out of it and for it to have a proper finish. It was a difficult job..... But now - i have no potential rust areas to worry about. | ||
Omar M. Shams Grand Master Username: omar Post Number: 1796 Registered: 4-2009 |
    | ||
Steve Emmott Prolific User Username: steve_e Post Number: 141 Registered: 11-2018 |
Omar I gasp in admiration......you are a true credit and advantage to the RR/B brand name.  BTW I have a couple of Shadow 1 rear screens FOC if someone else in the UK is planning this conversion...... | ||
Kelly Opfar Prolific User Username: kelly_opfar Post Number: 226 Registered: 7-2004 |
Egads Omar, I love that green so much! http://BritishToolWorks.com | ||
Geoff Wootton Grand Master Username: dounraey Post Number: 2069 Registered: 5-2012 |
Fabulous job Omar - looks great | ||
Brian Vogel Grand Master Username: guyslp Post Number: 2801 Registered: 6-2009 |
Very nice, Omar!! I don't know that I'd change the rear window, as I rather like the reduced one (and it's much larger than the one in my daily driver), but I would love to lose the Everflex on both of my cars were it not cost prohibitive to do "just because." I have never really liked vinyl roofs, either aesthetically or for more practical reasons such as rust (and even keeping them clean and conditioned). Brian, who thinks that's possibly Scots Pine (if it's an official color, whatever it is, it's very nice) | ||
Larry Kavanagh Grand Master Username: shadow_11 Post Number: 361 Registered: 5-2016 |
It might be "Irish Racing Green", just a random guess, hard to tell with the light but it sure does look good. | ||
David Gore Moderator Username: david_gore Post Number: 3190 Registered: 4-2003 |
Larry, You might just get away with this.....................  | ||
Larry Kavanagh Grand Master Username: shadow_11 Post Number: 363 Registered: 5-2016 |
David, Couldn't resist, sorry. | ||
David Gore Moderator Username: david_gore Post Number: 3191 Registered: 4-2003 |
I know - we are "two peas in a pod" as my grandmother used to say...... | ||
Patrick Lockyer. Grand Master Username: pat_lockyer Post Number: 2112 Registered: 9-2004 |
Supper job Omar, did you do the work on the conversion yourself or did you get a body shop to do it? just love the masking up! | ||
Omar M. Shams Grand Master Username: omar Post Number: 1797 Registered: 4-2009 |
Thanks for the kind words gents. I have little time to spend in the garage doing time consuming activities - so I had a shop do it for me. When I did this work (11 years ago) my children were small and I had to spend a lot of time with them being a dad. The colour green is a standard RR colour which I think may be Nottingham Green. I am sure it is a version of Irish green..... | ||
Steve Emmott Prolific User Username: steve_e Post Number: 151 Registered: 11-2018 |
That's my territory.....Robin Hood....Lincoln Green....and his arch enemy the Sherriff of Nottingham. Whatever green it is it sure looks good. I am assuming it had to have an original rear screen aperture grafted in. Indeed the whole job looks quite involved as the added stretched part of the roof again appears to be added into the rear too. I doubt very much RR would have spent out on a new press tool for the larger roof skin and it would be norm to join two panels together to create the stretch. Hence I had always assumed the reason of the different rear window and vinyl top. Like I said I am quite amazed at what you achieved here and I used to do this sort of work all the time creating prototypes when I worked at Jaguar/Aston Martin. The complexity of the roof extension just has to alter the dimensions at the rear window so I am still struggling a bit how the transition was achieved to have also got rid of the vinyl roof, fitted a standard rear window, and have a super smooth painted roof.....truly amazing. | ||
Robert J. Sprauer Prolific User Username: wraithman Post Number: 191 Registered: 11-2017 |
http://fineautosforsale.com/autos-for-sale/1980-rolls-royce-silver-wraith-ii-lwb-saloon/ Here is the link for the SWII with the factory delete Everflex roof. It appears that the roof body section had a smaller aperture from the start, but...it may have started as a normal size opening and a reducing panel is fitted from the factory for the Wraith model. In the one shown there are no seams, so it is possible there was a designated roof shell or this special order was leaded to hide the seams. I should have looked at my own when I gutted my interior a few years ago. Too late now. I like the small window and painted roof, especially in black. | ||
Steve Emmott Prolific User Username: steve_e Post Number: 153 Registered: 11-2018 |
Interesting history Robert but I still don't believe RR would have invested hundreds of thousand of pounds in a press tool for so few cars. Most of the aftermarket stretched Limos done today are definitely multiple roof skins joined side to side. Of course all the joints can be lead loaded and linished to perfection which I accept, but you can't take a swept/curved panel and expect it to be the same dimensions along the sweep a few inches further along the curve. Hence I think what Omar's team has achieved is quite exceptional to have got a standard rear screen in. Yes I would have liked to have seen the underside of the roof skin with the headlining down.....now that would be a long look into the cars history of how RR did achieve the stretch but now possibly lost unless you have an endoscope and look into yours  | ||
Robert J. Sprauer Prolific User Username: wraithman Post Number: 192 Registered: 11-2017 |
Actually....Come to think of it..the Wraith roof has to be a separate stamping to acommadate the longer floorpan and doors. So, the mystery deepens..How did they achieve the results on Omar's car? | ||
Benoit Leus Grand Master Username: benoitleus Post Number: 389 Registered: 6-2009 |
That looks great, Omar. It makes me want to remove the vinyl roof on my Shadow too. | ||
Steve Emmott Prolific User Username: steve_e Post Number: 154 Registered: 11-2018 |
Robert I don't know how RR did it for the roof but the floor pan is much simpler as they are smaller pressings usually joined somewhere at the rear of the front seats up to the rear seat so much simpler to extend a floor pan joining panels. Also the centre tunnel would just be two standard pressings joined somewhere strategically to achieve the length. Pretty much the same for the sills as not too much work to join two together and hand finish. The trouble is with the roof skin it is an exterior highly visible part that has to look perfect on finish so much harder to achieve a perfect finish so if producing a volume production car yes you would likely invest half a million bucks on a new press tool but for short volume where we produced extended funeral cars and limos etc no way would it be feasible to invest huge sums into special press tooling. Hence the roofs were often easier to vinyl than spend the detail man hours required to achieve an acceptable visual finish on the roof for painting. I am sure it was new tooling done for the rear doors and this would have been tooled up specifically for the LWB but again much smaller press tooling. On the Ford Lincoln and Jaguar based common floor pan we did actually produce a single longer floor pan that was then cropped shorter for the standard car IIRC. To be honest though I don't know what was done but the fact the roofs were nearly all vinyl covered I had always believed it was because of the joining of two standard skins. Until we could see inside a LWB under the headlining or someone else has definitive knowledge I can only say it may be either way. | ||
Robert J. Sprauer Prolific User Username: wraithman Post Number: 193 Registered: 11-2017 |
RR roofs and floor pans are one piece for the Wraith's and not stretched with panels. I have welded in new complete floorpans and they run from the toeboard to the rear seat riser. Wraith's are not stretched like limo's and maintain their integrity throughout. There was a fairly big premium for the Wraith which covers the added length. Hopefully Omar will check in and tell us what the shop did. | ||
Brian Vogel Grand Master Username: guyslp Post Number: 2803 Registered: 6-2009 |
Robert, Just curious if you know whether that was a change that occurred with the introduction of the Wraith II in the SY2 series. There seems to be a persistent belief that the Wraith IIs are stretched, which makes me wonder if there was a period where the Shadow LWB cars actually were. If memory serves, though, there are far more Shadow LWBs than there are Wraith IIs, so I'd think that the "one piece construction" would have started far earlier than the SY2 series even if some of the very earliest were stretched. Brian | ||
Robert J. Sprauer Prolific User Username: wraithman Post Number: 195 Registered: 11-2017 |
I have seen pics of SWII's with the normal rear window and Everflex roof. Upon further research I found the smaller rear window could be deleted and a regular window installed. Actually this was common. However, Omar's car is a head scratcher and perhaps factory build info would shed light. His before pic clearly shows a small window and post pics show a standard window with no evidence of body modifications. Omar....help us. | ||
Brian Vogel Grand Master Username: guyslp Post Number: 2804 Registered: 6-2009 |
Robert, Did you miss the third image in the sequence Omar posted? That shows a significant custom modification to the rear window surround sheet metal that had been on the car to accommodate a standard sized window. It looks like a big chunk was removed and, quite possibly, a segment from a donor roof or custom work put back in its place. Brian | ||
Steve Emmott Prolific User Username: steve_e Post Number: 157 Registered: 11-2018 |
Robert I don't think the floor pan for either car would have been a 'one piece'. At the very least it may have been one piece as a LH/RH side from front toe to rear seat and then joined to the centre tunnel and side sill. You only have to look under the rear wheel arch of these stored bodies to see how much panel jointing went on. I have lost contact with one of my old colleagues who was actually responsible for tool and die design at RR at the time before he joined Jaguar. Maybe time to find an old friend. Brian I agree the rear of Omar's car looks like a standard aperture has been grafted in. Somewhere along the roof length something must have changed as the sweep of the roof over the additional length must have changed dimensions....time for a bit of old trigonometry. 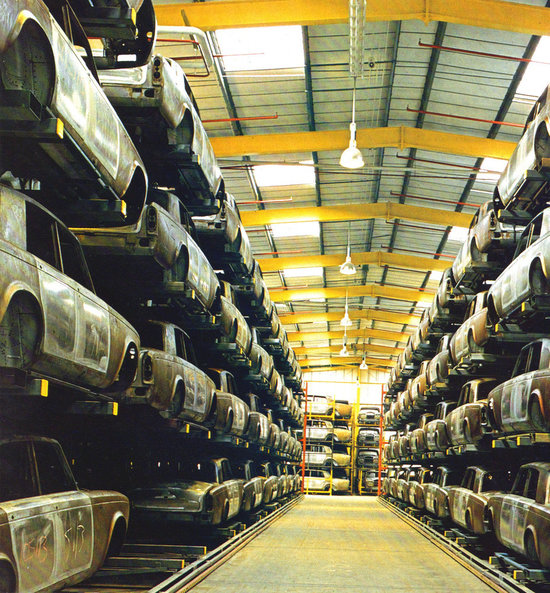 | ||
Omar M. Shams Grand Master Username: omar Post Number: 1798 Registered: 4-2009 |
      . | ||
Omar M. Shams Grand Master Username: omar Post Number: 1799 Registered: 4-2009 |
The insert that was removed was welded in place at the factory. The boys at the shop simply removed the lead loading and broke the welds to remove the insert. Once the insert was gone we had the standard Shadow rear screen arrangement. The trim was not easy to fix from the inside though. | ||
Robert J. Sprauer Prolific User Username: wraithman Post Number: 204 Registered: 11-2017 |
Ahh..the mystery is over! Thanks Omar. My first thought was a welded /leaded insert. | ||
Steve Emmott Prolific User Username: steve_e Post Number: 171 Registered: 11-2018 |
Omar it was a brave step into the unknown and I am sure will provide some historic excellent technical information for anyone else contemplating a similar modification. The exterior finish looks perfect. The mystery to me still though is was that roof panel a single piece. I am now of the opinion it probably was. Looking at the way the gutter channel is formed I am wondering if in the channel it has been spot welded joined and again lead loaded down the entire length. I don't have any pictures in this area of the unpainted bodies that would explain how the panel assembly of roof to gutter was achieved but for sure there is a lot of lead fill done on exterior panel joints all over the body. You say the interior was requiring additional work which is fully understandable as the headlining and woodwork would be totally different at the rear. What exactly did you have to do to finish the inside. That is did you obtain some original second hand wood for the lower and side/top interior screen aperture or did you finish it without wood. Some pictures of the interior would be nice to see if you can upload any. | ||
Omar M. Shams Grand Master Username: omar Post Number: 1801 Registered: 4-2009 |
Dear Steve, I had access to a Shadow that was being dismantled. I took all I could from that car and inserted in the Wraith II. I have to say that I cheated when I started this project. I saw a Wraith II already converted here in Dubai. It was imported in that state from Japan. I knew therefore that it was doable. |