| Author | Message | ||
Glen Poolen Frequent User Username: wgipps Post Number: 88 Registered: 3-2018 |
Looking up in the passenger side foot well toward the dashboard. Can anyone tell me what this breaker is for? 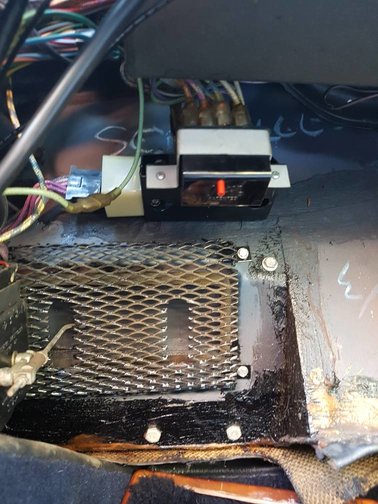 | ||
Jeff McCarthy Grand Master Username: jefmac2003 Post Number: 550 Registered: 5-2007 |
This is the cutout for the window lifts . There are 8 wires going in the top - 4 pairs of the same colour corresponding to the power supply to the four windows. If you want to you can make a change to this circuit slightly so you can use the window controls without the key in the ignition. I believe it was a Richard Treacy modification but a quick search and I couldn't find it in the archives. I did it years ago and it was well worth the effort. If I can find the reference I'll let you know. | ||
David Gore Moderator Username: david_gore Post Number: 3020 Registered: 4-2003 |
Glen/Jeff, I think this might be what you are looking for: http://rrtechnical.info/windowlifts/windowlifts  | ||
Jeff McCarthy Grand Master Username: jefmac2003 Post Number: 551 Registered: 5-2007 |
Thanks David, That wasn't the modification I meant though - there's one where you join a couple of wires together near the window cut-out Otter switch and it allows you to use the driver's door switches without the key in the ignition. This is very handy when working on the car and on hot days. However Glen probably needs to know about the page you linked to in any case; Glen, if you ever decide to do the modification in David's link (slow windows fix), contact me and I'll explain the wiring colours on your Shadow - the blue and white wires in Richard's first diagram are yellow & yellow/black on our cars. This confused me no end for a while. | ||
Glen Poolen Frequent User Username: wgipps Post Number: 89 Registered: 3-2018 |
Thanks guys. Modifications are coming along nicely. Hidden GPS tracker works, new stereo works, lots of little fixes along the way. But the last 2 hours of yesterday were spent on the windows. My auto elec is having problems with the really loose wires in the drivers door 4 window switch. Its while i was putting all the panels back together that i noticed this breaker. I would like the faster windows - these windows are ssssoooooooooo slow! so im thinking that while we are screwing around with it all i might do that mod as well. | ||
Paul Yorke Grand Master Username: paul_yorke Post Number: 2066 Registered: 6-2006 |
Glen, Slow windows are often caused by worn out or lack of grease in the gearbox. Worth Filling them with spray grease and seeing if that helps. | ||
Jeff McCarthy Grand Master Username: jefmac2003 Post Number: 552 Registered: 5-2007 |
I can vote with Paul on this one. I did the wiring/relay mod and can vouch for it. In the process however I took the whole works and motors apart and everything was gummed up with dead grease and crud. WD40 washed most of it away. Then a good spray of lithium grease on the worm gear and all was well. Afterwards I figured if I'd just sprayed WD40 with the little plastic straw thingy and then done the same with lithium grease I could've done the whole job in about 5 minutes without taking the whole apparatus apart! Spray inwards with the straw from the outside skin of the door. But if I'd done that I would've missed the opportunity to drop little screws and washers into the maze of metal struts under the motor and therefore hours of fun with a magnet on a bent bit of fencing wire... | ||
Paul Yorke Grand Master Username: paul_yorke Post Number: 2067 Registered: 6-2006 |
Lol. Indeed. Sneaky buggers! Taking just the motor off saves time. I use comma clear grease. Spray. Leave. Repeat a few times. | ||
Patrick Francis Prolific User Username: jackpot Post Number: 249 Registered: 11-2016 |
Hi Guys I am pretty sure that my windows work for a short while after the ignition is switched off. I'll double check. | ||
Patrick Francis Prolific User Username: jackpot Post Number: 263 Registered: 11-2016 |
No. My windows work all the time - with or without the ignition on. | ||
Jeff McCarthy Grand Master Username: jefmac2003 Post Number: 554 Registered: 5-2007 |
Paul, "Taking just the motor off saves time" Could you tell us where you spray the grease? Just removing the motor (not the whole lift mechanism) would allow you to spray grease onto the end of the worm drive shaft in the housing - is this the point where the old grease causes the problems? Jeff | ||
Jeff McCarthy Grand Master Username: jefmac2003 Post Number: 555 Registered: 5-2007 |
Patrick, It may well be yet another Australian delivery modification that was required at the time. Despite much searching I can find no reference to the conversation in the archives. I do know it was just an unplug and replug wires job. | ||
Steve Emmott Experienced User Username: steve_e Post Number: 11 Registered: 11-2018 |
There are quite a few reasons why the window lift mechanisms can be slow and a decent speed can be achieved without the electrical mods which just alone does not really fix the mechanical issues that need to be looked at. The whole units are very easy to strip down and quite simple really to rebuild but a couple of areas on reassembly need to be noted. Once the whole unit is out you need to just check the chain guide bars are straight. I have seen many cars that have had door damage where these rails have been slightly bent and whilst the bodyshops repair the door panel they do not think to check out any damage to these rails. On the early mechanisms the chain runs inside the guide rails and a piece of window channel flock sprayed rubber is fitted inside both guides for the chain to run inside and prevents any metal to metal contact on the metal rail by the chain. These are bonded in the guide rail in the middle and are about 25cm long. At times these can actually come loose and instead of the chain running inside the rubber channel the rubber channel moves up and down in the metal channel and can get trapped in the upper gear. Usually this has probably occured as the chain has got tight in the rubber channel due to debris, old grease and sometimes a bit of rust on the chain. Removing the nuts and bolts on the window gearbox drive and the top rail plastic cover exposes two top bolts on the rails which need to be removed too, the rails and gearbox body can then be easily parted. Two things to check here for is the rubber ring dirt protector on the gearbox middle spacer plate. Again sometimes these come away and get dragged into the gearing mechanism and chewed up which again can cause poor window lift performance. If come off but not damaged I refit using some loctite glue around the aperture so problem does not re-occur. When parting the gearbox body there are two thrust washers on the worm wheel nylon drive cog spindle. These are positioned with a small 'roll pin' that is pressed into the gearbox castings to centralise the washer. Just be careful when reassembling to position these correctly or the roll pin can be pushed down and it is so small I have not found an 'easyout' capable of lifting them back up. Once window drive box is parted you will notice there is not much grease actually inside as the metal worm drive from the motor works on a nylon drive wheel. Cleaning and lightly regreasing still helps but plenty of wd40 or maintenance spray on the metal worm drive shaft bearing areas at each end helps too. You can check the motor worm drive is free moving by powering the clutch brake and then it can/should be free to turn easily. Clean up and soak the chain in some fresh oil to ensure all links get well lubricated. Again once the rails are off the chain and upper cog can be slid out of the chain rail. Clean up the inside rubber chain guide and also clean the outside of the metal guide rail that the window lift bracket is attached to, this is important, as this outside of the rail gets dry deposits which prevent easy movement of the nylon coated bracket that the window glass attaches to. However you have to clean and check the inside of this small sliding bracket as any damage to the nylon coating can again cause slow window operation. On reassembly lightly grease up both inner rails inside AND the outside of the rail that carries the window sliding bracket up and down the rail. Check also the top cog is rotating freely. It won't spin round as it has a wavy washer on the shaft but it should be free to turn by hand. Again wd40 on the shaft though before reassembly helps. On reassembling you will see the top of the rails have an elongated hole so this allows the chain to be re-tensioned if any slight stretching has occured. The rails are handed so ensure they are put back as they came off. I have written this from old memories but think I have covered everything and you should find when refitted the windows will perform 'adequately'. A little teflon spray down the channels that the glass slides down also helps. Just doing the electrics mods may improve things but it will only cause more damage or strain to the mechanics without doing the full rebuild as described should any of these problems currently exist which they likely will. Well worth buying any old cheap door window lift mechanism though for any spares, but just thinking you can buy a secondhand one that someone says is working will still likely need a full rebuild as described and it is far easier to do a rebuild anyway before replacing with another one that ends up no better just because it has been 'bench tested' for movement by a seller. Interesting point too on that cut out relay per Glen's original post as my handbook says that there is one in this area for the central locking and does not show one for the window lifts. Have to check that one out as always something to learn every day.......trouble is remembering it nowadays. |