| Author | Message | ||
Geoff Wootton Grand Master Username: dounraey Post Number: 2022 Registered: 5-2012 |
I'm trying to remove the heater control box on my 74 SY1 and I'm really struggling. I removed the heater box and the control box should just pull out, according to the manual. However, it is rock solid held in place. I cannot get it to budge, even with judicious taps from a slide hammer. I've checked in detail for hidden bolts not mentioned in the manual and have used a thin flexible scraper to free any sealant along the bottom edge. Because of a lip on the vertical edges I cannot get the scraper in to free any sealant there, assuming this is what is holding the unit in place. My question is - Has anyone on the forum ever managed to remove their heater control box. I'm at a loss with this. 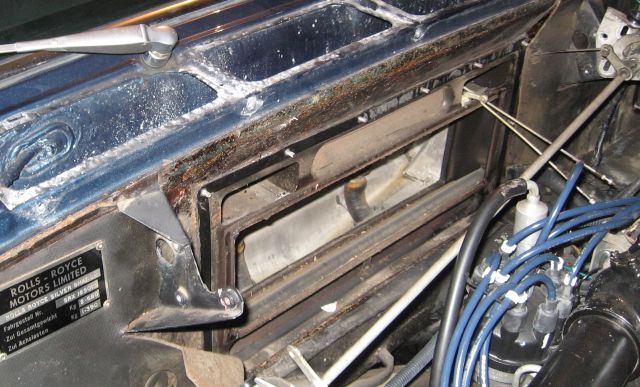 | ||
Carl Jensen Frequent User Username: carl_jensen Post Number: 57 Registered: 2-2005 |
I have felt your pain on removing the heater control box on my 1975 Shadow. The sealer they used had become hard so I had to heat the perimeter with a propane torch (a lot). As I was heating it I pried it off a bit at a time. The edges looked horrible when I finally got the box off but the metal is not very thick and it hammered back pretty well. There is probably a better way to get the old sealant to break loose but this is all I could think of. A pain. | ||
David Gore Moderator Username: david_gore Post Number: 3017 Registered: 4-2003 |
Geoff, If you can get in with enough room to reciprocate a length of suitable wire back and forth either on your own or with a helper, you might be able to wire cut the sealant sufficiently to allow you to break the bond between the flange and body. Piano string wire is useful for this purpose provided you use a suitable grip so you do not cut your hands to pieces. . | ||
Geoff Wootton Grand Master Username: dounraey Post Number: 2026 Registered: 5-2012 |
Carl - Thanks for your reply. It has given me confidence that I am on the right track i.e. that it is sealer that is holding the unit so rigidly in place. I did try heating it gently with a hair dryer but obviously it will need something much more brutal to soften the sealant. I will resort to my propane torch. David - I will see if I can get some wire in to use as a saw against the sealant. The problem is getting round the 90 degree bend of the outer flange. I will see if it is possible. It would be a good solution. One thing I have noticed is a number of flaps are either not working or working badly i.e. not forming a good seal. This is because the rubber grommets that act as bearings for the flap spindles perish over the years and the flap drops out of the housing. Below is a picture of one of the re-circ flaps. The rubber grommets/bearings are still available from Albers for 6 bucks each. I have bought 4 but I suspect I will need a lot more. One things for certain, that control box has got to come out, one way or another.  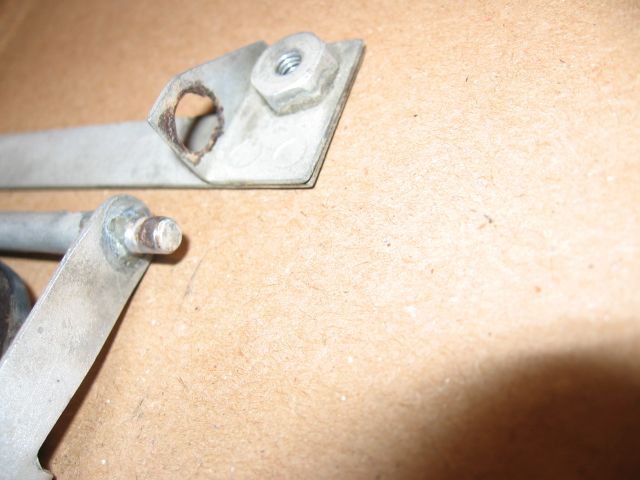 | ||
Christian S. Hansen Grand Master Username: enquiring_mind Post Number: 929 Registered: 4-2015 |
Geoff... I was by ACME Car Service today and there was a MPW Coupe (very early Shadow) having the heater box removed/replaced in order to get to those bushings and flap seals. Sorry that I was not there a few days ago in order to see and photograph the inner portion of the box removed. It was going back together and looked essentially as in your photo...inner box in place. Mark confirmed that there is only very tenacious bonding material holding the inner portion in place. Also noted that on this early model there are 6 flaps (as I recall) of which he could reach four from the inside but had to take the whole *** outer box apart to get to the other two, the process was not the least bit fun, that he had spent way too may hours fussing with it, and that if such a project ever came up again, he would likely refuse. So apparently it is a PITA, time consuming, and not something you want to do twice, if I may paraphrase! If you are still struggling with it, I might be able to suggest a tool to try to work away at that top part. If you're done, it's a moot point. . | ||
Geoff Wootton Grand Master Username: dounraey Post Number: 2029 Registered: 5-2012 |
Christian This project has been interrupted for a few days/week as I have had to travel to Denver,CO, so any suggestions of a tool that might help me would be gratefully received and potentially very helpful for when I return home to continue the work. I have been thinking of using a right angle or U shaped scraper to try and get in to break up the sealant, before resorting to a blow torch. Thanks for the additional information - it's good to know even the professionals have trouble with removing the control box. Of one thing I am certain, the control box has to and will come out; the condition of the flaps mandate it. I have received several samples from "The Foam Factory" to help me decide what best to use to line the heater boxes and flaps. After 43 years the original foam is mostly powder. I have already re-circulated the coolant and made up covers for the holes in the bulkhead, so I will be able to use the car, albeit without a heater or a/c while I carry out the time consuming re-conditioning of the system. That way I still get to use the car. Thanks again Geoff | ||
Jim Walters Prolific User Username: jim_walters Post Number: 199 Registered: 1-2014 |
Geoff, don't use a blow torch or propane torch to soften the sealer. Use a hot air gun with variable temperature settings or a hair dryer. An open flame is not a good idea in this area. SRH8505 SRC18015 SRE22493 NAC-05370 www.bristolmotors.com | ||
Jeff Young Grand Master Username: jeyjey Post Number: 383 Registered: 10-2010 |
I agree with using a hot air gun. Just be careful: you can still overheat/burn things with them. (And it's a great tool to have in your kit for stripping paint, shrinking heat-shrink tubing, bending plastic pipe, etc.) | ||
Geoff Wootton Grand Master Username: dounraey Post Number: 2030 Registered: 5-2012 |
Thanks for the good advice Jim. I mentioned the blow torch as Carl (above) has said that was his method, however I was a bit concerned because of the obvious risks. I have already tried a hair dryer but it had no effect. The extra power of a hot air gun will be what I try next - they are inexpensive. It was good to hear Carl managed to free his control box using the heating method. It shows it is effective. Geoff | ||
Robert J. Sprauer Frequent User Username: wraithman Post Number: 68 Registered: 11-2017 |
Guitar or piano wire. Go to a windshield shop and get a length of what they use to cut the sealant used to set the modern windscreens | ||
Geoff Wootton Grand Master Username: dounraey Post Number: 2031 Registered: 5-2012 |
Hi Robert The problem with using piano wire is there is a 90 degree flange on 3 edges of the control box. I have already free'd the bottom where there is no flange, but the flanges on the sides and top prevent a wire being used due to the 90 degree bend. | ||
Robert J. Sprauer Frequent User Username: wraithman Post Number: 69 Registered: 11-2017 |
Maybe this will work I have a few "flush cutting hand saws" that get into tight areas for precision trim work. You can also get offset handles. They are avail at all major home improvement store. https://www.youtube.com/watch?v=0tNshubiOXk | ||
Christian S. Hansen Grand Master Username: enquiring_mind Post Number: 930 Registered: 4-2015 |
Geoff... What is confusing me is your reference to a 90 degree flange. I do not see it. The following photo is quite similar to yours posted earlier and at flange around the inner box mounts onto the bolts and flat up against the bulkhead (disregard the nuts as they are there temporarily and simply to prevent loss. The "glue" between these two parallel surfaces is the issue at hand. I can feel with my finger nails the interface between these two parallel surfaces and do not see any other flange that would prevent some sort of curved pick or crowsfoot or other small flat pry tool from getting in between the two parallel surfaces in the same way that my fingernails did. The second photo is the outer box (still with primer) that mounts flush up against the flat surface of the inner box (after the nuts are removed). Can you clarify about this problematic flange?   . | ||
Geoff Wootton Grand Master Username: dounraey Post Number: 2032 Registered: 5-2012 |
Hi Christian It's difficult for me to describe the issues I am having. I am not even sure I am using the term "flange" correctly, as I am not an engineer. The photo below is of the outer heater box, taken from your entry. The flange I refer to is pointed to by the red arrow. Imagine this is the heater control box and it has been pushed into the housing on the bulkhead. The blue lines represent the depth of the control box inside the bulkhead. I have successfully pried the flange away from the bulkhead. The two parallel surfaces are separated. I was expecting the control box to then slide out however it is rock solid held in place. I surmised that the unit is therefore held in place by sealant on the sides and maybe the top of the control box - denoted by the blue arrow. This has been confirmed by Carl Jensen in an entry earlier in this thread. So by pushing a pry tool down the "flange", between the parallel surfaces, I hit the "body" of the control box i.e. it is a 90 degree bend and I would not be able to push a pry tool or even piano wire around that bend to remove the sealant. I think the solution is heat, so my next move will be to buy a heat gun and try and soften the sealant and pull the control box out, as was successfully carried out by Carl on his car. 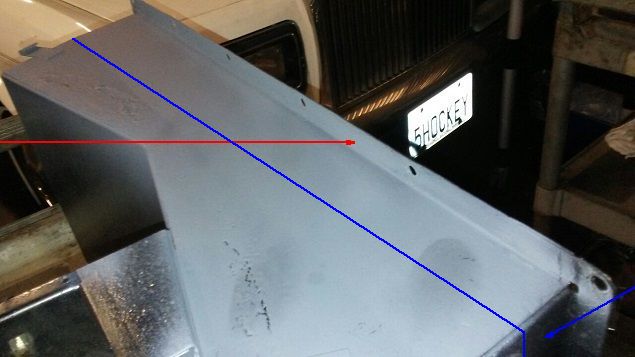 I would like to thank everyone for their suggestions - it has been a real help in trying to solve this problem. Regards, Geoff | ||
Christian S. Hansen Grand Master Username: enquiring_mind Post Number: 932 Registered: 4-2015 |
Geoff... Correct me if I jump to conclusions, but it now sounds like you have gotten the sealant broken free but inner box still will not come out? If so, it may or may not be relevant to mention that Mark also cautioned that there is a linkage that must be removed before the inner box, even after broken loose from the sealant, will come out. He said it is accessible "from the inside" and is located on the right and towards the bottom. Is it possible that this is what is hanging things up? p.s. this particular specimen is LHD as I presume is yours. . | ||
Christian S. Hansen Grand Master Username: enquiring_mind Post Number: 933 Registered: 4-2015 |
P.S. Re-reading your post I can now visualize the 90 degree bend you reference. I do not think that there is sealant on the inner edge of the inner box (your blue line) and is only on the flange that is parallel to the bulkhead. Wish I had seen the inner box when out and would be sure if I had. Carl has seen it out and can perhaps respond. I see no reason why there sould be sealant on the blue line as the inner box is trapped between the bulkhead and outer box parallel surfaces. Mark did however note that the installation was insane and as if RR expected this box to hold the car together!! My bet is that there is something else at play here. Good luck. . | ||
Geoff Wootton Grand Master Username: dounraey Post Number: 2033 Registered: 5-2012 |
Hi Christian Yes, I have disconnected the linkage from inside the car. The thing is, the manual says disconnect the heater hoses, disconnect the linkage from inside the car, undo all the nuts, pull off the heater box, and then pull out the control box. What they omit to tell you is they have glued the control box solidly in place. This discussion has been really useful to me as it has confirmed that it must be sealant that's holding the control box in place. I have done very detailed checks to make sure there are no hidden bolts either not mentioned in the manual or fitted as non-standard. There are none. I have just re-read your previous entry and you quote: "Mark confirmed that there is very tenacious bonding material holding the inner portion in place." This concurs with what Carl said earlier. The heat gun has to be the way forward. | ||
Christian S. Hansen Grand Master Username: enquiring_mind Post Number: 935 Registered: 4-2015 |
Geoff... I noticed that the upper part of the dash has been removed so that you can peer down into the "behind the facia" area from above thru the windscreen, but it was none of my business and overly presumptuous to open someone else's car and crawl inside to look around. From the inside, is it not possible to see the inner edges/portion of the inner box and apply some pressure outwards from the inside? Just wondering. . | ||
Alan Dibley Prolific User Username: alsdibley Post Number: 167 Registered: 10-2009 |
I did this job 15 years ago and still remember what a PITA it was. It is glued by the sealant. Solved by heat, a bent kitchen knife and brute force. I think I used foam rubber strip in place of sealant on reassembly - or I hope I did, 'cos I think it may have to come apart again. Alan D. | ||
Geoff Wootton Grand Master Username: dounraey Post Number: 2034 Registered: 5-2012 |
Hi Christian I removed several panels inside the car to see if I could drift the control box out from behind. What I have found is the A/C evaporator box gets in the way. Also the vent ducting inside the car e.g. the bulls eyes, butt up against the rear of control box, preventing access. It is clear the only way to remove the control box is by pulling it out from the engine compartment, short of dismantling the entire dash area of the car. Alan D - Respect - for anyone who has succeeded in doing this job. Thanks for another confirmation that heat is the only way to go. I've been told that standard weatherstrip, the type you can buy from any hardware store, is fine for replacing the foam gaskets on the flaps. There are youtube videos which use the same. However, since I want to replace the lining inside the heater box as well, I've decided to buy foam rubber sheets. I will cut the flap gaskets from these. I'm currently researching the best type of foam to use. | ||
John Kilkenny Prolific User Username: john_kilkenny Post Number: 299 Registered: 6-2005 |
Geoff, This doesn't help much but in 2009 I needed to get the heater matrix repaired on SRH1405 as it was leaking. I remember it was a fiddly job getting it out but not extremely so. I made a note that I replaced all the seals so I don't think there was any plastic sealant involved. | ||
Geoff Wootton Grand Master Username: dounraey Post Number: 2035 Registered: 5-2012 |
Hi John Agreed that the heater box is fiddly to get out, not least because the bonnet catch assembly has to be partially removed, but it is the heater control box that is located behind it that is the real problem. This is the box that is held by sealer. I am hoping to find time tomorrow to finally remove the control box. Called in to buy a heat gun today. 15 bucks from a local tool store (harbor freight). Cheap, but the reviews were mostly good. Geoff | ||
John Kilkenny Prolific User Username: john_kilkenny Post Number: 300 Registered: 6-2005 |
Thanks Geoff, I misunderstood the problem. Anyway best of luck for tomorrow. John | ||
Patrick Ryan Grand Master Username: patrick_r Post Number: 2014 Registered: 4-2016 |
Good luck Geoff. Hope it all goes well. | ||
Martin Taylor Prolific User Username: martin_taylor Post Number: 147 Registered: 7-2013 |
Just a side note here, it is actually possible to replace all the grommets on the heater door hinges and flaps inside the vehicle, it is very fiddly and the recirc flaps are even worse but they can all be done | ||
Geoff Wootton Grand Master Username: dounraey Post Number: 2036 Registered: 5-2012 |
Hi Folks It's out!!!! The heat gun worked perfectly. I'll be away from home for a week but when I get back I will put up some photos to show where all the sealant is, just in case anyone else needs to remove the control box on their car. Thanks again for all the help and good wishes. Geoff | ||
Patrick Ryan Grand Master Username: patrick_r Post Number: 2015 Registered: 4-2016 |
Great result Geoff. Catch ya when you return. | ||
Patrick Lockyer. Grand Master Username: pat_lockyer Post Number: 1960 Registered: 9-2004 |
As Martin has said flap bush replacement can be carried out in place. A few pixs when I carried out repairs some years ago. Something tells me to one flap mount at a time otherwise a RR calibration may needed to synchronise the whole set up!   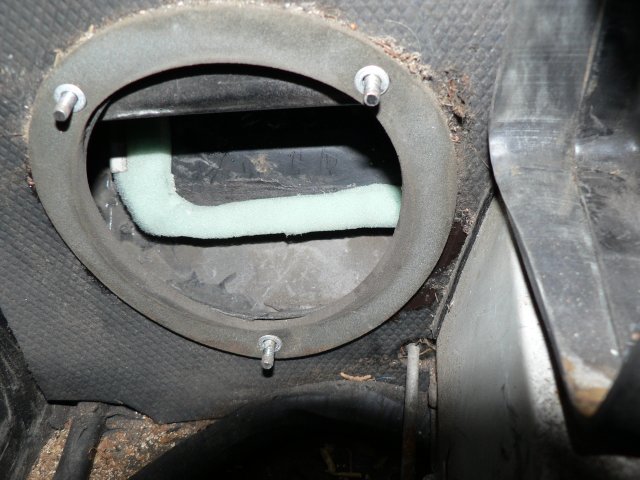 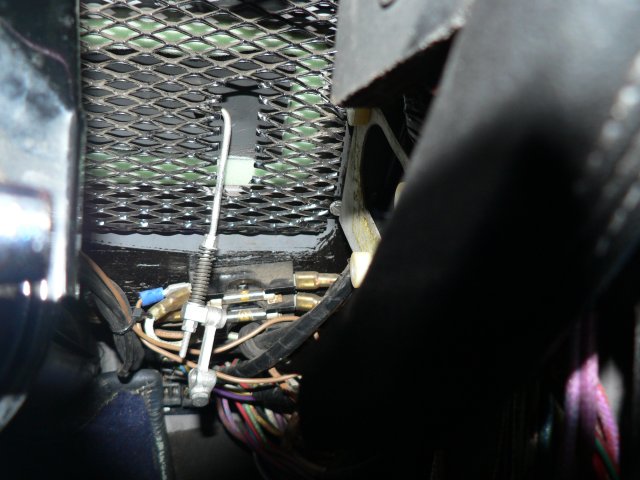 | ||
Randy Roberson Grand Master Username: wascator Post Number: 816 Registered: 5-2009 |
Glad to see you got through this. I had to remove the heater core ("matrix") on SRH9391 and I recall that box was really stuck at the flange, with whatever sealer was used. I kept at it and finally got it out without destroying it. | ||
Jeff McCarthy Frequent User Username: jefmac2003 Post Number: 650 Registered: 05-2007 |
Is it possible to remove the outer heater box on the bulkhead without draining the coolant etc. I just want to replace the smelly old foam rubber, which I assume is there for sound proofing. 1974 Shadow I SRH20280  | ||
Geoff Wootton Grand Master Username: dounraey Post Number: 2174 Registered: 05-2012 |
Hi Jeff No, you have to drain the coolant and remove the two hoses. The reason for this is the heater box contains the heater matrix and the two pipes protrude through holes in the heater box. I think all will become clear when you look at the pics below. They were taken just after I had removed the heater box and heater control box. The last pic below is of the restored heater box temporarily bolted to the heater control box. 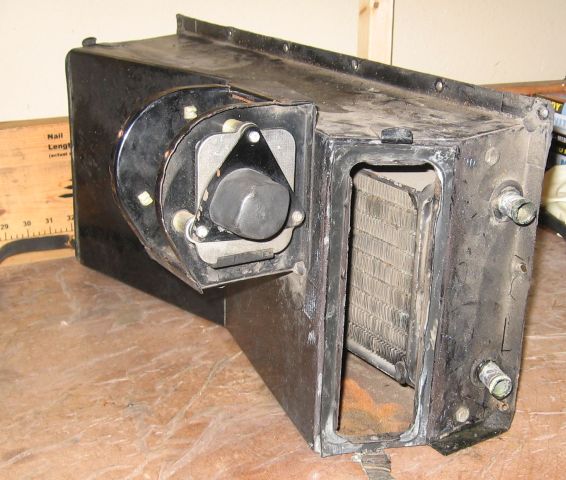 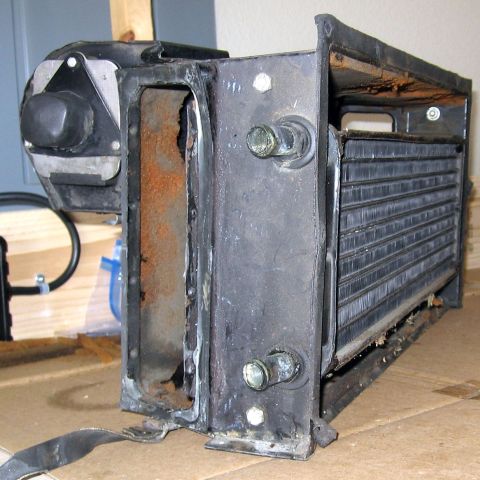 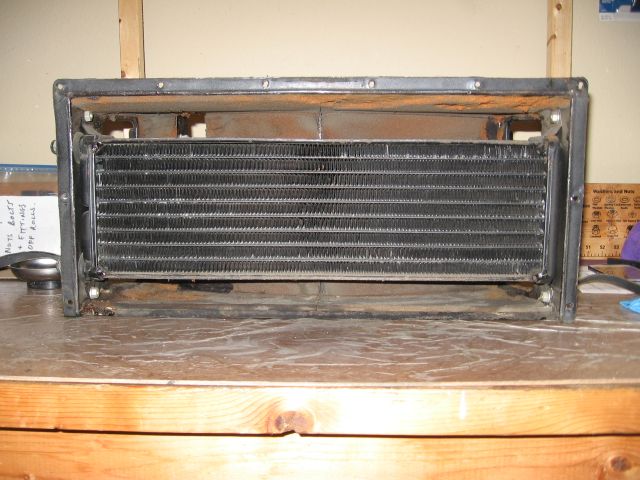 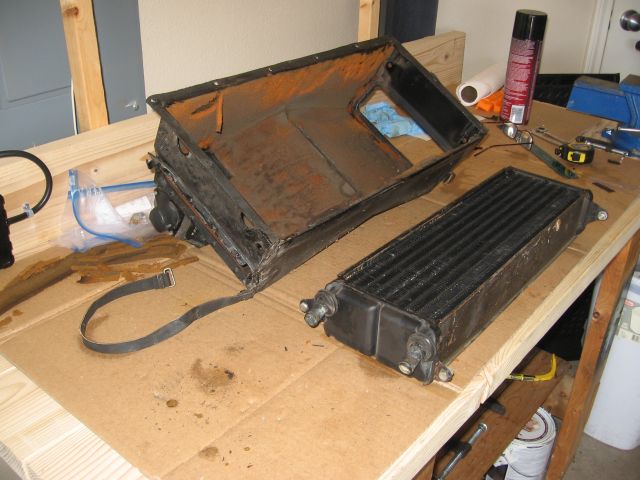 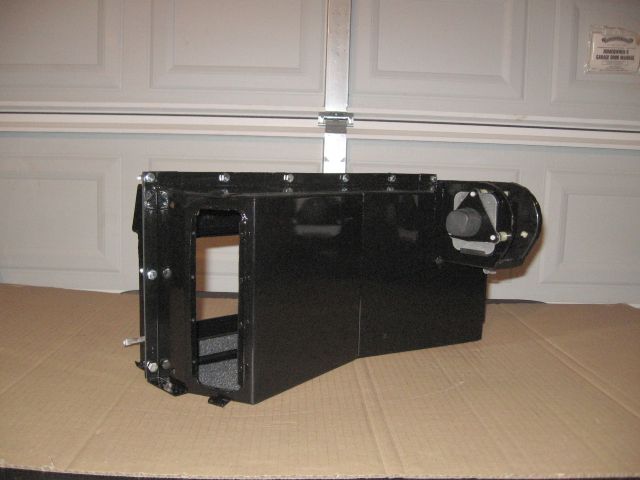 | ||
Geoff Wootton Grand Master Username: dounraey Post Number: 2175 Registered: 05-2012 |
BTW: My car is the same year as your's - 1974 - SRX18501 | ||
Jeff McCarthy Frequent User Username: jefmac2003 Post Number: 651 Registered: 05-2007 |
Thanks Geoff. I'll proceed as per workshop manual. | ||
Geoff Wootton Grand Master Username: dounraey Post Number: 2176 Registered: 05-2012 |
Hi Jeff Here are a couple of tips re: removing the bonnet catch. Use a loop of nylon cord to remove the two springs. The bonnet catch cannot be fully removed from the car without having to renew the cable (as far as I am aware). The manual says to move the catch to one side. What it doesn't tell you is there is a small grub screw that allows you to rotate the catch assembly out of the way. When I do a job on my car I document the procedure for future reference, hence the annotation on the pics. I specify a 3/16" allen key in one of the pics, but I believe this is wrong - it should read 1/16", which would be obvious when carrying out the job. If you get shipwrights syndrome and decide to remove the heater control box let me know. 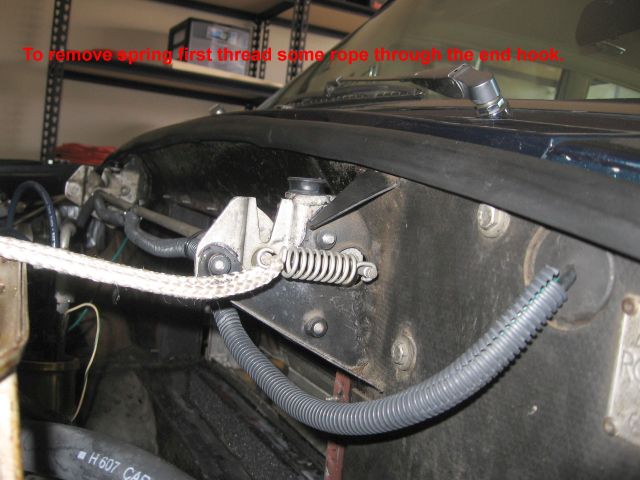 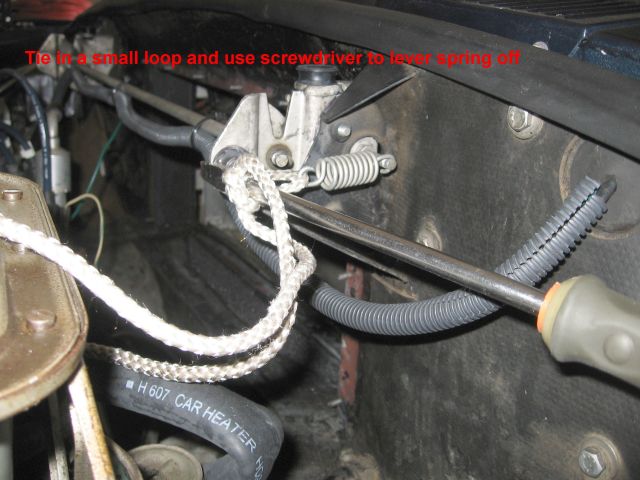 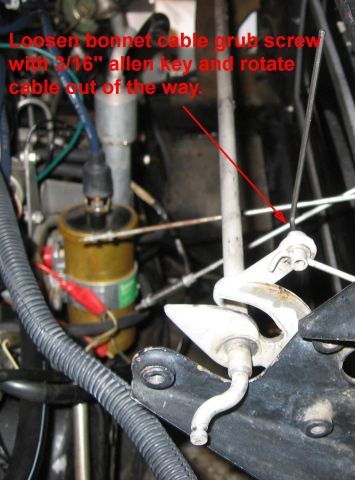 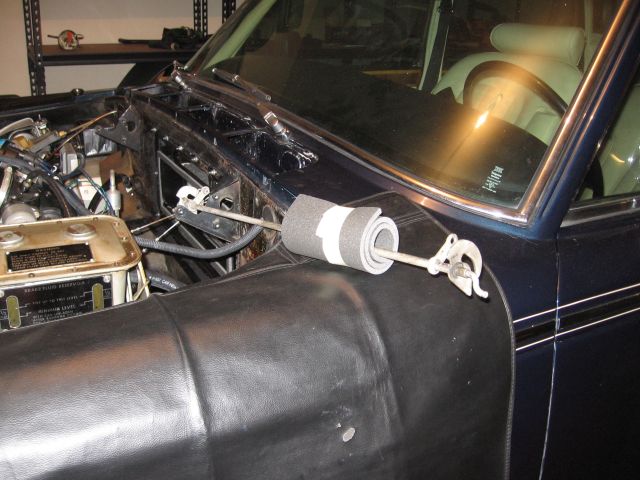 | ||
Jeff McCarthy Frequent User Username: jefmac2003 Post Number: 659 Registered: 05-2007 |
Geoff - I don't know how you managed to transmit the shipwright's virus but I'm definitely going to remove the heater control box as well; both to replace the foam and replace the flap bushes - one of them is non-existent - which might explain the rather ordinary performance of the demister setting. I've read this thread and the other one: http://au.rrforums.net/forum/messages/17001/31995.html I do not think I'm in for a fun day tomorrow. I'm also going to hunt for some bushes, hoping I can find something suitable in Australia because I don't think I want another 2 week delay getting them from the UK. What foam did you end up using? From the pics it looks like standard open-cell foam. | ||
Trevor Hodgekinson Experienced User Username: wm20 Post Number: 146 Registered: 11-2006 |
Don't know if it will be too stiff to make a seal but I use 85% teflon foam any where that is a PIA to get to. It is about the same hardness as the rubber on thong soles. | ||
Graham Phillips Frequent User Username: playtime Post Number: 219 Registered: 03-2019 |
G'day everyone,.... [quote="Jeff McCarthy"]I'm also going to hunt for some bushes, hoping I can find something suitable in Australia....[/quote] Have you tried 'Clark Rubber'? Graham. | ||
Geoff Wootton Grand Master Username: dounraey Post Number: 2182 Registered: 05-2012 |
Hi Jeff You could always buy the parts up front and start the job after they have been delivered. I bought some rubber bushes from a US supplier and found they were useless. The problem is you have to exert a fair force on them to get them to locate properly. The ones I bought split even though I had softened them in hot water and used a lubricant. I then bought OEM ones from Introcar and found they were up to the job. If you find an australian supplier just buy two and check they will withstand the stress of fitting them. I did extensive searches to try and find the correct foam to use. There is nothing listed anywhere (that I could find) as "heater box lining foam". You are right that open cell foam is used. I eventually settled for a sheet of foam from the Foam Factory in the US. It is not quite as dense as the original, but is the closest I could find. I ran tests on it to check it was not flamable and could withstand the likely temperatures within the heater box. A lot of youtubers use standard weatherstrip on their heaters, but I prefered to find something closer to the original. Another owner had used the foam used for lining audio speaker boxes and available from car audio stores. This struck me as a good idea, as long as the foam could stand the temperatures found in a heater box. HERE'S THE BIGGY - Rolls Royce in their wisdom decided to plaster the outer walls of the heater control box with sealant, effectively gluing it to the aperture in the front bulkhead . The result is when you have undone all the nuts and run a thin scraper along the bottom edge of the heater control box to break the seal of the legitimate sealant you will find the HCB won't budge. This is not documented. The solution is to use a hot air gun to soften the sealant. The HCB will then pull out with a little coercion. A hair drier is not hot enough for this job, so a hot air gun has to be used. You need to get the sides and top of the HCB quite warm, but not so hot the paint blisters. A propane torch is a definite no no, for obvious reasons. Jeff - one of the most helpful documents I found was the one you posted in a previous thread - http://au.rrforums.net/forum/messages/17001/Specification_Improvements_and_Electrical_Diagnosis_1972__2_-33605-35790.pdf Page 22 gives a schematic of how the Aircon/Heater is set up. It was absolutely invaluable in my restoration of the heater and more generally is a great document for diagnosing aircon/heater problems. I found the workshop manual to be excellent other than not documenting the sealant problem and the bonnet catch grub screw. My approach was to remove the heater box and heater control box, seal up the apertures in the bulkhead with metal plates and bypass the heater matrix by connecting the in/out coolant pipes. That way I could still use the car whilst restoring the heater boxes and flaps at leisure, albeit without a heater or aircon. This was useful given the inevitable problems that arise and the wait times for delivery of parts (e.g. I found the coolant tap was faulty and had to wait for the replacement from Flying Spares). 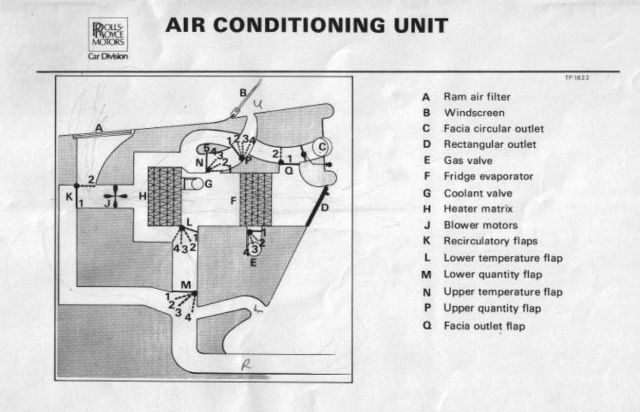 Geoff | ||
Jeff McCarthy Frequent User Username: jefmac2003 Post Number: 673 Registered: 05-2007 |
Okay - I finally got the heater box (both parts) out! Bonus - Found lots of little washers and screws that had disappeared down there over the years. While I have it out I'd like, if possible to remove the two plastic ducts that are now visible. I have a couple of spare ones and the idea is to put fresh foam in them as well. I'm assuming they're attached somehow behind the bullseye vents under the dash. Anyone ever removed them for cleaning before? Is it a (relatively) straightforward thing to do? I passed dash removal 101 years ago, so that's not a problem. | ||
Jeff McCarthy Frequent User Username: jefmac2003 Post Number: 674 Registered: 05-2007 |
While I have the heater core out I'm considering having it re-cored, or at least professionally flushed. Has anyone ever had this done? I'm assuming the local Natrad shop should be able to do it. Is the original core copper? Brass?. What should the replacement be - original materials or some modern improvement? | ||
Jeff McCarthy Frequent User Username: jefmac2003 Post Number: 675 Registered: 05-2007 |
The black plastic ducts I mentioned appear to be the demister ducts. Has anyone ever removed these on a shadow series I ? | ||
Geoff Wootton Grand Master Username: dounraey Post Number: 2228 Registered: 05-2012 |
Hi Jeff I'm following this thread and although I removed the heater box and heater control box in my car a year ago for refurbishment, I cannot offer any help. I did not remove the demister ducts and the heater core in my car was in good condition, so I just carried out a reverse flush and refitted it. Wish I could be of more help. | ||
Jeff McCarthy Frequent User Username: jefmac2003 Post Number: 676 Registered: 05-2007 |
Thanks Geoff, Further investigation involving inserting my 5 foot frame deep into the engine bay & inserting fingers made me realise there's no foam in the SSI ducts. So I have a spare set of SSII demister ducts going free to a good home. I've talked to the local Natrad guys & they're happy to replace the core. For me it's preventative maintenance at a rare time I actually have a few $100s to spare. Knowing my luck with the car the thing would've failed the day after I put the whole thing back together if I didn't take the opportunity! |