| Author | Message | ||
Geoff Wootton Grand Master Username: dounraey Post Number: 1910 Registered: 5-2012 |
I've got a strange leak that appears to be coming from the bleed screw on the front ACV of my 74 SY1 (SRX18501). The thing is, I've replaced the original with a brand new bleed screw and still it appears to leak. When I pressurize the system I get a constant drip from the bleed screw. I guess it could be seeping through the thread of the acv pressure switch, located slightly above and to the front of the bleed screw, giving impression the bleed screw is leaking. I've tried both the original and a new bleed screw and made sure they are tight. Could it be the seat in the acv is at fault here? Has anyone seen anything like this? I guess my only option is to remove the acv (yet again) and check for cracks etc. Before I do this I would be interested in any comments. The picture below shows the original bleed screw. The new one leaks the same. 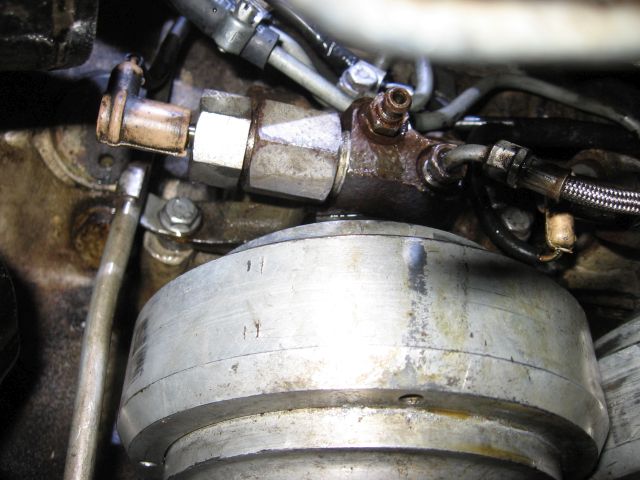 Geoff | ||
David Gore Moderator Username: david_gore Post Number: 2835 Registered: 4-2003 |
Geoff, Do you still have the original bleed screws? If so, can you check the depth of thread on the replacements? A possible cause could be the new screws not having 100% thread depth as 75% is often used to facilitate thread cutting during manufacture. A 75% thread leaves a minute channel between the tip of the bleed screw male thread and the base of the housing female thread which could allow fluid to leak out such as you are experiencing. Experiment with some teflon plumbers thread tape and see if this stops the dribble. | ||
richard george yeaman Grand Master Username: richyrich Post Number: 942 Registered: 4-2012 |
Geoff if it were mine I would try a soft thin copper or alloy washer between the bleed screw and the seat and see if it stops and if it does leave it. Richard. | ||
Robert J. Sprauer Experienced User Username: wraithman Post Number: 20 Registered: 11-2017 |
The bleed screw should not need a washer since the angled tip does the sealing. A common problem is overtightening leading to a misshapen profile of the bleed screw sealing tip. Very common. | ||
Brian Vogel Grand Master Username: guyslp Post Number: 2543 Registered: 6-2009 |
I don't think that anyone is disagreeing with this. But, if the seat in the ACV happens to be damaged then the use of a washer is simply a workaround. One that I might be inclined to use, at least until the next time I would need to take off the ACV for some purpose, as one seldom needs to use the bleed screw on the ACV. No, it's not correct, but if it's effective until it's convenient to make the correct repair then it's something worth considering as an option. Brian | ||
Geoff Wootton Grand Master Username: dounraey Post Number: 1911 Registered: 5-2012 |
Thanks for all your comments. I was careful to make sure the new bleed screw was dimensionally correct. I will go with Richard and Brian's workaround, as a diagnostic test. Geoff | ||
Christian S. Hansen Grand Master Username: enquiring_mind Post Number: 747 Registered: 4-2015 |
Before the angled tip, were there not round balls? Would they be better given that they would not deform from over tightening, or did they have other problems worse than the angled tip deforming the seat (such as getting stuck in place)? | ||
h_kelly Prolific User Username: h_kelly Post Number: 241 Registered: 3-2012 |
Geoff, I would check out David'S suggestion of plumber tape initally (I'd use a common plastic shopping bag,cut to small tape like size if no plumber tape). This may be good for diagnostic purposes,granted the heat from accumulator may melt/distort plastic bag. | ||
Patrick Lockyer. Grand Master Username: pat_lockyer Post Number: 1801 Registered: 9-2004 |
IMO this could be common cause of over tightening the bleed screw. Hopefully if one removes the bleed screw and can take a picture of the seat you will see a crack on the taper heading to the pressure switch thread shoulder, weakest point!!!!!!!!!!1 | ||
Jim Walters Prolific User Username: jim_walters Post Number: 151 Registered: 1-2014 |
Geoff, just replace the bleed screw with a short 3/8ths X 24 UNF bolt with a copper washer under the head to seal it. Permanent fix no matter what the seat looks like. SRH8505 SRC18015 SRE22493 NAC-05370 www.bristolmotors.com | ||
Paul Yorke Grand Master Username: paul_yorke Post Number: 2021 Registered: 6-2006 |
Bloody click to confirm. Lost my long answer.  Get it hot. Turn off and depressurise. Wash off with water and allow to dry. Use talc around the nipple and joints. Aerosol foot talk is handy. Start engine and watch carefully. Is it just the photo or has the hex bottomed out? Try the longer nipples. | ||
Christian S. Hansen Grand Master Username: enquiring_mind Post Number: 748 Registered: 4-2015 |
Paul... As a failsafe workaround I save my text to notebook or elsewhere occasionally while composing. My fumble fingers will occasionally hit the wrong key and my message completely disappears. Very annoying, but then I can retrieve my composition as of the last save. Also works if you forget the double click to post. Works for me as I HATE having to reconstruct my posts. . | ||
Paul Yorke Grand Master Username: paul_yorke Post Number: 2022 Registered: 6-2006 |
Christian, you would have thought I would have learnt by now!! Hate this forum for that function . . . but love the guys on it. My main problem is I'm usually on my phone when I post, Killing time whilst waiting for something or someone. So not only is it a pain to do on a phone the first time, the option of writing it on notepad etc isn't really viable. So many of my posts have gone that way, and usually it's not until I visit the thread again do I realise | ||
Christian S. Hansen Grand Master Username: enquiring_mind Post Number: 749 Registered: 4-2015 |
Sorry 'bout that. With my fat fumble fingers I cannot even dream of composing anything on those tiny keyboards on phones. Would rather drink sour milk! | ||
Geoff Wootton Grand Master Username: dounraey Post Number: 1912 Registered: 5-2012 |
Hi Folks Thanks for all the help. I now have a strategy based on the comments above. I will start with Paul's suggestion of getting the area clean and dry and then using talc to detect the leak. I am virtually certain the leak is coming from the bleed screw but it is possible it is dripping down from a higher position onto the screw. The talc test should confirm if it is the bleed screw. I will then drain the brake fluid, remove the bleed screw, and clean the seat. A while ago I bought a boroscope that Omar pointed to in another thread. I will see if I can get a meaningful picture of the seat with it. I like Richard's suggestion of using a copper washer. I guess the technique would be to use a 3/8" one and push it into the oilway until it is flush against the seat and then carefully screw the bleed screw down against it to make the seal. It occurs to this method would still allow the accumulator to be bled, just so long as the bleed screw was not withdrawn too far. If all else fails, then Jim's solution - seal it off with a 3/8" x 24 UNF bolt with copper washer. Even with this method I could gravity bleed the accumulator before tightening the bolt. Final bleeding at the calipers. I will do another careful check to make sure the bleed screw has not grounded. I've found that on the calipers and the other acv there is only about 1/8" clearance when the screws are fully tightened. Maybe there is an obstruction. I will check. The following pic shows two bleed screws that I have replaced, for obvious reasons. They are from the calipers but are the same size as the acv bleed screws. You can see the tips have been deformed by over tightening (by previous owners). i am always careful not to over tighten. The bleed screw to the right is the new one I fitted as a replacement in the ACV. You can see a slight line around the tip, which I put down to it's contact with the seat. Maybe that mark is made by a damaged, raised part of the seat. I will check. 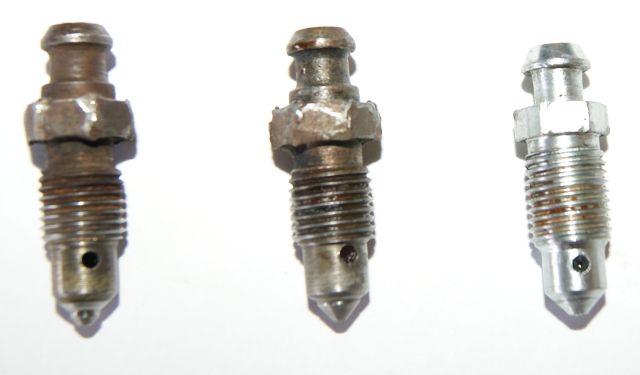 Thanks again Geoff | ||
Patrick Ryan Grand Master Username: patrick_r Post Number: 1861 Registered: 4-2016 |
Geoff, If still leaking after this, check for cracks emminating from the threaded hole. I have seen this in the past. | ||
Maxwell Heazlewood Prolific User Username: tasbent Post Number: 155 Registered: 9-2017 |
Uuugh!!....an ugly sight...such butchery! How tight do some people think things should be. Needs no more than two fingers on the wrench when tightening against a tapered seat like these. If these have been over tensioned a number of times, the thread form itself can be distorted allowing leakage. Either use a bottoming tap to 'chase' the thread or use soft thread lok compound. | ||
Robert J. Sprauer Experienced User Username: wraithman Post Number: 21 Registered: 11-2017 |
Also a closed end wrench or flare nut wrench should always be used. Looks like an amateur worked on the car. | ||
Brian Vogel Grand Master Username: guyslp Post Number: 2544 Registered: 6-2009 |
Geoff, Also, there is actually no need to bleed the accumulator in practice. Even a single pressurizing of the system, followed by a "brake pedal pump test," followed by starting the car again effectively purges the accumulator of any air that might be in it. Brian | ||
Omar M. Shams Grand Master Username: omar Post Number: 1435 Registered: 4-2009 |
Dear Geoff, another option you may wish to consider is attaching an o ring on the tip of the bleed screw using vaseline to hold it in place during insertion and then tighten against the o ring. All the best. Omar | ||
Geoff Wootton Grand Master Username: dounraey Post Number: 1913 Registered: 5-2012 |
Thanks for that info Brian. I had wondered if it was absolutely necessary to bleed the accumulators, particularly as I will be bleeding the calipers which should purge the entire system. I visually checked the acv seat and fitted a new bleed screw yesterday but to no avail. However, I am not absolutely sure the leak is actually coming from it. The brake fluid may be dripping down from a higher location giving the appearance the bleed screw is at fault. The problem is the view of the accumulators is obscured due it's location. I will spend the weekend with mirrors, cameras and talcum powder precisely locating the source of this leak. It most probably is the bleed screw, but I need to confirm it 100%. | ||
Geoff Wootton Grand Master Username: dounraey Post Number: 1914 Registered: 5-2012 |
Thanks Omar. | ||
Patrick Lockyer. Grand Master Username: pat_lockyer Post Number: 1804 Registered: 9-2004 |
"Also, there is actually no need to bleed the accumulator in practice. Even a single pressurizing of the system, followed by a "brake pedal pump test," followed by starting the car again effectively purges the accumulator of any air that might be in it." It mat purge the accumulator but what about the accumulator valve block????????????????? | ||
Geoff Wootton Grand Master Username: dounraey Post Number: 1915 Registered: 5-2012 |
The leak turned out to be from the high pressure braided hose next to the bleed screw. The brake fluid was diffusing across to the bleed screw and dripping off the end. I was further fooled because the whole general area was damp with brake fluid. Paul's tip of using talc was what solved it for me. What a great idea. It was then obvious where the leak was coming from and, as an added bonus, made the engine smell really nice. I will get a new high pressure hose made up and replace the one that's there. As a footnote, when I started this exercise in bleeding the brakes I decided to do the responsible thing and, against my better judgement, remove the gearchange cutoff from the fusebox. The result is the engine won't crank from the ignition switch. Everything is normal except when I turn the key to it's fully right crank position there is just silence. Long ago I fitted a manual starter switch in the engine compartment so I can still start then engine. Just a case of tracking the wiring through with a meter I guess, but I wish I'd left that gearchange cutoff alone. I'm always a bit leery at disturbing 44 year old connectors. Thanks again for all the help. | ||
Patrick Lockyer. Grand Master Username: pat_lockyer Post Number: 1805 Registered: 9-2004 |
That's good news to hear and lucky to catch the high pressure hose in time, these can burst and have been known to burn the car out with the inflammable brake fluid. | ||
h_kelly Prolific User Username: h_kelly Post Number: 242 Registered: 3-2012 |
Try a light sanding of both push in connectors, with a 12volt test lamp check to see you have current. Is the red button holding position when you refitted same{on mine the shadow 1 has a reset button} | ||
Brian Vogel Grand Master Username: guyslp Post Number: 2545 Registered: 6-2009 |
In addition to Mr. Kelly's recommendation, and there's nothing like mechanical cleaning when you can do it, is to be certain to give the newly cleaned contacts a coating with electrically conductive grease. Before reinserting into the fuseboard it's also a good idea to give the contacts that you can't mechanically clean there a shot of Caig DeOxIt or the equivalent. Brian | ||
Maxwell Heazlewood Prolific User Username: tasbent Post Number: 157 Registered: 9-2017 |
Sage advice from Brian  Two my favourite things to use with modern electronics and not so modern electrical connections....or three actually, a small brass wired brush, a tube of di-electric grease and a can of electronic cleaner/lubricant. this not only chemically cleans the contacts and pins but also lubricates them as a lot of electronic cleaners are just that. | ||
Geoff Wootton Grand Master Username: dounraey Post Number: 1917 Registered: 5-2012 |
What a nightmare this is turning out to be. To recap - I have a leak where the high pressure braided hose screws into the front acv, adjacent to the bleed screw. I decided to renew this line as the end fitting is knurled and I was also concerned that after all this time the bubble flare at the end of the hose may have hardened. I can only find 2 companies here in Tulsa that make up brake hoses. The first did not stock the correct fittings however the second company did. On getting the replacement hose home, I found that they had used metric 10 x 1mm fittings instead of the required 3/8" 24 UNF. So I took it back yesterday and they replaced it. I now find the angles of the replacement replacement hose are all wrong, not to mention the length. I know I should have inspected the hose at the shop, however I just took it for granted that they knew what they were doing. I could take this back again (40 mile round trip) but now I am getting worried any replacement may just not be up to the job. This is a high pressure hose that has to withstand 3000 psi and I'm wondering whether to trust their workmanship (or lack of it). The hose was only 20 bucks so I can easily write off the cost. Maybe I should buy the FS offering at $150. Here's a pic of the hoses with the original at the top: 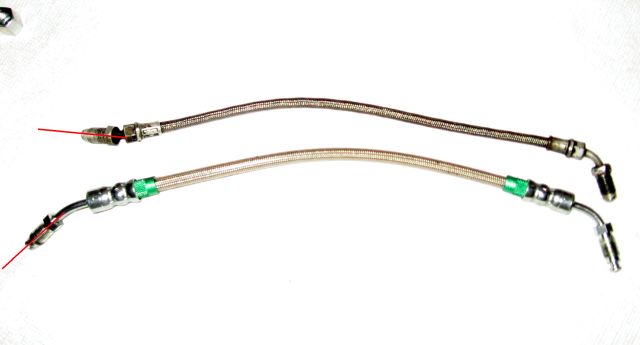 I've put the red lines in to try and emphasize just how far out the replacement is. There is just not enough give in the braided line to get the fittings to align properly and in any case, I don't want to add unnecessary stress to this high pressure hose by excessively twisting it. What a nightmare. Looks like I might be taking a road trip to Oklahoma City. This is not a question, just a vent - lol. Geoff | ||
Paul Yorke Grand Master Username: paul_yorke Post Number: 2026 Registered: 6-2006 |
Geoff . . . this is not an answer. I would try the hose and see if it will set in any semblance of comfortable. Although the braided hoses do not seem to be flexible they are. I also should mention that strangely, if the braided flex hose is touching the rubber return hose it will be the braided hose that wears through and leaks. Very strange but true! | ||
David Gore Moderator Username: david_gore Post Number: 2844 Registered: 4-2003 |
Geoff and Paul, Geoff - if the hose was made by a specialist hydraulic hose supplier, it will be OK as high pressure [3000psi] hydraulic systems are common in mining and construction machines. It appears to me they cut off the metric connectors to replace them with UNF and reused the shortened hose. Paul - Rule 101 of Tribology: When a hard and soft material are in contact in an abrasive environment, the harder material will show more wear than the softer material. The classic automotive example is crankshafts held in white metal shell bearings. You would be aware the worn component is always the crankshaft bearing surfaces. The reason being that any abrasive material in the oil embeds itself in the soft white metal and forms a very effective lap to erode the crankshaft journal. The braided hose/rubber hose problem is similar; dirt and road grime will embed in the softer rubber hose and abrade the harder metal braid on the braided hose. Intuition suggests it should be the other way around but practice proves the reverse applies. . | ||
Geoff Wootton Grand Master Username: dounraey Post Number: 1918 Registered: 5-2012 |
Hi Paul Thanks for not answering. I will take your advice and try and fit it tomorrow. If I loosely connect the more inaccessible connector block end first I will be able to see if I can get it to fit when I attach the acv end. Thanks for you reply. | ||
Paul Yorke Grand Master Username: paul_yorke Post Number: 2027 Registered: 6-2006 |
Hi David, I know how it works and have certainly seen it in practice in many places. I thought this one was worth mentioning at this point with the job at hand. It also seems a peculiar one because I'm sure that with the ribs and weave on the braided pipe if you could stretch it taught it would make quite a good file or blade. Certainly cut through rubber pretty quickly. However I've seen quite a few cars where flex pipes had been fitted relatively recently but the damage was already pretty severe. It's the speed it wears them that's surprising as well. | ||
David Gore Moderator Username: david_gore Post Number: 2846 Registered: 4-2003 |
Paul, A brief explanation re the braid anomaly - the best wear resisting coating is always the abrasive medium itself. In the braid/rubber hose contact, the abrasive first embeds itself in the softer rubber and forms an outer skin of abrasive material similar to emery paper so it then becomes the active abrasive. The metal braid usually will not retain the abrasive on its surface although it will often embed in the gaps between the braid and act as a less-effective abrasive as the bulk of the contacting surface remains almost entirely as bare metal. Hope this helps explain your observations in the workshop. | ||
Geoff Wootton Grand Master Username: dounraey Post Number: 1919 Registered: 5-2012 |
Hi Folks I'm still struggling with this accumulator leak. The story so far is 1) Rear accumulator leaking from seal between sphere and acv. 2) Removed both accumulators as front one has to be taken out to access the rear one. 3) Replaced O-ring and refitted both accumulators, however I reversed their positions. 4) Cured a leak from the high pressure braided cable. The problem is, I still have a leak from the seal between the acv and the sphere, even though I have just replaced the O-ring. I will remove this accumulator later today. My question is, what checks can I carry out on the accumulator when I have got it on the workbench, before I separate the acv and sphere. I do not have any pressure testing gear. The obvious things are careful visual inspection for any cracks. Also I was thinking of using a 1 thou feeler gauge to see if there is a gap between the acv and sphere i.e one of the mating faces may be distorted etc. On separating them I'm thinking of a straight edge on the machined faces. I guess I'm just asking for any ideas on what could be causing this leak. I am absolutely sure I used the correct sized O-ring and that the acv was fully seated and the acv fully tightened onto the sphere. I see no point in just replacing the O-ring again. Something is wrong here and I'd be grateful for any suggestions. Geoff | ||
richard george yeaman Grand Master Username: richyrich Post Number: 949 Registered: 4-2012 |
Goff according to Mr Yorke you take the accumulator and sphere of in one piece set it on the floor separate it using a soft face hammer replace the O ring and use the same hammer to tighten it, hit it till it is a metal to metal sound. | ||
Geoff Wootton Grand Master Username: dounraey Post Number: 1920 Registered: 5-2012 |
Hi Richard Yes, that's what I did. Paul also said you can feel when the acv grounds out on the sphere, which happened. Additional taps did not tighten it any further - it was fully tightened. I just can't understand why this seal keeps leaking. I guess I could have snagged the seal. I did use some brake fluid to lubricate it and carefully screwed the acv down, looking through the gap to make sure it hadn't lifted as I joined the acv and sphere back together. However I guess it's possible something went wrong. This will be apparent when I separate them tomorrow and inspect the o-ring. I was just wondering if there were any checks I could do before separating the two parts. | ||
Paul Yorke Grand Master Username: paul_yorke Post Number: 2031 Registered: 6-2006 |
Where are you sourcing the o rings from? Do they feel very oversized and proud when fitted in the groove? Bit of an odd one there :/ | ||
Geoff Wootton Grand Master Username: dounraey Post Number: 1921 Registered: 5-2012 |
Hi Paul, There is some history with this accumulator. I reconditioned it 6 years ago. I fiited an O-ring from Introcar which "blew" straight away. I then fitted an EPDM rubber O-ring that conformed to the standard AS568-218. This has been fine until it started leaking recently. I replaced it with another of the same a week or so ago but the seal has failed again. I'll get some pics up tomorrow. Geoff | ||
Patrick Lockyer. Grand Master Username: pat_lockyer Post Number: 1819 Registered: 9-2004 |
When I carried out the total repairs on the braking system many years ago I had most parts from Introcar, mostly in RR packaging including the sphere seals. Never had a problem with the "O" ring seals round or square and have reused the old ones [temp] in some cases no probs. The clue to the above leak straight after fitment of a "O" ring 6 years ago points strongly to incorrect fitment with leak failure. Seal lube is a must and positioning in the groove is a must. BTW the toruqe needed on assembly is no more than 60 lbf-ft. To remove it is more! a good clout with a hammer etc is needed. | ||
Geoff Wootton Grand Master Username: dounraey Post Number: 1922 Registered: 5-2012 |
Hi Patrick I did use lube and carefully observed that the O-ring was correctly positioned as I screwed the acv down onto the sphere. Also, I used a mallet to make sure the acv and sphere were fully tightened. However, I hope you are right i.e. incorrect fitment on my part - the cost of a replacement O-ring is much less than an acv or sphere. Geoff | ||
Geoff Wootton Grand Master Username: dounraey Post Number: 1923 Registered: 5-2012 |
Hi Folks Here are a couple of closeup pics of the acv/sphere O-ring. They were taken straight off the car i.e. I have not cleaned up at all. I will investigate later however on the top pic it looks like I may have snagged the O-ring at "10 o'clock". Pic 2 shows the ring slightly proud of the channel in the sphere. I would expect this. If it were level there would be nothing to compress to make the seal. 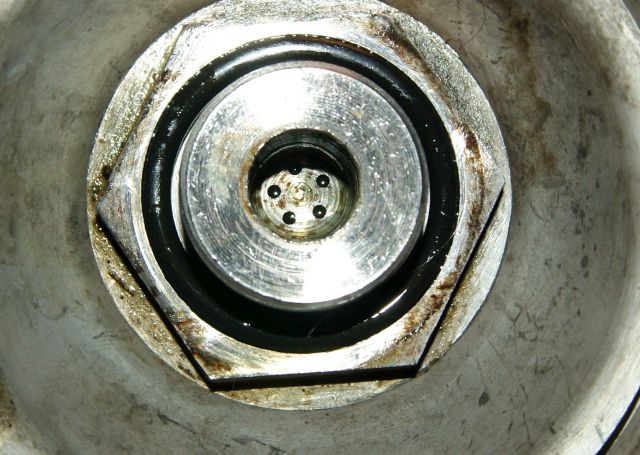 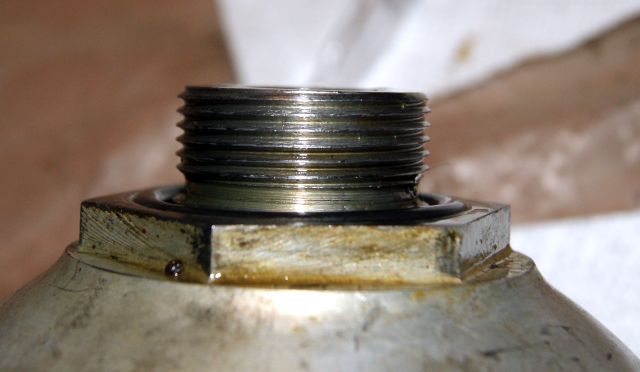 I'll put some more pics up later when I get time to make a more detailed examination of the O-ring, acv and sphere. | ||
Paul Yorke Grand Master Username: paul_yorke Post Number: 2032 Registered: 6-2006 |
Hi. Does the o'ring completely fill the groove horizontally? | ||
Geoff Wootton Grand Master Username: dounraey Post Number: 1924 Registered: 5-2012 |
Hi Paul No. The O-ring does not fully fill the groove. It is a snug fit on the outside edge of the groove and there is about 1/16" gap on the inside, all round. On the top pic, if you look at the 9 o'clock position you can see the gap. It is the same all round. This is not obvious from the photo due to the angle of the camera and shadowing of the light. I have checked the O-ring and it is smooth all round. I thought there was a rough area at the 10pm position in the pic, but this is just an optical illusion caused by light reflection. I am now wondering if the problem is due to a leak on the union where the high pressure line joins the acv. I did carry out the talcum powder test and it was dry but I was wondering if the brake fluid was running down the back of the acv and onto the accumulator sphere, giving the impression of an acv/sphere seal leak. Thanks for your help. Geoff | ||
Paul Yorke Grand Master Username: paul_yorke Post Number: 2033 Registered: 6-2006 |
Would you say the gap around the inside of the o'ring is much smaller in volume than the amount of rubber that is proud of the groove? Did you say that this o'ring has been fitted and in use for 6 years? | ||
Geoff Wootton Grand Master Username: dounraey Post Number: 1925 Registered: 5-2012 |
Hi Paul, Yes - There appears to be plenty of room for the O-ring to be compressed inwards, but I will confirm this as best as I can tomorrow. This O-ring was new when fitted two weeks ago. It is exactly the same size as the one on the other accumulator which is still ok after 6 years. What happened is this accumulator started leaking about 4 weeks ago so I changed the O-ring with a new one then refitted the accumulator and it still leaks. I've now had time to check the acv and there are no cracks and the mating machined faces look ok. I really appreciate your taking a look at these pics and giving your expert opinion. I realize it's very difficult to diagnose from 3000 miles away with patchy photos, but I am assuming you have not seen anything glaringly wrong so far. I'm thinking of replacing the sealing washer on the union where the high pressure line enters the top of the acv, installing a new O-ring and then trying it out again on the car. This accumulator was originally the rear one but I have swapped their positions. It is now the front accumulator and much easier to fit and see. I think this is my only course of action. | ||
Paul Yorke Grand Master Username: paul_yorke Post Number: 2034 Registered: 6-2006 |
It is tricky indeed from this far. Is it hot and sunny there. . . Maybe you should get me to visit if it is. To me it looks like that o'ring is too small. There should not be plenty of room for the rubber to be compressed into the groovr. The proud rubber should have nowhere to go except hard against the valve face. If there is room for all the the rubber to fit in the groove as it were . . .the fluid will just push between the rubber and the face. Hope that makes sense. Hard to tell on here, but that was my first thought. | ||
Geoff Wootton Grand Master Username: dounraey Post Number: 1926 Registered: 5-2012 |
Thanks Paul - that's a big move forward for me. I will check it out. | ||
Maxwell Heazlewood Prolific User Username: tasbent Post Number: 159 Registered: 9-2017 |
Hello Geoff....I agree with Paul. There shouldn't really be any annular gap in the inside of the 'O' ring. The idea is for the O-ring to compress vertically creating a seal. In the present state, as you tighten the joint, the O-ring compresses inwards and negates a successful joint and you have metal to metal faces with nothing to create an effective seal. Clean up those mating faces and install a fatter O-ring that effectively takes up all the space so it can only be compressed in a vertical fashion. | ||
Alan Dibley Prolific User Username: alsdibley Post Number: 132 Registered: 10-2009 |
Hi folks. Coming from a long-time old-Citroen-fixer, my observations may help. The fluid-tight joint is generated by the pressure of the fluid forcing the seal against the two outer surfaces of the joined parts. As long as there is no gap at no pressure, and enough flexibility to allow the seal to expand without exposing such a gap, the pressure of the fluid generates the conditions for a good seal. More pressure makes the sealing ring press ever more tightly against the outer surfaces. Citroen commonly uses square section O-rings on spheres and they "never" leak. Citroen union seals work in a similar way, using a rubber sleeve which deforms into the space around the pipe and should be tightened only to "snug fit" torque, never to the sort of torque used on metal-to-metal joints. The same goes for spheres, they should be tightened finger-tight plus a bit, the fluid pressure forces the threads to lock together - it is virtually impossible to loosen a sphere while there is any significant pressure in the system. Time to stop rambling and let someone disagree. I hope this may help understand the problem described in this post. Alan D. | ||
Alan Dibley Prolific User Username: alsdibley Post Number: 133 Registered: 10-2009 |
More... I should have pointed out that an O-ring seal relies on there being atmospheric pressure on the outside of the O-ring, and suitably smooth surfaces for it to seal against. Keep that in mind when looking for the source of leaks. Alan D. (Again.) | ||
michael vass Grand Master Username: mikebentleyturbo2 Post Number: 443 Registered: 7-2015 |
Hi Alan I agree with you!, shouldn't it be a square section seal not a round section 'O' ring? Mike | ||
Alan Dibley Prolific User Username: alsdibley Post Number: 134 Registered: 10-2009 |
Michael, oddly enough Citroen use both. The seal seems to work either way, as long as the surfaces are smooth. Alan D. | ||
Geoff Wootton Grand Master Username: dounraey Post Number: 1927 Registered: 5-2012 |
Hi Alan Thanks for that excellent explanation. Coincidentally, I was researching the same issue yesterday evening and came across the following diagram which illustrates what you are saying: 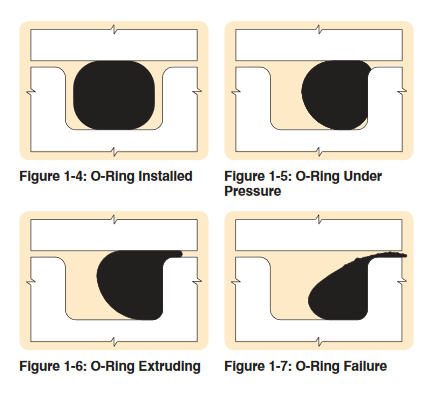 This also explains why the original O-ring I bought from introcar, 6 years ago, was about 15 thou undersize compared to the EPDM AS568-218 O ring I actually used. In practice the seal is made anyway by the pressure of the brake fluid, so the precise dimensions are not critical. Paul's suggestion of using a slightly larger O-ring would probably work, as it will mean there will be a greater spread of contact of the O-ring on the machined surface. This would overcome any imperfections in the machined surface. At the moment however I'm looking into the possibility of having the acv skimmed. If this is not viable, I will go for the larger O-ring solution. If that fails, a new acv At last I feel I am making some progress on this. Thanks to you all Geoff | ||
Patrick Lockyer. Grand Master Username: pat_lockyer Post Number: 1821 Registered: 9-2004 |
Just a thought, could all this be caused by the accumulator control valve not operating correctly with maybe air or valve failing causing the pressure to maybe rise and fluctuate. Maybe worth a pressure test! | ||
Patrick Lockyer. Grand Master Username: pat_lockyer Post Number: 1823 Registered: 9-2004 |
Going by the % of pix IMO the protrusion is more than enough to expand the gap between the "O" ring and the O/Dia of the grove without any failing thereof.  Don't no if this is a strange happening in the red or just the pix position. | ||
Alan Dibley Prolific User Username: alsdibley Post Number: 135 Registered: 10-2009 |
.. or evidence of a circumferential crack? Well spotted. That would explain everything. Alan D. | ||
Geoff Wootton Grand Master Username: dounraey Post Number: 1929 Registered: 5-2012 |
I'll be spending some time this weekend cleaning up the acv and sphere ready to be refitted next week, when a new crush washer for the acv arrives. I will be checking the area noted above with a magnifying glass. Thanks for pointing it out. |