| Author | Message | |||
Martyn Grattage Experienced User Username: martyngrattage Post Number: 28 Registered: 11-2017 |
Induction manifold fuel drain pipe connects to where exactly....?? One end to the drain filter of course but what about the other end..? Is it on the manifold or carby somewhere..? Anyone let me know. I looked at the technical manual it has no picture. I cant figure it out from it.?! Thanks Martyn | |||
Chris Browne Prolific User Username: chrisb Post Number: 281 Registered: 2-2010 |
Martyn, If you refer to the second post of your thread called �Pipes�, there is a diagram showing all the pipes. The fuel drain is connected to the bottom of a vertical casting which is part of the weakener/fuel system. Kind regards, Chris | |||
Martyn Grattage Experienced User Username: martyngrattage Post Number: 29 Registered: 11-2017 |
Hi Chris, thanks very much.. I have that pipe in place from the top of the vertical casting to the top of the drain valve. On mine as per the manual - there is another pipe which runs from the bottom of the valve to the induction manifold fuel drain pipe. See exerpt below from the manual. This is the Pipe I need i know it goes to the valve but where from there..? When I was trying to renew adjacent pipe it actually broke off from where it should go. Fuel spill pipe-To remove The following procedures apply to cars from Car Serial Number SRH 8742 and onwards only. 1. Unscrew the worm drive clip situated above the float chamber drain valve. 2. Unscrew the worm drive clip from the hose adjacent to the distributor. 3. Detach the hose. 4. Unscrew the worm drive clip situated below the float chamber drain valve. 5. Detach the hose from the float chamber drain valve noting that it is attached to the induction mani- fold fuel drain pipe. 6 . If the float chamber drain valve is to be removed, unscrew the bolt securing the valve clamping bracket and remove the bracket together with the valve. The valve clamping bracket is secured to a bracket attached to the bell housing. Note If a float chamber drain valve is faulty or damaged a new valve must be fitted. | |||
Martyn Grattage Experienced User Username: martyngrattage Post Number: 30 Registered: 11-2017 |
To be honest I am surprised no one can help me on here, especially with Australia being one of the lucky countries having these fittings as extra ha ha..!! I will try another couple of Forums as well and see if they can help. Thanks again everyone for your help. Martyn | |||
Martyn Grattage Experienced User Username: martyngrattage Post Number: 31 Registered: 11-2017 |
Hi Does Anyone have any advice on where it should go.? By the way the Below was taken from the Full Manual Chapter K Fuel Systems and Carburettor - Page 17 Point 5. is the relevant step. 5. Detach the hose from the float chamber drain valve noting that it is attached to the induction mani- fold fuel drain pipe Here are the full instructions as well for context. Fuel spill pipe-To remove The following procedures apply to cars from Car Serial Number SRH 8742 and onwards only. 1. Unscrew the worm drive clip situated above the float chamber drain valve. 2. Unscrew the worm drive clip from the hose adjacent to the distributor. 3. Detach the hose. 4. Unscrew the worm drive clip situated below the float chamber drain valve. 5. Detach the hose from the float chamber drain valve noting that it is attached to the induction mani- fold fuel drain pipe. 6 . If the float chamber drain valve is to be removed, unscrew the bolt securing the valve clamping bracket and remove the bracket together with the valve. The valve clamping bracket is secured to a bracket attached to the bell housing. Note If a float chamber drain valve is faulty or damaged a new valve must be fitted. Martyn | |||
Paul Yorke Grand Master Username: paul_yorke Post Number: 1977 Registered: 6-2006 |
Martyn, calm down a little bit buddy. Although when one has a problem and every hour you wait for a reply may seem like a life time, you only posted the message yesterday. This isn't a paid service with workers watching the screen to assist customers at any moment. It is watched by little elves who love RR&B cars and enjoy helping these cars live a long and cared for life. This is a busy period for these elves but just generally through the year - they have lives and families to distract them so answers will not always be instant! Can you post a couple of photos of what you have? I hope you both have a great 2018 :D | |||
Omar M. Shams Grand Master Username: omar Post Number: 1382 Registered: 4-2009 |
Dear Martyn, we all want to help - but as Paul says - a picture would speak a thousand words and we will be able to help rather than mislead you. We all know a lot but are all reluctant to offer incorrect information. We actually dont know what you mean exactly. Not all cars have the same fuelling systems. I look forward to seeing a few images. Meanwhile have a happy new year as you are now in 2018 and I am still in 2017. | |||
Patrick Lockyer. Grand Master Username: pat_lockyer Post Number: 1707 Registered: 9-2004 |
Sorry I can't help, know nothing on the set up as I have not had problems in that area. Bad time to study the books, no cider but some of the good stuff to warm up for the new year. Happy new year.  | |||
Martyn Grattage Experienced User Username: martyngrattage Post Number: 34 Registered: 11-2017 |
Ha ha All - I am so Sorry to be impatient...!! Perhaps one one of the Elves just look at the Sleigh quickly - pretty sure that has a V8 and an SU Carb.. So Humbug from me. Both my cars are off the road at the moment. I have this 1976 Silver Shadow and a 1984 Mercedes W123 280CE that the Alternator failed and been unable to even find anyone open at this time of year. Oh yes...And another Humbug from me. Martyn | |||
Martyn Grattage Experienced User Username: martyngrattage Post Number: 35 Registered: 11-2017 |
By the way I found Gin and Tonic again after a long time without. Its quite popular these days with most pubs having multiple choices. Hendricks apparently is the most popular. It tastes ok too me. | |||
Patrick Lockyer. Grand Master Username: pat_lockyer Post Number: 1708 Registered: 9-2004 |
Going by the vin number I believe your car has the SU carb type with the float chamber body, not the later type H1F7 with the internal float chamber. If so you have the clever IMO carbon canister system. Pix of the system.  | |||
Martyn Grattage Experienced User Username: martyngrattage Post Number: 36 Registered: 11-2017 |
Thanks so much for that Patrick That certainly explains why I haven�t found anything under the bonnet it goes to the fuel tank at the back. I can�t wait to have a look tomorrow. Thanks again Martyn | |||
Martyn Grattage Experienced User Username: martyngrattage Post Number: 37 Registered: 11-2017 |
i had a look yesterday and couldn't see anything obvious underneath that is missing something to connect the pipe from the fuel relief valve to. I am going again this afternoon - Any advice what to look for would be great. My Silicone hoses arrived yesterday so I will be trying to put those on as well. I am hoping to at least try to start her up if possible later I wont mind too much if she doesn't start I will be just be happy that I tried. I am going to clean the carby a bit aswell and lube a bit of obvious things linkages hinges levers etc while I am at it. Any tips for making sure she starts when i try. She hasn't been started for for 4 weeks...!! I was going to fill the carby lid and linkage with atf oil aswell Any more ideas or advice..? Thanks Martyn. | |||
Martyn Grattage Experienced User Username: martyngrattage Post Number: 38 Registered: 11-2017 |
Gotta be honest.. I can�t find anything again I am actually remembering that when I took it off there was a pipe that had fuel in that went somewhere on the inlet manifold.and not to the rear.. | |||
Paul Yorke Grand Master Username: paul_yorke Post Number: 1981 Registered: 6-2006 |
If you can't post a photo on here then email them to David . He's a star when it comes to that. Or post on a photo site and share a link. Or put a video on YouTube or video and post a link. | |||
Martyn Grattage Experienced User Username: martyngrattage Post Number: 39 Registered: 11-2017 |
I can�t post a pic because I don�t know where it went from the valve. One end goals from the top f the vacuum stack to the top of the valve The bottom of the valve goes to the overflow outlet but where I don�t know | |||
Martyn Grattage Experienced User Username: martyngrattage Post Number: 40 Registered: 11-2017 |
Post Number: 32 Registered: 11-2017 Posted on Sunday, 31 December, 2017 - 01:09 pm: Edit PostDelete PostView Post/Check IP Hi I was changing some vacuum piping that was leaking and hard and perisihed. While i was trying to renew this section it simply broke off So I have no way of knowing where it was. I know it runs from the valve but to where is the induction manifold drainpipe to connect it to..? Can anyone advise - by the way we in Australia have a lot of these additions that you may not even have. Anyone have any idea where it goes. I have used a borescope and the manual for a week with no success. By the way the Below was taken from the Full Manual Chapter K Fuel Systems and Carburettor - Page 17 Point 5. is the relevant step. 5. Detach the hose from the float chamber drain valve noting that it is attached to the induction mani- fold fuel drain pipe Here are the full instructions as well for context. Fuel spill pipe-To remove The following procedures apply to cars from Car Serial Number SRH 8742 and onwards only. 1. Unscrew the worm drive clip situated above the float chamber drain valve. 2. Unscrew the worm drive clip from the hose adjacent to the distributor. 3. Detach the hose. 4. Unscrew the worm drive clip situated below the float chamber drain valve. 5. Detach the hose from the float chamber drain valve noting that it is attached to the induction mani- fold fuel drain pipe. 6 . If the float chamber drain valve is to be removed, unscrew the bolt securing the valve clamping bracket and remove the bracket together with the valve. The valve clamping bracket is secured to a bracket attached to the bell housing. Note If a float chamber drain valve is faulty or damaged a new valve must be fitted. Thanks Martyn | |||
David Gore Moderator Username: david_gore Post Number: 2798 Registered: 4-2003 |
Martyn, Will have a look in my archives when I am back home this evening - I may be able to find something for you with a generous dose of luck. | |||
Paul Yorke Grand Master Username: paul_yorke Post Number: 1982 Registered: 6-2006 |
Think my message didn't go through. Martyn, take photos of what you have and post them. As many ends and angles as possible. You need to help us help you. Did you look at the pages I suggested. I feel the instructions you have posted again are for a much earlier car. Not your car. Although I don't remember you saying what year and chassis number it actually is. Photos will help us tons. | |||
Martyn Grattage Experienced User Username: martyngrattage Post Number: 41 Registered: 11-2017 |
Thanks David I am hoping for that bit of luck. I will take pictures and post them My reply earlier didn�t go through either. Martyn | |||
Martyn Grattage Experienced User Username: martyngrattage Post Number: 42 Registered: 11-2017 |
Hi David and Paul My last three attempts to reply didn�t work either Martyn | |||
Martyn Grattage Experienced User Username: martyngrattage Post Number: 43 Registered: 11-2017 |
Blimey oh Reily..!!! I am a bit slow sometimes and have just determined my Shadow is a 1976 Model so old maintenance Manual - Which was also the year in which it changed so I am the current Model in the old handbook. It means that 90% of what i have learned already might be wrong..ha ha. So tomorrow and this weekend I am going to start again and do things properly hopefully. I am going to try to and reset my memory with plenty of Gin or even Vodka. I do have a picture that was posted Numbers 1 to 14 are listed but there is no key for what A B C D EFGH are. Is it still relevant in my new world of Current Model..? Have a good weekend. Martyn https://s7.postimg.org/6nzbvipvf/Carb_System.jpg | |||
David Gore Moderator Username: david_gore Post Number: 2800 Registered: 4-2003 |
Martyn, When emission controls were introduced in Australia in 1973, it is my understanding RRMC sold cars from 1973 to 1975 as pre-emission 1973 models and the first emission controlled models were marketed from around 1975. I suspect Chapter U Part 2 from TSD2476 contains the information you need and I have extracted part of this for you as below. See Figures U7 and U8.
Part 5 is also relevant to dismantling and reassembling the SU carburettors and Figure U23 is what you really need: 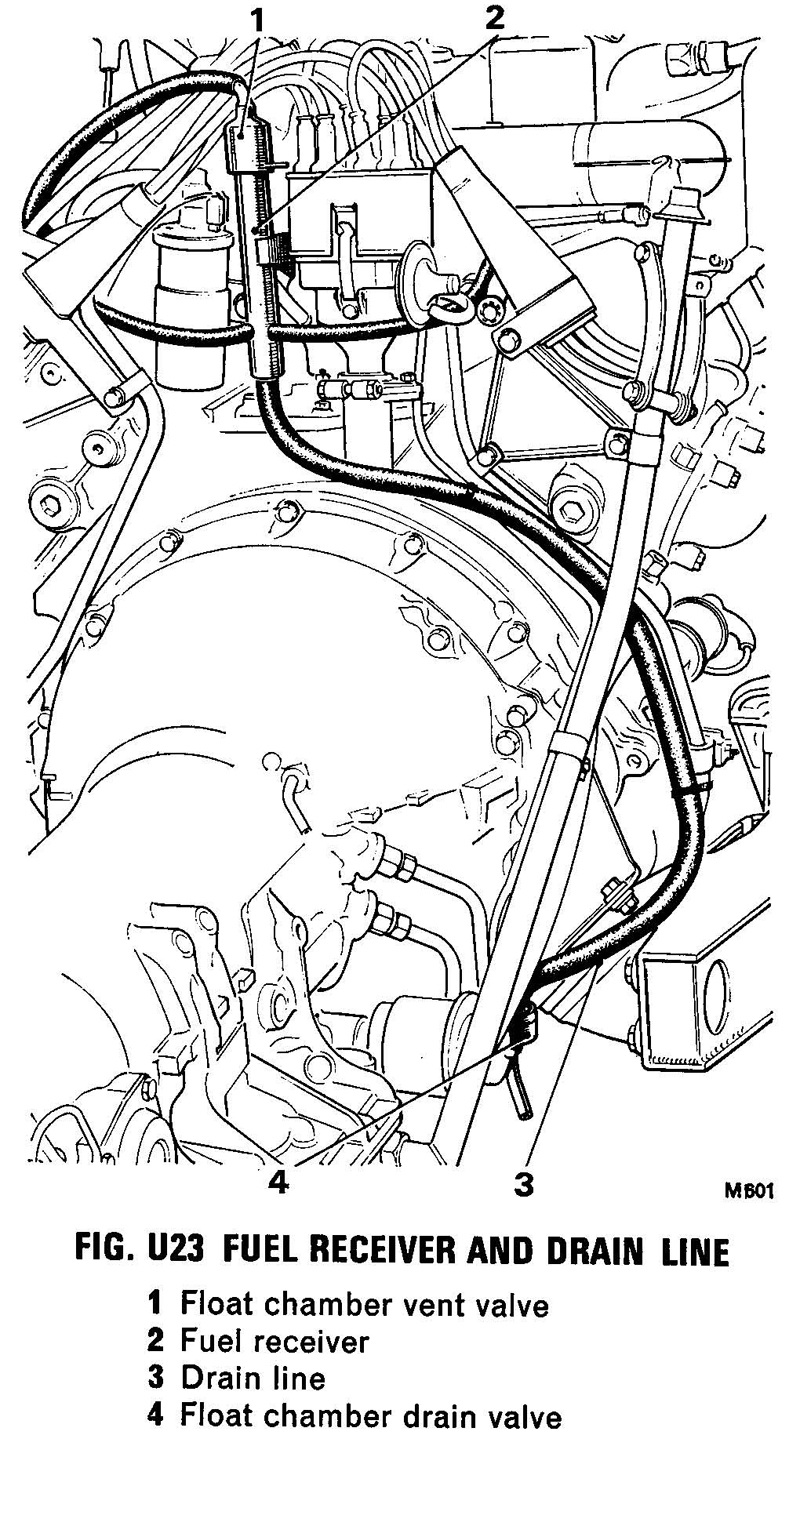 If you would like a full copy of Chapter U Part 2 please send me your email address and I will send it to you as an attachment as the file is too large to post on the Forum. Hope this helps P.S. The float chamber drain valve appears to be located next to the auto transmission modulator control valve which is my recollection from too many years ago  . . . | |||
Martyn Grattage Experienced User Username: martyngrattage Post Number: 44 Registered: 11-2017 |
Thanks David I feel so close....I can almost smell victory On the 8 Page emission control systems pdf document you posted. On Page 2 Item 6.. Is The Float Chamber Drain Valve which is exactly what I am looking for. My only worry is being able to Physically find it and connect to it. Now I know the correct terminology as well..Potato / Potatoe Can YOU or Anyone else take a picture or give me better picture so I can find this sucker. I have been trying to attach just the relevant page but cant seem to edit it as I thought. So I attach your 8 page document again. And refer to the Page 2 and the item number 6 The Float Chamber Drain Valve I would be so happy if I thought I knew what I was doing. Thanks Martyn | |||
Martyn Grattage Experienced User Username: martyngrattage Post Number: 45 Registered: 11-2017 |
my apologies..here is the attachment. With my problem answered I am hoping to have her running tomorrow ha ha Martyn
| |||
David Gore Moderator Username: david_gore Post Number: 2803 Registered: 4-2003 |
Martyn, You need to read Part U2 Chapter 2 then read Chapter 5 which deals with dismantling and reassembling the SU Carburettor with more information and diagrams of the carburettor components. I cannot post Chapter 5 on the forum as the file is too large but I can email it to you and I suggest you should get this from me ASAP and go through it plus download the Shadow Parts list from the Technical Library using the following link: http://rrtechnical.info/SY/spare/start.pdf Page 2 item 6 Float chamber Drain Valve is the same item as Item 4 in Figure U23 in my last post above and is located adjacent to the modulator on the side of the automatic transmission case underneath the car. If you start with the dipstick tube where it goes into the transmission sump and move towards the torque converter bell housing; the sequence of components is dip stick tube, transmission modulator and finally the drain valve. The float chamber vent valve is another component completely and is item 1 in Figure U23. Hope this makes things clearer for you. | |||
Martyn Grattage Experienced User Username: martyngrattage Post Number: 46 Registered: 11-2017 |
Thanks so much for this My email address is martyn.grattage@btinternet. com | |||
Paul Yorke Grand Master Username: paul_yorke Post Number: 1983 Registered: 6-2006 |
 | |||
Martyn Grattage Experienced User Username: martyngrattage Post Number: 47 Registered: 11-2017 |
Paul I trecognise that picture The pipe on the top of that valve goes to the vacuum stack adjacent to the distributor m. There is one on the bottom of mine, where does it go to. | |||
Paul Yorke Grand Master Username: paul_yorke Post Number: 1984 Registered: 6-2006 |
"There is one on the bottom of mine, where does it go to." Bottom of what? | |||
Patrick Lockyer. Grand Master Username: pat_lockyer Post Number: 1711 Registered: 9-2004 |
Can you say which is the system like yours. pix 1 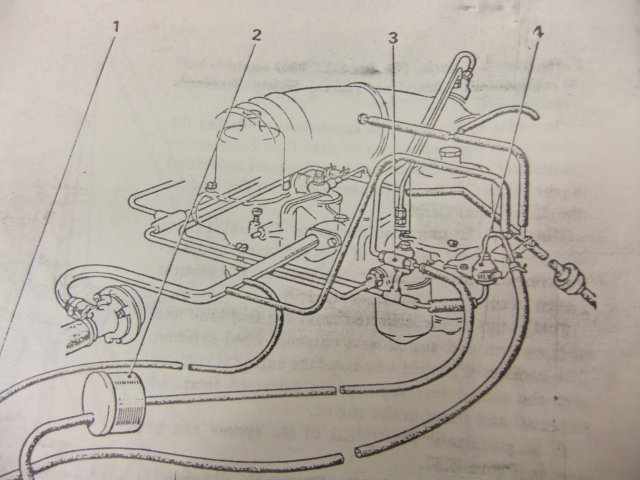 Is it the one that David has posted. pix 2. 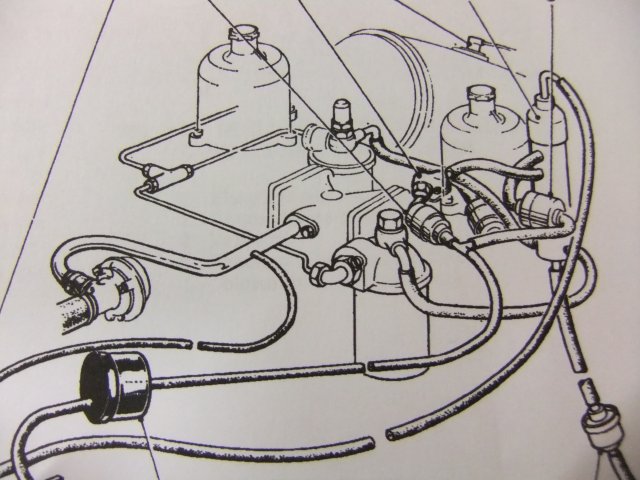 If it has the fuel float chamber vent valve [vac stack] then the lower connection is the float chamber drain valve. no 7. | |||
Geoff Wootton Grand Master Username: dounraey Post Number: 1890 Registered: 5-2012 |
Does anyone know how the internals of the fuel receiver are configured? Is it just a convenient way of connecting all the fuel "overflow" pipes or is there a one way valve inside to prevent air entering the system?  | |||
Paul Yorke Grand Master Username: paul_yorke Post Number: 1985 Registered: 6-2006 |
Geoff , yes. obviously the one down the bottom ...... and if you see the top looks very similar to the bottom valve same inside. if you look at the earlier pics Geoff they are listed on one there. | |||
Geoff Wootton Grand Master Username: dounraey Post Number: 1891 Registered: 5-2012 |
Thanks Paul. I get it now - the valves (except for the one at the top, held in place with a split pin) are external to the fuel receiver. I'd always wondered. | |||
David Gore Moderator Username: david_gore Post Number: 2804 Registered: 4-2003 |
Martyn, Have emailed the relevant information from TSD2476 Chapter U Part 2 which details the emission controls which I suspect were most likely fitted to 1975/1976 specification Australian delivered Silver Shadows. As a matter of interest, does your car have chromium-plated or plastic bumper bars? If plastic, you have a Shadow II and TSD4200 is the relevant Workshop Manual. If this is the case, then you will need to download the Shadow II workshop manual TSD4200 from the Technical Library. The various Chapters of TSD4200 can be downloaded from the link below: http://rrtechnical.info/SY/TSD4200/tsd4200.htm The small piece of pipe at the bottom of the valve was just long enough to clear the base of the automatic transmission so any fuel would go straight onto the ground and not remain on the car presumably to reduce fire risk. This is clearly visible in Figure U23 I posted above. . | |||
Martyn Grattage Experienced User Username: martyngrattage Post Number: 48 Registered: 11-2017 |
So Sorry All my terminology and wording has been incorrect and confusing to all. I wish I could erase everyone�s memories but I can�t. I am now clear what I mean and what I need to know now and need you to know aswell. Forget everything I have posted if possible. Ha Ha The hose at Top of the drain valve goes to the top Vacuum connector stack up by the distributor on mine. I actually mean the hose at the bottom of the drain valve on mine. It�s this hose that broke while I was trying to trace where it went to from there. Following everyones input I believe it went to The Float Chamber Drain valve. Which is definitely item 6 on the picture attached. So can anyone tell me exactly where it is and any one have any pictures or diagrams to help me locate and connect to it.
| |||
David Gore Moderator Username: david_gore Post Number: 2806 Registered: 4-2003 |
Martyn, Item 6 as identified by you in the above post is the one I have been referring to all along and is best illustrated as item 4 in Image U23 earlier in this thread. The hose on the bottom of the valve is a "tail" which is open to the atmosphere and intended to drain waste fuel safely under the vehicle - it is not connected to anything and this is what has caused the confusion. . | |||
Martyn Grattage Experienced User Username: martyngrattage Post Number: 49 Registered: 11-2017 |
My Brain hurts...So mine is wrong in a couple of ways and I have two connections My top connects to the drain valve but on the diagram U23 it should be the bottom. Where does the top connection go to does it just loop around back to the vacuum pipe again as it looks or does it actually go somewhere else..? Martyn | |||
Paul Yorke Grand Master Username: paul_yorke Post Number: 1986 Registered: 6-2006 |
David, Is there an unsubscribe button anywhere? Never looked for it before . . . . Cheers, Paul. | |||
Martyn Grattage Experienced User Username: martyngrattage Post Number: 50 Registered: 11-2017 |
Paul Ha Ha Are you saying you know the answer and won�t share..?! Or just don�t know the answer and can�t share..? Martyn | |||
Paul Yorke Grand Master Username: paul_yorke Post Number: 1988 Registered: 6-2006 |
Neither of those. | |||
David Gore Moderator Username: david_gore Post Number: 2807 Registered: 4-2003 |
Martyn, I think Paul is politely saying we are going around in circles and it is time to stop........ | |||
Martyn Grattage Frequent User Username: martyngrattage Post Number: 51 Registered: 11-2017 |
Paul..I saw your reply..and thankfully printed off your horrid words on my brand new printer before the moderator deleted your weak reply. If you had bothered reading my post instead of being a smartass you would have seen that I apologised and explained t hat i had just figured my model and details that I asked which were incorrect. Waiting a nano second for a reply etc etc By the way I have also printed this absolutely fine reply to you before the moderator deletes this aswell -And very happy to defend myself in any way. I know I have done nothing wrong. I am Just printing now..! Its really a shame that you have spoiled this I needed help having spending nearly two weeks with a borscope and this forum trying to get my car sorted over Christmas Time. Happy New Year Paul. Mr Moderator I know you are jus doing your job. .. And printing this reply of coruse Martyn | |||
Paul Yorke Grand Master Username: paul_yorke Post Number: 1990 Registered: 6-2006 |
Martyn, Don't jump to conclusions - the moderator did not delete the message. It certainly was much more weak that most I see on forums. LOL! We STILL have no idea what your car is exactly. Here is my guess - 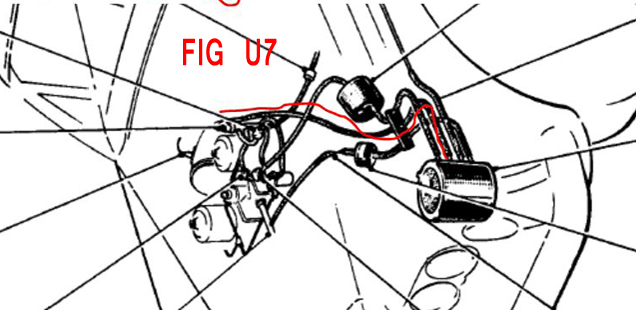 | |||
Patrick Lockyer. Grand Master Username: pat_lockyer Post Number: 1714 Registered: 9-2004 |
Having reread the postings and studied the set ups I believe the 1976 system must be like my 2nd pix that David had originally posted. Here it is with the two carb float chamber pipes going to the drain valve that is not connected to any pipes, just routed round the bell housing at the o/s side of the auto box. This part of the system is for the removal of fuel from one or both flooding carburetters if the situation arises.  | |||
Chris Browne Prolific User Username: chrisb Post Number: 283 Registered: 2-2010 |
Hello Martyn, I have not been contributing to this very complex issue but I would urge you, being a new member to this community, not to overreact and become abusive towards experts who are trying to help you. Such an attitude is going to turn people away from trying to help you which not what you want. These forums are the best available anywhere for technical advice and the only person to lose out will be yourself if you do not take a calmer line. I do not know you personally and I�m sure you are a great guy to deal with face to face but to Mr. Average, the way you communicate on this forum is a little confrontational and aggressive if you hope to solve the technical problems you are suffering. Everyone is trying to help you and is giving their input freely and are not trying to antagonise you. Our cars are enormously complex and trying to solve technical problems on this forum, rather than standing in front of the car, can be long winded and frustrating. Kind regards, Chris | |||
Martyn Grattage Frequent User Username: martyngrattage Post Number: 52 Registered: 11-2017 |
So Sorry All my terminology and wording has been incorrect and confusing to all. I wish I could erase everyone�s memories but I can�t. It has been way too complex for me mainly because a Hose broke I didn�t know anything about. I am now a bit clearer what I mean and what I need to know now and need you to know aswell. Forget everything I have posted if possible. Ha Ha On mine. The hose at Top of the drain valve goes to the top of the vent valve up by the distributor. I actually mean the hose at the bottom of the drain valve on mine. It�s this hose that broke while I was trying to trace where it went to from there. Following everyones input I believe it went to The Float Chamber Drain valve. Which is referred to a couple of diagrams and instructions So can anyone tell me exactly where it is and any one have any pictures or diagrams to help me locate and connect to it. I attach a couple of pictures perhaps someone can point me in the right direction. What are these things and more importantly where is The Float Chamber Drain Valve on mine. Martyn | |||
Martyn Grattage Frequent User Username: martyngrattage Post Number: 53 Registered: 11-2017 |
Here are the pictures this time of my car right now. Martyn 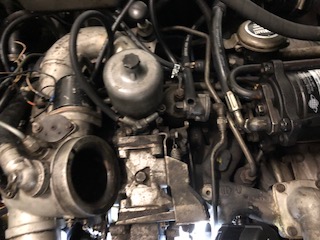  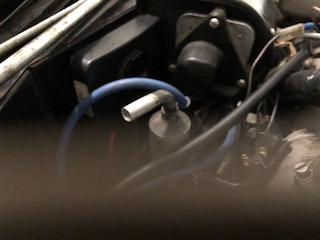    | |||
Martyn Grattage Frequent User Username: martyngrattage Post Number: 54 Registered: 11-2017 |
 Last one hopefully Martyn | |||
David Gore Moderator Username: david_gore Post Number: 2812 Registered: 4-2003 |
Martyn, Your images would benefit from making them larger before posting which will allow more detail to be seen. The current images are 320 pixels x 240 pixels - I suggest these should be resized to 640 pixels x 480 pixels with a resolution of 300 pixels per inch [i.e doubling their size] for future posts. Unfortunately, I cannot resize the above images without losing a lot of detail due to their low resolution [72 pixels per inch]. If you have problems resizing the images, please contact me. Regards David | |||
Paul Yorke Grand Master Username: paul_yorke Post Number: 1992 Registered: 6-2006 |
From what I can see in the photos it is a standard car with no fancy emission control and with the weakener system. 99.9% previously posted stuff is irrelevant. http://au.rrforums.net/forum/messages/17001/30002.jpg shows the rear connections. I'm sure there are plenty of photos of that setup on here already and hopefully somebody will post or point to some. I'll try and take a couple of pics later just in case. | |||
Martin Taylor Prolific User Username: martin_taylor Post Number: 120 Registered: 7-2013 |
The pictures are obvious, maybe you need to understand how the system works to be able to follow it. Both float bowls are vented to atmosphere to allow the fuel to be sucked in and used by the carbs. At partial throttle a small vacuum is introduced via a tap in the left hand throttle body, this vacuum is partially vented via the mixture weakener filter, otherwise it would not allow fuel to be metered via the carb and might pull fuel back via the throttle body. This is why blocking the weakener filter will cause an idling engine to stall as the pull on the fuel via the carb metering will then be less than the pull in the float bowl hence no fuel so engine stops. If a float sinks and floods the overflowing fuel goes down to the ground via the fuel trap ortherwise it could go into the metering hole or out the weakener filter and start a fire. If the non return drain valve is not sealing it will suck in air and the weakener system will never weaken. Strip and clean the drain valve as suggested above, you should not be able to suck air up it. Check for vacuum at the metering point by the left carb, should feel a pull. All other hoses just t together from memory, the pipes can harden and fall off. All comments are meant to be helpful, Paul has patience with many unskilled fellow enthusiasts on this forum particularly and has never lowered himself to being sarcastic or unhelpful. Read all the replies knowing that most people here (with very few exceptions) only give their time and energy to help others. | |||
Martyn Grattage Frequent User Username: martyngrattage Post Number: 55 Registered: 11-2017 |
Ha ha that�s quite amusing David Gore Firstly I tried unsuccessfully many times to post updates and the recent pictures. wouldn�t post twice lthat�s why they are low resolution Martyn Martyn | |||
Patrick Lockyer. Grand Master Username: pat_lockyer Post Number: 1719 Registered: 9-2004 |
Martyn going on your the 3rd pix down ie 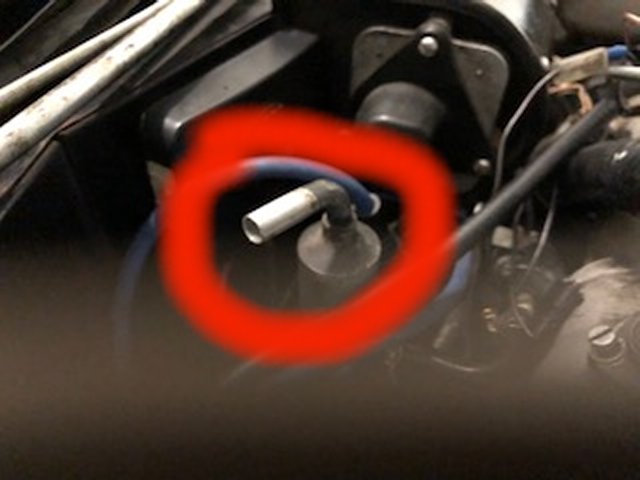 this is shown in Davids pix as the float chamber vent valve. the pipe off of this go's to the no4 connection to the carbon vent canister. This is located in the Lh valance up front by the side of the bonnet hinge. BTW the carb float chamber drain valve connections seem to be connected ,these are the ones that go to down the rear of the engine [bell housing] Maybe I have missed some other connections! | |||
Patrick Lockyer. Grand Master Username: pat_lockyer Post Number: 1720 Registered: 9-2004 |
Just spotted another pipe not connected, maybe if you put a better pix of the the connector by the carb, if it is in fact where the pipe goes, would be a help. 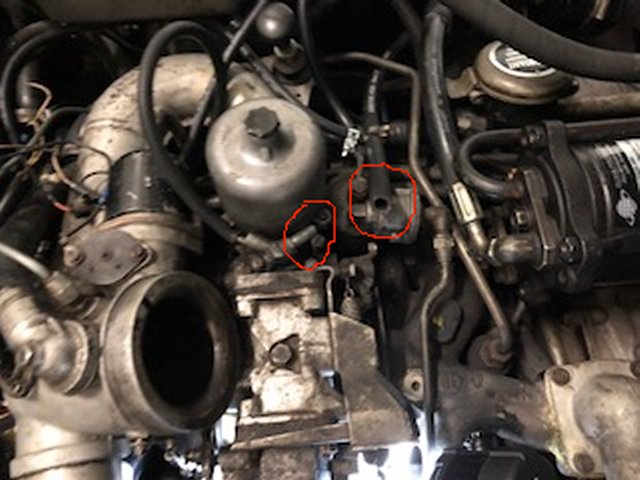 | |||
Paul Yorke Grand Master Username: paul_yorke Post Number: 1993 Registered: 6-2006 |
https://m.facebook.com/groups/394503164031807?view=permalink&id=979703488845102&comment_id=979706612178123¬if_t=group_comment¬if_id=1515716690360599&ref=content_filter Maybe? | |||
Martyn Grattage Frequent User Username: martyngrattage Post Number: 56 Registered: 11-2017 |
Thanks for that video and other advice I am going to have another look this afternoon My last look both my rechargeable light and borecope went flat and bugger the environment I am going to print out some stuff Martyn | |||
Patrick Lockyer. Grand Master Username: pat_lockyer Post Number: 1722 Registered: 9-2004 |
Looking at one of the pix Martyn has posted one thing for sure it does not have carbon canister fitted, that looks like the standard uk spec car. From Pauls video IMO it shows that type of system. Happy days! 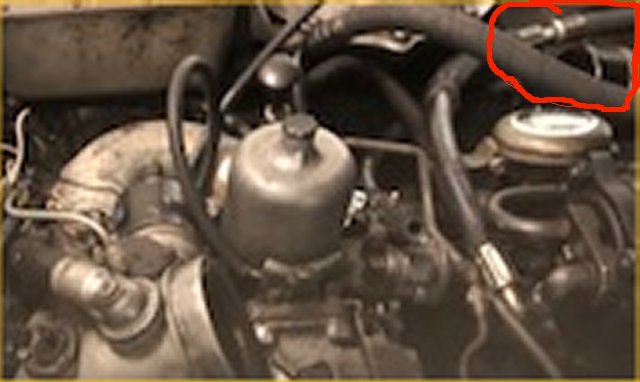 | |||
Martyn Grattage Frequent User Username: martyngrattage Post Number: 58 Registered: 11-2017 |
Hi All thanks for the continued support and input I do know that it�s Australian Registered.white and has been used for weddings all its life - Only 27,000 Km HOWEVER I was so shocked when she passed Rego FIRST time in December. I am also sure that it has clearly had no TLC Every rubber seal, all the switches hinge every lock electric windows central locking, aerial bonnet switch The Carbys were held on with cable ties because the pressure was too much for them Engine Backfiring and the first thing I noticed was that some of the vacuum pipes were missing or brittle or broken which led to all of them I was assuming and hoping that all that was wrong with the engine was the vacuum stuff because she sounded so beautiful when running. All This is all something I could happily sort out until now when I broke the pipe while trying to figure where it went. Only this morning I figured i may have an issue more than dodgy vacuum hoses. All the sensors and egr stuff has simply been blanked rather than replaced which people on this forum have suggested to do anyway I am going to contemplate what to do this weekend. Its probably too much for me. I can do most work but nothing too complex or heavy. Thanks a lot Martyn | |||
Martyn Grattage Frequent User Username: martyngrattage Post Number: 59 Registered: 11-2017 |
I forgot to mention I have most tools and a safe and secure storage to work on her. 24/7 if required. Martyn | |||
Patrick Ryan Grand Master Username: patrick_r Post Number: 1824 Registered: 4-2016 |
Martyn, How long have you had the Shadow, and how much did you pick it up for? Is the interior in good condition? | |||
Martyn Grattage Frequent User Username: martyngrattage Post Number: 60 Registered: 11-2017 |
If I did break her does anyone know exactly which S.U. Carburetter model it is And does anyone definitively know how I find out.. Or not. 1976?Rolls Royce Silver Shadow - Vin number SRH24545 Petroleum V8 twin S.U. Carburetter Very Last of the model. Thanks Martyn | |||
Patrick Lockyer. Grand Master Username: pat_lockyer Post Number: 1726 Registered: 9-2004 |
Martyn, not fitted with the later type H1F7 carbs. Should look something like this type. 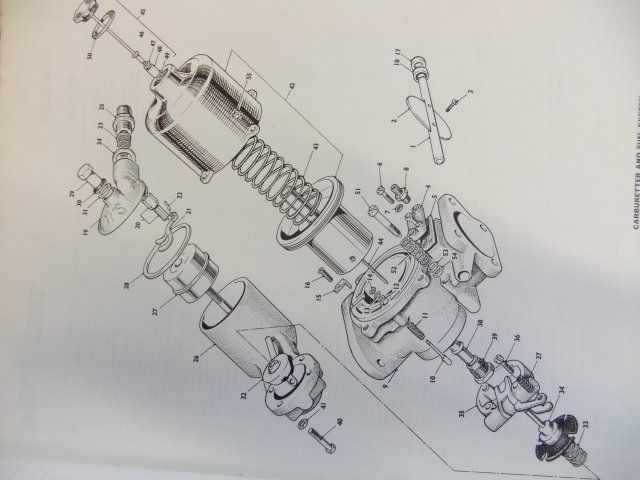 | |||
Martyn Grattage Frequent User Username: martyngrattage Post Number: 61 Registered: 11-2017 |
Thanks Patrrick .. That looks jusg like it. Just going from memory and my pictures I am not where she is at the moment I am at home. How many versions of it were there for the Shadow and would RR use these for other models aswell..!? And exactly which version is mine then. Where did you get the picture from was it the technical library.?. Martyn . | |||
Patrick Ryan Grand Master Username: patrick_r Post Number: 1829 Registered: 4-2016 |
Martyn, Why did you want to buy this particular car? | |||
Chris Browne Prolific User Username: chrisb Post Number: 284 Registered: 2-2010 |
Hello Martyn, I have just found the auction listing for your car with photographs. You may be interested to know that the car was originally painted Moorland green when it left the factory in Crewe and it was in Tasmania in 2000 as shown in the photos of the VIN plates on the auction site. Kind regards, Chris |