| Author | Message | ||
Martyn Grattage Experienced User Username: martyngrattage Post Number: 24 Registered: 11-2017 |
Hi I took lots of pictures of my engine before and during my work While on holiday recently My phone and wallet were stolen So I am trying to work on memory alone whhich is a challenge at the best of times I have been replacing my vacuum pipes Right underneath in the middle of the car is a cannester with two pipe connections one to the vacuum stalk and the other goes somewhere in the engine and it has fuel on it So what is this part and is it right one vacuum and one fuel where does the Petrol pipe go to..?? I am replacing the vacuum pipes because the y are hard and perished and nearly done Should I be changing fuel lines and which ones 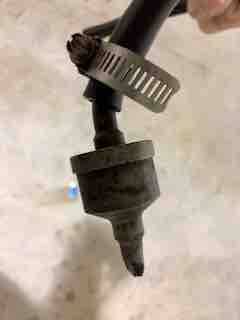 | ||
Brian Vogel Grand Master Username: guyslp Post Number: 2536 Registered: 6-2009 |
Martyn, The thing in the picture is the float chamber drain valve from the carbs that goes through the weakener device. It is shown as #5 in this diagram from the Workshop Manual: 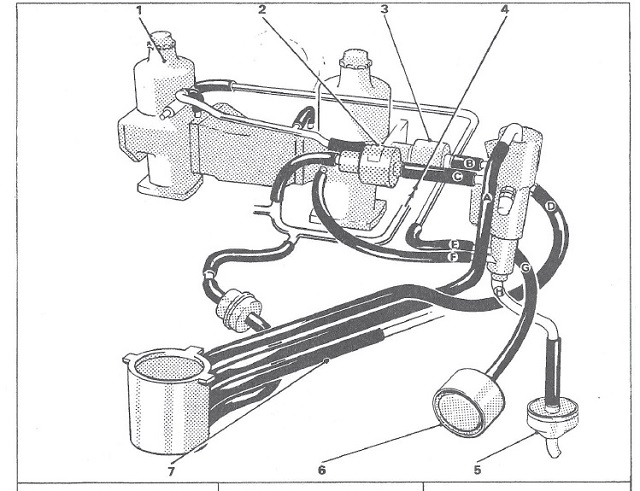 and this is a cut from the full figure K86 in the Shadow II workshop manual. It looks like the actual drain opening on yours has been at least partially crimped shut, which is unusual. This should have only the single line connected to it. The diagram shows all of the vacuum lines (except for E, F, & the line running to this valve, which will carry fuel when an overflow condition occurs). Brian | ||
Martyn Grattage Experienced User Username: martyngrattage Post Number: 25 Registered: 11-2017 |
Thanks for the quick reply Brian I am just about to order silicon fuel hoses - instead of the rubber ones I was going to use. I am also going to see about a new drain valve. What other parts and functions should I check or replace..? As you have the same car and replaced yours am thinking there are two different size pipes Can you confirm that it is 6.5mm external for the small one and 13mm external and 4.5mm internal for the larger one. Which sizes did you use..? Thanks Martyn | ||
gordon le feuvre Prolific User Username: triumph Post Number: 224 Registered: 7-2012 |
Martin, The drain valve is designed as one way valve to open when is something like 1 inch fuel in pipe. Searching workshop manual under fuel will explain. As I remember one way valve is easily stripped, with just disc to seal pipe and a spring. | ||
Martyn Grattage Experienced User Username: martyngrattage Post Number: 26 Registered: 11-2017 |
Thanks Gordon By stripped do you mean easily taken apart and fixed..? I am going to try tomorrow What do you think about the crimped end.? Is it actually right or should I uncrimp it I will see if I can have it look at the manual aswwll | ||
Robert Noel Reddington Grand Master Username: bob_uk Post Number: 1653 Registered: 5-2015 |
The gnarly bit on the lower end of the carb over flow valve should have a longer slightly bent tube on it. (5) in diagram. Not crimped. I would suggest a good one, new or used | ||
Brian Vogel Grand Master Username: guyslp Post Number: 2537 Registered: 6-2009 |
Martyn, With regard to the drain valve I would just test it. As Gordon has noted it is designed to open after some certain amount of fuel forms a column above it, and it's not much. You can perform a test using a piece of clear vinyl tubing and water so that you can see if it opens and drains. While a new one wouldn't be a bad idea it may be tricky to source (for a reasonable price, anyway). If you get a used one I'd still test it to make sure it opens well before the tube would fill up to anywhere near the level of the carbs. I have been replacing my vacuum lines using silicone vacuum tubing. The sizes noted by Jon Waples in The Shadow Owners' Companion are: 1/8" ID 1/4" OD 3/16" ID 5/16" OD 1/4" ID 1/2" OD and these have served me well. It's pretty obvious which size goes where as you remove the originals. He recommends getting something in the 70A to 75A Shore hardness range, but if you buy tubing marketed for automotive vacuum use it will certainly be in that range or slightly harder. The only place where something either ever so slightly smaller in ID than 1/8" would be handy are where the 2 vacuum connections come off of the metal tubing to each carb. The tiny tubes that go in to the carb are of smaller diameter than the vacuum line on the other end, but not by too terribly much. You can also use a very tiny dab of silicone sealant around the base of the tiny metal tube on the carb and push the line into that to form an airtight seal. The original formed lines here are very short and clearly molded with a smaller and larger opening for what they slide on to. If you replace them with the 1/8" ID silicone you need to cut the silicone line significantly longer since you cannot get the degree of bend you need over the tiny distance available without it kinking. While silicone is not recommended as fuel line it should be perfectly fine for the application here where zero pressure is involved and, if everything works as it should, it will never see fuel flowing through it anyway. If you wish to be really conservative then use actual fuel hose in the correct ID for those 4 segments in the diagram that have the possibility of carrying fuel in the event of overflow. One thing with regard to replacing vacuum lines which is tedious, but in my opinion, essential, is replacing only one segment at a time and running the engine after each. When you're dealing with a car with old vacuum lines it could very easily have developed leaks that have been "otherwise compensated for" over the decades and if you suddenly seal one up you could cause trouble (or vice versa). If you've gone through the engine bay and replaced all of the lines at once figuring out "where the culprit is" becomes nightmarish. Brian | ||
Robert Noel Reddington Grand Master Username: bob_uk Post Number: 1654 Registered: 5-2015 |
Fortunately UK spec cars are not so complex | ||
Patrick Lockyer. Grand Master Username: pat_lockyer Post Number: 1702 Registered: 9-2004 |
Tip, take plenty of pixs with the digital camera. Use a mirror for hard to see places. | ||
Maxwell Heazlewood Prolific User Username: tasbent Post Number: 138 Registered: 9-2017 |
Martyn....save yourself a lot of time effort and money and remove most of this rubbish and cap it off. It won't upset the running of the car and will probably be more reliable. | ||
Paul Yorke Grand Master Username: paul_yorke Post Number: 1975 Registered: 6-2006 |
The valve is a one way valve and you should be able to gently breath out through it but not in. Open it up and clean it with carb cleaner. They are pretty bomb proof but can gum up. Yours has been damaged or something, but opening the tube will be ok. Lots of used ones here if you do need one. | ||
Martyn Grattage Experienced User Username: martyngrattage Post Number: 27 Registered: 11-2017 |
induction manifold fuel drain pipe connects to where exactly....?? One end to the drain filter of course but what about the other end..? Is it on the manifold or carby somewhere..? Anyone let me know. I looked at the technical manual it has no picture. I cant figure it out from it.?! Thanks Martyn I | ||
ross kowalski Grand Master Username: cdfpw Post Number: 682 Registered: 11-2015 |
Martyn, I would leave the outlet a little crimped to prevent a mud dauber wasp from taking up residence. | ||
Paul Yorke Grand Master Username: paul_yorke Post Number: 1978 Registered: 6-2006 |
Does the picture posted actually look like your system? Have you got a Shadow 2 or is it a Shadow 1 that you are working on (Shadow 1 judging by your profile chassis number). Have you got emission control on your engine? Look in emmissions p44 If it has where you are looking is wrong? Post some photos so we can actually see what you are after. Cheers, Paul. |