| Author | Message | |||
Geoff Wootton Grand Master Username: dounraey Post Number: 1721 Registered: 5-2012 |
I have started my long postponed overhaul of the brake calipers and fluid replacement on my 74 SY1 (SRX18501). I'm wondering which is the best way to remove the caliper pistons. I've discounted the methods I've watched on youtube for various reasons. Viz: I do not have an air compressor so cannot force them out using compressed air. I do not like the grease gun method where grease is used to force the pistons out as I'm not sure it's possible to fully clean the internal channels of the calipers afterwards. etc. I'm thinking of buying a cheap clutch master cylinder from NAPA for 24 bucks and hooking it up to the caliper to force the pistons out. Since there are 6 calipers to recondition I feel it is worth spending a little time building a working tool to make the overall job quicker and easier. I'd be interested if there are any simpler ways of doing this or any "tricks of the trade" I am not aware of. Geoff | |||
David Gore Moderator Username: david_gore Post Number: 2580 Registered: 4-2003 |
Geoff, IMHO the grease gun is the safest way to remove the pistons and any residual grease is easily removed if the callipers are soaked afterwards in kerosine/paraffin. Your master cylinder jig would also work using light engine oil or even water [rinse with methylated spirits/denatured alcohol afterwards]. Do not use brake fluid as the possibility of fluid being sprayed everywhere if a stuck piston occurs and high pressures are needed to release it [Murphy's Laws always apply in this situation]. Using compressed air is my least favoured method due to the inherent risks involved in trying to release a corroded stuck piston [common problem with cars suffering from neglected maintenance]. | |||
Paul Yorke Grand Master Username: paul_yorke Post Number: 1826 Registered: 6-2006 |
Grease gun. If you are afraid of grease use meths or water or oil, but there should be no problem with washing the grease out. Or before you take the callipers off the car, remove the pads and replace with about 1/4" of ply. Press the brake pedal and pop the pistons to the near out position. Make sure they do not come out too far and release brake fluid. If your pistons are stuck a master cylinder will not move them, although you could get a vacuum servo and add that to. :D David is spot on. | |||
Geoff Wootton Grand Master Username: dounraey Post Number: 1722 Registered: 5-2012 |
David and Paul Thanks for your quick replies. You have convinced me to go the grease gun route. I will check out if there are any grease gun to brake union adapters out there. If not it should not be too difficult to get one made. Thanks again Geoff | |||
Patrick Lockyer. Grand Master Username: pat_lockyer Post Number: 1400 Registered: 9-2004 |
I did my front callipers in April so have some pixs of the grease gun ect that I used. The engine was started to allow the brake system to have full pressure to get the pistons moving or to bleed the system first before starting the callipers. First I freed and removed all the pads and refitted all but one to start with. In place of the pad not fitted I used a peace of wood that would allow the piston or pistons to travel the full distance but not drop out. Once all the pistons moved to the end of travel on all callipers I removed the brake pipe and bunged the pipe so to prevent loss of fluid. 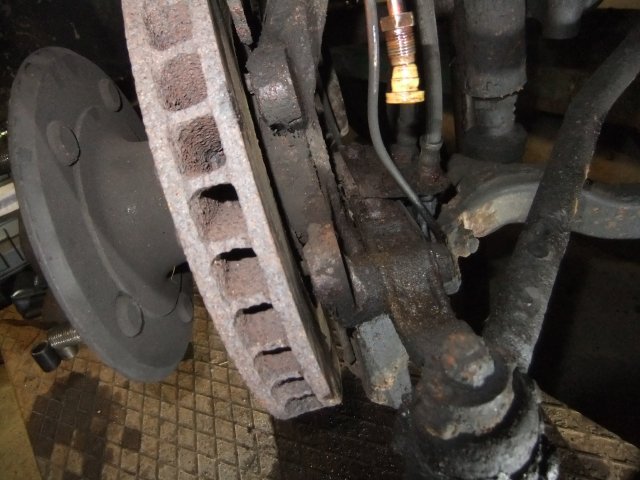 When the calliper is off the car then I fitted a grease gun screwed directly to the calliper.  With a good clamp holding the first easy moving piston pump the other out. 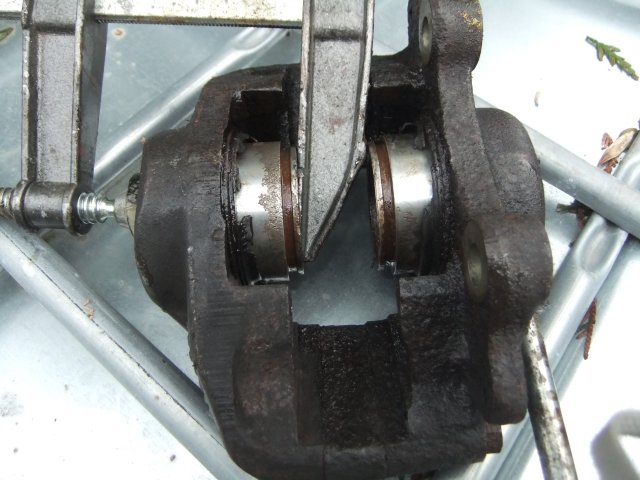 Geoff hope this helps get you going. | |||
Geoff Wootton Grand Master Username: dounraey Post Number: 1723 Registered: 5-2012 |
Hi Patrick Thanks for putting up the photos. I have found that the thread on the flexible hose on my grease gun screws into the caliper port perfectly. I've pushed out the two pistons and find they are in good condition. Just need to call in at the DIY store and get some solvent to clean out the grease. My thanks to you all for sorting this problem for me. Geoff | |||
Jim Walters Prolific User Username: jim_walters Post Number: 111 Registered: 1-2014 |
Geoff, grease is the safest way to go if they are really tight. I have a "piston popper" tool that usually works unless the piston is really seized in which case the grease trick is needed. You should split the caliper halves to replace the seals that seal the connection block between the caliper halves. They are NOT common O rings, I have come across leaking calipers where some idiot has used common O rings from an assortment kit which are not compatible with brake fluid. They are square rings of EPDM composition. Clean the grease out of the fluid channels with Brakleen or equivalent and pipe cleaners. Some "experts" say don't split the halves, in my opinion that is unsafe advice. These seals can be deteriorated, damaged by Brakleen or solvent in the cleaning process, or have been replaced by O rings of an incompatible material. Also, safer than using a C clamp is using a piece of steel flat bar 1/4 inch by 2 inches by 6 inches long along with two steel spacers 1/4 inch thick by 1 inch square. Put the bar and spacers in the slot where the rotor runs and pump the first piston out to rest against it. Then swap the spacers to the other side of the bar and pump the second piston out against the bar. Using a bar like this keeps the pistons from tilting when they get just about out which can happen with a C clamp. If they tilt they may not seal well enough to pump the second piston out. Using a bar and the right spacers allows the pistons to pump out to the edge of travel without allowing them to pop completely out and lose the seal. 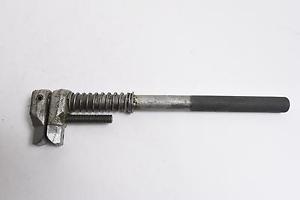 SRH8505 SRC18015 SRE22493 NAC-05370 www.bristolmotors.com | |||
Geoff Wootton Grand Master Username: dounraey Post Number: 1725 Registered: 5-2012 |
Jim Many thanks for your advice. I released the first two pistons this afternoon with my grease gun using the C clamp method. This was before I read your entry. Guess what happened - lol. Took about an hour to get the one piston back in square only for it to get stuck when the other one popped. Finally succeeded getting them both out without any damage but with everything, including myself, covered in grease. Oh, us amateurs eh. I will make up a set of spacers as you describe. With 5 calipers to go it will be worth it. Would you recommend replacing the caliper bolts. The two I have removed look in good condition so I am just checking to see what best practice is. Should they be replaced regardless. FS have the O rings for around 6 bucks each. Geoff | |||
Jim Walters Prolific User Username: jim_walters Post Number: 112 Registered: 1-2014 |
6 bucks!! I sell them for only 2.50 each, no wonder I can't afford to retire yet.  I don't think it necessary to replace the bolts unless they show damage on the threads or shaft. Use blue Loctite on them and always torque them when reinstalling. If you do replace the bolts use grade 8 and match the length of the non threaded part of the shaft. With over 40 years of rebuilding calipers I've never had an issue reusing the bolts. Every once in a while a KD 2105 caliper piston removal tool as I illustrated previously shows up on Ebay, they usually go for $20 or so and are a handy tool to have. Saves making a mess with grease if they are not seized tight. SRH8505 SRC18015 SRE22493 NAC-05370 www.bristolmotors.com | |||
Geoff Wootton Grand Master Username: dounraey Post Number: 1729 Registered: 5-2012 |
Does anyone know the torque settings for the four bolts that fasten the two halves of the brake calipers together? Of the four bolts, two are SAE 9/16 and the other two SAE 5/8. The workshop manual gives the caliper to stub axle figure, but there is no reference to the caliper bolts described above. If such figures are not published, is there a safe value I can torque these bolts to on my calipers. Geoff | |||
David Gore Moderator Username: david_gore Post Number: 2594 Registered: 4-2003 |
Geoff, See below standard R-R torque values for standard fasteners from Section P - TSD 2476. Have also attached full copy Section P if you do not have one:- 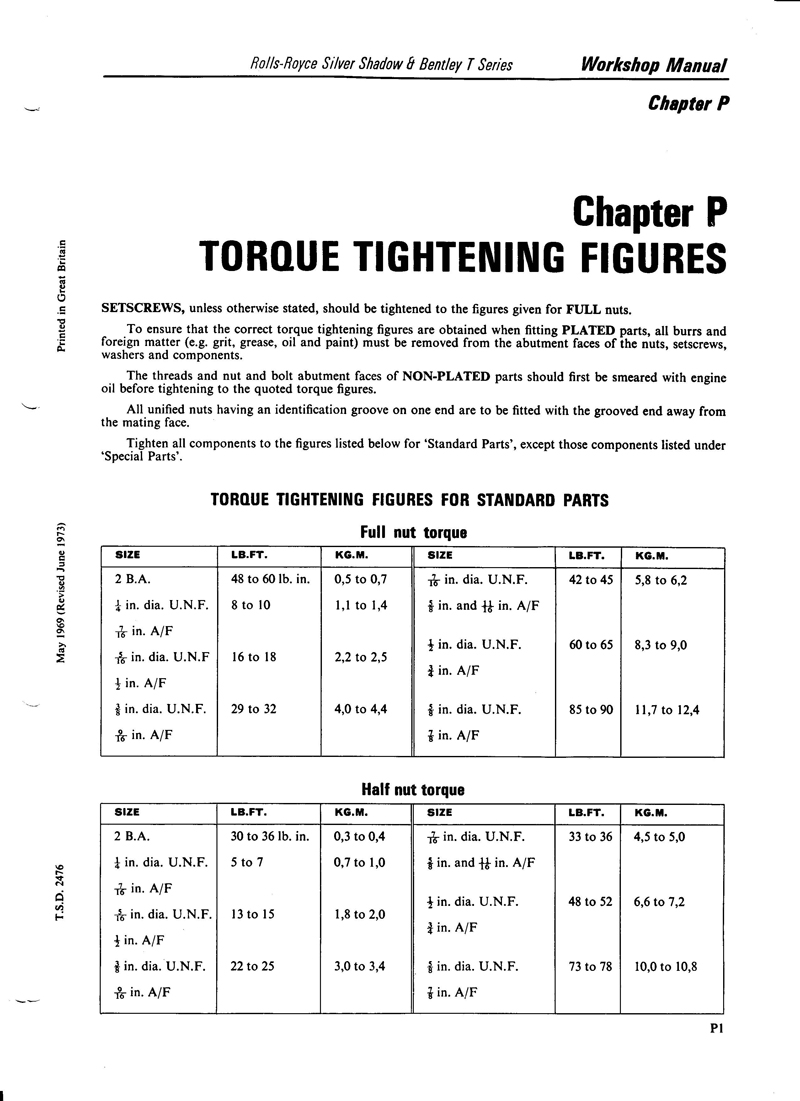
Hope this helps........... | |||
Geoff Wootton Grand Master Username: dounraey Post Number: 1730 Registered: 5-2012 |
Hi David Many thanks for your reply. However, the figures in the table seem a bit low to me. The two smaller diameter bolts have an A/F measurement of 9/16" and the two larger ones 5/8". The torque values in the table are given as 22 to 25 lb/ft and 42 to 45 lb/ft respectively. I was figuring on the range of 60 to 70 lb/ft at least. The bolts are going into the steel, rather than aluminum. What do you reckon? This is a safety critical part of the car, so I need to get it right. Geoff | |||
David Gore Moderator Username: david_gore Post Number: 2596 Registered: 4-2003 |
Geoff, The torque figures are related to the TPI [Threads Per Inch] of the fastener. As a general rule, coarse threads [low TPI] require a higher torque than fine threads [high TPI] as the are more prone to loosening when subject to cyclic loading. Another variable occurs when the torque is required to preload the fastener. If you are inclined to the "belt & braces" philosophy, there is nothing wrong in using a low-strength thread locker although these might lose effectiveness if the callipers get hot from repeated heavy braking. Paul York, what do you think please? | |||
Paul Yorke Grand Master Username: paul_yorke Post Number: 1827 Registered: 6-2006 |
Yes, go tight on them and use thread lock. Sorry, I'm not sure of the figure but are they bolts with undersize head? 20 lb/ft is too low imho. (I think the manual does not give torque settings because it specifically says you should not split them.) It's sealed with a rubber seal so extreme tightness (in theory ) should not be necessary. But I like them tight  | |||
Geoff Wootton Grand Master Username: dounraey Post Number: 1736 Registered: 5-2012 |
Just thought I'd add a couple of tips that I've found useful when removing pistons from brake calipers. If the pistons are not seized then a tyre inflator pump, either foot or battery powered, will deliver sufficient pressure to push the pistons out. Just purchase a lilo/sunbed inflator adaptor and push it into the brake line port on the caliper. This makes cleaning the channels much easier once the pistons have been removed. Of course, if the pistons are tight or seized, then the grease gun method has to be used. Geoff | |||
John Beech Grand Master Username: jbeech Post Number: 410 Registered: 10-2016 |
Anticipating this job in future, I went and looked on eBay where I found the tool - new and used - and both with free shipping. First the new one where a seller (in Mississippi) has several NOS units available. NOS means New Old Stock, so they're brand new. Anyway, he had 4 (for $28 each) but now only has 3 because I bought one! If he's unwilling to mail it internationally, let me know and I'll buy it for you because it's no big deal for me to post it to you. New K-D Tools #2105 for $28: http://tinyurl.com/ybsors72 Meanwhile, there's a used one for $50 but note it appears to be sans the long Allen wrench: http://tinyurl.com/y99mwojc Finally, an interesting looking alternative from China for $23 with free shipping as well: http://tinyurl.com/yc85z9jo Anyway, I opted for Jim's recommendation in part because it's Jim but also in part because it's a far more compact tool than that Chinese example, e.g. it will be easier to store (my story and I'm sticking to it). Finally, I just got my eBay notification for shipping so I should have it in a few days - yippee, I love a new tool. Next to lay in a supply of the correct o-rings for when I split the calipers. Jim, will you post stateside and do you accept PayPal? Please contact me via: info@genesishobby.com | |||
carole jarvis New User Username: caroleuk Post Number: 2 Registered: 3-2017 |
Hi Geoff, I didn't need to do the front ones as they were fine (leave well alone) but the rear ones have to be split which takes a lot of pulling on a bit bar! lot's of DW40 or similar and heat make life easier. Once they are apart even the stickiest pistons can be removed with a pair of mole grips and some twisting and pulling so long as you only hold them by the protruding rim and not the piston body. You will find that any rust on the pistons will be on this part of the pistons as the rest is protected by the inner seal and the brake fluid itself, Good luck and let me know how you get on as I'm in the middle of this process myself | |||
Geoff Wootton Grand Master Username: dounraey Post Number: 1737 Registered: 5-2012 |
Hi Carole Re: You will find that any rust on the pistons will be on this part of the pistons as the rest is protected by the inner seal Yes, I've got bad pitting on the two larger pistons on my rear caliper. Problem is the pads need replacing, so given the pistons will need to be pushed further into the cylinder to accommodate the new pads the pitted area falls exactly on the inner seal. Two new pistons required. Did you have any trouble undoing the two bolts that hold the caliper to the hub assembly? I'm having trouble undoing the right side caliper. The problem is I can't get enough purchase on the socket wrench - even with a cheater bar. I bought a small floor jack today and will use that to push the end of the wrench up and free the bolt. Beats a double rupture. Geoff | |||
carole jarvis New User Username: caroleuk Post Number: 3 Registered: 3-2017 |
Hi Geoff Yes they are tight! funnily enough it was the R/H one I had problems with I used a vice to hold it and a put a 4' scaffolding bar over the ratchet handle and pulled with all I had, it was a case of I will break something or they will come undone. Fortunately they came undone, if they don't then it is a case of plenty of heat (you will destroy the rubbers but they will need changing anyway) but it should come apart after that. But just in case good luck |