| Author | Message | ||
Brian Vogel Grand Master Username: guyslp Post Number: 2322 Registered: 6-2009 |
Well, over the last several days I finally got back up on the proverbial horse and started working on LRK37110 again. Given the ease with which this project has gone so far (at least in the grand scheme of things) I wish I had been inspired enough to do this much sooner, but the timing is what it is. I've got a number of miscellaneous questions and I'll place a couple of pictures as reference points. 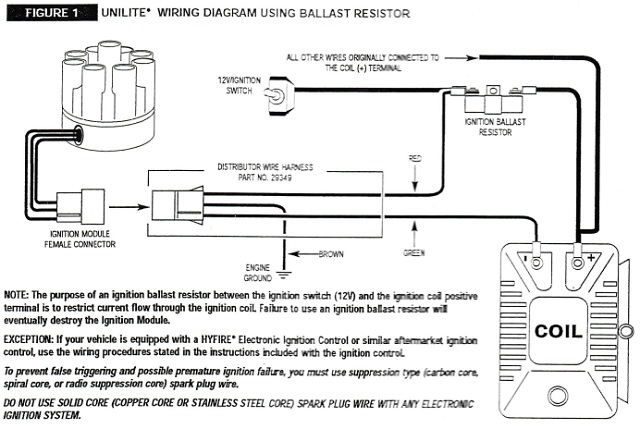 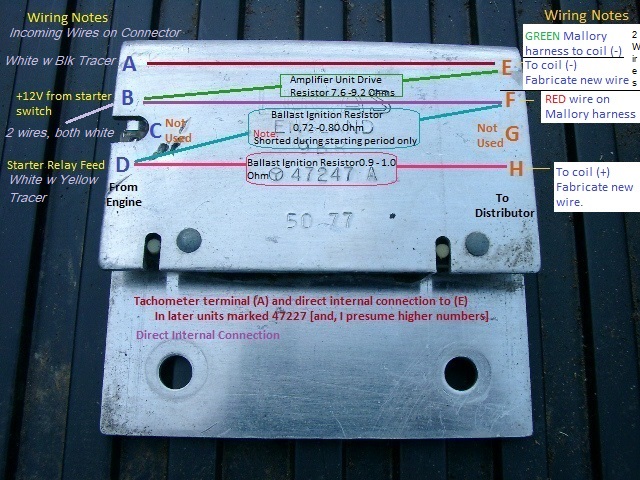 Diagram showing wiring from 9BR to Lucas 35DE8 and Mallory Unilite Distributors That last one cannot be shrunk to the size the forum wants and still be readable, so I've set it up so that you can download it for easier viewing. I have the new Mallory Distributor connected to the 9BR ballast resistor block and the coil per the large format diagram. I fabricated new wires to go between Coil (-) and Terminal E as well as Coil (+) and Terminal H. As you can see in the Mallory instructions, there is a harness that is used to complete the connection between the car and the distributor itself. I have direct access to all of the electrical connections in that harness. So the first set of questions: 1. Should I do any specific tests with a multimeter when the car is being cranked before actually hooking up the distributor on the red wire and the green wire? 2. While one probe would go in the harness, I presume the other would go to ground for both tests. If this is incorrect then let me know where probes positive and negative should be placed during each test. 3. If the answer to #1 is yes, what should I expect to see in terms of values? Not having taken a picture of where the rotor was pointing on the original distributor when I took it out (my bad) I cannot know for certain whether the new distributor will be anywhere near to correct in terms of timing. I did try to have the coupler attached such that there was almost exact symmetry between the old distributor and new one as far as "rotor to body" orientation, so I presume I'll either be really close or 180 degrees off. So: 4. If I'm 180 degrees off, I presume the car will not start. Is this correct? 5. If the car does not start my first intention would be to pop the distributor off and turn the rotor such that it's 180 degrees from where it was, put it back on, and try again. Does this seem reasonable. 6. How far off can the timing be and still have the car fire up at all? I really have no idea and if it doesn't start after steps one and two I have no idea of what exactly to try next. Details about the "what to try next" can be held in abeyance until I come to that bridge, if I do. I would like to know about the "how far off" figure if someone knows. She's now very close to the "let's fire her up!" stage but I don't want to fry the distributor because I've done something stupid or failed to check something I should have checked before hooking up the distributor. This is all new territory for me so I'm doing the proverbial measuring twice before I cut once. Brian | ||
Jeff Young Grand Master Username: jeyjey Post Number: 354 Registered: 10-2010 |
Hi Brian, I don't know the answer to a lot of those questions, but I do know that the timing can be way off and still fire up. If it's too far advanced, the firing will kick the starter, so if the starter keeps disengaging immediately after the first fire (which probably won't be enough to start the engine), it's probably too far advanced. 180� out on an inline 4 results in firing on the exhaust stroke, which as you can imagine won't run, but can produce rather surprising backfires. Not sure if a V8 would show the same behaviour or not. Cheers, Jeff. | ||
Patrick Lockyer. Grand Master Username: pat_lockyer Post Number: 1373 Registered: 9-2004 |
First take NO 1 spark plug out have a whisle on a tube fitted into the spark plug hole turn engine, whisle will sound on compression and stop on TDC. This plug will be firing. Position the distributor and rotor to this plug lead on the cap, set the leads to the firing order on the cap. job done. More later on your conversion, As I see it at the mo it is a no go! | ||
ross kowalski Grand Master Username: cdfpw Post Number: 438 Registered: 11-2015 |
Brian, The Mallory distributor needs three wires to fire, brown green and red. Brown goes to any ground, a ring terminal around any piece of grounded metal would do. Maybe the bolt securing the coil holder. Red needs power when the engine is on, which as you correctly noted is terminal "F" on the ludicrously complicated and unnecessary ballast resistor block. Lastly,green wire from the Mallory distributor is the wire that triggers the coil. It is the control signal TO the coil, ground to charge the coil (points closed) and open to fire it (points open). In your diagram you show it connected to the "H" terminal. It looks to me as it should should be connected to the "E" terminal (the coils path to ground) | ||
ross kowalski Grand Master Username: cdfpw Post Number: 439 Registered: 11-2015 |
Brian, Patrick is right on with the whistle, just remember you need a proper bobby's whistle and not an escargot style like the Acme Thunderer. You could also put the timing mark on TDC then check if the piston was in the correct location with a long piece of wire inserted in the plug hole. The distributor #1 position usually is the rotor pointing at the #1 piston (A1?). If the dizzy is mounted correctly I would think you would see the rotor pointing roughly at the front right turn signal. | ||
Brian Vogel Grand Master Username: guyslp Post Number: 2323 Registered: 6-2009 |
Ross, Thanks for looking at the wiring. The Mallory green goes to Coil (-) and there's an additional wire that goes from Coil (-) to terminal E (not H). As far as I can tell it should not matter whether I put a "doubler" on Terminal E and run the Mallory wire there along with the one between Terminal E and Coil (-) or just put the Mallory ring connector on Coil (-) and run a wire from Coil (-) to Terminal E [which is exactly what I have done. That's what I tried to represent in the diagram but I should have annotated that the wire that goes between Coil (-) and Terminal E is retained in the new arrangement and failed to do that.] Terminal (H) has a direct wire to Coil (+), which is precisely what the arrangement was for the Lucas distributor as well. I would strongly prefer not to have to turn the engine, and will avoid doing so unless it's absolutely required. I believe that as the distributor and rotor sit, I am either really close to where I need to be or am 180 degrees off. I really wish I had taken a photo once the distributor cap was off when I was raiding LRK37110 for her distributor for transplant but somehow failed to do that. Brian | ||
Brian Vogel Grand Master Username: guyslp Post Number: 2324 Registered: 6-2009 |
P.S. to Ross: Diagram now updated to note the two wires that were used with the Lucas Distributor that are also maintained for the Mallory. If anyone ever finds a NOS Mallory Unilite in this model (since they've stopped producing this unit specifically for RR/Bentley) it helps if this graphic is accurate. Brian | ||
ross kowalski Grand Master Username: cdfpw Post Number: 440 Registered: 11-2015 |
Brian, I think when I looked at the diagram I thought you had tied the green wire from the ballast resistor unit to the coil negative and the mallory distributor. The green Mallory wire has a 90 degree bend in it that occurs at exactly the point it crosses the green line coming from the ballast unit. That said, sounds like you have it hooked up properly. If you leave the red wire off of the mallory, there really shouldn't be any issues turning the engine over. I usually do it from the engine compartment with my thumb over the hole, but to each his own. When it puffs, there's TDC compression. The rotor will either be pointing at the front right turn signal like mine or to the rear left turn signal. It doesn't really matter as long as you then put A1 there and follow the rest of the order around CCW. I would keep the dizzy loose enough to turn by hand, start the car and rotate it until it idles smoothly. After getting this initial setting, let the car reach OT and set the timing with a light. Good Luck. | ||
Brian Vogel Grand Master Username: guyslp Post Number: 2325 Registered: 6-2009 |
Ross, Thanks again for the input. I've updated that diagram one more time hoping that it would be more easily read accurately by someone other than myself. I've now got "jump over" markings for both the green and red Mallory wires and made the replacement wire for the original H to Coil (+) solid black. It's a grand PITA trying to come up with a diagram that would show both what's present for the original 35DE8 and the Mallory (or any other distributor and some replacement electronic ignitions that fit in the original 35DE8) at the same time. I always find it useful to be able to "compare and contrast" since the way I figure stuff out is to look at what is original, understand how it works, then work out the analogous arrangement for what's going in its place. I may consider your engine turning technique since I can get my partner to assist with key turning. I just don't really know how quickly one needs to react never having tried this before. I like to keep things as simple as I can but not so simple that essential elements have not been taken care of. On SRH33576 the A1 position was "towards right front turn signal" as is shown by the Firing Order Diagram for SC-II through 1986, Except Turbo R that I made. I took the distributor out of LRK37110 and when I installed it in SRH37110 simply made sure the rotor was pointing where the original had been pointing and it slid right into place. All I had to do was tighten down the nuts that hold it on to the car. I have never yet taken the time to set the timing again with a timing light because I haven't been able to drive her much and with the driving I did do it felt and sounded like absolutely nothing had changed. Brian | ||
Brian Vogel Grand Master Username: guyslp Post Number: 2326 Registered: 6-2009 |
Updated wiring diagram for Mallory 4711701 RR Unilite & Lucas 35DE8 Distributors Also added the part number in the diagram, as it can still be found via web search and it's likely that someone may still have one NOS. If you can stand a red distributor cap Mallory makes a top shelf product if you're lucky enough to find one (but unlucky enough to need one). Brian | ||
ross kowalski Grand Master Username: cdfpw Post Number: 441 Registered: 11-2015 |
Brian, The new diagram looks the business. Because the distributor can only be in one of two positions, the puff test should really be good enough. If you have a dog.... https://www.youtube.com/watch?v=BkkTkZsw9Ro If you don't have a dog... https://www.youtube.com/watch?v=ReeXgsHqOHI&t=318s or if you have a lot of time... https://www.youtube.com/watch?v=u2sA-q7_FtQ | ||
Patrick Lockyer. Grand Master Username: pat_lockyer Post Number: 1376 Registered: 9-2004 |
Brian have you checked the what the primary winding resistance is on the pickup module of this mallory unit? When do you aim to start this machine? | ||
Brian Vogel Grand Master Username: guyslp Post Number: 2328 Registered: 6-2009 |
Patrick, No, I have not, since the unit was custom designed for installation in the Rolls-Royce/Bentley V8 of the era in question. It is supposed to be a drop-in replacement. I hope to do so by early next week. I need my partner to assist with a couple of things and his schedule is full at the moment. Ross, Thanks again for re-reviewing the updated diagram. I figure if I just have the lead from the coil to the distributor disconnected I can have the engine turn and turn, if necessary, without ever turning over (which does mean start and run in the USA). I imagine the puff is quite detectable and that "lightning speed" is not required on the key release. It's probably a matter of figuring out when the next one is coming and being ready to release the key when it does. Brian | ||
ross kowalski Grand Master Username: cdfpw Post Number: 444 Registered: 11-2015 |
Brian, You don't need an assistant when doing the puff test. You just need a remote starter Or you can attach a wire to the starter solenoid and just power it to "bump" the starter. Basically, it works like this, power the starter for half a second, then repeat until you feel the compression stroke. You don't really want to continuously crank the engine just bump it. The plugs on this car are super easy to get to so I might just film a clip of finding TDC on a RR using the puff method. I'll at least add it to the ever increasing things to do list. I've never actually heard anyone use the term "turning over" to mean the engine running. I personally use crank for the electric starter motor doing it's deal, fire for the ignition causing some kind of combustion, and run for the engine continuing to operate on it's own independent of the starter motor. | ||
Brian Vogel Grand Master Username: guyslp Post Number: 2330 Registered: 6-2009 |
Ross, Thanks for the additional information. Very much appreciated. It's interesting with regard to "turn over." I have been in several heated conversations with those who refuse to believe that "turn over" means anything beyond "will turn." I ask them to start talking to Americans (at a minimum) and to try to get at the meaning of "turn over" indirectly rather than asking. You will frequently hear the construction, "She'll crank, but she won't turn over," and I can assure you that "turn over" means start and run [even if briefly] in that context. And that context is not rare in a great many places where I've lived or traveled. You also hear "fire up" for start and run [even if briefly]. "Turn over" has never, in my experience, been synonymous with plain "will turn" [as in is not seized] when talking to an American mechanic. Brian | ||
Jim Walters Prolific User Username: jim_walters Post Number: 110 Registered: 1-2014 |
Just gotta put my two cents in as Ross brought it up.  Brian and I have disagreed on this before Brian and I have disagreed on this before I am a mechanic who has had his own shop for over 40 years, and who knows countless other mechanics, at least in Canada, who along with me have understood that "turn over" or "turning over" means that the starter motor is engaged and turning the crankshaft and the internal reciprocating parts of the engine are moving. Firing means it is turning over and making an attempt to start, and running means, well, just that. It can be barely running or running poorly, but running is running. At least those are the definitions among all the professional mechanics I know. Sounds like you and I are on the same page Ross. SRH8505 SRC18015 SRE22493 NAC-05370 www.bristolmotors.com | ||
Paul Yorke Grand Master Username: paul_yorke Post Number: 1819 Registered: 6-2006 |
Over here. .. Will turn is usually not seized. By hand or starter. Will crank means will turn with starter. Turns over means cranks with starter but no running. Turns over but won't run. Fires . . Some sort of fuel burning going on. She fires but won't run. Fires but won't start. Running is sustained combustion takes place without starter motor.. perfectly or just about. Turn her Over. . Start her. . .crank her. . Crank her over. Starts but cuts out means . Cranks on starter . Then runs. But then stops once starter is released. It is often a nightmare trying to find out what a non professional actually means when using one of the terms. Lol. | ||
Patrick Lockyer. Grand Master Username: pat_lockyer Post Number: 1379 Registered: 9-2004 |
Paul, the retired type may also call will crank as the original term for "crank the starting handle" turning the crankshaft. | ||
Paul Yorke Grand Master Username: paul_yorke Post Number: 1820 Registered: 6-2006 |
Patrick . . .yes indeed . . .but you are then the starter motor !! :D ;D | ||
Patrick Lockyer. Grand Master Username: pat_lockyer Post Number: 1380 Registered: 9-2004 |
Ah yes but a starter motor turns 360% something that a starting crank handle with a human should only be pulled up at 180%. Had many stories about broken arms wrist and thumbs. Am I thick, what is D D. | ||
Geoff Wootton Grand Master Username: dounraey Post Number: 1712 Registered: 5-2012 |
Patrick :D ;D are smileys. They relate back to the early days of email and were the precursors to clipart. They are read by tilting your head 90 degrees left. So, a smiley face used to be written as : ) :D is a big smile and ;D is a big smile with a wink. Paul used them to denote his comment was used in a lighthearted way. Geoff I've just discovered if you type a colon followed by a "close bracket" the software on this site automatically inserts the clipart "happy" | ||
Patrick Lockyer. Grand Master Username: pat_lockyer Post Number: 1382 Registered: 9-2004 |
Thanks Geoff learn something every day. will try this one.  | ||
Paul Yorke Grand Master Username: paul_yorke Post Number: 1821 Registered: 6-2006 |
| ||
Brian Vogel Grand Master Username: guyslp Post Number: 2335 Registered: 6-2009 |
OK, gentlemen. After much consideration, and remembering that I had the coupler put on to the Mallory distributor such that both the rotor arm and the "slot" position on the coupler matched what was on the original distributor, I have to believe that if I put it back in the car oriented as it is in my firing order diagram: Firing Order Diagram SC-II through SZ That I am going to be either right where I was when I took it out or 180 degrees off, and I'm really doubting that I have any real chance of the car starting if I'm 180 degrees off. Because I could be off by 180 degrees, though, I'd prefer not to put on the nuts to hold the distributor tight if it's not necessary, and given it's weight and how far the body is inserted into the tube that holds it. All I'd like to know is whether this presumption is valid, or if there are forces other than the rotational one that I should be taking into account when the car is sitting still that I'm failing to take into account. If she won't start then I'll move along to the TDC puff route. Brian | ||
ross kowalski Grand Master Username: cdfpw Post Number: 447 Registered: 11-2015 |
Brian, Bolt it in, if it's 180 out just move the plug wires. | ||
ross kowalski Grand Master Username: cdfpw Post Number: 448 Registered: 11-2015 |
Brian, I've got a story. Trying to start a friends Austin Healy Sprite but don't know if it's on TDC, so puff test. Then I rotate the engine to line up the mark on the flywheel. Put a test light on the points , rotated the dizzy against the rotation to the point where the points opened and tightened down the bolts. Then... the engine cranks and cranks but no fire. Ooops, the Sprite had a timing mark located on the bottom of the crank (seriously) then the engine builder put a mark at the top of the crank pulley and another indicator on the timing cover. Two timing marks, go figure. Another puff test, then aligning the correct mark to the indicator, Off she goes. The other part of the story is that the reason I was putting a 45d on in place of the OEM 25d was that the engine was only firing on two cylinders with the pertronix in the 25d and the 45d with points out of my mini would definitely start it and I was trying to tune the carbs. Pertronix has the advantage that in a car used infrequently there are no points to oxidize and stop working. Points have the advantage of always being able to run, being completely immune to over voltage and spikes, and have no lower threshold at which they start to work at. I will be keeping my points. | ||
Brian Vogel Grand Master Username: guyslp Post Number: 2337 Registered: 6-2009 |
OK, gentlemen, here's the latest. She'll crank like a champ but will not fire up in either the initial or 180 degrees off rotor positions. Not even the vaguest indication of starting. Now, the question becomes should I put her old distributor back in as a testing/diagnostic step before going the "puff test" route? My way of thinking is that there are lots of possible confounds as far as the new distributor goes. It might make sense to put the original one that's now in SRH33576 back in and see if she'll fire up with that one in first. I could also give the Mallory unit a whirl in SRH33576 to see if it functions as I expect it should in her. I'm just trying to determine what route is the least likely to possibly take me down the rabbit hole while at the same time allowing me to rule in and out various issues. What is the consensus? Straight to puff test or try to swap in the original distributor, which is working just fine in SRH33576, first? Brian | ||
Geoff Wootton Grand Master Username: dounraey Post Number: 1720 Registered: 5-2012 |
Brian First thing to do is check you are actually getting a spark at the plugs. Then make absolutely sure the gas is getting through. Your car has been standing for a while so it could even be stale fuel. I have never had the problem of stale fuel before but when I came to start my motor mower up for the summer season it just would not start. I was about to start stripping it down and remembered the stale fuel issue. I removed the air filter and squirted fresh gas into the inlet manifold. Started first time and then kept running ok after that, even though I was still running the old gas. Seems the engine just needed a bit of heat from the initial fresh gas to get things going. Geoff | ||
Brian Vogel Grand Master Username: guyslp Post Number: 2338 Registered: 6-2009 |
Geoff, Thanks for the ideas. I did just run out and connect my spark tester to plug A4, and it's definitely getting spark, which tells me that the distributor itself is working (yea!) though I will have to check all of the plugs to be sure. Once I'm sure I have spark to all plugs then I may try a puff of starting fluid or similar just to see if she attempts to start on that. Brian | ||
David Gore Moderator Username: david_gore Post Number: 2573 Registered: 4-2003 |
Brian, Be very wary of using ether-based "easy start" products on petrol/gas engines as it is possible for the ether to ignite on the compression stroke from "dieseling" either causing the engine to rotate in reverse or damage to engine components. The volatility of ether is such there is also a possibility stray ether fumes may be ignited by a stray spark from the vehicle electrical system causing immediate onset of "brown undergarments". I will only use ether on non-turbo diesel engines usually during cold spells when warm weather blend diesel fuel is very difficult to ignite unless the engine is fitted with working glow plugs and even if they are working, you may need 2 or 3 plug heating cycles before the fuel will spontaneously ignite during start up. | ||
Jeff Young Grand Master Username: jeyjey Post Number: 357 Registered: 10-2010 |
Starting fluids is one of those places where we really lose out to the Australians. We get things like "Easy Start", "Instant Start" and "Quick Start". They get "Start Ya Bastard". It's just not fair.... | ||
Carl Heydon Prolific User Username: car Post Number: 137 Registered: 2-2004 |
Professionally, we use butane/propane camping gas cylinders as substitute fuel. Cheap, reliable and least likely to do any damage to petrol or diesel engines. | ||
Brian Vogel Grand Master Username: guyslp Post Number: 2340 Registered: 6-2009 |
Well, the latest update is I have confirmed spark on all A bank cylinders and on B1. I stopped there this evening but I have very little doubt that the rest are OK as well. My fuel level is actually much lower than I had remembered, so tomorrow I'm going to get a 5 gallon tank of gasoline to add to what's already there to see if that makes any difference. If it doesn't I believe pulling A1 and getting that cylinder to TDC via "puff" will be the next step unless something else occurs to me first. Brian | ||
ross kowalski Grand Master Username: cdfpw Post Number: 456 Registered: 11-2015 |
Brian, I would put a timing light on whatever plug you are using for tdc and crank the engine. When it flashes the timing mark should be visible next to the indicator on the engine cover. Bear in mind it will flash quite slowly because you are just cranking the motor so it might take a few turns of the motor. Report back where the mark is relative to the indicator on the engine block or if you see it at all. Also, I just filmed a puff test. I'll put it on youtube for you. It's OK considering I filmed it by myself, in the dark, getting eaten by mosquitos, and with a phone. | ||
ross kowalski Grand Master Username: cdfpw Post Number: 457 Registered: 11-2015 |
Brian, I just posted how to do a puff test on youtube here. After you get the engine "puffed" turn it over by hand to TDC. Then loosen the dizzy and rotate the housing until the rotor is aligned with the cylinder one plug. 5 min to shoot the video, 15min to edit it and 40min to upload to youtube. :/9//& | ||
Brian Vogel Grand Master Username: guyslp Post Number: 2342 Registered: 6-2009 |
OK Gentlemen, some updates and some questions. It occurred to me that one of the major issues I had when I was initially attempting to get LRK37110 back to the land of the living is that she would start, but unless you gave her a *lot* of gas she'd just conk out. I eventually traced that to a stuck anti-dieseling/anti-run-on solenoid, so I thought I should recheck that and the weakener solenoid. I just realized in checking my records that it has been just short of 4 years since I was last working on her in earnest. My, but how time flies when you're otherwise occupied!! In rechecking those solenoids the anti-dieseling solenoid had stuck again. A quick spritz with WD40 and a few minutes to let it act had it functioning perfectly again. I may need to replace it over the long term or it may stay free if I actually get the car to where I can use it and drive it. I also thought that I needed to add a hefty shot of fresh fuel, so went out and got 5 gallons of new gasoline and added it to a nearly empty tank. First try at starting was no more successful than the prior ones. Then I remembered that I really should try turning the rotor 180 degrees one more time. Released the distributor clamp bolt, lifted it enough to disengage the coupling, and rotated the rotor arm by 180 degrees. Now, when trying to start, it's quite obvious that the situation has changed dramatically. She is trying to fire up, but not quite getting there. I am presuming that this is likely caused, at least in part, by the timing being "off enough" to make things difficult. My next steps are going to be stepwise slight rotation of the distributor to see if I find a "sweet spot" that allows her to start and run. My question is, once she's running, about adjusting the timing. Specifically, what is it safe for me to grab in the area of the distributor. Obviously one has to rotate the thing while adjusting the timing, but is it better to hold it by the base of the cap or by the distributor body when doing this? I'd really prefer not to damage the equipment nor to somehow give myself an unexpected and unwelcome shock. Brian | ||
gordon le feuvre Prolific User Username: triumph Post Number: 194 Registered: 7-2012 |
Have just jumped on end of this. I presume there is a TDC mark/line/pointer/hole on Mallory unit. The car should start on TDC as Cloud timing (V8) was 2 degrees. This should be a good place to start, the car would probably be very "flat" but with time AND patience it can be tweeked up (advanced) on road to point of detotation, then back a bit. If it "feels" right on road, it can't be far away! | ||
David Gore Moderator Username: david_gore Post Number: 2576 Registered: 4-2003 |
Brian, Do not twist using the cap unless you have irresistible urges to be a bright spark or see what a prison electric chair feels like - if the cap is cracked or dirty, the HT output could find you a very attractive earth connection. Been there, done that . As the distributor body is earthed through the engine, this is the best point of contact - if you are inclined to be of the "belts and braces" persuasion; a pair of electrician's insulating gloves is additional protection. | ||
Brian Vogel Grand Master Username: guyslp Post Number: 2343 Registered: 6-2009 |
Thank you gentlemen. These "small details" are something a newbie to this particular undertaking is lacking entirely. Ignorance is curable, and I'm always trying to take the cure! Brian | ||
h_kelly Prolific User Username: h_kelly Post Number: 217 Registered: 3-2012 |
Brian, have you cleaned rotor arm and the 8 brass connection points under distributor cap?. The only reason I ask, approximately a month ago while out driving the car failed to start,long story short, I hadn't cleaned both items since replacing same, assuming all were good. Correct me if I'm wrong but I think you posted photos of your dis cap and rotor arm some months back, they looked similar to mine and probably need good clean IMHO. Ps I was in Athens Georgia at start of month fabulous place, first time in USA and really loved it. Good luck with same | ||
Brian Vogel Grand Master Username: guyslp Post Number: 2344 Registered: 6-2009 |
Hubert, I believe you're probably conflating my photos from the aftermath of the Christmas FTP a couple of years ago with SRH33576 and this undertaking. The distributor in this case is a brand new unit. I also made sure to clean the metal bits to remove oxidation and apply a very thin (as in you probably couldn't feel it at this point) coating of electrically conductive grease to prevent future oxidation. The spark I'm getting, based on the lamp in the tester, is quite strong. I've used the same tester on a car with a failed distributor so I've seen what it looks like on a barely functioning system, too. Brian, who still sincerely appreciates the input | ||
Patrick Lockyer. Grand Master Username: pat_lockyer Post Number: 1397 Registered: 9-2004 |
What happened to the simple whistle or puff test to get TDC with the alignment of the crank pulley TDC marks with spot on basic distributor timing. This IMO is not the simple way of doing the job more like a write up of lets try this and that with plenty of maybe's on the way! | ||
Brian Vogel Grand Master Username: guyslp Post Number: 2345 Registered: 6-2009 |
Patrick, And that should matter to you precisely why? I solicit advice as much to help me think things through and decide what I would like to do next, which may not be what has been advised, and for many reasons. Just yesterday I said in reference to my own opinions and advice, on a technical support forum on which I'm a moderator: I will offer my opinion and let folks weigh it and use all of what I say, part of what I say, or none of it. Whether I decide to follow any given piece of advice is entirely my choice. My choice should not be taken as an indicator that the advice is bad or unappreciated. I use virtually all of it as part of my thinking things through whether I end up directly following it or not. No one is obligated to participate in any given thread and can drop in, or out, at any time of their choosing. Brian | ||
Patrick Lockyer. Grand Master Username: pat_lockyer Post Number: 1398 Registered: 9-2004 |
Brian I have seen cars that have burnt out and also the cause of garages being burnt down. From your account of how not to carry out the distributor timing can cause a back fire or cause a sneeze within the carbs. Cranking can causing flooding this in the exhaust system with incorrect timing can cause an explosion blowing the silencer box and a resulting fire! This type of stress can cause flexy plate to fail also not unheard of is ring gear failure. and more. YOU HAVE BEEN WARNED> | ||
Brian Vogel Grand Master Username: guyslp Post Number: 2346 Registered: 6-2009 |
Yes, Patrick, I have been warned. I have been warned by you on multiple occasions about things that have not occurred. I concern myself with the probable issues that might arise from doing something after I've thought about it. The remotely possible but highly improbable, which you love to fling about with almost constant regularity, is of no concern to me. I cannot count the number of times you've played this schtick and I, for one, have tired of it. If you don't wish to assist me that's fine. If you want to think I'm stupid or insane, that's fine too. Please just cease and desist offering me your stream of worst cases which are about as likely as my being hit by a meteorite when stepping off my porch. Please!! They have never been intended to help. | ||
Patrick Lockyer. Grand Master Username: pat_lockyer Post Number: 1399 Registered: 9-2004 |
Brian have a look at this as to what can happen, it sums it up as a WARNING. Plenty more if you have time to find them on the nett. https://www.youtube.com/watch?v=mpB3A6Itq5M | ||
David Gore Moderator Username: david_gore Post Number: 2578 Registered: 4-2003 |
Patrick, The individual in the video is a strong candidate for a Darwin Award - instances of unsafe working practice are numerous [note what appears to be fuel mist blowing towards him on the first attempt to start the engine]: 1. Not having a proper fire blanket let alone a fire extinguisher handy [every home garage/commercial car workshop where vehicles are being worked on should have these items regardless of whether it is a home or business]. How many of us have these in our work area?? 2. Having an apparently open container of fuel at the LHS side of the car - note the fuel spill when he picks it up to remove it from the garage. 3. Trying to blow out the flames instead of trying to smother the flame with a fire blanket or even a towel - too much time was lost with this futile and completely inappropriate action. 4. Using a hose to extinguish the fire when there was burning fuel on the floor - petrol/gasoline floats on water and the burning fuel on the floor could easily have been washed into locations where an even greater fire hazard would have been created. No doubt I have missed other things of similar nature. http://www.darwinawards.com/ * | ||
ross kowalski Grand Master Username: cdfpw Post Number: 461 Registered: 11-2015 |
David, Yeah, that video highlights a ton of safety issues. I'll throw a couple at it too. Safety point 1. He should have been able to back the car out of the building and he didn't. Sometimes you need to throw the bowline on the h bit and do it that way, but here I am doing exactly that safety procedure a couple weeks ago.  Safety point 2. The difference between a regular day and a life changer is a couple moments. That video things didn't really go bad, but a couple things different and it certainly could have. Fire goes very bad very fast. Safety point 3. He's doing that with open exhaust with a no start. He is pumping gas out the open exhaust all over the engine compartment. He might have even choked it. Safety point 4. His timing is obviously off. He is running a (strange sounding) fuel pump from a tank. When doing this, you only should fill the float bowl on the carb. The float bowl will run the car long enough to answer that question. Safety point 5. Did he seriously still crank the motor and turn the fuel pump on with an engine in flames? What you do there is put the fire out first, then continue trying to start the car. Safety point 6. The guy in the video did "do safety". He put the gas can away from the carb, he pulled out the gas line from the can when there was fire, he stopped cranking when the fire got bad, he moved the gas can out of the fire area when the fire was close to it. Problem is everything he did was wrong because he had no idea what he was doing. Brian, I am in agreement with Patrick L regarding dire warnings and standard practice. He's only looking out for your well being. Out of control big fires come from small fires and small fires come from sources of combustion and sparks. Starting cars with out of time dizzy's is nothing more that a formula for fire. What did I do two weeks ago when starting the limo, pull the car out of the house, put a rag on the fender, unhook the fuel to the pump, put a fire extinguisher a couple yards back,remove the air filter, and fill just the float bowls. I didn't do those things because I start cars on fire all the time and am afraid. I've just lived long enough to see lots of people start cars on fire. I saw a guy just a couple days ago spray starting fluid into a car with the air cleaner in place. Really, ether into a paper wick. Either way, it's good to have people looking out for you whatever their motives. I have friends whose rituals to invoke or placate the invisible omnipotent sky ghost are very different to mine. I have friends whose political views are completely incorrect and ill considered. I have friends who like cats (a friend) The point is, the reason we are friends is that we look out for each other. Speaking of friends I have to go move another load of sand (4000lbs?) to my buddy's place to fix his road. :/9//& | ||
Brian Vogel Grand Master Username: guyslp Post Number: 2347 Registered: 6-2009 |
OK, gentlemen, life has calmed down enough to allow me to get back into the garage and do some work. By giving really brief hits on the starter this is about as close as I can get to TDC, which appears to be about 5 degrees after TDC. The TDC mark is the pinkish line just below the pointer and the white mark further down is 15� BTDC. At this point I imagine that I should set the distributor such that the rotor arm is just the slightest bit ahead the position of A1 on the distributor before proceeding: 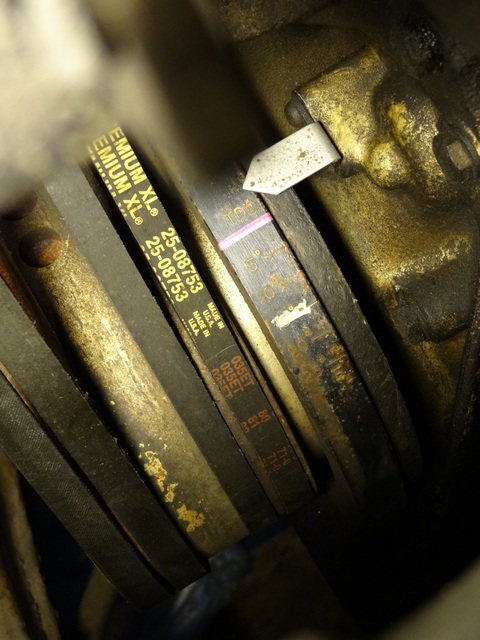 I make this presumption because Chapter U of the Workshop Manual discusses setting the ignition timing and notes that all of the marks on the crankshaft damper are BTDC and that static timing is 9� BTDC, so if I'm 5� ATDC I need to have the rotor arm about 4� ahead of the A1 position to get that static timing. This would position the rotor arm such that it will pass the actual A1 position very rapidly when the starter is next engaged. I would appreciate a confirmation as to whether this is correct. Brian | ||
David Gore Moderator Username: david_gore Post Number: 2588 Registered: 4-2003 |
Brian, If you want to set the static timing exactly from the timing marks without using the starting motor; this can be done by removing the spark plugs to render the engine free from compression and the drive belts can be used to rotate the engine to precisely align the mark and pointer making sure A1 cylinder is on the compression stroke as covered recently. Of course you have the hassle of removing/replacing the spark plugs however you will be certain the timing is correct and can be eliminated as a possible cause if problems still exist afterwards. | ||
Brian Vogel Grand Master Username: guyslp Post Number: 2348 Registered: 6-2009 |
David, This might be a next step, but I doubt it. I have a timing strobe light and have used it before and that's what I intend to do this time. I'm just trying to "eyeball" how I need the distributor oriented just to succeed in being "close enough" to get the car to start. If it's better to do the "remove the sparkplugs" method first then I could do so. Even then the 9� BDTC position for the distributor if the engine is at TDC would be a bit of a guesstimate, too. [Or having the engine at 9� BTDC and the rotor arm aimed dead on at A1.] Brian | ||
Patrick Lockyer. Grand Master Username: pat_lockyer Post Number: 1402 Registered: 9-2004 |
Whack static timing to TDC run up engine if your lucky and use the strobe gun to set at the required degrees at different RPM. Then check the advanced vac curve if fitted. Of course it may not start if the gear that drives the distributor has been located on the shaft incorrectly. This is if the new distributor did not have a gear fitted. How do you know that the rotor arm should be on A1 and not on B2? | ||
Brian Vogel Grand Master Username: guyslp Post Number: 2350 Registered: 6-2009 |
Patrick, I suggest you consult the Workshop Manual to see how I would know that the rotor arm should be on A1 and not B2 to set timing. It would also help if you ever looked at a single photograph, many of which I've posted myself, of the actual distributor coupling. There is no gear involved for these cars. I really shan't be engaging you further, as you pay absolutely no attention to what has been said and seem to believe that I, and many others, don't plan a lot of things out quite thoroughly before we actually turn a key (or similar). Brian | ||
Patrick Lockyer. Grand Master Username: pat_lockyer Post Number: 1403 Registered: 9-2004 |
May the Lord help you!!!!!!!!!!!! You say "There is no gear involved for these cars." Just slipped out and took a picture of a RR opus distributor new old stock showing the need of which I have done many, drilling and pinning the gear in the correct position on the shaft. I shall not respond any more to you, you are beyond help. | ||
Patrick Lockyer. Grand Master Username: pat_lockyer Post Number: 1404 Registered: 9-2004 |
And the pix to confirm. 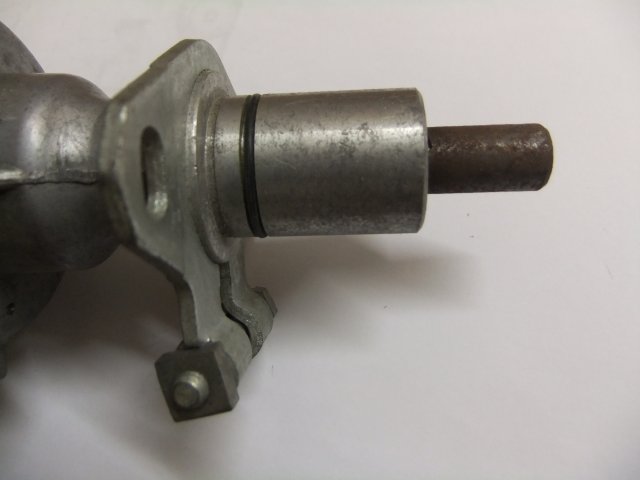 | ||
Geoff Wootton Grand Master Username: dounraey Post Number: 1728 Registered: 5-2012 |
Hi Patrick The more recent cars (mine included - a 74 SY1) have a slot at the end of the distributor shaft. Maybe you are referring to earlier models. Brian I get a different result from your reasoning. I may well be wrong but want to give my input. When static timing the A1 fires at 9 BTDC. The position of the rotor at this point is directly inline with A1 on the cap. From the photo, the crank has moved to 5 ATDC. So the actual position of the crank now is 14 degrees after when the spark plug should have fired. Since the distributor rotates at half the speed of the crankshaft my result is the rotor should be positioned 7 degrees after the A1 terminal. This is one of those mind bogling scenarios, like trying to figure out time zones when phoning friends. Geoff | ||
Brian Vogel Grand Master Username: guyslp Post Number: 2351 Registered: 6-2009 |
Just so these are part of the record for future readers of this thread: Distributor from LRK37110, 4 February 2015 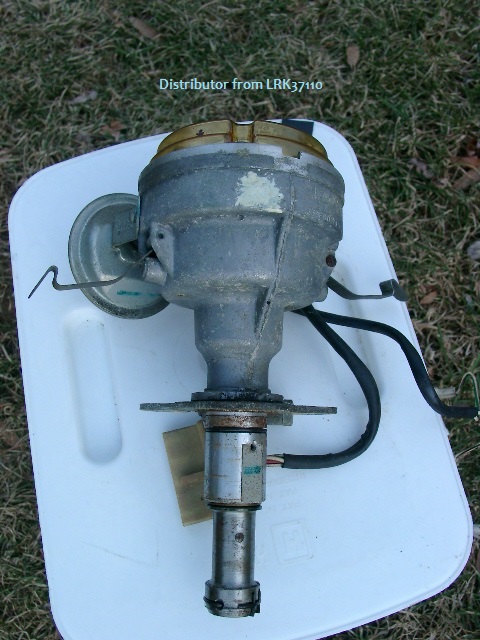 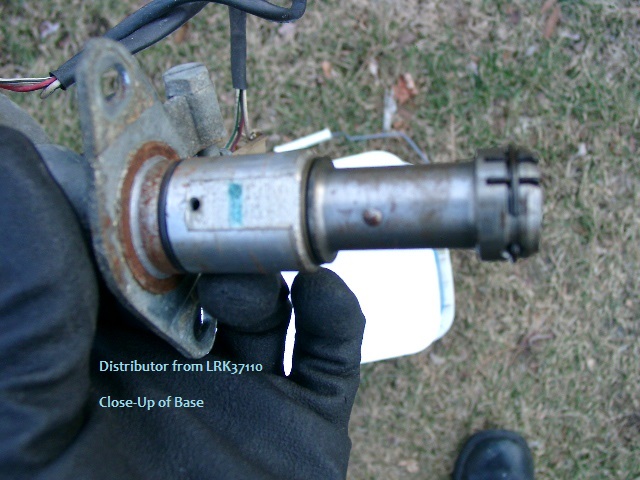 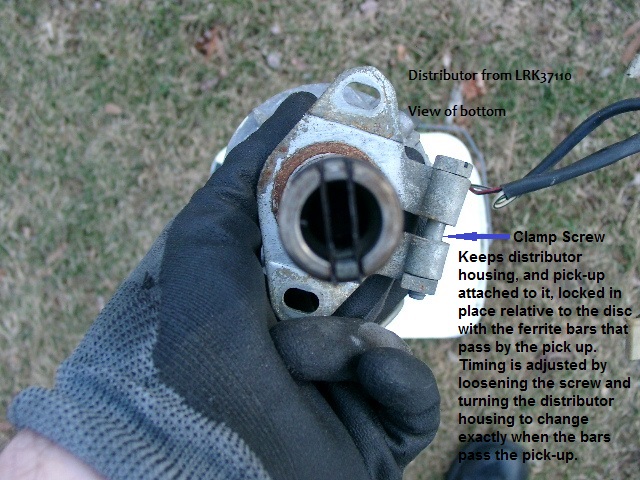 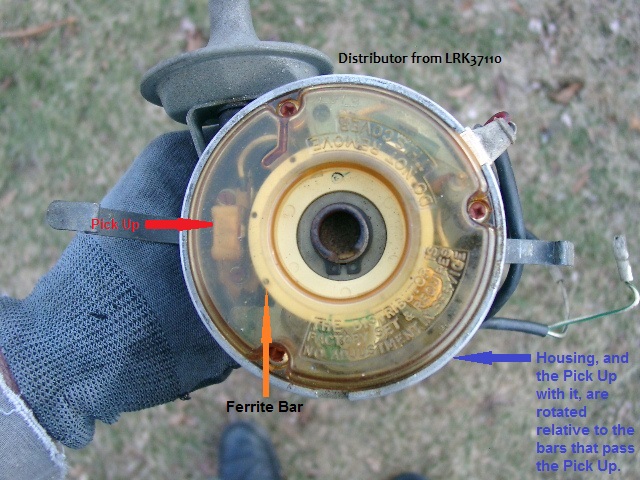 ------------------------------------------- Distributor from SRH37110, 4 February 2015  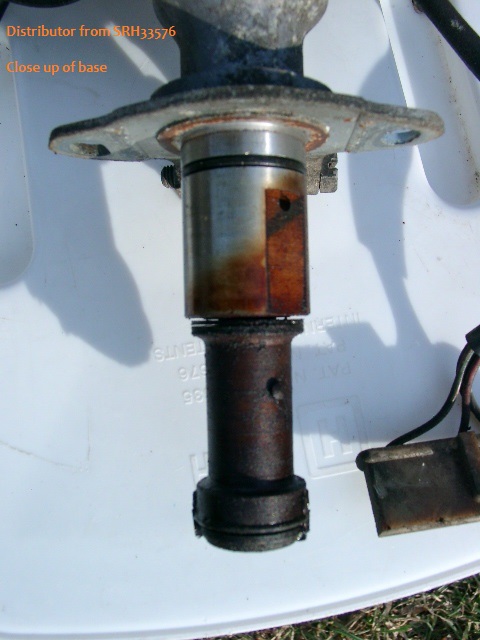 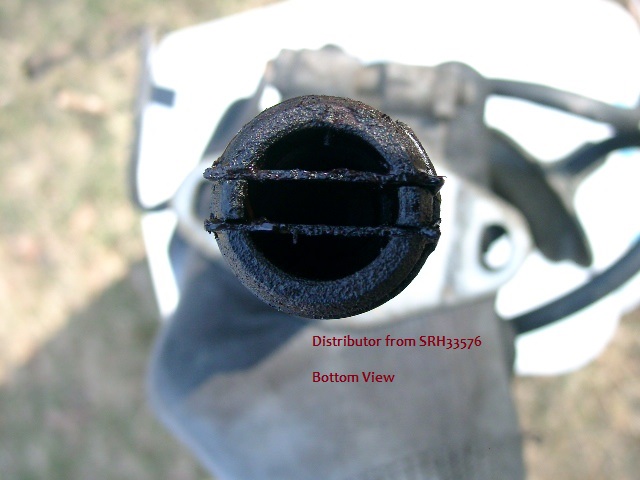  -------------------------- Geoff, you would indeed be correct. I don't know why it escaped me that firing at the distributor itself requires that the rotor arm is directly pointing at the position for a given cylinder itself. At that same moment the timing pointer would be pointing to 9� BTDC in the static configuration. Hence the reason I ask others to review my presumptions and the reason I don't rush out to take "the next step" until due consideration has been given in light of input. Brian | ||
ross kowalski Grand Master Username: cdfpw Post Number: 463 Registered: 11-2015 |
Brian, On a points dizzy, that 4 degrees atdc should work as a initial timing point. I would be very surprised if it didn't start and idle like that. If you had points it would work like this. 1. Put the engine at tdc / 4 degrees atdc, what have you. 2. disconnect the distributor to coil wire 3. connect a test light from battery + to the dizzy wire. 4. loosen the dizzy base. 5. rotate the dizzy against the direction of rotation until the test light just goes out. 6. the HT terminal the rotor is facing at this point is now 1, set the other wires in order. With the Mallory it's hard to know exactly when it's triggering whereas with points it's just a quick check with a test light. I might just set the initial timing by cranking and looking at the marks with a timing light. A few degrees retarded isn't really a problem at idle. On a lot of old hoopties with manual advance you would throw a couple degrees atdc at it when starting as a matter of course. Retarded timing makes an engine run hot so it's a good idea to dial in spec timing as soon as possible after starting. On a related note, the rotor doesn't need to be exactly lined up with the center of a cap contact. The rotor arcs to the cap contacts so the rotor only need to be overlapping the cap contact enough for the arc to occur. If you think about it, when the weights are advancing the timing, the spark is occurring at a different point of the rotor contact cap contact overlap. | ||
ross kowalski Grand Master Username: cdfpw Post Number: 464 Registered: 11-2015 |
Brian, Retarded timing. I recently helped out a friend by giving him the distributor from my mini because his pertronix wasn't working. The mini distributor was set at 5 BTDC or so on the Austin Sprite. Trouble was no power and lots of overheating. I remember setting the timing when I did the tuning on the engine and it didn't advance at all at 2k. Hmmm. Turns out totally frozen advance mechanism. I just put it back together after freeing up the advance weights and cam assembly. | ||
Patrick Lockyer. Grand Master Username: pat_lockyer Post Number: 1405 Registered: 9-2004 |
Geoff, a quick look for an old unit for repairs. The same applies to a geared type, this RR one shows the offset. This is critical with the positioning of the drive to the distributor shaft and not just being set at a 180 degrees out. One thing is for sure if the car had a spark and fuel flooding in the engine it would have in most cases had a blow back.  Offset drive.   | ||
ross kowalski Grand Master Username: cdfpw Post Number: 467 Registered: 11-2015 |
Brian, Easy peasy, https://www.youtube.com/watch?v=v-HzatlyDRA though he did not remove the dizzy. also https://www.youtube.com/watch?v=cDwY5aZt-Ts Patrick L, Pinesol. I don't know what it is called around your parts, but in the colonies it is Pinesol. I buy it from the dollar store and it is like magic when it comes to degreasing distributors. It doesn't corrode, it doesn't seem to attack plastic or rubber, and it does a number on grease. I usually disassemble things before soaking for a couple of days. I have a nasty 45d sitting in a tub right now. BTW the 45d is a garbage dizzy. What was lucas thinking. Probably the same guy that put the caps inside the rotor of their bike Mags. | ||
Brian Vogel Grand Master Username: guyslp Post Number: 2354 Registered: 6-2009 |
Ross, Though not as inexpensive as Pinesol (which seems to be available under some name as Pine "something" everywhere I've ever been) another good option is Simple Green. Really good at removing grease, whether vulcanized cooking type or motor type. Brian | ||
Patrick Lockyer. Grand Master Username: pat_lockyer Post Number: 1407 Registered: 9-2004 |
Gun wash is what I use when dismantled, let it soak and blow the dirt old oil etc away. Carbs also benefit from the same treatment. | ||
ross kowalski Grand Master Username: cdfpw Post Number: 469 Registered: 11-2015 |
Gun Wash? | ||
Patrick Lockyer. Grand Master Username: pat_lockyer Post Number: 1408 Registered: 9-2004 |
Ross, it is used for the cleaning of spray guns. | ||
David Gore Moderator Username: david_gore Post Number: 2595 Registered: 4-2003 |
Ross, Gun wash = recycled automotive paint thinner available through smash/crash repairers' supplies retailers. No good for painting but ideal and cheap for cleaning equipment and any job where a solvent is needed. | ||
ross kowalski Grand Master Username: cdfpw Post Number: 471 Registered: 11-2015 |
Patrick L and David, That would definitely cut some grease! | ||
ross kowalski Grand Master Username: cdfpw Post Number: 472 Registered: 11-2015 |
Brian, I just bought a remote starter at Harbor Freight tools on sale for 4.99. As the starter solenoid is easily accessible on these cars, it might be a useful investment. I usually just use a jumper for the task, now I will be able to crank the car in style from under the hood. It's cheap imported style, but more style than I currently have. | ||
Patrick Lockyer. Grand Master Username: pat_lockyer Post Number: 1412 Registered: 9-2004 |
Ross this is the one I have had since the seventies. Use it to start this machine once in a while so I don't have to get in and out of the cab. Great for doing the whistle puff test on a Shadow with just no 1 plug out. Of course you won't find this in the Shadow workshop manuals like many other short cuts to get a car up and running in a short time before other problems arrive and set in!  | ||
ross kowalski Grand Master Username: cdfpw Post Number: 478 Registered: 11-2015 |
Patrick L, Looks like it should go another 30 years. | ||
h_kelly Prolific User Username: h_kelly Post Number: 248 Registered: 3-2012 |
Hi, does anyone know how to remove an opus ignition, I had dis cap off, rotor arm, cir clip off, plastic rotor disc thing off, but no idea how one actually remove the opus unit itself. Any advice appreciated. Many thanks Hk | ||
Paul Yorke Grand Master Username: paul_yorke Post Number: 2054 Registered: 6-2006 |
3 screws. Ease it over the vacuum advance linkage or remove the back advance capsule. | ||
h_kelly Prolific User Username: h_kelly Post Number: 249 Registered: 3-2012 |
Thanks Paul, I'll attempt same again today. I sold the old 1968 Shadow 1, it's heading to Poland to start a new life as a wedding car, or so I'm lead to believe. Thanks again Hk | ||
h_kelly Prolific User Username: h_kelly Post Number: 250 Registered: 3-2012 |
Hi Paul, just to say thanks for advice, new ignition from fs fitted. The rotor arm is only few months old with a black stain on same, I gave a clean with sand paper. Should a clean be good enough or should I purchase new one. Thanks Hk | ||
Mark Luft Prolific User Username: bentleyman1993 Post Number: 207 Registered: 10-2016 |
Brian, any luck with the Mallory distributor? The SVBCC car show is coming and I'd like to see you there. | ||
Brian Vogel Grand Master Username: guyslp Post Number: 2616 Registered: 6-2009 |
Mark, The distributor is in the car and, as reported earlier, she fires up. That's where work stopped back in April, as other issues presented themselves in my life (typical stuff, not catastrophic). I really need to get on the proverbial horse again. I just hate working out in the garage when the temperatures are in the 90s F (near or above 32 C) and humid. I hate being outdoors, period, when it's hot and humid. Hot alone can work if you can find shade. But if it's humid as well you can't even have sweat be a successful cooling method! Brian, who will probably be there anyway as an observer if nothing else |