| Author | Message | ||
Patrick Lockyer. Grand Master Username: pat_lockyer Post Number: 1197 Registered: 9-2004 |
After I thought getting to grips with the upholstery a few years ago I thought all was ok but a Sunday trip with friends for lunch etc in the spring sunshine the seats were returning to the old sticky surface. Today I bit the bullet and started on the rear seat. Heck not easy with the LPG tank. Removed the centre arm rest.  Then the top backrest two securing fixings one marked red.  Removing the dye.  First part of the dye removed  More to follow soon. | ||
John Beech Prolific User Username: jbeech Post Number: 282 Registered: 10-2016 |
Tedious job. Lacquer thinner will make short work of the dye but still, this qualifies as a pain in the hind end. I'm sorry you're having to undertake it. On the flip side, this presents the opportunity to change color if that's your druthers. | ||
Patrick Lockyer. Grand Master Username: pat_lockyer Post Number: 1205 Registered: 9-2004 |
Keeping the colour the same. Using gun wash type thinners. out with the passenger seat today ready to remove dye. I would have given the RR trimmer the sack for not having the pleats in line!  Cripes the carpet has not been cleaned for years.  Time to oil the seat mechanism! | ||
John Beech Prolific User Username: jbeech Post Number: 288 Registered: 10-2016 |
At first I wondered if perhaps the pleats aren't aligned because the seat bottoms have been switched. However, based on what Robert Noel suggested vice swapping them occasionally to even out the wear I did it to Tootsie. Anyway, I just checked and the pleats lined up perfectly. Is it possible yours have been re-upholstered? | ||
Patrick Ryan Grand Master Username: patrick_r Post Number: 1325 Registered: 4-2016 |
Looking forward to more of this post Pat. | ||
Christopher Williams Unregistered guest Posted From: 50.84.174.74 |
I am interested in doing this to my Silver Cloud III. Would you mind sharing your process, chemicals used and tools? Thank you, Christopher Williams (Message approved by david_gore) | ||
Patrick Lockyer. Grand Master Username: pat_lockyer Post Number: 1214 Registered: 9-2004 |
Will do. | ||
Patrick Lockyer. Grand Master Username: pat_lockyer Post Number: 1218 Registered: 9-2004 |
John tried swapping the drivers seat swab to the passenger seat, no joy.  Chris to remove the dye I find old towels cut into squares, soak with thinners and rub the dye off, use both sides of the cloth till full of dye and discard. Found a scratch so this will be rubbed down with a fine wire wool. 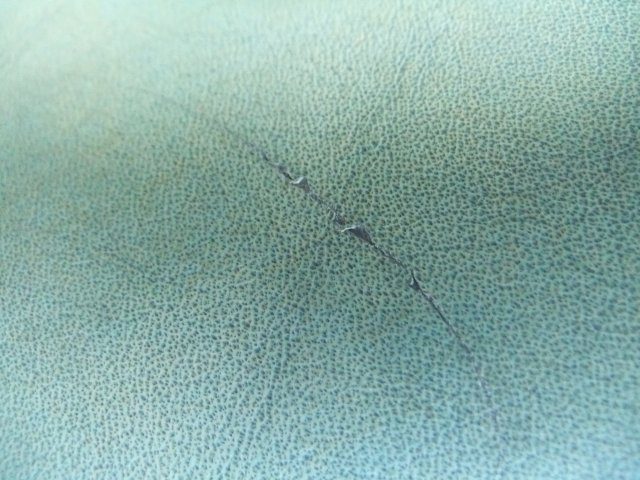 Best to carry the job outside and in a not to hot atmosphere. What is the temp in Dallas at the moment. Once I complete the first part of the dye removal will then go over the whole lot and the rub down before the next part. | ||
John Beech Prolific User Username: jbeech Post Number: 297 Registered: 10-2016 |
I presume you plan to fill the scratch, right? I recently got interested in the process and began perusing YouTube and there are a ton of videos showing the basic process. Some are dramatic because they show how to repair seriously torn side bolsters in the leather seats and they turn out looking brand new! Anyway, they have some flexible fillers that are water-based (a company based in Canada springs to mind but not their name). Anyway, you can definitely feather fill that small scratch and it will be indistinguishable from new. | ||
Patrick Lockyer. Grand Master Username: pat_lockyer Post Number: 1221 Registered: 9-2004 |
YouTube then no need to waste my time the way I do it. One thing I do know is when I complete the job it is 100% | ||
Mark Aldridge Grand Master Username: mark_aldridge Post Number: 421 Registered: 10-2008 |
Patrick, the seat bases on my Mulsanne are thick with "re connolising", but I have not yet had the courage to strip them off. Is it necessary to feed the leather prior to re colouring ? I am watching this thread with interest. Mark | ||
Christian S. Hansen Grand Master Username: enquiring_mind Post Number: 568 Registered: 4-2015 |
Be advised that replicating the pebbled grain of the original surface, which can easily be flattened with any sanding of the area while trying to address the scratch, is nigh impossible. You are simply substituting problems. While the scratch may be addressed, you will be left with a smooth area absent the pebbled grain in its place. YOU HAVE BEEN WARNED!! . | ||
Patrick Lockyer. Grand Master Username: pat_lockyer Post Number: 1226 Registered: 9-2004 |
Mark don't know what is on you-tube apart from what I have seen, IMO is a bodge. Anyway the leather seats etc do not have to have hide food at this stage. Once the dye is removed the whole lot is cleaned with a liquid deep into the fibres. One happy bunny to-day looked at the pleats on some other shadow seats and the are much the same as in mine. Pic of misaligned pleats original it seems. 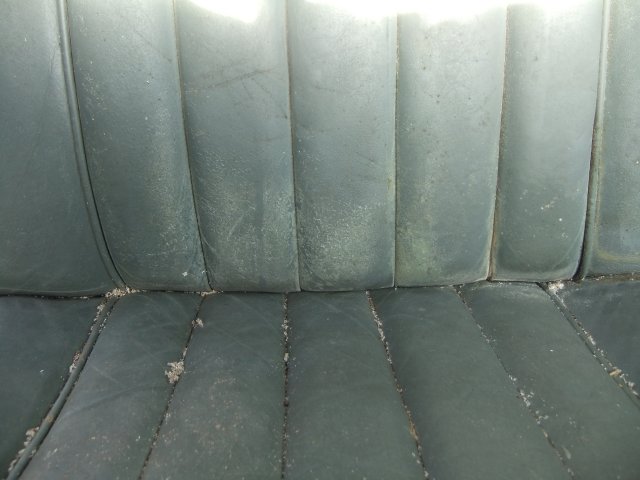 | ||
Patrick Lockyer. Grand Master Username: pat_lockyer Post Number: 1231 Registered: 9-2004 |
Going going, with no filler paste etc. 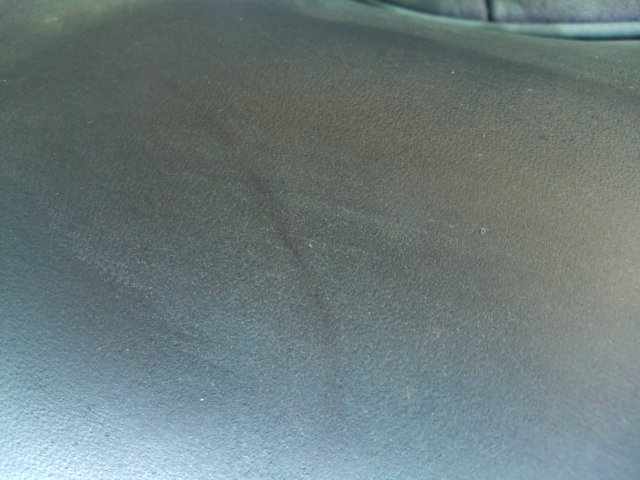 | ||
John Beech Grand Master Username: jbeech Post Number: 312 Registered: 10-2016 |
Good thing you're Johnny on the spot and we're merely back seat drivers. Of course, we offer advice with your best interest at heart - kind of like how mothers operate. Anyway, you were right and I was wrong . . . and I'm happy for your results. | ||
Christopher Williams Unregistered guest Posted From: 50.84.174.74 |
Looks like great work to me. The temps in Dallas this time of year range from about 40F to 90F, so it just depends on what nature decides to do that day. Thank you for the excellent pictures and description. (Message approved by david_gore) | ||
Robert Noel Reddington Grand Master Username: bob_uk Post Number: 1375 Registered: 5-2015 |
LPG tank is in the way of the bolts that hold the rear seat up right bit. I have found that the seat stays in place without the nuts and bolts. 2 x 5/16 unf nuts and fat washers at the top and 2 x 1/4 unf nuts, bolts and washers. | ||
Patrick Lockyer. Grand Master Username: pat_lockyer Post Number: 1243 Registered: 9-2004 |
Bob I'm putting mine back with the top seat adjuster bolts locating the back to the set amount from the factory. 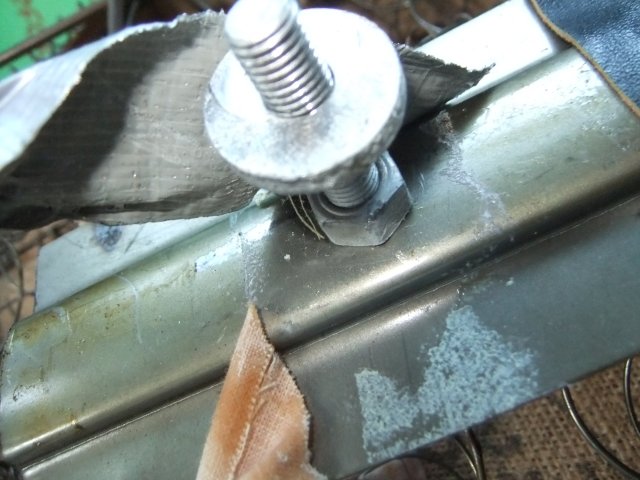 The two nuts and washers I can just remove with 3/8 extensions etc. The 4. 1/4" bolts are screwed into the plates to locate the centre arm rest. 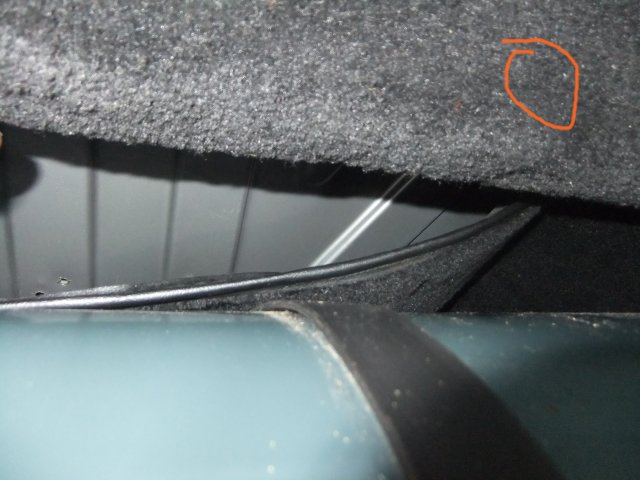 position of the hole in red for the top seat fixing above the LPG tank. 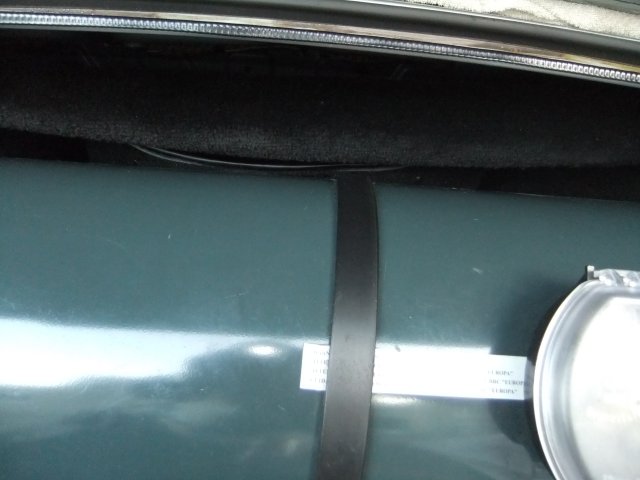 This shows the gap through witch to work with the LPG tank. | ||
Patrick Lockyer. Grand Master Username: pat_lockyer Post Number: 1247 Registered: 9-2004 |
Two head rest and one front seat back still to remove the old dye. Had a rest today well sort off. Had to mow the lawns.  | ||
Patrick Ryan Grand Master Username: patrick_r Post Number: 1396 Registered: 4-2016 |
Nice job on those lawns Patrick. I have to do mine today as well. It's Easter Saturday here, there ain't no bloody Easter bunny here to push my mower for me!!!  | ||
Patrick Lockyer. Grand Master Username: pat_lockyer Post Number: 1263 Registered: 9-2004 |
The drivers seat has some scuffs from braces that I shall not wear in the car ever again. 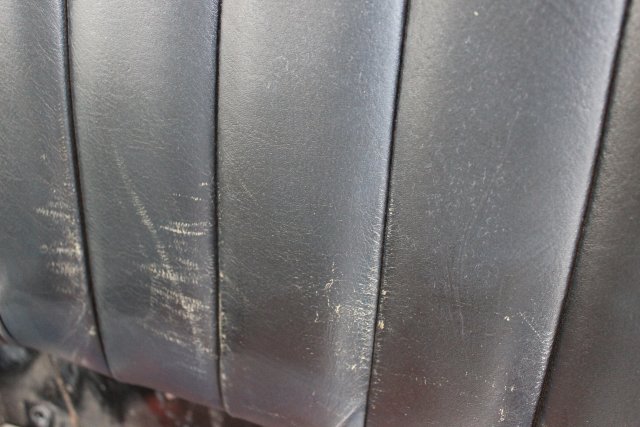 Removed the dye and treated the area with fine wire wool. All appears ok we will see.  Two head rests and the rear centre arm rest to do before the final prep of the leather in the pleats. | ||
Patrick Lockyer. Grand Master Username: pat_lockyer Post Number: 1264 Registered: 9-2004 |
The rear arm rest needs the gentle touch. If the seats are cracked or scraped then this will be the exception IMO to use some hide food before the colour is applied. Only after the leather scrape or crack has been delt with and removed, gently treat the leather as a living thing and then once recleaned the hide food can at best be left for three days to soak in. Then the use of leather cleaner reapplied yet again.  Head rests are now finished and the door card arm rests are next. | ||
Patrick Lockyer. Grand Master Username: pat_lockyer Post Number: 1293 Registered: 9-2004 |
Goodness the arm rests do stick as well.  Dye removed arm rests, ready for the next clean once the smell has dispersed.  Door card damage. +++ jpeg +++ 26804 +++ Door card nearly repaired in place. +++  Now the door shut if poss. | ||
Patrick Lockyer. Grand Master Username: pat_lockyer Post Number: 1294 Registered: 9-2004 |
Door card damaged, missed the pix.  | ||
Alan Dibley Frequent User Username: alsdibley Post Number: 56 Registered: 10-2009 |
I posted this question elsewhere, but have no replies yet. How does one cure door card damage of the kind caused by seat belt buckles? Is there a filler material which works on flexible material like leather and accepts leather dye? I've tried rubbing in lots of "leather food" to see if it swells up. It doesn't. Alan D. | ||
Jeff Young Grand Master Username: jeyjey Post Number: 349 Registered: 10-2010 |
Hi Alan, I'm not aware of anything that can be done for it. I like a car to have a bit of patina, though. To me, overly-restored cars lose their past. All the stories they could have told are gone. So just think of your leather marks as patina. ;) Cheers, Jeff. | ||
Patrick Lockyer. Grand Master Username: pat_lockyer Post Number: 1299 Registered: 9-2004 |
Did mine with a heat gun. Be careful! Can you put a pix up to see extent of damage? | ||
John Beech Grand Master Username: jbeech Post Number: 357 Registered: 10-2016 |
Patrick, I'm especially looking forward to your concluding remarks. By my standards as a hobbyist mechanic, that's been quite an ambitious undertaking. Do you have more pictures? | ||
Patrick Lockyer. Grand Master Username: pat_lockyer Post Number: 1301 Registered: 9-2004 |
More to come as I proceed next week. Three other jobs on the go porsche speedo in bits waiting for the gear. Making up a exhaust system on an old classic. Engine mods on going. And the weather, to cold at present. | ||
Patrick Lockyer. Grand Master Username: pat_lockyer Post Number: 1302 Registered: 9-2004 |
Exhaust finished, no gear yet in post, going to rain tomorrow so the weather being perfect today I though i would crack on with the drivers seat first. a good clean and a final going over I re-dyed first the pleats etc. The dyeing complete time to leave and allow to air dry. A few pictures  seat air drying  back of seat  Post as I type arrived and gears, will be busy on the Porsche now! Will find the posting and pix about the unbelievable 3d printing. | ||
Benoit Leus Prolific User Username: benoitleus Post Number: 290 Registered: 6-2009 |
Patrick, that seat looks absolutely fantastic ! As I plan to undertake this over the winter, I would be interested to know what make of products you use. Also, how did you apply the dye ? By spraying ? I am looking forward to see the rest of it. Benoit | ||
Mark Aldridge Grand Master Username: mark_aldridge Post Number: 428 Registered: 10-2008 |
Patrick, Superb; like Benoit, I have the front squabs to do on my Mulsanne as the thick coats applied by a previous owner are flaking off.Which products did you use ? Mark | ||
Patrick Lockyer. Grand Master Username: pat_lockyer Post Number: 1304 Registered: 9-2004 |
Thanks for the kind comments still much to do! I have seen lots of leather that has dye applied on top of old dye, IMO it causes cracking and may be the sticky leather. The only way is to remove the dye back to the bare leather. I decided to do a little more as the rain is on its way tomorrow. Thought I would do the drivers seat swab next, the pleat has a heavy grease. So the first pix is of how the grease looked at the start.  Using a heat gun on the crease with the use of a damp cloth but be carful a little heat at a time! This is the crease on its way. 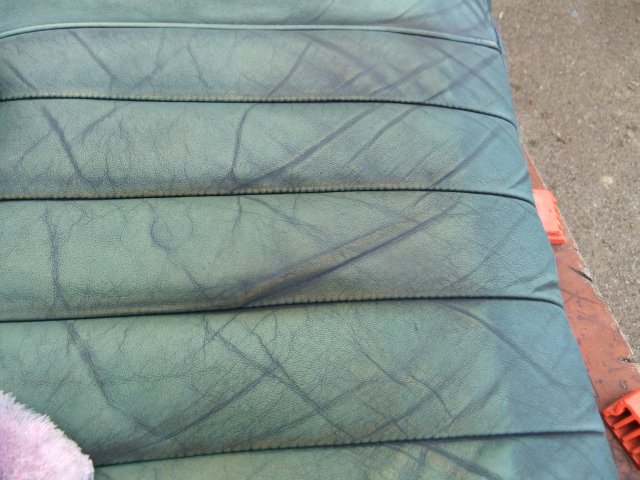 This one nearly gone.  Back to the patina look before the cleaning and the dyeing.  A first application of the dye with a cloth light rubbing into the pleats stitching etc.  A few more coats are applied by hand with a cloth then a few light coats with my old small spray gun May look good but then its time for inspection and final touch up. After a few days the sealer is used before fitting back to the car. Will put up some more pix of the progress. | ||
Patrick Ryan Grand Master Username: patrick_r Post Number: 1504 Registered: 4-2016 |
What an excellent thread this is Patrick. I know the whole world is watching your progress with this. Fantastic set of images as well. Thank you for sharing your work with us. | ||
Patrick Lockyer. Grand Master Username: pat_lockyer Post Number: 1308 Registered: 9-2004 |
Well the rain came then the sun came out then a small storm so plan "b" moved the old camper van out the small shed and found an old tressal and made a temp table with scaffold boards. set to work on the rear seat back and rear seat swab.Next the passenger seat. some pix of todays progress. 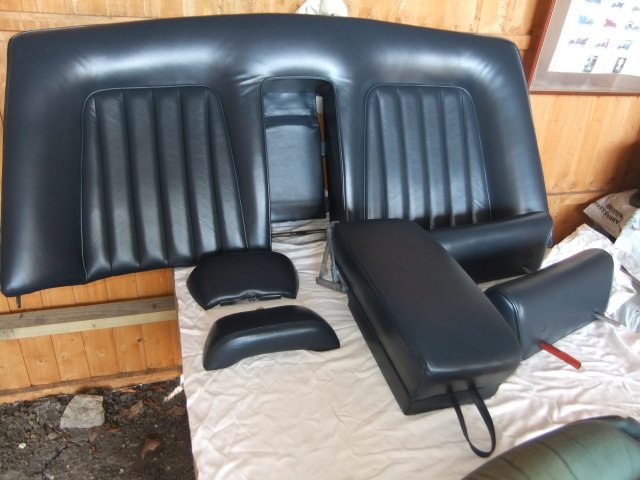 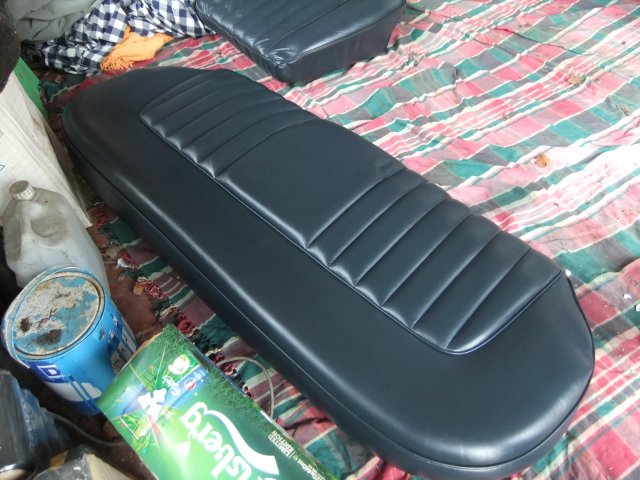 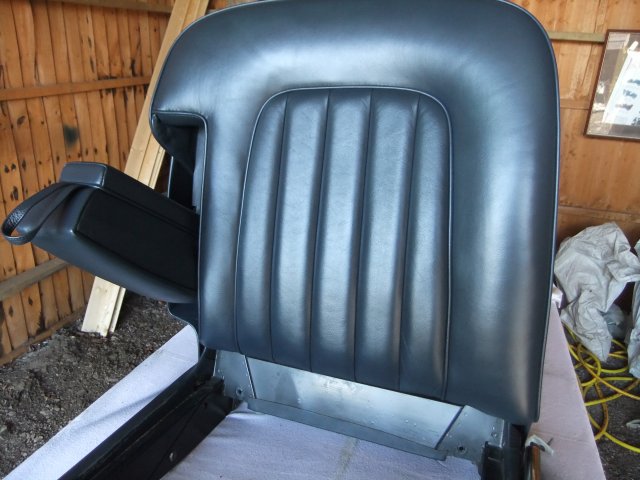 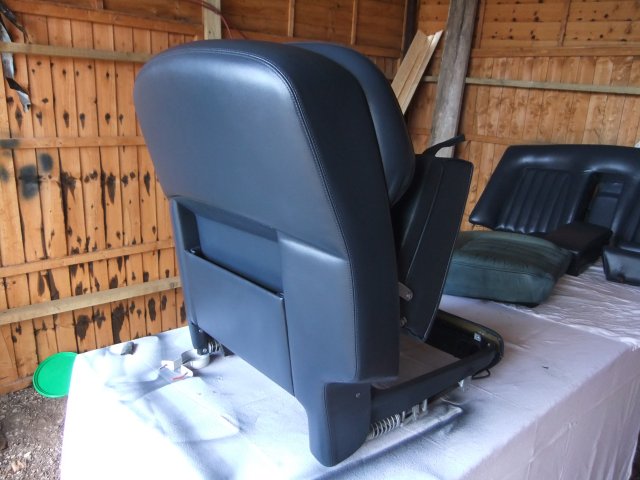 A few jobs with the heat gun to-morrow. The passenger seat swab is the last to dye. then the final inspection. The door cards need to be delt with then a good rest for the leather before the sealing takes place. | ||
Geoff Wootton Grand Master Username: dounraey Post Number: 1694 Registered: 5-2012 |
Patrick Fabulous Job. What products did you use? I once used a dye from a US Company called Leatherique. They made excellent products. Their sales blurb said their dyes were water based and much more suitable than oil based dyes. They would of course say that. I was wondering what type of dye you used. Geoff | ||
Patrick Lockyer. Grand Master Username: pat_lockyer Post Number: 1309 Registered: 9-2004 |
Geoff, water based is what I use. | ||
Michael Carr Experienced User Username: carsie Post Number: 25 Registered: 7-2016 |
Patrick, along with everyone else I'd like to say what a fabulous job you've done there; thank you for sharing. Both my Jag and Rolls need to receive the treatment you've outlined and I'm really keen to do the work myself. Please could I ask that you write up a detailed process, product and equipment list? e.g Wire wool grade, if matting agent was used and so forth. I notice that others have also asked; it would be of real value and very appreciated by all I'm sure. If you do this for a living then of course I wouldn't ask. Thank you Patrick! Best Mike | ||
Patrick Lockyer. Grand Master Username: pat_lockyer Post Number: 1310 Registered: 9-2004 |
Mike, first I do not do this or anything else for a living. Its all hobby with out the cheaque book Charley approach. I am a car nut who was once a garage proprietor, car repairs and serviceing mots on all makes and more. As for the writeing of the process it is a no go. Pictures can tell and show more than words ever will. There is no fixed way IMO with the working of old leather every car can have various failings one has to test area's before the applications and learn by ones mistakes. I did on my Jaguar Mk1 many years ago. Good to know freinds in the trimming business for advise if one needs it. No matting agent used, wire wool type fine grade! Water based car dye matched to the cars leather under the seat away from the sun light. Do have a go it is most rewarding and do not rush any of the processes. Hope this helps. | ||
Christopher Williams Unregistered guest Posted From: 50.84.174.74 |
That is exceptional work. I've been watching this thread to see the process, and it really is amazing. I am anxious to try it out myself! (Message approved by david_gore) | ||
John Beech Grand Master Username: jbeech Post Number: 371 Registered: 10-2016 |
In my opinion it's a big job for the average hobbyist. Calls for serious perseverance. Anyway, there are loads of videos on YouTube dealing with this subject but Patrick is the first guy I've known to tackle it. In a word, 'Attaboy', for working to a high standard. | ||
Patrick Lockyer. Grand Master Username: pat_lockyer Post Number: 1311 Registered: 9-2004 |
No wind or rain today, the final seat swab was under taken with a little more info . After a good first clean and allowed to dry it was time to use the blow gun in all the pleats opening up with finger pressure a small part at a time. Once all the dust etc is blown out a final clean with the solusion provided. The dye must then be rubbed in a little at a time with a cloth into all the pleat stiching this allows a good key for the following coats. Once dry the application of the dye is with a spray gun doing passes till a light covering is complete and allowed to dry. Repeat untill the final finish is complete with the texture and patina of the leather witch is again shown. Have looked at some of the videos and IMO it is carried out for the Aurthur Daily type cars for the car lots, may be ok for some folk though but not for me! Pix of the blow gun for getting the dust dirt away from the stiching. 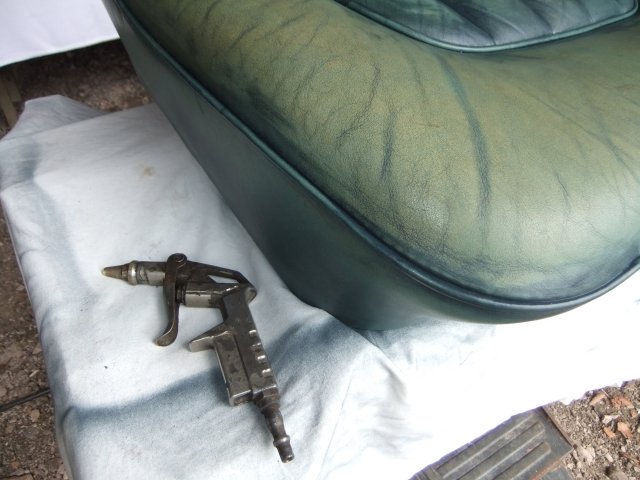 pix of the application of dye in the pleats.  pix of the first use of spraying the pleats. 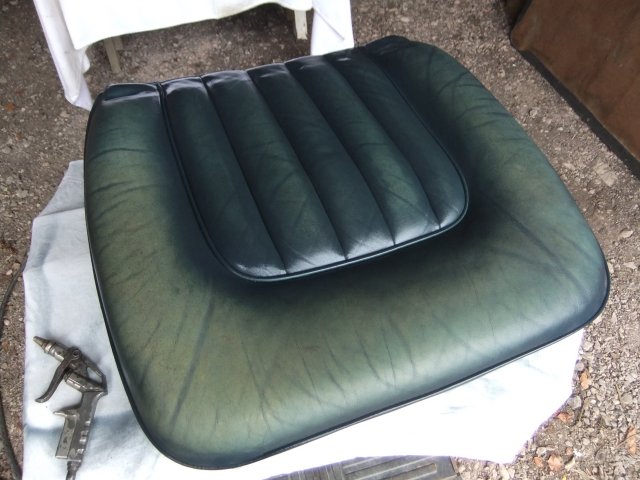 pix of the finished swab allowed to air dry for a few days befor the sealing. 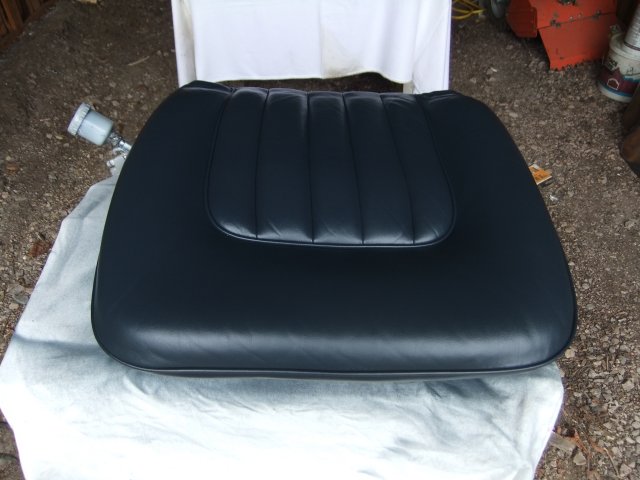 And one for Bud, now where is that scratch with no filler!  | ||
John Beech Grand Master Username: jbeech Post Number: 375 Registered: 10-2016 |
Patrick, I don't understand the Author Daily reference, but I believe I take your meaning. And I agree YouTube offerings generally aren't produced aren't to the high standard of your work. This thread is valuable for this supplement to those types of videos. That said, some YouTube videos are quite valuable as well. For example, I found one where the bolster was torn and the guy made a repair and it looked superb when he was done. While I don't have any such repairs in mind, it was quite useful to watch and learn. The details and insight you've provided, however, take it up a level. Especially insofar as it informs the unwary how very tedious this job will be once you start it. Moreover, I also agree that your photos speak volumes and thus, no subtext (or a stand alone article) is needed beyond what you've written. Nevertheless, while I believe it would still be useful, I don't argue for it. Finally, how did the scratch you burnished with the fine wool turn out? Quite frankly, I was skeptical because I feared the hide pattern would be lost. Would you kindly show how this turned out once again (now that it's been dyed)? And please later, show us again when it's been sealed and the job is completed for return to service? I suspect it's already indiscernible, or near enough. Last thing; someone asked about specific products, which you declined to provide. Is it your opinion it doesn't matter? Anyway, I look forward to further photos of your progress and the closing shots of the seats after being reinstalled. | ||
Patrick Lockyer. Grand Master Username: pat_lockyer Post Number: 1312 Registered: 9-2004 |
Bud. Well that was a lot of useless rambling. First if the bolster is torn get it replaced, it is a bodge and just for the short term besides the texture is also lost. Photo speaks volumes well not with you it seems. The seat back is referred to with the completed close up shot showing the the finished area! "Tedious this job will be once you start". I don't think so, tedious for you maybe but rewarding for most. As for products, that will be shown at the end when I decide the job is complete and the product can be recommended. As for the rest it will be completed when I decide to finish it. If you want a Quick job I suggest you use your car and pay for the work via utube. | ||
Christopher Williams Unregistered guest Posted From: 50.84.174.74 |
Patrick, is the sealant you are using like a clear coat type product for the leather? I am planning on trying Leatherique's line of products and dyes. They do show a clear coat in their product line, but state it is generally used on steering wheels, which makes a lot of sense due to wear. Does the sealer you are using slow down the wear-through process, or does it actually "set" the dye underneath? Thank you for all the information you've provided, it is extremely helpful. (Message approved by david_gore) | ||
Patrick Lockyer. Grand Master Username: pat_lockyer Post Number: 1315 Registered: 9-2004 |
Chris why don't you register I'm sure it would make it more easy for all. In reply to the type of sealer it is a sort of cream. At the mo I am doing all the contact parts of the leather for the fiting starting with the rear seat. The sealer will be applied to the whole of the leather after fittment, in case I mark it, once applied you cannot put dye back on top without starting from scratch. Sealer is applied with cloth and a gentle polish to a shine. The sealer stops the dye comming off with different humidity and body temp etc. Some pix of I hope the rear seat and armrest fitted later today. | ||
Patrick Lockyer. Grand Master Username: pat_lockyer Post Number: 1317 Registered: 9-2004 |
All went well apart from the two locating fixings. Bit of a struggle with the LPG tank in place, Dropped a socket so will get the flex camera with light and try to locate it with the magnet. Do not want that rattling around. Px of the fitted seat and arm rest, not a good pix as the car needs to be out in the day light.  passenger seat in place.  nearly ready to seal 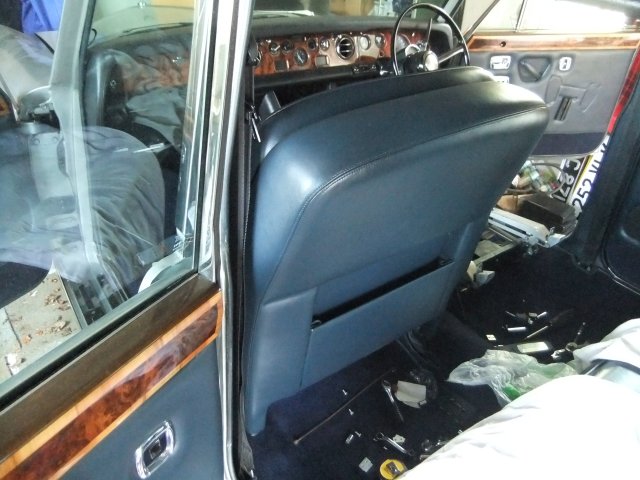 | ||
Mark Luft Frequent User Username: bentleyman1993 Post Number: 64 Registered: 10-2016 |
Patrick, a truly wonderful job! I love the color. Are you taking appointments?? Just kidding, thanks for sharing. Mark | ||
Mark Aldridge Grand Master Username: mark_aldridge Post Number: 430 Registered: 10-2008 |
Patrick, this looks superb and proves DIY jobs can produce an excellent finish despite what I have been told. When you have finished your project, I intend to do the Mulsanne front squabs and then James and I will start the complete interior of his Shadow. Mark | ||
David Gore Moderator Username: david_gore Post Number: 2552 Registered: 4-2003 |
Patrick, Inspirational and I am in no doubt there will be follow-on refurbishments by other forum members who were apprehensive about taking on a project of this type. Like everyone else following this thread, I hope you will detail the products you used as the results speak for themselves. The time and patience required is something that is our responsibility alone. | ||
Patrick Ryan Grand Master Username: patrick_r Post Number: 1516 Registered: 4-2016 |
Patrick, I am stunned & impressed at this job mate. Very well done, the photographs & descriptions are superb. One of the best threads ever. Thank you for sharing. | ||
Patrick Lockyer. Grand Master Username: pat_lockyer Post Number: 1318 Registered: 9-2004 |
Thanks for that. This morning fitted the last seat and will seal the contact area for the squab before fitting.  Then a break, out with the old tractor before the midday coffee a trip round to look at the crop! Lucky I had the camera! will post a pix in idle chatter. | ||
Patrick Lockyer. Grand Master Username: pat_lockyer Post Number: 1324 Registered: 9-2004 |
Seats and trim completed apart from a final sealing.  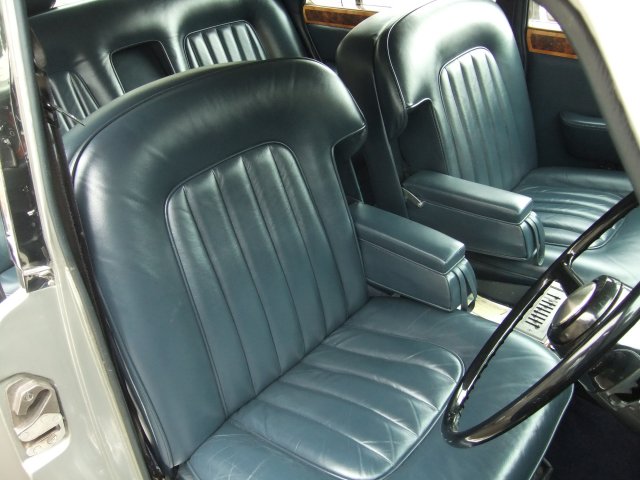  This is a pix of the tools etc. forget the flex camera unless LPG fitted!  Will give an detailed write up in due course | ||
Patrick Ryan Grand Master Username: patrick_r Post Number: 1523 Registered: 4-2016 |
Great stuff Patrick. | ||
David Gore Moderator Username: david_gore Post Number: 2558 Registered: 4-2003 |
Patrick, Magnificent outcome and one to be proud of as you will get a lot of satisfaction in the years to come. I [and no doubt a large number of our members] look forward to your summary of the products and techniques you used. | ||
Patrick Lockyer. Grand Master Username: pat_lockyer Post Number: 1326 Registered: 9-2004 |
To remove the old dye when it becomes sticky or has been re connolised with build up needing to be removed, the product I found best was gun wash[cellulose paint thinners] When the seat base are removed look for a piece of leather and cut of to send away, takes 2-3 weeks in the UK for the dye to be matched with the leather colour and the kit to arrive. Once all the seats etc are removed leave for the air to remove the smell of thinners. IMO the whole operation must not be hurried. Once the leather is checked for any failings i.e. scratches heavy creases these can be dealt with the use of a fine steel wool or p400 wet and dry using folded with the edge used to gently rub along the scratch. The gentle use of the heat gun on any creases or loose panels will tort up the leather. Once again when happy that all is ok with whole of the leather to be dyed, it must be cleaned with the use of the blow gun in the pleats stitching to remove years of dust and debris. The use of the cleaner supplied is the time to now go over all the leather and a final blow on the pleats. Lastly a damp cloth is used to wipe the whole areas. Once completely dry the renovator [dye] is used first on all the pleat stitching and contact areas with the use of a cloth provided. After a couple of coats working the dye well in by hand it is time to use a spray gun. The renovator dye is water based and is used in spray gun in the supplied consistency. I found the regulated pressure for the spray gun is about 40lb. Make sure the regulator and compressor are free from moisture. Apply light coverings of renovator dye till a satisfactory covering is complete. When all ok fit all the seats etc before the final sealing after a few days. Do not throw the old dye bottle away after use it will have the matching leather code on it. Think that's all but hey the name of the product [I have no connection and have not had time to test long term!] is Woolies and the details in the pix: 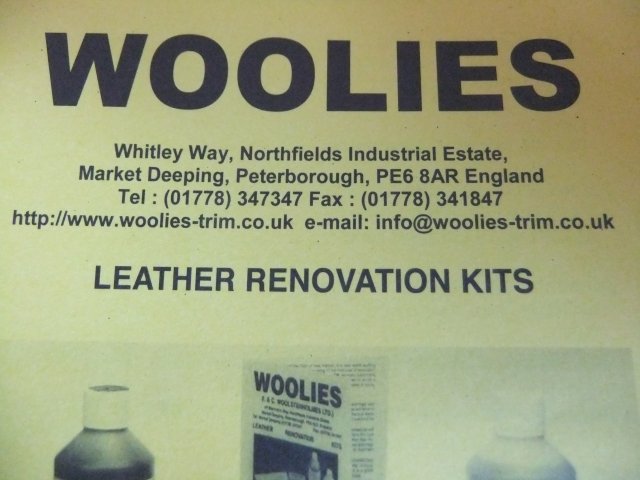 | ||
Mark Aldridge Grand Master Username: mark_aldridge Post Number: 431 Registered: 10-2008 |
Patrick, we have used Woolies products to renovate leather seats in a Morris Minor and a MK1 Jag, where the colour had worn away, but they had never been recoloured. We did not strip the original coating ( it did not occur to us ). The results were excellent, and even with daily use for 5 years, the Morris seats are still excellent. We are going to follow your example, and strip the Shadow seats and do a colour change. Mark | ||
Patrick Lockyer. Grand Master Username: pat_lockyer Post Number: 1328 Registered: 9-2004 |
Good on you for having a go Mark, if I have not made any part clear do ask. Was not the best at composition and spelling! BTW I had to do something to get rid of the sticky seats in the warm hot weather. I have three possible reasons for the cause of the seats being sticky. Has this happened to others here? | ||
Michael Carr Experienced User Username: carsie Post Number: 26 Registered: 7-2016 |
Patrick, Thank you! thank you for taking the time and the effort to write it up as well; it read fine to me- just grand  Its looks to be a challenging job, perhaps not so much having once done it, but your methodical, gentle approach allies the fears and has certainly given me the confidence to tackle it, so thank you once again; finished job looks fantastic! Best Mike | ||
Patrick Ryan Grand Master Username: patrick_r Post Number: 1526 Registered: 4-2016 |
Hey Patrick. When you in Australia next? I have a "little" job for you  | ||
Omar M. Shams Grand Master Username: omar Post Number: 1190 Registered: 4-2009 |
Dear Patrick L, Like everyone else I am equally fascinated and impressed by what you managed to do. Your end result is better than anything i have seen thus far. If we wanted to do work like you have done - what would be your advise regarding stiff leather? do you suggest dye removal followed by oiling of bare leather for weeks on end until supple and then removing oil to re dye? somehow i see a flaw in soaking the leather in oil and then expecting dye to stick. In short - at what point in the process would you recondition the leather to return its softness? Thanks Omar | ||
Patrick Lockyer. Grand Master Username: pat_lockyer Post Number: 1333 Registered: 9-2004 |
Hello Omar, I am no expert but can only advise on the products instructions and how I see it. The cleaner is a water based liquid that cleans and also penetrates deep into the fibres this will soften and feed the leather. IMO I would give two or three applications and see the results if ok carry out the dye process and leave for say 6 months before maybe using a hide food. Hope this helps. | ||
John Beech Grand Master Username: jbeech Post Number: 379 Registered: 10-2016 |
Patrick, this brings up a question I have in mind regarding the sealer you've used. I know you mentioned it being the dye being water based but what about the sealer; is it of a type that will allow application of hide food, later? Reason I wonder is I've read about some products where the leather is subsequently sealed and which leads me to wonder if that wouldn't preclude using hide food. | ||
Mark Aldridge Grand Master Username: mark_aldridge Post Number: 432 Registered: 10-2008 |
John, we have used the same kit as Patrick, and we coat the seats with hidefood,quite a thick coat, and leave overnight. Next morning, most has disappeared, so I assume it soaks in. We do this annually, on all of our cars. Mark | ||
richard george yeaman Grand Master Username: richyrich Post Number: 752 Registered: 4-2012 |
Patrick L well done, Patience is a virtue. Richard. | ||
Randy Roberson Grand Master Username: wascator Post Number: 727 Registered: 5-2009 |
Great Job so thanks for taking the time to share! Beautiful seats; exact same color as my '77 Wraith II interior. I am really partial to blue. |