| Author | Message | |||
Alex Wilson Yet to post message Username: alex_wilson Post Number: 1 Registered: 6-2014 |
I've just replaced all of the spark plugs, leads, new rotor and distributor cap, but my Silver Shadow SRH 9370 won't start. I've pulled out a plug and checked that I have spark, and undid the fuel line and have fuel pumping up. One error I made was to put the new leads on the dist cap as if the rotation was clockwise. Of course the engine backfired before I read that it rotates anti-clockwise. Any advice as to my next step would be greatly appreciated. | |||
richard george yeaman Grand Master Username: richyrich Post Number: 626 Registered: 4-2012 |
Alex we need to hear the whole story, Why was it deemed necessary to change all these parts, what was the problems before these changes, and also check the work you have done to make sure that you have everything correct, hope this helps. Richard. | |||
Alex Wilson New User Username: alex_wilson Post Number: 2 Registered: 6-2014 |
Hi Richard, I've had this car now for two years and have started some preventative maintenance. I replaced the power steering hoses and found the main one stamped 1979! Not knowing how old the plugs and leads were, I thought I'd replace them. On trying to take the coil lead out of the distributor cap, I damaged the cap, as it was seized in there. When I ordered the cap, I thought I'd get the rotor as well. The car has an after market electronic ignition. It was running well before I changed the plugs. Alex | |||
Nick Adlam Frequent User Username: crewes_control Post Number: 61 Registered: 12-2015 |
Hi Alex I assume it does have spark at the plug?. If so, then it's likely you've crossed the leads on the cap. Here's Brian Vogel's handy firing order diagram. 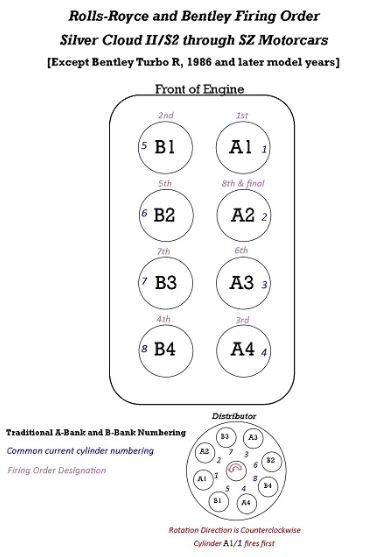 | |||
ross kowalski Prolific User Username: cdfpw Post Number: 132 Registered: 11-2015 |
Alex, It sounds electrical. First test, pull a plug and with the plug grounded crank the car and look for spark. You need compression fuel and timed spark to start an engine. You have compression and fuel which leaves a timed spark. Keep us posted. | |||
Alex Wilson New User Username: alex_wilson Post Number: 3 Registered: 6-2014 |
Hi Nick, Thanks for your interest in this. Yes, it has spark. I used the firing order from the workshop manual, which is the same as the info you've kindly provided. Cheers Alex | |||
Alex Wilson New User Username: alex_wilson Post Number: 4 Registered: 6-2014 |
Hi Ross, Thanks, did that exact test to see if I have spark, and it does. Cheers Alex | |||
ross kowalski Prolific User Username: cdfpw Post Number: 133 Registered: 11-2015 |
Alex, Did you mark what wire went to A1 on the cap when you pulled the wires? Sometimes that gets moved by people when the distributor is serviced at one point or another | |||
Nick Adlam Frequent User Username: crewes_control Post Number: 62 Registered: 12-2015 |
Hi Alex Ross is right- the rotor position and dist settings are often disturbed at some stage of the car's life. Maybe try the trusted old method- turn engine over until A1 is at TDC on the compression stroke, then check and align the rotor to A1 lead on the cap. Once you've established that, you can then set up the other leads. Also, have any wires or vacuum hoses been disturbed in the dist area?. | |||
ross kowalski Prolific User Username: cdfpw Post Number: 134 Registered: 11-2015 |
Alex, You could put the engine at TDC on 1 and look where the rotor is pointed to confirm the A1 wires location. If thats right, I double check the wires again. It's unlikely anything happened to the fuel but spraying carb cleaner into the choke housing would make the car run and at least tell you the spark and timing are good. Luck. | |||
ross kowalski Prolific User Username: cdfpw Post Number: 135 Registered: 11-2015 |
Nick, Just what I was thinking! | |||
Hubert Kelly Prolific User Username: h_kelly Post Number: 203 Registered: 3-2012 |
Alex, has the car electronic ignition, I know from experience, incorrect wiring, even for few seconds, can affected the electronic module(of the electronic ignition). Fingers crossed it's something simple. | |||
richard george yeaman Grand Master Username: richyrich Post Number: 627 Registered: 4-2012 |
Hi Alex I would go with Ross and Nick on this one. Richard. | |||
Geoff Wootton Grand Master Username: dounraey Post Number: 1418 Registered: 5-2012 |
Hi Alex I suspect firing order as well. If you are unfamiliar with how to find TDC on the A1 cylinder on the compression stroke let us know and we will talk you through it. Do not follow Brian's diagram unless you are sure the A1 position shown in his diagram corresponds to the same position on your car. On my car, A1 is at the "1 o'clock" position (A3 in the diagram) Geoff | |||
Hubert Kelly Prolific User Username: h_kelly Post Number: 204 Registered: 3-2012 |
http://www.simonbbc.com/ignition-kit-helper | |||
Martin Taylor Frequent User Username: martin_taylor Post Number: 53 Registered: 7-2013 |
If you have the order correct simply move all the leads around one space at a time until it fires, don't touch anything else until sorted or you may multiply your problems | |||
Alex Wilson New User Username: alex_wilson Post Number: 5 Registered: 6-2014 |
Hi Geoff & All, Thanks your advice. I foolishly should have marked the distributor where A 1 lead goes, I'm thinking this is the cause of the non- start now. Please talk me through how to determine tdc for cylinder A1. Cheers, Alex | |||
Alex Wilson New User Username: alex_wilson Post Number: 6 Registered: 6-2014 |
Hi Martin, Yes, I was thinking if doing that, but a bit worried it may cause another backfire which may damage the electronic ignition. (If it's not already damaged!) Cheers Alex | |||
Geoff Wootton Grand Master Username: dounraey Post Number: 1419 Registered: 5-2012 |
Hi Alex Before starting, it might be worth checking the distributor cap you replaced, as a previous owner may have marked the A1 position. Look for a dot of paint or scribed mark. It's a long shot, but you may be lucky. In theory, finding TDC for cylinder A1 is just a case of rotating the engine until the timing marks align and then checking A1 is on it's compression stroke. The rotor is then pointing at the correct terminal on the distributor cap and the spark plug wires can be fitted accordingly. Of course in practice, things are much more difficult than that. The first problem is finding the timing marks. They are etched into the crankshaft pulley but over the years they get covered with gunge and are hard to see. I removed the alternator on my car to allow me the space to reach down and clean the relevant parts. I then used white paint to highlight the markings and the pointer, arrowed in the pic below: 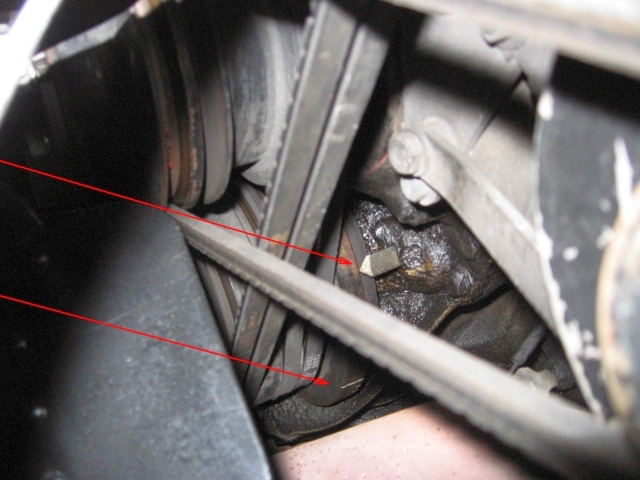 To see the timing marks You need to peer through the gap between the front wing and the raised bonnet. In the pic, and as a reference point for viewing, you can see the bonnet spring and air con hose in the foreground. 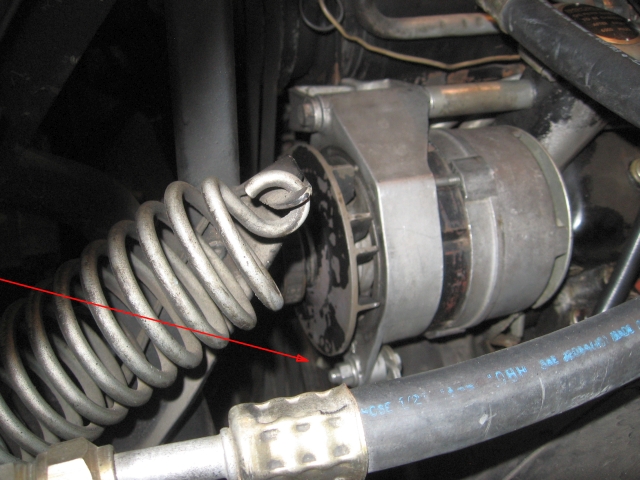 The red arrow in the pic below points to the timing mark pointer. It is slightly blurred as my camera was auto focusing on objects closer. Rotating the engine is a problem in these cars as there is not a handy crankshaft bolt to fit a large socket on to. Also access is poor. My method is to remove all the spark plugs to substantially reduce the resistance to turning the crank. I then pull off the + connector to the coil to protect the distributor electronics and crank the engine for a few rotations to get some oil on the crankshaft bearings. I then use a socket on the air compressor nut to pull the crank around via the twin belts. Once you've got to this stage it's just a case of aligning the TDC timing marks on the crank pulley with the pointer. However, you need to know whether A1 is on it's exhaust stroke or it's compression stroke. The "proper" way to do this is pull off the timing cover and check the inlet and exhaust valves are both closed. If so, A1 is on the required compression stroke. If the exhaust valve is depressed, then it's the exhaust stroke. I have read of an alternate method of determining the stroke, although I have never used it. It sounds logical however and makes things easier. Push a snug fitting rubber tube into the A1 spark plug hole. Blow into the tube. If resistance is felt you know you are on the compression stroke (the one you want) and if there is no resistance you are on the exhaust stroke, since the exhaust valve is open (180 degrees out). Another method of finding TDC on A1 is to push a small diameter plastic tube into the spark plug hole and get an assistant to rotate the engine. You will be able to feel the position of the piston as the plastic tube is pushed upward out of the hole. This entry has got a bit long and rambling so I will sign off and wait for any other suggestions from other owners. It may have given you some ideas on how to proceed. Geoff | |||
Robert Noel Reddington Grand Master Username: bob_uk Post Number: 1133 Registered: 5-2015 |
There is a second timing marking by the bell housing by removing a small cover. This allows the crank o be turned via the ring gear with a pry bar with care. Remove A1 plug rotate engine to mark. Blow down the plug hole. Air coming from inlet and exhaust means valves open. If so then the rotor arm should point to B2. If the valves are closed then the rotor arm should point to A1. A1 is opposite B2 on the dizzy cap. To adjust timing with engine running, hold revs at about 1200 rpm and advance until engine runs rough and then back off until smooth plus a nudge for safety. Drive car on road at 30 mph in top gear and go full gas pedal in the carpet. just before the car kicks down listen for pinking. If pinking then back off timing retard a nudge until pinking is gone. This method works with all petrol engine dizzy cars. it also works on diesels but an eye has to be kept for smoke and unburnt fuel. So not recommended. Geoff Wootton's posting is not too many words. There is a few ways of finding which stroke a cylinder is on. On lesser cars I just whip a rocker cover off and check the valves on the rock. A series BMC engines can be viewed by removing the oil filler cap. on the rock means that the inlet and exhaust valves of that cylinder are both open equal amounts and that cylinder should be at TDC on end of exhaust stroke. I have never seen any diesel or petrol engine where this is not so. From a lawn mower to a V12 they are all valve timed the same---- equal overlap. | |||
Geoff Wootton Grand Master Username: dounraey Post Number: 1420 Registered: 5-2012 |
Hi Bob Looking down on the dizzy cap with 12 o'clock nearest the front of the engine, at what position is A1 on your car? I'm just wondering if all cars are at the 1 pm position, as on my car. My guess is they should all be about the same unless the distributor drive gear on the camshaft has been dismantled and the gear wheels moved along a cog. Geoff | |||
richard george yeaman Grand Master Username: richyrich Post Number: 630 Registered: 4-2012 |
Geoff thats where I would go as a starting point one o clock give or take a smidgeing. Richard. | |||
Geoff Wootton Grand Master Username: dounraey Post Number: 1422 Registered: 5-2012 |
Hi Richard I agree. It might be worth Alex trying this before getting involved with the hassle of accurately checking the correct position. I seem to recall someone saying the 1 o'clock position is where A1 should be. Geoff | |||
Robert Noel Reddington Grand Master Username: bob_uk Post Number: 1135 Registered: 5-2015 |
A1 is at the front | |||
David Gore Moderator Username: david_gore Post Number: 2227 Registered: 4-2003 |
Please do not take chances on where the actual position of A1 on the current distributor is located as it is possible any position could have been used due to changes made by past "mechanics". The best thing to do is set A1 on compression by removing the rocker cover, ensure both A1 valves are fully closed and then checking the timing marks to ensure they correspond. If not, major "malfeasance" has occurred and stocking up on headache medications will be required. If the marks do align, check the position of the distributor rotor as this will correspond to the cap terminal for the A1 spark lead and fit this lead followed by the other leads in firing order. Manually rotate the engine with the plugs removed for two full revolutions and check the timing marks to ensure they align and the distributor rotor to ensure it still aligns with the A1 terminal on the distributor cap. Set the timing mark to 6 degrees BTDC [Before Top Dead Center] and rotate the distributor body until the points just begin to open and clamp the distributor. This will set the static timing for later checking with a timing light when the engine is running. If electronic ignition is fitted, just set the static timing to 6 degrees BDTC and check the timing with a timing light once the engine is running and adjust as necessary. If the engine still refuses to start, the problem may be with one or more of the following; the points/electronic module, the coil/ballast resistor, the distributor cap/rotor, the spark plugs or the plug leads in that order. I am assuming the battery is fully charged and the battery voltage with the starter motor operating is 11 volts or higher. If the battery voltage is 10V or less, starting will be difficult if not impossible. To effectively sort out this problem, it is important to follow a logical procedure to check for possible causes and rectify these as necessary. Above all, remember Murphy's Law of engine ignition systems: "a AUD200 part will always fail to protect an AUD10 part". Proceed logically and carefully never assuming anything and you will eventually find and rectify the reason for the failure to start. As I have said previously elsewhere in this forum, sometimes it is better to leave an unsolved problem for several days and then come back to it; it is amazing how effective a break of this nature will often bring fresh insights into finding and fixing the real problem. Good luck and may the sound of a running engine be heard sooner than later. P.S. I have used both Geoff's and Robert Reddington's suggestions for manually rotating the engine, Geoff's is my preferred method despite the need to remove the difficult B3 and B4 plugs; having to get under and out from under the car to check the timing marks/valve position using Bob's method is a real PITA if the car is not on a hoist. P.P.S. After trying to start the engine unsuccessfully, can you smell petrol from the exhaust pipe? If not, the problem may be carburetors and not ignition. Using a timing light will quickly indicate if the distributor is working as the flashes should be uniform in intensity and regular. | |||
ross kowalski Prolific User Username: cdfpw Post Number: 136 Registered: 11-2015 |
Here's the way I use as demonstrated by the editor of HotRod magazine and his accomplice. https://youtu.be/5iIleaQjIz0?t=279 Once you identify you are at the compression stroke, just move the crank to the mark. Don't pull the plugs on the other cylinders for this technique as it keeps the engine from turning a lot with each bump of the starter. | |||
Alex Wilson New User Username: alex_wilson Post Number: 7 Registered: 6-2014 |
Hi Gentlemen, Thanks for your time in providing advice on this starting issue, great photos Geoff. SRH9370 is running again thanks to your posts, and as some thought A1 position is one o'clock if 12 is regarded as towards the front of the motor. She fired first go once this position was determined. The next preventative maintenance task is to replace the diff oil which I have ready to go. Then I'll do the rear fuel filter now I've found where it is while thinking I had a fuel supply problem. Cheers, Alex | |||
Jeff Young Prolific User Username: jeyjey Post Number: 274 Registered: 10-2010 |
Great result, Alex. The diff oil change should go a bit more smoothly. Top up the oil in the trunnions while you're there, and grease the U-joints. Cheers, Jeff. | |||
Geoff Wootton Grand Master Username: dounraey Post Number: 1423 Registered: 5-2012 |
Hi Alex Nice one!!! Loosen the filler plug on the diff before removing the drain plug. It has been known for the filler plug to be jammed in, so this prevents you from emptying the diff and finding you can't fill it again. Unlikely I know, but it will buy you time if this problem does occur. Geoff | |||
Brian Vogel Grand Master Username: guyslp Post Number: 2075 Registered: 6-2009 |
Gentlemen, I'm sorry I wasn't able to jump in on this thread a bit earlier, but . . . I'm attaching my Firing Order diagram in PDF format that includes the distributor. This was all updated last year when another thread covered this territory in detail. Brian
| |||
Alex Wilson New User Username: alex_wilson Post Number: 8 Registered: 6-2014 |
Hi All, Thanks Jeff and Geoff for your advice on the diff oil change. Having purchased the Shadow Owners Companion I knew to change the trunnion oil, buying an 80mil syringe for this task along with a hand pump for the diff oil. The trunnions had only a small drissle of oil in each one, so I'm glad I drained and topped them up! Removing the diff fill plug was not something I would have thought of, and it took quite a while to loosen, while the bottom drain plug came out nicely. The U-joint grease nipple is something I really had to look for, so thanks for that advice while the car is in the air and I'm in that area. I put 150ml in each trunnion, pushing an unused nossle from a silicon gun onto the tube on the end of the syringe to inject the oil. With the new plugs, leads, dist cap and rotor, the car starts really well, particularly when I gave to restart after stopping somewhere during a run. Heater hoses are next in the list. Cheers Alex | |||
Randy Roberson Grand Master Username: wascator Post Number: 697 Registered: 5-2009 |
Both the 1970 Shadow and the 1977 Wraith had almost dry trunnions; the left one on the '77 had a split boot as well. Imagine how happy the trunnion needles were to finally meet up with Mr. Oil again! Supposedly the '77 had been "checked out" and "serviced" prior to my obtaining it. Well, it has now! |