| Author | Message | ||
Kelly Opfar Prolific User Username: kelly_opfar Post Number: 105 Registered: 7-2004 |
I've finally managed to stop wailing in the fetal position for a few minutes, so I'll try to get this out. I don't have a picture of my original block that highlights the damage that I was trying to repair but here is a picture of my new block with the same type of damage:  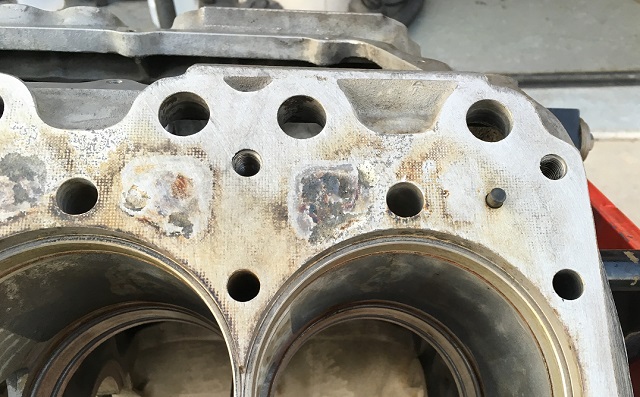 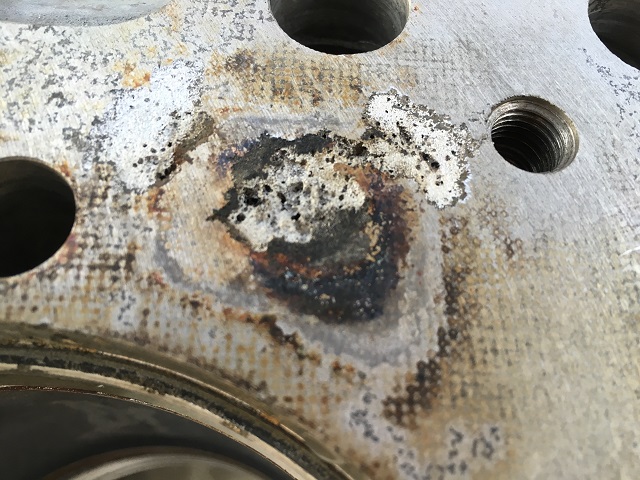 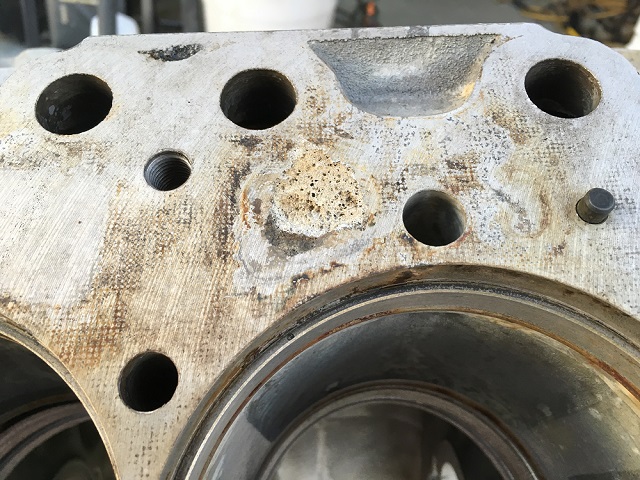 At first I thought this was some kind of electrolysis damage, but upon further consideration, I now believe it to be the effects of cavitation. These spots correspond to holes that are in the heads where no water actually flows. Moreover, these spots are also covered by the head gasket - the water shouldn't be in direct contact with the block deck. But clearly somehow, water gets through and cavitation occurs. All I know about cavitation is what I read on Wikipedia: "Cavitation is the formation of vapour cavities in a liquid � i.e. small liquid-free zones ("bubbles" or "voids") � that are the consequence of forces acting upon the liquid. It usually occurs when a liquid is subjected to rapid changes of pressure that cause the formation of cavities where the pressure is relatively low. When subjected to higher pressure, the voids implode and can generate an intense shock wave." I wanted to repair this electrolysis damage on my original block so I cut out the spots offoamy looking aluminum with a carbide burr and filled them in with JB Weld WaterWeld epoxy. This is the original reason that I extracted the studs in SRE24700 - I knew I was going to have to deck the block to flatten the epoxy. Extracting the stuck studs was cause for great consternation itself requiring many months and several custom tools. I instructed the machine shop to mill the very minimum amount of material to clean up the epoxy. They called me later in the week and told me that the milling machine had flung the epoxy clean out of the holes as if it was never there. But not to worry, they had just the ticket - a super-gee-whiz-bang epoxy that was used all the time by racers and was super expensive. This was flung out too. The decks had now been milled twice. I then decided to use MuggyWeld low-temperature aluminum solder to fill the voids. http://muggyweld.com/super-alloy-1 This solder melts at 350�F I practiced on a couple of pieces of aluminum to make sure I had the knack. Here's where I ran into the biggest trouble although I didn't know it at the time. The block is so large and aluminum is such an efficient heat sink that I couldn't get enough heat localized to melt the solder. The heat dissipated throughout the block faster than I could apply heat, so I had to keep turning up the heat until it worked. Eventually the voids filled in nicely and I had the block decked for a third time. The block came back from the machine shop looking great. 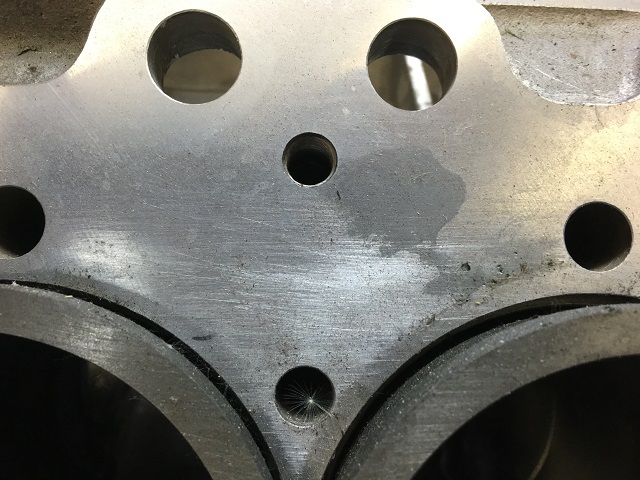 Except I noticed the serial number was looking a little thin. That was to be expected though, right? I mean the block had been milled 3 times now. 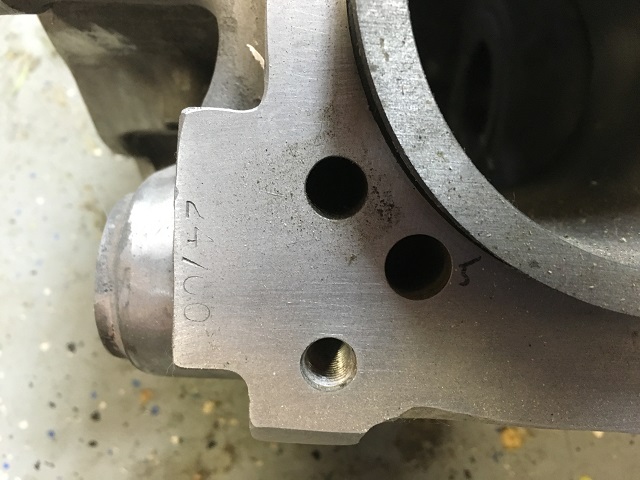 Here is 41193 for comparison: 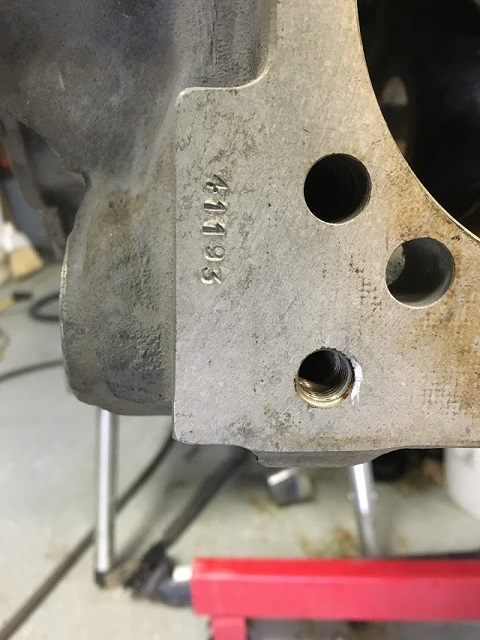 I went through the process of dropping in the liners knowing that they still needed to be machined to get the nip height correct and this is where I started to get the inkling that something was wrong. The nip heights varied from .003 to .009 proud sometimes even on the same liner. I took them back out and checked for debris and measured the lip thickness on the liners and put them back in again. The measurements were the same. Now I was really confused. It hadn't yet dawned on me that I'd warped the block while soldering with MuggyWeld. I thought about it for several months while I did other things and finally I decided to make a large precision ground sanding block with a built-in sandpaper stretching mechanism to keep the paper taut. This block is 6" x 10" x 1/2" thick ground steel. I used it to sand the tops of all of the liners so the nip heights would be correct. Right about the time of the last sanding block stroke, the warped block theory started to occur to me. I installed the crank bearings and laid in the crank and torqued the main caps down. The crank was immobile. The full extent of the damage occurred to me right then including the ruined liners. This was a near perfect engine with no wear showing on anything including bearings, pistons, liners, cam and lifters. I was going to clean it, balance it, reuse everything and put it back together. Because I couldn't live with a little cavitation damage that really didn't affect anything I ruined it. Putting too much heat into the decks of the block made the block bend into an arched position, but when it cooled, it overcorrected into a "U" shape. It is not something you can see - it is less than .010" - but that much is not reasonably fixable. If this was a classic 1 of 5 Ferrari block, theoretically everything could be repaired. The mains could be line bored and the cam bore could be straightened and cam bearings could be installed. The liner bores could be bored straight and the counter-bores could be cut to an even depth. Custom made oversize liners could be made. But this is not that rare and not worth the cost of fixing. You may notice that I pulled the studs out of 41193 too. That's because the part of me that failed economics got sucked into the sunk cost fallacy. I had already made a brand new set of beautiful stainless studs and I wanted to use them. 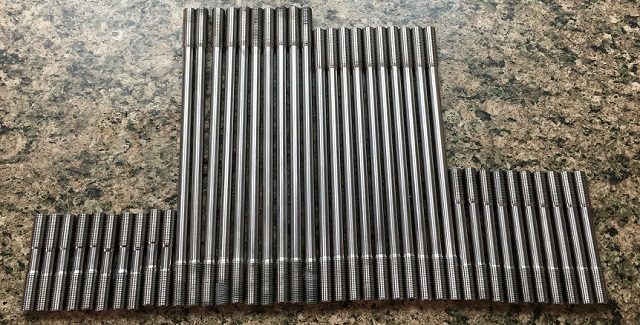 I did not have as much trouble with 41193 even though it took longer than the first block. I had 10 studs stuck this time. I Kroiled everything, double-nutted the top of every stud and positioned a wrench on every single one in a tensioned position. Every day I would give each one a twist and occasionally I would be rewarded with a stud coming out. The last one took 3 months but at least I didn't have to drill out one that was broken. It might not have taken so long if I'd known about Ross K's ATF/Acetone solution. I'm going to live with the cavitation damage on this block. There! Having gotten this off my chest, maybe I can stop mumbling to myself in my rocking chair while looking off into the distance with a 1000 yard stare. Kelly | ||
richard george yeaman Grand Master Username: richyrich Post Number: 611 Registered: 4-2012 |
Hi Kelly sorry about all that, indeed that was a bitter pill and I with my big mouth kept saying you should fix the original, and thank you so much for sharing your experience and knowledge, we cant win them all. | ||
ross kowalski Frequent User Username: cdfpw Post Number: 71 Registered: 11-2015 |
Kelly, I cannot count the number of times I have done the same thing. "That stud has bogus threads and would torque fine, but I'll never have a better shot at removing it..." Then when it snaps off I now have a whole new kind of fun removing a broken off stud in an AL block! Good times. A good friend and I always say "Did you mess with it?" when we are recounting a story like this because of the following flow chart I wonder if TIG welding would have warped the block less as the heat is more localized? Hmmm. If you really have to get a stud out of a non feris block, there is the old watchmakers trick. Here is a guy doing it on a big bolt on youtube Oh yeah, the studs are really clean. | ||
Christian S. Hansen Grand Master Username: enquiring_mind Post Number: 353 Registered: 4-2015 |
Kelly... ...and the irony is that you proceeded with everything so meticulously. Sometimes the fates can be mercilessly cruel. | ||
Kelly Opfar Prolific User Username: kelly_opfar Post Number: 107 Registered: 7-2004 |
Ross, no doubt TIGing the block would have been better. I could have run a small bead on alternating decks for 3 or 4 seconds each until all the cavities were filled. I figured at the time that low melting temp solder sounded like a better idea. That broken off stud trick is the greatest thing I've ever seen! How did I not know about this? I almost can't wait for my next broken off stud. | ||
ross kowalski Frequent User Username: cdfpw Post Number: 74 Registered: 11-2015 |
Kelly, I just googled "RR block broken stud extraction". Seriously, my wife and I made hinged wedding rings with tiny watch screws closing them. They were something on the order of .7 or .75 mm so the taps were tiny. The watchmaker who sold us the taps sold us a set of 5 (he knew) and told us about the alum trick "if we needed it" (he knew) After the fourth tap we were pretty good at boiling them out with alum. I've only used this trick once for a carb preferring the weld a nut on the end trick, but it works great. Two things I learned about this process. If you can drill a hole in the center of the fastener, it will work A LOT faster. If you heat the solution it works faster but you cannot put it in just anything so if you can steal your better half's Visions pyrex cookpot... Also, there are a few other feris only solutions but (and this is a big but) some are extremely sketchy health and safety wise. | ||
Omar M. Shams Grand Master Username: omar Post Number: 768 Registered: 4-2009 |
Dear Ross, I am grateful to you about the alum trick. I still dont know what alum is nor where I can buy it. Like Kelly I cant wait to try it out in anger - but first I need to know what this alum material is and where to buy it from. | ||
Geoff Wootton Grand Master Username: dounraey Post Number: 1363 Registered: 5-2012 |
Hi Omar From your local Rolls Royce store a.k.a. Walmart. You can pick it up when you are buying caster oil for your brake fluid. https://www.walmart.com/ip/17340272?wmlspartner=wlpa&adid=22222222227015517534&wl0=&wl1=g&wl2=c&wl3=66579602072&wl4=pla-130448513792&wl5=9026490&wl6=&wl7=&wl8=&wl9=pla&wl10=8175035&wl11=online&wl12=17340272&wl13=&veh=sem Geoff | ||
David Gore Moderator Username: david_gore Post Number: 2165 Registered: 4-2003 |
Omar, Pharmaceutical shops usually carry alum as it is often used to stop bleeding and was the main ingredient in the styptic pencils sold in the days of cut-throat razors to stop bleeding from razor cuts. A swimming pool chemical supplier may either carry stock or be able to source it for you as it is commonly used in water-treatment applications. There is a deposit of Alum [Alum Mountain] at Buladelah NSW which is about 50 minutes drive from my partner's home. This deposit was mined for many years; large quantities were sent to Germany immediately prior to WW2 however the mine closed in the early 1950's and all that is left is a park and traces of the decline system used to transfer the alum from the mine to the wharf on the bank of the Myall River for shipping. During the construction of the Buladelah road by-pass several years ago, a number of large alum rocks were unearthed and are now displayed for posterity; one is mounted above the road as a feature and another has been donated to the National Rock Garden in Canberra. http://chemistry.about.com/od/moleculescompounds/f/What-Is-Alum.htm http://www.bulahdelah.nsw.au/history.html | ||
Geoff Wootton Grand Master Username: dounraey Post Number: 1364 Registered: 5-2012 |
I've been reading about it and it's a very interesting compound with a vast number of uses. It dates back 2000 years. Most common form appears to be potassium aluminium sulphate ( KAl(SO4)2, but can come as sodium aluminium sulphate, chromium aluminium sulphate etc. The wiki page lists the property we are most interested in: "Alum solution has the property of dissolving steels while not affecting aluminium or base metals, and can be used to recover workpieces made in these metals with broken toolbits[5] lodged inside them." Geoff | ||
Patrick Ryan Grand Master Username: patrick_r Post Number: 442 Registered: 4-2016 |
This has to be the most interesting item I have learned this year so far! | ||
Omar M. Shams Grand Master Username: omar Post Number: 769 Registered: 4-2009 |
Thanks guys. Now I know where to get the stuff from - the pool shop!! Sadly we dont have a wallmart in our neck of the woods. | ||
ross kowalski Frequent User Username: cdfpw Post Number: 77 Registered: 11-2015 |
I just learned something about alum removal. It shows up in Henly's for the same purpose and that thing was written back when you could buy points at the auto parts store. It said something I didn't know. It said to make sure that the part is positioned in the solution so bubbles can freely move up and not make a bubble inside. Makes sense. The fellow on youtube should have cut the end off the VB can and heated it from the side. Might have only taken 29 hours! | ||
ross kowalski Frequent User Username: cdfpw Post Number: 78 Registered: 11-2015 |
Just kidding, no one really drinks VB. | ||
Patrick Ryan Grand Master Username: patrick_r Post Number: 444 Registered: 4-2016 |
I did in the 90's  | ||
Vladimir Ivanovich Kirillov Grand Master Username: soviet Post Number: 575 Registered: 2-2013 |
Kelly the way to retain sanity when dealing with these blocks is to use high explosives. Mount the block on top of two tons of TNT crack open a bottle of Jack drink half and inhale a pound of the strongest weed from Colorado then ignite. It will get rid of your cavitation problem completely and the judge will understand as you are dragged away in chains but these small warp problems will vanish Forever!!! | ||
Omar M. Shams Grand Master Username: omar Post Number: 774 Registered: 4-2009 |
I have been wondering about an unorthodox method of overhauling an engine where you dont want the risk of scrapping the block. Why not cut the liners out? Looks to me like there are plenty of liners lying about but not all that many blocks....... | ||
David Gore Moderator Username: david_gore Post Number: 2180 Registered: 4-2003 |
Omar, I think this would involve using a linear boring machine with a mandrel guiding a reciprocating cutting tool to carefully cut a groove in the liner which would then allow the liner to be cooled with "dry ice" or a dry ice/acetone mixture to shrink it out of the block. The biggest problem as I see it would be accidentally cutting right through the liner leaving a groove in the block thus destroying the seal between the replacement liner and the block. Some tricky machining best left to an experienced toolmaker with the right machine. | ||
Patrick Ryan Grand Master Username: patrick_r Post Number: 467 Registered: 4-2016 |
That's a great idea Omar. Many years ago while overhauling a Leyland 410 diesel, we ran half a dozen welds down the inside of the steel liners. It shrunk/constricted the liner that much, they literally fell out. However this was a cast iron block, and a very high amperage stick welder. MIG might be ok with an aluminium block. But an idea that worked really well. | ||
ross kowalski Prolific User Username: cdfpw Post Number: 103 Registered: 11-2015 |
Patrick, Good call. This is how you still pull the outer race of a blind press fit bearing. I did one a couple years back on a double row axle bearing on a Suburu with a mig and it worked great. Saved hours on the job. You can also shrink bearings with annular welds which might be the ticket for a liner. With annular welds there is less localized heat which the aluminum might like and more metal to contract which you definitely would like. | ||
Geoff Wootton Grand Master Username: dounraey Post Number: 1379 Registered: 5-2012 |
Whilst we are on the topic of unorthodox ways of removing liners, why not put the block in a tank of alum - would remove the head studs as well. | ||
Omar M. Shams Grand Master Username: omar Post Number: 775 Registered: 4-2009 |
Now that's an even better idea than the cut or weld methods...... | ||
Randy Roberson Grand Master Username: wascator Post Number: 685 Registered: 5-2009 |
I have learned the hard way: leave it alone if it doesn't hurt anything. I am no expert but I can't see what that little corroded spot on the block deck could have possibly hurt. Sorry for your loss. I swear Bill Coburn or someone posted pics once in which liners were removed by welding beads longitudinally in them to shrink them; it works in general. | ||
Vladimir Ivanovich Kirillov Grand Master Username: soviet Post Number: 583 Registered: 2-2013 |
Perhaps the saying "if it is not broken, don't fix it" is American in origin but Russian in practice. When Kelly first announced that he had extracted the cylinder head bolts from the block it blew my mind.I thought this guy is either very crazy or very skilled or possibly both. A Rolls Royce mechanic with many years experience once told me that the studs may rip out the threads in the block when the cylinder head nuts are being tensioned down and that the engines are difficult to reinstall. One hears many strange yaks in the RR/B world. The caper of dissolving the entire lot of the studs using a bath of alum sounds scary but feasible especially when Kelly can manufacture a new set in stainless for you. Sometimes my entire journey into RR/B land seems like a mad acid trip into another universe and when I observe the braking system on the Camargue this really is evidence that the acid has taken hold. Then again as an apprentice mechanic in an Italian owned garage I was given the job of removing the gearbox of a mint condition Maserati 3500 which came out through the interior of the car and all was well until another older apprentice closed the door and did much damage to the front mudguard and door because only being a second year apprentice I thought putting a stumpy screw driver into the door jam to keep the gravity shutting door from closing was acceptable on a coach built Superleggera aluminum body. Ah the howls and screams of the owner - now that was something else!!! | ||
Bill Coburn Moderator Username: bill_coburn Post Number: 1602 Registered: 4-2003 |
Seeing that I am named I have to admit to only extracting the liners on a Silver Shadow. I bought a fire blanket to shroud the engine and laid two bar radiators under the crankcase. Having fitted the borrowed extractor, the top of which had a large hole in it, I was able to load up the cylinder with crushed ice and leave the system to contemplate its fate. The extractor was gently tightened until my clenched rectum started to ache. Suddenly there was a muffled �thunk� and the puller screw went limp. All that remained was to pull the liner and go and do my laundry. | ||
Omar M. Shams Grand Master Username: omar Post Number: 1350 Registered: 4-2009 |
was the laundry trip necessary because the clenched rectum relieved itself due to the liner popping out safely...... or was it because the liner took some of the block with it as it popped out? | ||
Bill Coburn Moderator Username: bill_coburn Post Number: 1603 Registered: 4-2003 |
Omar you are a pessimist but probably justifiably! The liners all came out clean! Can I record my pleasure at reading the adventures of those brave enough to delve into the maintenance of our charges? Nearly fifty years ago (where the Hell did they go?) I hazarded a conventional existence and bought a partially dismantled Silver Dawn . The spectre of bankruptcy, divorce and distruction of continuing an interesting career teetered but remembering the advice to be �bloody, bold and resolute� I forged on, dismantled the car to the bare chassis and rebuilt it. Club members would point me out ang largely ignore me, lest, no doubt they too caught my disease. I survived, as did the car which is still loved and cared for by a total stranger. Two memorable experiences still pop up from this chapter of my life. The first during the �let�s get the body off so I can repair the cracked chassis stage and the second whilst reading an account of removing the �bog� I had had to use to cover a few decades of backyard panel repairs. The former task involved removal of a conspicuous fitting in the car in order to remove another one! I asked fellow owners who smiled indulgently and then changed the conversation, so I resorted to consulting �professionals�. This latter approach resulted in a spectrum of responses ranging from simple refusal to gross suspicion that I was establishing an insidious cult to destroy professional restorers. Fortunately I grew an even thicker hide and with the help of a few devotees, pressed on and �saved� a car that was clearly headed for destruction! I will stop prattling but not without thanking the coterie of correspondents that contribute to these various sites, motivated by a surviving desire of many owners to keep these cars extant. | ||
David Gore Moderator Username: david_gore Post Number: 2716 Registered: 4-2003 |
Bill, You understate the influence and benefits that have resulted from your participation and sharing of experience with both the Australian and International R-R/B community. The advice, help and encouragement that you and George Shores gave me and other NSW Branch members when we set up our Self-Help Group 15+ years ago was both priceless and greatly appreciated in keeping, restoring and preserving our vehicles for the future. Our Club has justifiably and properly recognised your contributions in recent years and you will always be the doyen of R-R/B DIY owners both here in Australia and overseas. After all, what could top "Fixing Rolls-Royces in a Firestorm" at your Canberra home on the 18th January 2003........................... http://au.rrforums.net/forum/messages/30/338.html http://au.rrforums.net/forum/messages/30/7151.html Words cannot express my full appreciation of the help, advice, support and guidance you have given me and other custodians - you are a true legend in our community. | ||
Mark Luft Prolific User Username: bentleyman1993 Post Number: 127 Registered: 10-2016 |
Thanks David for posting the links about Bill. All I can say is incredible. | ||
Randy Roberson Grand Master Username: wascator Post Number: 789 Registered: 5-2009 |
Love Bill, wish he would publish TeeOne Topics in a book. It has helped me tremendously. As for liners: additionally we remove them from compressor cylinders by using a boring bar off-center to cut a thin side onto them. When it is thin enough the liner will lose its tightness by collapse and so can be removed. As for the warped block: do we know anything about how they were originally machined at the Factory? Perhaps there was a specific series of steps which were needed to end up with a straight block. Maybe it's necessary to line bore the mains and cams after decking. I can't imagine they are not repairable without warping, with reasonable care and normal machine tools and processes. Modern auto engines are so fragile many could not withstand the machine processes which were typical years ago. | ||
Kelly Opfar Prolific User Username: kelly_opfar Post Number: 189 Registered: 7-2004 |
I think every one of us has pored over Bill's Tee-One topics and has them memorized by now. Thank you Bill, for your massive efforts over the years. Randy, pulling the liners themselves wasn't my problem. I've easily pulled liners from two Shadow blocks with (almost) no drama. I ruined this block by trying to repair the cavitation damage on the deck and overheating the block. I don't think the factory anticipated my misguided efforts. Kelly |