| Author | Message | ||
Kelly Opfar Prolific User Username: kelly_opfar Post Number: 103 Registered: 7-2004 |
I don't believe that I've ever mentioned it on this forum, but I managed to scrap the block for SRE24700 and found myself in need of a new one. Maybe someday when the wound is scarred over I'll tell the story, but for now, here is the tale of how I extracted the liners from my new engine - number 41193. The first thing to do when contemplating liner extraction is to spray penetrating oil around the tops and bottoms of the liners and in all 8 weep holes. You should do this as far in advance as possible. Weeks or months if you can. Keep spraying oil in it every day. I like to use Kroil. Their advertising says it's the best penetrating oil in the world and I'm sure they wouldn't lie about a thing like that.  I bought a used horse watering trough from the local classified ads. I filled it with water, added 4 gallons of vinegar and dropped in my freshly pressure washed block. I didn't have the foresight at the time to take a picture, but the water was crystal clear at that time. This picture was taken about 18 hours later. 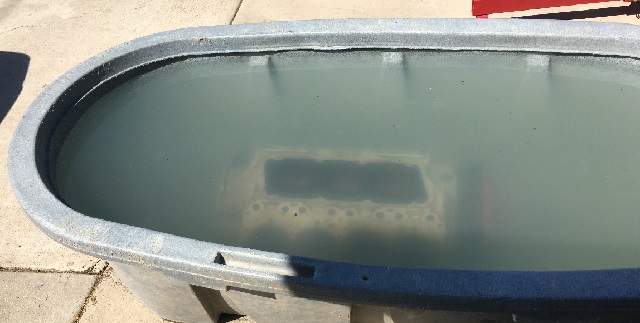 The water was very murky and I was a little nervous. Was the vinegar dissolving the aluminum? It had been a fairly short period of time and the solution was less than 4%. There was a steady rapid stream of bubbles coming out of all 8 weep holes. I pulled the engine out of the water and measured the cam bores. They were still perfect. The vinegar was eating the calcium around the liner seals just like it was supposed to. I rented a heater to heat the block and installed my liner puller on cylinder A2 and put it under a little tension. The best thing to do is extract the number 2 and 3 liners from each side one at a time. Leave the 1's and 4's alone for awhile. 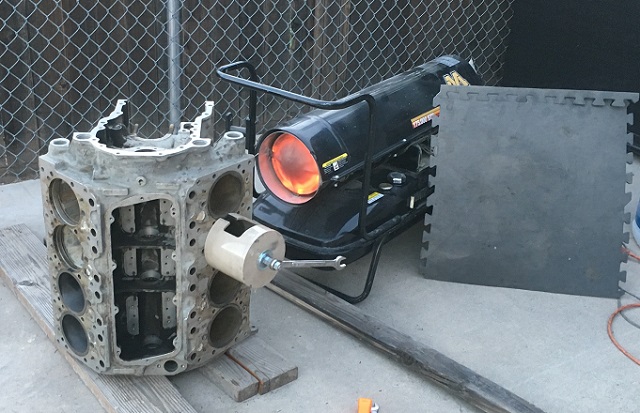 It was a 100�F day outside and the heat from the heater was blowing back onto the thermostat causing the heater to turn off. My solution was to rig a heat dam and set up a cooling fan. I took the control cover off and aimed the fan right at the thermostat. It ain't stupid if it works... 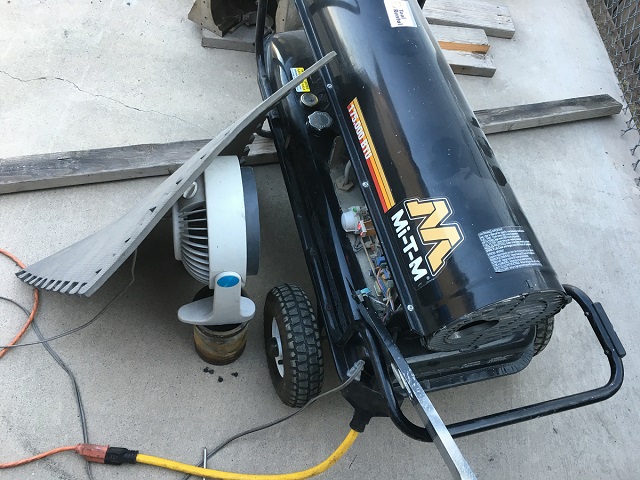 As soon as one liner is removed, you have to remove the seals from their grooves and clean out all the calcium and corrosion from the bore. You can then take the opportunity to spray penetrating oil under the bridge to help loosen the calcium in the adjacent cylinder(s). 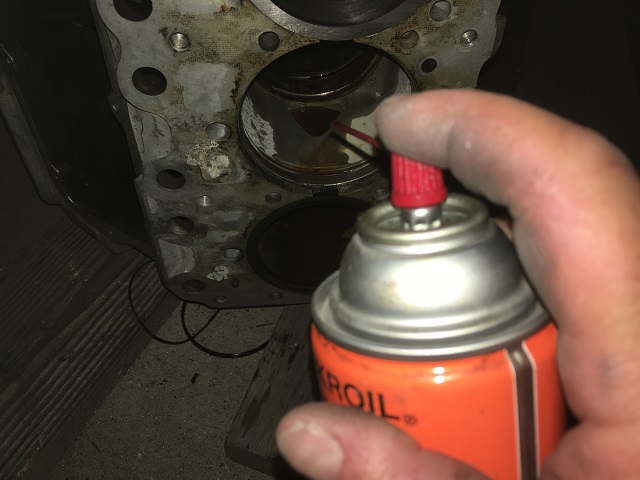 Since I scrapped block SRE24700, I had the liners from it cleaned and ready to put back in as bridge supports. I kept them in the freezer. I only needed four of them because cylinders 1 and 4 on both banks don't need support after their liners are extracted. Here is the last one ready to go. 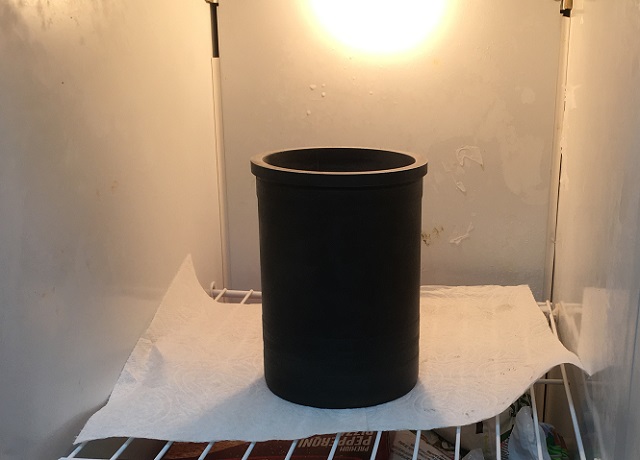 As soon as the bore is cleaned and oiled and your liner is cleaned and frozen, you can heat the block back up again and drop the frozen liner into place. It should drop right in with no resistance. Once all of the 2's and 3's are extracted, cleaned and replaced, the 1's and 4's can be extracted all at once. Since they are on the ends of the banks and the adjacent bores have the liners back in to add bridge support, they can all come out as fast as you can heat the block. The 2's and 3's can come back out as soon as the 1's and 4's are out. This is the same extractor that I pulled the liners out of SRE24700 with but 41193 had a little clearance issue on the bottom:  I had to grind a flat on the liner base to clear a protrusion inside the crankcase. All liner pullers that I make for sale from now on will have this flat milled. I did this extraction on the ground while maneuvering the block end for end. Doing this allowed me to aim the heater up or down with a block of wood under the front or back. This method worked pretty good but I recommend that this be done on an engine stand instead. It is fairly difficult to position the liner puller with the block in a vertical position. It is a two person job doing it this way. Heating the block while on a stand means the heater has to be on a table or stand of some kind so plan ahead of time. I hope this helps anybody contemplating this crazy endeavor.  | ||
ross kowalski Frequent User Username: cdfpw Post Number: 70 Registered: 11-2015 |
Great post. You have to tell the story of the first block. FYI, an engineer friend turned me on to ATF / acetone as a penetrating oil a few years back and it really works. Basically free, and twice as good as Kroil (which is already great) Check it out here Just mix up a batch and put some in this or better yet these | ||
Geoff Wootton Grand Master Username: dounraey Post Number: 1358 Registered: 5-2012 |
Kelly Thanks for going to the time and trouble of documenting this for us. It's really invaluable. Geoff | ||
Omar M. Shams Grand Master Username: omar Post Number: 764 Registered: 4-2009 |
Dear Kelly, What an amazing post. I bet Vlad is having lots of thoughts now as he is at this point in his engine overhaul. Brilliant post Kelly!! Omar | ||
Christian S. Hansen Grand Master Username: enquiring_mind Post Number: 349 Registered: 4-2015 |
Wow! I'm getting a rash and shivers just thinking about ever having to do such a task! That said, what is the deal with those weep holes? I understand that the top o-ring keeps water out, and the lower o-ring keeps oil out, and that when they fail, either water, oil, or both, fills the cavity around the liner and exits the weep hole. Correct? I suppose that if water is coming out, that is bad and a sign of imminent problems, but what if it is oil? Can you "live with" that, and if so, for how long? It does create a bit of a mess over time and mileage, so what are the problems encountered if you simply plug the weep holes in order to minimize the mess? On my MPW, the oil symptom (not water) is evident. Not gushing, just evident. What is the prognosis? Shall I plug, or panic? | ||
Philip Sproston Experienced User Username: phil2025 Post Number: 25 Registered: 7-2006 |
Have a look at Tee one notes 86 re engine rebuild | ||
Christian S. Hansen Grand Master Username: enquiring_mind Post Number: 350 Registered: 4-2015 |
Phil... Thanks. I assume that the reference was in response to my question about weep holes rather than as a supplement to the main topic of the thread as being liner removal? I gave it a read looking for information about the weep holes and since it simply stated in passing that when the lower seal goes, it allows oil to leak out, I would take that to be "not to worry", rather than "the end is nigh". Did I miss anything? | ||
Paul Yorke Grand Master Username: paul_yorke Post Number: 1617 Registered: 6-2006 |
Live with it until you can't stand the mess anymore or it's using too much to keep up with it. | ||
richard george yeaman Grand Master Username: richyrich Post Number: 603 Registered: 4-2012 |
Kelly great stuff very informative, regarding the vinegar solution at 4% if such a solution was added to the coolant of an engine at an early stage in its life would it stop the build up of calcium, and I also would like you to tell the story about how the original block was destroyed. Richard. | ||
Ben Curtis Experienced User Username: burgundyben Post Number: 16 Registered: 12-2015 |
I read much about the risk of cracking the bridge support. Clearly sounds like it needs careful thought and to follow the procedure as detailed here. But I'm not clear on where it is in the block or why it cracks? | ||
Paul Yorke Grand Master Username: paul_yorke Post Number: 1618 Registered: 6-2006 |
Richard, running acid coolant is not a good idea. One of the reasons we need to change it every 2 or 3 years is to keep it ph neutral. The inhibitors wear out eventually. It also helps prohibit limescale etc. Ben, the cylinders are machined next to each other in the block with relatively small distances between them and other areas. If there is too much build up on the liners or the cylinders, when you pull them the seals can twist causing too much outwards force or the scale will jam and expand the block bore enough to damage the block. It has to be pretty bad for this to happen though. Care and patience wins through  | ||
Patrick Ryan Grand Master Username: patrick_r Post Number: 430 Registered: 4-2016 |
This is a very interesting thread gents. It's amazing to see what I have read much about. The clearance between these liners is staggeringly close. Always love reading anything Kelly inputs. I can sense some pain here Kelly. But of course we still want to hear it.  | ||
Kelly Opfar Prolific User Username: kelly_opfar Post Number: 104 Registered: 7-2004 |
Ben, if you look at the picture above showing me spraying the can of Kroil, I'm aiming it at the bridge. This web/bridge is only about .200" thick. You can see the adjacent liner through the hole under the bridge. Here is a picture I swiped from the US RROC forum showing a Corniche engine that a member was going to rebuild. 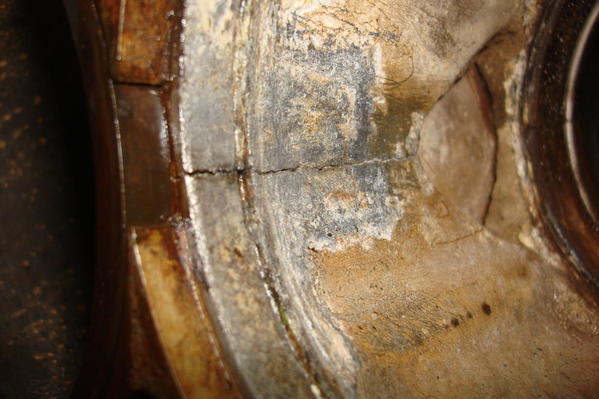 This is what a cracked web looks like. This crankcase was beyond repair and he ended up getting a better used block from Albers in Indiana. Ross, I love the AceTF idea. I bought one of those air pressurized canisters a while ago to flush out brake lines with Alcohol - sorry, I mean methylated spirits. Tomorrow, I'll tell the story of the block I scrapped. Of course I can only type in-between sobbing fits so it might take awhile. | ||
Patrick Ryan Grand Master Username: patrick_r Post Number: 433 Registered: 4-2016 |
Thanks Kelly. Looking forward to it. Do you have a suitable psychiatrist couch on which to lay while you type? | ||
ross kowalski Frequent User Username: cdfpw Post Number: 72 Registered: 11-2015 |
Kelly, SureShot is a great outfit and those reusable cans work perfectly. I just bought another for $10 at a second hand store and brought it to the factory for a rebuild kit. (My family lives right close to Germantown WI where their headquarters is) They don't have any public showroom or retail there, but they were great. A guy looks at the spraygun, notes the model fondly as it was an old one, goes in back and in two minutes brings out the repair kit. The chrome plated brass sprayers are the best, but they don't make them anymore in brass. Also, if you use the brass ones just steer clear of ammonia based products. Every year I mix up a gallon or two of magic anti-rust spray and apply it with a Sureshot. | ||
Geoff Wootton Grand Master Username: dounraey Post Number: 1362 Registered: 5-2012 |
Kelly I'm assuming you used an IR thermometer. What temperature did you raise the block to and how uniform was the heat in the engine block? Geoff | ||
Kelly Opfar Prolific User Username: kelly_opfar Post Number: 106 Registered: 7-2004 |
Geoff, you're right about using an IR thermometer. I heated the block only until it reached 240 degrees on the cylinder I was working on. The biggest differential was 40 degrees less on the other side of the block. Heating the whole block evenly is difficult with one heater of this style but aluminum is a very good heat sink with fast thermal properties. I don't want to take too much credit for heating the block this way. I saw pictures of Simon Curzon of Zenith Motors in Independence, Missouri doing it this way on Facebook. The factory manual states that the block should be evenly heated in an air oven to 300 degrees but that was not realistic in this situation. I had access to a large powder coating oven when I pulled the liners from 24700, but even that has limits as it is not practical to pull more than 1 liner per side per heating cycle. The operation is too slow and the heat loss is too fast. 41193 and 24700 were both 38000 mile engines in about the same condition. The liners came out of both crankcases very evenly with no surprises. Everyone will have to use their own judgement as to what they are comfortable with. A higher mileage engine might have more corrosion around the seals and perhaps should be soaked in a vinegar solution longer. |