| Author | Message | ||
Richard Greene Experienced User Username: benzjag Post Number: 18 Registered: 12-2012 |
The cruise control has never worked on my 75 RHD Shadow. When I press the "engage" button, nothing happens. Everything seems to be connected inside & at the servo under the hood. The rubber bellow looks new. Is there a fuse? I couldn't find reference for one. Any guidance appreciated as I know very little about the system! Richard | ||
Geoff Wootton Grand Master Username: dounraey Post Number: 1356 Registered: 5-2012 |
Richard I don't know whether you have already read the article in the Technical Library, but if not it is certainly worth a read as a start point to solving your problem. http://rrtechnical.info/SY/TSD4200/speedostat.pdf Geoff | ||
Jeff McCarthy Grand Master Username: jefmac2003 Post Number: 468 Registered: 5-2007 |
Check to see if the wires are connected to the dash switch and that the +ve feed is live with the ignition on. To get to the switch remove the dash wood panel - the switch is attached with a single countersunk screw. Possibly someone has played around and not reassembled it correctly. I have changed mine over to the Shadow II gear lever switch and replaced the black lower padded panel with the full length earlier Shadow I piece. Both switches are a single on/off switch and 2 mo/mo switches: nothing complicated. If you need more info, photos or advice get back to me. It is also possible that the vacuum line between the bellows and the control unit has perished or come off at the control unit end - easy to do if someone has removed the washer bottle at any point. | ||
Paul Yorke Grand Master Username: paul_yorke Post Number: 1612 Registered: 6-2006 |
Just a word of advice. Don't expect to much from it. They were particularly bad and jerky even when new. Even worse than the Shadow II and early Spirit systems. Make sure that your brake light switch comes on nice and early, the contacts wear so they do not come on early enough. Scary!! | ||
Jeff McCarthy Grand Master Username: jefmac2003 Post Number: 469 Registered: 5-2007 |
God Paul - now you have me worried! They are jerky but it's also one of the few ways the driver can directly engage with the state of the engine ;-) Please tell me the brakes are failsafe no matter what solder point fails in the gubbins. I must admit I only ever use it if there's likely to be a camera or a Peeler in the vicinity (and never on a wet or winding road) but rebuilding it did teach me what the vacuum does in a carburetted system so it does have some use. | ||
Robert Noel Reddington Grand Master Username: bob_uk Post Number: 1108 Registered: 5-2015 |
the cruise works on my SS1 but its jerky and I* dont use it. So dont worry to much. | ||
richard george yeaman Grand Master Username: richyrich Post Number: 601 Registered: 4-2012 |
Hi my 1975 SS1 has one but I never tried it and I am not going to try it. Richard. | ||
Paul Yorke Grand Master Username: paul_yorke Post Number: 1615 Registered: 6-2006 |
Jeff, had a quick look at your work and it looks damn fine  I love a cruise control . . But the RR one is pretty basic. The brake light switches have two metal fingers that short across a brass barrel. When the finger and barrel wear away you may loose your brake lights or have to press much further down to bring the brake lights on. So when braking without the brake lights on the cruise control will just think it's come to a hill and increase the throttle. Scary! ! Shadow II onward have a double contact switch so one has to be open and the other closed for the speed control to operate. A Shadow II switch could be fitted. Most people check their brake lights by pushing the pedal right down so they will light, but only under very heavy braking. Check inside a garage or Watch the ammeter to see where the pedal is when they actually light. Sorry to scare you. . | ||
Bob Reynolds Grand Master Username: bobreynolds Post Number: 414 Registered: 8-2012 |
"I have changed mine over to the Shadow II gear lever switch and replaced the black lower padded panel with the full length earlier Shadow I piece. " That sounds like a mod worth doing. Could you post more details? Does the Shadow II have the controls on the gear lever? What's involved in changing the gear lever, and the padded panel? The Shadow I cruise control panel was obviously an afterthought, doesn't look right, and makes dashboard removal and replacement very fiddly indeed. | ||
Patrick Ryan Grand Master Username: patrick_r Post Number: 426 Registered: 4-2016 |
I'm very luck my series I does not have cruise at all. I don't miss it. | ||
Richard Greene Experienced User Username: benzjag Post Number: 19 Registered: 12-2012 |
Jeff, As you suggested, I checked the wiring at the switch. I do not have power with the ignition on. The vacuum hose is attached. A interesting note is I talked to the original owner in London soon after I bought the car years ago. He said the cruise never worked since he bought the car new! I asked why he did not take it back to the dealer & he said it wasn't important to him! HELP! Richard | ||
Jeff McCarthy Grand Master Username: jefmac2003 Post Number: 470 Registered: 5-2007 |
Not sure about the power not going to the lever - I'll do a few tests on mine to see which fuse it is and how it's wired into the system. The control won't work until the car's travelling about 40kph in practice. I'll do a short photo essay while I'm at it and come back in a day or so. As I said, I only really use it to avoid speeding, usually on the freeway when I'm driving to Melbourne. I don't mind the mild rocking to and fro around the exact speed - you can actually sort of feel the bellows working, but it would be interesting to know if there's a more modern unit that could be fitted if one wanted to avoid it. The Shadow II also fitted an extra relay (or two?) around the gearbox but I haven't found it necessary to do so when I changed the switch. I will, however, get the brake light switch tested and/or upgraded when I next go to Melbourne. | ||
Geoff Wootton Grand Master Username: dounraey Post Number: 1357 Registered: 5-2012 |
I don't mind the mild rocking to and fro around the exact speed - you can actually sort of feel the bellows working Mine has never worked. I had thought of removing the switch as it does ruin the look of the dash panel. However, after Jeff's comment it's made me think maybe it would be interesting to see what it feels like when in operation. I may get mine working. I've recently replaced the brake light switch so hopefully I won't get too many surprises. Geoff | ||
Christian S. Hansen Grand Master Username: enquiring_mind Post Number: 348 Registered: 4-2015 |
Jeff... You mentioned something as a possible error, that I believe, correct me if I err, is in fact the designed operation feature. It is my recollection that the owner handbook either directly states, or at least implies, that the system is not intended to work at speeds below about 40mph, therefore your observation that it does not seem to engage until about that speed is as designed and expected, not indicative of a problem. | ||
Jeff McCarthy Grand Master Username: jefmac2003 Post Number: 471 Registered: 5-2007 |
Christian you are correct. Sorry I didn't mean to imply it was a fault, it is indeed designed that way. I'm just not sure how it "knows" - either by a switch or perhaps vacuum level? | ||
Paul Yorke Grand Master Username: paul_yorke Post Number: 1616 Registered: 6-2006 |
There is a pressure sensor switch in the gearbox. Senses when it has settled into top gear I believe. If anybody wants to sense what the cruise control feels like without going to much trouble . . . Get a passenger to watch the speedo. You ( driving ) keep looking forward , do not try and guses the speed. Now choose a speed (say 50mph) now ask your co-pilot to just say "faster" , "slower" , "steady". I'm sure you can see where this is going..... Press the accelerator firmly, release the accelerator at a fair rate. Neither of you try to guess ahead, just faster , steady, slower, steady, slower, steady, faster , steady etc. If you fancy trying resume. . . Slow down to 30 . Driver says resume then plants accelerator 3/4 way to the floor until your co-pilot says steady then lift off completely until yor co-pilot says faster . . . Etc. Be safe. I rekon that a restriction in the vacuum hose would help smooth things down, but you would need a dump valve for braking then. Later systems had two valves on the bellows. After market systems are available and could probably be wired up using the existing switches. | ||
Jeff McCarthy Grand Master Username: jefmac2003 Post Number: 476 Registered: 5-2007 |
Finally I had a chance to get back to this. I've discovered an anomaly in the wiring diagrams. If you go to the wiring diagrams for the "jmors speed control system" ( http://rrtechnical.info/sy/tsd2476/16.pdf pages 31 onwards for the various models ) it appears that the blue/green plastic power wire to the dashboard switch is fed from the reverse lamps switch. My physical examination of this wire appears to have it coming from a relay behind the glovebox and just above the window lift cutout! This relay also has Black/Brown cotton wires connected to it. Some questions: Does anyone know where the reverse lamps switch is located on circa 1975 Shadows? Does anyone know what relay this might be? One thing in any case is clear - there is no direct wire from the fusebox to the Cruise Control Switch on the dashboard. I've taken some photos which I'll attach over a few posts showing what little I've managed to nut out from reading the diagrams and following wires - I haven't undone any looms to make sure but I'm fairly certain the power to the switch is fed from the the box in the engine compartment via this relay. Perhaps Crewe made some modifications that didn't make the diagrams at the end run of the Shadow I? By the Shadow II relays and gizmos had been attached all over the place to try to deal with the "rocking around the target" problem. I've also shown my modification replacing the early switch with the gear lever from a Shadow II. Basically the switch is an on/off switch with 2 MOMO switches; one for "set" and one for "resume". Here is a photo of the relay in question. The Green/Blue plastic wire is attached to C2. 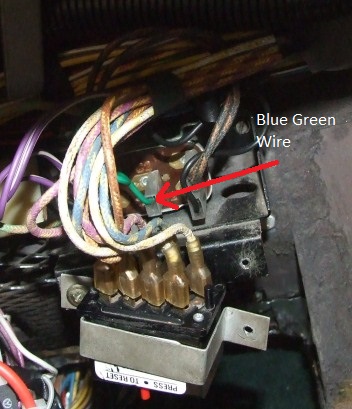 | ||
Jeff McCarthy Grand Master Username: jefmac2003 Post Number: 477 Registered: 5-2007 |
Here are some photos of the switch mod. It is very simple electrically - marry four wires to the ones already there feeding the original switch - the connectors are about 6 inches back from the switch so there's no need to cut anything or add new connectors except to the gear lever switch. I chose to use one of those plastic connectors though to keep things orderly and this required removing the plastic terminal covers from the wires. The Shadow II switch on the gear lever has four thin plastic wires: Red Brown Blue and Green Red is connected to the Blue/Green plastic wire Brown to the Purple/Yellow Cotton wire Blue to the Purple/Blue Cotton Green to the Purple/Red wire (which is cotton on the original switch but connected to the same colours on a plastic wire behind the dash - at least on my car this is the case.) 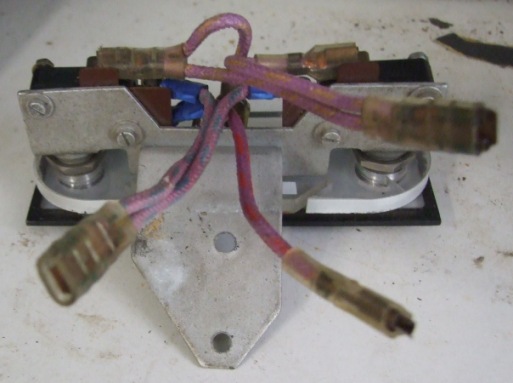 Not shown in this view is the blue/green plastic wire which attached to a terminal behind the wires shown. | ||
Jeff McCarthy Grand Master Username: jefmac2003 Post Number: 478 Registered: 5-2007 |
Here is the connector. The Blue /Green wire shows up clearly in this photo - I teased out the loom - but in practice it looks just the same as the green plastic wires feeding the gauges etc. This is why it took a while to figure out that it wasn't fed from the same circuit. 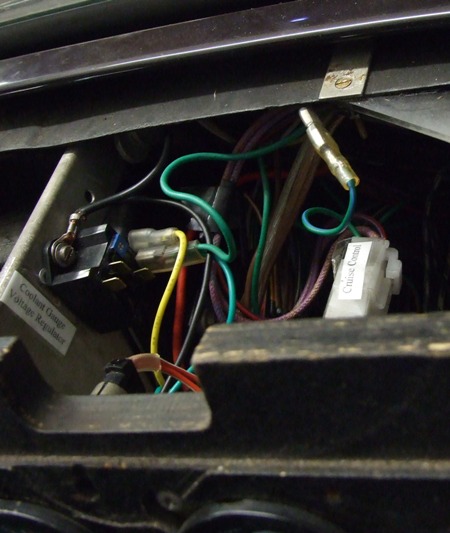 Here is the plastic covered loom which comes with the Shadow II gear lever - it only just fits through the join in the cowl - be very careful gentling it into position and never force the screws on the cowl - I broke mine the first time I took it off years ago and getting an unbroken replacement is not a cheap exercise. 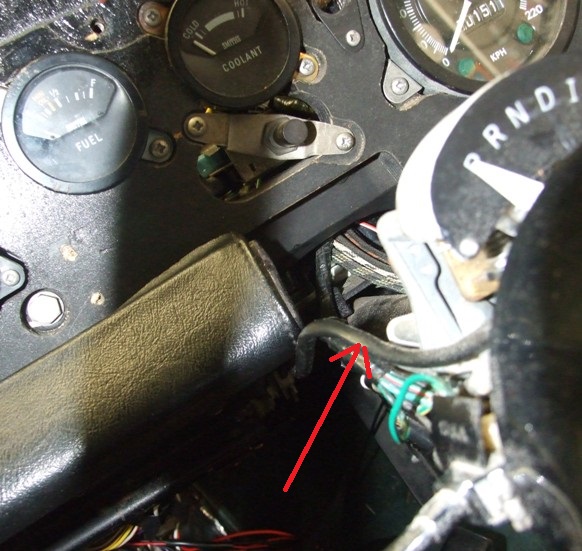 | ||
Jeff McCarthy Grand Master Username: jefmac2003 Post Number: 479 Registered: 5-2007 |
The only somewhat difficult part is bending the Shadow II lever. As it is, if you put it on without bending it a bit you keep hitting it with your knuckles while steering. Using the Shadow I lever as a guide it's fairly obvious where it needs to be bent slightly - I've arrowed it in red. I used a cheap aluminium pipe bender from eBay - in fact in the course of experimenting I broke several; perhaps you can borrow a real one from a plumber. WATCHWORD: the soldered connections in the gear lever switch are tiny so peel back a bit of the plastic cover where the loom enters the lever and make sure you don't put any strain on the wires when you bend the metal. Push the wires in a bit and maybe use a gentle heat gun to make them supple. A tiny amount of bend gives a great deal of distance at the switch end - don't overdo it, just enough for a big knuckle-dragging friend to be able to freely swing past it while steering but still close enough to enable your delicate index pinkie to hit the end button without removing your hand from the wheel. Undoing the lever and installing the new one just involves undoing a few miniscule screws and other bits - it's very obvious once you remove the cowl. From memory it isn't necessary to remove the steering wheel but if you haven't done that before it would give you a clearer view of how it's all laid out and does make manipulating the pins and spring etc easier. If you do, don't forget to scribe a mark on the steering wheel boss before you remove it or you'll be ages getting it to the correct position again. 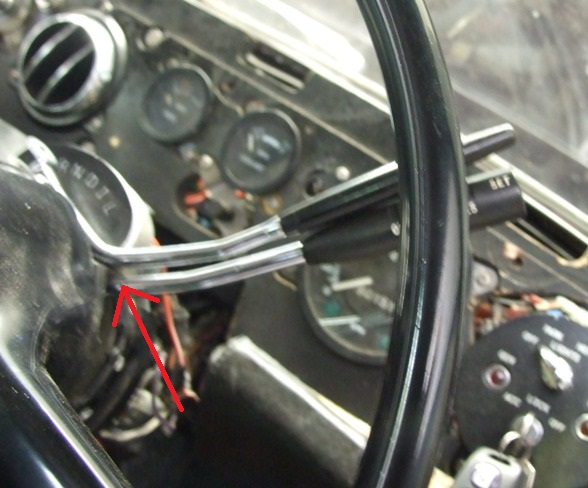 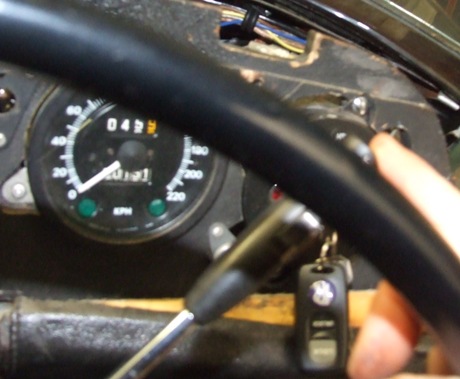 | ||
Jeff McCarthy Grand Master Username: jefmac2003 Post Number: 480 Registered: 5-2007 |
Finally you have a cosmetic problem.The inclusion of the cruise control on the lower dash padding did 2 things. It moved the securing nut for that padding into a bloody difficult position behind the dash - near the aircon bullseye - and shortened the bolster considerably. I chose to replace the old switch and bolster with an early one which has an easier nut to get to at the steering wheel end. At the glovebox end you really have to remove the glovebox to get to the nut. This gained me a nifty little downlight above the centre console - but it's one of those lilliput edison screw affairs so don't expect luminous brilliance. 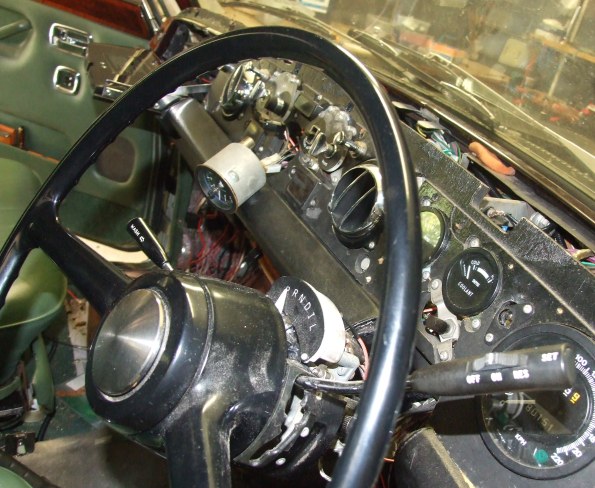 | ||
Jeff McCarthy Grand Master Username: jefmac2003 Post Number: 481 Registered: 5-2007 |
Incidentally, the original switch has similar dimensions to the smaller drivers' door ashtray used on the Shadow II and Corniches and which turn up regularly on eBay. With a Dremel these can be angle cut to make a small coin tray where the switch was, using the vinyl covered metal bracket for the switch. The black and chrome lid looks OEM in position on the bolster. |