| Author | Message | ||
Geoff Wootton Grand Master Username: dounraey Post Number: 1348 Registered: 5-2012 |
The generator light has started coming on when the engine is idling on my 74 SY1. I know this is normal, but in my car the original slight flicker of the light at idle has changed to the light being brightly illuminated. The idle speed has not changed and runs at 700 rpm. When the engine revs increase the light goes out as normal, from about 800rpm. The ammeter reads 0 on tickover and deflects slightly to the right when the revs are increased i.e. the readings are normal. Is this changed behavior of the generator light an indicator of an impending alternator failure? Geoff | ||
Robert Noel Reddington Grand Master Username: bob_uk Post Number: 1098 Registered: 5-2015 |
check the brushes. | ||
Omar M. Shams Grand Master Username: omar Post Number: 756 Registered: 4-2009 |
Bob is right. These are easy peasy to replace too. | ||
Robert Noel Reddington Grand Master Username: bob_uk Post Number: 1102 Registered: 5-2015 |
My theory is that at low speed the brushes arent contacting properly. The brushes be about 10mm long when new. Maybe jammed. 2 screws hold the brush box in. see workshop manual. No Emery cloth | ||
Geoff Wootton Grand Master Username: dounraey Post Number: 1349 Registered: 5-2012 |
Omar and Bob Thanks for your replies. I will be pulling the alternator next week. I hope it's just the brushes that need replacing, however I've stethoscoped the alternator and it may need new bearings. I will know when I've got it off and can check for wear. Has anyone had any luck in fitting a substitute part? I've checked Brian's and Larry's resource files but there doesn't appear to be one, although I recall there has been discussion in the past on using a Delco part number 7127-9. I'm just curious at this stage. I know there are companies out there that can recon alternators and also Flying Spares. Geoff | ||
John Kilkenny Prolific User Username: john_kilkenny Post Number: 243 Registered: 6-2005 |
Geoff, A idle speed of 700 is on the high side and if the alternator and voltage control are OK you would not expect to see the GEN light on at idle. Having said that it does look as if something is failing. Apart from the slip ring brushes there can be other causes, including loose drive belts and even the battery itself. For a quick health check next time you start the car, while on fast idle switch on high beam lights and fan motors and check that the ammeter remains in positive territory. For a borderline case, moving the CAV input to the next level may help. | ||
Geoff Wootton Grand Master Username: dounraey Post Number: 1350 Registered: 5-2012 |
John I'll do those checks in the morning. Thanks for sending them. I will also check the battery voltage with the engine off and then on, with load and no load etc. The battery is only 2 years old but I will put it on the charger. It will likely need charging as I have only been doing short, local runs, which can cause the battery to need charging, even with a good alternator. The charge level and time it takes to get a full charge will give clues to it's condition. As mentioned in your article, tee-one c51 p750, the alternator does sound slightly noisy, so I need to check it in detail in any case. I agree the idle speed is a little fast, however it suits me, as in D, at the many traffic lights we have here, it idles quite smoothly. 700 does not cause a crunch when I engage D or R so I'm happy to stay with it for the time being. When I get round to tuning the engine again I will look at setting it to the recommended 600 rpm. I have just completed a house move so have not had chance to look in detail at what's happening, other than noticing the generator light is bright at (fast) idle. I'm hoping that by early next week I will have time to take the alternator off, unless of course tomorrow's quick tests point to something else. Regards Geoff | ||
Robert Noel Reddington Grand Master Username: bob_uk Post Number: 1104 Registered: 5-2015 |
the brgs are a standard size try SKF. | ||
Geoff Wootton Grand Master Username: dounraey Post Number: 1352 Registered: 5-2012 |
Hi Folks I've done a few preliminary tests on my alternator The drive belt looks good and is tensioned correctly. The connectors are firmly pushed on. The voltage at the battery with the engine off is 12.47 and with the engine idling, 14.09 At idle and with the headlamps and fan blower on I am well into negative territory on the ammeter. Only a slight deflection to the left, but given the -50 to +50 amp range, I would guess I am at about -4 amps. The only strange anomaly is the generator light can under certain conditions be glowing dimly but with ammeter needle at -4amps and vice versa. I guess this is because the two are on different circuits, but basically saying the same thing, insofar as even a dim glow on the generator light is showing there is no charging current. When I put the battery on charge it was at 79%. It recharged to 100% in just 90 mins on 3amps. Is this too quick? On running the tests again on a fully charged battery the results were the same. I put the charger back on the battery after having started the engine just the once and it had moved from 100% to 98%. I'm assuming this is normal. Had it dropped to below 90% on just one start then I'd be suspecting a tired battery. The quick recharge time bothers me though. It seems to me the problem is with the alternator however I would be grateful for any comments. Geoff | ||
richard george yeaman Grand Master Username: richyrich Post Number: 597 Registered: 4-2012 |
Hi Geoff my experience of charging batteries is that the nearer the battery is to be being fully charged it seems to take the longest amount of time, Yes I think 90 minutes is quite short I would expect several hours but don't worry someone will know the answer. | ||
David Gore Moderator Username: david_gore Post Number: 2151 Registered: 4-2003 |
Geoff, A long shot worthy of a gremlin intervention - have all the diodes in your fuse box been replaced? The diodes break down over time and a faulty diode could be allowing voltage to bleed through the electrical system to trigger the alternator light. | ||
Patrick Ryan Grand Master Username: patrick_r Post Number: 421 Registered: 4-2016 |
As a side note, My ammeter does not seem to visibly move much. I guess I will need to test the input to the gauge? Is there any tests for the terminals that plug into the gauge, or a test for the gauge its self? | ||
John Kilkenny Prolific User Username: john_kilkenny Post Number: 244 Registered: 6-2005 |
Geoff, My suggestion to check the system under load was at 'fast idle' that is on startup when the engine initially runs at about 900 rpm. If the voltage at the battery is 14.09 at an idle speed of 700 rpm, your alternator is almost certainly OK. In this case the GEN lamp should not be lit. | ||
Geoff Wootton Grand Master Username: dounraey Post Number: 1354 Registered: 5-2012 |
Thanks again for the comments. They are really helpful. David: Yes, I replaced the fusebox diodes a few months ago. John: I ran my load tests at 700rpm. I will try them again at 900 rpm. At 900rpm the generator light is extinguished, so I'm starting to think you are right and maybe the alternator is not causing the problem. I will try moving the CAV input from M to H as you (and Paul Yorke) suggested in earlier posts. It may be a marginal thing with the regulator. If I can't find a quick fix, this weekend I will get serious and strip the whole lot down and get to the bottom of the problem. The fact the generator light was never illuminated before, when the engine was running, means something has changed in there and I need to repair it before I get stranded somewhere. Geoff | ||
Geoff Wootton Grand Master Username: dounraey Post Number: 1368 Registered: 5-2012 |
I did some further tests and found that although my alternator was producing 14.1v on idle, this dropped to below 12v when the load of the headlamps and heater fan was applied. Even revving to 2000 rpm(ish) would not raise the voltage above 12.20v. I've taken the alternator off and found the one brush is just 9mm long. New ones are 16mm long. I will be ordering the new parts from: http://www.jcrsupplies.co.uk/products/ALTERNATOR_REBUILD_PARTS/C_A_V_ALTERNATOR_BRUSH_BOXES_AND_BRUSH_SETS/AC5_CAV_ALTERNATOR_BRUSH_SET_4-7_X_7-9_X_16-6_REF_ABR5101.html I've found the armature rotor is stiff on part of it's rotation so I will be stripping the alternator down, to find out why. This will also give me the opportunity to test the diode block. Does anyone know why the manual say's to use "very fine glass paper" on the slip rings and not emery paper. The two reasons for not using emery paper I've found on the net would seem to apply to glass paper as well. These reasons being 1) they produce too rough a finish and 2) particles can embed themselves in the slip rings and cause electrical resistance to the brushes. I was just wondering if anyone had the definitive answer, or an opinion on this. The manual was written 40 years ago so maybe modern wet and dry papers are ok to use. Could this be just a case of old practices being needlessly perpetuated. Geoff | ||
Omar M. Shams Grand Master Username: omar Post Number: 770 Registered: 4-2009 |
Dear Geoff, interesting that the fault you have discovered is the very same one that was suggested 90 minutes after you asked for support from the forum. Well done Bob!!! you were spot on. | ||
Geoff Wootton Grand Master Username: dounraey Post Number: 1369 Registered: 5-2012 |
Hi Omar Indeed, it's always good to hear from Bob. The nice thing about replacing the brushes is it is so easy on these alternators. 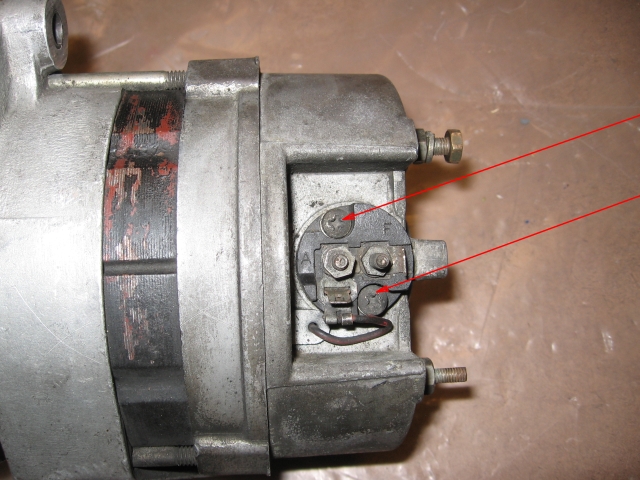  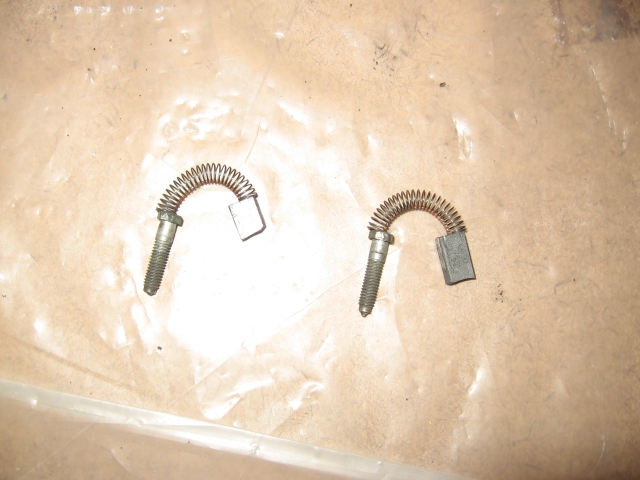 Just a case of undoing the terminal nuts, removing the two setscrews (red arrowed) and pulling out the brushes housing. You can see from the pic that the one brush is getting marginal, which (probably) explains why the alternator is not charging under load. Whilst I'm waiting for the replacement brushes to arrive I will strip the alternator down to see if I can cure the stiffness of the pulley that occurs in part of it's rotation, assuming I can get the pulley nut off that is  Geoff | ||
Patrick Ryan Grand Master Username: patrick_r Post Number: 445 Registered: 4-2016 |
Nice work Geoff, And as Omar said, good on you Bob. Straight out of the starting gate with the right answer LEGEND mate. | ||
David Gore Moderator Username: david_gore Post Number: 2170 Registered: 4-2003 |
Thanks Geoff for the follow up and Omar for acknowledging Bob [Robert Reddington] for his early advice on the probable cause of the problem. I have had similar problems with alternator brushes wearing unevenly after they tended to "stick" in the brush holder and not drop down as they wore. When replacing brushes, I always give all four sides on the brush a light rub on fine [800 grade] wet and dry emery paper placed on top of a small sheet of plate glass lubricated with water containing a drop of dish washing detergent to give a smooth flat surface then wash the brush to remove the grinding residue and allow to dry thoroughly before installing. This virtually eliminates the brush sticking problem both for alternators and other tools powered by electric motors. The same paper is used on commutators to polish any roughness away and the commutator surfaces cleaned afterwards using a toothbrush to dislodge any residues in the grooves between the segments and then with a damp lint-free cloth to remove the residues. It is easy to see if any residues are present after cleaning as the segments should be bright and the insulation between the segments have a uniformly coloured hard surface. | ||
Geoff Wootton Grand Master Username: dounraey Post Number: 1370 Registered: 5-2012 |
Hi David Interestingly, the dimensions of the brushes on my alternator are 0.2mm less than those spec'd in the advert for the new brushes. I put that down to wear over the years. So I can expect a fair bit of gunge in the housing for the new brushes. I will clean it thoroughly and also take your advice if the brushes are not completely free to move. I've hit another problem. I cannot remove the nut that holds the pulley on the alternator. I have spent 30 mins with a rattle gun but have had no luck in freeing it. I had not clamped the pulley and was relying on inertia to allow a few "hammer blows" before it started spinning. Works great on youtube, but not on my workbench. I'm thinking of clamping a rod of steel to the pulley to use as a lever to stop it spinning when I apply the grunt. However I have major reservations about this as I may just succeed in taking a chunk out of the casting. The red lines represent the rod of steel and the blue arrow points to the hole where I would put the bolt. 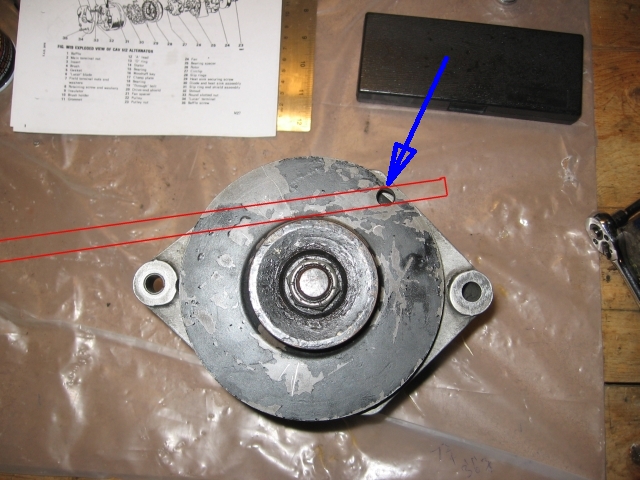 Is this a bad idea? Geoff | ||
Geoff Wootton Grand Master Username: dounraey Post Number: 1371 Registered: 5-2012 |
To be more precise, the picture should look like this, to undo the nut. 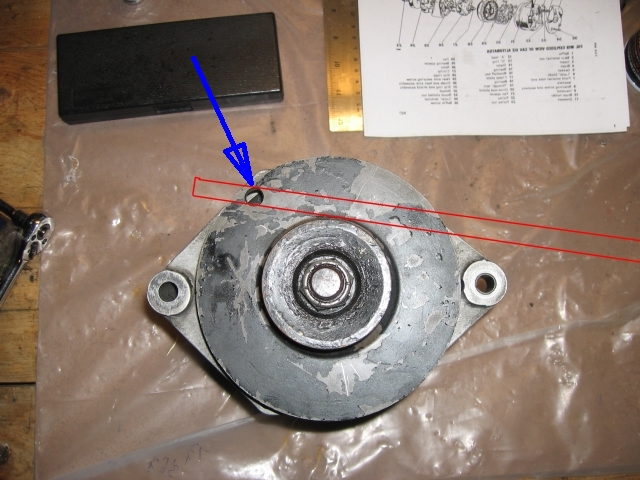 | ||
Christian S. Hansen Grand Master Username: enquiring_mind Post Number: 356 Registered: 4-2015 |
Geoff... Just thinking out loud here, but perhaps instead of attaching the rod to that one place on the pulley, would there be a way to put a strap wrench around the entire pulley and with the handle of the wrench jammed against something, and the alternator firmly fastened to the bench in order to secure the pulley from turning? The way that single hole is so close to the outer edge of the pulley, I would stress about snapping a piece out of the pulley, or do you feel that to be not likely? | ||
Geoff Wootton Grand Master Username: dounraey Post Number: 1372 Registered: 5-2012 |
Hi Christian I think I will go with your idea. Thanks for sending it. I've just been into the garage to check it again and the actual pulley is made of steel. The larger outer disk in which the hole is drilled is non-magnetic so I would guess it is aluminum alloy. It is the casting that forms the fan so I think you are right - I stand a very good chance of snapping a piece out of it. I just thought that CAV, who manufactured the alternator, may have put the hole there for the purpose of holding it steady while the inner nut was tightened. I cannot think of any other reason for it being there. But ultimately, I think it will be much safer to go with your idea of using a strap wrench on the inner pulley. Thanks again. Geoff | ||
Patrick Ryan Grand Master Username: patrick_r Post Number: 446 Registered: 4-2016 |
Hi Geoff. You are absolutely correct as to what the hole is for. However, I have to admit I have never seen a pulley nut THIS tight before, quite amazing really. Usually 2 quick blips with a rattle gun is all it takes. I don't want to insult your intelligence here mate, but the thread is a right hand thread, and/or the rattle gun is turning in the correct direction? I have made this error a few times in the past. | ||
Geoff Wootton Grand Master Username: dounraey Post Number: 1373 Registered: 5-2012 |
Hi Patrick When I was using the rattle gun I tried it in both directions, just to try and break the seal. Since I was not holding the pulley and was just relying on inertia I figured it would be ok to try it in both directions. I've just watched a youtube video and the person there was holding the pulley in an ungloved hand whilst using the rattle gun. This is telling me there is not too much force actually trying to rotate the pulley. I'm not brave enough to hold the pulley with my hand, especially when you take into account hospital charges over here, so I will buy a strap wrench tomorrow to make the job safer. You are right, it never occurred to me that maybe it's a left hand thread.  Geoff | ||
Alan Dibley Experienced User Username: alsdibley Post Number: 27 Registered: 10-2009 |
The pictures and symptoms suggest the problem is a sticking brush (the shorter one). New brushes will do no harm, of course, but check them for free movement, plus a bit, after installation. Though if the hesitant rotation is caused by loose windings it's a whole new game. Regards from Alan D. | ||
Patrick Ryan Grand Master Username: patrick_r Post Number: 447 Registered: 4-2016 |
Hi Geoff This is turning out to be a bit of a problem. As I mentioned I have never seen out of hundreds of alternators, power steering pumps, air pumps and the like, where a couple of blips of the rattle gun doesn't shift the nut. As you said both ways, is usually more than enough for a real problem child. Geoff is your rattle gun ok? I mean the hammer function hasn't failed or worn out? | ||
David Gore Moderator Username: david_gore Post Number: 2171 Registered: 4-2003 |
Geoff, Two blocks of wood in a large off-set jaw vice to clamp the pulley with the nut facing up, pour penetrating oil around the nut and soak for 24/48 hours [the 50/50 acetone/auto transmission fluid mix is ideal] then try the impact wrench operating in the reverse direction to the pulley rotation [I am assuming the thread direction will lock the pulley on when the pulley is rotating rather than allowing it to undo for obvious reasons]. I am assuming you are using an impact socket on the impact wrench and not an ordinary "star" socket as the star socket will inevitably roll the corners off the nut before it can come loose. The nut appears to be rather thin from the photograph which means keeping the socket absolutely vertical during the removal process is essential to avoid deforming the nut. This might be one of those situations where it is a good idea to leave the job alone for a day or two before coming back to it. My experience has been this tactic often results in a hassle-free subsequent removal of a recalcitrant nut/bolt/stud that defies undoing in the first few attempts. | ||
Patrick Lockyer. Grand Master Username: pat_lockyer Post Number: 1037 Registered: 9-2004 |
Never had a problem useing an old V belt round the pulley clamped in the vice. As for the brushes all ok, not the problem. A common fact is the differental wear of the brushes due to the running on different radia of the slip ring. | ||
Geoff Wootton Grand Master Username: dounraey Post Number: 1374 Registered: 5-2012 |
Hi Folks First of all many thanks for all your help and suggestions. It has genuinely been a tremendous help. In the end I opted to make a wooden clamp from some old pieces of wood in the garage. I tried a couple of blips on the rattle gun with a standard socket with no luck. Taking David's advice I went off to the tool store and bought some impact sockets. Back home and the nut finally came free after the sixth blip. Patrick - the gun I am using is an electric one I bought a couple of years ago. It hammers away quite nicely but would have nowhere near the power of a professional air gun. However, I finally got there. Alan and Patrick - I tend to agree that this is not just a simple worn brushes problem. It will be interesting to see what horrors await me once I've separated the alternator. It is held together by three long setscrews. The manual suggests heating them locally with a soldering iron to soften the black threadlocker - I'm expecting big trouble trying to undo them. 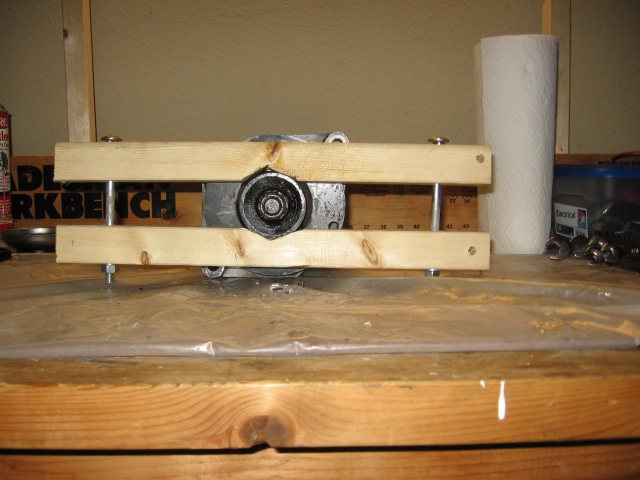 Geoff | ||
Patrick Ryan Grand Master Username: patrick_r Post Number: 453 Registered: 4-2016 |
Mate, We will look forward to your next instalment. Lets be positive as to your findings. Thanks for the update, and well done on getting it moving. I wouldn't have much luck at all as my alternator fan is plastic  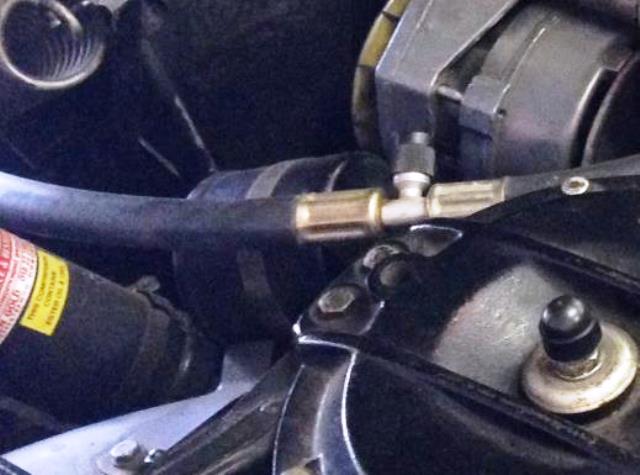 | ||
ross kowalski Frequent User Username: cdfpw Post Number: 80 Registered: 11-2015 |
Geoff, Weak charging is a good symptom of one of the three stator windings having failed (or a brush slip ring issue.) The stator part. It is easy to check if you have the stator removed. (and seperated from the rectifier deal) There will be three wires from the stator, measure ohms between each. The three readings should match. Then check between any of the wires and the body of the stator. There should be no path to ground. The rotor part You can check resistance between the slip rings on the rotor as well, 3.8 ohms or something like that as per the manual. Then check between the slip rings and the rotor shaft There should be no continuity. The surface of the slip rings should be clean as well. Good luck. | ||
David Gore Moderator Username: david_gore Post Number: 2173 Registered: 4-2003 |
Geoff, Try using an electric hot air gun to soften the thread locker - more heating effect than a soldering iron as the diecast alternator housing acts as a very efficient heat sink. You can control the temperature of the alternator body by simply adjusting the distance of the heat gun away from the alternator. I would heat it until the casing is just too hot to touch and then try undoing the setscrews; this should be hot enough to soften the thread locker but not hot enough to damage non-metallic components in the alternator. Do not forget to check the alternator diodes - I would replace all of them while you have the alternator apart as a preventative maintenance item regardless of whether they test OK. | ||
Geoff Wootton Grand Master Username: dounraey Post Number: 1376 Registered: 5-2012 |
Hi Folks It's not looking good  I've split the alternator and measured the resistance between the slip rings and I get a very creditable 3.6 ohms. However, when I apply Ross's test, I get continuity between each individual slip ring and the rotor, meaning I need a new alternator. Thinking about it though, the workshop manual says to do the test with a 15 amp light bulb and a 110 AC supply. Why did they not say to do a straightforward 12v DC continuity test. Could it be the coils are earthed in some way, so RR use a 110 AC supply to generate the resistance within the coil, which in a good coil would be sufficient to not illuminate the bulb. Before I throw the alternator in the bin I will need to check this out. I'd be grateful for any comments. Geoff | ||
David Gore Moderator Username: david_gore Post Number: 2174 Registered: 4-2003 |
Geoff, I would take the alternator to a reputable auto electrician and get them to have a look at it as they will have the equipment and experience to discover any problems and be able to fix them for you at a reasonable cost. I have found alternator/starter motor repairs/overhauls by auto electricians have been one of the least costly aspects of car ownership. As the alternator is off the car, they will not know it is a R-R and will not be tempted to charge R-R prices. If they ask, just say it is off a 1970's RHD British Leyland truck you are restoring  . . | ||
Geoff Wootton Grand Master Username: dounraey Post Number: 1377 Registered: 5-2012 |
Hi David I think I will just fit the new brushes and see how the alternator performs on the car. If it is not satisfactory I will just order one from Flying Spares. I've checked the net and all the websites I have looked at said there should be no continuity between the slip rings and the rotor. However these all refer to more modern alternators. I just think the CAV may be different, or why would the workshop manual say to test it with a 110V AC supply. Also, the alternator was producing 14.10v dc when not under load, so I think it is quite possible it just needs the replacement brushes. The rest of the internals look ok and there is no significant play in the bearings. It only takes 15 mins to put the alternator back on, so I will go with that option first. It occurs to me I could carry out the 110V AC test, but I think I'll decline that one. Geoff | ||
Paul Yorke Grand Master Username: paul_yorke Post Number: 1622 Registered: 6-2006 |
If the brushes do not help . . . An alternator and starter repair shop should know the unit well. Is it a growler that you are talking about? growler https://en.wikipedia.org/wiki/Growler_(electrical_device) | ||
ross kowalski Frequent User Username: cdfpw Post Number: 83 Registered: 11-2015 |
Wow Geoff , ...not sure if I would be plugging mains voltage into a car alternator either. When I looked over that diagnostic in the shop manual it really didn't look like any charging diagnostic regime I am aware of so maybe there is something special with grounded slip rings, but I sort of doubt it. The path to ground would have to be through the slip rings, to the shaft, then through the bearings (grounding through the bearings is bad) to the case. Good luck. | ||
ross kowalski Frequent User Username: cdfpw Post Number: 84 Registered: 11-2015 |
Geoff, Looks like these folks have the replacement rotor for a 512 for 40 pounds. repacement rotor | ||
ross kowalski Frequent User Username: cdfpw Post Number: 85 Registered: 11-2015 |
Looks like it also comes in a 60 amp variety, but looking at the shop manual the alternator apears to be a 30 amp unit. 30 amps, Aaaah the good old days. | ||
Patrick Ryan Grand Master Username: patrick_r Post Number: 459 Registered: 4-2016 |
Yes the good ole days for sure Ross. Back in my first car (HD Holden) a 30amp alternator was a huge upgrade, one I could never afford. Some of our trucks today can be specked with brushless 120amp. | ||
David Gore Moderator Username: david_gore Post Number: 2175 Registered: 4-2003 |
The CAV alternator fitted to DRH14434 was rated at 85 Amps presumably to allow for the extra load on the electrical system from the hydraulic pump when the roof was being lowered/raised. I cannot remember the CAV model code for the alternator. I think Paul Yorke is "right on the money" with his reference to the AC voltage test being a "growler" test. I cannot think of any other definite reason why an AC mains voltage test would be used on a low-voltage alternator. | ||
John Kilkenny Prolific User Username: john_kilkenny Post Number: 246 Registered: 6-2005 |
Looking at the early workshop manuals it seems that the Silver Shadow initially had either a dynamo (Lucas C48, 35 Amp) or alternator (Lucas 11AC, 45 Amp) if aircon was fitted. Later cars used the CAV 512, 55 Amp alternator with its CAV 440 Control Unit. Incidentally the minimum usable brush length for the CAV 512 is specified as 0.312 in. It would seem that the company underestimated the electrical needs of its cars. The starter motor was also upgraded early on, from 60 Amp to 100 Amp running current. | ||
ross kowalski Frequent User Username: cdfpw Post Number: 90 Registered: 11-2015 |
David, I'm not sure they are doing a growler test. I think they were actually using the mains voltage to do a continuity test to ground. "Test for defective insulation between one of the sliprings and one of the rotor poles using a 110 volt A.C. mains supply and a 15 watt test lamp. ( see Fig. M28). If the lamp illuminates the coil is earthed to the rotor core and a replacement rotor slip ring assembly must be fitted." I think if you used a growler on a alternator it would have to be done on the stator as well. I never heard of doing a growler test on a stator but It should work. Here's a guy not afraid to do a mains continuity test? | ||
ross kowalski Frequent User Username: cdfpw Post Number: 91 Registered: 11-2015 |
John, My car is serial srh8824 I think which makes it a 70 car and has a cav 512 with a 4 pole rotor. They probably used the same rotor on both the original and the uprated 55 amp units as the rotor has relatively no electron flow through it. (one amp?) and uprated the stator. I was talking to a friend this afternoon and he mentioned a technique that doesn't work on a Lucas but is probably worth contributing to the general knowledge pool of the forum. He said he touches a screwdriver to the rear bearing cap with the car running and notes the magnetic field. After the car is started with the lights on the alternator should be getting a lot of power to the rotor from the regulator and be generating a strong magnetic field. I tried to find someone doing this on youtube and found nothing, but I never heard of this before so maybe it isn't so common. It won't work on the Lucas unit because the slip rings are past the bearing on the end you would be doing the test on. | ||
ross kowalski Frequent User Username: cdfpw Post Number: 94 Registered: 11-2015 |
Hard to believe, but there is no one on youtube doing the screwdriver test on an alternator. I must have an alternator on something that has the bearing to the outside and accessibility. I'll try it tomorrow and if it works, I'll film it and post it to the you tubes. | ||
ross kowalski Frequent User Username: cdfpw Post Number: 98 Registered: 11-2015 |
I was a little busy today but was around some cars so I tired the screwdriver thing. 1. No magnetic field on the rotor ... no electricity. Bad rotor, regulator, brushes, slip rings, or wiring to the slip rings 2. If you feel a weak magnetic field, maybe a shorted rotor coil or a bad regulator. 3. If you feel a magnetic field it means the rotor is good. I tried it on a car with a known bad stator coil and the magnetic field was strong. I would be more concerned but it is my diesel vw and the electrical system doesn't really do a lot. So, if you have no charging the screwdriver will tell you if the rotor, slip rings, regulator and regulator wiring are working, but only that. I won't be throwing away the meter any time soon. | ||
Geoff Wootton Grand Master Username: dounraey Post Number: 1411 Registered: 5-2012 |
Hi Folks I'm in luck, it was the brushes. I've just fitted the re-brushed alternator and everything has returned to normal. The generator light does not come on, even on idle with the headlights and fan blower on. Voltage across the battery is 15v on idle (is this too high?) and drops to 13.5v under full load. On starting the car the ammeter flicks up for a few seconds and then settles down just positive of the top zero position, as was it's way before the fault occurred. This however still leaves the question of why I was getting a short when I measured between the slip rings and the rotor. This is the standard test and normally means the rotor is faulty. However the RR workshop manual says to do this test with 120v AC through a test lamp, which indicates to me the standard test of using a 12v DC meter will not work on this alternator. We all know putting AC through a coil produces very different results to using DC. I guess the answer to this is academic now, unless I have an intermittent short. I will report back if this turns out to be the case. I ordered the brushes around the 25th August. They arrived yesterday (15th September). Almost 3 weeks to get here. I could tell from the tracking they sat in Chicago from the 4th Sept until the 11th. Isn't the US postal service great. So whilst I was getting really frustrated waiting for the brushes to arrive, checking each morning to see they were still stuck in Chicago, I decided to buy a substitute alternator and fit it temporarily until I had got the RR alternator fixed. I was expecting to have to replace the rotor which would have meant another 3 weeks of my car being off the road, so fitting a substitute seemed like a good idea. I'd read the twin pulley 7127NC would fit the Rolls so I sent off for one. http://www.jegs.com/webapp/wcs/stores/servlet/SearchResultsPageCmd?Ntt=7127NC&requestYear=&storeId=10001&catalogId=10002&langId=-1&year=&make=&model=&submodel=&engine=&Nrpp=&No=&persistYmm=false However, what I did not realize is what appears to be a twin pulley version in the advert is in fact a single pulley. In the photo, the chrome fan face reflects the single pulley making it appear as a double pulley. So the pulleys don't align, although had they done so I would have been able to fit it, albeit with a spacer on the top bolt. If anyone knows of a substitute alternator or a twin pulley 7127NC I would be interested to hear about it. Regards Geoff | ||
Mark Aldridge Grand Master Username: mark_aldridge Post Number: 348 Registered: 10-2008 |
Geoff, can you swap the single pulley for a twin ? your local bearing/ engineering supplies shop can probably help. In the UK, Transpower Services Ltd are brilliant, and they supplied the pulley for my S1 alternator conversion. Mark | ||
Geoff Wootton Grand Master Username: dounraey Post Number: 1412 Registered: 5-2012 |
Hi Mark I don't think it would be possible as the spindle is not long enough. It would be possible for a machinist to make a pulley with a deeply recessed centre, but I was looking for a quick easy solution. I did read the double pulley 7127NCs are available. It's just a case of finding a supplier. Obviously this is not a big issue for me now as my alternator is now working. I just thought it would be useful as a low cost backup for when I next need to recondition the alternator. Geoff |