| Author | Message | ||
Brian Vogel Grand Master Username: guyslp Post Number: 1890 Registered: 6-2009 |
This question is not related to any current project of my own, but is triggered by someone else asking me for information I don't have, and that I'm now curious about. First, my annotated "exploded" ACV photo: 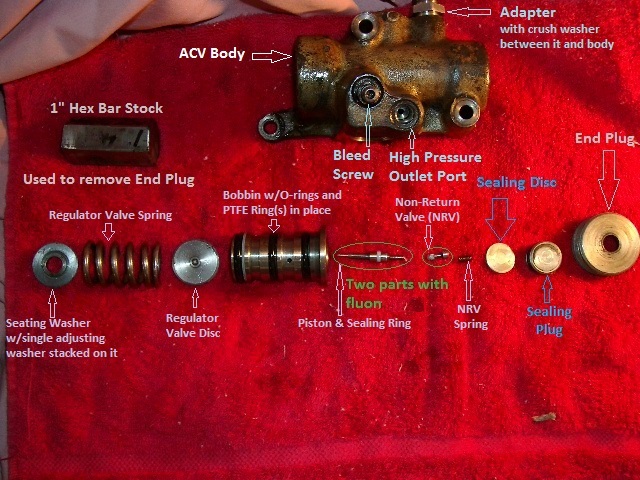 The seating washer rests at the far end of the valve body away from the end plug, and based on what I've read and seen it may, or may not, have an adjusting washer or washers piled upon it. It is my understanding, and this may be incorrect, that these adjusting washers (shims, really) are used to calibrate the cut-out pressure by slightly increasing the pressure exerted by the regulator valve spring on the regulator valve disc. If that's not the purpose of these washers then what is it? If I am correct regarding the purpose of the adjusting washer(s), I'd presume that each has a standard thickness (my ACV had only one) and that each one added to the stack would increase the cut-out pressure by some set amount, or very close to it. Would that be correct, and does anyone know how thick they are and by how much each additional adjusting washer added to the stack should increase the cut-out pressure? Brian | ||
Geoff Wootton Grand Master Username: dounraey Post Number: 1232 Registered: 5-2012 |
Hi Brian Thought I'd help resurrect this thread in the hope someone may have the answer. I can only speculate, but an alternate view may be the washer is hardened and is there simply to protect the coil spring seat. My car is the earlier SY1 however, like yours, it has just one washer: 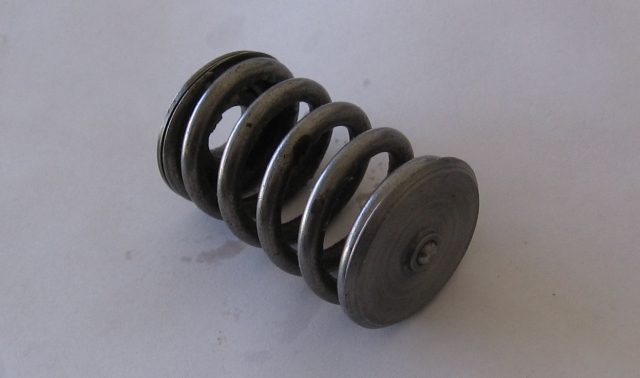 There is no mention of shimming in the manual to re-calibrate the cutout pressure. Also there is not a lot of facility in the design for the seat to take many shims. Compare this with shims used to adjust the springs in a cylinder head, where the valve stem is a good 1/2" proud of the seat. I've read you should never use shims to re-tension a tired spring, but to always replace the spring. Maybe the factory just checked the spring was in spec and fitted it without the need for further adjustment, relying on replacement to bring the cutout pressure back to it's correct value, when required. This is just an alternate, speculative view. A guess. It would be interesting if anyone knew the definitve answer. Geoff | ||
David Gore Moderator Username: david_gore Post Number: 2040 Registered: 4-2003 |
Geoff, I think your assumption is correct as your spring is identical to what I found on DRH14434 when overhauling the hydraulics. | ||
Larry Kavanagh Yet to post message Username: shadow_11 Post Number: 1 Registered: 5-2016 |
See Section G7.5 para.7 of the workshop manual in relation to the accumulator valve. It states that if the accumulator is controlling at too low a pressure (and if you are satisfied that there is no leak) the controlling pressure may be increased by adding an adjusting washer to the spring seat. Introcar Ltd.,UK have a number of different sized adjusting washers advertised in their catalogue. I imagine that one would not add extra washers but replace the existing washer with a thicker size. It appears to be a trial and error practice so a test rig would be needed to gauge the effect the increased size otherwise it might be necessary to remove and fit the accumulator valve body and sphere to the engine and remove them a number of times trying various sized adjusting washers until the desired controlling pressure is attained unless one got lucky and reached the target in one attempt, Regards, Larry | ||
gordon le feuvre Prolific User Username: triumph Post Number: 111 Registered: 7-2012 |
At Hythe Rd (and I assume at Crewe, they had a nice rig test unit that took only a minute to connect ACV to rig test. Very handy. that said in the (I guess) 100's of these I reworked over the years and then gauge tested when refitted any variation in spec was always for other reason, i.e pitting of ball in disc as shown in Geoff Wootton photo or this not seating correctly. | ||
Brian Vogel Grand Master Username: guyslp Post Number: 1900 Registered: 6-2009 |
Gordon, Where do you see pitting in Geoff's picture? I can't see it. One thing is for sure, the ball on the regulator valve disc always ends up getting a flat spot in the top center from being pounded by the piston again, and again, and again over the course of decades. I'd actually presume that change occurs fairly rapidly and then simply stays that way. Brian | ||
Jim Walters Frequent User Username: jim_walters Post Number: 74 Registered: 1-2014 |
I made my own test rig from a bottle type hydraulic jack so I could check and adjust the relief pressure on accumulators I rebuild. This allows me to not only test the relief pressure but to ensure the unit holds pressure and has no internal leaks before I send it back to the customer. Will share the details if anyone wants to build their own.  SRC18015 SRE22493 NAC-05370 www.bristolmotors.com | ||
Kelly Opfar Frequent User Username: kelly_opfar Post Number: 87 Registered: 7-2004 |
I appreciate Brian bringing this topic up because it has been on my mind lately too. Jim, I would very much like the details of your testing rig design. I reassembled my ACV's just the way they came apart, but it's been bothering me that I don't know that they are exactly right. Using Cal West's book and the factory manual, I have been designing a test rig in my head, but I don't want to re-invent the wheel if I don't have to. | ||
Brian Vogel Grand Master Username: guyslp Post Number: 1902 Registered: 6-2009 |
Kelly, I believe that someone else (not to take away from Jim) has also posted, and I thought on this forum, about building a test rig. It could have been on rollsroyceforums.com or the US RROC Discussion Forums, but I thought it was here. Since I know you, and believe I can at least ask, if you do build yourself one of these would you consider doing the testing necessary to determine what effect the various washer thicknesses have on the cut-out pressure? I've just been having this conversation with someone else "off forum" and he provided the following information regarding the adjusting washers, 'I know the sizes and they are in inches; 0.005", 0.020", 0.034", 0.048", and 0.124"' I am convinced that there has to be some direct, if not linear, relationship between the thickness of the adjusting washer and the cut-out pressure. If there weren't, why would they exist in the first place? I also know that there are many instances, and this may or may not be one of those, where very, very slight adjustments to one part of the system results in "much larger than expected" changes in its operation. I really wonder whether very slight increases in spring pressure on the regulator valve disc trigger very significant increases in cut-out pressure. If I lived next door to you I'd volunteer to do the "pull out the guts and switch out the adjusting washer(s)" repetition just to have an answer on this. Then, of course, one would have to determine whether the results could be replicated on additional ACVs. We may never have a sample size that would give us statistical numbers, but a couple of consistent results or very nearly consistent results would give me all the reliability and validity data that I need to be satisfied. Brian, who figures that getting a statistically valid sample size, even of just SY series cars, would be no mean feat | ||
David Gore Moderator Username: david_gore Post Number: 2049 Registered: 4-2003 |
Brian, I think Bill Coburn may have described a test unit either on this forum or in "Tee One Topics" although my memory also brings up the now-closed Swammelstein Shadow Forum as another possibility. | ||
Larry Kavanagh New User Username: shadow_11 Post Number: 2 Registered: 5-2016 |
I would be really interested in receiving details including adapter sizes and hose type used by Jim Walters in his bottle jack test rig. I presume the bottle jack would need to be completely cleaned of existing hydraulic fluid which would be replaced by RR363 or at least DOT3 or DOT4 and that the seals in the bottle jack would need to be renewed also? Regards, Larry | ||
Kelly Opfar Frequent User Username: kelly_opfar Post Number: 88 Registered: 7-2004 |
I have seen Jim's excellent test rig picture several times before, here and other places, but I can't recall ever seeing a testing rig or detailed procedure anywhere else. A quick perusal of Bill's Tee-One topics led me into many interesting side-streets but I didn't come across exactly what I was looking for. Brian, I was hoping to do exactly what you are asking. As it so happens, right now I have 4 ACV's to conduct tests on. I have my pair plus a pair I'm rebuilding for a friend. Still, a very small sample size indeed, but if the results are consistent, linear and reproducible, that would be great. | ||
Jim Walters Frequent User Username: jim_walters Post Number: 75 Registered: 1-2014 |
I made this test rig by removing the ram from the jack then threading the inside of the big nut at the top which held the ram seals with a pipe thread tap. I then installed a T fitting into this nut with a pressure gauge on one outlet and the pressure line to the accumulator from the other. Drilled and tapped a hole in the side of the jack housing to accept the return from the ACV which is low pressure. This is the white silicone hose on a brass barbed fitting on the left side of the jack housing. Also replaced the O rings inside the jack with EPDM ones. BUT, there is an easier way. Buy a porta power hand pump, strip and clean it of hydraulic fluid. Replace any O rings with EPDM ones. Anneal or replace any copper high pressure sealing washers you find inside. Drill and tap a hole in the top of the body for a return line fitting. This hose will attach to the relief port on the ACV, the fluid dumps back into the pump housing when the relief valve opens. Make up an adapter so you can fit a T with a brake hose and pressure gauge into the outlet of the pump. Fill with Dot3 or RR363. I think converting a porta power pump would be much easier than converting a bottle jack, you don't have to deal with sealing up the housing after the ram is removed. SRC18015 SRE22493 NAC-05370 www.bristolmotors.com | ||
Chris Miller Grand Master Username: cjm51213 Post Number: 404 Registered: 5-2013 |
Hi Folks, Not to diminish Jim's bottle jack rig, I bought a test rig, and a similar pump is available from Harbor Freight. http://www.harborfreight.com/automotive-motorcycle/hydraulics/4-ton-heavy-duty-portable-hydraulic-equipment-kit-62115.html I emptied the fluid that came with it and filled it with HB363, and replaced the one o-ring with an EPDM o-ring. As for the shims, I calibrated my ACVs with shims I got from Grainger:https://www.grainger.com/category/arbor-shims/machine-tool-accessories/machining/ecatalog/N-9mk#nav=%2Fcategory%2Farbor-shims%2Fmachine-tool-accessories%2Fmachining%2Fecatalog%2FN-9mkZ1z0nmm8Z1z0nqwdZ1z0lbot I am being vague here, because I don't have any record of precisely what I bought, meaning thickness and outside diameter. I suspect that the O.D. was 1 1/8" and I think the thicknesses were .005 and a few others. They fit exactly, and with the bench pump, I was able to calibrate my ACV very close to 2,500 PSI. I did not develop a equivalence formula: inches of shim to PSI. It seems like it should be linear, but I think the spring rate variances are overwhelming, meaning any formula would not translate to any other ACV with any accuracy. | ||
Jim Walters Frequent User Username: jim_walters Post Number: 76 Registered: 1-2014 |
Chris, I knew someone had mentioned using a porta power pump, so full credit to you for the idea. I couldn't remember who had used one or where the idea came from, obviously it was you. I too can't remember what value of shim equates to psi difference, but I punched out shims from some .015 thou shim stock for the last set I rebuilt and used two shims in one of them. Now if I could just remember what the pressure was before and after adding the shims....... SRC18015 SRE22493 NAC-05370 www.bristolmotors.com | ||
Brian Vogel Grand Master Username: guyslp Post Number: 1907 Registered: 6-2009 |
I have no doubt that Kelly will report back on the shim thickness to pressure change figures on the ACVs he'll be working on in due time. Even if the figure isn't perfectly accurate, I'd have to believe that there is a rough ballpark expected changed based on each thickness. The springs in these things are not really all that likely to weaken since they are not constantly compressed (well, not beyond what they are when the car is off or the ACV is in charging state, and that's very little). Each shim gives some set additional amount of "push" from that spring on the regulator valve disc. I will be very curious to see what the findings are. Brian | ||
Kelly Opfar Frequent User Username: kelly_opfar Post Number: 89 Registered: 7-2004 |
I very much like the idea of converting my porta-power pump into a testing rig, but that makes it tough for me to use it as a porta-power again. For the price I like the bottle jack better. I bought a bottle jack from Harbor Freight for $19 and am currently in the process of machining a few new parts for it and I've bought new EPDM seals. I like Chris's idea of getting arbor shims from Grainger (or McMaster-Carr). I hadn't thought of that. I also like Geoff's speculation that the spacer could be helpful strictly because it is hardened and can protect the spring seat. My plan for now is to get the pressure correct by shimming, then make new stainless spring seats that are the correct thickness - minus .020" - and adding one .020" spring steel shim for wear protection. |