| Author | Message | |||
Kelly Opfar Frequent User Username: kelly_opfar Post Number: 60 Registered: 7-2004 |
To avoid hijacking other threads, I'm starting a new thread to highlight a few parts that I've restored. First up are few pics of the subframes. All of the hardware has been manufactured from an aircraft stainless alloy: 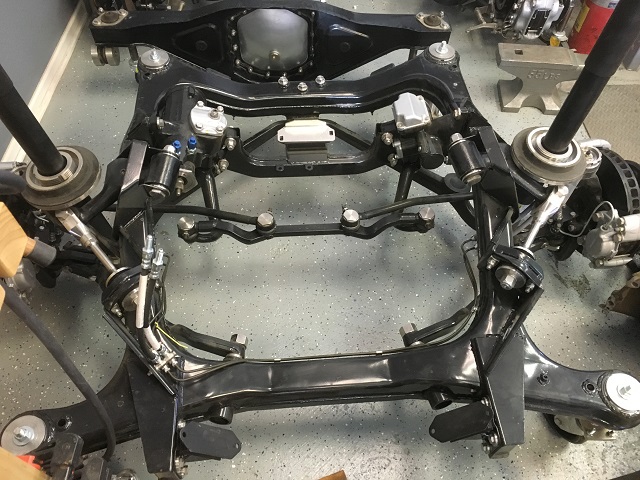  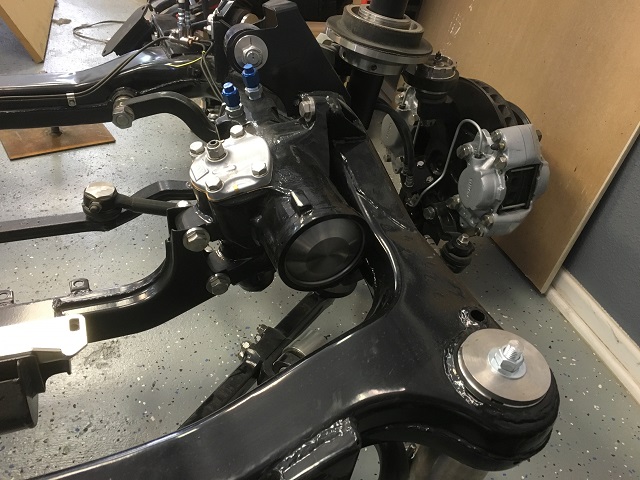 I made the spring perch to be adjustable: 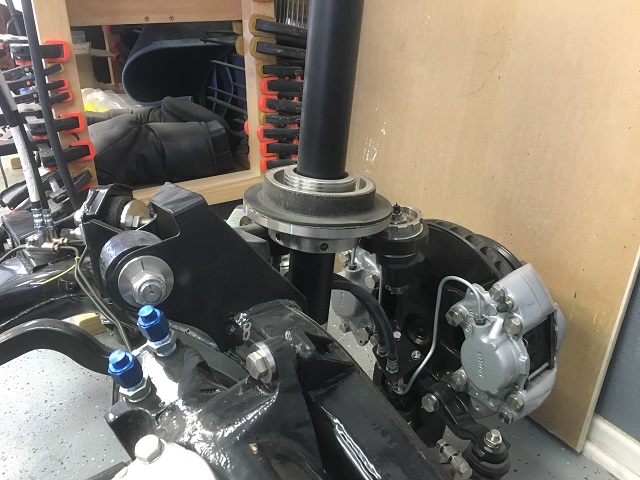 Here is the differential carrier: 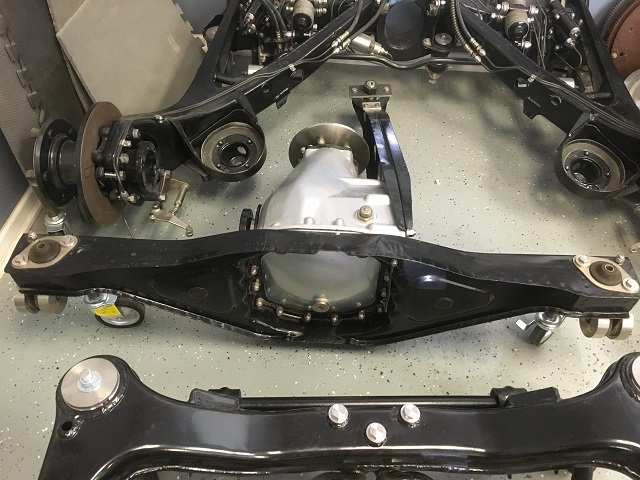 A few shots of the rear subframes. Note the billet wheel in the corner. I'll show that tomorrow. 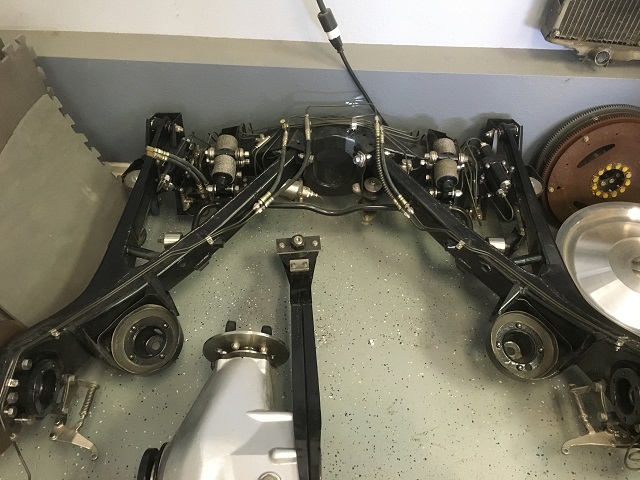 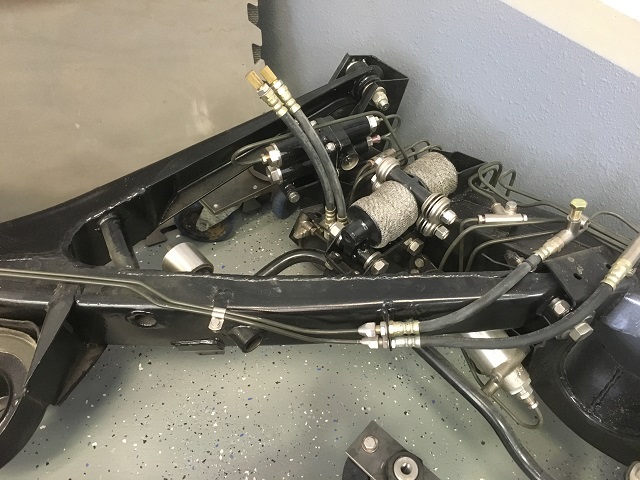 Man, this stuff takes a long time. I have several more pics I took today but I gotta go to work. I'll post more tomorrow.  | |||
Patrick Ryan Frequent User Username: patrick_r Post Number: 77 Registered: 4-2016 |
Thanks for posting these Kelly. Magnificent work. As the guys have said attention to detail. First rate. Awesome job mate, well done. Looking forward to more pics. ps: I asked a question on the "photos of our cars" thread I hope you can help with. | |||
Geoff Wootton Grand Master Username: dounraey Post Number: 1190 Registered: 5-2012 |
Kelly This is an awesome restoration. Cars restored to this level command very high prices. These are also very good reference pictures for anyone carrying out work on these components. It's not often one gets to see things like subframes completely removed from the car. I look forward to the other pics you will post tomorrow and hope you will use this thread to update us as the restoration progresses. Geoff | |||
David Gore Moderator Username: david_gore Post Number: 1986 Registered: 4-2003 |
Kelly, magnificent work and attention to detail - a true labour of love to be sure. The content of this thread will be a tremendous accompaniment if edited into a book that goes with the car especially if it remains with future generations of your family. Looking forward to seeing the ongoing restoration as it proceeds. If possible, can you include details of what techniques you have and are using in your posts to help other forum members undertaking similar restorations now and in the future. Of course I have a vested interest here being one of the original participants in Bill Coburn and George Shaw's Shadow Self-Help Group which started in the ACT and John Begg and myself transferred the concept to NSW in the early 2000's and included other R-R/B models as well. Robert Wort started a similar group in Victoria at the same time. The most memorable event would have to be the "Fixing Rolls-Royces in a Fire Storm" session at Bill's Canberra home on the 18th January 2003 which was the day Canberra and the ACT were devastated by out-of-control bush fires. Bill posted some details on this forum and I wrote a more detailed report with photos for publication in the NSW Branch monthly bulletin "L and D" [I am trying to find a copy of this article which is somewhere in my archives]: http://au.rrforums.net/forum/messages/30/338.html P.S. Kelly, I have never seen a blacksmith's anvil in as good a condition as the one in your first photo. Says a lot about your consideration for your tools as well as your car. | |||
Randy Roberson Grand Master Username: wascator Post Number: 670 Registered: 5-2009 |
Awesome. Thanks for sharing! | |||
Omar M. Shams Grand Master Username: omar Post Number: 575 Registered: 4-2009 |
wow Kelly!! Truly amazing.I think you have taken our breath away with these amazing photos Omar | |||
Nick Adlam Experienced User Username: crewes_control Post Number: 24 Registered: 12-2015 |
Kelly, you should write a book detailing your restoration. The quality of your work is mind-boggling to say the least. I dare say even better than factory. | |||
Kelly Opfar Frequent User Username: kelly_opfar Post Number: 62 Registered: 7-2004 |
As promised, here is today's offering. I am not a purist. I am not concerned with the original shade of black on the undercarriage, or having the right head markings on a bolt. That being said, I am trying very hard to make everything the way the factory did it and any modifications I make can be reversed if necessary. I am making a set of billet wheels for myself. Because I can. They are 17" instead of the factory 15". They are going to duplicate the look of the factory wheel covers with the color ring and vents. 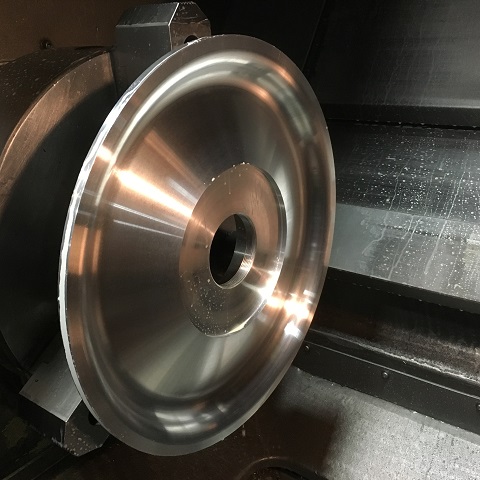 Here it is with the lug cover installed. It still needs a little adjustment to fit flush. The RR center caps are always-upright spinners from a new Phantom. The wheel nut pattern has not been milled yet neither have the vents. 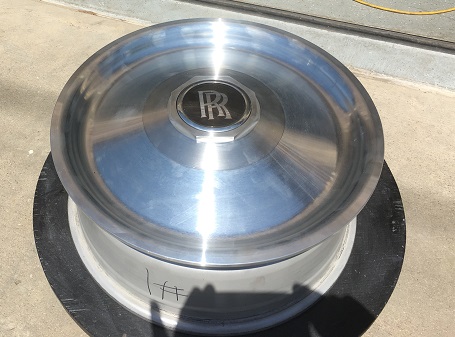 Here it is shown with the wrench I made installed on the octagonal nut.  There is still much to be done on these before they are finished. Besides the milling, they need welded, heat treated, straightened (a possibility after heat treating), polished, chromed plated then have the color ring painted on. Polished aluminum is nice but nothing looks like chrome! | |||
Jeff Young Prolific User Username: jeyjey Post Number: 245 Registered: 10-2010 |
Those wheels look great, Kelly. Cheers, Jeff. | |||
Kelly Opfar Frequent User Username: kelly_opfar Post Number: 63 Registered: 7-2004 |
This is an oldie but a goodie. This has been posted before but I'll show it again for the newbies. It's been electroless nickel plated. The reed switches, filters and gaskets have been replaced and the hardware is all stainless. 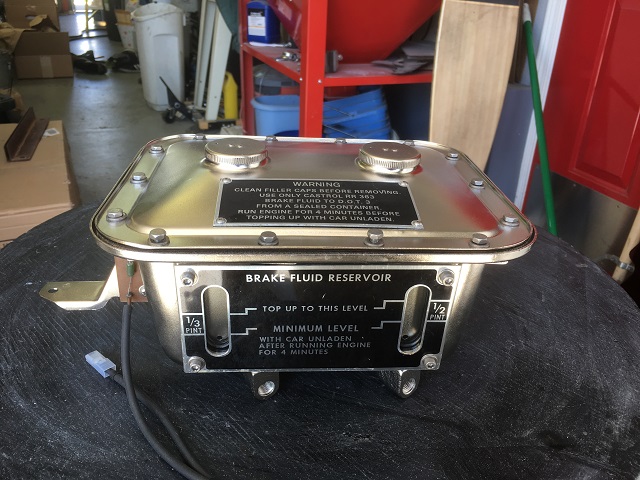 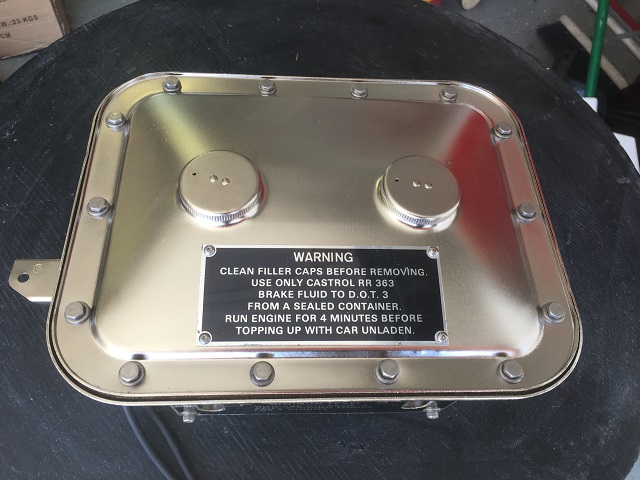 Here are my restored rear hydraulic rams. They're black powder-coated and have new kits in them. The ram pistons have been made from scratch from high-strength stainless (Grade 630 aka 17-4 precipitation hardened, H1150 condition for you engineering nerds). 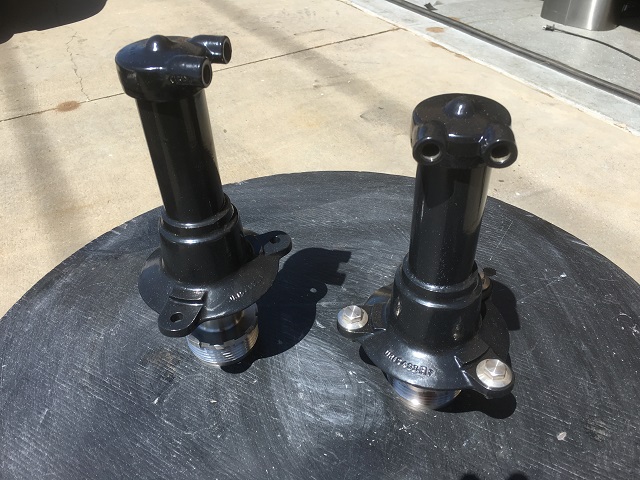 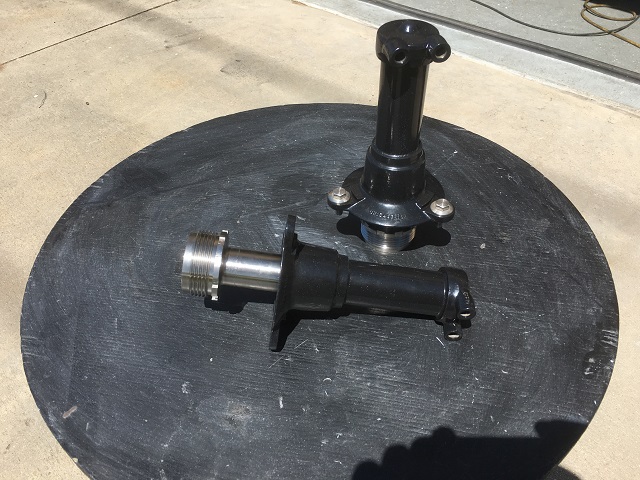 | |||
Geoff Wootton Grand Master Username: dounraey Post Number: 1197 Registered: 5-2012 |
Kelly How did you make the wrench. Was it made entirely with a miller? I presume the steel has to be toughened or hardened. How is this done? Geoff | |||
Kelly Opfar Frequent User Username: kelly_opfar Post Number: 64 Registered: 7-2004 |
I had these engine bay decals made. They are exactly the same size and font as the originals. It cost the same for 6 as it did for one so if anybody else is as nuts as me and has a '76 US model, I've got a couple of extra stickers. 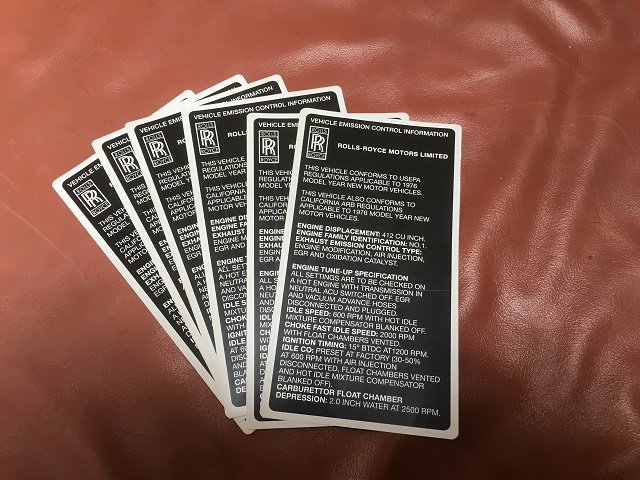 | |||
Kelly Opfar Frequent User Username: kelly_opfar Post Number: 65 Registered: 7-2004 |
Geoff, the wrench is laser cut aluminum. I want it soft so it doesn't mar the chrome finish on the octagonal nut. It doesn't have to be tough, it just has to keep the cover from coming off. It is not holding on the wheel. I had a new jack bag made awhile ago and I'm going to have it modified with a zippered pouch to include this wrench. | |||
Kelly Opfar Frequent User Username: kelly_opfar Post Number: 66 Registered: 7-2004 |
I recently rebuilt my A/C compressor. There are kits available for these GM A6's. The front and rear plates are electroless nickel plated as is the clutch unit. I wanted to be the one to rebuild mine because nobody cares about my parts as much as me. I can take the time to make sure everything is perfect. The sticker is available from any place that specializes in GM car restorations. I got this one from Classic Industries. 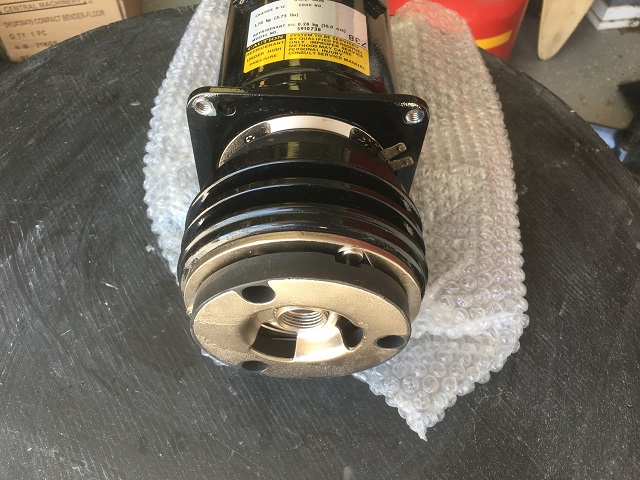  I made the block on the back to pressure test it with Nitrogen when I was done. It serves double duty now to keep it sealed until I install it.  That's all I got time for today folks. Make sure and come back for tomorrow's matinee! | |||
Omar M. Shams Grand Master Username: omar Post Number: 579 Registered: 4-2009 |
Goodness me. I am gobsmacked by the amount of work that you have put into these components Kelly. Your deviations from factory standard are very welcome in my eyes. I see them from an engineering perspective only - and from that perspective your products are superior to Rolls-Royce original. | |||
Patrick Ryan Frequent User Username: patrick_r Post Number: 100 Registered: 4-2016 |
Kelly, Those parts are stunning to say the least. What an amazing job to break that car down and start from scratch. I think I can speak for others here. Picture this We are now like a group of kids standing in front of a lolly (sweet) shop window while the owner is restocking his display with the latest never before seen range of lollies that make us drool and lick the glass waiting to see what the next lot of goodies will be he brings out!  | |||
David Gore Moderator Username: david_gore Post Number: 1990 Registered: 4-2003 |
Kelly, As an old-time materials applied scientist who specialised in steel and its alloys as well as being exposed to non-ferrous metals as well, I am following your work with great interest especially the modern technology you are using. If possible and without divulging any trade secrets, I would be very interested in how the bright chromium plating is undertaken especially the surface preparation for the final bright finish plating of your billet wheels. I approve your selection of 17-4PH for the rear ram pistons - great alloy and very versatile. As a recently graduated Metallurgist at Comsteel in Newcastle NSW in the early 1970's, I was given the responsibility for casting what was most likely the first commercial ingot of 17-4PH in Australia and the subsequent forging of this ingot into bar stock for evaluation as an addition to our product range. As chance would have it, the Eastern Nitrogen fertiliser plant on Kooragang Island near our works had a major pump shaft failure which halted production and needed to source 17-4PH which was the original material used and none was available in Australia [or so they thought] - the engineer supervising the breakdown rang Comsteel to see if we could supply an alternative and I happened to receive the call. The absolute relief in the engineer's voice when I told him we had just made an experimental batch of this alloy and I could get a suitable bar forged for him free-of-charge if he would provide feedback on the machinability, heat treatment and subsequent service performance for my final assessment; this opportunity made my project even more interesting. The final outcome was a successful pump repair and a later letter of appreciation to our General Manager thanking the Company and myself for helping them fix their problem and resume production much earlier than they anticipated. This was the catalyst for my appointment a short time later as a Technical Service Metallurgist in Sydney which I still consider to have been the most rewarding and interesting period of my career due to the challenges involved in finding the reasons behind customer/end user problems and finding appropriate solutions. My ethos was "you do not have a problem, we have an opportunity" which was also supported by Australian industries that had the same attitude and were prepared to put the time and effort into innovation and customer service. Sadly, I think we have now lost this capability and willingness as so-called "free market" philosophies prevail and have destroyed our secondary industries that created employment for so many of our population. I do not see quarrying/extracting finite resources and the exporting of jobs without creating future industries to replace these jobs as a sound basis for the future of Australia. I am fearful my grandchildren will not have the same opportunities I had to find interesting and rewarding employment with sound prospects for their future. | |||
Geoff Wootton Grand Master Username: dounraey Post Number: 1199 Registered: 5-2012 |
David I so agree with you David. I've seen the impact of globalization on the manufacturing base, both in the UK and the US. I lived in Cleveland Ohio for 9 months in 2012 and the devastation was obvious. The Americans call it part of the "rust belt", where manufacturing industry has been destroyed and is rusting away. Quite a price to pay for our cheap imported goods. Barack Obama has just told the British if they vote to leave the EU in the coming referendum they will be "at the back of the queue" for any new trade deals with the US. Phew - thank god for that -lol. Geoff | |||
Randy Roberson Grand Master Username: wascator Post Number: 672 Registered: 5-2009 |
Outstanding work! You could make a book out of this project. By the way: as an American I advise you to listen carefully to our President's advice, then do the exact opposite and you should be good to go. | |||
Kelly Opfar Frequent User Username: kelly_opfar Post Number: 68 Registered: 7-2004 |
Thank you everybody for the kind words. It actually inspires me to work a little faster. David, I can't help but feel that you are giving me a little too much credit. I don't have formal metallurgy training except for a few classes in vocational college years ago. I am a machinist for a large company that services the oil and gas industry. I have access to a large engineering department which is where I was advised to make the rams from 17-4ph. As for the chrome process, I wish I had a good answer for that. I will do the preliminary rough polish but final polish and the actual plating is a job that I will farm out to others. The heat-treat to return to a T6 condition will be farmed out as well. | |||
Kelly Opfar Frequent User Username: kelly_opfar Post Number: 69 Registered: 7-2004 |
When I first bought my car, I bought a new brake pedal pad but quickly realized that there was no way to attach it. The original pad is bonded/vulcanized to the metal pedal. The instructions were to use some kind of glue. I couldn't imagine that being effective. So I came up with this. I made a new pedal assembly from stainless with a rabbet-joint type of ledge to secure the pad in place. 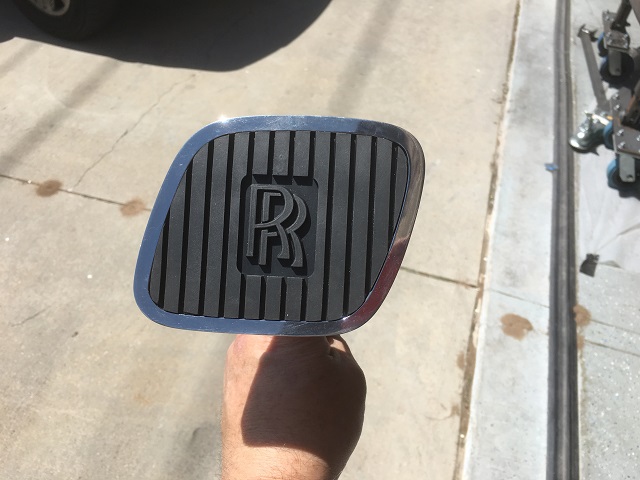 There is a hole in the backside so the pad can be pushed out if needed. 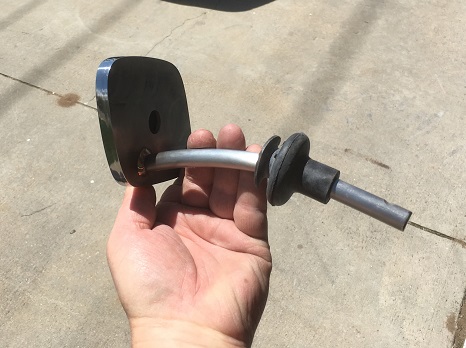 and the throttle pedal to match: 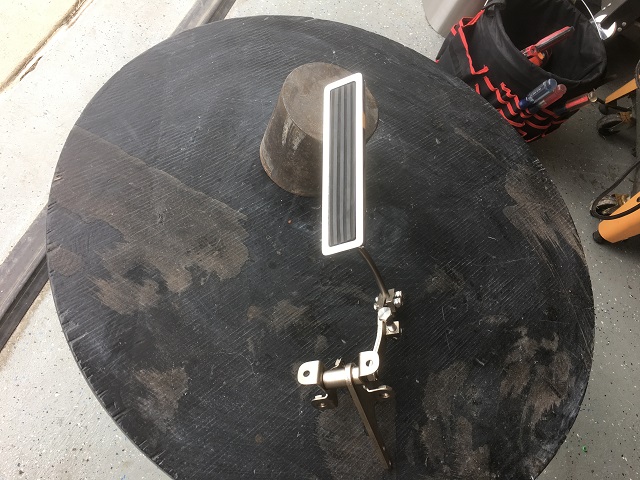 The rat trap has been rebuilt with all of the rods and hardware duplicated from stainless. The frames, small brackets and brake lever are powder-coated and everything else that could be was electroless nickel plated. 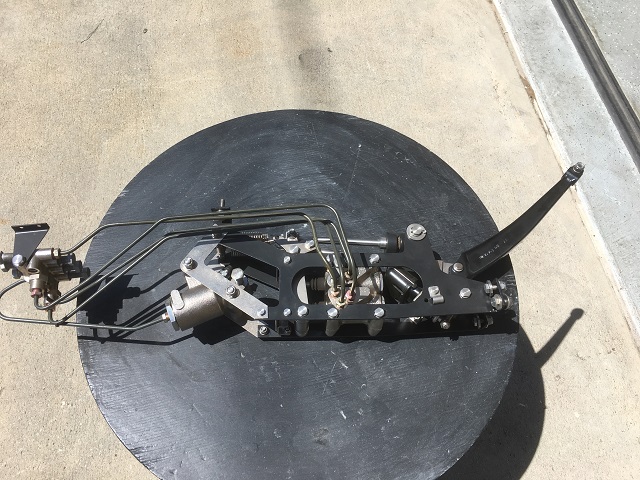 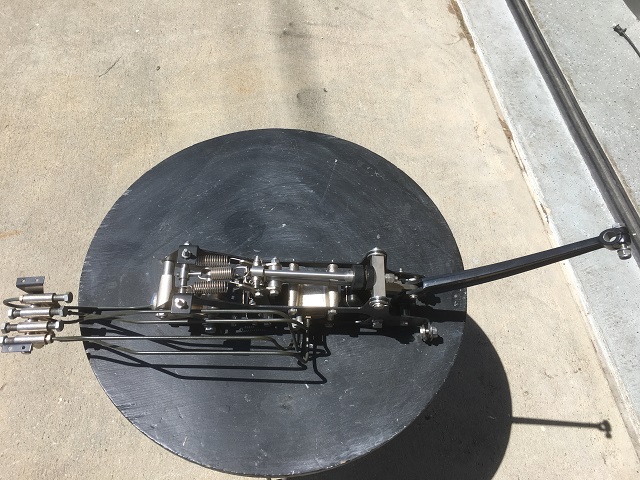 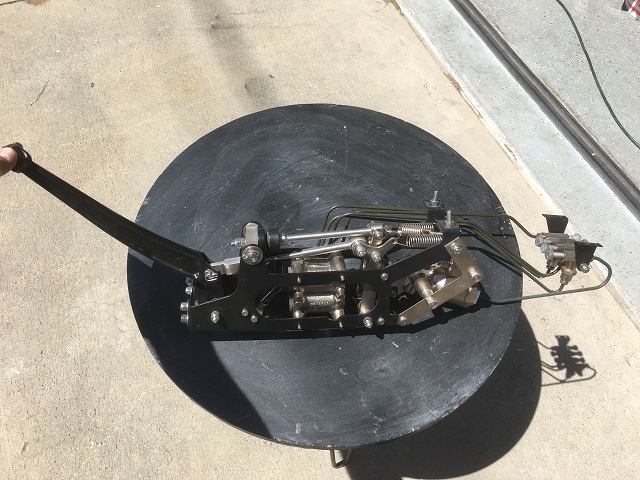 Here are a couple more pics of the intake manifold assembly. The fuel line is replaced with stainless and all of the connections have been replaced with Swage-Lok fittings. The tubing is all Viton. Rebuilding the carbs is easier than people think. Get the right kit from Burlen and it is all pretty straightforward. Don't be afraid to try it. The funny thing is that several of the pieces were only available through Bentley. Burlen doesn't have everything. Thank goodness for the Spares Catalog. Making the EGR valves from scratch sounded like a good idea at the time, but probably isn't something I would do again. Testing on a flow rig showed identical opening and closing rates throughout varying vacuum ranges. When you're a hammer the whole world looks like a nail...  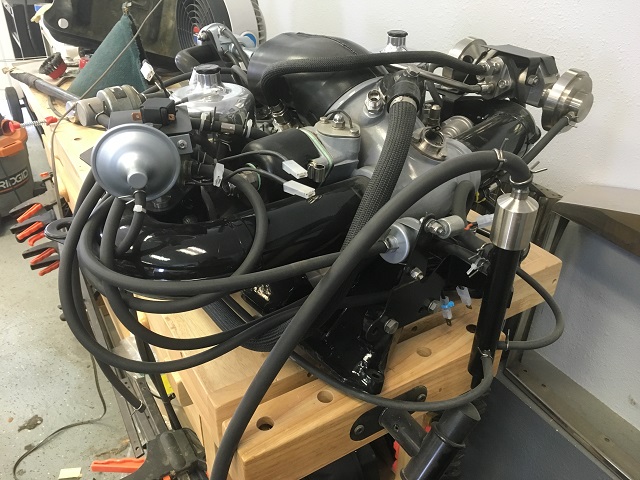  | |||
David Gore Moderator Username: david_gore Post Number: 1995 Registered: 4-2003 |
I would very much like to be at the first car show you enter your car in after it is completed - the looks on the judges' faces let alone the viewing public as they evaluate your car would be a sight to see. You are a perfectionist and it shows in the quality of your work - please do not stop letting us see the progress of your restoration as it will most likely inspire others to follow in your foot steps. | |||
Kelly Opfar Frequent User Username: kelly_opfar Post Number: 70 Registered: 7-2004 |
I took a few more pics today to share. This is the jockey pulley with a fresh plating job. The pulley is stainless with new bearings and a new stainless shaft. 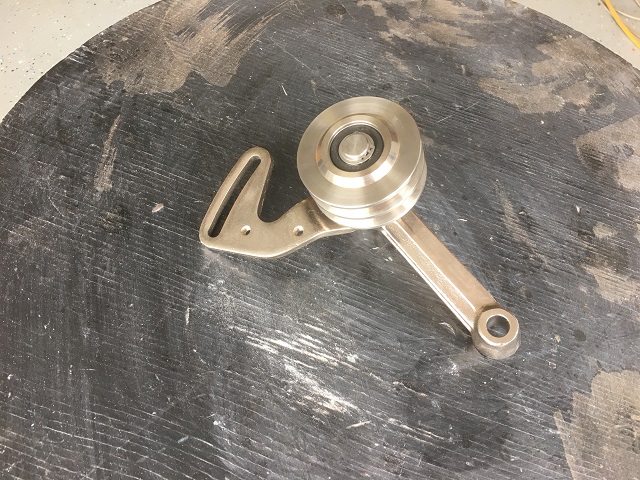 Most of the black parts have been powder-coated, but not the header tank. It was wet-sprayed so as not to melt the solder that holds the tank together. 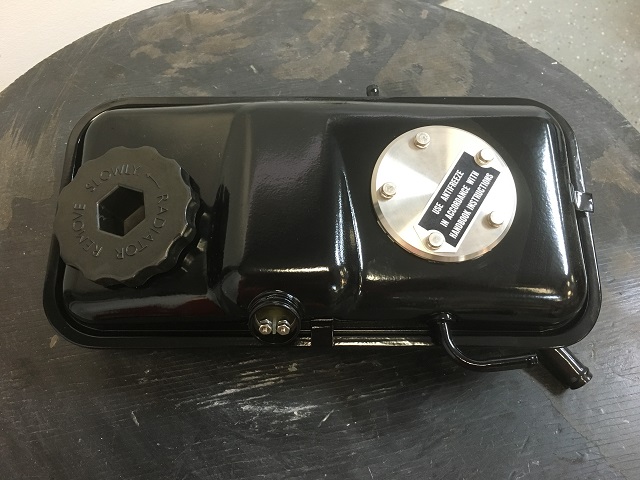 The rear lights are freshly re-chromed with all new lenses, bulbs and sockets. 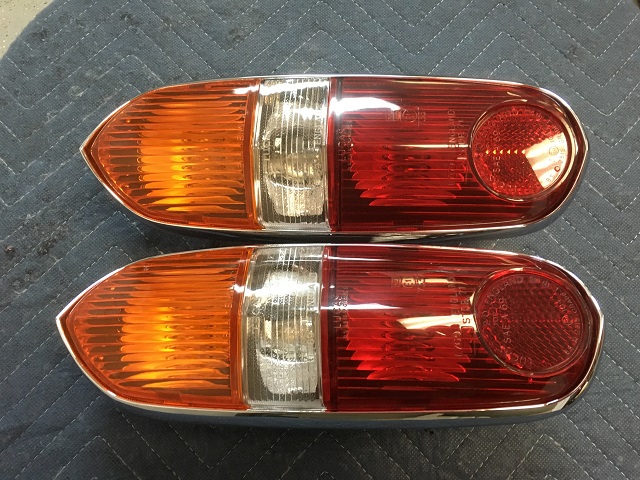 Ready for a little controversy? I installed permanent gages in the bottom of my accumulators so I would always know their charge condition. They have been sitting on a shelf for a year and a half with no change in pressure. 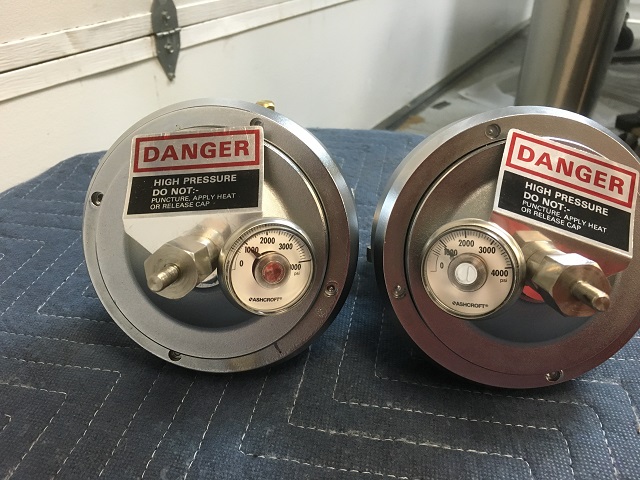 The spheres are chromed (not polished first), and the ACV's are electroless nickel plated. 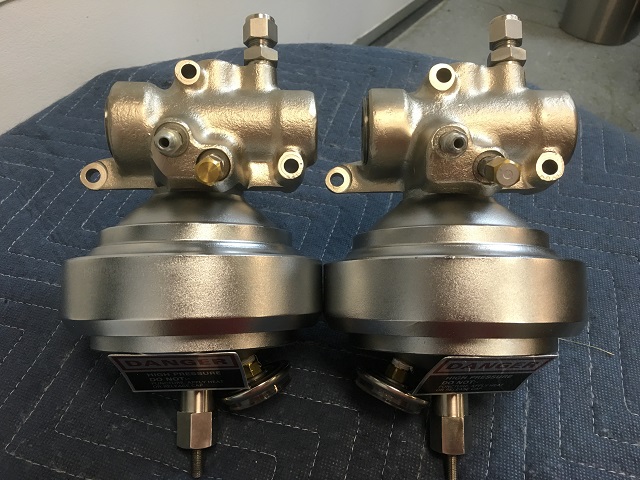 The hex plugs are stainless. All ports have Swage-Lok fittings. 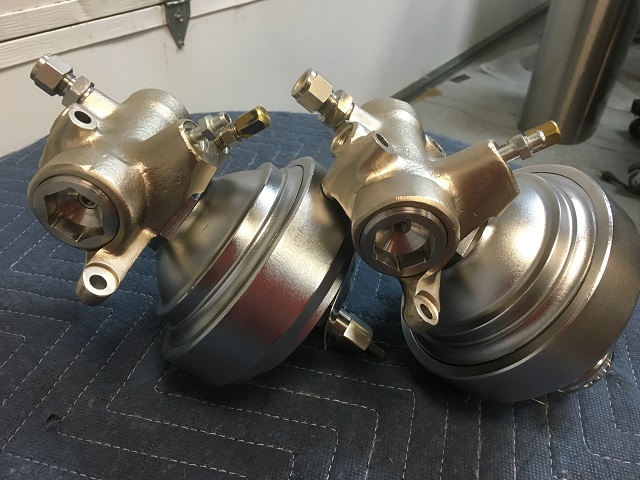 | |||
Omar M. Shams Grand Master Username: omar Post Number: 583 Registered: 4-2009 |
Just a note Kelly. Please never think that we will tire of seeing these masterpieces that you have shown us. If you post photos ever day - I dont think we will get bored with what we see. So please keep em coming. I live in hope that you will build the car and then want to take on a different challenge and then look to see if Dubai would be a good home for your old but new Shadow. Apart from the man in Dubai, there will be a army of people who will want to buy your better-than-new Shadow. | |||
Kelly Opfar Frequent User Username: kelly_opfar Post Number: 71 Registered: 7-2004 |
Thank you Omar. I have several more days worth left.  | |||
Geoff Wootton Grand Master Username: dounraey Post Number: 1200 Registered: 5-2012 |
Kelly I knew from the occasional pics you have put up in the past, to help fellow enthusiasts, that your work was going to be good, but I didn't expect this. You have blown us all away. Your work is spectacular. There is so much detail here. I think Omar sums it up when he uses the phrase "better than new". Geoff | |||
Patrick Ryan Prolific User Username: patrick_r Post Number: 107 Registered: 4-2016 |
Hi Kelly. Agree with all the other gents comments above. Thank you for sharing your magnificent work with us. I particularly like the gauges in the accumulators. Nice touch indeed. Already looking to the next instalment. | |||
Nick Adlam Experienced User Username: crewes_control Post Number: 26 Registered: 12-2015 |
This is absolutely incredible work. I can see thousands of hours here. This will simply be the world's best Shadow, if not the best RR- period. Sir Henry's ghost would be smiling proud as he sees this, and will probably insist that Crewe give you an Engineer in Chief's position!. I wouldn't fret about purity and originality- your work transcends these well above and beyond!. Please keep these pics coming. I know this is a long shot, but do you have an estimated finish time?. | |||
Geoff Wootton Grand Master Username: dounraey Post Number: 1203 Registered: 5-2012 |
Kelly I am not an engineer so am really curious as to how you made the brake pedal. My guess is you used the laser cutter to cut the outside shape from a 1/2" (ish) thick stainless blank, milled the rabbet joint ledge and then welded the brake lever to the back. Is this nonsense or am I on the right track? Geoff | |||
Kelly Opfar Frequent User Username: kelly_opfar Post Number: 72 Registered: 7-2004 |
Geoff, I made this using much lower-tech techniques than a laser. First I took the new pad and made a rubbing of the top with a pencil and paper. I cut that out and made sure that it fit and looked right. I used that to make a thicker template from card stock, and I used that template to scribe the outline on a piece of 3/8" stainless plate. At this point it is easier to keep the outside of the plate square and not worry about shaping it because it has to be held in a vise on the milling machine. Then the center is milled away 1/4" deep making sure to not cut too close to the line. At this point, the line is not straight and doesn't look very good. I wish now that I would have taken pictures. Before doing anything else, I took a woodruff key cutter: 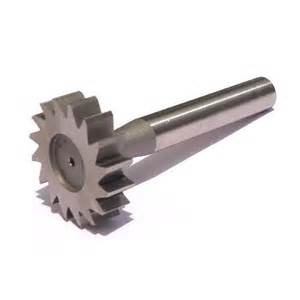 and undercut the bottom of the recess for the lip of the pad to sit in. This is also when I drilled the hole in the bottom to be able to take the pad out when adjusting the fit. At this point the mill can be used as a reverse spindle sander. Using small flapper abrasive wheels and sanding cartridges, the pedal is moved freehand around the milling table and sanded right up to the scribed line. The pad was inserted for fit, and adjustments were made until the fit was perfect. Then I took my digital calipers:  locked in place at 3/8", and scribed the outside line using the inside line as the reference. I milled the excess off the outside, cutting close to the line but not touching it, and when it was close enough, the rest was ground away on a belt sander. It was just a matter of polishing at that point. I took the original pedal and cobbled together a temporary jig that held everything in position and placed the new pieces in the jig to make sure the alignment was right. Weld, final polish, voila! | |||
Geoff Wootton Grand Master Username: dounraey Post Number: 1204 Registered: 5-2012 |
Kelly The pedal looks like it has been machined. To achieve the final curved shapes of the inner and outer lines of the pedal, with a flapper wheel/belt sander, shows considerable skill. Thanks for sharing. Geoff | |||
Kelly Opfar Frequent User Username: kelly_opfar Post Number: 73 Registered: 7-2004 |
When I bought my car, I went in blind assuming that any car from the '70's was just like any other car and I should be able to fix anything. Well, my skills are up to the task, but I still had no idea what I was getting into. I bought it on eBay sight-unseen and on one hand I got very lucky. SRE24700 has low-mileage (36,000 miles) and has no rust damage anywhere. On the other hand, it had low mileage and everything - especially the brakes - needed to be rebuilt. Everything leaked including the crankcase weep holes. I didn't buy it with the intention of restoring or rebuilding it, there just didn't seem to be a stopping point once I got into it. I've seen a few water pump housings recently that are in horrible condition. The US RROC forum had a recent thread by a member where he started to detail the rebuild of his engine. His waterpump housing is unsalvageable from corrosion. I sold another extra good one that I had to another friend whose housing had cracks and corrosion. My housing on the other hand was perfect. All it needed was cleaning and powder-coating. The water pump has a fresh bearing and seal kit in it. I store everything with the correct fasteners attached so I don't have to look for them later. 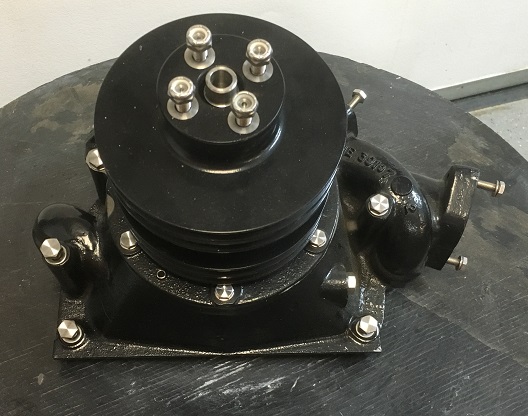 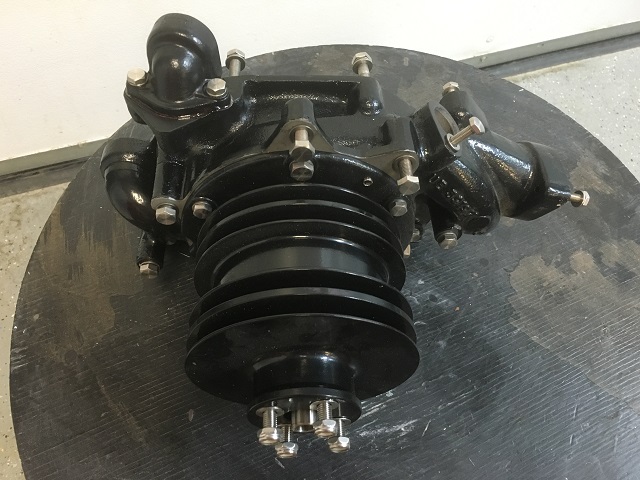 The fan viscous coupler seems to be in good shape and is being stored properly, face down. The fan is powdercoated. Rather than repeating myself everytime, let's assume that all hardware is new stainless from now on shall we? 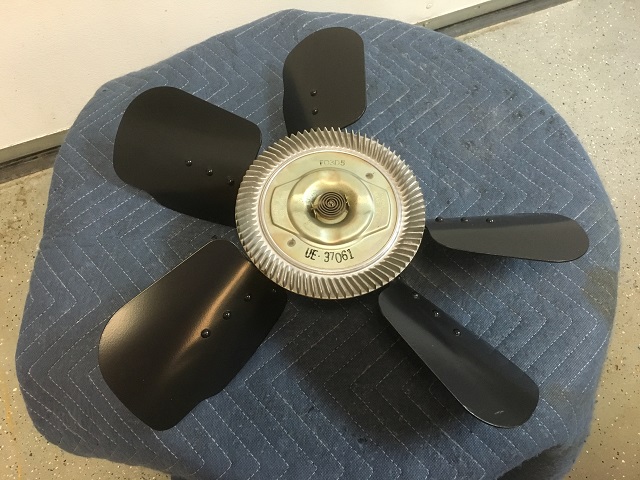 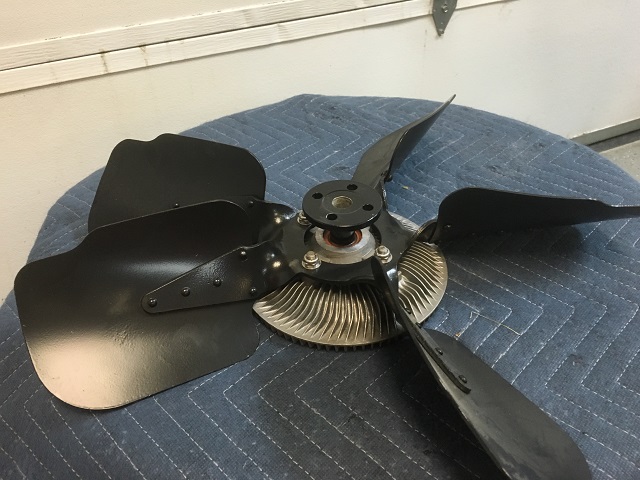 This is one of the four headlight buckets. The adjusting hardware is new and the harness is stock. The socket and the terminals inside are new. 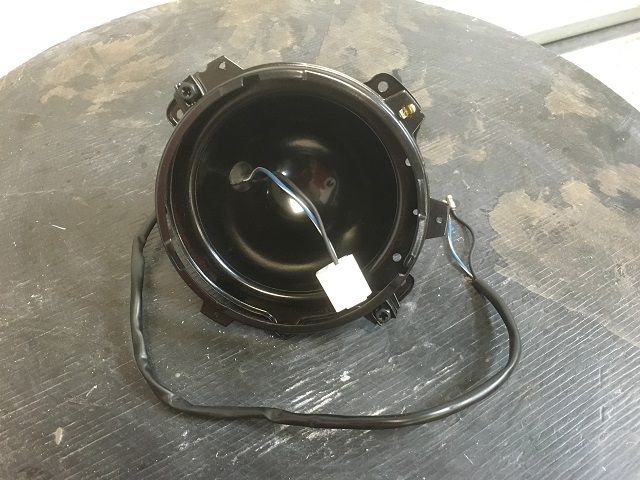 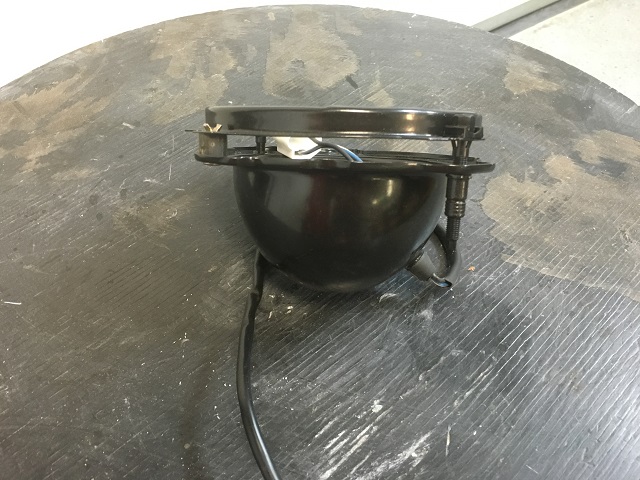 What is one to do when the aluminum brake pump housing has corrosion in the sealing area? Make one from billet stainless of course. The attaching bracket is stainless and so is the pump body itself. You can see the top and bottom of the body poke out of the housing. The internal pump mechanism is stock. The fittings are Swage-Lok's and the retaining ring is stainless. The follower bodies and the underside of the valley cover are painted with Glyptal. 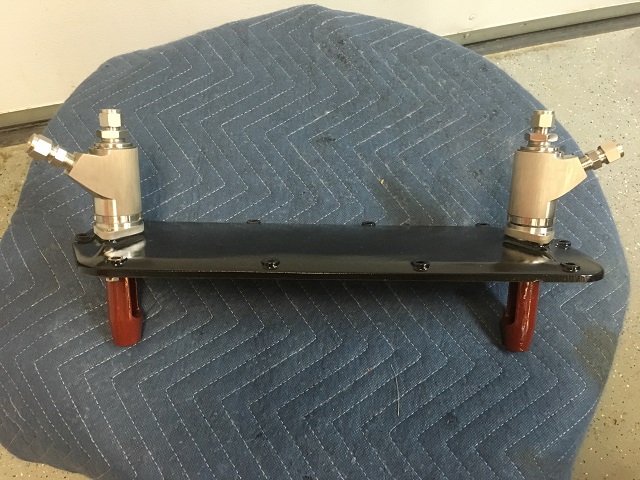 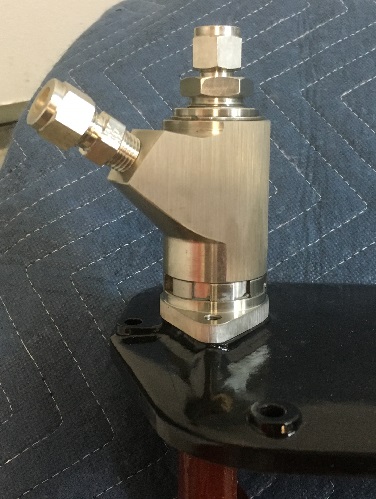 | |||
Omar M. Shams Grand Master Username: omar Post Number: 584 Registered: 4-2009 |
just when we thought we have seen the ultimate in bespoke manufacturing - Kelly blows us away with even more........ Just look at those pump housings!!! Incredible..... | |||
Benoit Leus Prolific User Username: benoitleus Post Number: 240 Registered: 6-2009 |
Kelly, your work is absolutely amazing ! It's to such an incredibily high standard. The only downside is that it makes me want to redo all the parts I have already refurbished on my own car as suddenly they don't seem good enough anymore. Benoit | |||
Kelly Opfar Frequent User Username: kelly_opfar Post Number: 74 Registered: 7-2004 |
Not even the emissions equipment is safe. The air horns have fresh plating and new check valves. 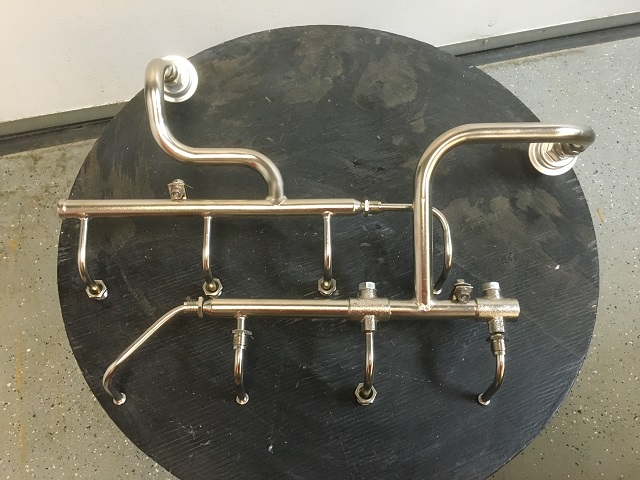 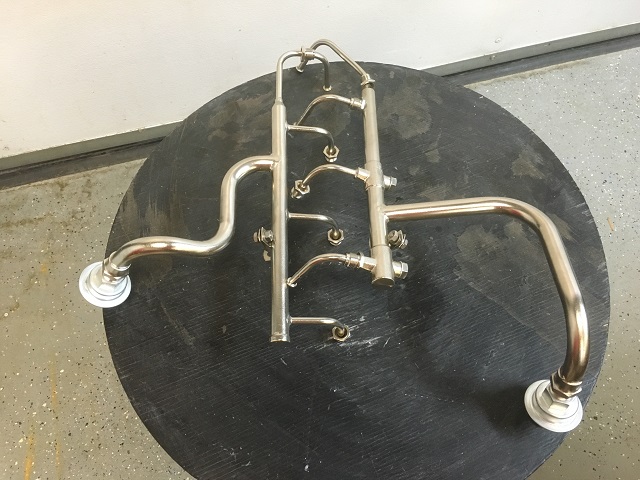 The smog pump has been rebuilt with new bearings and a stainless pulley. 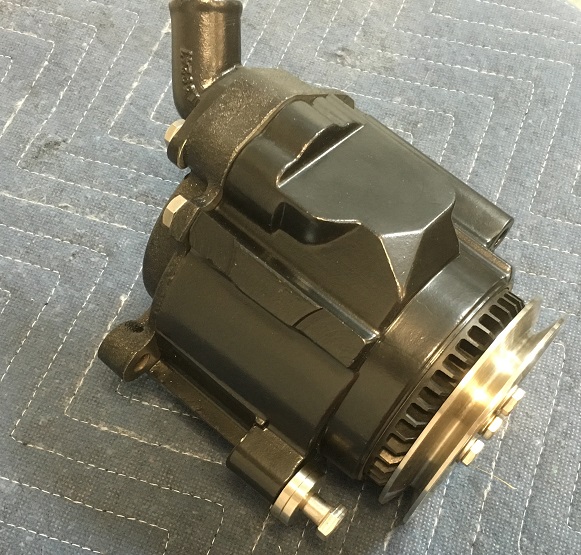 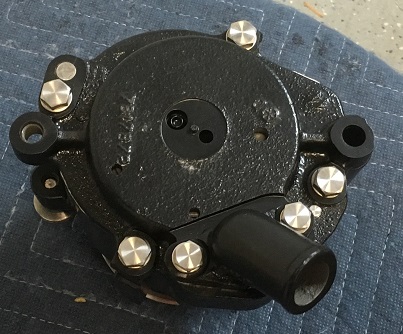 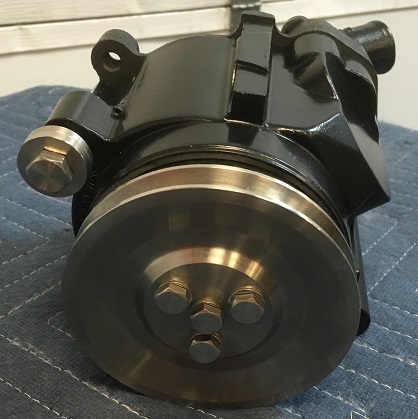 The exhaust manifolds were sandblasted and coated with a satin black ceramic coating from TechLine Coatings. The mounting flanges of the manifolds were flattened by opening up a 100 grit sanding belt and taping it to a 5ft. granite surface plate. The clamps are billet 316 stainless and the olives are unhardened 416 stainless. The downtube is part of a new stainless exhaust system. 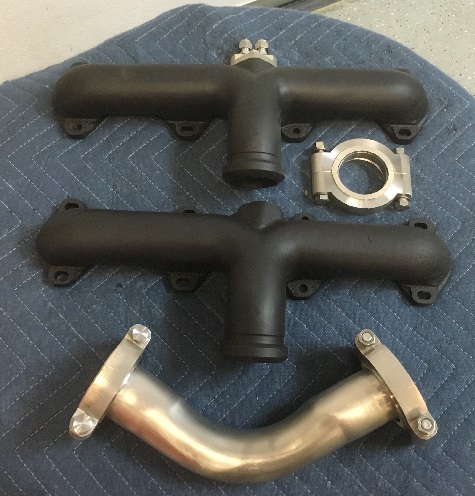 The choke tube mount and hardware is stainless and the fittings are Swageloks. 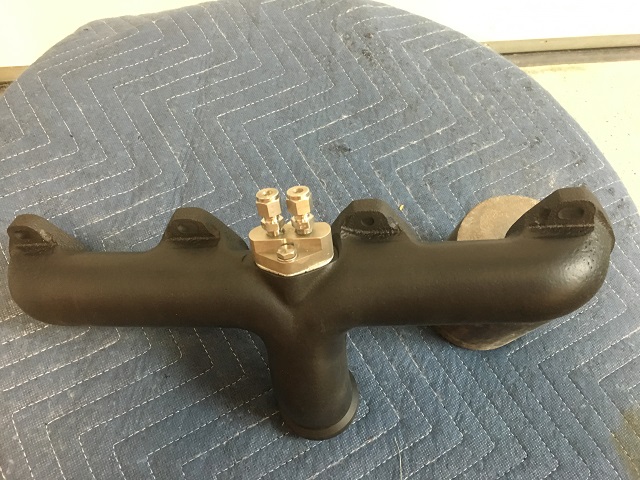 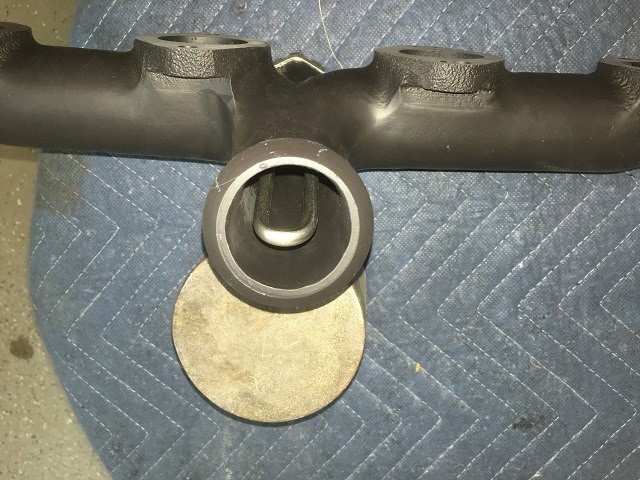 Billet Delaney cushions? That seems reasonable... 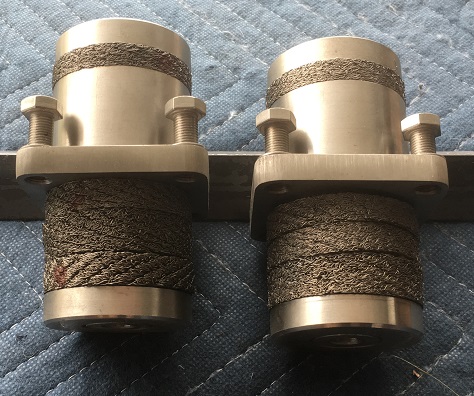  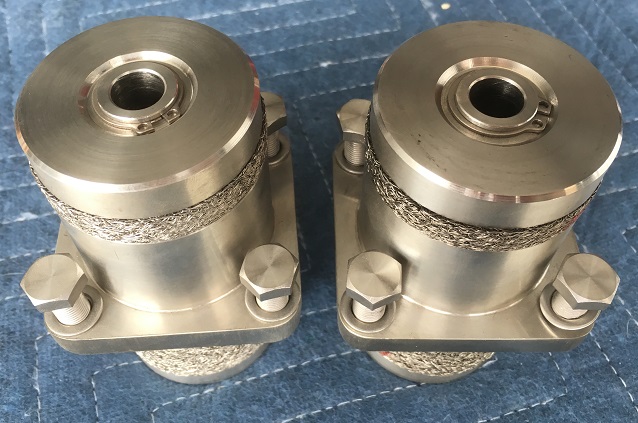 I think think that cotter pins are an unsightly abomination. For all of the park brake linkages, I made new pins that accept stainless retaining rings. I did that for all of the carburetor linkages too. The brake pistons are made from 316SS.  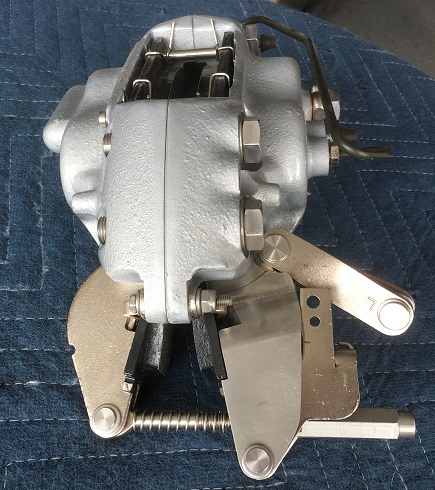 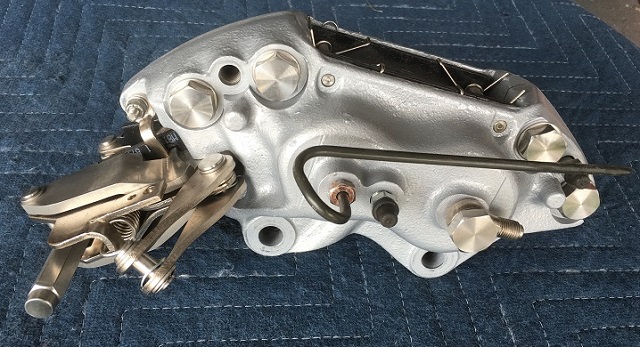 | |||
richard george yeaman Grand Master Username: richyrich Post Number: 487 Registered: 4-2012 |
Kelly I have been watching this thread all week while I was in Spain I only had a stupid smart phone with me now back home I would like to add my applause to the Quality of the workmanship and the man hours and the mountain of Money that has gone into this project. Richard. | |||
David Gore Moderator Username: david_gore Post Number: 1997 Registered: 4-2003 |
Hi Kelly, Just a small thing you should be aware of relating to your use of type 416 for the exhaust olives - this is a free-machining grade of stainless steel and the resulting Manganese Sulphide inclusions plus the low Chromium content in the alloy reduces its corrosion/oxidation resistance. I would prefer to use type 304 for the olives as this grade has better corrosion/oxidation resistance when exposed to exhaust gas and road splash on the exterior. Personally, I would not have used type 316 for the clamps especially those close to the exhaust manifolds as this grade of stainless is prone to the development of sigma phase when exposed to service temperatures in the range 500 to 800 deg Celsius. This sigma phase is prone to initiate thermal fatigue cracking over time from thermal cycling from room temperature to operating temperature and back again. Again, I would use type 304 for these items as this grade is not subject to sigma phase, the Carbon content is low and the Chromium content gives good oxidation resistance. The choke tube mounting will also be in an environment where using an inappropriate grade of stainless steel could result in thermal fatigue cracking as it is in a high temperature environment and subject to thermal cycling. You did not mention which grade you used but I would use type 304 or type 321 due to their chromium content, low carbon [type 304], chromium carbide formation resistance [type 321] and lack of susceptibility to sigma phase formation. My suggestion for your exhaust system is to use heavy gauge [16 gauge or thicker] type 304 tube - the thicker the tube, the quieter is the exhaust due to the sound attenuation properties of the thicker tube. This is why the OEM R-R exhaust was made from heavy gauge tube. Most after-market systems use light gauge tube to keep the cost down which may result in an after-market stainless steel system being noisier than you wish. Happy to help wherever I can with material selection information, please to do hesitate to contact me if needed. | |||
Robert Noel Reddington Grand Master Username: bob_uk Post Number: 998 Registered: 5-2015 |
stop posting porn. WOW | |||
Randy Roberson Grand Master Username: wascator Post Number: 674 Registered: 5-2009 |
Engineer porn. My cars are sulking in the garage and won't come out... | |||
Kelly Opfar Frequent User Username: kelly_opfar Post Number: 75 Registered: 7-2004 |
David, I've heard of some of those words before. Are they Elvish or ancient Druid? I'm certain that you are correct in all of these statements. This is one of those things that is going to stick in the back of my mind until I make new parts to replace them using the materials you suggest. I'm always game to tackle a new project, but redoing a project makes me want to suck on a tailpipe. I have a great many irons in the fire right now but I'm going to add new exhaust clamps to the list. I don't want my Mongolian Sulfur's or Sigmite phrases falling off unexpectedly.  Thank you for your offer of assistance in material selection and you can look forward to hearing from me in the near future. | |||
Omar M. Shams Grand Master Username: omar Post Number: 587 Registered: 4-2009 |
Dear David and Kelly, is there a caveat regarding 304 grade compared to 316 from a physical appearance perspective over time? I say this because there is a trade off between chrome content and cracking induced by temperature. The 304 will be a much better selection from a materials properties perspective but you will have to accept the fact that it will not shine as brilliantly as 316. In my eyes this is an acceptable trade off for the exhaust clamps. The end result over time will be that you will see your stainless looking a little rusty. David, please correct me where I may be off the mark here. Also correct me if it is true that regular polishing will prevent this "rusting"from occuring on 304 stainless components. Thanks Omar | |||
David Gore Moderator Username: david_gore Post Number: 1999 Registered: 4-2003 |
Omar, The only difference between T304 and T316 stainless is the addition of approximately 2.5% Molybdenum to 316 to increase its resistance to pitting corrosion from salt water and other chloride-containing liquids. The downside is the Molybdenum content has an unwanted side effect when the material is heated and kept in the range 500/800 deg celsius when a phase change occurs in the metal forming an Iron/Chromium/Molybdenum intermetallic compound which is very brittle and fractures when stressed by the thermal expansion/contraction of the parent metal when heated and/or cooled. This is also a problem in welds for the same reason. The lustre of polished T304 and T316 will be different due to the Molybdenum content of the 316 - I have not looked at polished 304/316 for many years and have forgotten what type of lustre each grade has. However, discolouration due to water stain and iron contamination is another thing entirely and with different long-term effects on the parent metal due to a corrosion process known as "differential aeration" where a small electrochemical cell can form under surface deposits and depending on the chemical content of the moisture and the permeability of the surface deposit, this can result in visible pitting of the metal surface in relatively short periods of time if oxygen from the atmosphere cannot reach the underside of the surface deposit to form the Chromium Oxide layer that protects the steel surface from corrosion [I always tried to use the term "corrosion-resisting steel" rather than "stainless steel" because the iron/chromium/nickel alloys are not stainless and will corrode quickly if the environmental conditions are right and surface contamination is present]. The common cause of physical rusting of a stainless alloy is iron contamination on the surface due to physical contact with iron/steel particles especially from grinding wheels/abrasive belts in industry and ordinary steel wool in the home environment. Evaporation of contaminated water will leave surface deposits that can subsequently absorb chemicals and moisture from its environment to form an aggressive corrosive environment if not promptly cleaned off. Omar, there are a variety of cleaning methods which are used to maintain a high quality finish and their selection involves determining what is causing the discolouration/corrosion problem and then using one of the appropropriate techniques. Suffice to say, it is not possible to suggest a solution for every problem without investigating the circumstance and conditions applying in each case. However, one of my most common cleaning compounds was a paste made from powdered whiting [finely powdered white chalk or Calcium Carbonate], liquid washing detergent and pure water]; rub it on, allow to dry and dust off then rinse with clean water with a very small amount of dish washing detergent added to act as a wetting agent. This will not scratch a mirror finish surface but will not rectify visible pitting corrosion. Removing surface iron contamination normally requires the use of acid solutions and should only be attempted by experienced operators using protective clothing, face shields and eye protection - for this reason I will not go into more detail here. Rectifying pitted surfaces often requires specialised grinding and polishing equipment as well as experience as it is easy to induce surface buckling from localised surface heating [often described as "oil canning" from the old-fashioned oil cans where you pushed the base in to force oil out of the spout] by too heavy an application of pressure on the tool to speed up the rectification process. You have to "creep up" using finesse rather than brute force to achieve a suitable reclaimed finish. The best way to maintain a polished stainless steel surface is to keep it away from chloride-containing chemicals, keep it clean and wash it regularly as this ensures the protective Chromium Oxide layer remains intact at all times. As always, this is a "broad brush" summation and not a specific guide to maintaining stainless steel items and their finish. If in doubt or you are not certain what is the cause of the problem and what is the appropriate rectification techniques; do not hesitate to seek advice before proceeding. | |||
Paul Yorke Grand Master Username: paul_yorke Post Number: 1514 Registered: 6-2006 |
Just awesome. Oh to have the time, patience, tools, and the skill. | |||
Kelly Opfar Frequent User Username: kelly_opfar Post Number: 77 Registered: 7-2004 |
and David's education... | |||
Kelly Opfar Frequent User Username: kelly_opfar Post Number: 81 Registered: 7-2004 |
The bonnet hinges were disassembled and the pieces were powdercoated individually. The stainless pins are secured with retaining rings. The NOS bonnet switch was an eBay find. 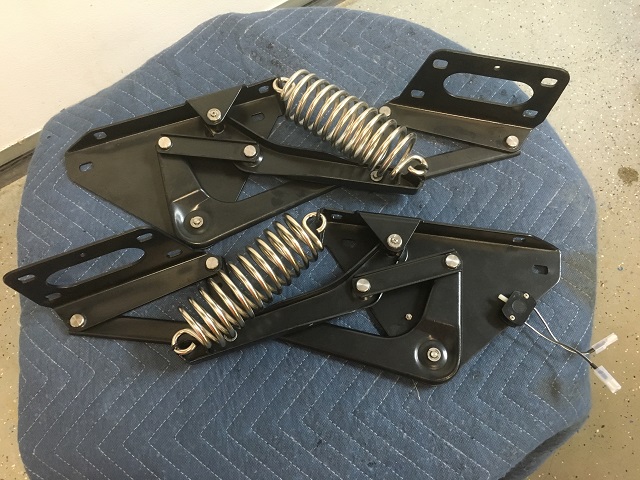 The heater motors are wet spayed because I couldn't get the bushings out of the end of the housings and I didn't want to bake them in the oven. 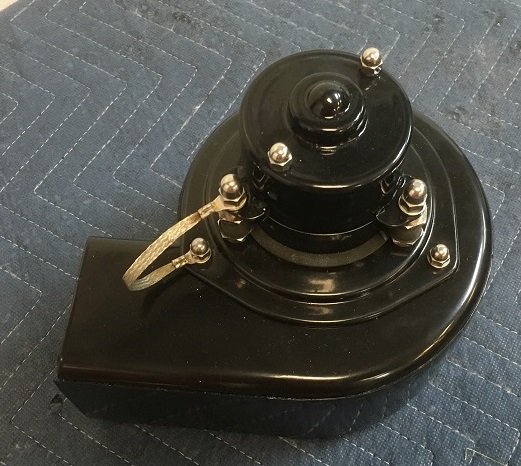 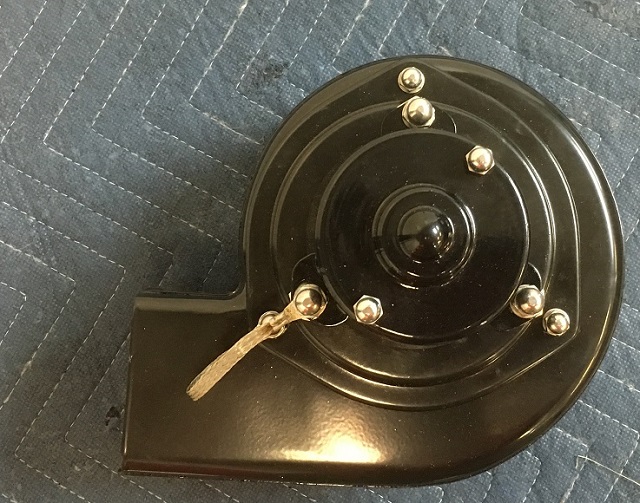 The power steering pump was rebuilt with a new kit and the pulley and brackets are made with stainless. 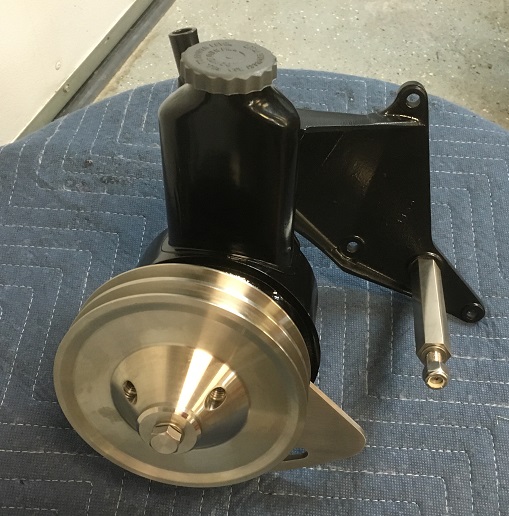 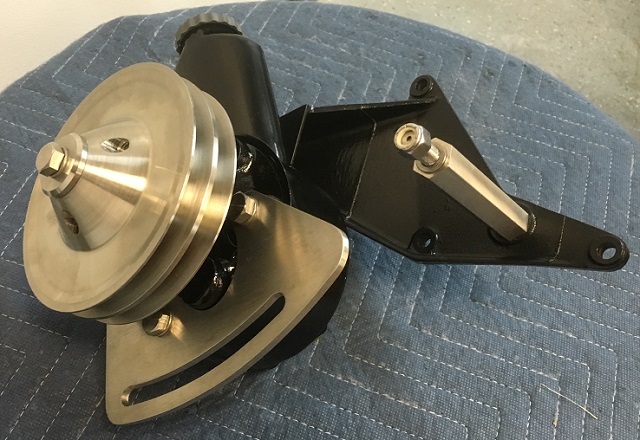 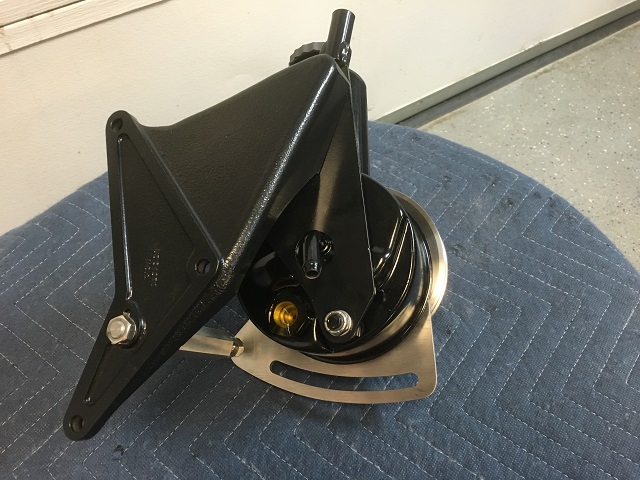 I didn't want to pay new RR prices for a high-pressure PS hose so I made my own. The ends are Swageloks. I couldn't find new hose ferrules in stainless so I made my own. Because that's not crazy. 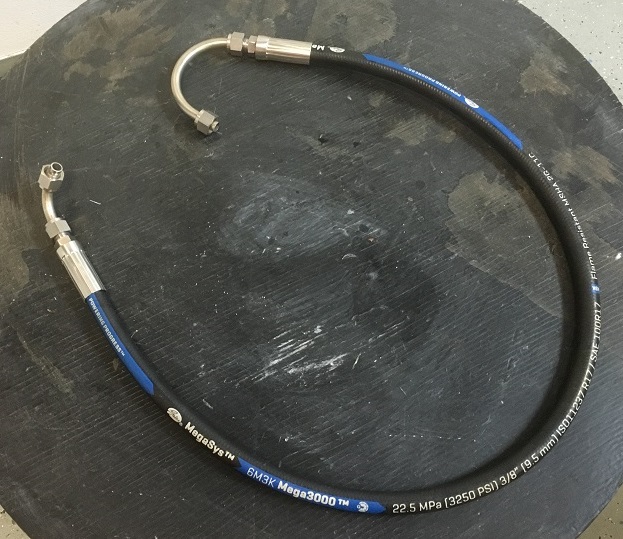 The valve covers are powder-coated black and the tops of the logos were sanded with a sanding block to expose the aluminum. The hardware is all duplicated in stainless. I'm not thrilled with the level of gloss on these. The next time I set up a wet-spray gun, I'm going to clear coat these. 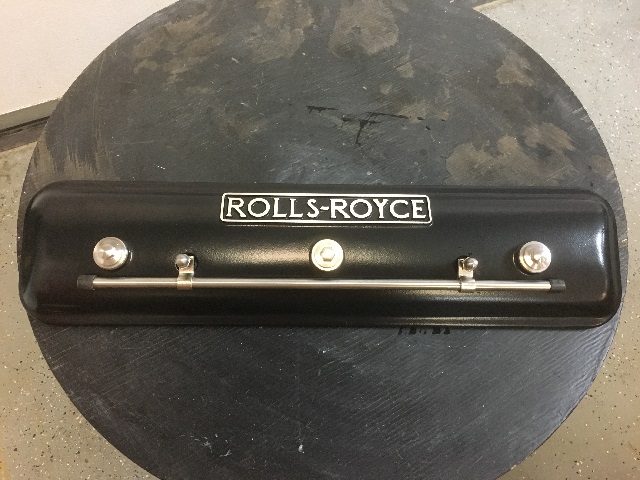 I'm pretty sure these go together somehow. 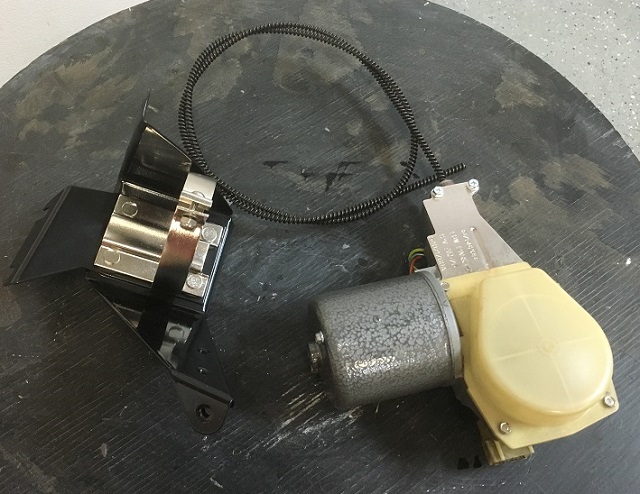 I had the motor rebuilt and painted by a British electrical specialist. The rack is new. 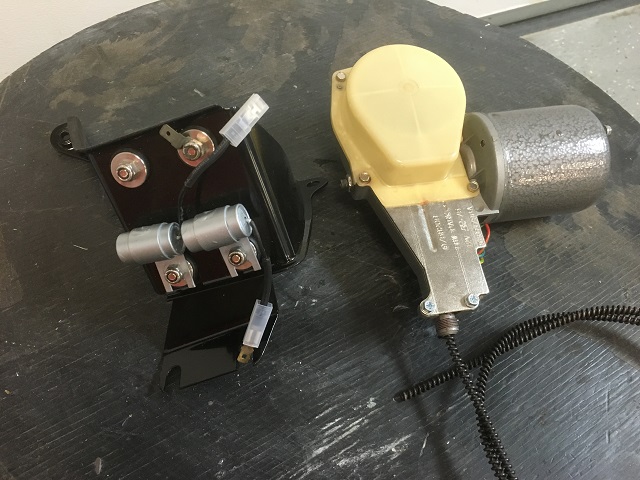 | |||
David Gore Moderator Username: david_gore Post Number: 2000 Registered: 4-2003 |
"and David's education..." Education was only the beginning, subsequent experience visiting manufacturers and end-use applications to investigate and fix "real world" problems plus the ability to lateral think to cover possible reasons for and appropriate rectification of problems is the real reason for my knowledge. I was fortunate to be involved in a lot of unusual and interesting things during my working life such as confirming debris from the Skylab re-entry into the atmosphere over West Australia was genuine [proved to be the remains of a stainless steel water tank that did not burn during re-entry], the flagpole and lightning protection system on Parliament House in Canberra and the unique "Ad Astra" sculpture outside the Smithsonian Air and Space Museum in Washington D.C. [manufactured and coloured in Australia as we were the only country with the engineering capability to make the sculpture and uniformly colour the stainless steel as specified by the sculptor]. Another interesting problem was the unexpected and extensive corrosion of stainless steel ducting within 18 months of completion of a landmark Australian building; somehow someone forgot to include the type of stainless steel in the material specifications so the tenderer quoted a price based on using type 430 stainless steel which was the cheapest available but entirely unsuitable. I turned up with a Molybdenum spot test device we used in the field to confirm the use of type 316/317 stainless and my trusty permanent magnet used to reveal whether austenitic or ferritic stainless was present. First test was with the magnet and I can still hear today the "kerfunk" noise of the magnet sticking to the metal and the look on the engineer's face as I had previously explained to him why these tests would be used [ferritic steel like T430 is ferromagnetic whilst austenitic steel [300 series S/S] is less so unless it is heavily cold worked like T301 as used in S/S railway carriages however there is an obvious palpable difference. The outcome was the entire ducting system had to be demolished and replaced at huge expense to the building owner all because 4 words [type 317 stainless steel] were missing from the specifications. Because of the sensitivity involved, we were all sworn to secrecy at the time and I have not seen any reference since to this matter. | |||
Patrick Ryan Prolific User Username: patrick_r Post Number: 121 Registered: 4-2016 |
Awesome guys. I'm learning a lot here just reading the "to's" & "fro's" Great stuff. Oh of course. All the while drooling over my screen at the procession of Kelly's magnificent reworking of parts. | |||
Kelly Opfar Frequent User Username: kelly_opfar Post Number: 82 Registered: 7-2004 |
If anybody out there has purist sensibilities that I haven't offended yet, this will probably be the post that does it... Confession - I don't like the stance of the Shadow. I think it sits too high, like a Porsche Cayenne. Now, I don't want it to sit like a 911, but I do want it dropped a little bit. One inch in the back and two inches in the front. Nothing that can't be undone, mind you. A slight drop coupled with 17" wheels ought to just do the trick. Here's a lesson on how to make your wife giddy with glee. First move all of the furniture out of the dining room and drag in all of your car parts and tools: 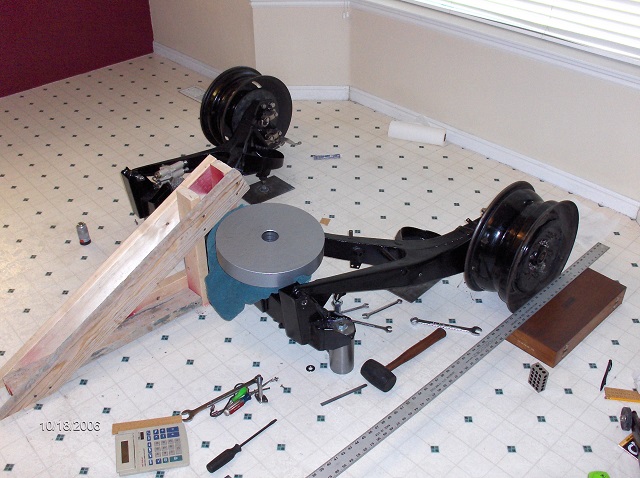 Second, let it sit there for a week. 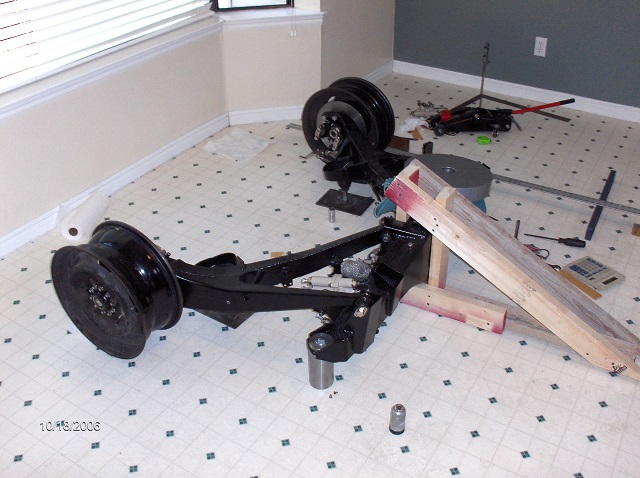 When you finally remove it (and promise to install new hardwood floors), she'll be so happy! 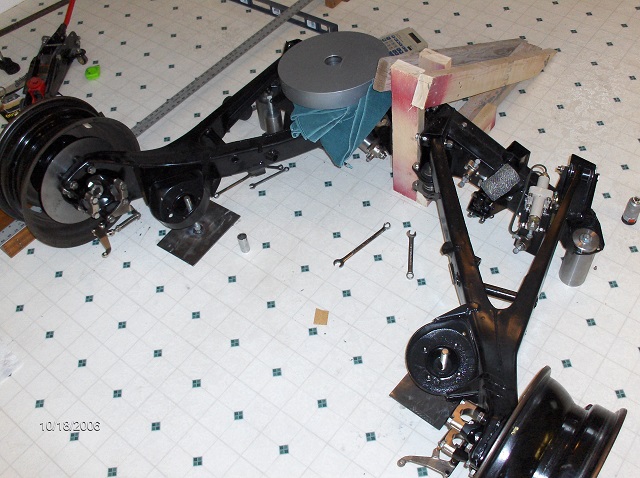 I used the instructions in the factory manual to align the swingarms correctly. The grid on the linoleum made for easy measuring. Since these pics were taken (in 2008), I've bought a complete Lobro rear assembly to better account for the non-horizontal positioning of the drive shafts. To drop the front, I taken a two-prong approach. First, I made a half inch spacer to raise the spring tower plate: 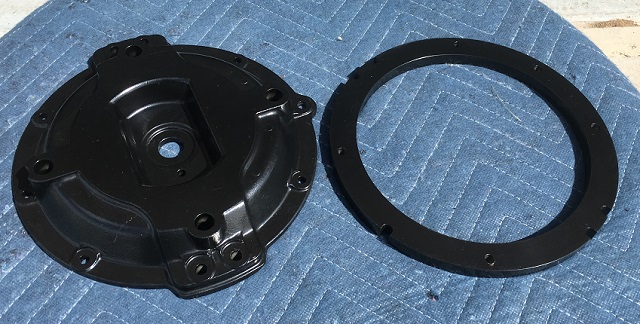 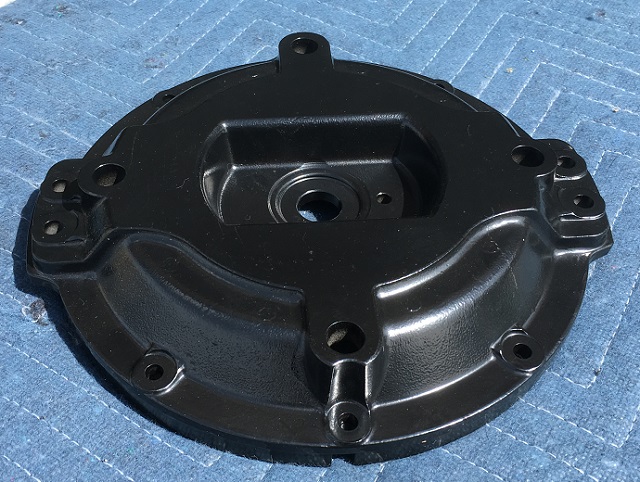 Then I made this adjustable spring perch that was visible in the first pics in this thread: 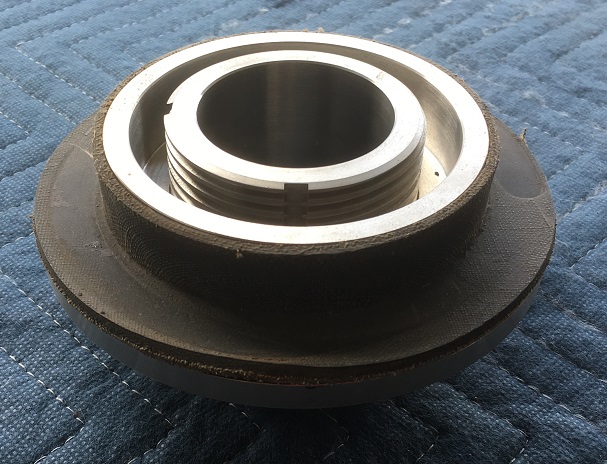 The perch itself rotates on a cylinder with Acme threads. There 6 threads per inch which gives a pitch of .166. There are 24 locking positions per full rotation, giving an adjustment range of .007 increments. The perch sits on a Torrington bearing for smooth rotation. 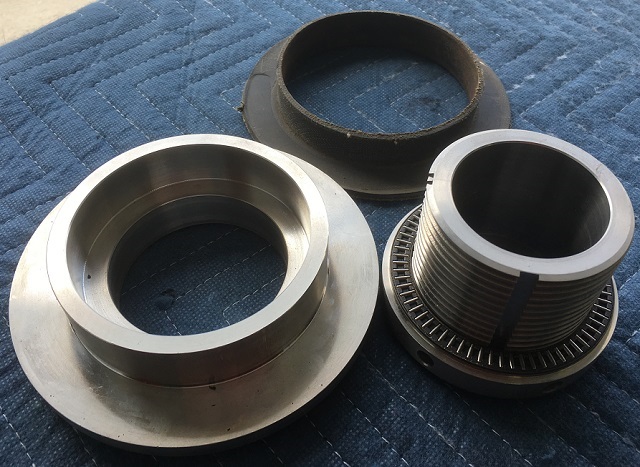 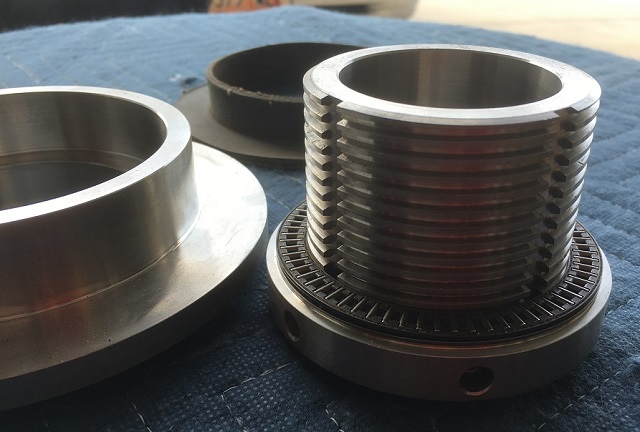 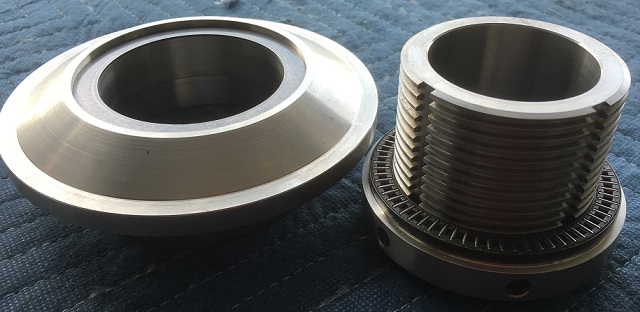 Here is the oil filler cap assembly. I drilled out the rivets holding the label on and reinstalled it with 2-56 stainless button head cap screws. 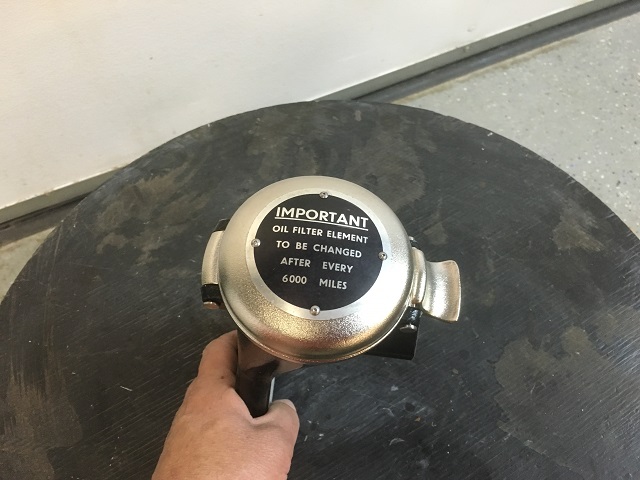 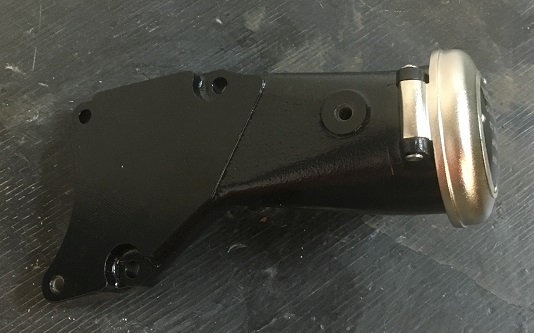 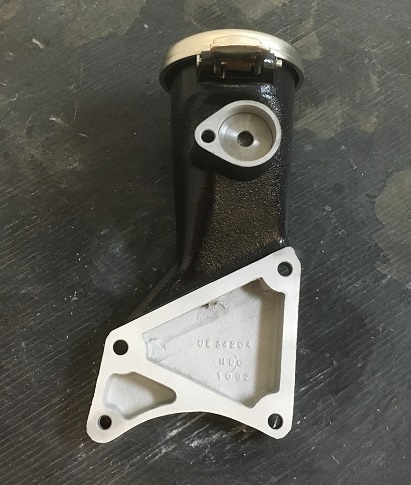 The shifter motor was completely disassembled, powder-coated and put back together with new gaskets, and a NOS motor with a new rubber boot. 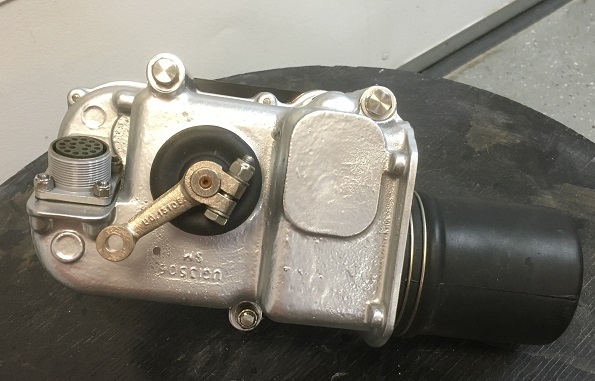 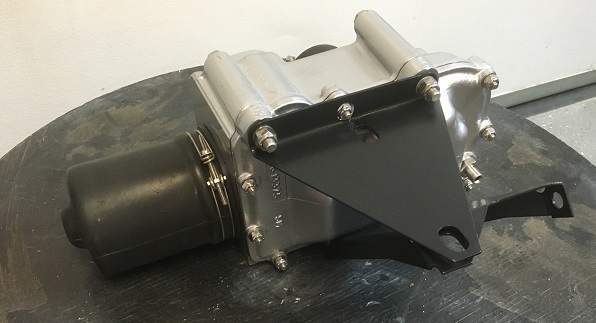 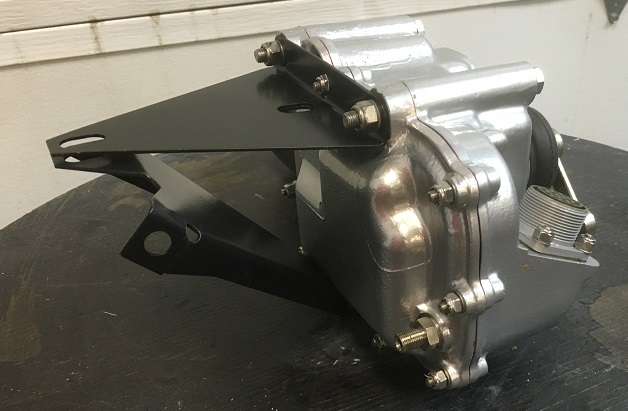 The distributor was disassembled and the housing was glass bead blasted for a satiny smooth sheen. There is no coating on it. It has a new genuine Lucas cap and rotor on it. The pins for the clips have little stainless retaining rings on them. 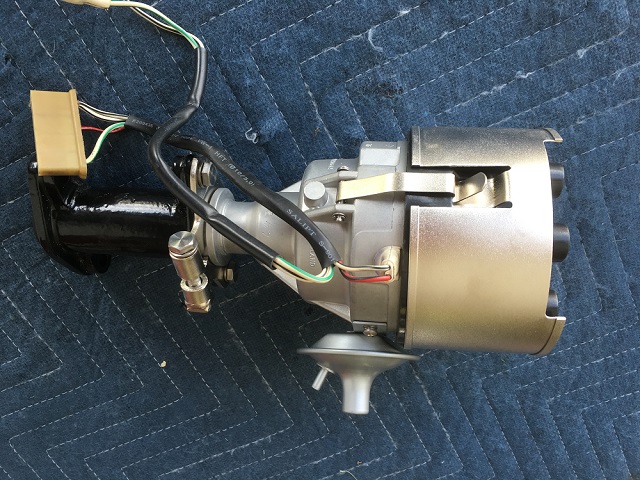 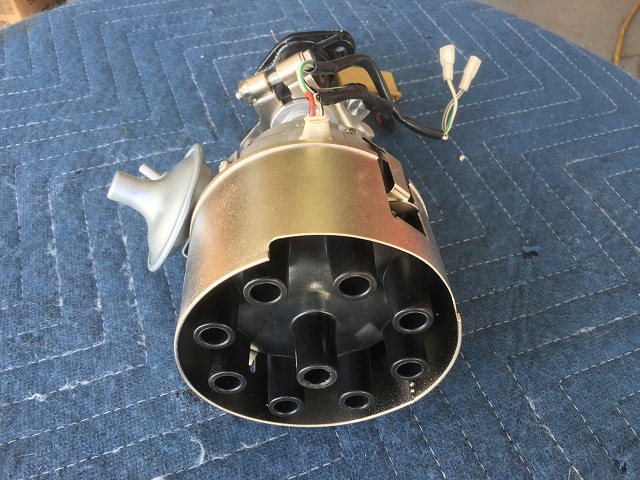 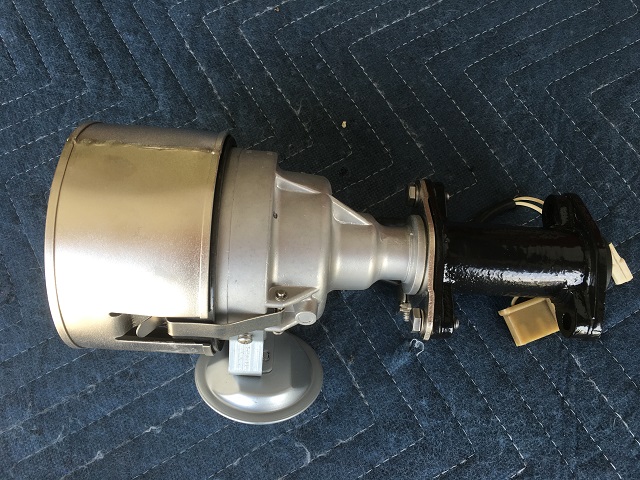 | |||
Omar M. Shams Grand Master Username: omar Post Number: 593 Registered: 4-2009 |
Dear David, Many thanks for your fantastic response. Dear Kelly, anyone who rebuilds cars inside their house is a friend of mine. In the 80s I met a chick who thought my living room was really cool because it had a Suzuki GS1000S in pieces being rebuilt to show standards. Every week she saw the bike take shape and raved on about the whole thing. When the bike was done I took her to France on it and we had a great time. Fast forward 25 years and the same woman gave me an ultimatum when I brought one of my Goldwings into the front hall as a showpiece. This bike was better than any furniture we have at home - but hey - I lost that battle. The poor bike is back in the garage again keeping the E Type company. How fickle can women get?? | |||
Patrick Ryan Prolific User Username: patrick_r Post Number: 122 Registered: 4-2016 |
Hi Omar. Women just don't understand us do they. Even after 10 years of completing my vintage lawn mower display, she still sighs when she see's them all lined up in the front living room of the house. Women point and stare my mates and other male visitors just love them. All are fully restored to better than new, and all run beautifully. I actually do take them outside to run them, 2 stroke fumes do take a while to disappear from inside the house LOL Yes I did start one inside once. If only they see things the way we do??? A gold wing does sound better than any furniture piece in my mind as well. | |||
Patrick Ryan Prolific User Username: patrick_r Post Number: 123 Registered: 4-2016 |
Kelley Even after so many images of wonderful parts, you still knock my socks off with each new set posted. Keep em coming. 2 questions. I notice your Torrington race is not sealed. Won't this get quickly contaminated from road grime dust and dirt once lubricated? Unless I'm mistaken in its position, but is the Torrington race taking the whole sprung weight on that corner where fitted? But I'm guessing it does, as its this adjuster that determines ride height. I just worry it won't be strong enough. All applications I see of this type of race are not load bearing as this one will be subject to. | |||
David Gore Moderator Username: david_gore Post Number: 2001 Registered: 4-2003 |
Kelly, You have not offended my sensibilities one bit; in fact, you have greatly increased my admiration and respect for the quality and extent of your restoration. I am particularly impressed with the modifications you have made to the suspension as I have also believed the Shadow would benefit from both more roll resistance when hard cornering and mild lowering to give less passenger "chucking around" when driving the car enthusiastically. As far as the floor goes, suffice to say, everything has a price as Omar found......... Given your skill with stainless steel, you may be interested in the stainless steel cars made by Allegenhy Ludlum in the USA:
| |||
Kelly Opfar Frequent User Username: kelly_opfar Post Number: 83 Registered: 7-2004 |
Omar, I perhaps overstated my wife's perturbance at my eccentricities. She is amazingly tolerant and... Ok, good she just left. That crazy unreasonable, impatient!! ... *ahem* Where was I - Oh, yes.. Patrick, that is the most awesome thing I've ever heard. I wonder what antique hardware collection I can get away with... Also, I'm sure you're are correct about water and grime egress into the bearing cavity. The bearing recess is exactly the depth of the bearing plus its two hardened bearing washers. When assembled, it doesn't exactly have a seal but no daylight can get in either. I can think of a dozen ways to seal it better and I still might, but it's purpose is only initial adjustment. It should never have to move after that. Each bearing assembly has a dynamic thrust capacity of 5,800 lbs. I think that should bear the weight. If not, maybe I'll remove it and replace it with a spacer. David, I've seen those cars before and I have often wondered how much more of a premium some buyers would be willing to spend for a stainless body. How much more of a premium would classics like Camaros and Mustangs command today if stainless bodies had been an option? Clearly, I'm not an economics major. Somebody recently bought that stainless '36 Deluxe Sedan and polished it. 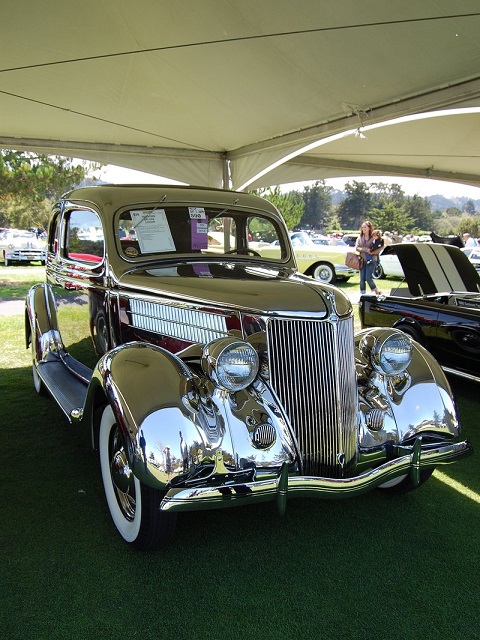 | |||
Paul Yorke Grand Master Username: paul_yorke Post Number: 1517 Registered: 6-2006 |
Dust or dirt . . . Sacrilege; ) | |||
Omar M. Shams Grand Master Username: omar Post Number: 594 Registered: 4-2009 |
I have a stainless steel car in my garage...... I will post pictures in due course | |||
Patrick Ryan Prolific User Username: patrick_r Post Number: 124 Registered: 4-2016 |
It's not a Delorian is it Omar? | |||
Patrick Ryan Prolific User Username: patrick_r Post Number: 125 Registered: 4-2016 |
HI Kelly. It's fun starting the old mowers. Usually when I start one, I have to do all of them. I have a carpet I use to take them outside as all the wheels are NOS. They really didn't worry about mufflers on mowers in the 50's. Some bark like you wouldn't believe lol | |||
Vladimir Ivanovich Kirillov Grand Master Username: soviet Post Number: 461 Registered: 2-2013 |
Kelly I am far too drunk at the moment to comment on what you have shared with us in what can only be described as pure XXXX restoration porn. I saw it this morning and now that the sun is going down and I have paid the last payment on my mortgage to the thieving bank I realise that I have sunk far too many beers in celebration of my financial freedom to comment accurately on your display of total blatantness. This is no reason to think you are safe. I will be back. | |||
David Gore Moderator Username: david_gore Post Number: 2002 Registered: 4-2003 |
"I have a stainless steel car in my garage...... I will post pictures in due course." Omar, I am waiting on your reveal with great anticipation although I suspect Patrick is "on the money". The other possibility might be a child's toy car although I cannot think of any that have been made and sold commercially. Kelly, thanks for the photo - I would really enjoy given the privilege of polishing this car especially if the end result was that shown in the photo. Wonderful to see the car is still around to demonstrate the craftsmanship and skill of the motor body builders in the 1930's. Stainless is not the easiest of metals to form given it's tendency to "spring back" when being shaped due to its work-hardening characteristics which necessitate "trial and error" over-bending/stretching to give the desired finished shape. I would love to see this car and hopefully this may eventuate in the next few years. | |||
Jean-christophe Jost Experienced User Username: jc_jost Post Number: 13 Registered: 3-2016 |
this thread is pure delight | |||
Omar M. Shams Grand Master Username: omar Post Number: 595 Registered: 4-2009 |
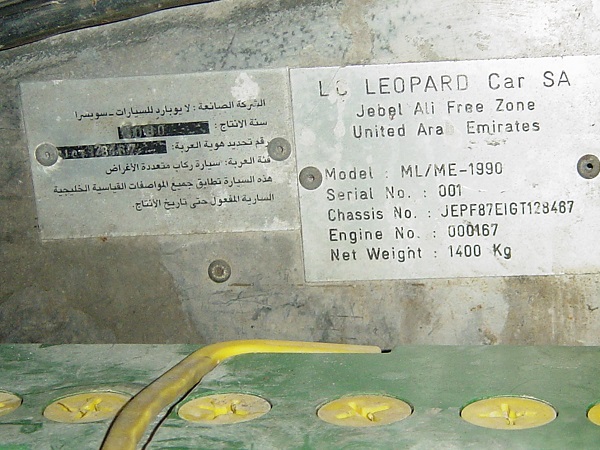
My stainless steel car is not a Delorean nor is it a toy car. It is car number 01 of 11 only produced in Jebel Ali in the United Arab Emirates. Look at this link - and the car is the 1st third and fourth images on the link. It is a Moon Leopard. Great name...... but a production car without all the faults of a hand made car would have been better value for money.: https://www.google.ae/search?q=moon+leopard+car&espv=2&biw=1366&bih=659&source=lnms&tbm=isch&sa=X&ved=0ahUKEwjOpeuz-7DMAhUkKsAKHeFwBMgQ_AUIBigB This link is also connected with the car http://www.thenational.ae/lifestyle/motoring/the-moon-leopard-the-first-car-built-in-the-uae | |||
Omar M. Shams Grand Master Username: omar Post Number: 596 Registered: 4-2009 |
...... and just for our very own Vladimir..... here it is in Russian...https://www.drive2.ru/c/1093597/ | |||
David Gore Moderator Username: david_gore Post Number: 2003 Registered: 4-2003 |
Omar, You have done the car fraternity a favour by ensuring a rare and unique vehicle with an unusual pedigree has been preserved in the country where it was made and which is not regarded as having been a vehicle manufacturer. Well done by your father and yourself. The Philippines Jeepney connection is most interesting as the South-East Asian region has been the birthplace of specialised low-cost vehicles to meet the unique needs of the locals as well as developing manufacturing skills to overcome the limitations of local industry. Today, the same countries [e.g. Thailand] are becoming mainstream assembly centres for the major world car companies. You have achieved a rare distinction in preserving examples of what may well be one of the smallest number of cars ever made for one brand. | |||
Omar M. Shams Grand Master Username: omar Post Number: 597 Registered: 4-2009 |
Many thanks for your kind words David. You know what we are all like - we have all popped out of the same jelly mould on this forum. I bet if anyone else from the forum lived in Dubai instead of me - they would now be custodians of the Moonie. 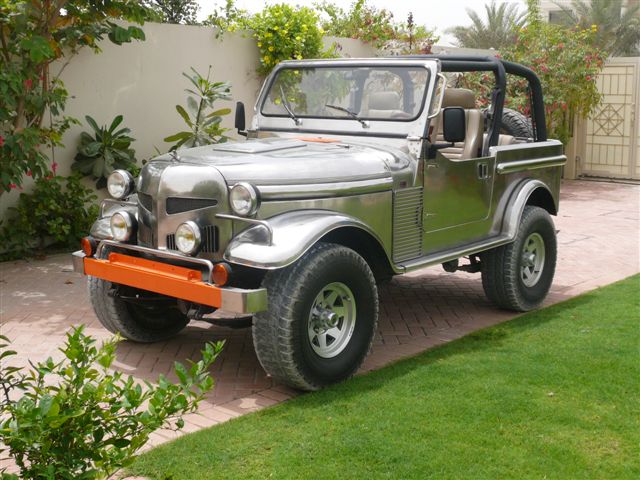 | |||
Omar M. Shams Grand Master Username: omar Post Number: 598 Registered: 4-2009 |
  | |||
Patrick Ryan Prolific User Username: patrick_r Post Number: 127 Registered: 4-2016 |
Wow Omar, Never seen nor heard of this great car. Its stunning. The finish is amazing mate. You are right, we are all one of a kind here. I think we love anything with an engine we can tinker with. A fantastic look into your collection mate, thanks for sharing with us. | |||
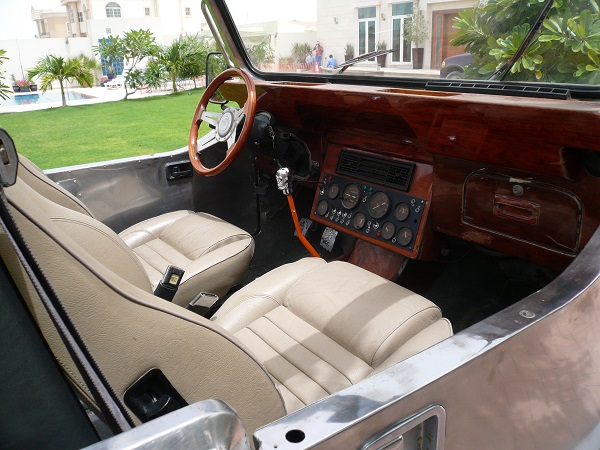
Kelly Opfar Frequent User Username: kelly_opfar Post Number: 84 Registered: 7-2004 |
Omar, what a great car! Love the wood dash. This is going to be the last of the daily updates. I have piles of new and NOS parts in boxes, on shelves and hangers but nobody wants to see those. Ditto for singular painted and plated parts. These are the last of the semi-interesting ones...for now. Of course I made all new ball joint housings: 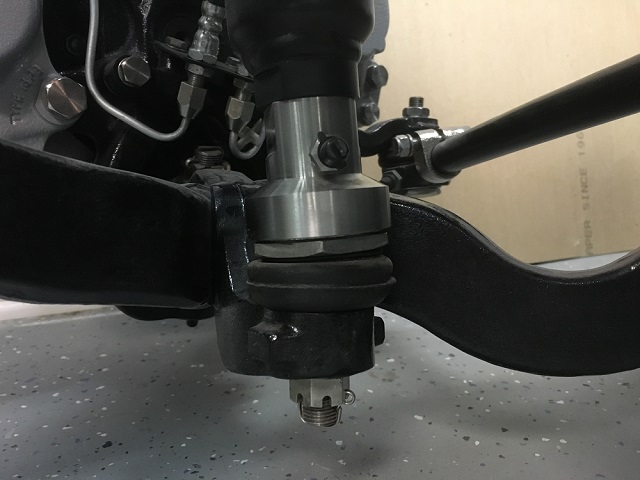 The entire joint - housing, nut and ballpin were made from 17-4. 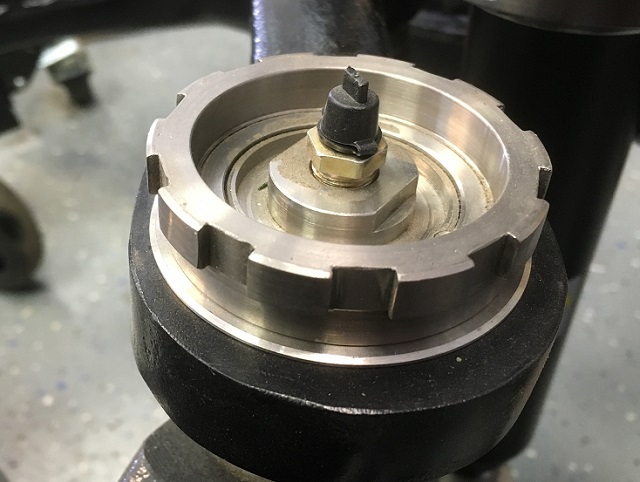 Charcoal canister complete with fresh new charcoal, stainless spring clamps, viton hoses and plated hose attachment point thingy: 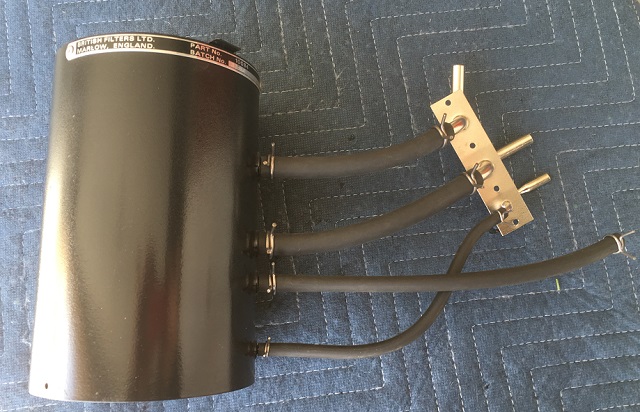 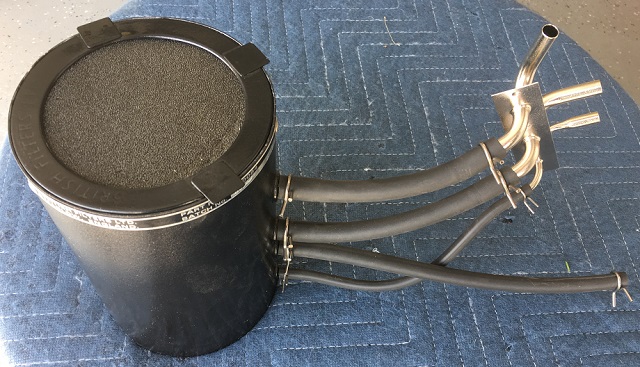 The fog light housings are a combination of stainless and chromed carbon steel. For that reason, I drilled out all of the rivets, had the steel parts replated and polished the stainless parts. They were re-assembled with stainless button-head cap screws. The glass and even the Lucas covers are original. I bought a new set of Lucas covers but they didn't look as good as these ones once I washed them. 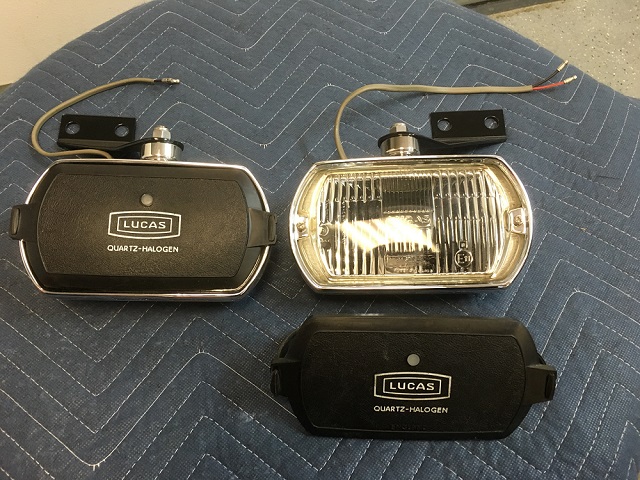 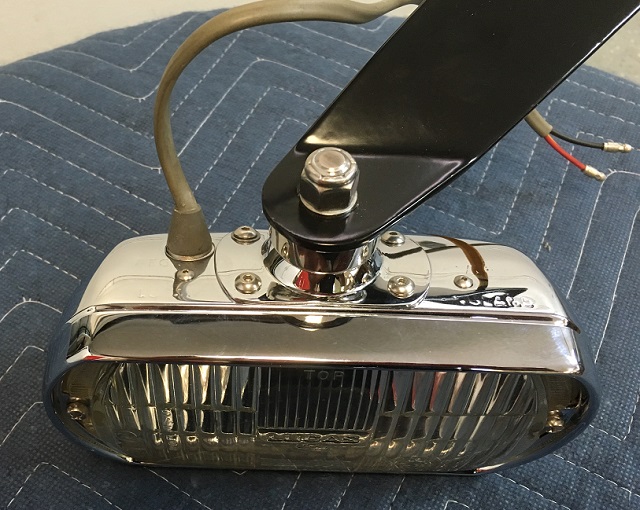 Fresh chromed bezels, all new lenses and bulbs. The harnesses are just cleaned up original items. 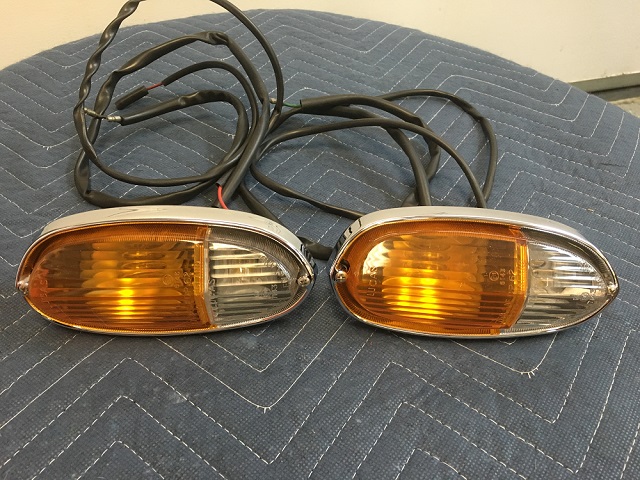 Restored fuel filter canister? Why not? 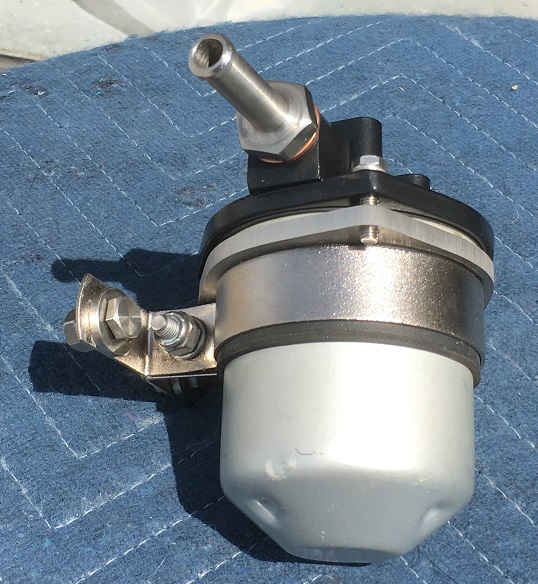 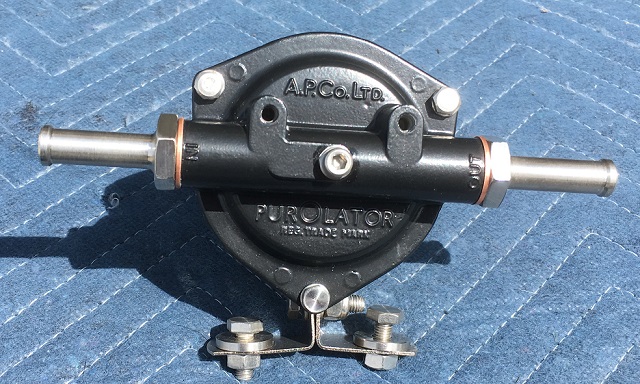 The fuel pump is rebuilt with new diaphragms and points. 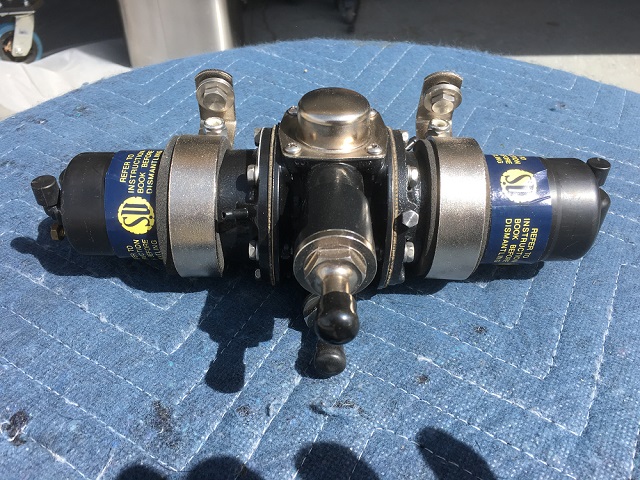 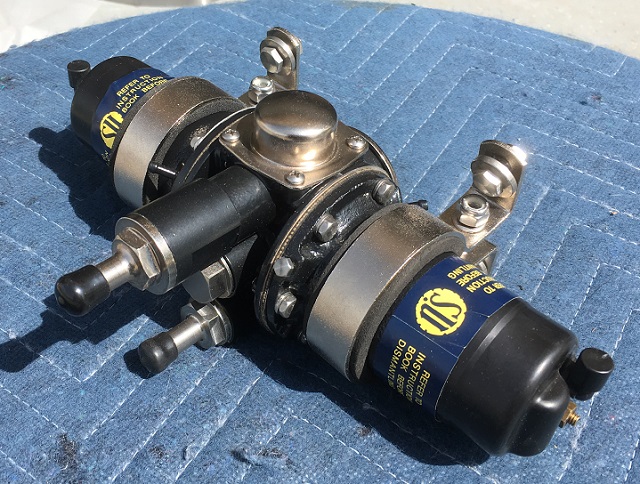 The park brake bracket is powder coated with plated hardware and new oilite bushings. 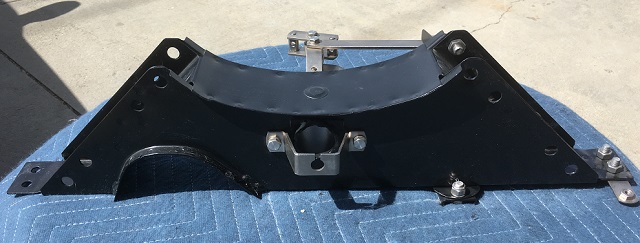 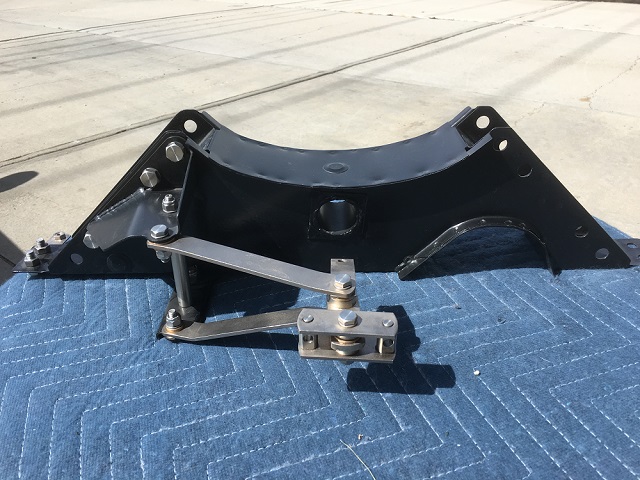 Here is maybe the last NOS wiper bottle in the world. 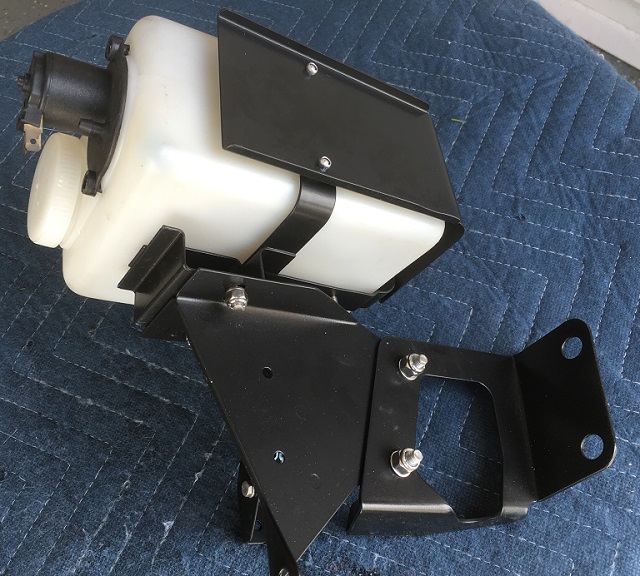 And last but not least...a wood steering wheel: 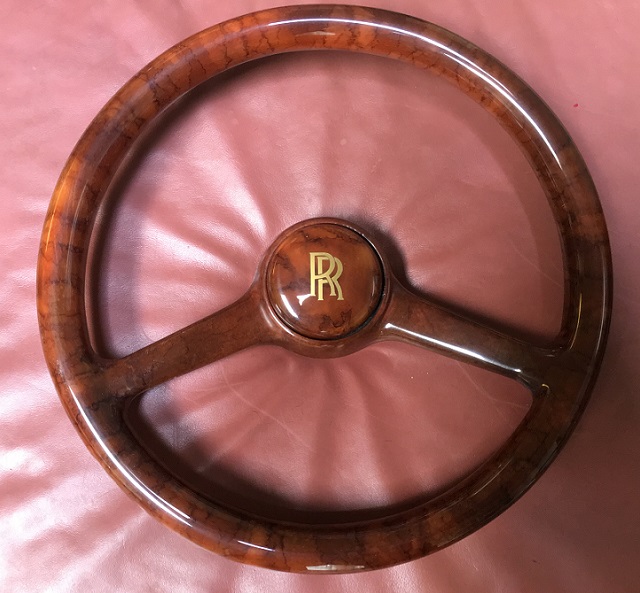 I'll revive this thread from the dead occasionally when I've made sufficient progress on the wheels, engine and/or body and paint work. I hope everybody enjoyed it. Kelly | |||
Patrick Ryan Prolific User Username: patrick_r Post Number: 130 Registered: 4-2016 |
Thanks for the sweet ride through your world Kelly. I have really enjoyed it, and I have really appreciated it. Can't wait to see the finished product. | |||
Jeff Young Prolific User Username: jeyjey Post Number: 248 Registered: 10-2010 |
Indeed, thanks for posting those. Most enjoyable. | |||
Geoff Wootton Grand Master Username: dounraey Post Number: 1215 Registered: 5-2012 |
Kelly I've really enjoyed this thread and marveled at your exceptional engineering ability. Thank you for taking the time out to select, resize and upload these photos. I hope the universal praise you have received will spur you on, now you are in the final straight of your restoration. Geoff | |||
Vladimir Ivanovich Kirillov Grand Master Username: soviet Post Number: 462 Registered: 2-2013 |
Kelly this post is to date the one that gives me a freaky feeling like the first time I saw a Lamborghini Espada and Muira at a car show. You never forget things like that. Its like when you first discover women and then realise that they not only think differently but are indeed another species altogether as nothing else can explain their behaviour. I think you should definitely be contacting a publisher now with this post and waterboard him until he offers a substantial cash advance. But remember publishers and editors are the swine of the book world. That aside if you were to write a book I would pay at least $300 USD for it provided it had a hard cover with lots of glossy pictures. This is really great stuff. My second lead is that you should hunt down the present owner of the Duesenberg name and negotiate rights to the name and then headlock a billionaire to finance the building of a late model Duesenberg. There are plenty of rich Russians who will buy one as they have money like we have water. But I have a number of questions for you. Perhaps my reading of the posts are incorrect but do you talk about chrome plating stainless steel items and if so why? The stainless steel window surrounds I have on my 420G Jaguar are still perfect after almost 46 years. I cannot imagine any quality of chrome plating lasting that long without bubbling, cracking or in some other way behaving like a poisoned reptile. What drill bits do you recommend for drilling stainless steel? My experience of stainless in the mechanical trade is that it is a horrid mongrel of a thing to drill out ie a broken stud. The normal drill bit gets blunt really quick and more often than not the bit jumps out off the stainless and maims every other soft piece of surrounding metal. As for the 17 inch wheels. I just don't know why you did not make them in 15 inch so as not to lose any of the comfortable ride. I have a deep seated hatred for low profile tyres - where I live the roads are such that low profile tyres are as useless as a one legged non laying chicken and as trustworthy as a politician begging for a vote. Lastly, when you have a bit of time please go and buy me an American lotto ticket and mail it to me - making certain it will win big. That way I will have the means to try to bribe you into selling me your Rolls Royce when you have completed it. I will be very interested to see your posts on paint and upholstery. This car of yours is going to a real hootnanny ! That aside I am certain your wife has absolutely no idea what you are up to and if she knew would spontaneous demand a $30,000 mink coat to go with the car ! | |||
Patrick Ryan Prolific User Username: patrick_r Post Number: 131 Registered: 4-2016 |
Let's hope Kelly's wife does not read this thread Vlad, we will all be in trouble for encouraging him | |||
Kelly Opfar Frequent User Username: kelly_opfar Post Number: 85 Registered: 7-2004 |
Vladimir, I think you are quite correct that it is indeed time to resurrect the Duesenberg name. Bugatti and Maybach made a nice run at it. How do you start a bespoke supercar company and end up with a small fortune? Start with a large fortune. I'll be messaging you soon for those Russian contacts. Re-reading my posts regarding the fog lamps, I realize that I could have been more clear. What I meant is that the main body of the lamp housing is stainless, but the internal brackets that attach the front trim and the bracket that attaches the mounting lug are chromed steel. I disassembled it so I could rechrome the steel parts and polish the stainless parts. Then it was reassembled with stainless hardware. At no time have I chromed stainless. That's why I like stainless so much - it is near forever hassle-free. Stainless can be difficult to work without the benefit of a lathe or stationary mill. I use regular High-speed drill bits or preferably high-speed alloyed with cobalt. The trick is to run the drills (or mills or lathe rpms), at about 60% of what you would run regular carbon steel at. Constant, even pressure and coolant flow are a must also because 300 series stainless tends to work harden if a tool is allowed to dwell without cutting a chip or if the speed is too fast. High-speed drill bits will not go through work-hardened stainless. Constant, even pressure is very hard to achieve with a hand drill. I knew that at some point I would have to defend my choices in wheel and stance. The Rolls was a whim purchase that I just intended to drive around. It was cheap and cool. Well, we know what they say about a cheap Shadow. I had never even seen a Rolls Royce in person - ever - until I saw one in a used car lot. It was obviously junk, but it got me looking on eBay and I made an impulse buy. My background is strictly in American muscle cars. Here is a pic of the last car I completed: 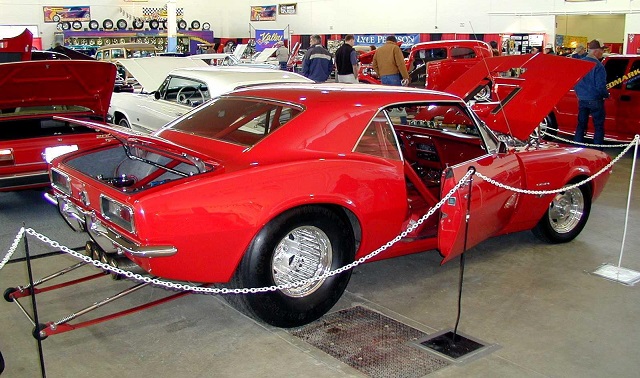 Now we know that everything has a cost. There will be a trade-off for lower profile tires and a lower stance. I'm willing to accept a less smooth ride for a better look. The oil pan on my Camaro sat literally 1 1/2" off the ground. But to drive around on, it has hydraulics. The stance is very inconvenient but looks super-cool. If one of the rear tires ever blew, it would settle right on the suspension and exhaust system and possibly the roof. That would never be acceptable in a new car, but I was willing to risk it for the look. The Rolls is a whole 'nuther animal. I'm certainly not going wild with this build but I have to do something about the stance. I think that 17" wheels show remarkable restraint. I debated with my self long and hard between 17" and 18" wheels. I'm glad I went with 17". At no time were 20's or 22's on the table. I do get more conservative as I get older. It is quite possible that I may want to return SRE24700 to her "proper" ride height someday. I still have all of the pieces to do so. It'll take an afternoon and a trip to an alignment shop. My wife is miffed that I didn't buy a Cloud III. | |||
David Gore Moderator Username: david_gore Post Number: 2013 Registered: 4-2003 |
Vladimir [and to a lesser extent Kelly], You have started me on a quest approximating that for the Holy Grail centuries ago. Back in the early 1970's as the Comsteel alloy, stainless and tool steel product metallurgist, I wrote a Technical Note on machining stainless steel which was subsequently published by Comsteel as an information brochure for engineers and machinists struggling to successfully machine stainless steel with the machine tools, tool bits and cutting oils available at that time. I do not have a copy of the brochure but I do have a copy of my Technical Note somewhere in my archives along with my thesis on the Santa Caterina meteorite which is also an interesting story for another time. My archives are in two places 400Km apart so finding these might take some time but I will try over the next few weeks and if I am successful, I will scan it into a PDF file and post it on this forum [as the author, I have copyright so no problem with publication]. Watch this space...... | |||
Patrick Ryan Prolific User Username: patrick_r Post Number: 134 Registered: 4-2016 |
Awesome Comaro Kelly. Your work is just stunning. | |||
Geoff Wootton Grand Master Username: dounraey Post Number: 1219 Registered: 5-2012 |
Kelly My introduction to American muscle cars came when a work colleague, and very good friend of mine, turned up in a Trans-am. This was when I lived in the UK, so the car was unusual. As I recall it was of the late 60s / early 70s vintage, with an engine size of around 7 liters (as I recall). What I definitely remember was you would get wheelspin on the shifts of the autobox. We had some good fun in that car. American cars in the UK had a reputation for soft springing and bad handling. Not true of the Trans-am. It went round corners like it was on rails. Geoff | |||
David Gore Moderator Username: david_gore Post Number: 2030 Registered: 4-2003 |
As promised, my Technical Note on machining stainless steel is available for downloading below. Please keep in mind this was written nearly 44 years ago and machine tools, cutting tools and machining lubricants have undergone significant improvements meaning the use of higher speeds and feeds are made possible by the higher powered machine tools available today. However, experimentation will still be required to find the limits for productive machining using a modern machine, tooling and cutting fluids. I apologise for the speeds and feeds being in Imperial units as the metric system was not in widespread use in Australia when this guide was written. I also apologise for the page quality of the scans as my copy is getting very fragile and the binding did not like being stressed to allow full flat scanning of some pages. If anyone has specific questions, please start a new thread under the General Discussion Topic or send me a message through this forum:
| |||
John Beech Prolific User Username: jbeech Post Number: 161 Registered: 10-2016 |
Having had a long phone-conversation with Kelly recently, I can assure folks he's every bit as nice and down to Earth as you could hope. Not that anyone needed reminding, so think of this post as a bump more than anything because it's fallen down the list quite a bit since May and it's a thread worth reviewing even if you've read it. | |||
Michael Carr Experienced User Username: carsie Post Number: 61 Registered: 07-2016 |
Well, I've just sat down to dial into my on-line fix of all things RR. I was feeling rather proud of myself having spent the last two weeks of Covid lock down negotiating a pass out with SLIMBO and attending to the brakes of SRH39723 of which, as you know, I am the current custodian. The old girl has been neglected for some time as my supercharged XJ40 project initially held centre stage,only to be outed by the launch of a new business and furthermore so (bad grammar!) by the arrival of a rather fetching, flappy paddle, exhaust barking Jag XK- Darn! that animal is a beast! So poised, so fluent in dynamic transition cross country and far,far outside of my operating envelope in my older years- I love it! Back to the Shadow lol! I was fortuitous to be offered the use of a two post lift and x4 sturdy, chest high, axle stands to attend to the Shadow's crusty brake lines. Fast forward x 2 weeks and yards of discarded kunifer brake pipe, I was feeling rather proud of my achievement (he says modestly). The curvature had no stress, the curves, gentle and neatly clipped, new nipples abounded (and we know how much we all like those! )even the reservoir was explored for gunge and worm like traces, of which I was really pleased to report, there were none. Foraging under the belly of SRH39723 (or is that underside? for it is me that has the "belly" :D) prodding and poking produced no worrying, crunchy,flaking metal at all; I was really rather chuffed! Alas...t'was not to last, because then I logged on for my "fix" You've kinda' guessed it haven't you? I found Kelly's posting and his pictures..... My pathetic attempts at freshening up her underside and the gentle curvature of piping falls dismally short when compared to to this mans achievement. Kelly, you've set a very high bar; I applaud you!. :D Can't wait to see the finished result. I'm going hunting for a rather stiff Irish Whiskey! Best Carsie Michael, As much as I would like to be given the credit for Kelly's skill and workmanship, Kelly rightly deserves both our appreciation and credit for the quality of his work [as also reflected in the quality of his workshop tools purchased by our dedicated DIY members]. I have edited your post accordingly. David . | |||
Graham Phillips Frequent User Username: playtime Post Number: 283 Registered: 03-2019 |
G'day everyone,.... Damn but I am impressed with the work done,... I just wish I could get all that done on mine,..... That is some awesome results achieved and I applaud you. Special mention for the hydraulic brake fluid tank. Graham. |