| Author | Message | ||
Geoff Wootton Grand Master Username: dounraey Post Number: 1110 Registered: 5-2012 |
Whilst waiting for the delivery of a brake light adjuster from Flying Spares, I thought I would have another attempt at switching the driveshafts on my car and also take the occasion to lubricate the trunions. In my previous attempt I followed the manual and removed the 6 nuts but could not remove the circular plate that attaches to the diff. (yellow arrow points to one of these nuts.) My question is, having undone the drive shaft at the wheel end, is it just a case of undoing the large diameter clip (red arrow) and pulling the driveshaft away from the diff to disengage it. I have checked the previous posts on this topic but would like to confirm this is the correct way to go forward. Picture was taken looking up from underneath the trunnion. 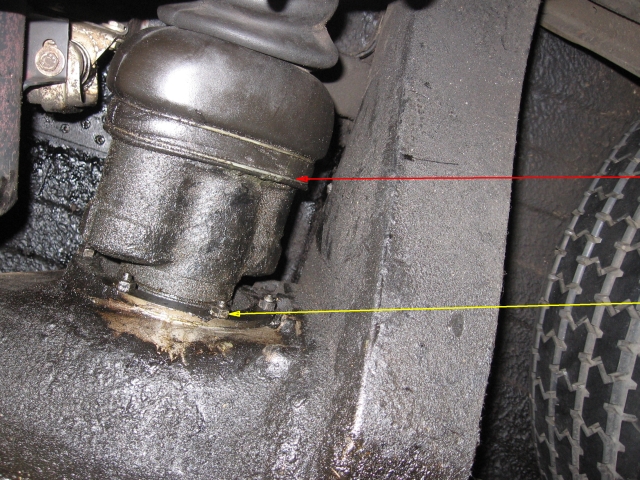 Geoff | ||
Jeff Young Prolific User Username: jeyjey Post Number: 235 Registered: 10-2010 |
Hi Geoff, No, you need to separate it at the yellow arrow. Taking the clip off at the red arrow will separate the trunnion (and drain any oil that's in it). If you're swapping side-to-side, you want to keep each half-shaft with its associated trunnion, so you need to separate at the yellow arrow. Last time I did this I stuck a screwdriver at the joint between the ring and the diff housing and gave it a couple of sharp taps with a hammer -- after removing all the nuts, of course. (It's pretty similar to getting the water pump off, if you've ever done one of those.) Cheers, Jeff. | ||
Paul Yorke Grand Master Username: paul_yorke Post Number: 1484 Registered: 6-2006 |
Hi, if you leave a couple of the nuts on a few turns, you can use a screw driver to lever the flange away. It usually has some blue hylomar or welseal sticking it on. It is the trunions that wear. But change them as a matched pair as geoff says. | ||
Geoff Wootton Grand Master Username: dounraey Post Number: 1111 Registered: 5-2012 |
Hi Jeff Thank you for your reply. Looks like I will have to abandon attempt two. I did try shocking the ring free with a hammer and drift on my first attempt a few months ago, but decided the force required to free it might crack the diff casing. I did try for a few hours, on and off, but the ring is well and truly stuck. After reading some other entries on this site I thought I might have been able to remove the half shaft by pulling the splined shaft out. I understand your point about it being best, if not imperative, that the entire half shaft is kept together as a unit, if you are switching them. The reason I want to swap them is since changing the rear springs and hence the ride height, I get a vibration when accelerating from 30 to 50 mph. With use, the vibration is much less, but I would like to eliminate it completely. Looks like I will have to put up with the vibration until such time I can remove the diff and get the whole lot on a bench. Regards Geoff | ||
Geoff Wootton Grand Master Username: dounraey Post Number: 1112 Registered: 5-2012 |
Paul I will try that method. Originally I was trying to keep away from the machined surfaces, but with care I might be able to separate the ring. Thanks for the help and also for confirming I need to keep the drive shafts together as a pair. Geoff | ||
Paul Yorke Grand Master Username: paul_yorke Post Number: 1485 Registered: 6-2006 |
My post wasn't very clear to myself. If you look at your pic. The next stud us in about the right place to lever against the widest part of the trunnion so no need to chisel. Usually.  Once you break the bond it should pop off. Make sure you keep the washers and spacer on the correct (same) sides. | ||
Robert Noel Reddington Grand Master Username: bob_uk Post Number: 890 Registered: 5-2015 |
There is a cut away drawing of the assembly in the work shop manual. From memory there is a circlip holding on a brg on to the cv pot joint splined shaft. The ring with the nuts holds the outside on that bearing into the final drive case. Which is why the nuts need to be undone. Using a cold chisel that has an intentionally very blunt smooth polished round end tap lightly with hammer not to hard to put dents in. This causes the ring to spring deform, Spring means it returns immediately to right shape, thus breaking the sealing caused by age. To remove the shaft leave the nuts on the studs level with the end of the stud and lever off the nut. Once the shaft has moved a bit it will come easy. If the final drive case is heated in the area of the cv pot shaft bearings this will help. The splines are in the oil side of the final drive and probably well oiled so seizing is unlikely. As we know the cv joints are oiled by 75/90 ep gear oil. Why oil is a mystery to me. I suspect that should graphite CV joint grease is used the joint will vibrate, again a mystery. The first thing to check on a Shadow that has drive line vibration is the oil or lack of in the cv joints. The above also apply to any vehicle with drive shafts or prop shafts. Surprising how smoother greasing prop shaft UJs can make a car with dry UJs, hopefully the UJs don't fail at a later stage due to them being run dry, most time one gets away with it, best not to though. If the UJ clicks under load it's finished and dangerous. General purpose chassis grease or graphite version for UJs. I use Castrol lithium based LM grease and never get problems. For CV joints 75 /90 GL4 gear oil. Both very common lubs in the car world and cheap. UK only. I use Castrol stuff because I get a good discount on the old pals network. However if the discount ended I would change to Comma oils. Comma is generally perceived as lower quality at a lower price. The latter is true. The price is lower but the quality is not lower and the products are as good as the bigger brands. Comma is more geared up for selling to independent garages rather than retail customers. Check out motor factors they do some really good deals for bigger amounts such as 40 litres of Antifreeze @ �40. Go halves with a mate. Way off topic, gone from drive shaft to how to get cheap oil. | ||
Randy Roberson Grand Master Username: wascator Post Number: 648 Registered: 5-2009 |
When I replaced the split boot on the '77 Wraith's left Joint, it was in good condition but I reshimmed it to specs and it needed it. Perhaps checking the specifications and reshimming it tight would help with vibrations. Also, I am removing the main drive shaft on the '70 Silver Shadow as I notice vibration at speed which indicates at least one of the two Hooke joints is bad. I have seen these that looked fine until taken apart, and found this vibration and corrected it this way on other cars. It will of course be at engine speed when cruising, while the half-shaft turns at 1/3.08 engine speed (or whatever your diff ratio is). | ||
Geoff Wootton Grand Master Username: dounraey Post Number: 1113 Registered: 5-2012 |
Thanks Paul. I think I've got it. The green line shows the position I think the lever should be positioned. Will try it tomorrow. 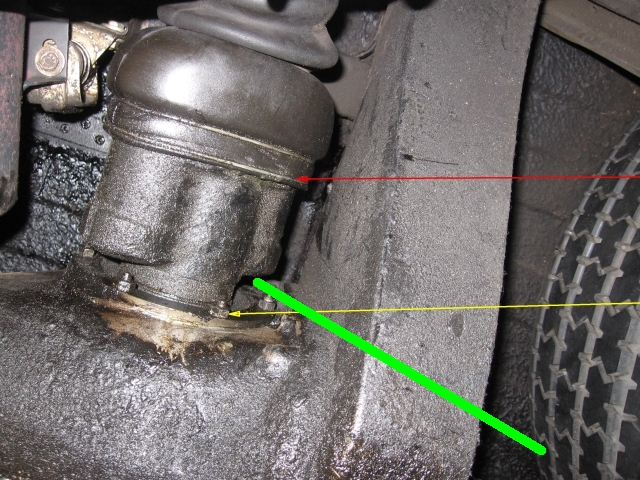 Geoff | ||
Geoff Wootton Grand Master Username: dounraey Post Number: 1114 Registered: 5-2012 |
Bob and Randy - I should have refreshed my screen before replying to Paul. I note your comments. The one thing I have ruled out is heating the joint. The reason is entirely due to my own (irrational?) fear. It is too close to the petrol tank for me to be comfortable with it. Just a personal preference. If I can get the drive shafts off, I will replace if necessary. Here's hoping they are ok. Geoff | ||
Jeff Young Prolific User Username: jeyjey Post Number: 236 Registered: 10-2010 |
I echo Robert's comments to check the outer u-joints too. One of mine had a plugged grease nipple and had consequently run dry. I hate u-joints with a passion, so I had Paul replace both of them. ;) Cheers, Jeff. | ||
Robert Noel Reddington Grand Master Username: bob_uk Post Number: 892 Registered: 5-2015 |
Boiling water will help expand the final drive case. Hot air gun. | ||
Omar M. Shams Grand Master Username: omar Post Number: 780 Registered: 4-2009 |
OK - now its my turn to do this ugly job. I also have vibrations at the back of my car now - and when I looked under the car I saw one split trunion seal and a perished one on the other side. The fear of doing this job has left it way beyond late and I am in for an even uglier job than if I did them 3 years ago. So I am looking at the two new rubbers and for the life of me I cant figure out how to get this rubber item onto the shaft. I will naturally remove both half shaft assemblies - but then what? after I clean everything up and the new rubber needs to go on........ how does that happen? the small end is very very small. Words of wisdom are welcomed..... | ||
Randy Roberson Grand Master Username: wascator Post Number: 683 Registered: 5-2009 |
Word is the rubber trunnion boot can be heated in boiling water and stretched over the pin. I tried it once and failed so I pressed the pin out of the axle, as per the Factory manual. It can be fiddly to get the big end of the rubber boot in place over the Detroit joint. The secret seems to be to turn the axle whilst encouraging the boot over the lip. You can do it! I know because I did it three times to get it right! | ||
Omar M. Shams Grand Master Username: omar Post Number: 781 Registered: 4-2009 |
Dear Randy, I don't get it mate. I just went and looked under the car again. The shaft has two ends that are both very large yet the boot has a tiny hole at one end. It must mean that the shaft must separate for the small hole to go over the shaft. | ||
Paul Yorke Grand Master Username: paul_yorke Post Number: 1627 Registered: 6-2006 |
Hi Omar, The shaft splits inside the trunnion. Just undo the outer shaft bolts and the large wire clip. Lever off the outer caps and then lift the outer end of the shaft up above the disc and outwards. The rubber boot will slip off the inner trunnion connected to the diff. The outer and inner joints are full of roller bearings and cap. Tape them up to stop them going everywhere. Omce on the floor you will see the T piece the boot has to stretch over. Get the boot hot all the way through is key to not splitting it. That along with grease and NO SHARP or rough areas on the tool used to stretch it over.. I'venever been temptied to pus the pin oit. Totally unnecessary in my experience. Do it out in the hot air, not airconditioned. Wink. | ||
Omar M. Shams Grand Master Username: omar Post Number: 782 Registered: 4-2009 |
Thanks Paul. when I split my rubbers I will be on the blower to you to send me a new pair..... | ||
Randy Roberson Grand Master Username: wascator Post Number: 684 Registered: 5-2009 |
Undo The Hooke u-joint at the wheel hub, then remove the clamp holding the big end of the rubber boot on the Detroit joint (the one on each side of the differential). The shaft will slip out of the inboard joint once you swivel the outboard end around to clear the wheel hub ( you need to have the tire-wheel off). Don't try to remove the inboard joint; not necessary. When you pull it out be gentle as you want it to stay together if possible so you can put everything back as you found it. Once you see one apart you will see how the shaft slips into the inboard or Detroit joint. | ||
Omar M. Shams Grand Master Username: omar Post Number: 783 Registered: 4-2009 |
Thanks Randy. I have now seen enough images on Google to know what I am looking at. I also have a good idea how all this will pan out. I am gratfeul for all the advice about needles - I will extract with care and make sure I dont drop things. I may also slice the boot off before I start as it is already torn. That will help me see things easier before i remove anything. I am lucky to be able to do all this work standing under the car. No need for the inconvenience of lying on my back. I may even get some help from one of my daughters if I ask them nicely. Take care. Omar | ||
Omar M. Shams Grand Master Username: omar Post Number: 784 Registered: 4-2009 |
How important is it to take the wheel off? | ||
Paul Yorke Grand Master Username: paul_yorke Post Number: 1628 Registered: 6-2006 |
Wheel off makes life much easier I just remembered you also said you were picing up vin rations. . Once you have the rubber off, finger inside and feel for wear where the balls go. There may be a gentle rise not a ridge) which may give you vibrations under load. If it is just on the thrust side then you should swap the trunnion from left to right. You will need to swap flanges over and watch out for things falling inside. | ||
David Gore Moderator Username: david_gore Post Number: 2191 Registered: 4-2003 |
You need the wheel off to be able to pull the driveshaft away from the differential after you have undone the outer universal joint. Make sure the replacement boots you buy are a matt black and supple not grey and hard [sign of old stock] - old new boots can be restored with Krytox GPL105 as I have mentioned in other threads. As Paul Yorke has said, the secret to installing the new boots is lots of heat and lubrication.......[where have I heard this in another context??]. Be careful when withdrawing the shaft from the inner housing as I recall there are unrestrained washers that have to come out with the shaft otherwise they can drop into the differential housing and you do not have to guess what this means. With replacing the boots on DRH14434, I resorted to pushing the pins out as this forum was not in existence at the time so advice such as that in this thread from others was not available. This was a simple operation with a 20ton hydraulic press and plenty of lubrication. I made a re-installation jig from a piece of steel pipe cut to length corresponding to the stand-out distance of the pin from the drive shaft boss. The press simply pushed the pin into the boss until the ram just touched the top of the pipe which had been slipped over the pin, the pin stand-out was exactly the same on both sides. As the pin is a precision-ground item, it is critical for the pin to be fitted using copious lubrication to minimise galling during the press fit operation. | ||
Christian S. Hansen Grand Master Username: enquiring_mind Post Number: 360 Registered: 4-2015 |
If anyone should happen to end up with a torn new boot as the result of a failed installation attempt (not the old boot that needs to be replaced) I am most interested in purchasing it for...what?...say $10US plus shipping?...yes, even from Dubai!...as I have an experiment I would like to conduct with such an item. Thanks. | ||
Martin Taylor Experienced User Username: martin_taylor Post Number: 49 Registered: 7-2013 |
If your boot is not torn I would check that the drive shafts are straight before going any further, if they are not then the trunnions will not be against the worn surface anyway, video them while driving or (carefully) support the rear trailing arms on stands with the front of the car against a wall should things get ugly and run it up to vibration speed, usually if it can be felt it can be seen. I used a shoe horn to get the boot over the pin when replacing mine, I also added a heat shield between the diff and the exhaust pipe to stop the replacement one cooking As mentioned previously if too low adjust the linkages to correct, if too high a few bags of sand in the boot will change the vibration if that is the cause | ||
Omar M. Shams Grand Master Username: omar Post Number: 785 Registered: 4-2009 |
Great advice as always. Thanks a lot. Christian - if I tear any of the boots I will gladly post them to you for nothing. I am hoping that I dont contact you to ask you for your address as I only have two new boots in my garage right now. | ||
Christian S. Hansen Grand Master Username: enquiring_mind Post Number: 361 Registered: 4-2015 |
Omar... Thanks, and hoping I don't receive yours! However, since "the most well laid plans of mice and men oft go astray", in such a case, rest assured it will go to a noble cause, and possibly a workaround solution for this problem. Christian | ||
Omar M. Shams Grand Master Username: omar Post Number: 786 Registered: 4-2009 |
OK guys!!! the drive shaft on the easy side is out. what a pain in the aas that was!! I didnt have to take the wheel off. Instead I had to take the handbrake linkage off. I didnt lose any washers or needles - so I am glad for the advice for being careful of these loose parts. I have a Turbo R on the drive which has been robbed of lots of parts but it still has its diff and two drive shafts...... I am almost tempted...... would the transplant work? To have the Turbo R drive shafts would be such easy maintenance..... Meanwhile I am now going to change the universal joints on the Wraith as a matter of course before I rebuild it. | ||
Mark Aldridge Grand Master Username: mark_aldridge Post Number: 334 Registered: 10-2008 |
Have just come back from MOT test and the UJ on the right side driveshaft has started clicking ! Has anyone changed one in situ without removing the drive shaft ? Mark | ||
Paul Yorke Grand Master Username: paul_yorke Post Number: 1630 Registered: 6-2006 |
Omar, it's possible to swap just the drive shafts. Mark, make sure everything is tight . It's unusual for them to click but can make noises. What car have you got again Mark ? Shadow type outer UJs yes take the shaft out / off. Later type the ends can be taken off. Unusual for them to go. Good luck and have fun both. | ||
Mark Aldridge Grand Master Username: mark_aldridge Post Number: 335 Registered: 10-2008 |
Paul, it is a 1975 Shadow 1. Definitely is UJ, unfortunately. I can see and feel movement in the joint, almost as though one of the bearings in the spider of the UJ has broken up ,even though there is plenty of grease. Mark | ||
Paul Yorke Grand Master Username: paul_yorke Post Number: 1631 Registered: 6-2006 |
Mark, it may have been left dry in the past. Once the hardened outside layer is worn, no amount of grease will stop the inevitable. Yes it's a vice job I'm afraid. Make sure all the rollers are in place when refitting. Use a vice or press to smoothly press in the cups . . Don't be tempted to tap them in. Make sure it stays free to move as you put them in. One wayward roller will lead to tears  | ||
Mark Aldridge Grand Master Username: mark_aldridge Post Number: 336 Registered: 10-2008 |
Thanks Paul, I hope the replacements are better quality than the Pattern Landrover propshaft UJ,s; I have replaced these at regular intervals . Mark | ||
Omar M. Shams Grand Master Username: omar Post Number: 789 Registered: 4-2009 |
The impossible looking task is indeed possible. I have one boot on now thanks to my two daughters and wife. All four of us worked as a team to get the boot on. My 14 year old daughter wanted to know if we could remove the pin to help get the boot on - I can see a potential engineer in that girl..... The girls used hair driers to heat the rubber up. We used lots of vaseline and a screwdriver and a steel shoe horn to get the job done. | ||
Omar M. Shams Grand Master Username: omar Post Number: 790 Registered: 4-2009 |
We are ready to do the second drive shaft now. They both came off the car really easily. I was standing under the car and had good clear access to everything with the wheels firmly on the four post jack. I have lots of Classic Volkswagens and in a moment of inspiration I went to my VW parts bin to look for an item which is common amongst the VW fraternity. It is the all too familiar drive shaft rubber boot. The VW people seem to be cleverer than us and they have made and marketed a split rubber boot that you can assemble on the shaft without taking anything off. For a moment i thought we had the solution at our fingertips until I took one out of the drawer and found that it is a wee bit too small to fit. But the same people who made these split boots could easily run a batch for us RR guys and this can be the answer to all our dreams.    | ||
Paul Yorke Grand Master Username: paul_yorke Post Number: 1634 Registered: 6-2006 |
Omar . . . Can you imagine the imbalance when it starts spinning though. | ||
Omar M. Shams Grand Master Username: omar Post Number: 791 Registered: 4-2009 |
we are lucky that we have an oval to clamp to. That will affirm the position of the bellows against the diff output shaft. I think the design has merit and it would be very successful in our application. If only someone would make them. On a separate note, my daughters and wife helped me get the second bellows onto the second shaft without tearing the rubber. Good on them!! Vaseline is definitely the way to go. And before any of you guys start having a go at me for making this statement............. let us keep the focus on the split bellows design.... | ||
Paul Yorke Grand Master Username: paul_yorke Post Number: 1635 Registered: 6-2006 |
Omar good job mate!! . . . It's a breath holding moment as it goes over . . . But not nearly as scary once you've done a couple. You'll fly through the next few cars Last one I burst was about 20 years ago . . . Where? Nigeria. Bloody sods law. 3000 mlies away fron a replacement. . . Luckily the old one only had a pin prick and I had left it on the shaft not cut it off first. . Phew for super glue! I could be wrong but I have a feeling that the VW one is just a seal between the box and the axle tube, so doesn't spin like the Rolls one does. They are a bit of a pita but I would guess that yours were probably the original ones . . So fitting time versus longevity is pretty manageable! Just IMHO. ;) | ||
Geoff Wootton Grand Master Username: dounraey Post Number: 1405 Registered: 5-2012 |
Re: I could be wrong but I have a feeling that the VW one is just a seal between the box and the axle tube, so doesn't spin like the Rolls one does. Correct - the joint just has to flex up and down with the suspension. I've just checked it out on youtube. As Paul said, one can only imagine the vibration if it were to rotate with the wheels. Geoff | ||
David Gore Moderator Username: david_gore Post Number: 2199 Registered: 4-2003 |
Also, do not overlook the boot contains a pool of oil to lubricate the trunnions - I doubt the VW style boot would not leak oil in service. Omar, did the benefits of the hoist in facilitating the repair finally bring an end to the family "discussion" arising from your original purchase??? | ||
Paul Yorke Grand Master Username: paul_yorke Post Number: 1636 Registered: 6-2006 |
No family should be without one. :D | ||
richard george yeaman Grand Master Username: richyrich Post Number: 614 Registered: 4-2012 |
I have successfully replaced a few of these rubber boots and also I have thought that there should be a way to make it an easier job I wonder could they be made of leather with a zip fastener an perhaps lubricated with grease instead of oil, Just thinking. Richard. | ||
Paul Yorke Grand Master Username: paul_yorke Post Number: 1637 Registered: 6-2006 |
Velcro? | ||
richard george yeaman Grand Master Username: richyrich Post Number: 615 Registered: 4-2012 |
Hi Paul does Velcro mean you think it might work or other? Richard. | ||
Omar M. Shams Grand Master Username: omar Post Number: 792 Registered: 4-2009 |
Dear David, I asked the wife if she had forgiven me yet for installing the 4 post at home. Her answer was a very sharp NO. She then went on and on and on and on and on..... like only they can..... Dear Paul, Yes!! every house should have one!! So back to the poor design of the bellows..... the part works very well but maintenance has not been given due consideration. I would love to see a new design bellows that can do the job without requiring total disassembly. I have really hated doing this job. Maybe the redesign would not be of the bellows but perhaps the whole shaft. From the diff to the wheels. Why even have the Detroit coupling? | ||
David Gore Moderator Username: david_gore Post Number: 2200 Registered: 4-2003 |
Omar, RRMC did fix the problem with the adoption of the Lobro drive shafts for the later models after the Shadows. P.S. Have you ever heard of the affliction known as "marital deafness"? A problem worth having IMHO  . . | ||
Mark Aldridge Grand Master Username: mark_aldridge Post Number: 343 Registered: 10-2008 |
Omar, I have been offered a 4 post lift today. I am considering if this is feasible, and if I dare install it in the front garden. As divorce is expensive, have you any tips ? Mark | ||
Geoff Wootton Grand Master Username: dounraey Post Number: 1408 Registered: 5-2012 |
Mark Would you require planning permission? The back garden would be ok I am sure, But the front garden? Fantastic idea and I hope it works for you. I would love a lift myself. Geoff | ||
Benoit Leus Prolific User Username: benoitleus Post Number: 262 Registered: 6-2009 |
I've seen Flying Spares sells a lobro shaft conversion kit(for a substantial sum). Has anyone installed one on their Shadow ? | ||
Omar M. Shams Grand Master Username: omar Post Number: 795 Registered: 4-2009 |
The 4 post lift I installed has taught me a few things: 1- Never buy what I bought - a simple 4 poster. Buy one which has two in-built jacks to allow you to lift the whole car off its wheels whilst still on the jack. The price difference is not that great but the versatility is worth the extra money. 2- Dont be surprised when you find out how much concrete you need to fill the foundations. I had a full size cement truck show up and it left empty!! 3- Don't ever underestimate the wife!! They really dont like to have a 4 post jack in the house. God knows why - but they don't. 4 - Before you put your car on it make sure that the jack is horizontal in both planes. 5- Good luck | ||
Omar M. Shams Grand Master Username: omar Post Number: 796 Registered: 4-2009 |
Dear Benoit, I have just looked at that FS conversion kit. I have a whole car on my drive that I can cannibalize for the conversion. That is why I was asking if this conversion is doable. Any ideas anyone? | ||
Omar M. Shams Grand Master Username: omar Post Number: 797 Registered: 4-2009 |
How much oil should I put in the detroit couplings? | ||
Randy Roberson Grand Master Username: wascator Post Number: 689 Registered: 5-2009 |
Seems like it is 150CC but at any rate; turn the joint until the fill hole is horizontal and squirt oil in until it runs out, then put the plug in. I used a largish syringe as a large animal vet might have. | ||
Omar M. Shams Grand Master Username: omar Post Number: 799 Registered: 4-2009 |
Thanks Randy thats a good tip. | ||
Paul Yorke Grand Master Username: paul_yorke Post Number: 1638 Registered: 6-2006 |
An old LHM Bottle with the tube is also good. My earlier post went awol sorry . . Omar . . Yes you should be able to use your lobro type but it depends if you can get the outer yoke off etc. Richard . . . No. No velcro will not work I don't think anything would. David . . I would suggest that the Lobro CV gaiters are actually a bit harder to do than the Shadow type. Although the boots are cheaper access is trickier with more Allen head bolts which rust out inside. It's nice not having to check them for oil bit that only takes 5 mins once a year. But it is shocking how many people / garages don't bother!!! | ||
Jean-Pierre 'JP' Hilbert Prolific User Username: jphilbert Post Number: 155 Registered: 9-2013 |
Shadow owners should not have old LHM bottles lying around )))) | ||
richard george yeaman Grand Master Username: richyrich Post Number: 653 Registered: 4-2012 |
Hi fitted an offside driveshaft rubber boot today on a 1969 MPW two door coupe, I really think they are making them out of thicker rubber, or maybe I am just feeling my age more!!! Richard. |