| Author | Message | ||
Alan Scard Experienced User Username: alanscard Post Number: 11 Registered: 7-2015 |
Ref. 1972 Shadow SRH 13952 I have the final drive and cross-member out of the car, due to a split in the drive shaft convoluted boot. This gives me the opportunity to carry out a good clean, change oil seals etc. I thought I would strip and clean the cross-member harmonic dampers. The rubber washers are cracked and distorted to a certain amount. Perhaps someone has in the past used the dampers as a jacking point. I thought I would replace all the rubber washers which comprise of 2 x 1/8� thick and 3 x 3/16� thick on each side of the damper plus a rubber distance piece. On checking the prices at Flying Spares in the UK the 1/8� (UG 12540) is 70p + VAT, 3/16� (UG12541) is �2.39 + VAT but the distance piece (UG12539) is a staggering �42.18 +VAT. As the car is over 40 years old I just wonder how important these harmonic dampers are. To renew all the rubbers on both dampers would cost a total of �91.78 Pounds Sterling. Each rubber �bundle� consists of 1/8� + 3 x 3/16� + 1/8� making a total of 13/16�. I am thinking about using 5 x 1/8� + 3/16� which still gives 13/16� OR all 1/8� washers to give either 12/16� or 14/16�. I can either re-use my distorted distance piece of try to find a suitable piece of new tubing that will fit. I would appreciate any comments from anyone. Regards Alan | ||
Randy Roberson Grand Master Username: wascator Post Number: 528 Registered: 5-2009 |
All very iffy there: obviously the Engineers found some sort of noise or vibration that needed to be damped out, likely at one frequency, so devised these to react accordingly. With dampers it's all in the mass and the spring constant. IMO it's worth a try as they are as you say deteriorated anyway, and if you don't have any noticeable symptoms of failure, like a drumming vibration at a particular speed, you are good to go. | ||
richard george yeaman Grand Master Username: richyrich Post Number: 368 Registered: 4-2012 |
Hi Alan I don't even know where these dampers are but seeing that you have found them and gone to a lot of unnecessary dismantling to fit a rubber boot I think I would fit the proper parts (just my opinion) Richard. | ||
Geoff Wootton Grand Master Username: dounraey Post Number: 983 Registered: 5-2012 |
Hi Alan I'm in the "replace them" camp. With all the work you have carried out and with all the money you have saved in labour costs, I'd spend the hundred quid and know you have completed a good job that will likely last another 40 years. Having said that, I have always been curious about those youtube videos where owners make their own rubber bushes by pouring 2 pack polyurethane rubber into makeshift mouldings. I am sure the resulting bushes must be drastically substandard. Has anyone ever tried this? Geoff | ||
Robert Noel Reddington Grand Master Username: bob_uk Post Number: 600 Registered: 5-2015 |
I would shim them so they are tight and barely move when crow barred. The design of this sort of stuff is very much subject to so many variables that often the designers just educated guess at the details and suck and see. I have often fitted shims to compliant mountings all makes of cars to tighten things up a bit. Go to far and the ride gets harsher but the handling MAY only may be better. Taking the arse end of Shadow mechanicals off is a lot of work. So I would get that tube thing made. Simple turning job. Check the hydraulic metal pipes. While you have good access. Incidently to change the drive shaft boot. Undo the 4 x 5/8 AF bolts that hold the UJ to the hub yolk. Then because the boot is split and scrap. Cut the large end of boot and pull shaft and trunnion from the joint. The rest is obvious. | ||
richard george yeaman Grand Master Username: richyrich Post Number: 369 Registered: 4-2012 |
Taking the arse end of shadow mechanicals off is a lot of work. I would get that tube thing made. Simple turning job. Bob with all due respect I would rather buy the proper part than run round the country looking for someone to make a one off. Taking the time and effort that this would cause to oneself the �42.18+vat pales in to insignificance. I know that making such a part would be easy for you personally as you have the equipment and the skill to do it. Richard. | ||
Chris Browne Prolific User Username: chrisb Post Number: 229 Registered: 2-2010 |
Hello everyone. Just for information, here are a couple of photos showing the location of one of the harmonic dampers and the component parts. When I restored the running gear beneath SRH37131, the dampers were caked with underseal and I was curious about what they were and how they were put together. Sad, I know! 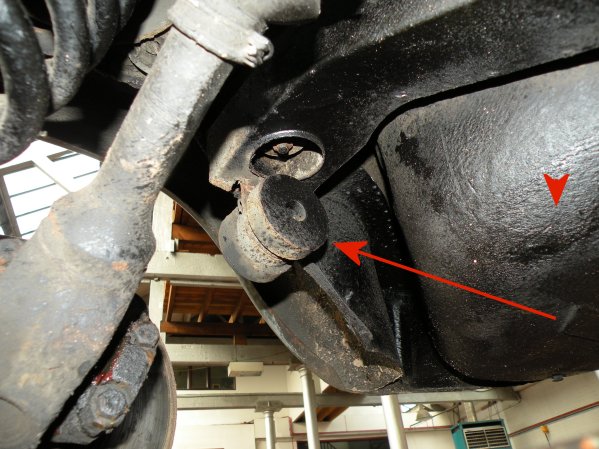 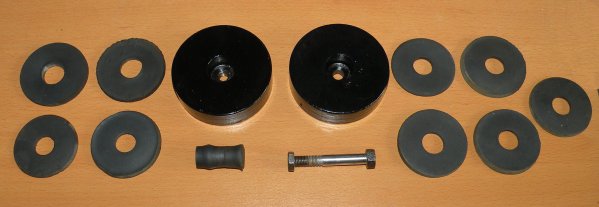 Kind regards, Chris | ||
Alan Scard Experienced User Username: alanscard Post Number: 12 Registered: 7-2015 |
Hi Chris, Thanks for some excellent photos of the parts. Your rubber washers look in good condition with no distortion, so I guess you just re-assembled and put them back. The distance piece is rubber, see photo. The dimensions are approximately 1.25" long with o/d of 9/16" and i/d of 5/16". Although mine is distorted I cannot see any reason why it was originally just a straight distance piece that held all the rubber washers and the "disc damper" in place. I suppose my real question is how critical the rubber parts are to this harmonic damper or are they just to "insulate" the frequencies from the disc dampers which are heavy solid metal. Perhaps someone out there is a "damper expert" Regards Alan 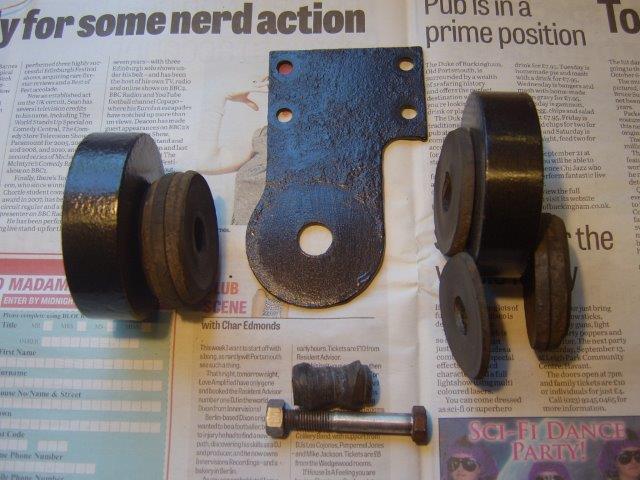 | ||
richard george yeaman Grand Master Username: richyrich Post Number: 371 Registered: 4-2012 |
Hi thanks for the photos the next time I hit my head of them I will know what to call them when I swear at them. Richard. | ||
Robert Noel Reddington Grand Master Username: bob_uk Post Number: 601 Registered: 5-2015 |
Not an expert on harmonics. But the mass of the big steel bits swings in opposition to vibs of the lower frequency or drones. Pendulum. Think about dampers in sky scrapers in earth quake zones. I thought the cross member with the trailing arms had be removed and we were talking about the horizontal compliance mountings. The cross member we are talking about now is the final drive one. Because these are held on with 2 easy access bolts which are now not cruded up. Then just pack them out so they still have a bit of give a coat of black gloss and nail them back on the car. I will be surprised if this repair goes wrong, how can it. If rubber bushes are polished up with a bit of old brake fluid. They come up like new. I wonder what happens if the dampers are left off. I going to check mine out. Will report back on what I find. Since RR363 got confirmed we need a new thing to worry about.   | ||
Alan Scard Experienced User Username: alanscard Post Number: 16 Registered: 7-2015 |
Silver Shadow 1972 SRH 13952 Since I took the Final Drive Unit off last year to replace a split gaiter, I then got involved in local Borough, Police and Crime Commissionaire elections and the EU referendum over the past 6 months. I am now able to get back to more important things like getting the final unit back in the car. Getting the new gaiter over the trunnion pin by using lots of rubber grease smeared on the pin and the gaiter and using a large screwdriver was literally a 1 minute job. The final drive unit is now back on the car but I have a question about the Final Drive Position Check. According to page J20 in the workshop manual, the different dimensions of the 2 half shafts should be 0.175� (4.44mm) as per Fig. J18. The dimension on my car seems to be the same and I just wonder how critical this dimension is? I would appreciate any comments. Alan in the UK | ||
Randy Roberson Grand Master Username: wascator Post Number: 677 Registered: 5-2009 |
I tore the first boot $100+ down the tubes so I pressed the pin out. You have to press it back in as close to the center as you can then adjust with shims. Once I got a tool to make my own shim, no problem. | ||
Paul Yorke Grand Master Username: paul_yorke Post Number: 1575 Registered: 6-2006 |
Randy, you really were the unlucky one  I've never taken a pin out. It is really important not to have any burrs whatsoever on your tools etc. Check the seams before yoi start and then Boil it well. Must confess I do still hold my breath while I do one.  | ||
David Gore Moderator Username: david_gore Post Number: 2117 Registered: 4-2003 |
Randy, I used a cut-to-length piece of steel pipe with an I.D. slightly greater the the pin as a jig when replacing the pins using my hydraulic press. I previously had 3 boots split trying to get them over the pins before I took the easy way out and pressed the pins out. Just put the jig over the pin, make sure the drive shaft is level and the pin upright then bring the ram down pushing the pin in until the ram just makes contact with the jig. Check the pin for uniformity on both side, touch-up with the ram if necessary for near-perfect fit. | ||
Geoff Wootton Grand Master Username: dounraey Post Number: 1304 Registered: 5-2012 |
David Did you heat the boots in boiling water before your attempts to get them over the pin? Geoff | ||
Randy Roberson Grand Master Username: wascator Post Number: 678 Registered: 5-2009 |
David, pushing out and replacing the pin wasn't as bad as some seemed to think from the comments I had read. It has to be put back in the center or as near as possible; the problem I Had is it is tight so it tends to pop or jump and overshoot the intended position. In a couple tries I got it within about 5 thou of perfect then shimmed the remainder. Of course I had access to a press and I was determined, etc. | ||
Randy Roberson Grand Master Username: wascator Post Number: 679 Registered: 5-2009 |
My opinion: if you are hearing droaning or moaning noises out back, you might need to change these. Otherwise, I worry about other things like having brakes! | ||
Christian S. Hansen Grand Master Username: enquiring_mind Post Number: 315 Registered: 4-2015 |
If anyone has not discarded any split and otherwise damaged, but new boots, I would be quite happy to purchase them for a nominal fee plus shipping to me here in California as I would like to try an experiment with one that is damaged. Please PM me this? Thanks. Christian | ||
David Gore Moderator Username: david_gore Post Number: 2118 Registered: 4-2003 |
Geoff, Yes I used both hot water with some added detergent as a lubricant then tried with a hot air gun as well. My personal opinion is the boots were old stock and had age-hardened in storage most likely from ozone degradation. Randy, I had no problems removing or replacing the pins with the press however I did use Rocol as a lubricant to minimise galling. I also made sure the drive shaft was well and truly clamped accurately and the pin vertical before starting to press with the ram. I had no problems with the pins sticking or binding. | ||
gordon le feuvre Prolific User Username: triumph Post Number: 133 Registered: 7-2012 |
I used to only press pin until flush with main shaft body, i.e. halfway out. This was after having first measured how far pin end was from main shaft face. The gaiter will then go over and fit on shaft. Then repress to original length. |