| Author | Message | |||
Geoff Wootton Grand Master Username: dounraey Post Number: 855 Registered: 5-2012 |
I have finally got round to the project of fitting a temperature gauge on my 74 SY1 (SRX18501). I am trying to figure out where best to put the sender unit. As a possible location, does anyone know what the two bolts are for, pointed to by the arrow in the photo. 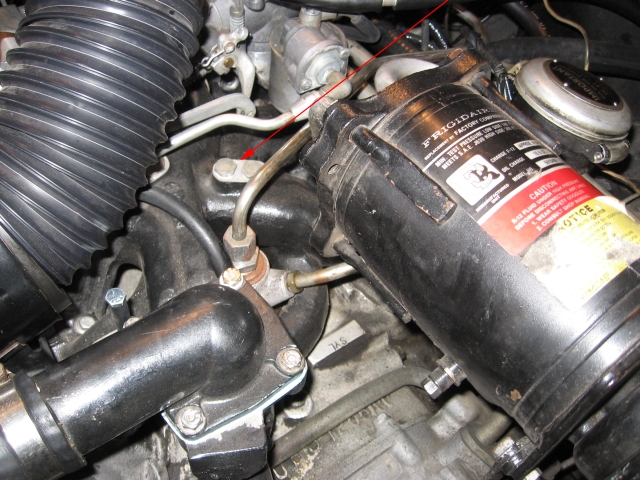 Geoff | |||
Mark Aldridge Prolific User Username: mark_aldridge Post Number: 233 Registered: 10-2008 |
Geoff, the sensor on my 1975 car is in an adapter in the top hose. This is a commercially made fitting from the custom car suppliers. Not ideal, but better than nothing . Mark | |||
Robert Noel Reddington Grand Master Username: bob_uk Post Number: 318 Registered: 5-2015 |
My engine 17768 1974. Had a hex keyed grub screw which when removed had coolant behind it. It was in the inlet/coolant manifold near the thermostat housing. I am not sure what the 2 plugs do shown in photo. Easy way is to remove and see what comes out. Cold engine. | |||
Christian S. Hansen Experienced User Username: enquiring_mind Post Number: 29 Registered: 4-2015 |
On the UK EBay site a few months ago was a top for the thermostat housing, reasonably priced as I recall at around $50-$75, which had the sensor already pre-installed. Search for "rolls royce thermostat housing" or "silver shadow thermostat housing" or et cetera. If interested and cannot find it, let me know as I may be able to locate the listing since I had a series of emails with the seller who was in UK until I found that it was not compatible with my very early series Shadow coupe. | |||
Robert Noel Reddington Grand Master Username: bob_uk Post Number: 320 Registered: 5-2015 |
The sensor should be fitted before the thermostat. Fitting the sensor in the elbow means the sensor can only sense water leaving the engine. If the stat is closed then the sensor cant measure engine coolant temperature. However some heat will find its way to above the stat and the sensor even when the stat is shut. As soon as the stat starts to open the sensor will work the same as a sensor fitted in the correct place. The sensor fitted in the elbow is for the exhaust gas recirculation system. Not the gauge. | |||
Kelly Opfar Experienced User Username: kelly_opfar Post Number: 40 Registered: 7-2004 |
On SRE24700, these are vacuum ports that connect to the diverter valve solenoid and the vacuum motor that sits on top of that. 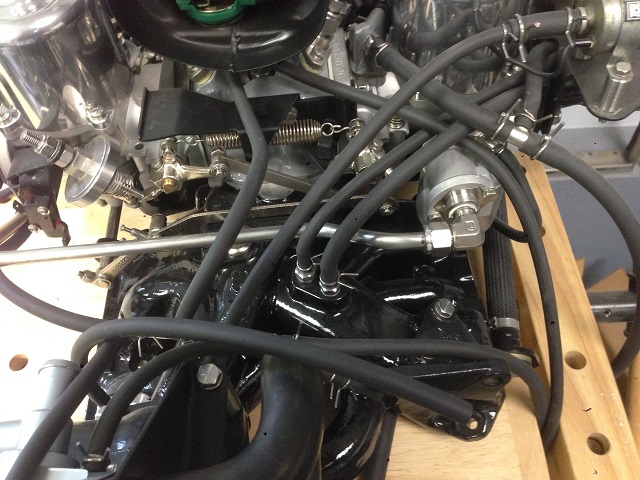 | |||
Christian S. Hansen Experienced User Username: enquiring_mind Post Number: 30 Registered: 4-2015 |
Hmmm...guess that idea was too good to be true and not entirely accurate, since upon reflection and as noted, the later serial numbered engines are already using that port for the EGR. Wonder if it would be possible to adapt the port for dual purposes. If so, perhaps it is still an expedient solution since the port is already there? | |||
Geoff Wootton Grand Master Username: dounraey Post Number: 856 Registered: 5-2012 |
Many thanks for all the replies Mark - I recall I have seen these fittings. It will be my fall back position if I find it too difficult to get to the other side of the thermostat. As you say, it will be better than no gauge at all and will certainly make fitting a lot easier. Robert - I have located the hex keyed grub screw you mention (see photo below). If there is sufficient depth beneath it, to take a sender unit, this has to be a favorite. Christian - I believe the sensor on top of the SY2 thermostat housing is an otter switch for the coolant fan. A sender unit could be fitted there, but I will try to get the other side of the thermostat. Kelly - Thanks for your photo explaining all. It saves me going in and potentially breaking the seal. I have to mention how fantastic your inlet manifold and carb assembly is - superb. Here's a photo of the hex setscrew Bob mentioned. This looks really promising. 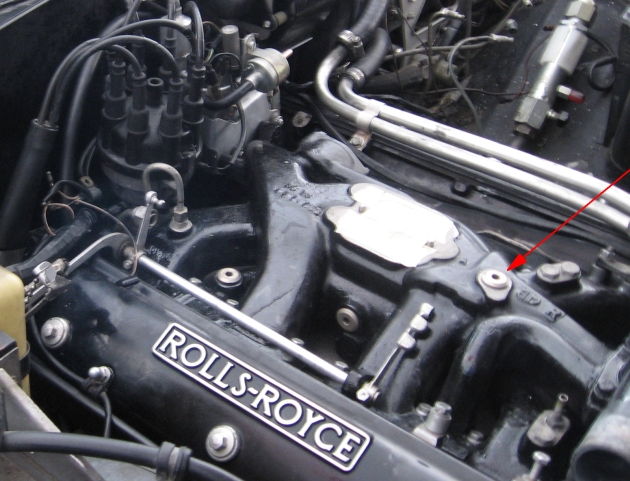 Thanks for the help Geoff | |||
Christian S. Hansen Experienced User Username: enquiring_mind Post Number: 31 Registered: 4-2015 |
Geoff... Now I recall why I originally made that suggestion. It was because the photo you initially posted shows that you have an earlier elbow without the fitting for coolant fans, or EGR, or whatever. Therefore, except for that location measuring temperature after thermostat opens, which happens after only a few minutes anyway, so no real big issue there, it is an easy win as long as the temp sender can be adapted to the existing threading in the elbow. Also, the reason it did not work in my case and I discarded the idea is that on my early MPW (CRX2508) there is another fitting under the horizontal portion midway between the elbow and the jubilee clamp that connects to a solid line that goes down and "somewhere" which the later elbow with the fitting does not have, therfore making the later elbow, convenient as it might have been for the temperature monitoring purpose, noncompatible with that other fitting. If your does not have that other fitting on the bottom, and you strike out elsewhere, the idea remains as a possible and easily accessible Plan "B". | |||
Geoff Wootton Grand Master Username: dounraey Post Number: 858 Registered: 5-2012 |
Hi Christian I take your point, but if I go this way (measuring rad temp), there are various adapters on the market that can be fitted in the top hose which will achieve the same at a lower price than buying the SY2 top thermostat housing. I agree the thermostat opens after a few minutes, so rad and engine temp are roughly the same, however this is one of the things I wish to monitor when driving the car. If the thermostat fails and stays closed then this would be a situation I would very much like to be aware of. I know this could be monitored from the radiator temperature i.e. the gauge would read low for too long when the engine was warming up, but how much better to have the gauge screaming at you by quickly going into the red area. This has been a long postponed project for my car as other more pressing matters have had to be addressed. I found, in my notes, the following passage I saved about a year ago: "Plumb the temperature sensor at a point on the inlet manifold (LHS) where you will see a small alum.(triangular shaped) removable "blank off" plate. Remove said plate;fabricate exact duplicate from steel and affix. appropriate union to accept end probe of capilliary. Check depth/protrusion to avoid capill.probe "head" making contact with surrounding metal etc. You wont regret this modification and after a short time will become familiar with the "normal" orientation of the needle and as in light aircraft, wont need to feverishly scan the dial face every few seconds, whilst in a continuous state of nervousness." This is the location Bob referred to and that I pointed to in my photo. It is currently top of my agenda as a site for mounting the sender unit. It occurs to me the SY1 cars do have a coolant temperature probe that is used to sound the overheat buzzer. This may also be a possibility. I will check it out. Geoff | |||
Bob Reynolds Prolific User Username: bobreynolds Post Number: 300 Registered: 8-2012 |
The early Shadows did have a temperature gauge. I found an early Shadow inlet manifold on ebay and used that. A proper solution, but probably not the cheapest! 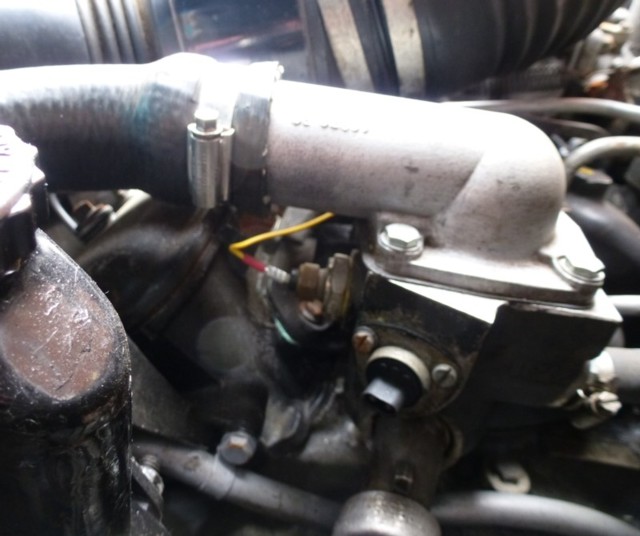 You can see that the sender unit is underneath the thermostat elbow (the yellow wire goes to it). There is also an unused Otter switch next to it (seen at the front of the photo). I've got no idea what that does, perhaps somebody else knows? These cars weren't fitted with electric fans. Whatever it is, it's not on the later SY1s, so it must have been deleted at about the same time as the temperature gauge. I also got the temperature gauge from the same ebay seller. Unfortunately, when I connected the two together they didn't work - but that's another story! I did eventually get the system working. There's generally plenty of Shadows being broken up for spares, so these parts are not difficult to obtain, and the sellers are usualy glad to get rid of the stuff! A cheaper option would be to take your inlet manifold to a machine shop and get them to drill and tap it to take the gauge sender. Should be a simple job, and you will be secure in the knowledge that you've done the job properly!  | |||
Christian S. Hansen Experienced User Username: enquiring_mind Post Number: 32 Registered: 4-2015 |
Geoff... Point well taken about the ability to monitor a faulty thermostat and fortunately there seem to be lots of other better ideas proposed. Interestingly my early variant is completely basic and has neither of the other senders/switches shown in Bob's photo. I'm told my temp sender is stashed away somewhere less than ideally accessible at the rear of a head and up against the bulk head, and that is what provoked me to put an accessory sender at the thermostat housing. I gave up too easily, I guess. | |||
Geoff Wootton Grand Master Username: dounraey Post Number: 900 Registered: 5-2012 |
Hi Folks Finally fitted the gauge this weekend. Now for the small matter of the sender unit. 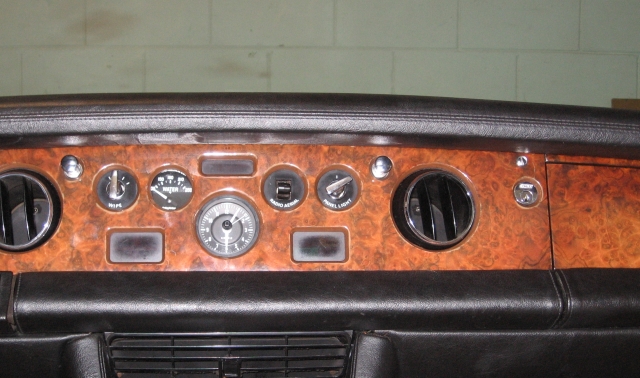 Geoff | |||
Robert Noel Reddington Grand Master Username: bob_uk Post Number: 391 Registered: 5-2015 |
The photo with the carbs removed amd the kidney holes masked up. The red arrow points to the hex plug. This is where my sender is fitted. It works fine | |||
Geoff Wootton Grand Master Username: dounraey Post Number: 902 Registered: 5-2012 |
Hi Bob Good to hear you have been able to fit a sender here. Can you remember the details. Does the sender in some way replace the hex plug, or will I have to drill and thread the plate, to take the sender. Geoff | |||
Robert Noel Reddington Grand Master Username: bob_uk Post Number: 396 Registered: 5-2015 |
My sender came with a range of brass adaptors the hole in the manifold is quite big and the sender quite small. By coincidence today I fitted a nice rubber bootie over the screw terminal of the sender. The colour of the wire is green to match Lucas colour code. The bootie makes it look like a proper job. RHD car. I routed the wire alongside the vacuum for the cruise control. Then to the inner wing back to the bulk head and through a small hole under the blower motor I found on my car. You may not have this hole. The adaptor and sensor only need to be nipped up, it shouldn't leak. Remember that the case of the sender must earth to the engine as part of the electrical circuit. So ptfe thread tape could be a problem. To test the gauge earth the sensor terminal with wire connected and the gauge should show full scale deflection to HOT. All easy stuff. Note those horrid crimp on terminals with blue plastic ferrules. I pull off the plastic ferrule then solder and heat shrink. Much nicer looking. If you have the spade terminal type then use brass female spades with dainty clear plastic covers. These look Lucas/Royce and very period. The idea being that the mods look factory fitted or fitted to RR standards. | |||
Geoff Wootton Grand Master Username: dounraey Post Number: 904 Registered: 5-2012 |
Bob Just out of interest, where did you mount your temperature gauge. Geoff | |||
Geoff Wootton Grand Master Username: dounraey Post Number: 906 Registered: 5-2012 |
Hi Folks I am on the final stretch of fitting the sender unit for my temperature gauge. I'm looking for any comments and advice as I haven't a clue what I'm doing. Plenty of opportunity here to destroy an expensive inlet manifold. Here's a picture of the sender unit, with the two supplied adapters. 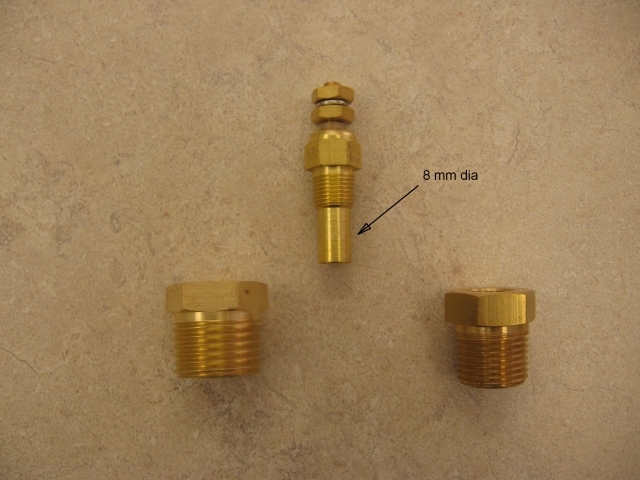 Here's a photo of a possible location for the sender. 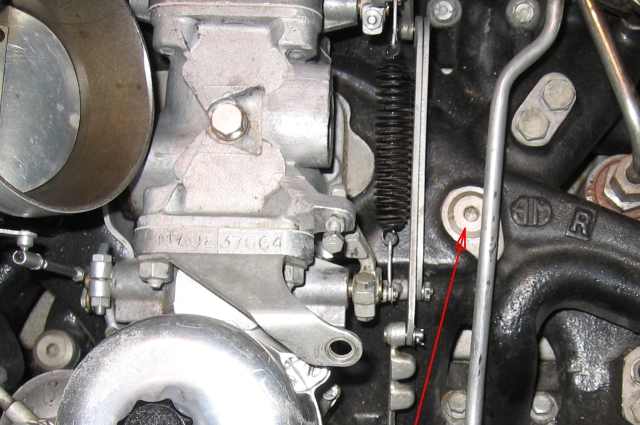 I'm thinking of removing this plug, drilling and tapping the hole and fitting the sender unit. What do you reckon? One of the problems with this location is I would have to reroute the fuel pipe. By reroute I mean bend a fairly stiff pipe. Any advice on how to do this. Should I just bend it in situ by pulling at the pipe? Would this cause unacceptable strain on the carburetor float connections? Would it be better to take it off and bend it on a workbench? Finally, I saved the following extract from the forum a long time ago. Several attempted searches have failed to locate the author: Plumb the temperature sensor at a point on the inlet manifold (LHS) where you will see a small alum.(triangular shaped) removable "blank off" plate. Remove said plate;fabricate exact duplicate from steel and affix. appropriate union to accept end probe of capilliary. Check depth/protrusion to avoid capill.probe "head" making contact with surrounding metal etc Can anyone identify the location of this "removable blank off plate" As always, any help greatly appreciated. Geoff | |||
Geoff Wootton Grand Master Username: dounraey Post Number: 907 Registered: 5-2012 |
I've been trying to undo the plug, arrowed in the above picture. It is solid. If I put any more force on the allen key it will either snap, or (more likely) round off the hex hole. What happens if I simply drill and thread the plug to take the sender. The sender thread is M10 1.0. The outside diameter of the plug is 22mm. I obviously cannot tell what the thread diameter of the plug is. If I drill through, whats on the other side? Will the water channel be deep enough to take the sender? It protrudes through by 16mm. Should I take the chance and drill through? Bob_uk - Is this the location for the sender unit on your car? Geoff | |||
Christian S. Hansen Experienced User Username: enquiring_mind Post Number: 46 Registered: 4-2015 |
I hate to be a bummer, but my gut feeling is to advise against what you are doing as there are too many unknowns and you have itemized them sufficiently above. Bending by pulling in situ? ABSOLUTELY NOT!! Honestly, the presence of a hard line that conflicts with your proposed installation and needs to be rerouted should be sufficient reason to choose another plan. Even if bent, the OAL will then be reduced to some degree and will likely no longer fit at the ends. My bet is that you will have to custom fabricate one with appropriate bends incorporated while maintaining the proper OAL. Oh, and this assumes that the line is solid versus flexible for a reason, thus ruling out working up a substitute flexible line. ALso, anything that can go wrong, will go wrong, so what about the possibility of the rerouted line conflicting with something else, as yet unnoticed? As to the plug...if you cannot get it out via someone's advice without ruining it, you have just burned your bridge in that regard . If you do any drilling in place, where do you suppose those drill scraps are likely to go? My money is somewhere you don't want them. Even if you get past these hurdles, the question of whether or not there will be sufficient interior clearance is problematic. My temperment (problem avoidance) would be to either find another location where an installation is known to be viable, or remove the manifold so that the work can be accomplished under better situational control. P.S. About getting the plug out: Since the allen key hole is rather small, that means to me that the plug was probably intended to come out without excessive force, otherwise a large key hole would have been used. Accordingly, it is likely that the plug is frozen in place and that extraction strategies should follow that assumption. P.P.S. I see that Robert Noel has earlier noted that his temp sender is in this location so that may provide some confidence that sufficient interior clearance exists, which takes you back to the issue of how the plug can be removed. | |||
Robert Noel Reddington Grand Master Username: bob_uk Post Number: 410 Registered: 5-2015 |
There is enough clearance on my car that plug is directly in the water flow to the stat. I use Snap On 1/2 drive hex keys. If you decide to drill and tap then the centre is ready marked for you. I think the plug is brass. To avoid swarf entering the system drill tapping size and before you break through vacuum the swarf up. Apply grease to the drill for the last bit. Same when tapping. If the plug is brass then brass produces fine chips when machined. A small amount of swarf in the cooling system is not going to do any damage. Also if the coolant is taken out first then the vacuum will suck any swarf out of the water passage. I have found sand in coolant passages. I use a cutting grease called Trefolux. It smells very engineering. The long bolt carb assembly will have to come off. A few more bolts and the manifold will come off. Then take the manifold to a thread guy. Also if the engine is run and heated up then the alloy might release its grip on the plug. Nearly forgot drill ( use a drill that is a snug fit in the hex) then a 3mm pilot hole the rest of the way, this will guide the larger TAPPING size drill to centre properly giving a clean hole. If you look at the end of a drill there is a web. The idea is that the pilot hole clears the web and allows free cutting. Remember TAPPING size drill. Also worth drilling and tapping a test hole in a piece of scrap. Brass screams and squeaks when tapping. Also if you have to buy the drill and tap then the cost of the thread guy may be the same. | |||
Geoff Wootton Grand Master Username: dounraey Post Number: 908 Registered: 5-2012 |
Thanks for the replies. Christian - I guess I was too imprecise in my original message. I only need to move the pipe by 1/2" where it passes the (proposed) sender. Since there is some flex in it, I think my best option is to use some flexible rubber hose to insulate the pipe from the live connection on the sender. Regards the swarf, I had planned to use a vacuum cleaner to suck it up as I drill in, millimeter at a time. This has been confirmed by Bob_uk. The problem of finding another location is that this is the best one, assuming I can flex the fuel pipe slightly to avoid shorting the sender. Bob_uk - I had completely forgotten about hex keys. I will buy one tomorrow and hopefully this should do the trick. Thanks for the info on vacuuming the swarf. This gives me confidence in drilling the plug in-situ, should I be unable to release it with a hex drive. I'll tap the hole myself - I have already done a test run on a piece of aluminium strip. Works fine. So, I'm ready to go. Tomorrows question: does anyone know how to repair a wrecked inlet manifold. Geoff. | |||
Philip Sproston Experienced User Username: phil2025 Post Number: 17 Registered: 7-2006 |
Geoff look at tee one notes 81 page1122 Remove the three bolts and plate has an oring BS129 Drill in plate and fit sender note thread is not 1/8 gas on sender it is 1/8 NPT.Do not try to remove that plug you will brake it. | |||
Geoff Wootton Grand Master Username: dounraey Post Number: 909 Registered: 5-2012 |
Philip A million thank yous' You have just saved my inlet manifold. At last I have found this mysterious triangular plate, hidden deep beneath the carb assembly. The good news is, only the left hand U shaped air duct has to be removed to get access to it. It also looks thick enough to take a deep thread for the sender unit. This appears to be the perfect location. It is even conveniently placed for the wiring. 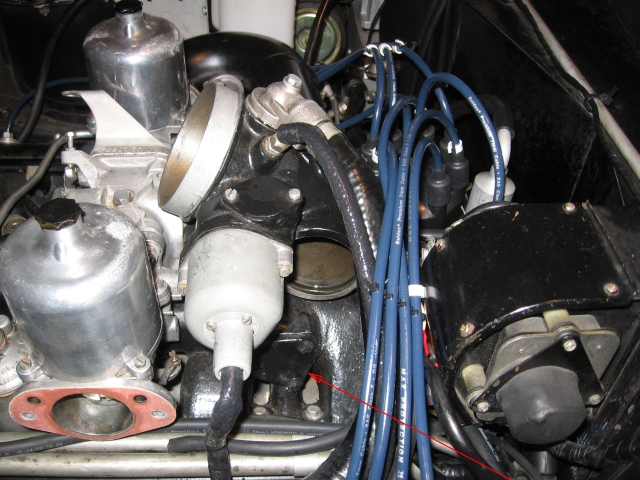 This just goes to show all the information is in Tee-one topics, if you dig deep enough. Thanks again Philip for pointing me to this article. Geoff | |||
Robert Noel Reddington Grand Master Username: bob_uk Post Number: 413 Registered: 5-2015 |
The triangle plate is a good idea. Muck it up and simply make a new plate and start again. My sender required the that the petrol feed pipe from A bank to B bank carb be slightly bent to move a 1/4 inch forward. A quick pry with a lever sorted it out. The hex plug. One more go. Using a large punch 1" dia and a hammer hit the plug square on. When threads are tightened the clearance in the thread is taken up and the flanks of one side of the thread are touching. By hitting with a punch it causes the washer under the plug to squash and the threads to bounce. The terminal on the sender if shorted will simply cause the gauge to go full deflection to hot. The terminal on the sender is sort of on the earth side of the gauge circuit. So don't worry about shorts to much. I fitted a rubber boot to the terminal just in case. The huge hose to the carby toots hides the sensor anyway. | |||
Geoff Wootton Grand Master Username: dounraey Post Number: 910 Registered: 5-2012 |
Hi Folks, Here's what the other side of the triangular plate looks like. I have of course already fitted the sender unit - the original is just a blank. As Philip said, the correct tap size was 1/8 NPT 27. The plate pushes into a 1 11/16" dia hole on the manifold. The groove, visible in the photo takes, as Philip also said, a BS129 O-ring (how did he know that?). In fact the US spec is AS258-129, ID= 1 9/16", OD= 1 3/4" and CS= 3/32". Bill Coburn surmises in his article (Tee-one 81, page 1122) this triangular plate and associated hole in the manifold was for the provision of a choke thermocoil. I am sure he is correct in this. It does however offer the perfect location for a temperature sender unit. Incidentally, the hole behind the plate is 1 1/2" deep. If for any reason you need to remove this plate, buy the O-ring first. I now have to wait for the one I have ordered to arrive before I can fit the unit back on the engine. Actually, the minimum quantity was 100. Always a problem with these items, it's not worth companies selling in small quantities. Here's the photo: 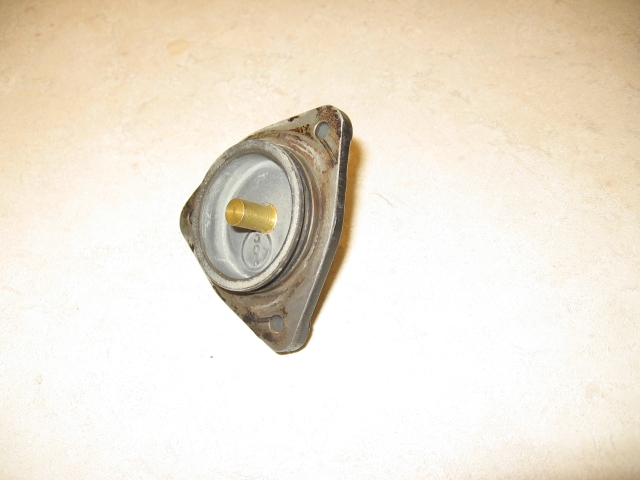 Geoff | |||
Robert Noel Reddington Grand Master Username: bob_uk Post Number: 420 Registered: 5-2015 |
Sorted. I brought a selection of non specific 0 rings from Poundland for 1 pound. I only use these for water or air. Originally the choke was going to be water heated. But water heated chokes are slow so they went to hot exhaust gas instead which is faster. The pressure on this 0 ring is a max of 15psi. So don't fuss to much. A smear of silicon gasket helps the new ring slide in and seal perfect. Belt and braces. When I work in this area I find it easier to pop the long bolt carb assembly off. I have got this down to 5 mins. The split pin for the throttle linkage is a R clip instead of a split pin. I have a short 3/4 spanner for the petrol feed. Also a piece of wire twisted around the stove pipe that goes to the choke solenoid which stops the nut sliding down the pipe towards the exhaust manifold. My stove pipes are made from brake pipe. I used brake pipe flares. It works fine. Removing the horns is nigh impossible with the carbs on the car. | |||
Geoff Wootton Grand Master Username: dounraey Post Number: 911 Registered: 5-2012 |
Also a piece of wire twisted around the stove pipe that goes to the choke solenoid which stops the nut sliding down the pipe towards the exhaust manifold. Sounds like your stove pipes have no insulation. How many times have you burned your arms - lol. Geoff | |||
Robert Noel Reddington Grand Master Username: bob_uk Post Number: 426 Registered: 5-2015 |
My stove pipes have no insulation. It fell off. This has the advantage of being able to polish the pipes. Kunifer. I should really get some sleeve from the electrical shop but hate going to that area because of parking and traffic. I have never burnt myself on stove pipes. I have on exhaust manifolds though. I had a FORMOCO burnt in to my arm once. That hurt. Tim Birkin was one of the Bentley Boys in the 1920s to 1933. When he died. He burnt his arm on a hot exhaust which went septic and the poor man died from septic shock. | |||
David Gore Moderator Username: david_gore Post Number: 1724 Registered: 4-2003 |
Be aware the lagging on the stove pipes contains asbestos so follow safe working practices for asbestos-containing material when removing/replacing/cleaning up the stove pipes. Personally, I think lagging the stove pipes is overkill in most parts of the world as they will warm up quickly from the hot exhaust manifolds and the flow of hot air through them once the engine starts. Might be useful in locations with sub-zero temperatures though. | |||
Mark Aldridge Prolific User Username: mark_aldridge Post Number: 243 Registered: 10-2008 |
My stove pipes are 6mm copper fuel tube, not lagged. I have not had problems summer or winter in the UK. I like Geoffs Sensor position, and may well alter mine from the top hose when I do the Autumn antifreeze change. Mark | |||
Geoff Wootton Grand Master Username: dounraey Post Number: 913 Registered: 5-2012 |
Mark If you would like to pm me a forwarding address, I will put a couple of O-rings in the post. Geoff | |||
Geoff Wootton Grand Master Username: dounraey Post Number: 914 Registered: 5-2012 |
Bob Removing the horns is nigh impossible with the carbs on the car. I find the best way in, for removing the horns, is to use a long 1/4" extension and universal joint for the difficult bolts, working from the other side of the engine: 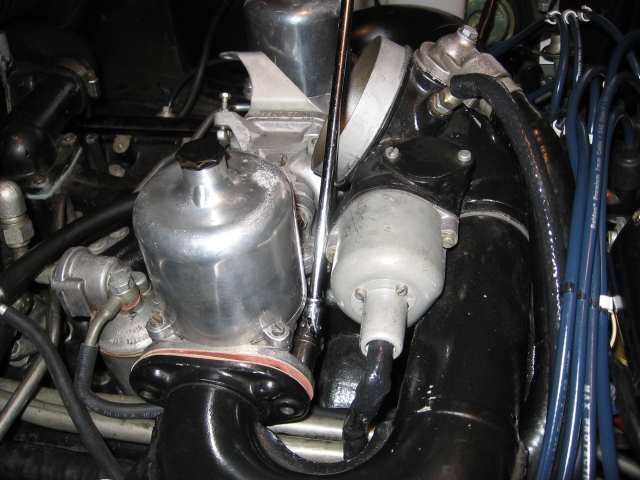 I agree, it is delightfully easy to remove the entire assembly, but for this job, I found removing the left horn only, was much quicker. Geoff | |||
Robert Noel Reddington Grand Master Username: bob_uk Post Number: 432 Registered: 5-2015 |
I am afraid my days of fitting awkward bolts are gone due to old age butter fingers. Where is your throttle damper above the throttle stop 2 BA screw. I like to lift the carbs out for proper cleaning of whats below. My rocker covers and camshaft cover are leak free but its surprising the amount of debris that builds up down there. I am not one for engines clean enough to eat food off. But a heavy build up id like a tea cozy over the engine. Part of the cooling is radiated heat to atmosphere from the engine itself. | |||
Geoff Wootton Grand Master Username: dounraey Post Number: 915 Registered: 5-2012 |
Hi Bob Well noticed. The throttle stop damper is on my RR shelf. Since reconditioning the carbs a while ago I just haven't got round to refitting it. I find it makes no difference to the running of my engine. My understanding is the damper is there to prevent the throttle valve closing too quickly when the drivers foot is released suddenly from the accelerator pedal. Apparently, this could cause the engine to stutter. In practice I have found it makes no difference. I will however replace it, for the sake of originality. The same applies to the missing choke solenoid. I took it off a couple of years ago to repair it and fitted a temporary plate so I could continue using the car. I have found my car has no problems in starting so again, I haven't got round to re-fitting the repaired unit. I intend to do so soon and wire it in the same way as Bob Reynolds has on his car. (to the starter relay). Again, I have had no problems without it. The car always starts first turn, probably because I live in a warmer climate. Geoff | |||
Bob Reynolds Grand Master Username: bobreynolds Post Number: 319 Registered: 8-2012 |
The throttle damper was another of those early seventies anti-emission bodges, designed to give greater control of the fuel/air mixture under all circumstances. Others were the warm air flap, the one-way valve in the butterfly, the spring loaded jet needles, and plastic anti-tamper covers. None of these devices is necessary to the running of the engine. It can safely be left on the garage shelf, giving improved access to the carbs for maintenance and adjustment. | |||
Christian S. Hansen Experienced User Username: enquiring_mind Post Number: 48 Registered: 4-2015 |
Geoff... Forgive a series of probably dumb questions, but when I look at the dash photo from your August 11 posting, what was previously in the place of where the temperature gauge now resides? The gauge appears to match quite nicely the others, so may I assume it to be a take out from another RR vehicle, or an OEM part from a supplier? Finally it appears that there are numbers on the gauge, rather than just marks, a white band, and the words "cold" at the left and "hot" at the right. What temperature numbers are at the top middle of the gauge and what are the highest numbers at the right of the gauge? Sorry for these questions. The photo is a bit out of focus so I cannot tell from observation. Thanks. | |||
Geoff Wootton Grand Master Username: dounraey Post Number: 923 Registered: 5-2012 |
Hi Christian The slot my temperature gauge resides in was originally occupied by the radio balance potentiometer. It took the form of a round plastic knob. It was completely defunct on my car as the original radio had been replaced. Siting a temperature gauge on an SY1 is quite difficult as, where ever you put it, it is going to look non-original. I figured this was probably the best way to go. I am pleased with the result. The gauge is an Autometer and the markings are just numeric 100 - 250 (Fahrenheit scale). The top of the gauge is 200, so when the engine is at running temperature, the needle sits just right of the top (at 205). I didn't go for a RR gauge or Smiths replica as I did not want to pay $150+ for a gauge I knew I was going to have to hack, to get it to fit. This one was 70 bucks, including the sender. The Autometer signature is quite small and unobtrusive. Ideally I would have liked a smaller gauge with the 1 1/2" barrel, but I could not find one that fitted in with the other instruments. They all had multicolored faces or red needles. The same was true of most of the 2 1/16" barreled meters, limiting choice somewhat. The Autometer was a good compromise, given this was very much an experimental exercise. Geoff | |||
Christian S. Hansen Experienced User Username: enquiring_mind Post Number: 49 Registered: 4-2015 |
Geoff.... Thanks for the info. In the photo it looks quite natural and authentic and that is why I had assumed it to be RR. Bottom line is that the entire project appears to have turned out to be a roaring success. Congrats! | |||
Robert Noel Reddington Grand Master Username: bob_uk Post Number: 446 Registered: 5-2015 |
Lovely jubbly. If an amplified internal aerial is fitted or an automatic relay for the electric aerial. Then that hole could be used for an oil pressure gauge thus giving the normal 4 gauge set up. The internal amplified antenna are about 15 quid from Halfords. A big plus point is that this device does away with the stupid electric aerial. Or put insulation washers on the front bumper mounting bolts and use the chrome bumper as an aerial. In Dorset UK the radio reception is 99% very good. So almost anything metal shoved in the radio aerial socket works fine. | |||
Geoff Wootton Grand Master Username: dounraey Post Number: 928 Registered: 5-2012 |
Christian Thanks for your comments. I am pleased with the outcome, although I will do it differently if the gauge ever needs replacing. It's great to have the gauge in the car. I cannot imagine why it was not fitted as standard. Bob I'm currently resisting the temptation - lol. I keep looking at those holes. But no. I don't want to make the car too unoriginal. In fact, I believe most modern radios have built in facility to raise the aerial automatically, each time they are switched on. Tempted BTW - where did you fit the temperature gauge in your car? Geoff | |||
Bob Reynolds Grand Master Username: bobreynolds Post Number: 326 Registered: 8-2012 |
Most people fit it in place of the ammeter. | |||
Robert Noel Reddington Grand Master Username: bob_uk Post Number: 451 Registered: 5-2015 |
Removing the ammeter is a viable option which changes things the lest. My oil gauge and water temp are made by TIM. I got these at my local car shop. The temperature gauge was £15 with sender and brass adaptors. The oil was £26 with sender which screwed straight in with no adapters. 2004 year of purchase I mounted these where the 8 track went. The original bit of wood is wrapped in bubble wrap. In place is a black leather covered piece of 3mm ply. I dont like it and I am re-thinking where to put the gauges. But I also have an LPG control thingy which is mounted there. Ideally I would like to remake the centre consul facia in walnut burr. Thus keeping the original should I change my mind. Walnut burr veneer is quite expensive. Also dual water and oil gauge but I believe these are capillary. Electric is much easier. I broke a capillary tube once. I am aware that my radio has a wire for auto aerial operation. I think electric aerials are naff. And to make it worse my car has a switch and is not even automatic. How quaint. I would like to remove the electric aerial weld up the hole and use a amplified internal aerial. Halfords sell for £15. If the device doesn't work on my particular car then Halfords well refund it anyway so not much to lose. I have seen aerials hidden under wings etc. Car radio aerials are very simple things. I got good reception from a wire from the broken off stub to the roof rack. The wire was insulated and not connected to the roof rack just tied to it with a granny knot. Remember the big whip aerials.The reception was no better than a coat hanger stuffed in the hole. As long as I can get BBC Radio 2. It's the only station I listen to. Originally car radios were a luxury item. A chrome aerial standing proudly on the wing showed you had the money to afford a car radio. Status symbol if you like. Every new car has a radio and now the aerials are concealed. An idea has just occured. Put the aerial wire under the rear parcel shelf trim which is wood sponge and vinyl. Note in some areas this won't work due to poor signals. | |||
Bob Reynolds Grand Master Username: bobreynolds Post Number: 327 Registered: 8-2012 |
The trouble with mounting the gauges in the centre console is that you're not likely to notice them if something goes wrong. They ought to be on the dashboard, and preferably in front of the driver. This is why the ammeter is a good position. I suppose the fuel gauge could be moved to the centre console, as that's not likely to suddenly indicate an emergency. Temperature and oil pressure could be a disaster if not spotted straight away. | |||
Robert Noel Reddington Grand Master Username: bob_uk Post Number: 454 Registered: 5-2015 |
Good point. Swap them around to suit. Right hand drive. Far left fuel then amps then water and far right oil pressure. Or Communist Labour Tory and Nazi. The main thing is under no circumstances do any thing that cannot be undone by simply unscrewing stuff. I would like a MPW Fixed Head Coupe dash board. Which is doable in a Shadow no problem. But the cost of the facia and instruments and glove box lid is seriously expensive. A cheaper way might be to just buy a 4 gauge unit and make a new dashboard. The only hard part are the chamfered holes because the instruments are behind the wood and of course the veneer. But I know a man who can do this sort of stuff he has router tables and other cabinet making stuff. Everybody knows a guy good with wood. | |||
Brian Vogel Grand Master Username: guyslp Post Number: 1624 Registered: 6-2009 |
I am asking the following neither to be snarky nor to start a flame war, but because I'm actually interested in the collective experience: How many times, if any, in your time driving cars [and please offer that length if willing] have you ever experienced either an overheat condition or loss of oil pressure? I get why people like having gauges to give them "hard data" just for the mental peace of mind it provides, that's not something I question. I've been driving now since 1977, and I can't count the number of cars (including rentals, friends' cars, etc.) and in all that time have only had one car that would overheat [and not catastrophically, and only when it randomly decided to "eat" its thermostat] and have never, ever had an oil pump/oil pressure failure. It seems to me that the level of worry is a holdover from an era long, long ago when these events must have been common, or at least more common. I'm certainly not someone who is overly lucky in the grand scheme of things, and since I've dodged these bullets for almost 40 years I have to believe they're extremely rare events. If I'm wrong I'd love to know so that I can add at least one, "Heavens, I'm lucky!!" category to my life list. Brian | |||
Geoff Wootton Grand Master Username: dounraey Post Number: 930 Registered: 5-2012 |
Hi Brian I took my driving test in the UK, seven weeks after my seventeenth birthday (the legal age in the UK) in 1969. This was rapidly followed by the purchase of my first classic car, a TR3. Since then I have owned many day cars and many classic cars. Wracking my brains, I can think of no instance where any gauge on any car I have owned has alerted me to impending catastrophe and prevented the wrecking of an engine. Not one. But, how great is it to glance just beyond my right hand as it sits on the steering wheel, and see that temperature gauge, sitting comfortably at 208F. How reassuring. Love it. I'm afraid I have to confirm all of the assertions you make, from my experience at least. Geoff. | |||
Christian S. Hansen Frequent User Username: enquiring_mind Post Number: 51 Registered: 4-2015 |
Brian... Hmmm...how to reply... first, you should consider yourself not only lucky, but blessed as well if you have never had the sinking feeling of looking at your gauges and seeing something amiss, but then being able to avert disaster by taking corrective actions prior to the knocking sounds emminating from your engine, or the clouds of steam arising from all the cracks in the engine bay. Secondly while in the grand scheme of things problems or disasters may be rare occurances, minding that airline disasaters are also "rare" occurances on the basis of flight miles per death, etc, the Russian Stalin noted that while a single death may be a tragedy, a million deaths is simply a statistic. Point is, statistically rare or not, when you are the unlucky recipient of that rare instance, that one time is all that really matters to you. How often has a seat belt saved your life, but you wear one don't you? That said, I would have to note that almost every vehicle I have ever driven, and I used to also do 18 wheelers in my youth, so include them, has had problems of the overheating and oil pressure variety. In every instance I benefitted from the presence of gauges that allowed me to monitor the conditions and note initially benign variations from the norm as tell-tale warning signals of symptoms that need to be monitored more closely and then rectified either immediately or as soon as possible. While it is true that without advance warning methods, you will also eventually find out about the problem, by then it is usually too late. Gauges often allow problem avoidance rather than problem resolution. So yes, add my experiences to the side of the ledger that has had problems and appreciates, no mandates, gauges and that yes, bad things DO happen, and when they happen,they can be VERY costly if not caught in time, and gauges give you that edge. | |||
Mark Aldridge Prolific User Username: mark_aldridge Post Number: 246 Registered: 10-2008 |
I have to agree with Christian,I have had sticking oil pressure relief valves, ( Morris8 and BMC "A" seies) blocked oil spray jets (Austin 7's) Blown head gaskets ( BMC "A" series) water pump gland failure (Shadow) Fan belt failure. Early symptoms of all of these faults were indicated by oil pressure, water temperature, or ammeter irregularities well before damage occurred. 42 years of "experience" !! Mark | |||
Bob Reynolds Grand Master Username: bobreynolds Post Number: 328 Registered: 8-2012 |
Christian's answer is an excellent one. It's quite easy to have a coolant leak and to gradually lose coolant without realising it. A temperature gauge will show that something's wrong. A broken fan belt will usually be signalled by the ignition warning light. To answer your direct questions, I have been driving for 41 years. I have never had an oil pressure failure, but the oil pressure gauge can give an indication of engine wear when buying a second-hand car. It can be quite depressing to see the oil pressure gauge gradually go down year-on-year as the car puts on the miles. I have had 2 occasions where I was saved by a water temperature gauge: Once when I had a bottom hose leak, and once when an airlock developed in the cooling system. The hose leak wasn't an emergency situation, but the airlock completely stopped the water from circulating and the gauge went right off the scale. I was only 4 miles from home, but it took over an hour for the gauge to drop back to normal again whereupon I could drive for another mile before it went off the scale again! When I got home, I topped up the cooling system and everything was alright again - for another few weeks! I got rid of that car soon afterwards because the airlock could occur at any time completely without warning. I never did find any leaks. When I had my first Mini I used to use the temperature gauge as a guide to when I could switch the heater on! It had a dashboard-controlled water valve and if pulled too early it would blow cold air and the engine would take another 10 minutes to warm up! | |||
Brian Vogel Grand Master Username: guyslp Post Number: 1625 Registered: 6-2009 |
So far the input is interesting, but I'm hastening to add, again, that I am not arguing against gauges in any way. I've never said there are no instances where they wouldn't be helpful, and agree that they are. That being said, the much reviled "idiot lights" would (and do) serve the same warning flag function that Mr. Reynolds describes with a gauge pegging off the scale. I'll be the first to admit that "idiot lights" don't give you "shaded" information as some gauges can. So far, with the very limited data available, I'm seeing a trend as to both eras and makes where gauge warnings were critical. It will be interesting if more data comes in. My only experience with an overheating car was with my 1996 Chrysler Sebring Convertible, and the temperature gauge was pretty useless as far as "warning" went. This car had the peculiar habit of "eating" its thermostat approximately once every two years (and once I'd figured that out I just started replacing it that often until I sold the car). This is the only vehicle I've ever owned, other than the RRs, where I've replaced a thermostat at all, let alone at set intervals. One time I was driving down the New Jersey turnpike when the thermostat failed and slammed shut. Within a few short moments the gauge pegged, the tiny LED "idiot light" on the gauge illuminated, and I had a cloud of steam coming out from under the hood that passing motorists were pointing at wildly until I could get pulled off. The other time I was driving to the shopping center, had pulled into the turn lane and come to a stop, and the gauge pegged and LED lit. In both instances there was no warning - no creeping up of the gauge - and given the peculiar failure mode of the thermostats that was no surprise. I've never had an oil pressure failure or irregularity that I know of (and since any serious irregularity results in the engine becoming a huge paperweight I think I'd have noticed). I always keep an occasional eye on the dash of any car I'm driving, but I don't do constant monitoring with an anticipation of disaster since it's been my personal experience (and observation) that it almost never comes. When it comes right down to it my preference is for an actual gauge that also incorporates an "idiot light". I'm much more sensitive to sudden state changes such as the appearance of a warning light than I am to gauge creep if I am otherwise engaged. On cars I've owned that had that setup I've always thought it incorporates the best of both worlds. Brian, whose current vehicular stable runs the gamut between straight gauges for everything [the GMC trucks] and nothing but idiot lights [the Cadillac] | |||
Patrick Lockyer. Grand Master Username: pat_lockyer Post Number: 953 Registered: 9-2004 |
I will keep my shadow as it came out the factory with a working low coolant level indicator light also a correct type of thermostat [lead pellet type] fitted, thermostat failure confirmed if the situation takes place by slow warm up of the heater etc etc. Many accidents can be caused on route by folk specifically looking at gauges and more so when the sender bulb is in not in contact with coolant due to air pockets[cavataion etc] in some of the senders fitment position sending fluctuations to the needle of the gauge. A hotter than usual engine will start to put a flicker with the oil pressure light at tick over. Head gaskets and radiator when starting to fail will start to loose water by expansion putting low coolant warning on long before major damage occurs if delt with sooner than later. | |||
Robert Noel Reddington Grand Master Username: bob_uk Post Number: 456 Registered: 5-2015 |
Patrick has a very valid point. Gauge fixation can cause accidents. All the overheating indications fitted by Crewe are all working on my car. However I do like a temp gauge. Not so much a oil gauge. Brian you have been extraordinarily lucky I have had a few engines not boil but get hot, easing off the gas pedal and slowing down saves a boil up. I had a Cologne 2.3 V6 Ford engine drop a mess of burnt carbon from cheapo oil which blocked the pickup strainer. The oil light came on at 70mph I saved the engine by stopping. I didn't need a gauge. I found that by switching off the carbon drops away from the pickup pipe and by driving at 1000 rpm the car would go 5 miles before the light came on. I was 25 miles from home. Idiot lights are a misnomer. Because with out them even Einstein wouldn't know unless there is a gauge. I never quite understood why my car had no temp gauge but an ammeter. Ammeters are not really of any use to the driver. An ammeter is useful for the mechanic. Mechanics have meters. The generator light is enough. In general a charging system either works as it should or it doesn't charge and the light comes on. A sensible mechanic always uses an independent meter so the fitted ammeter is of little use. | |||
John Beech Experienced User Username: jbeech Post Number: 21 Registered: 10-2016 |
Old thread in which Brian quite reasonably asks, "How many times, if any, in your time driving cars [and please offer that length if willing] have you ever experienced either an overheat condition or loss of oil pressure?" Since you asked; minibike (sans license) since 1967 (3-1/2hp Tecumseh pull start and foot-operated friction-brake), farm tractor in 1968 (Ford and quite tricky to drive straight enough to cut a proper furrow), farm truck in 1969 (Ford Chief with a rotted muffler that would startle the cows and make them run if you shifted into neutral and revved it up - great fun because I learned to drift on dirt roads in this), motorcycle license in 1972 (50cc Suzuki), automobile learner's permit in 1973 (and first time over 100mph - Mom's 1973 Buick station wagon), and driver's license later in 1973 (at 15-1/2 years of age instead of 16 due to good grades) with a Datsun 1200 coupe. In university in 1976 some frat boys got carried away with fire extinguishers and my 1973 Fiat 124 Spider was one of the automotive casualties. They basically unloaded their white powder extinguishers inside a bunch of cars as a prank. Corrosion of the wires quickly led to inop gauges. Since the speedometer worked and I was near finals these had low priority. One day over the summer the car began to slow from highway speeds. I foolishly pressed harder on the accelerator instead of immediately pulling over (to no avail as it continued slowing). Unfortunately, once I did pull over to the side, the engine had began knocking and promptly quit. Oil pump shaft had failed. This put a hurt on my savings and I learned a lesson about unscrupulous shade tree mechanics. Would gauges have saved the day? Hard to know for sure but I've always had the habit of frequently glancing at them so I wager it would have - if I had noticed before the engine began to sag. And probably would have quickly pulled over instead of pressing down harder on the accelerator. Idiot lights are useful in my opinion because we all focus on the primary task (driving) versus the secondary job (monitoring gauges) so I take your point in asking. Flying is different because the instrument scan is part of the routine. Of course it helps there's a lesser likelihood of needing to avoid an idiot on a cell phone drifting into my lane. That, and I find flying quite boring so gauge-watching can help distract from the monotony. As an aside, engines seem especially prone to making strange noises whilst flying over water out of sight of land, and on moonless nights over rough terrain . . . but I digress. That said, whilst moving to Florida in 2004, the water temperature gauge in the step van began creeping up. We were fortunate enough to notice and I instructed the driver to pull over - but then I made the executive decision to leave the truck idling while spraying water on the radiator (instead of immediately shutting the engine down for what proved to be a stuck thermostat). Suddenly it started knocking (it had gotten so hot it spun a rod bearing). Costly lesson and very inconvenient because I had a day's delay waiting to lease a truck and transfer the contents (plus everybody still getting paid, of course). That, plus the expense of getting it repaired and subsequently sending someone to North Carolina to drive it Florida. The only good thing is this happened 100 miles into a 700 mile trip and fortunately, only 20 miles from where a good friend lived. The same friend who drove from Tampa to go with me to Brunswick to buy Tootsie, in fact. Anyway, 'I' like a warning light in parallel with a gauge. Finally, I've noticed a mention of an ammeter instead of a water temperature gauge in the Shadow panel. However, Tootsie has the water temp gauge and is the reason I've responded. Apparently there's been variation in what's fitted to the panel. In general, if I had to pick I'd rather have the water temperature gauge instead of the oil pressure gauge but I'd really rather have both but unfortunately, there's no oil pressure gauge. The good thing is they fitted indicator lights. From left to right, I've noticed the generator and oil light by the key, an orange indicator light just above the steering column (for the parking brake), and two red brake test-lamps (on the right just below the wiper switch). There's also one in the water temperature gauge, which I presume is overtemp, is this correct? What I'm unsure of is the function of the button below the water temp gauge. 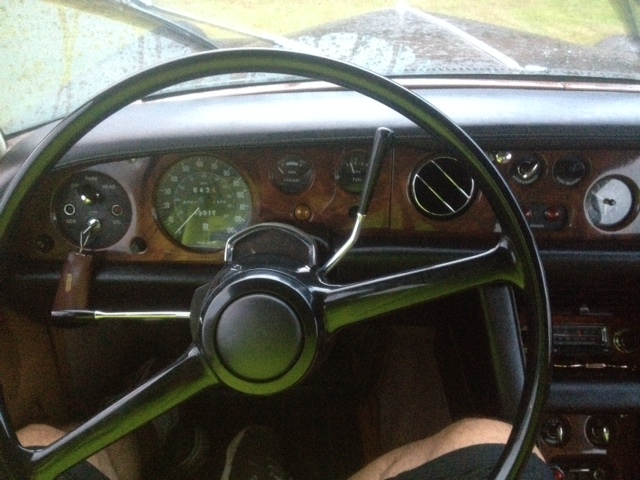 - Yes, 15,713 miles is correct. This due to 39 years in air conditioned storage! | |||
Jeff Young Prolific User Username: jeyjey Post Number: 279 Registered: 10-2010 |
A few times in 36 years. A '69 Ferrari that suffered loss of oil pressure when cornering due to a loose oil pick-up. Same car would overheat in traffic with the A/C on. A Kubota lawn tractor that overheats every time the radiator screen clogs up with grass. A '71 TR6 that would overheat in traffic due mostly to a missing radiator shroud. A '68 Mercedes that overheated due to a knackered water pump belt. Same car overheated again after springing a (big) radiator leak. Cheers, Jeff. | |||
John Beech Experienced User Username: jbeech Post Number: 22 Registered: 10-2016 |
Forgot the Jacobsen lawn mover, Jeff. We operate that one with an eye on the water temperature gauge for the exact same reason! In fact, we once killed the Kubota diesel powering it due to inattention one time. Pricey little bugger. | |||
Luis San Juan Bueno New User Username: guillesanjuan Post Number: 2 Registered: 10-2018 |
Hello All, I have a Silver Shadow 2 (1979) and the temperature gauge does not work at all. I have read that it could be due to a problem with the sensor or the thermostat but I am not sure which one it is. Could you please help me to identify what can be the problema and how to fix it? Thanks, Luis | |||
Brian Vogel Grand Master Username: guyslp Post Number: 2661 Registered: 6-2009 |
Luis, The first thing I'd suspect is that the temperature sender has gone bad if the gauge does not move at all. While it is possible that the failure could be at the gauge itself, it is far more probable that it's the sender or that the wiring between sender and gauge has been compromised in some way. See the RR & Bentley Parts, Repair, Restoration & Other Resources Compilation in which I am positive I have documented temperature sender units that are readily available that are functional substitutes for the original. You need to look in the workshop manual, though I did put the figures in this thread, https://au.rrforums.net/forum/messages/17004/18682.html, for the placement of the various sensors in the thermostat housing. (It's also worth having a look at: https://au.rrforums.net/forum/messages/17001/17822.html?1434450748). Brian | |||
Luis San Juan Bueno New User Username: guillesanjuan Post Number: 4 Registered: 10-2018 |
Hello Brian. Thank you for your detail reply. I have read the information from the links you sent me but I'm not sure if you would recommend to replace all the sensors since I'm not sure which ones work. From my understanding, all sensors are the same but used on different applications... Sorry for the basic questions but I'm new on this exciting world of fixing your own car but I promise to learn fast and contribute to the forum... Thanks again. Luis | |||
Brian Vogel Grand Master Username: guyslp Post Number: 2663 Registered: 6-2009 |
Luis, I am proposing that you change one and only one thing: the coolant temperature sender. I believe that's part UR40361 in the diagram, but you can consult the illustrated parts list to be certain. Brian | |||
Luis San Juan Bueno New User Username: guillesanjuan Post Number: 10 Registered: 10-2018 |
Hello Brian, I have already ordered the temperatura seal using the substitutes you gave me. I tried to locale the temperature sensor on my car using the drawings you gave. Could you please let me know if it is the one highlighted in red. I have noticed that the other sensor next to it is quite corroded so I wonder if it would be a good idea to replace it. Thanks, luis | |||
Luis San Juan Bueno Experienced User Username: guillesanjuan Post Number: 11 Registered: 10-2018 |
| |||
Paul Yorke Grand Master Username: paul_yorke Post Number: 2078 Registered: 6-2006 |
Hi. Red yes. Changing other switch,not if it's ok. The work happens inside. Give everything a light misting coat of aerosol lubricant. This will help slow corrosion. | |||
Luis San Juan Bueno Experienced User Username: guillesanjuan Post Number: 13 Registered: 10-2018 |
Thank you Paul! I will keep you posted once I get the replacement. | |||
Luis San Juan Bueno Experienced User Username: guillesanjuan Post Number: 14 Registered: 10-2018 |
Hello, I finally got my temperate sensor today so I'll be replacing it tomorrow. Do I have to get the coolant liquid drained before doing the job? Do I have to be careful with anything in particular or it is just a matter of replacing one for another one? Thanks! Luis |