| Author | Message | ||
Brian Vogel Grand Master Username: guyslp Post Number: 1121 Registered: 6-2009 |
Ever since the rebuild has been completed I have not been happy with the fact that I have had very slow leaks of nitrogen. These are so slow that they don't even show up if you do an immersion test, but they're there. I have to believe that the leaks are emanating from the charge port, and even the addition of the secondary "plastic" ball bearing "seal" and the O-ring inside the charge port cap have not effectively kept the leaks from occurring. I actually hate the plastic ball seal because it's such a PITA to remove. I seem to recall someone (and I think I know who, but I'll let him chime in if he wishes) mentioning that he'd done away entirely with both the plastic ball and O-ring seals and had substituted a thick (as compared to the supplied O-ring) rubber disc in the charge port cap to act as a seal when the cap is screwed on tight. I'd like to know if my recollection is correct and whether anyone else has tried this. That solution is sort of the "flip side" of the Flying Spares modification of the charge port valve to use a machined disc/post (with a T-shaped cross section) that has a small O-ring slipped on it as a substitute for the original metal ball bearing. If one can use this "flip side" option I'd rather do so than tearing the accumulators down again to install a Flying-Spares-Style charge port valve modification. Since the "off season" is upon us here in the northern hemisphere now's the time to tackle this issue. Brian | ||
Bob UK Unregistered guest Posted From: 94.197.122.84 |
If the leak is from the charge port then simply unscrew charge cap and apply hydraulic thread sealer. See loctite web site. This stuff is standard practice in hydraulic engineering. (Message approved by david_gore) | ||
Brian Vogel Grand Master Username: guyslp Post Number: 1122 Registered: 6-2009 |
Bob, I will have to remove the "plastic" ball so I can recharge 'em. Is there a preferred number Loctite? I'm presuming either 545 or 5452. Had I known about this stuff I would have used it and skipped the plastic ball. Brian | ||
Bob UK Unregistered guest Posted From: 94.197.122.79 |
If you can winkle the ball out in situ then a quick puff of nitrogen while still fitted to the car is ok. I had a look at the locktite web site and found it confusing and there is more than one chemical locking and sealing stuff. I would go to one's nearest hydraulic supply place or bearing supply shop and ask. My local brg shop has a full range of industrial adhesives and sealants. Also some bigger auto stores, but they most probably will have little knowledge of the product. In general these thread sealing chemicals are rated to 10,000 psi and 200 c so well within the scope for this application. I have used thread locking stuff as a sealant on 90psi air and it's very good much easier than ptfe tape. Just a couple drops on the thread, no stupid air leaks wasting my electricity. Also normal tools will easily undo. About $10 for a small bottle 30cc guess. It sets when air is excluded as in screw threads. When undoing it shears then lubricates the thread as the thread is turned. Also when doing up it lubricates the thread. And also lubricate the new o ring, it will not stick to the o ring but will seal any wee gaps between the ring and mating surfaces as well as the threads. Normal torque setting. Industrial adhesives have come a long way. Lotus glue aluminum together to make car bodies. (Message approved by david_gore) | ||
A_Helpful_Chap Unregistered guest Posted From: 94.197.120.152 |
Or you could learn from other peoples headaches, buy the modified and correct parts, or even better, exchange parts from somebody that is used to doing the job ...... do the job correctly and not worry about it for another 10 or 15 years. How long have these accumulators been bugging you for now? All for a days work with the correct parts. (Message approved by david_gore) | ||
Chris Miller Prolific User Username: cjm51213 Post Number: 279 Registered: 5-2013 |
Hi Brian, The product I used was Permatex 54540 and here's a source: http://www.amazon.com/Permatex-54540-Pneumatic-Hydraulic-Sealant/sim/B000HBGL14/2 I used this on the accumulators from the '66 cadaver car and I have them on the "spares shelf", not on the '72, but they are holding fine, although they have not been subjected to road conditions and the higher pressure caused by heat, so they may still have a leak at higher pressure, but I doubt it because they survived boiling for over an hour with no measureable loss of flick-up pressure and they have no secondary or tertiary seal -- just Permatex 54540. I finally discovered an adequate sealing protocol for the '72 accumulators, which are similar to yours. I did not use the Permatex 54540 on them. I used the o-ring at the diameter of the threads of the charge port that is often called the "secondary seal" just like everybody else, but I didn't use the plastic ball for tertiary; I used a smaller HNBR o-ring in the recess of the charge port. It was about 3/8" outside diameter. I'd tell you the spec, but as much as I like you, I'm not really excited about removing the charge cap to measure them, and it would take more than a few beers to convince me to do it. Here's the charge port recess I mention. Fit an o-ring snugly inside it, then test to see if you've succeeded. Obviously, the gauge of the o-ring material, sometimes called the "thickness" of the o-ring, will have to be greater than the depth of the recess, but that is a very easy requirement to meet. 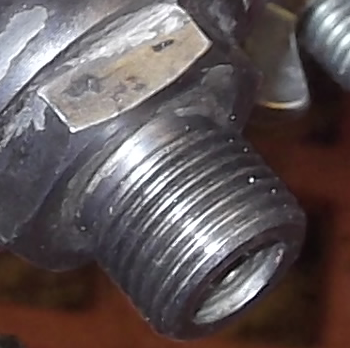 If you want to test for a slow leak, then I can recommend: an initial baseline "flick-up" pressure test, boil the accumulators taking the necessary precautions against catastrophic loss of integrity, and a flick-up pressure test after for comparison. I boiled mine for over an hour. If you see pressure loss, then your seal can be improved. In my case, I have the hydraulic pump on the bench and spare ACVs, so I have the benefit of being able to remove the spheres alone and test without re-installing everything on the car, which installation is a huge pain. In your case, I think I might just try it on faith, because removing the sphere alone is pretty easy, but without an ACV you can't test your seal. (I'll loan you one of mine, if you want to do some bench testing...) With the sphere on the bench, adding nitrogen, and replacing the charge cap with the small o-ring in place and the Permatex 54540 on the threads is probably pretty easy, and you'll find out soon enough if it worked. Chris. | ||
Brian Vogel Grand Master Username: guyslp Post Number: 1123 Registered: 6-2009 |
Chris, Thanks for the input. The original "valve" (and I really hesitate to call it that) design on these accumulators is just pitiful. Even if you do exactly what you're instructed to do, with a Crewe Original kit (which, by the way, is what I did) they will still often leak. The whole plastic ball and O-ring bits were attempted workarounds for a basic design flaw. I really like what Flying Spares did as far as replacing the metal ball bearing as the primary valve seal mechanism. However, I no longer have easy access to a workshop where I can tear the accumulators apart again and even if I did I really would prefer not to do so. I've done quite a bit of reading on these hydraulic/pneumatic sealants and they're another thing, like anti-seize, that are godsends that fall into the "if only they'd had them . . ./if only I'd known about. . ." category. My friend who's the aircraft mechanic will gladly charge these up again and reseal with hydraulic/pneumatic thread sealant and O-ring(s) when he does so. I intend to leave out the plastic ball since it makes things a PITA when you want to do a recharge and all evidence (and not just my own) suggests they don't perform their function very well at all. I strongly suspect the sealant will put an end to this issue for good. Brian, who won't be doing any "off car" testing since I now know how to remove the accumulator without having to remove the ACV | ||
Chris Miller Prolific User Username: cjm51213 Post Number: 281 Registered: 5-2013 |
Hi Brian, > The original "valve" (and I really hesitate to call it that) design on these accumulators is just pitiful. Yeah, ... I tried to lap the seat for purposes of fitting a steel sphere. I bought $100 of precision styluses and they were simply too delicate to do the job and failed -- the precision, diamond embedded spheres simply came off the stylus. I never got any kind of adequate seal. Jim Walters has a stylus that he made and uses with good result, I hear, but I've not had any success making one either. So, I abandoned the steel sphere design completely. I made a "Flying Spares" equivalent that worked really well. I initially used a pop-rivet because I could get the spring centering post, but it required that I glue the pop-rivet stem in place and I didn't like that because I had no idea how leak-proof the glue was, nor how that glue would age. However, it worked well as far as I could evaluate it, and is currently in both '72 accumulators. This design couldn't work for the old style accumulators, much to my surprise, because the aperture was very much smaller and the pop-rivet didn't fit. For the old style accumulators, my best design is also the simplest -- a sheet rock nail cut to length: 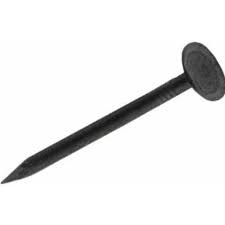 It is not obvious from the picture, but notice that the head is concave, which centers the spring without the need for a post. The underside of the head often has "forming marks" which I removed by chucking the nail in a drill press and filing the underside of the head smooth. I fitted it with a tiny o-ring, and I'm going from memory here, A-005? I used Viton, because it is a bit harder. When fitting, use a minuscule amount of castor oil to allow the o-ring to comfortably seat itself, but not so much that friction is reduced to the point where it can collapse and be blown out of the charge port, which it will do! I know, because I did it, and it startled the snot out of me -- it is abrupt and loud, and requires immediate sartorial remediation... (Thanks to Geoff Wootton for that image!} I don't think the drywall nail will work with the new design accumulators, like yours, because the ratio of charge port aperture diameter to check valve gate shaft diameter leaves enough area that I suspect the pressure would collapse the o-ring and blow it out the charge port, so you would probably have to use the pop-rivet design. Chris. P.S. It is my current belief that the check valve is only necessary to hold the nitrogen in the sphere until you can apply secondary and tertiary seals. I don't think the check valve is a major part of the long term containment; that is the job of secondary and tertiary seals. I also believe that all of this is academic if you use a pneumatic thread sealer like Permatex 54540. As long as your check valve preserves the nitrogen pressure long enough for the pneumatic thread sealant to take effect, you've met 100% of the objectives. However, an obvious failure mode is if the nitrogen pressure is able to force a leak in the thread sealer while it is setting. | ||
Brian Vogel Grand Master Username: guyslp Post Number: 1124 Registered: 6-2009 |
Chris, Here's what the Flying Spares valve part that replaces the steel ball bearing looks like [with my primitive addition of where I envision the spring centering on a short post and the long post acting as a centering aid for the O-ring in the inside of the charge port]:  The centering for the spring could be just as easily achieved by having a recess as opposed to a small post. This piece certainly isn't "rocket science" but is a brilliant and easy solution to the problem. It's certainly not difficult to envision how something similar could be made with a nail or screw or made on a metal lathe. However, if one is actually overhauling an accumulator sphere, as opposed to just recharging it, then buying the full kit from Flying Spares certainly makes the most sense. There's no source I know of for the accumulator sphere diaphragms other than Crewe Original or the specialty suppliers like Flying Spares who have them made. Brian P.S. I agree with your PS. Given that every hydraulic/pneumatic thread sealant I've read up on is rated for 10000 PSI for liquid and at least 3000 PSI for gas I'd presume they have to seal pretty well "pre-cure" since lots of things that use them get turned on well before the full 24-hour cure time. | ||
Geoff Wootton Grand Master Username: dounraey Post Number: 550 Registered: 5-2012 |
Hi Brian and Chris I somehow missed this thread, although I would not have been able to help as, when I reconditioned my spheres a couple of years ago, I had the good fortune to have ordered my recon kit from FS, completely by chance. I so agree with Brian's statement - The original "valve" (and I really hesitate to call it that) design on these accumulators is just pitiful. Even if you do exactly what you're instructed to do, with a Crewe Original kit (which, by the way, is what I did) they will still often leak. The whole plastic ball and O-ring bits were attempted workarounds for a basic design flaw. For any newbies reading this I would absolutely recommend they buy a kit with the machined pin instead of the ball bearing (what on earth were the RR engineers thinking of.) Regards Geoff PS (has anyone else noticed, we appear to have picked up an internet troll on this thread) | ||
David Gore Moderator Username: david_gore Post Number: 1489 Registered: 4-2003 |
"PS (has anyone else noticed, we appear to have picked up an internet troll on this thread)" I checked this post before approving and found nothing to suggest a troll was involved. This forum encourages expressions of personal opinion and does not censor posts whether they come from members or guests which express views contrary to those of the moderator[s] or other members. Abusive, defamatory or potentially dangerous comments will be edited/deleted as appropriate and I always include an annotation that the post has been subject to editing. If it is found a troll is participating, you can be certain it will meet a quick and decisive elimination. David | ||
Chris Miller Prolific User Username: cjm51213 Post Number: 282 Registered: 5-2013 |
Interestingly, "A_Helpful_Chap" is on the same internet provider is "Bob UK", Three.co.uk. This ISP has a class B subnet using addresses 94.197.0.0 - 94.197.255.255. I think "A_Helpful_Chap" is "Bob UK" being coy and having fun playing tricks on everyone... | ||
Brian Vogel Grand Master Username: guyslp Post Number: 1125 Registered: 6-2009 |
Chris, Since "unregistered guests" are a relative rarity, I can't be sure my recollection is correct, but I believe that all will show as posting from that address as they are not actually posting directly. I believe the content is actually posted by the forum moderator (Mr. Gore, in recent years) after review. I have my pet theory as to who's hiding behind that moniker, but it doesn't really matter. People will make their own decisions and, if they're smart, they'll take posting history into account as part of making an accurate assessment. I long ago learned that in many pursuits and certainly in the world of RR/Bentley, "received wisdom" is anything but. You and I both like taking the time to actually think things through, at length, to figure out what's what and follow the route that takes us. When where that initially takes us (e.g., your pop rivet valve design) is later thought or demonstrated to be suboptimal we say so and why. It's only through sharing experiences, both positive and negative, and with dissent as a part of the conversations that a useful body of knowledge is built. Brian, who's very wary of dogma no matter where it shows up | ||
Chris Miller Prolific User Username: cjm51213 Post Number: 283 Registered: 5-2013 |
Hi Brian, > I believe that all will show as posting from that address as they are not actually posting directly The IP address in question is from the U.K. and David Gore is in Australia. The posting address is that of the poster. David Gore simply approves/rejects items in his moderators queue. > You and I both like taking the time to actually think > things through, at length, to figure out what's what > and follow the route that takes us. When where that > initially takes us (e.g., your pop rivet valve design) > is later thought or demonstrated to be sub-optimal we > say so and why. Yes. I think that is the fun part. Well, that is the social fun part. It would be nice to report 100% success, but benefit comes equally from knowing what will not work and why. I really like tinkering in my shop and trying things and they are not all winners, but they are all fun. If I stumble on something valuable, I share it, as others have done before me. Even the guys that don't particularly see things my way have chimed in with helpful advice on more than one occasion. Chris. | ||
Bob UK Unregistered guest Posted From: 94.197.122.89 |
The part from flying spares is a simple turning job on a lathe 5 mins. Using nails and screws is not the way to go. The part must be true and made with a bit of precision. There is bound to be someone local be it a clockmaker or model engine diyer will have a lathe. Brass will do fine. If one is unwilling to bother to make the bits properly then buy them or re built spheres. The charging valve is merely a charging valve so that the cap can be fitted. The correct way to test for leaks is to place the sphere inside a sealed chamber and check for nitrogen ratio climbing in the cabinet. Sometime a vacuum is used and sometimes helium is added to the nitrogen and the helium is detected. In engineering completely sealed doesn't exist. Instead leaks are acceptable or unacceptable. Mine as I am fond of stating have lasted 18 years, they came via the forerunner of flying bits. 18 years is not rare. IMO acacceptable would be 10 years minimum. When I read back at a sphere stuff it seems that a disproportionate amount of time and money is being used on a very simple part to save money. (Message approved by david_gore) | ||
Bob UK Unregistered guest Posted From: 94.197.122.78 |
My address is different from helpful chap. Also the grammar and words used are different. The posting is a valid opinion and not troll. The posting does point out that this job has taken months when the pros take 2 hours. All helpful chap has done is agree with others on this forum that just buying proper stuff is the way to go. However should one wish to diy spheres then I am here to give helpful advice. It's not my place to heap scorn upon someone's efforts. Just the odd bit of scorn when nails are used as valves.  (Message approved by david_gore) |